Ever wondered how to use the Lightroom crop landscape to portrait technique to turn a wide landscape shot into an eye-catching vertical portrait? Picture transforming your scenic, horizontal photos into captivating vertical compositions that grab attention.
Interested?
Let me guide you through how this powerful yet simple tool can completely change the way you approach your photography. By the end of this article, you’ll not only know the steps but also discover the creative potential that lies in cropping.
Ready to take your editing to the next level?
Let’s get started!
Table of Contents
Understanding the Lightroom Crop Landscape to Portrait
The crop tool is a versatile feature. It helps you resize and reframe your pictures. Whether you’re looking to resize and reframe your pictures or use the Lightroom crop landscape to portrait technique, this tool offers easy aspect ratio adjustments.
This tool lives in the Develop module. It allows for precise adjustments of the image’s frame.
The crop tool also offers a range of preset aspect ratios suitable for different needs and preferences.
Why Change Crop Orientation?
Changing crop orientation from landscape to portrait or vice versa is useful. It transforms the feel and focus of your picture. By doing so, it can highlight specific elements, making the composition strong.
Using the crop tool, photographers can customize pictures to fit specific dimensions, ensuring content looks its best.
Switching orientations also ensures that your pictures are optimized for different viewing platforms and print formats.
Steps to Use the Crop Tool in Lightroom
Open your photo in the Develop module.
Select the crop tool from the toolbox.
Choose a preset dimension ratio or enter your own custom dimensions.
Click and drag to select the area of the image you want to keep.
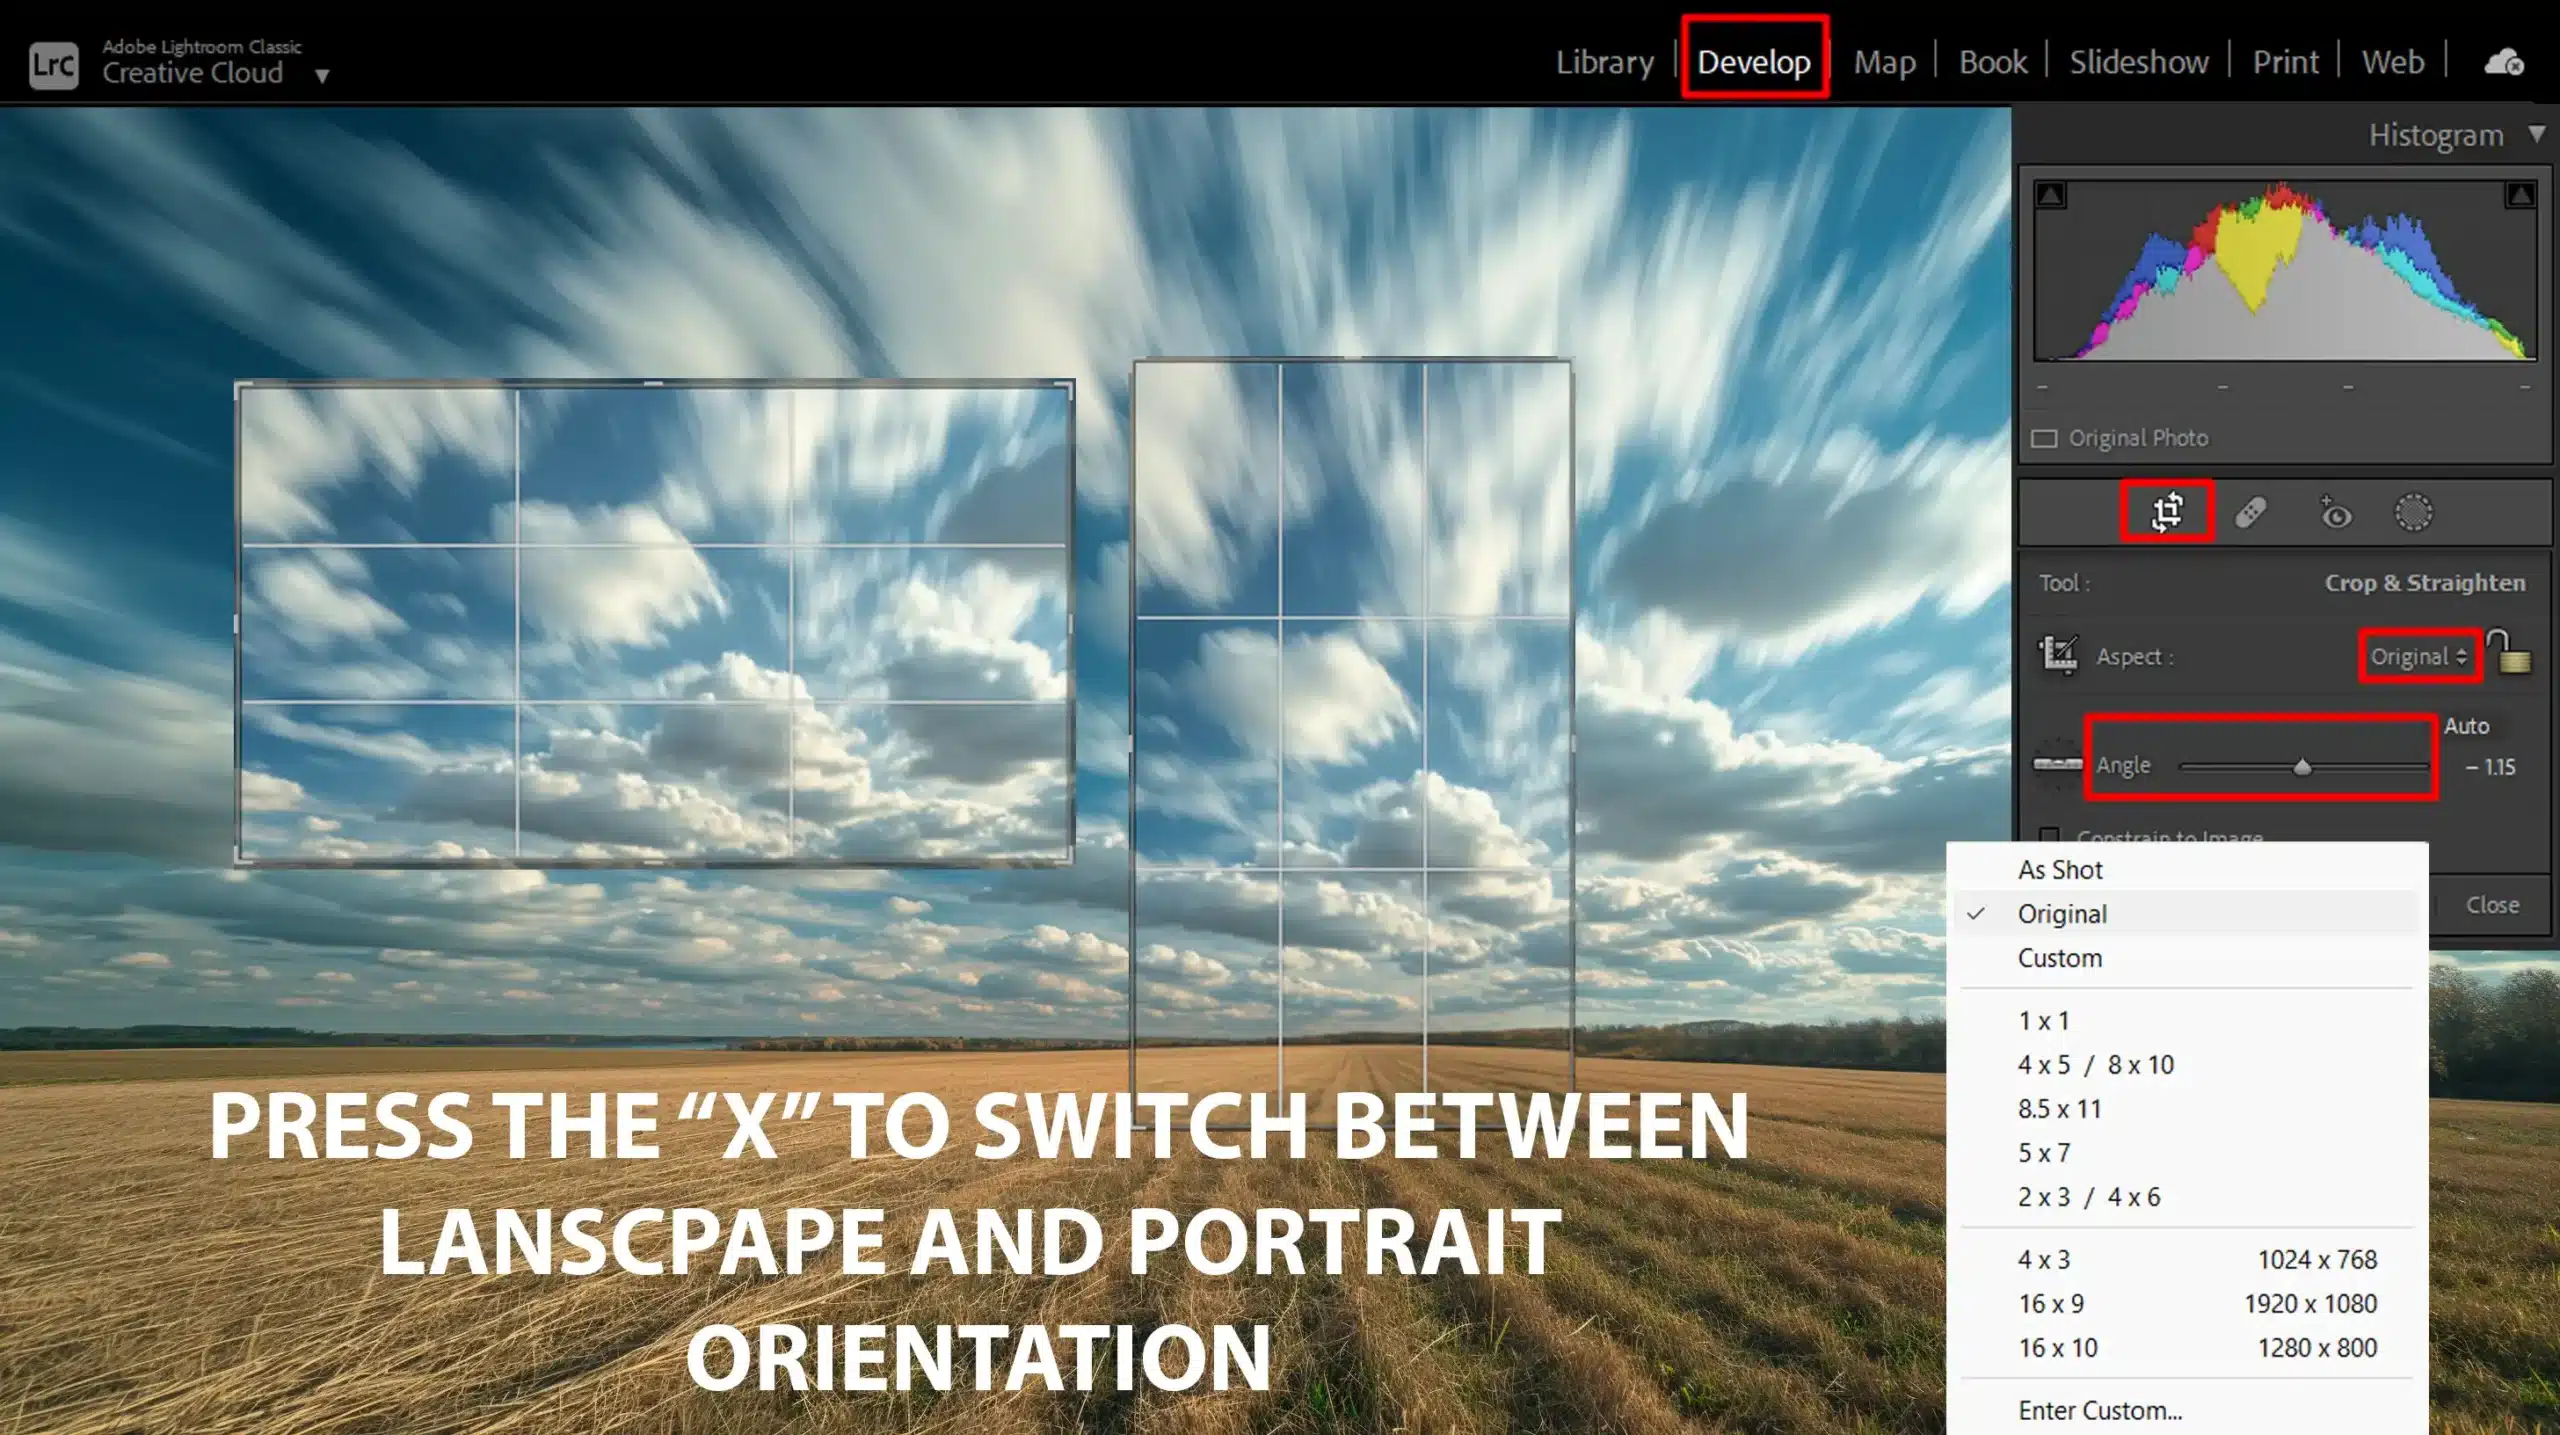
Press the X key to switch between landscape and portrait orientation.
Use the corner handles to adjust the crop further.
Use the angle slider to straighten if necessary.
Confirm your crop by pressing Enter or clicking Done.
Additional Tips for Effective Lightroom landscape to portrait cropping
Always consider the main subject of your photo.
Use grid overlays to maintain important alignment and balance in your pictures.
When in doubt, test different dimension ratios and orientations.
Don’t hesitate to revisit cropped pictures later for adjustments to complement new creative ideas.
Pro Tip: Using the X key frequently helps you get a better visual sense of both landscape and portrait orientations.
By following these steps and tips, mastering the crop tool becomes simple. This ensures your photos achieve their fullest potential in any orientation.
How to Use the Crop Tool in Lightroom
The crop tool is important for resizing and reframing your pictures. This straightforward guide will help you master it in no time.
Here’s a quick breakdown of the important steps and concepts to master the crop tool in Lightroom, including how to switch between landscape and portrait orientations, adjust aspect ratios, and fine-tune your crops
Aspect
Overview
Accessing the Crop Tool
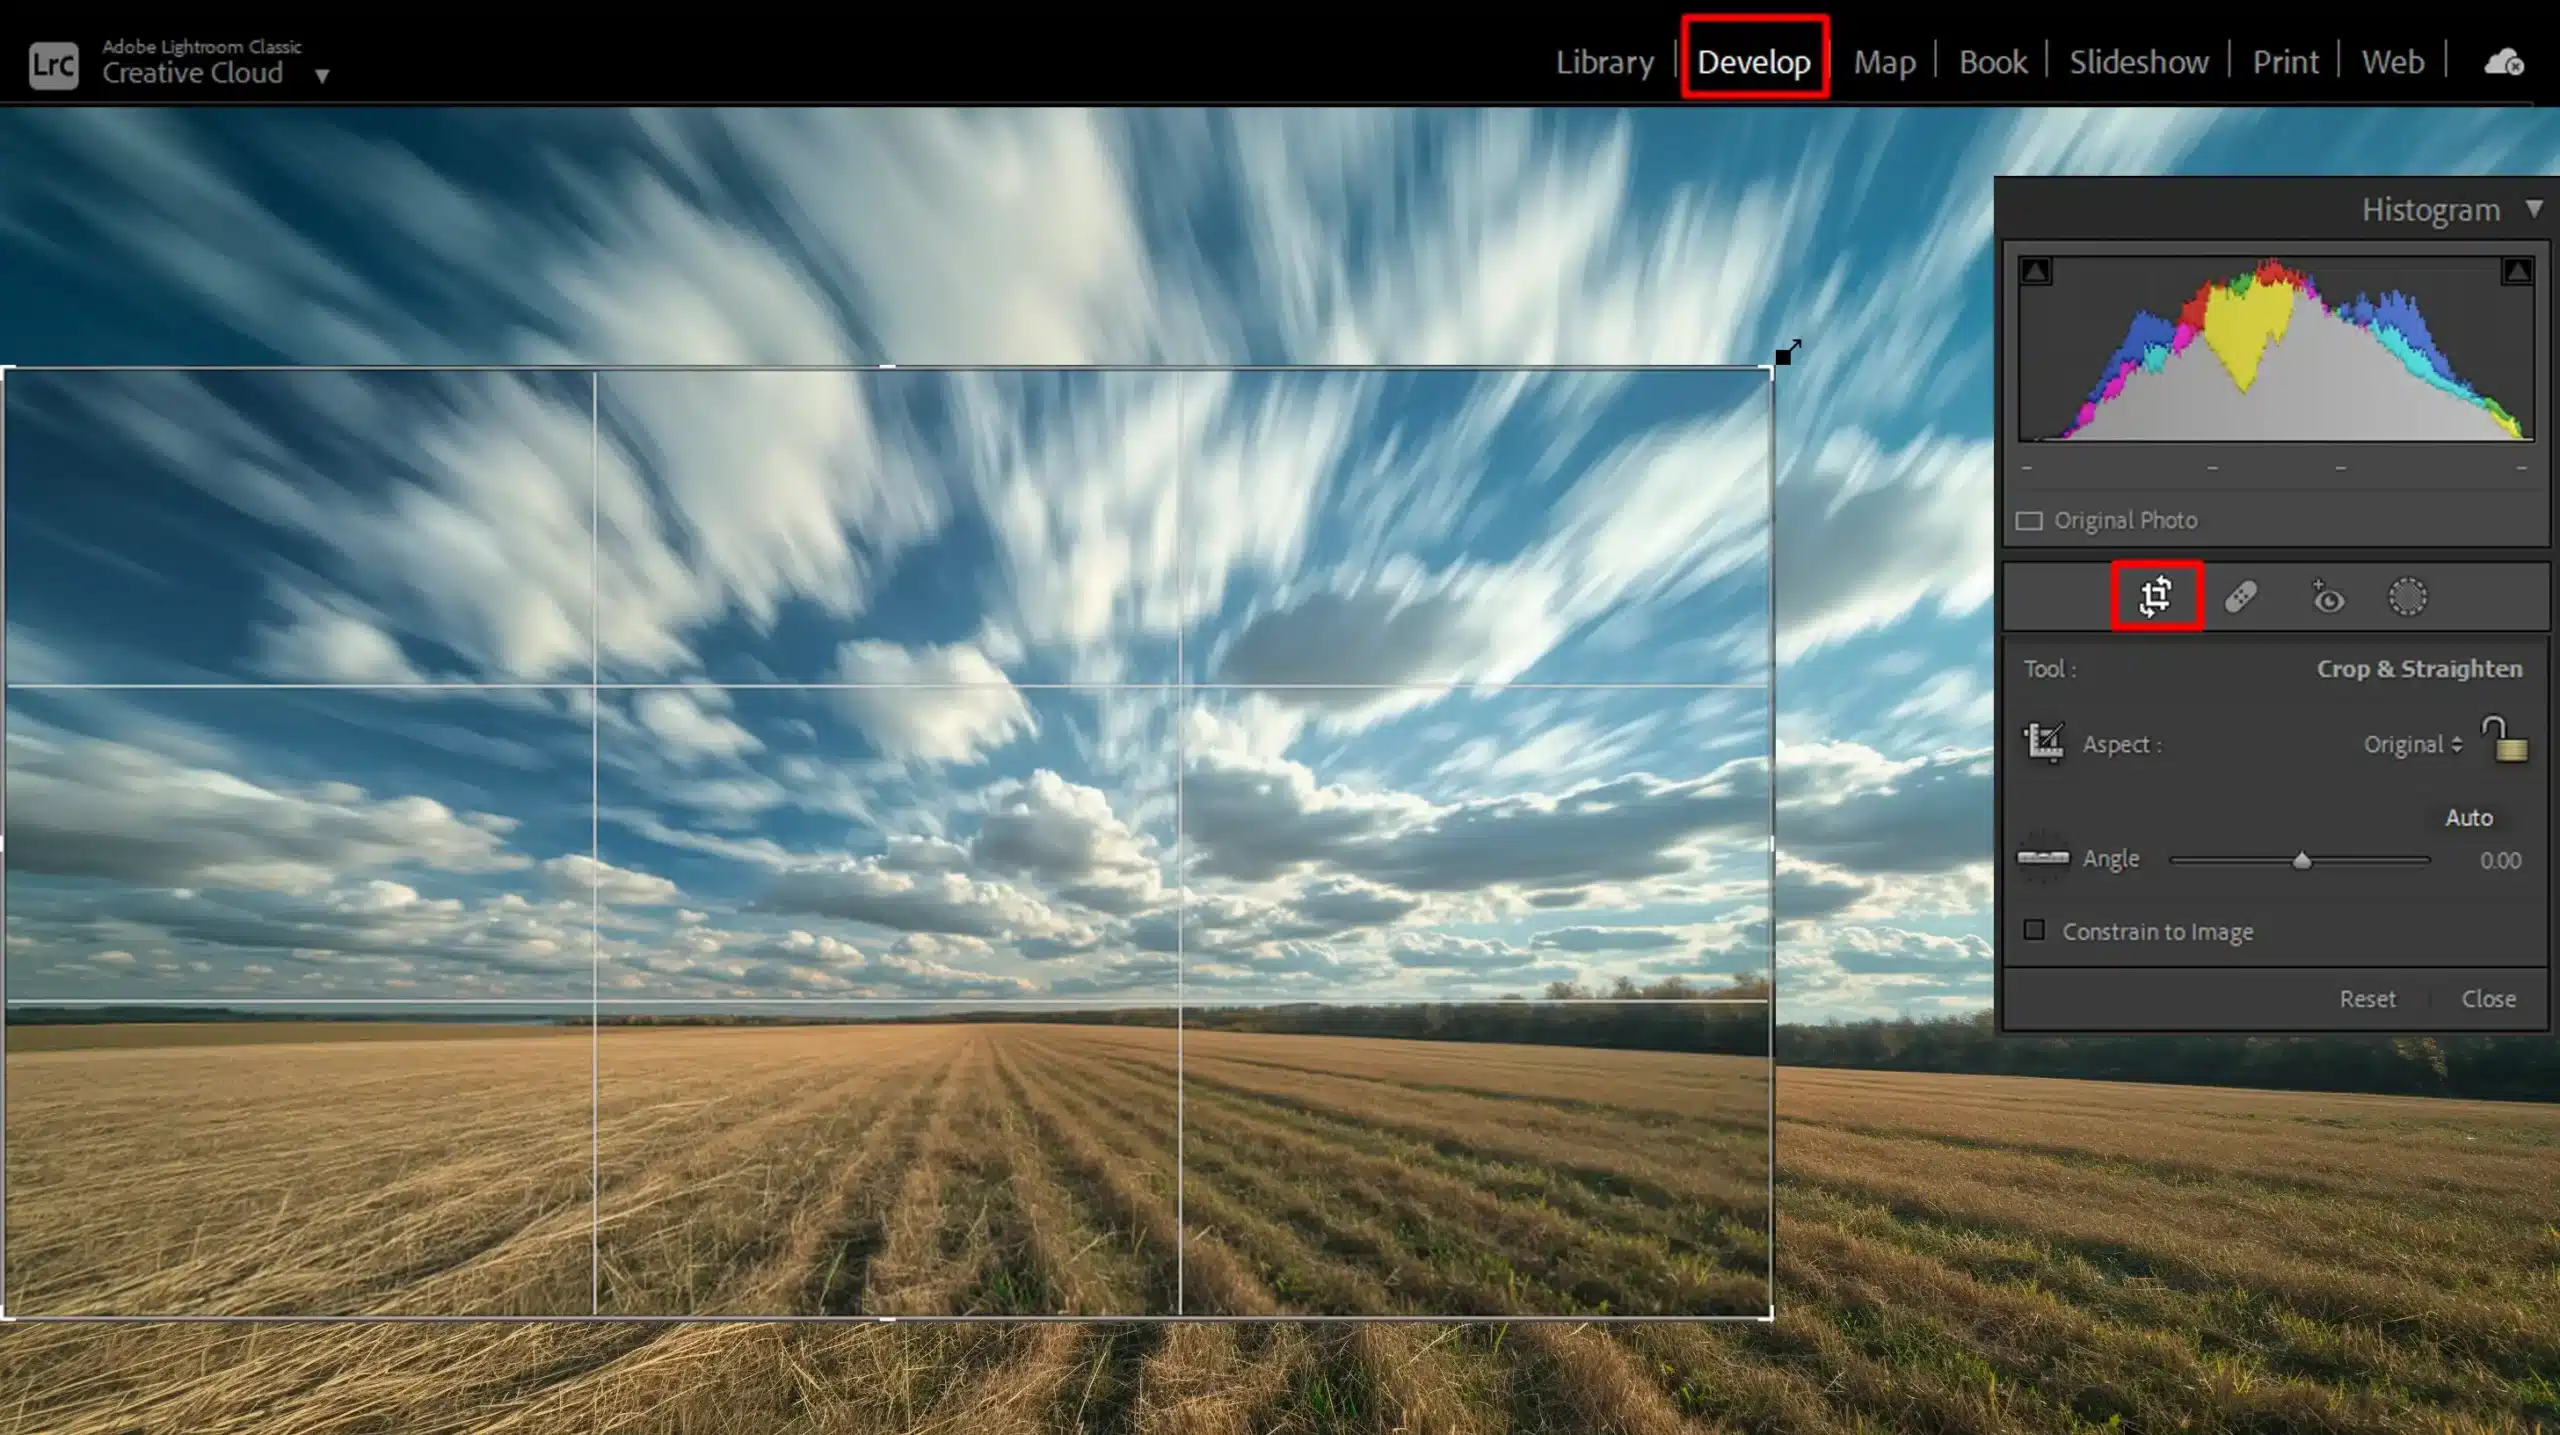
Open Lightroom Classic, navigate to the Develop module, and activate the crop tool by clicking its icon below the histogram.
Understanding Aspect Ratio
Dimension ratio refers to the width and height relationship of an image. The Lightroom crop landscape to portrait feature helps you seamlessly switch between orientations.
Changing Crop Orientation
Use the x key to toggle between landscape and portrait modes. Drag the crop box edges for precise adjustments.
Fine-Tuning the Crop
Use the corner handles to resize, rotate with the angle slider, and finalize with Enter or Done.
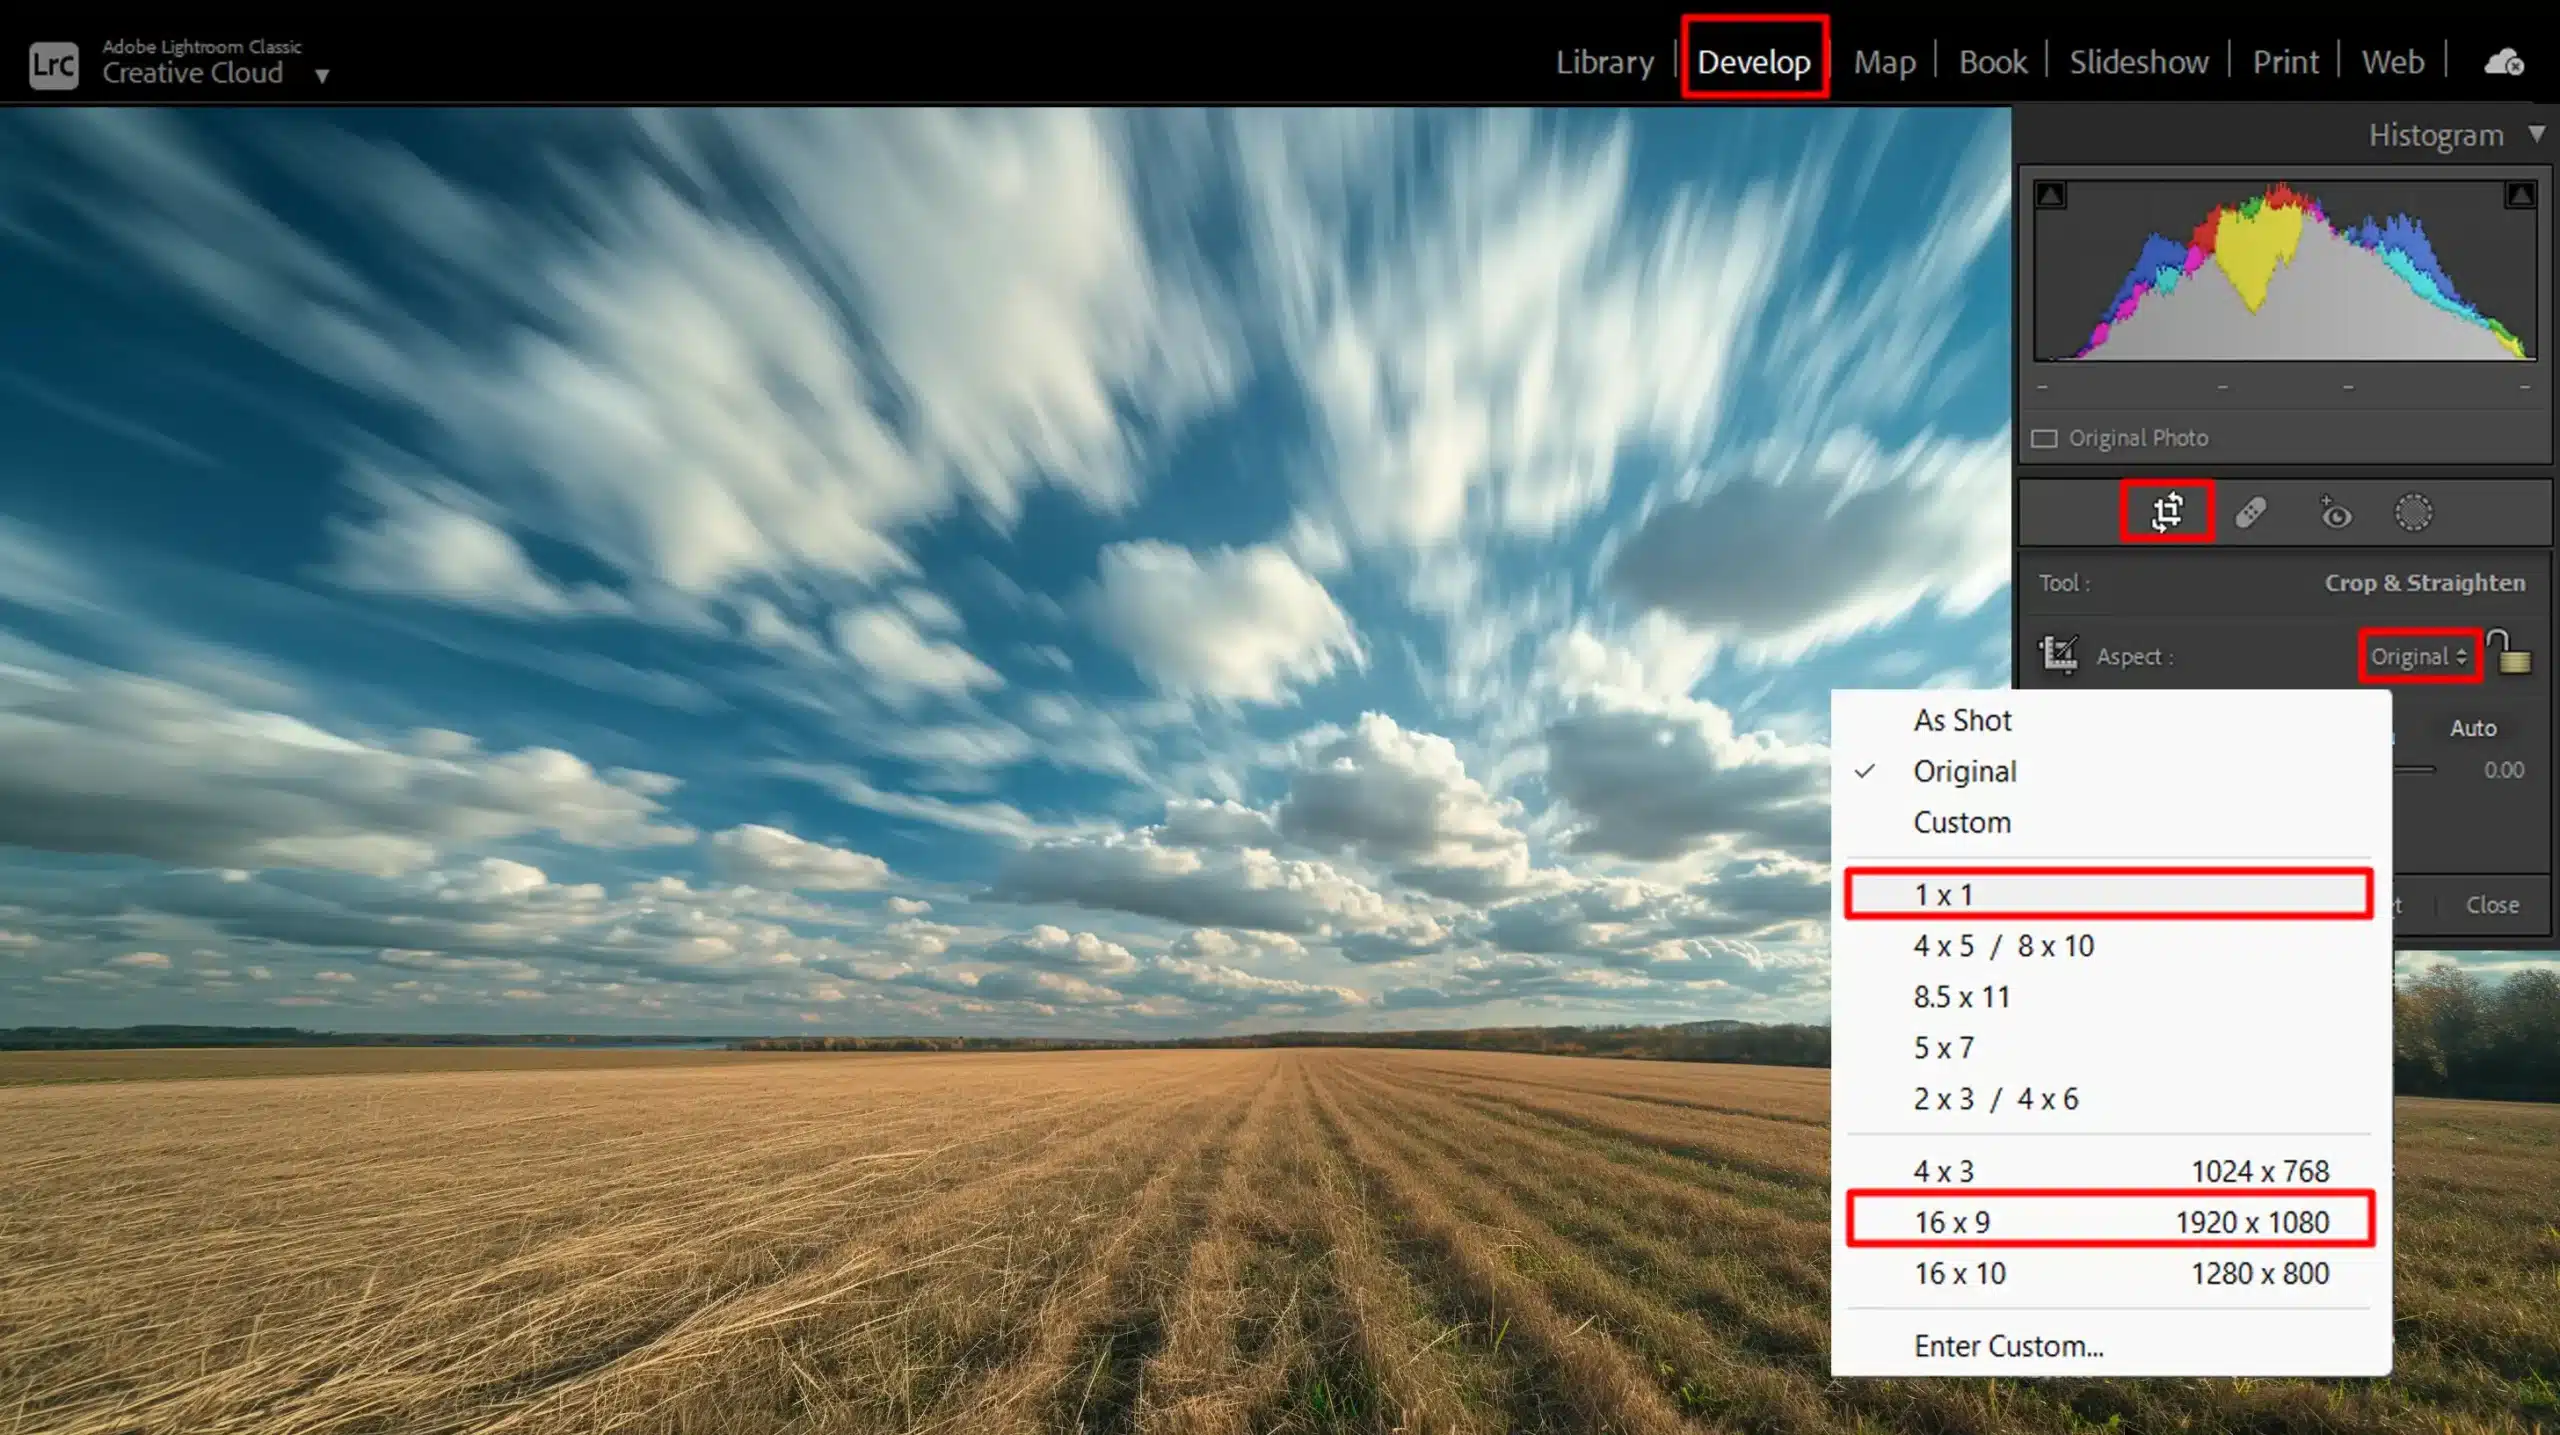
Preset Aspect Ratios
Choose from presets like 1:1 for square crops and 16:9 for widescreen, depending on your needs.
Accessing the Crop Tool
Open Lightroom Classic and navigate to the Develop module. Here, you will find all the tools needed for image adjustments.
To activate the crop tool, click on its icon found just below the histogram.
Understanding Aspect Ratio
Dimension ratio refers to the proportional relationship between an image’s width and height. When using the Lightroom crop landscape to portrait feature, selecting a specific ratio ensures that your picture fits within specific boundaries, allowing you to switch from a wide landscape to a vertical portrait seamlessly.
Classic offers preset dimension ratios like:
1:1 for square crops
16:9 for widescreen
Simply click on the drop-down menu and make your selection.
Changing Crop Orientation
Switching between landscape orientation and portrait orientation is easy. While in crop mode, press the x key to toggle between the two.
For finer adjustments, use the edge handles of the crop tool. Drag them inward or outward to resize your selected area.
If the angle isn’t quite right, click and drag outside the crop box to rotate the image. Alternatively, use the angle slider to straighten things out.
To finalize your crop, press the Enter key or click Done. It’s that simple.
Pro Tip: Experiment with both landscape and portrait orientations using the x key. Sometimes, a simple switch can dramatically improve your image’s focal point.
While using the crop tool in Lightroom, remember that similar principles apply when cropping in Photoshop, allowing for precise framing and better composition in both programs
Additional Lightroom Shortcuts for Better Lightroom Crop Landscape to Portrait
While mastering the crop tool, familiarize yourself with other shortcuts to speed up your workflow. For instance, pressing “R” quickly activates the crop tool, and “O” cycles through different overlay guides to help with composition.
Common Photo Editing Mistakes to Avoid for Lightroom Crop Landscape to Portrait
When using the crop tool, be mindful of common photo editing mistakes, such as over-cropping, which can lead to the loss of important details. Always preview your changes before finalizing to ensure the best results.
Step-by-Step Guide to Lightroom Crop Landscape to Portrait
Begin by opening Lightroom Classic and navigating to the Develop module. It’s important to choose the photo you wish to work on. Once selected, activate the crop tool by clicking its icon located below the histogram.
This is your starting point in the Lightroom crop landscape to portrait process. Determine if your cropped image will better suit a square or vertical orientation. Having this clear helps in visualizing the final result even before you start dragging corners.
Using the X Key for Quick Orientation Change
You can change the orientation quickly by pressing the X key. This toggles between landscape and portrait orientations effortlessly.
A valuable tip when you realize a vertical crop might better emphasize your subject. It’s like flipping a switch, very handy when experimenting with different looks.
Fine-Tuning the Lightroom Crop Landscape to Portrait
After deciding on the orientation, you can fine-tune the crop:
Use the corner handles to adjust the crop box size.
Dragging outside the crop box allows you to rotate the image slightly.
Remember, over-cropping may result in important details being lost.
Press Enter or click Done to finalize your crop settings.
Experiment with both landscape and portrait formats to find the best focal points.
Pro Tip: While optimizing your crop, keep in mind composition rules in photography, such as the rule of thirds. This helps in placing your subject more effectively.
Additionally, when you edit portraits in Lightroom, applying these composition rules can make your images more impactful and professional-looking
Tips and Tricks for Perfect Lightroom Crop Landscape to Portarit
to Tips and tricks for creating perfect crops by adjusting your file’s dimensions ratio to decrease unwanted elements and enhance your composition
Maintaining Aspect Ratio
Maintaining the dimension ratio is important when cropping. It’s about preserving the original relationship between the width and height of the image. In Lightroom Classic, this is straightforward.
Just lock the dimension ratio by clicking the padlock icon. If you want to change between landscape and portrait orientation, press the X key. This is one of the many handy shortcuts that can speed up your workflow.
For example, if you start with a 4:3 dimension ratio, make sure you crop it as a 4:3, not 16:9. This way, your image won’t look stretched or squished. It’s especially important when you plan to print the photo.
Using Crop Overlays
Crop overlays are lifesavers. They help you get the best composition for your photo. Press the O key in the Develop module to toggle through different overlays like the Rule of Thirds or Golden Ratio. These guides can help balance the image better.
Using overlays assists in placing the most important elements on intersecting lines or points. For example, align a horizon line with the top third gridline. This gives your photo a balanced look.
Common Mistakes to Avoid
One common mistake is over-cropping. This removes significant details and affects image quality. Remember to crop with purpose. Likewise, avoid awkward rotations. Use clear angles that enhance the image.
Another common error is ignoring the dimension ratio. Switching between different ratios haphazardly can ruin the image’s composition. Also, pay attention to the orientation. A photo that looks amazing vertically might lose its appeal when cropped horizontally, and vice versa.
Pro Tip: Always try to preview your image in multiple settings (like on a website and printed) to ensure it looks good in all formats.
Advanced Techniques for Cropping in Lightroom
Let’s explore some advanced techniques for cropping in Lightroom to refine your file composition, moving beyond default camera settings for a more customized result.
Custom Aspect Ratios
To create a unique crop, start by unlocking the padlock icon next to the dimension ratio in Lightroom. Drag the sides or corners of your image to adjust it as needed. This can help tailor your photos to different formats, like social media posts or prints.
Remember to keep the overall composition balanced by aligning important features with grid lines. Additionally, understanding the crop factor can help you make more informed decisions about how much of the image to retain.
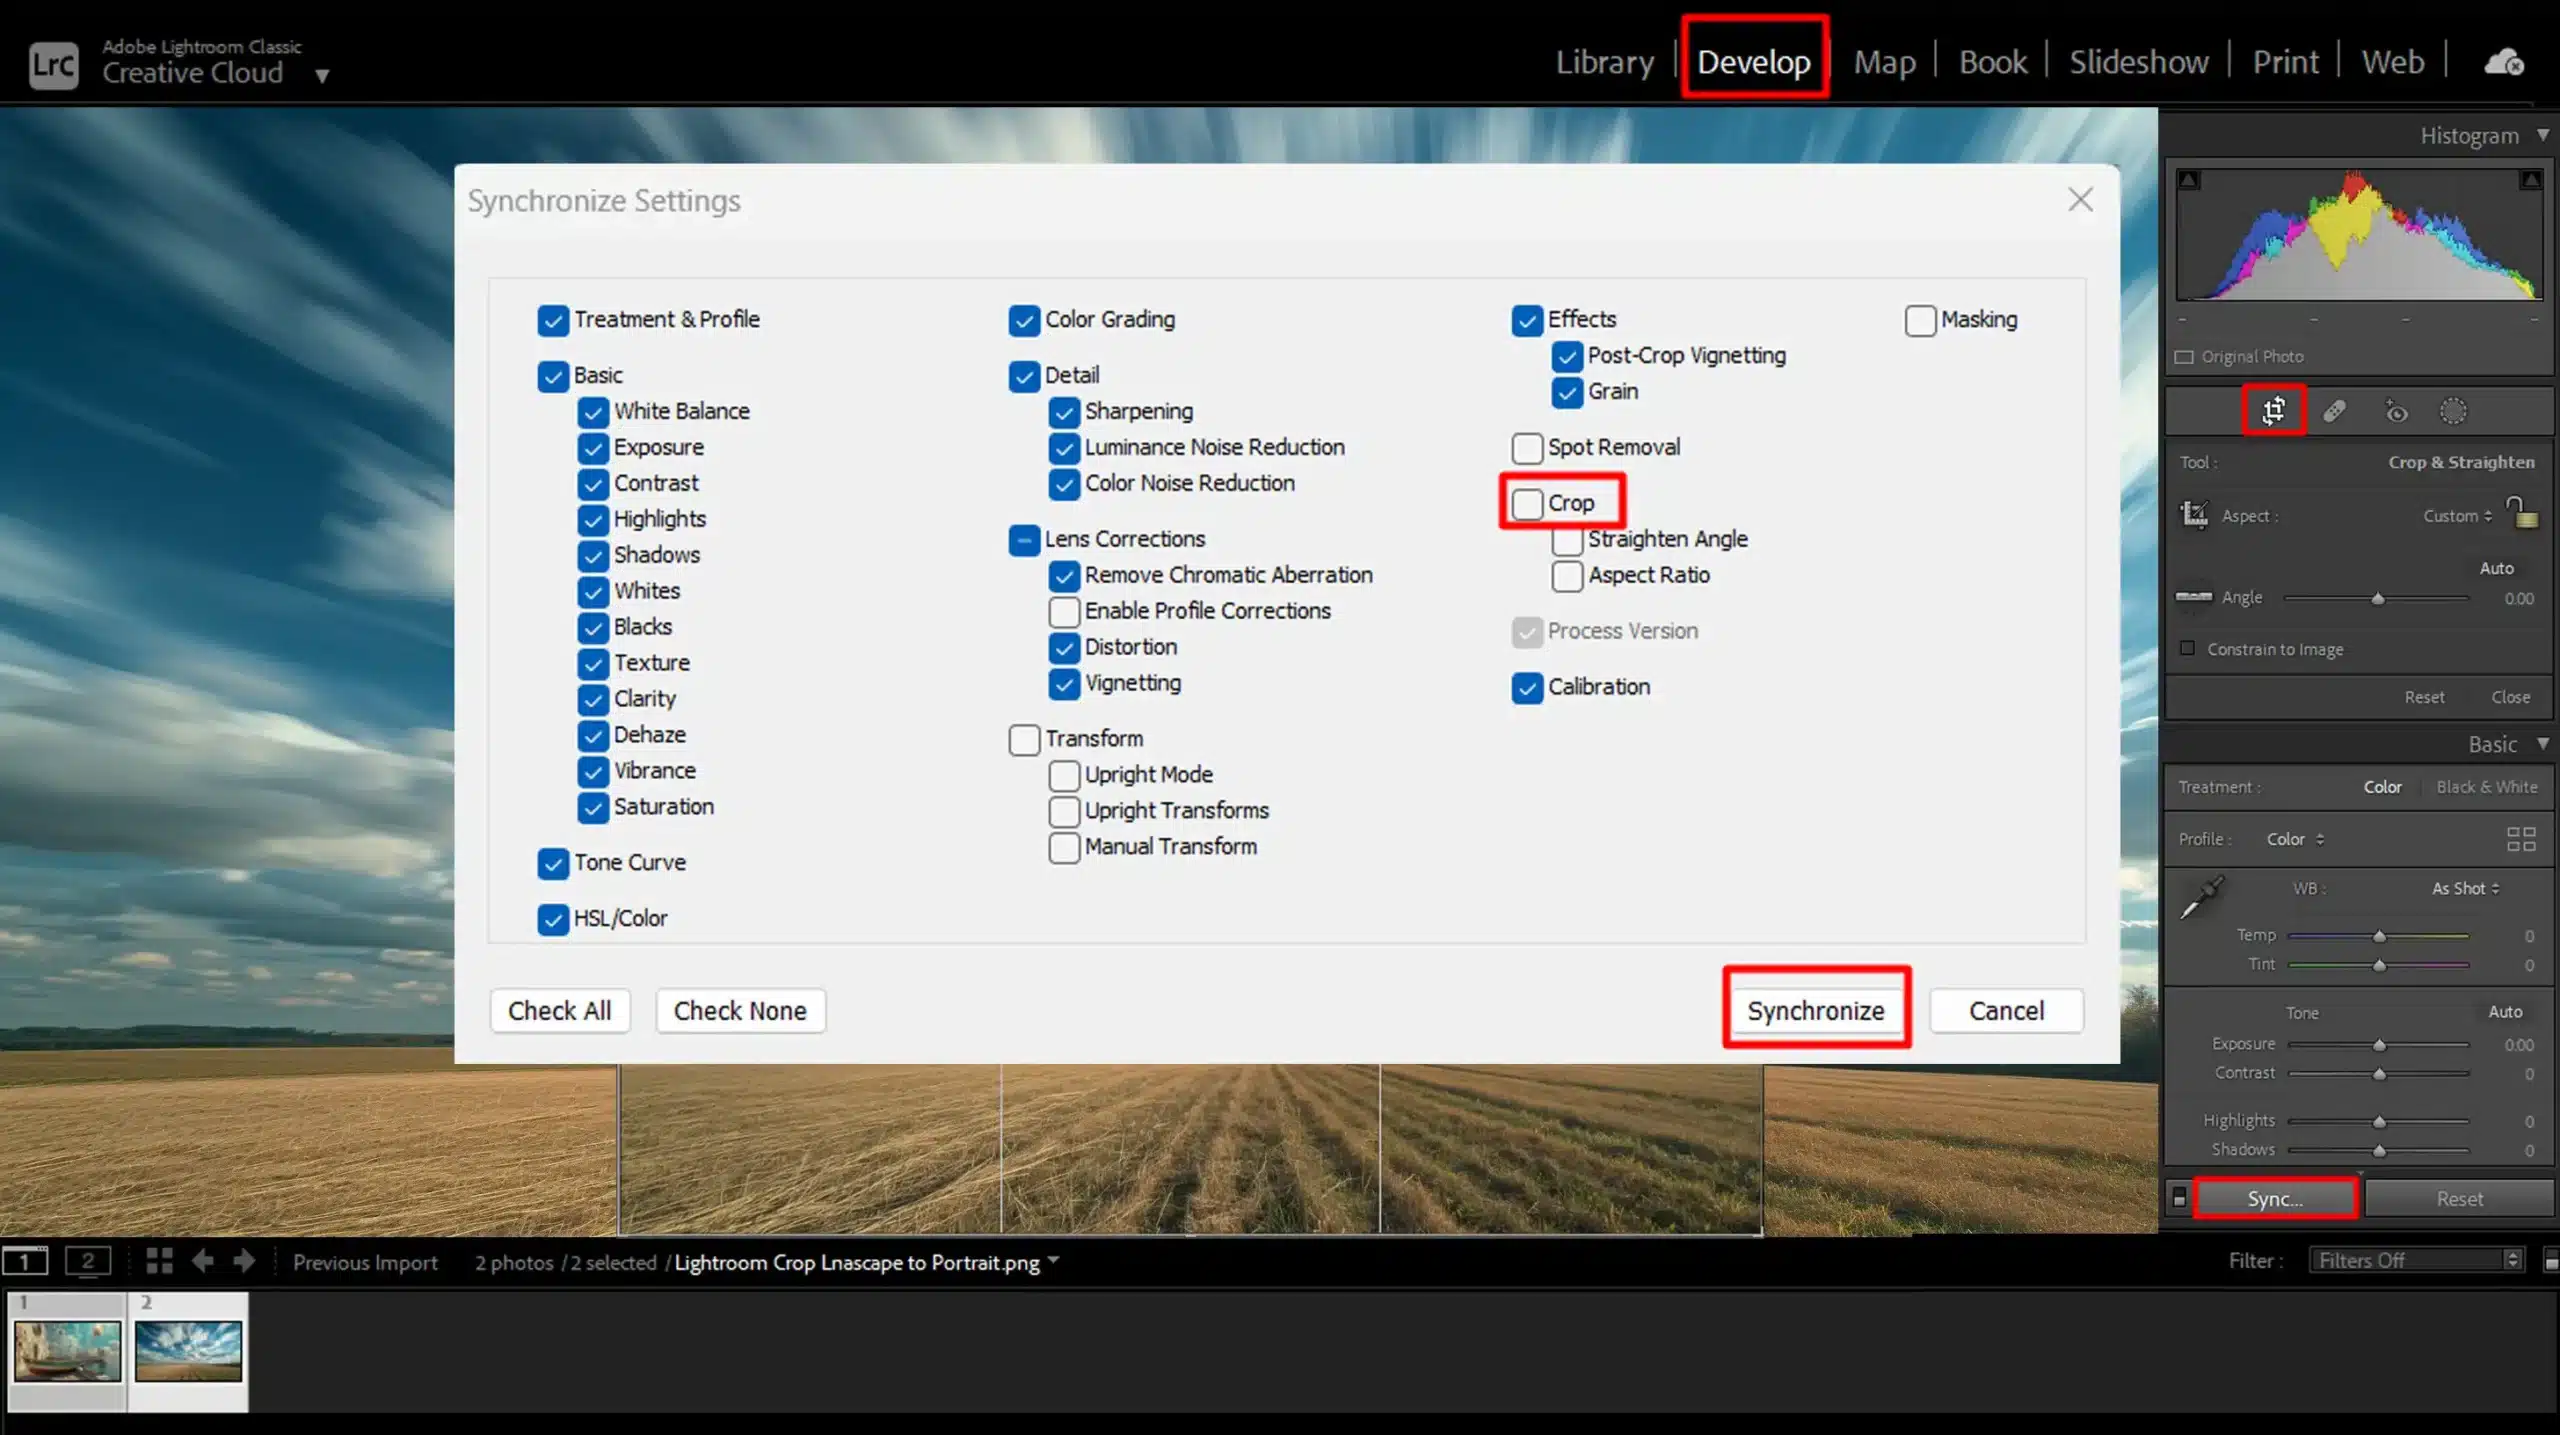
Batch Cropping Multiple Photos
If you have several pictures that need the same crop, use batch cropping.
Select multiple photos in the library module.
Move to the develop module and set your preferred crop.
Sync the settings across all selected pictures.
This saves time and ensures consistency across your picture series. For those who frequently work with large batches, knowing some Lightroom shortcuts can further streamline your workflow.
Using the Crop Tool with Other Editing Features
Efficiently combining the crop tool with other features can significantly enhance your workflow. For example, you might:
Apply a crop first and then rotate your image to straighten a horizon line.
Drag it to reposition your image within the cropped frame.
This helps focus on the most important parts without losing the overall context.
Pro Tip: Always preview your pictures at different sizes and formats after cropping. This ensures they look great on any platform, whether viewed on a camera, phone, tablet, or desktop.
When you edit landscape photos in Lightroom, applying these tips can help maintain clarity and impact, even when switching to a portrait orientation.
Using one of the best landscape photography cameras can also improve the quality of your images, ensuring they retain detail and sharpness throughout the cropping process.
Lightroom Crop Landscape to Portrait: Recap of Significant Points
Let’s quickly recap the significant steps for mastering the crop tool in Lightroom:
We began with unlocking the padlock icon to create custom dimension ratios.
Adjusting image sides or corners was next, along with aligning important features with grid lines.
Understanding crop factors was critical for making informed cropping choices.
Batch cropping multiple photos was also discussed.
Combining the crop tool with rotation and repositioning.
We emphasized previewing pictures in different sizes and formats to ensure they look good on various platforms.
Landscape to Portrait Crop in Lightroom: Final Tips for Better Crops
For even better results, remember these tips:
Experiment with crop orientation to see if horizontal or vertical framing works best.
Don't hesitate to rotate your pictures for a fresh perspective.
Use the grid lines in the crop tool for balanced, harmonious compositions.
Before finalizing, preview cropped pictures in different outputs and sizes to ensure they meet your standards.
Small adjustments can make a significant difference.
If you encounter challenging pictures, try a different approach, like rotating them slightly.
Pro Tip: When cropping, sometimes less is more. Small tweaks can yield amazing results. To make your pictures pop post-crop, consider adjusting brightness and contrast for better impact.
But remember, always start with high-quality images for the best photofinishes. If you’re struggling with the rotation in Lightroom, you can also check out how Photoshop rotate canvas might offer more flexibility for complex edits.
Frequently Asked Questions (FAQs)
How do I crop a Horizontal Video to a Vertical one in Lightroom?
Open the video in the Lightroom Library or Develop module.
Select the Crop Overlay tool.
Choose the aspect ratio of 9:16 for a vertical video.
Adjust the crop frame to select the area you want to keep.
Press Enter to apply the crop.
How can I use the Lightroom Crop Landscape to Portrait Tool to turn a Landscape Photo into a Portrait?
Select the photo.
Activate the Crop Overlay tool.
Change the aspect ratio to a portrait format like 4:5.
Adjust the frame to fit the desired area of your photo.
Hit Enter to crop the photo.
Can you Change the Orientation of a Photo in Lightroom?
Load the image or video.
Click on the Crop Overlay tool.
Select a new aspect ratio or enter custom dimensions.
If this article has helped you, then Like and Share it with your friends
Facebook
Twitter
LinkedIn
Pinterest
Conclusion
In conclusion, using the Lightroom crop landscape to portrait technique has really changed the way I edit my photos. I remember the first time I needed to convert a landscape shot into a portrait for a magazine cover.
Lightroom made it easy for me to make precise adjustments without losing the feel of the original image. The ability to crop and frame my shots properly has opened up new possibilities for me, and now my photos look more professional.
If you’re looking to improve your photo editing skills, I recommend checking out my Photoshop Course and Lightroom Course. These courses have been really helpful in refining my techniques and could do the same for you. Also, you can explore more about Photoshop and Lightroom through Adobe.
$2,061.00Original price was: $2,061.00.$1,061.00Current price is: $1,061.00. 27585
Download Your Free Guide Now!
Discover the secrets of photography with our printable guide! Master essential techniques like aperture, shutter speed, and ISO to create stunning images. Get your free printable PDF now and start turning your snapshots into masterpieces!