Are you looking to learn how to stretch an image in Photoshop? You’re in the right place! In this guide, I’ll walk you through the process step-by-step, making it easy and approachable for everyone, whether you’re a beginner or have some experience with Photoshop.
Imagine transforming your images with a simple stretch, enhancing their impact and adding a new dimension to your creative projects.
By the end of this article, you’ll be equipped with the knowledge and confidence to stretch images like a pro.
So, let’s dive in and unlock the potential of your visual creations!
Table of Contents
How to Stretch an Image in Photoshop
Stretching images in Photoshop is simple once you know which tools to use. I’ll walk you through it. From using the free transform tool to adjusting image size, we cover it all here. Let’s explore some methods to stretch an image without losing quality.
Using Free Transform

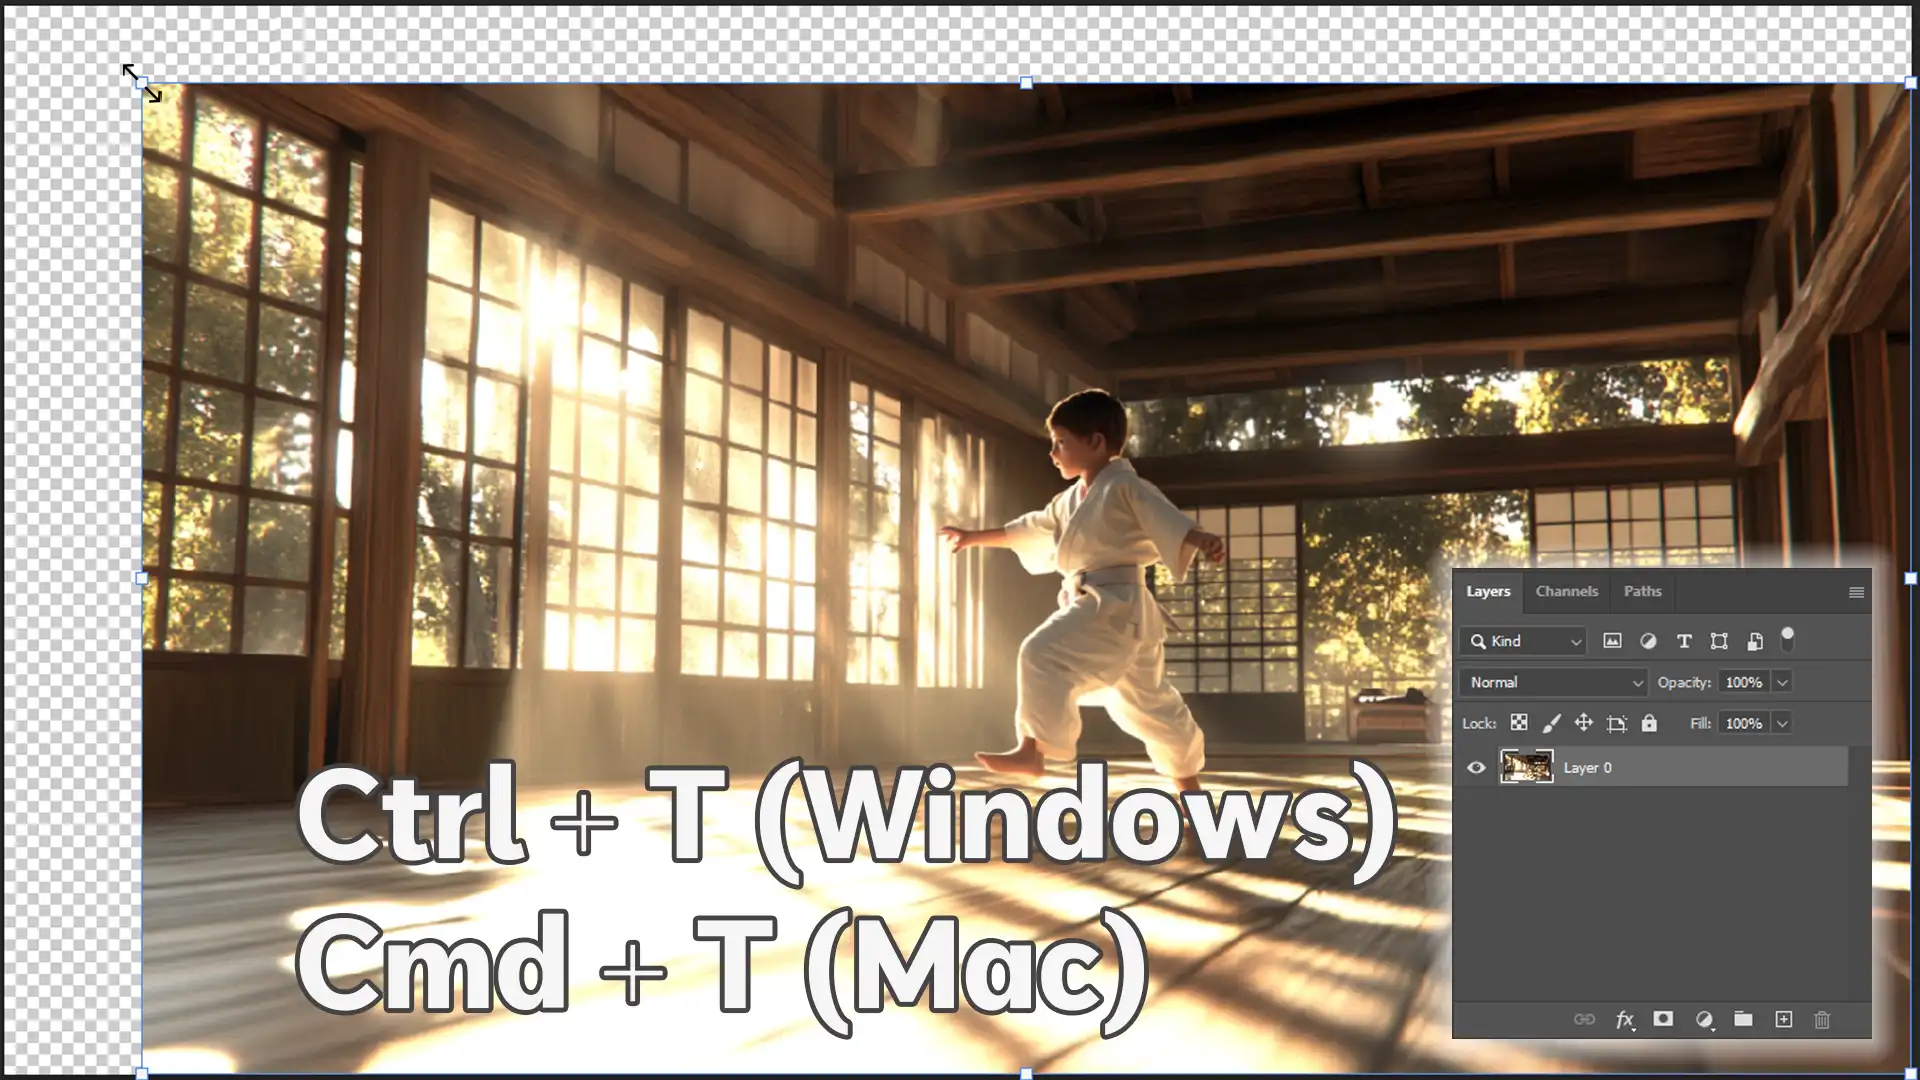
The free transform tool is your go-to method for resizing. First, open your image in Photoshop, then select the layer you want to resize from the layers panel. Hit Ctrl+T (Cmd+T on Mac) to activate the free transform feature.
- A bounding box appears around your image. Simply drag the corners while holding the shift to maintain the aspect ratio.
- To stretch freely, let go of the shift key and drag the sides or corners to your desired dimensions.
- Once you’re happy with the new dimensions, press enter to apply the changes.
Adjusting Image Size

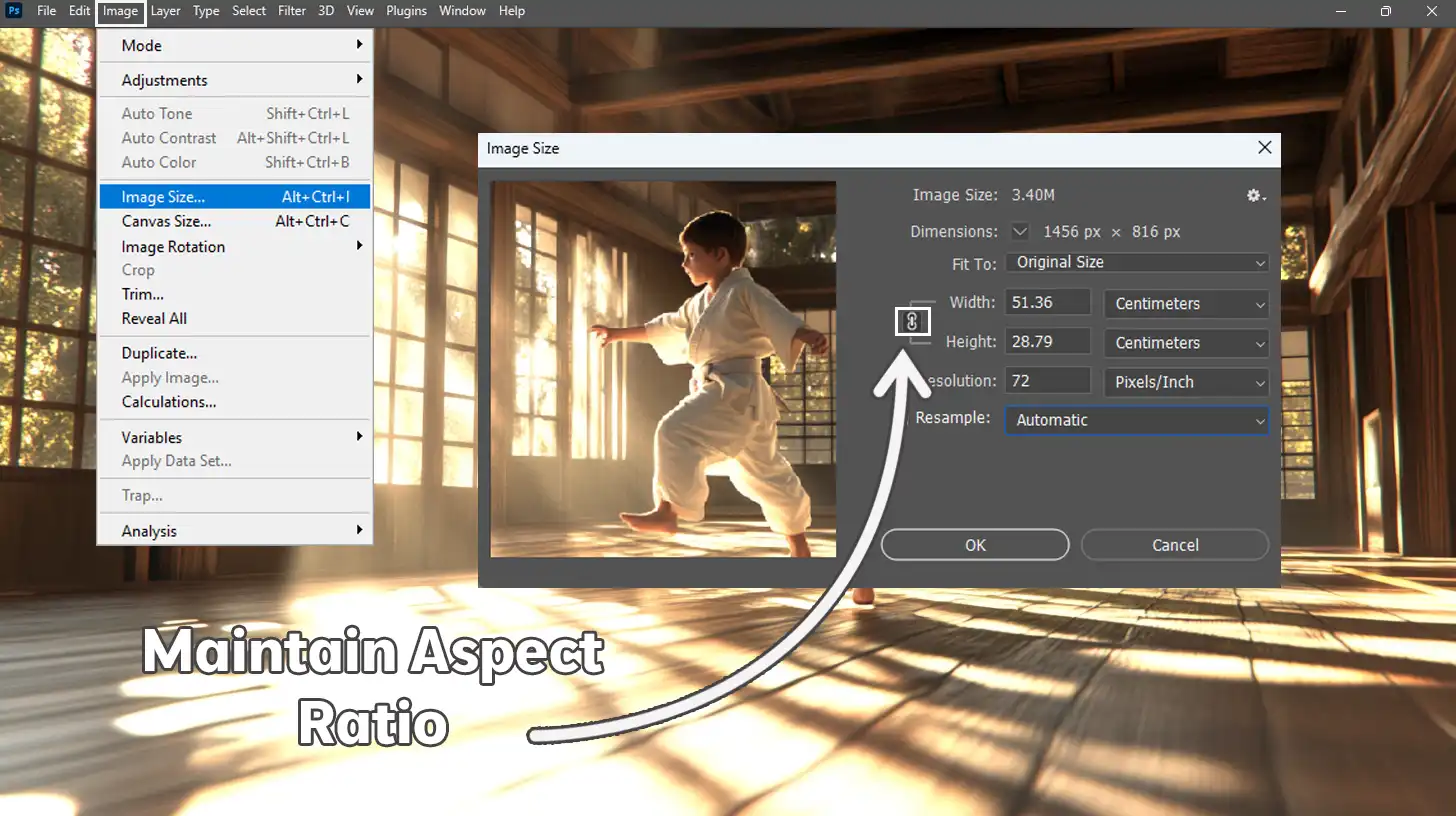
If you need more precision, use the image size command. Navigate to the top menu bar and click on ‘Image‘, then select ‘Image Size‘. A dialog box will appear.
- In the image size dialog box, you can enter new width and height values, including the current width. If 'Maintain Aspect Ratio' is checked, it will automatically adjust to keep the aspect ratio.
- If you want to use exact new dimensions, unchecking 'Maintain Aspect Ratio' lets you put in different width and height values.
- After adjusting, review the final image dimensions to ensure they meet your needs, then click OK.
Preserving Image Quality

Preserving image quality is important when resizing or stretching images. Converting the image layer to a smart object can be beneficial. This prevents losing quality when resizing multiple times.
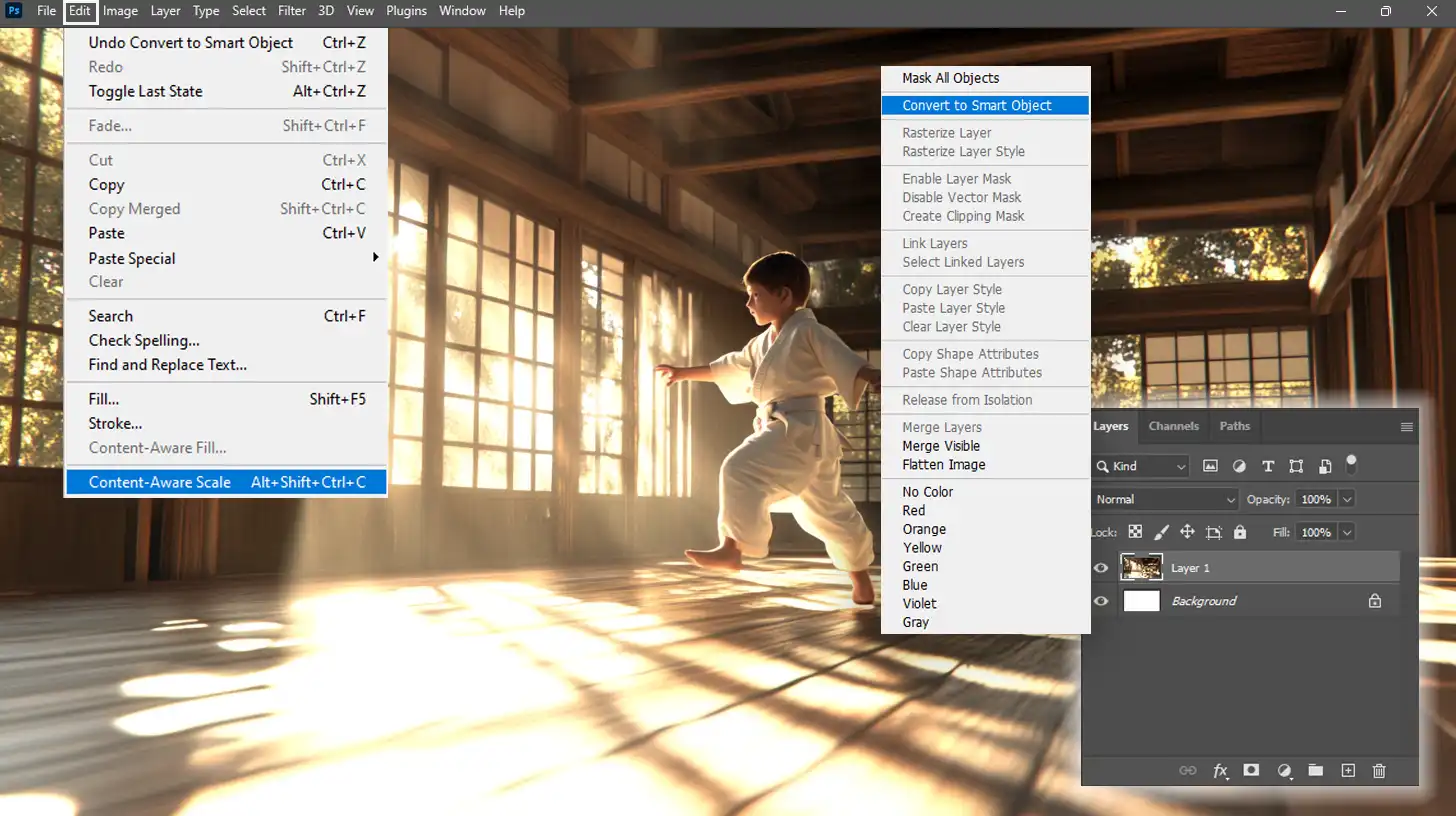
- Right-click on the layer in the layers panel and choose 'Convert to Smart Object'.
- Select 'Content-Aware Scale' after you click "Edit" in the menu bar when making subtle stretches, as this option works effectively on high-resolution images.
- Use the content-aware scale for images with a lot of detail. It helps stretch parts without damaging the overall appearance.
These techniques should make your image stretching efforts effective and worry-free. You’ll gain better Photoshop skills and enjoy the process more!
Pro Tip: Always save a copy of your original image before you start editing, as this allows you to revert back if things go awry.
For those looking to expand their editing capabilities, understanding the difference between Photoshop and Lightroom can be beneficial. Each software offers unique features that cater to different aspects of photo editing.
Additionally, exploring Photoshop shortcuts can significantly speed up your workflow and enhance your efficiency.
Working with Image Layers in Photoshop
Image layers are a fundamental part of the Adobe Photoshop experience. They allow for greater flexibility and control in your editing process, enabling you to make adjustments without affecting the entire image.
In this section, we will explore the basics of layers and how to effectively use them to enhance your designs.
Understanding Layers
Layers are fundamental to organizing your work in Photoshop, allowing for flexibility and creativity in your projects. By grasping how to effectively manage these layers, you can streamline your editing process and enhance your overall workflow.
Layer Management Tips
Efficiently organizing your layers can significantly enhance your workflow. By keeping your image layer well-structured, you can easily locate, edit, and manage them as needed.
This not only saves time but also improves the overall quality of your projects. Let’s explore some effective strategies for organizing layers in Photoshop.
Organizing Layers
Now, let’s talk about handling these image layers without losing our minds. Layer management is kind of like organizing a messy closet.
- Name your layers properly: Instead of calling one "Layer 1," use a name that describes its purpose, like "Sunshine Glow" if that's what it adds to your image.
- Grouping is fundamnetal: Merge similar layers together but keep the background image solo.
- Select the appropriate layer before stretching: This helps avoid mistakes and keeps everything looking good.
Experimentation and Tools
Also, experiment! Use the free transform tool located in the top menu bar to resize and stretch. Stretching too far?
Content-aware scale helps to stretch an image subtly, keeping the aspect ratio intact and maintaining image quality. And let’s not forget the perks of converting layers into smart objects.
Pro Tip: Save your work regularly. This not only protects you from mistakes but also keeps your layers safe. Feel free to stretch that image, knowing your work is secure.
Advanced Techniques for Image Stretching in Photoshop
In this section, we’ll explore some advanced techniques for image stretching in Photoshop.
Using warp and distort are essential tools in Photoshop that allow you to manipulate images creatively and achieve unique effects.
They help transform images, shapes, and paths effectively. Let’s dive into how you can effectively use these features to enhance your projects.
The following table outlines basic aspects and overviews of significant techniques, including using warp and distort, maintaining image quality, adjusting canvas size, and utilizing the Free Transform tool.
| Aspect | Overview |
|---|---|
| Using Warp and Distort | These tools allow you to reshape images creatively, giving you control over pixel manipulation. |
| Maintaining Image Quality | Use Content-Aware Scale to enlarge parts of your image while preserving overall quality. |
| Adjusting Canvas Size | Ensure your image fits perfectly within the canvas edges to avoid any unwanted cropping. |
| Using Free Transform | Activate Free Transform to stretch and resize images while maintaining proportions with the Shift key. |
Using Warp and Distort

Let’s talk about Warp and Distort. These are handy tools for any Photoshop user looking to stretch an image. You can think of them like magic scissors that can pull and shape the pixels without making the image look weird or unnatural.
- Select the image in Photoshop you're eager to stretch.
- Activate the Free Transform tool.
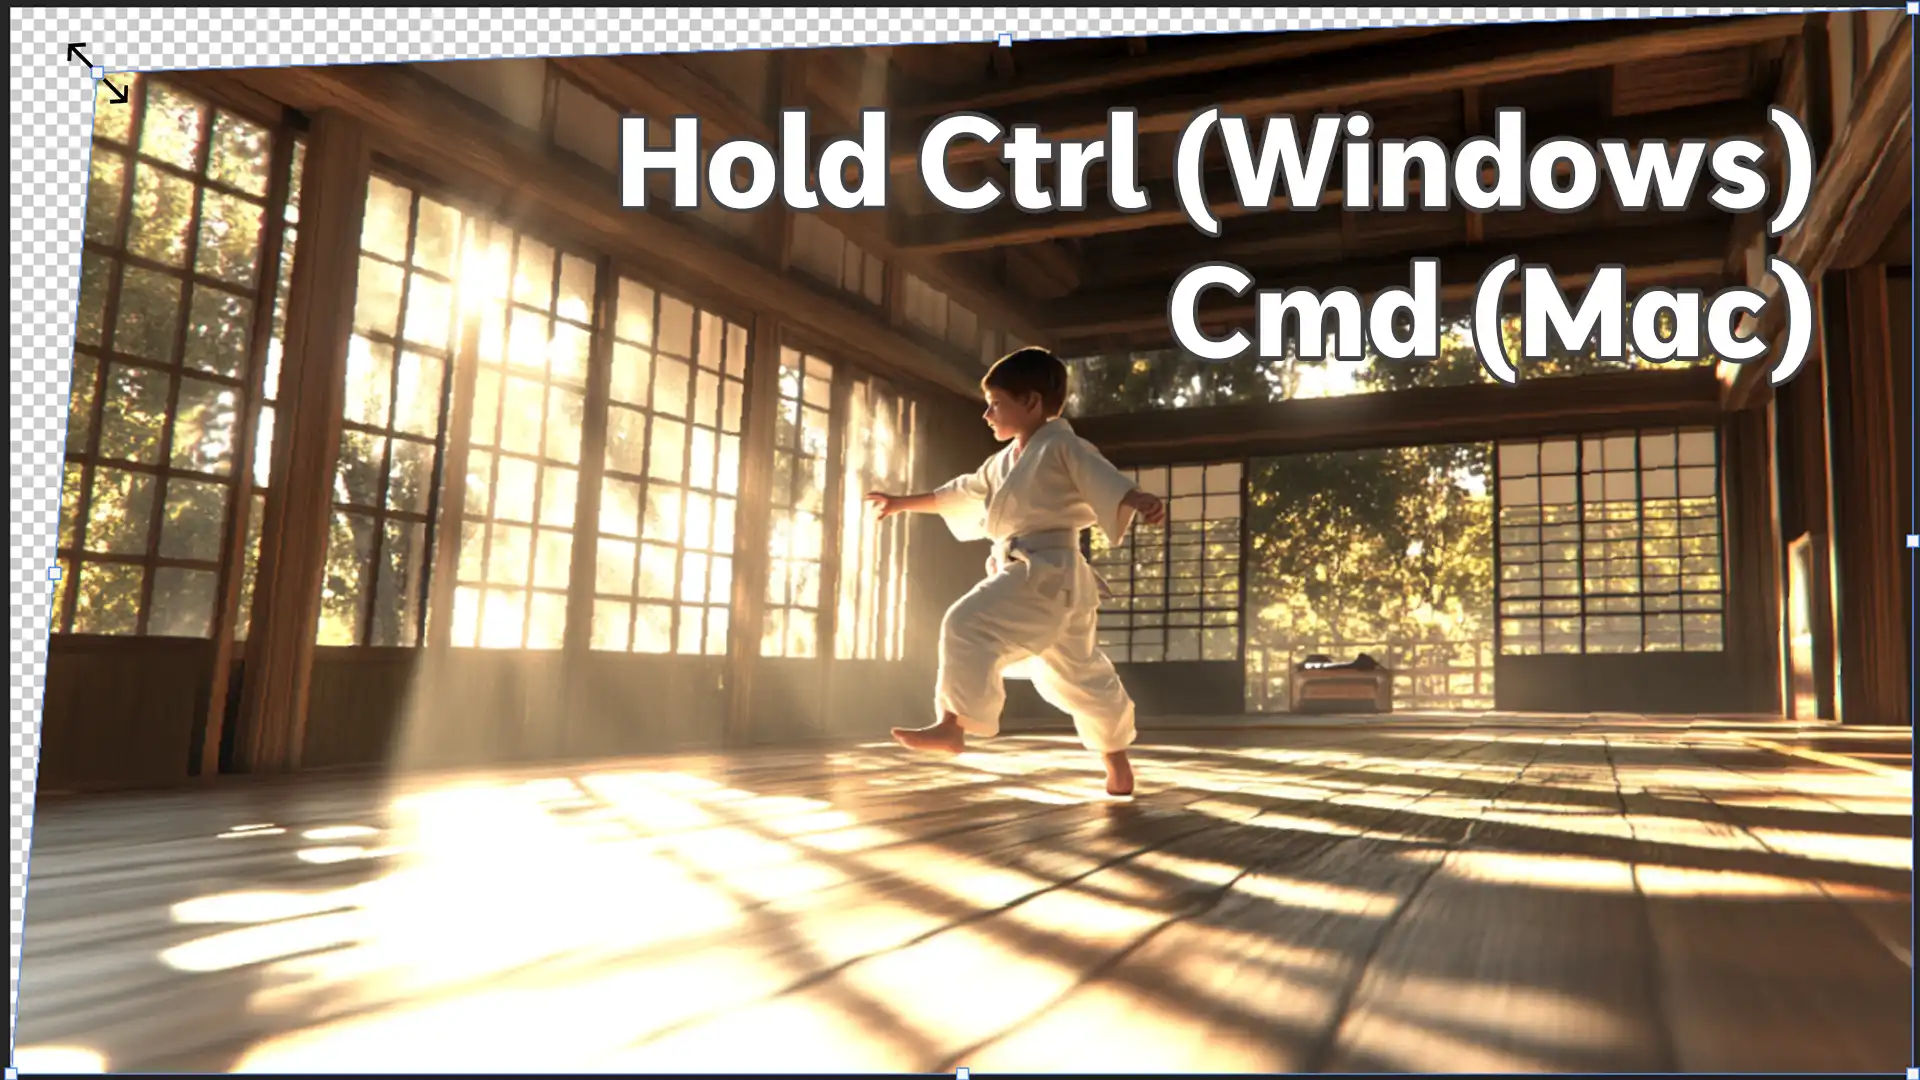
- Once the bounding box surrounds your masterpiece, hover over the corners. Hold ‘Ctrl’ (or ‘Cmd’ on Mac), click, and drag.
- The warp feature morphs like clay, adjusting segments individually.
- Distort behaves like a playful stretch effect; simply pull the corners as desired.
Keep your eyes peeled on the aspect ratio, ensuring it doesn’t get wild and out of control. Who needs crooked proportions when you’ve got elegance to maintain? Now, you’re ready to warp images like a pro and explore how to warp text in Photoshop effectively.
Maintaining Image Quality
It’s important to keep your image sharp, no one wants a blurry stretch. That’s where the Content-Aware Scale comes in to help. This feature feels like a smart solution, allowing you to enlarge certain parts of your image while keeping the quality intact.
- Use the magic of the Content-Aware Scale. This isn't merely resizing images, mind you, it's an artful method of hiding the pixel stretch under profound mimicry.
- Head to the dropdown menu under 'Edit' and select it.
When working with images, make sure to adjust the canvas size so that your image fits perfectly within the canvas edges without spilling over. Use the image size command to adjust the width to fit your canvas.
Pro Tip: When using Free Transform, hold the ‘Shift’ to maintain the proportions of your image while scaling it, and consider using the content-aware fill feature to blend areas when making adjustments seamlessly.
You can also use the free crop Photoshop technique to refine your image’s edges and enhance its overall look.
Troubleshooting Common Issues
When working on your projects, it’s important to keep an eye on your canvas size to avoid pixelation.
Properly managing the dimensions of your canvas can prevent unwanted distortions in your images. Let’s look at some effective tips to help you avoid pixelation in your designs.
Avoiding Pixelation
Pixelation can really mess up an image in Photoshop. One moment, you’re stretching it, and the next, it looks like a character from Minecraft.
That’s not what anyone wants! The main issue is low resolution. When you enlarge an image that doesn’t have enough resolution, pixelation happens, and it just doesn’t look good.
To avoid pixelation:
- Increase the resolution by using the Free Transform tool wisely.
- Begin with the highest resolution possible.
- Try to upscale minimally.
- If you can't avoid pixelation, apply slight blurring to soften rough edges, subtly hiding pixelation.
Correcting Aspect Ratio Problems
The aspect ratio is like that friend who always insists on staying balanced. If you don’t respect it, things will look odd. If you aim to stretch an image but end up with a squished or elongated mess, the aspect ratio needs attention.
To maintain the correct aspect ratio:
- Use the Free Transform tool while holding ‘Shift’ to maintain the original proportions.
- Make small adjustments instead of going wild at once.
- Adjust the canvas size before making changes to keep everything tidy.
- Consider using the Photoshop Levels to ensure your image maintains its visual integrity.
Finally, let’s not forget the wonders of the Content-Aware Scale. This tool practically whispers sweet nothings to your image as it expands.
Instead of stretching parts that shouldn’t be stretched, it focuses on adjusting the least critical areas and maintaining quality.
Pro Tip: Always work on a duplicate layer. That way, if anything goes wrong, you have a safety net to rely on. These transform image techniques help you edit confidently, knowing your original image is safe.
Frequently Asked Questions

How do I stretch and warp an image in Photoshop?
- Open your image in Photoshop.
- Select the Edit menu, then choose Transform, and select Scale for basic stretching.
- To warp, go back to the Edit menu, select Transform, and then choose Warp.
- Drag the handles that appear to stretch or warp your image as needed.
- Hit Enter to apply the changes.
How to stretch an image in Photoshop without distorting it?
- Open your image and select the Edit menu.
- Choose Transform, then Scale.
- Hold down the Shift key while dragging the corners to maintain the aspect ratio and avoid distortion.
- Release the mouse button and then the Shift key when you’re satisfied with the resizing.
- Hit Enter to finalize the adjustment.
What is the process for free stretching in Photoshop?
- Load your image into Photoshop.
- Click on Edit, hover over Transform, and select Scale.
- Click and drag outside the bounding box to rotate or inside the box to free stretch.
- Adjust the image freely without holding any key for unconstrained resizing.
- Hit Enter to apply your changes.
How do I expand part of an image in Photoshop?
- Open the image in Photoshop.
- Select the area you want to expand using the Lasso Tool or any selection tool.
- Go to the Edit menu and choose Content-Aware Scale.
- Adjust the selection by dragging the handles.
- Press Enter once you achieve the desired expansion.
Conclusion
Learning how to stretch an image in Photoshop has truly changed the way I create visuals. This skill gives me the freedom to adjust landscapes or modify proportions for artistic projects effortlessly.
It’s been a game-changer in my editing process. If you want to improve your editing skills, I highly recommend checking out my Photoshop Course and Lightroom Course.
The Photoshop course covers techniques for stretching images effectively, while the Lightroom course helps you enhance your photos seamlessly. These resources have streamlined my workflow and boosted my creativity.
Whether you’re a beginner or experienced, mastering how to stretch an image in Photoshop can elevate your digital artistry. For the best editing experience, consider using Adobe Photoshop and Adobe Lightroom. With the right tools and knowledge, you can create stunning visuals that impress everyone!
Read more about Photoshop:


