Patching Adobe Lightroom is an important task to ensure your software runs smoothly and stays up to date. A patch fixes bugs, improves performance, and adds new features. If you’re learning how to patch Adobe Lightroom, it’s essential to keep your program updated to avoid errors and make sure you’re getting the best experience.
In this article, I’ll explain how to patch Lightroom on both Mac and Windows. You’ll also find troubleshooting tips and steps to fix any patching errors. And, I’ll share advice on how to prevent common issues that can arise during updates. Let’s dive in detail!
Table of Contents
What Does it Mean to Patch Adobe Lightroom?
Patching Adobe Lightroom means updating the software to its latest version to fix bugs, enhance performance, and acquire new features. Adobe often releases patches to resolve issues reported by users and improve the overall user experience.
A patch ensures that your Lightroom runs smoothly and stays compatible with the latest assignments, plugins, and operating systems, like Window or macOS. Keeping your software updated can help you take full advantage of the latest plugins for lightroom, allowing for an even more efficient editing experience.
Why Patching is Important
When you patch Adobe Lightroom, you are ensuring your software is up-to-date and free from any known problems. Regular updates are essential for the following reasons:
- Bug Fixes: Adobe listens to the community and fixes bugs that might cause crashes or errors when editing photos.
- Security Updates: Patches often address security vulnerabilities, protecting your account and sensitive data.
- New Feature: Every patch may introduce new tools or improvements, giving you access to Adobe’s latest version of Lightroom.
- Better Performance: Patching helps your software execute faster and more efficiently, especially when working with large photo collections.
Example
Imagine working on a batch of images and experiencing constant crashes. A simple patch from Adobe can fix these issues by improving memory management and stability, allowing you to batch edit in lightroom without interruptions.
Regularly patching Adobe Lightroom is essential for maintaining optimal performance, security, and acquire to the latest features. Staying updated ensures a smoother editing experience and helps you get the most out of your software.
Why Should You Keep Adobe Lightroom Patched and Updated?
Keeping Adobe Lightroom patched and updated is essential for ensuring your software runs at its best. Regular updates can fix bugs, introduce new tools, and protect your account from security risks. When Adobe releases a patch, they respond to user feedback, improving Lightroom based on real-world issues and experiences. Let’s look at why it’s so important to keep your Lightroom version up-to-date.
1. Bug Fixes and Improved Performance
Patches fix known bugs that could cause Lightroom to crash or behave unpredictably. For example, a patch might resolve an issue where the app freezes when loading large photo collections. Keeping Lightroom updated helps you avoid frustrating errors and downtime.
- Fixes for known crashes.
- Smoother performance with large files.
- Resolves memory-related issues.
Example
A user editing hundreds of high-resolution images may experience slowdowns. Using a patch tool that optimizes how Lightroom handles memory can greatly improve performance, allowing the user to work more efficiently.
2. Access to New Features
Adobe frequently adds new premium features to Lightroom through patches. These details are designed to enhance your workflow and provide new tools for creativity. Whether it’s a new tool for organizing images or advanced filters for better editing, staying updated allows you to take advantage of these upgrades.
- New editing tools.
- Advanced filters and presets.
- Enhanced AI-powered features for better lightroom editing.
Note
Some updates may introduce premium elements available only with a full license, so make sure your Lightroom plan is up to date for the full benefits.
3. Security Updates
Security patches protect your data from potential vulnerabilities. Just like any other software, Lightroom can become a target for hackers. Patching ensures that your account information, photos, and other sensitive data are safe. Adobe releases patches that close these gaps, keeping your data secure.
- Protects your images and personal information.
- Prevents unauthorized acquire to your Lightroom account.
- Keeps your Lightroom compatible with the latest security standards.
Example
If Lightroom is not patched, there could be a risk of your account being compromised, leading to loss or unauthorized access to your photos. Regular updates help prevent this from happening.
4. Compatibility with Operating Systems and Plugins
Patching Lightroom ensures it remains compatible with the latest versions of operating systems like Windows or macOS, as well as any third-party plugins you might use. If you don’t update, you may run into compatibility issues, which can slow down your workflow or even prevent Lightroom from functioning.
- Ensures Lightroom works with the latest operating systems.
- Keeps plugins and external tools functioning properly.
- Prevents compatibility errors with new versions of software.
Example
If you have a Lightroom plugin that adds extra editing features, updating both Lightroom and the plugin ensures they work smoothly together.
Step-by-Step: How to Check for Patches
To keep Lightroom updated, you can obey these simple steps:
- Open Creative Cloud: Launch the Creative Cloud desktop application.
- Sign In: Enter your account details if you are not already signed in.
- Check for Updates: Go to the "Updates" tab to see if a new download or patch is available.
- Install the Patch: If an update is available, click "Update" to start the installation.
- Restart Lightroom: After the patch is installed, restart Lightroom to apply the changes.
By regularly updating Lightroom, you can avoid issues that could disrupt your workflow and always have acquire to the latest tools and details. This simple habit can save you time and effort in the long run. Additionally, consider reviewing adobe photoshop preferences to optimize your editing environment for maximum efficiency.
How to Patch Adobe Lightroom on Windows
Patching Adobe Lightroom on Windows is a simple process that ensures your software is running on the most stable version. Patches fix bugs, improve performance, and introduce new feature. Keeping Lightroom updated means fewer crashes, smoother performance, and acquire to new editing tools in lightroom. Here’s how to patch Lightroom on Windows step by step.
1. Check for Available Updates
Before you patch Lightroom, make sure you’re using the most recent version. Adobe regularly releases updates to fix common issues and add new functionalities.
- Open the Creative Cloud App: If you have this app installed, launch it. You can find this in your taskbar or start menu.
- Sign In: Use your Adobe account to login if you aren't already logged in.
- Check the Updates Tab: In the installed app, go to the “Updates” section. This is where you’ll see any available updates for your software.
2. Download and Install the Patch
Once you’ve found an available patch, you need to download and install it. This will ensure you are running the latest version of Lightroom.
- Click Update: After locating the available patch, click "Update." The download will start automatically.
- Installation Process: Once the downloaded file is complete, Lightroom will install the update. You don’t need to do anything else but wait for the setup to finish.
- Restart Lightroom: After the update is installed, it’s important to restart Lightroom to apply the changes.
3. Troubleshooting Common Issues
Sometimes, patches don’t install correctly, or issues may arise. Here’s what to do if you face problems:
- Patch Fails to Download: Make sure your internet connection is stable. Restart the Creative Cloud app and try again.
- Patching Freezes: If Lightroom freezes during the patch, force-close it, restart your computer, and start the patching process again.
- Compatibility Issues: Check that your system meets the minimum requirements for the latest Lightroom version.
4. Benefits of Keeping Lightroom Patched on Windows
Keeping your Lightroom patched has many benefits:
- Improved Performance: The latest patch often fixes slowdowns and enhances speed. This allows you to edit photos in lightroom more efficiently, especially when working with large photo libraries.
- Access to New Features: Patching gives you immediate access to any new tools or details Adobe has released.
- Security Enhancements: Updates also include security patches that protect your data from vulnerabilities.
5. Tips for a Smooth Update
Here are some tips to ensure your Lightroom patch goes smoothly:
- Ensure a Stable Internet Connection: A stable connection is essential to complete the download without interruptions.
- Back Up Your Work: Always back up your Lightroom projects before installing an update, just in case something goes wrong.
- Have Patience: Depending on your internet speed, some updates may take a while to download and install. Stay patient for the best results.
By following these simple steps, you’ll keep your Adobe Lightroom running smoothly and ensure you’re always using the latest feature. Regularly checking for updates will also help you avoid any performance issues and keep your workflow efficient.
How to Patch Adobe Lightroom on Mac
Patching Adobe Lightroom on a Mac is an easy process that ensures your software is running on the most stable and up-to-date version. A patch can fix bugs, improve performance, and introduce new features. It’s essential to patch Lightroom regularly to avoid any issues and enjoy a smooth editing experience. Let’s break down the step-by-step process.
1. Check for Available Updates
The first step to patching Lightroom is to check for updates. Adobe releases patches regularly to fix errors and improve functionality.
- Open Creative Cloud: Launch this app from your Applications folder or the menu bar.
- Login: Make sure you're signed in with your Adobe account to see available updates.
- Check for Updates: In the launched app, click the “Updates” tab. If a new patch for Lightroom is available, it will show up here.
Note: If you don’t see any available updates, this could mean you’re already using the most recent version of Lightroom.
2. Download and Install the Patch
Once you’ve found an available patch, you can proceed to install it.
- Click Update: Select the “Update” button next to Lightroom to begin the patching process.
- Download: Creative Cloud will download the patch automatically.
- Install: After the download finishes, the patch will be installed. Wait for the installation to complete, and avoid running other programs during this time.
Example: If you’re editing images in Lightroom, and find it difficult to remove objects from your images due to software glitches, a patch may help resolve these issues by enhancing the software’s performance and stability.
3. Restart Lightroom
Once the patch is installed, it’s important to restart Lightroom so that the changes take effect.
- Close Lightroom: Make sure to save any open projects and then close Lightroom.
- Reopen Lightroom: Once you reopen it, the patch will have been applied, and you should notice improved performance.
4. Troubleshooting Common Issues on Mac
Sometimes, things can go wrong during the patching process. Here’s how to troubleshoot common issues:
- Patch Fails to Download: If the patch doesn’t download, restart Creative Cloud and try again. Make sure your internet connection is stable.
- Compatibility Issues: Make sure your Mac is running the latest operating system compatible with Lightroom. This will prevent crashes after patching.
- Patching Stops Halfway: If the patch stops during setup, restart your Mac and try again.
Example: If you’re using an older Mac model and Lightroom isn’t performing well after a patch, check Adobe’s community guidelines to ensure your system meets the requirements.
5. Benefits of Patching Lightroom on Mac
There are many benefits to keeping Lightroom patched on your Mac:
- Improved Speed: Patches often improve the speed of Lightroom, especially when handling large files or multiple photos.
- New Features: Adobe introduces new tools through patches, giving you more editing options.
- Better Security: Regular updates help keep your data safe by patching vulnerabilities.
Note: If you have any related conversations about patches or updates, Adobe’s community is a great resource for getting the correct answer or finding solutions to any questions you may have.
6. Steps to Ensure Smooth Updates
Here are a few tips to make sure your patching process goes smoothly:
- Check for System Compatibility: Before installing a patch, check that your Mac is running a compatible macOS version.
- Back Up Your Project: Always back up your work before patching Lightroom. This prevents any loss of data if something goes wrong.
- Have Patience: Some patches may take time to install, especially if they are large. Be patient and let the process complete fully.
By regularly patching Adobe Lightroom on your Mac, you’ll enjoy a smoother, more efficient photo editing experience. Always check for updates to stay on top of the latest tools and details!
Troubleshooting Common Issues When Patching Adobe Lightroom
Patching Adobe Lightroom is usually easy, but sometimes things go wrong. If you run into problems, don’t worry! Below are some common issues and how to fix them, so your patching process goes smoothly.
1. Patch Fails to Download
Sometimes, the download can get stuck or fail. Here’s what to do if that happens:
- Check Your Internet: Make sure you have a stable connection.
- Restart Creative Cloud: Close this app and reopen it to restart the download.
- Free Up Space: Ensure you have enough space on your computer for the update.
- Try Again: If the download still fails, restart your computer and try again.
2. Patching Stops Midway
It’s frustrating when the patch stops halfway through. Follow these steps to fix it:
- Restart the Installation: Close all programs, then start the patch process again.
- Clear Cache: Go to your system settings and clear any unnecessary files.
- Disable Other Programs: Other apps might be slowing down the patch. Close them before restarting the patch.
3. Lightroom Crashes After Patch
Sometimes, after patching, Lightroom might crash or behave oddly. Here’s how to fix this:
- Update Your Operating System: Make sure your macOS or Windows is fully updated.
- Clear Cache in Lightroom: Go to Lightroom’s preferences and clear the cache.
- Reinstall the Patch: Uninstall and reinstall the patch if crashes continue.
4. Patching Not Available
Sometimes, you can’t find the patch in Creative Cloud. Here’s what to do:
- Check for System Compatibility: Ensure your computer meets the requirements for the latest update.
- Log Out and Log In: Try signing out of your account and then sign back in.
- Manual Update: If the automatic patch is not working, you can manually download it from Adobe’s website.
Note: Always follow Adobe’s community guidelines to avoid breaking the software during manual updates.
5. Plugin or Preset Issues After Patching
Patching may sometimes cause problems with your plugins or presets. Here’s how to fix it:
- Reinstall the Plugins: Go to your plugin manager and reinstall any missing or broken plugins.
- Update the Plugins: Some plugins may need to be updated to work with the new Lightroom version.
- Restore Presets: If presets aren’t working, try restoring them from a backup.To ensure compatibility, it’s essential to install lightroom presets that are designed for your current version.
Example: If a Lightroom plugin stops working after the patch, contact the plugin developer for an updated version.
6. Tips for Avoiding Patching Issues
To avoid patching problems in the future, follow these simple tips:
- Backup Your Files: Always back up your images before patching, just in case.
- Check for Compatibility: Make sure your system meets the minimum requirements before installing a patch.
- Keep Your Computer Updated: Ensure both your operating system and Lightroom are on the updated version.
By following these steps, you’ll be ready to patch Lightroom without running into major problems. If any issues arise, stay calm, follow these solutions, and you’ll be back to editing in no time.
Manual vs. Automatic Patching in Adobe Lightroom
Feature | Manual Patching | Automatic Patching |
---|---|---|
Process | 
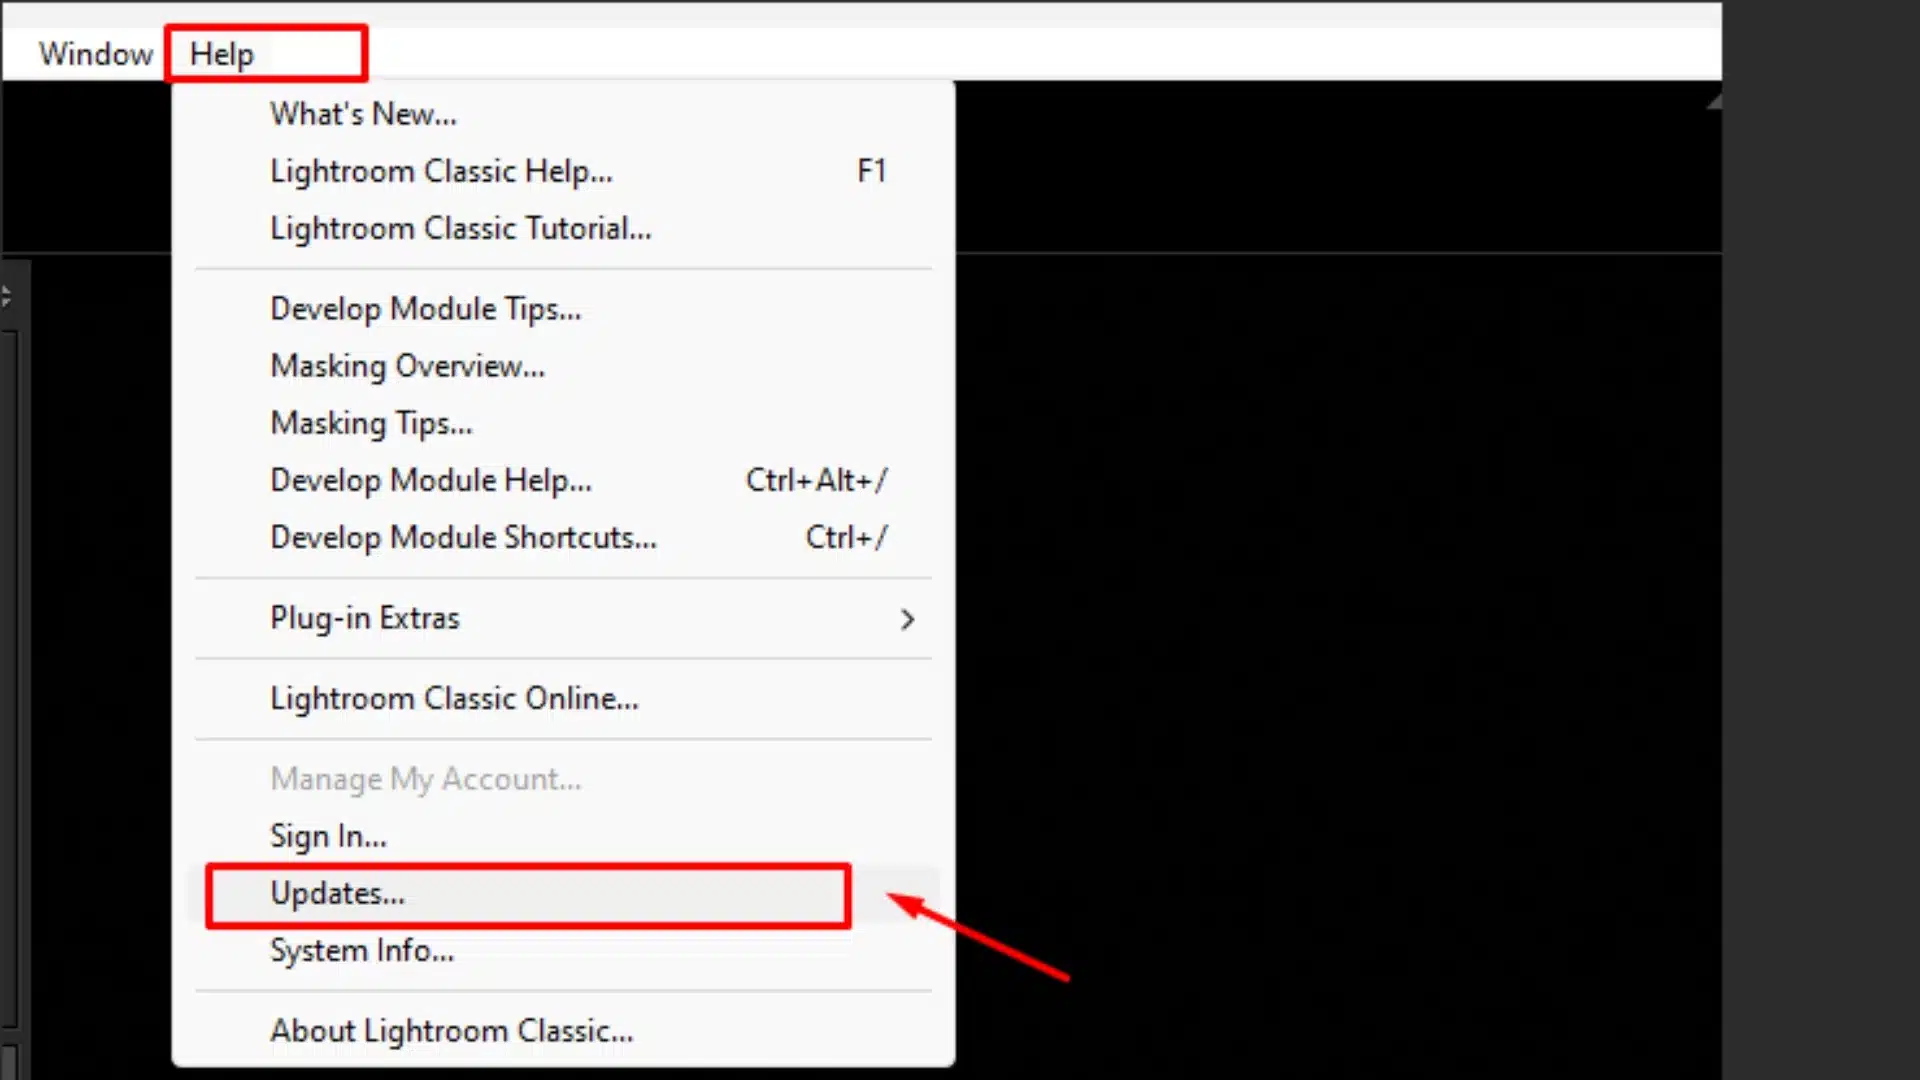
You check for updates yourself. | Updates happen on their own. |
Control | You decide when to patch. | Lightroom updates without asking. |
Time | Takes more time because you do it manually. | Saves time as updates are automatic. |
Flexibility | You can skip updates if you want. | Always uses the latest version. |
Risks | You might forget to patch. | No risk of missing important updates. |
Customization | You can wait to update until you’re ready. | No control over when updates happen. |
Frequently Asked Questions : How to Patch Adobe Lightroom
How do I patch in Lightroom?
To patch Adobe Lightroom, open the application. Check for available updates under the “Updates” tab. If there is a patch, click “Update.” This will automatically download and install the latest patch. After the patch is installed, restart Lightroom.
How do I fix imperfections in Lightroom?
Can you fix a scratch on a photo?
Yes, you can fix scratches on a photo in Lightroom. Use the Spot Removal tool to heal the scratched area. Zoom in on the scratch, click on it with the tool, and Lightroom will blend the scratch with surrounding areas for a smooth finish.
How do I patch in Adobe?
To patch any Adobe software, including Lightroom or update photoshop, open the application. Check for updates under the “Updates” tab. Click “Update” if a patch is available, and the app will automatically install it. Restart the software after completing it.
How to fix spots in Lightroom?
To fix spots on your photo, use the Spot Removal tool. Select the tool, click on the spot, and Lightroom will replace it with a matching part of the photo. Adjust the size of the tool to match the spot for a cleaner look.
Conclusion : How to Patch Adobe Lightroom
Keeping Adobe Lightroom patched has saved me from many frustrating moments. Once, I ignored an update, and Lightroom started crashing during a big project. After I patched it, the issue was fixed, and my work became smoother. Regular updates make a huge difference.
If you have any questions about improving your skills, I encourage you to join our Photoshop Course and Lightroom Course to get started!
If “How to Patch Adobe Lightroom” article has helped you, then Like and Share it with your friends
Have a nice photoshoot!
Read more about: Photo Editing with Lightroom and Photoshop
Course
Light Effect Photoshop
Lightroom Course 2024
Adobe Photoshop Course
Photo Editing Course
Get the latest version of Photoshop & Lightroom