How to Make a GIF in Photoshop: A Step-by-Step Guide
How to Make a GIF in Photoshop: A Step-by-Step Guide
Creating captivating animations can seem daunting, but learning how to make a GIF in Photoshop can open up a world of creative possibilities.
Attention to detail is fundamental, and I’ll guide you through each step, ensuring you feel confident and inspired.
Imagine the ability to transform your ideas into dynamic visuals that engage viewers and drive interest in your content.
Whether you’re a social media enthusiast or a digital artist, understanding this process can elevate your projects to new heights.
I’ll provide all the information you need to take action and start making eye-catching GIFs today.
Table of Contents
How to Make a GIF in Photoshop
Making an animated GIF in Photoshop is a fun way to bring your ideas to life. In this guide, we’ll walk you through the steps to create a GIF using the Graphics Interchange Format, ensuring your animations look great and are ready to share.
Let’s dive in and see how to create a GIF that stands out.
Step-by-Step Guide to Creating a GIF in Photoshop
Creating a GIF in Photoshop is an exciting process that involves several steps. In this section, we’ll start by preparing your images to set a strong foundation for your animated GIF.
1. Prepare Your Images
First, gather the images or video frames you’ll use. Ensure they align with your creative vision. Remember, the final GIF size will affect load times online.
2. Import Files into Photoshop
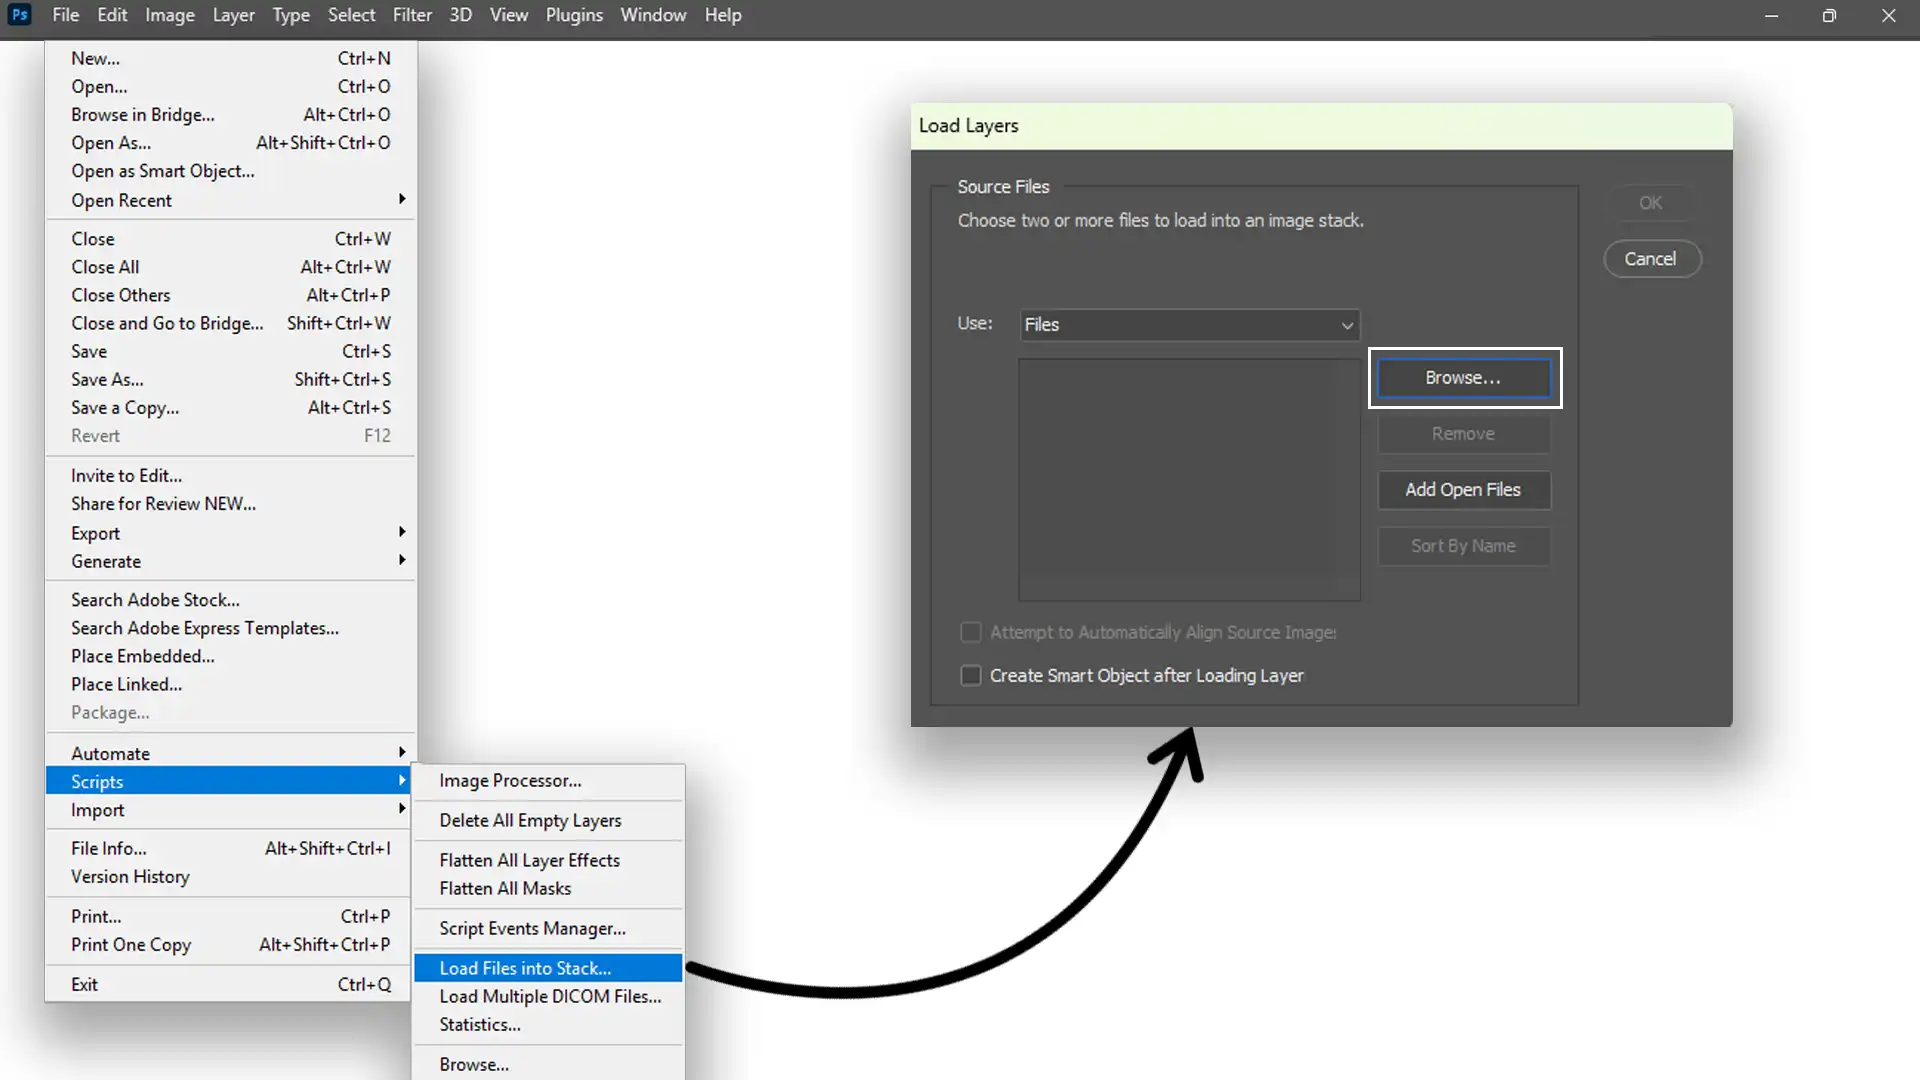
Open Adobe Photoshop and navigate to the File menu at the top of the screen. From there, select “Script” and then choose “Load Files into Stack” from the dropdown menu.
Finally, choose your desired images, either individually or from a video file.
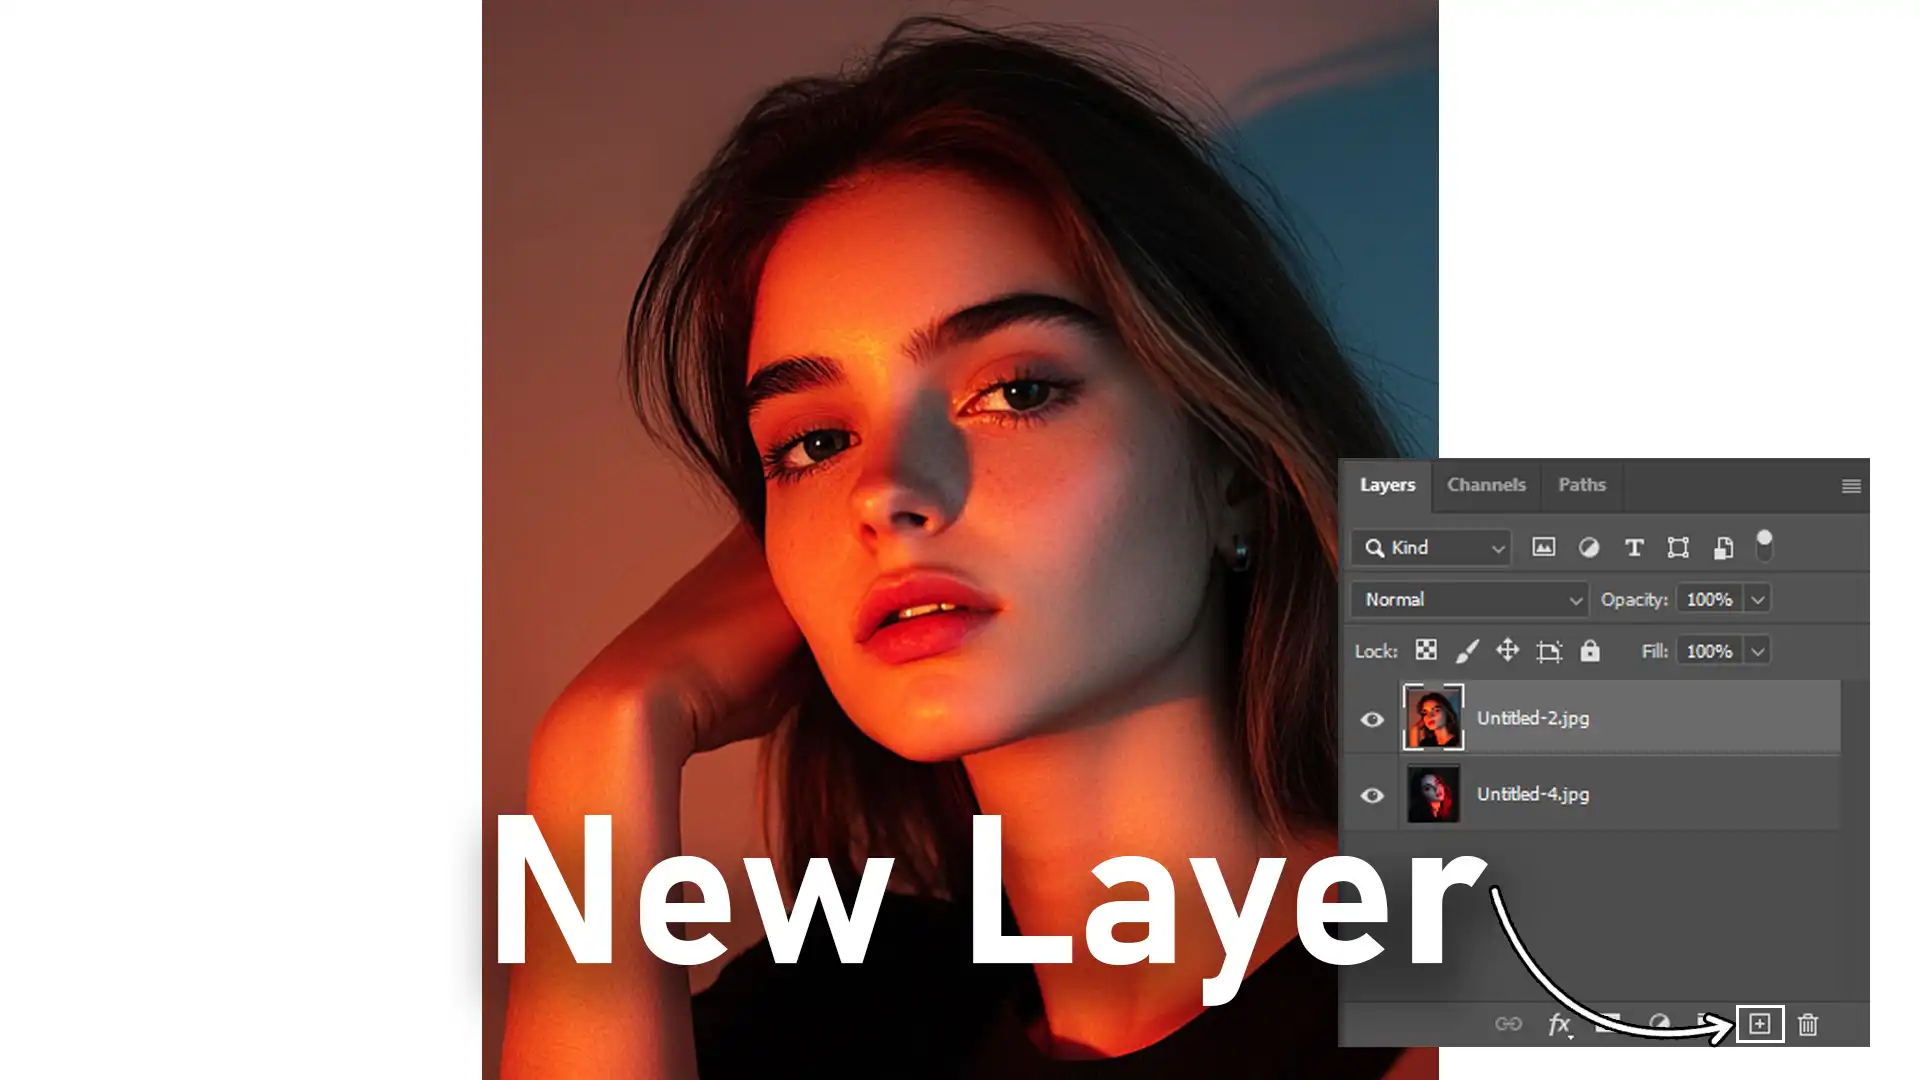
3. Organize in Layers
Each image should occupy its own layer. This ensures you can adjust each image precisely. Create a new layer if needed.
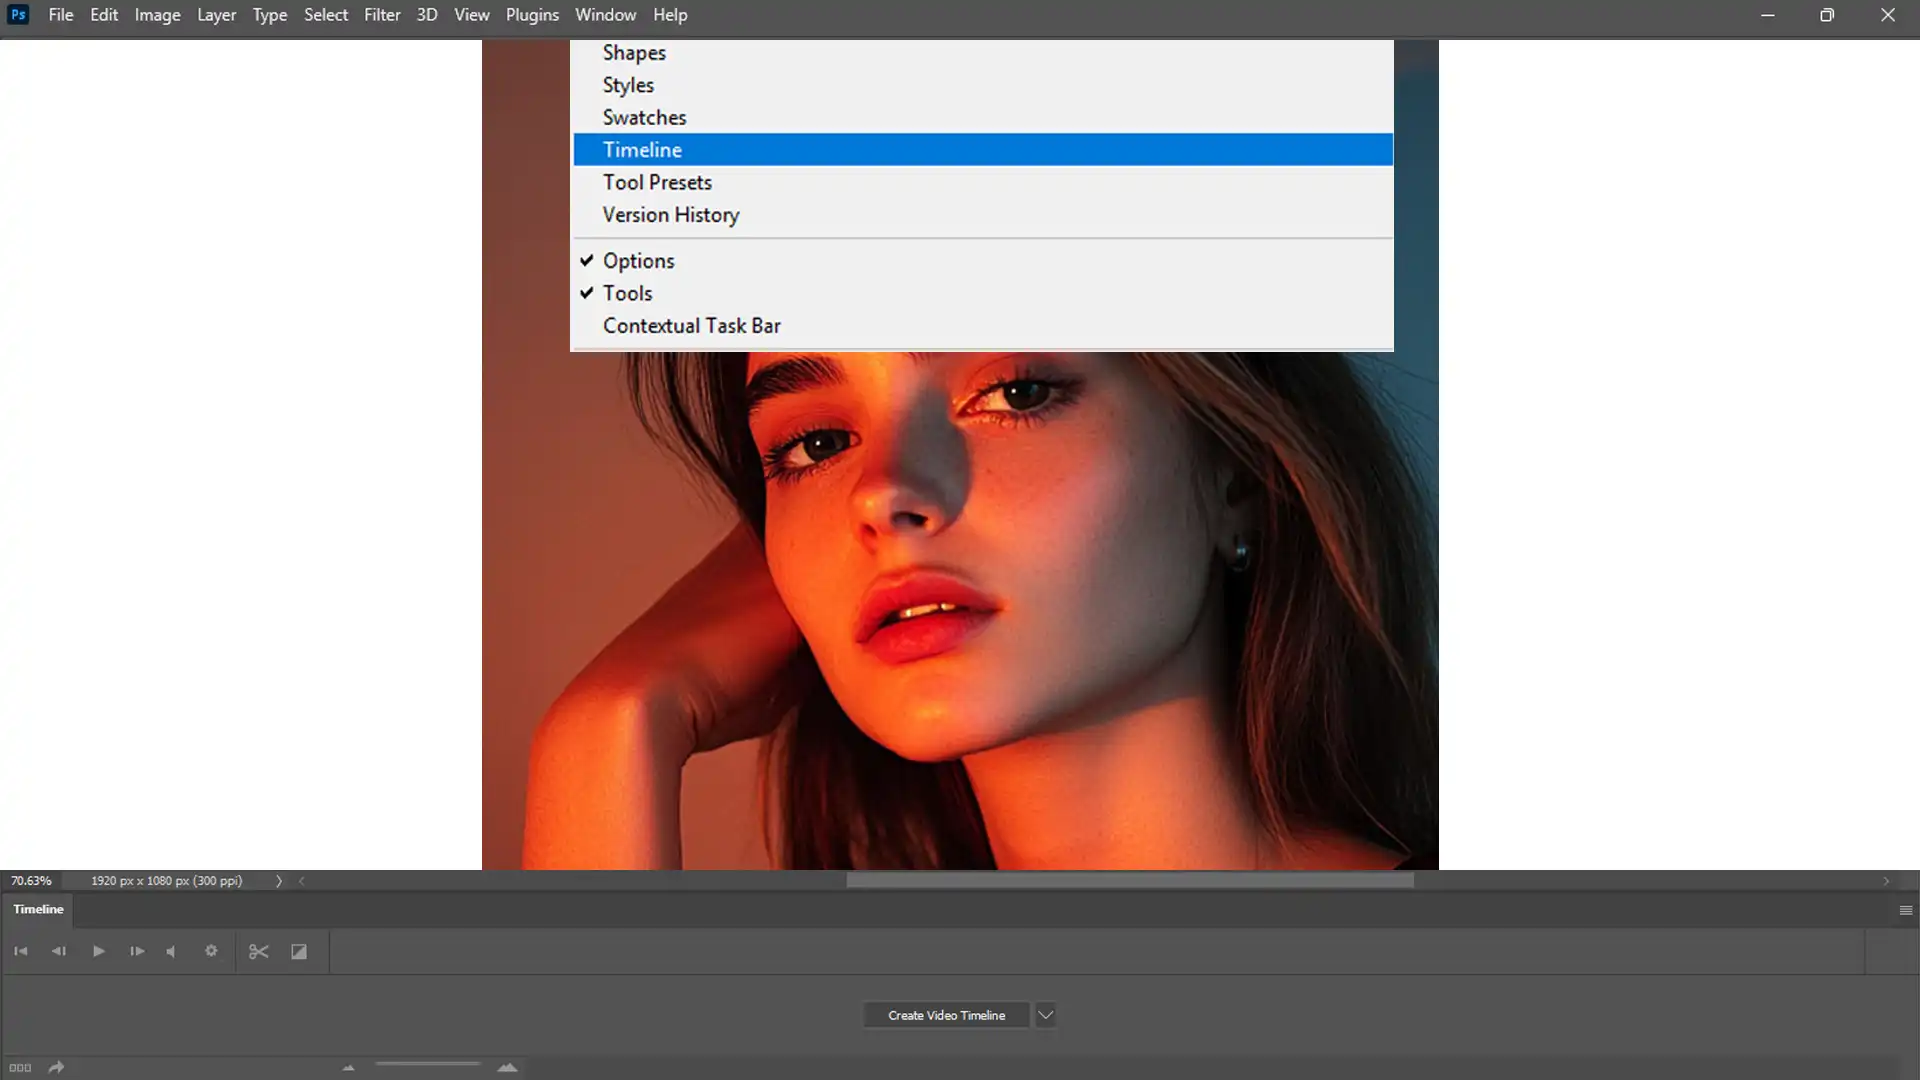
4. Open the Timeline Window
Under “Window” in the top menu, select “Timeline“. You’ll see the timeline window appear, which is important for creating animated GIFs.
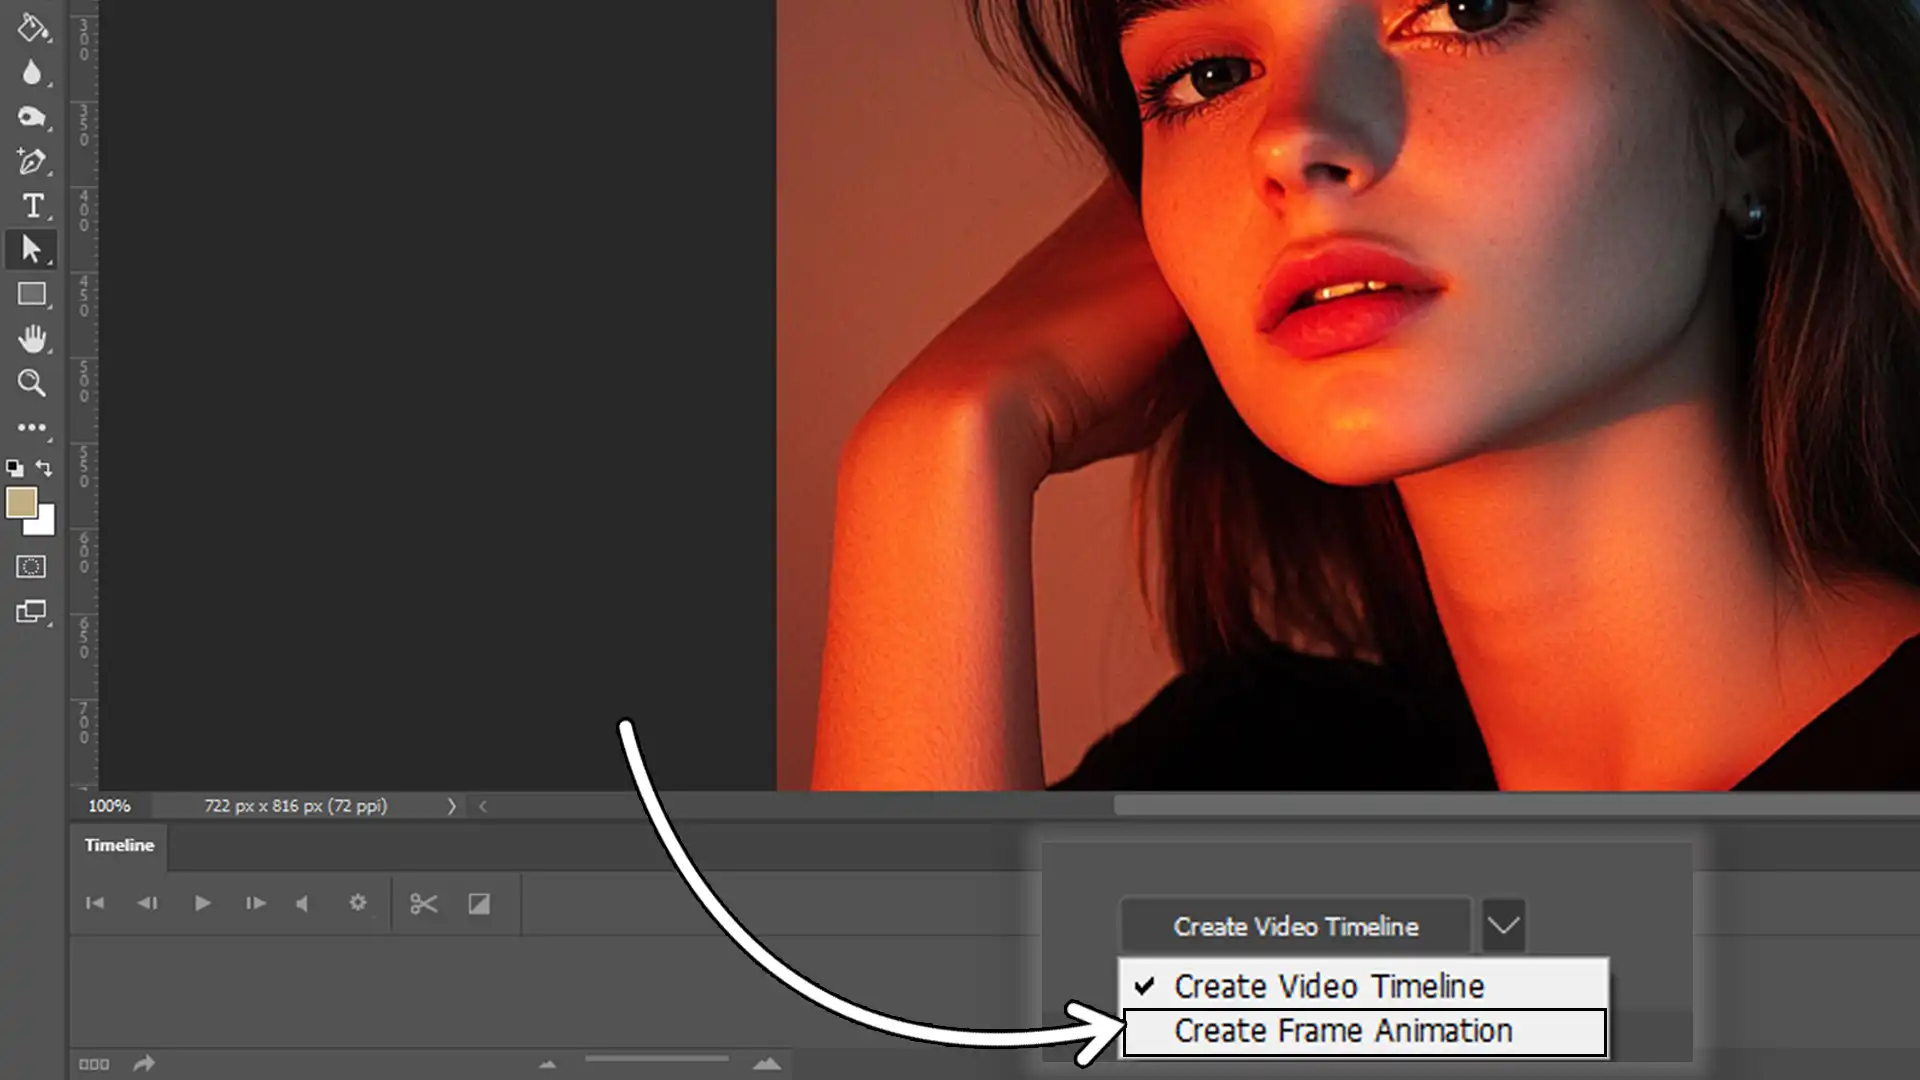
5. Select Create Frame Animation
In the timeline window, select “Create Frame Animation“. Here, you’ll arrange each frame accurately to ensure a smooth transition.
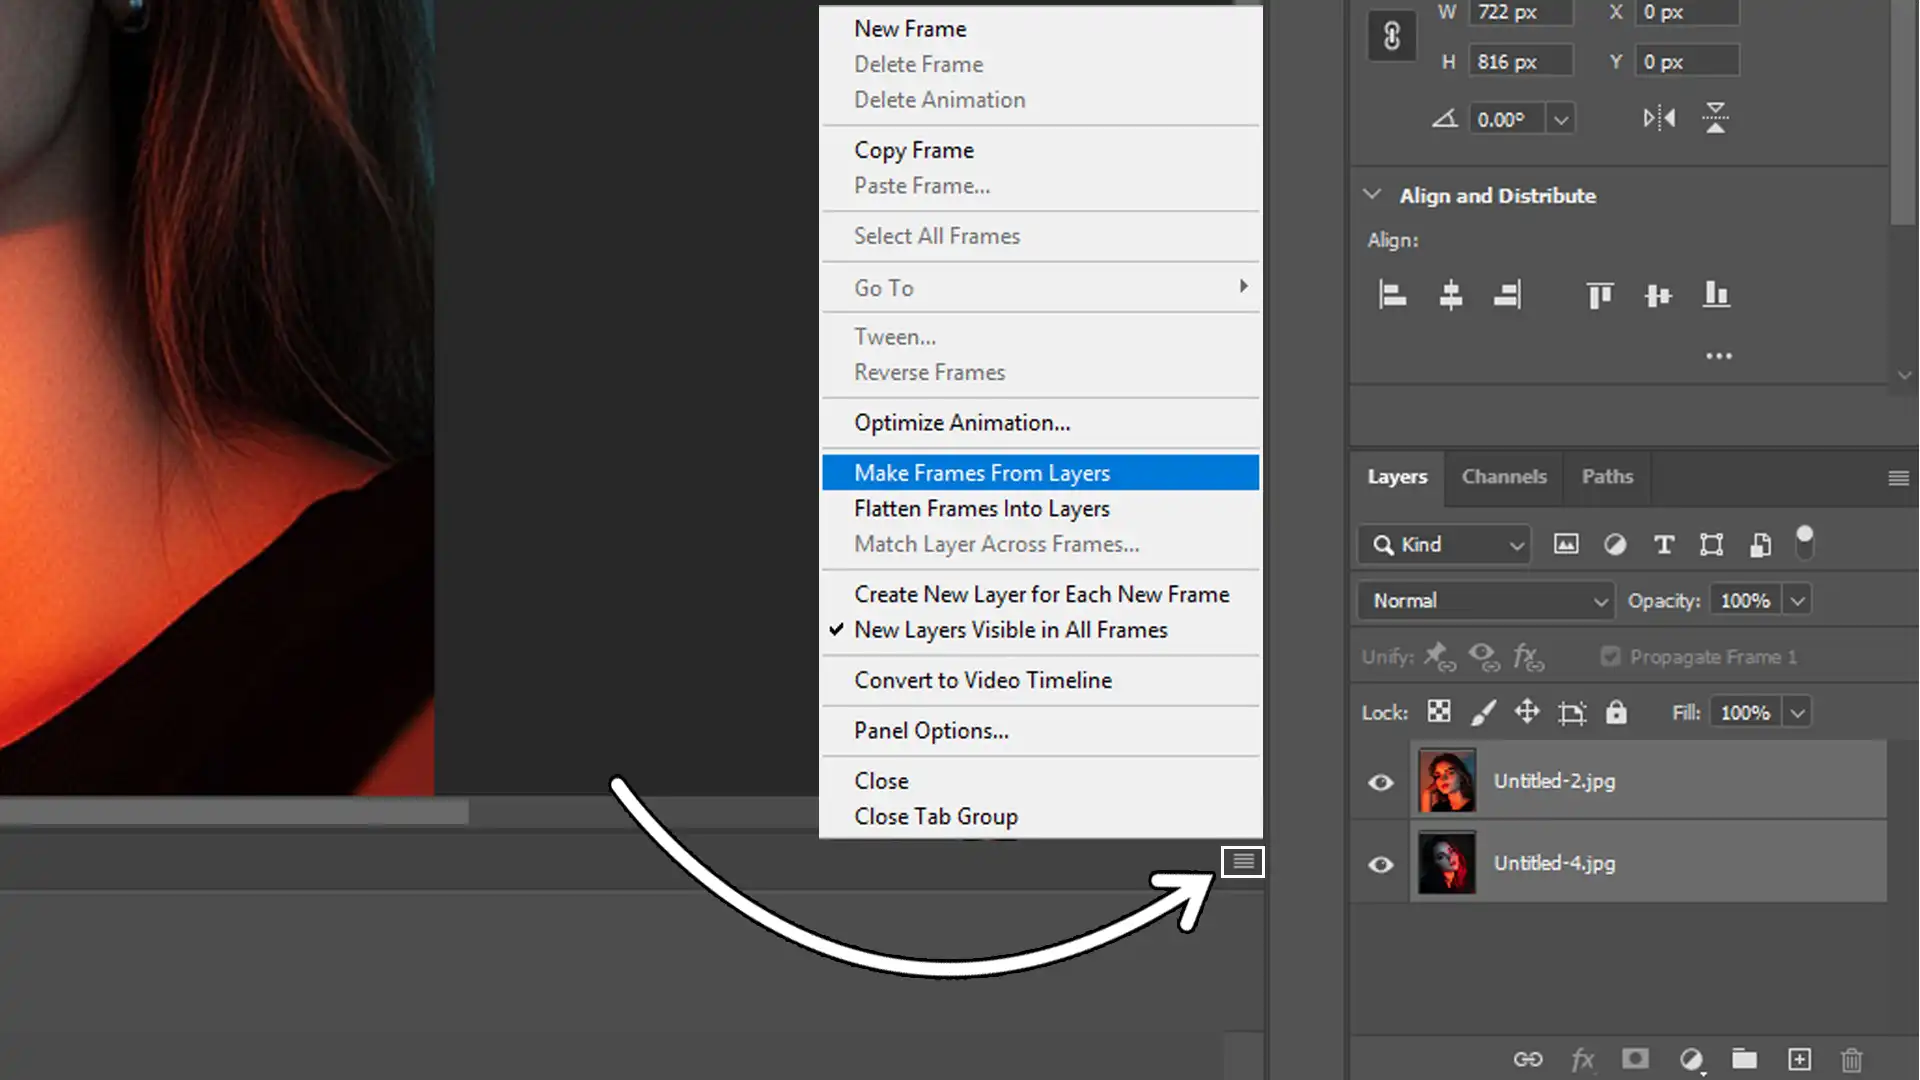
If your images aren’t yet arranged, make frames from layers by clicking “make frames from layers“.
6. Adjust Animation Frames
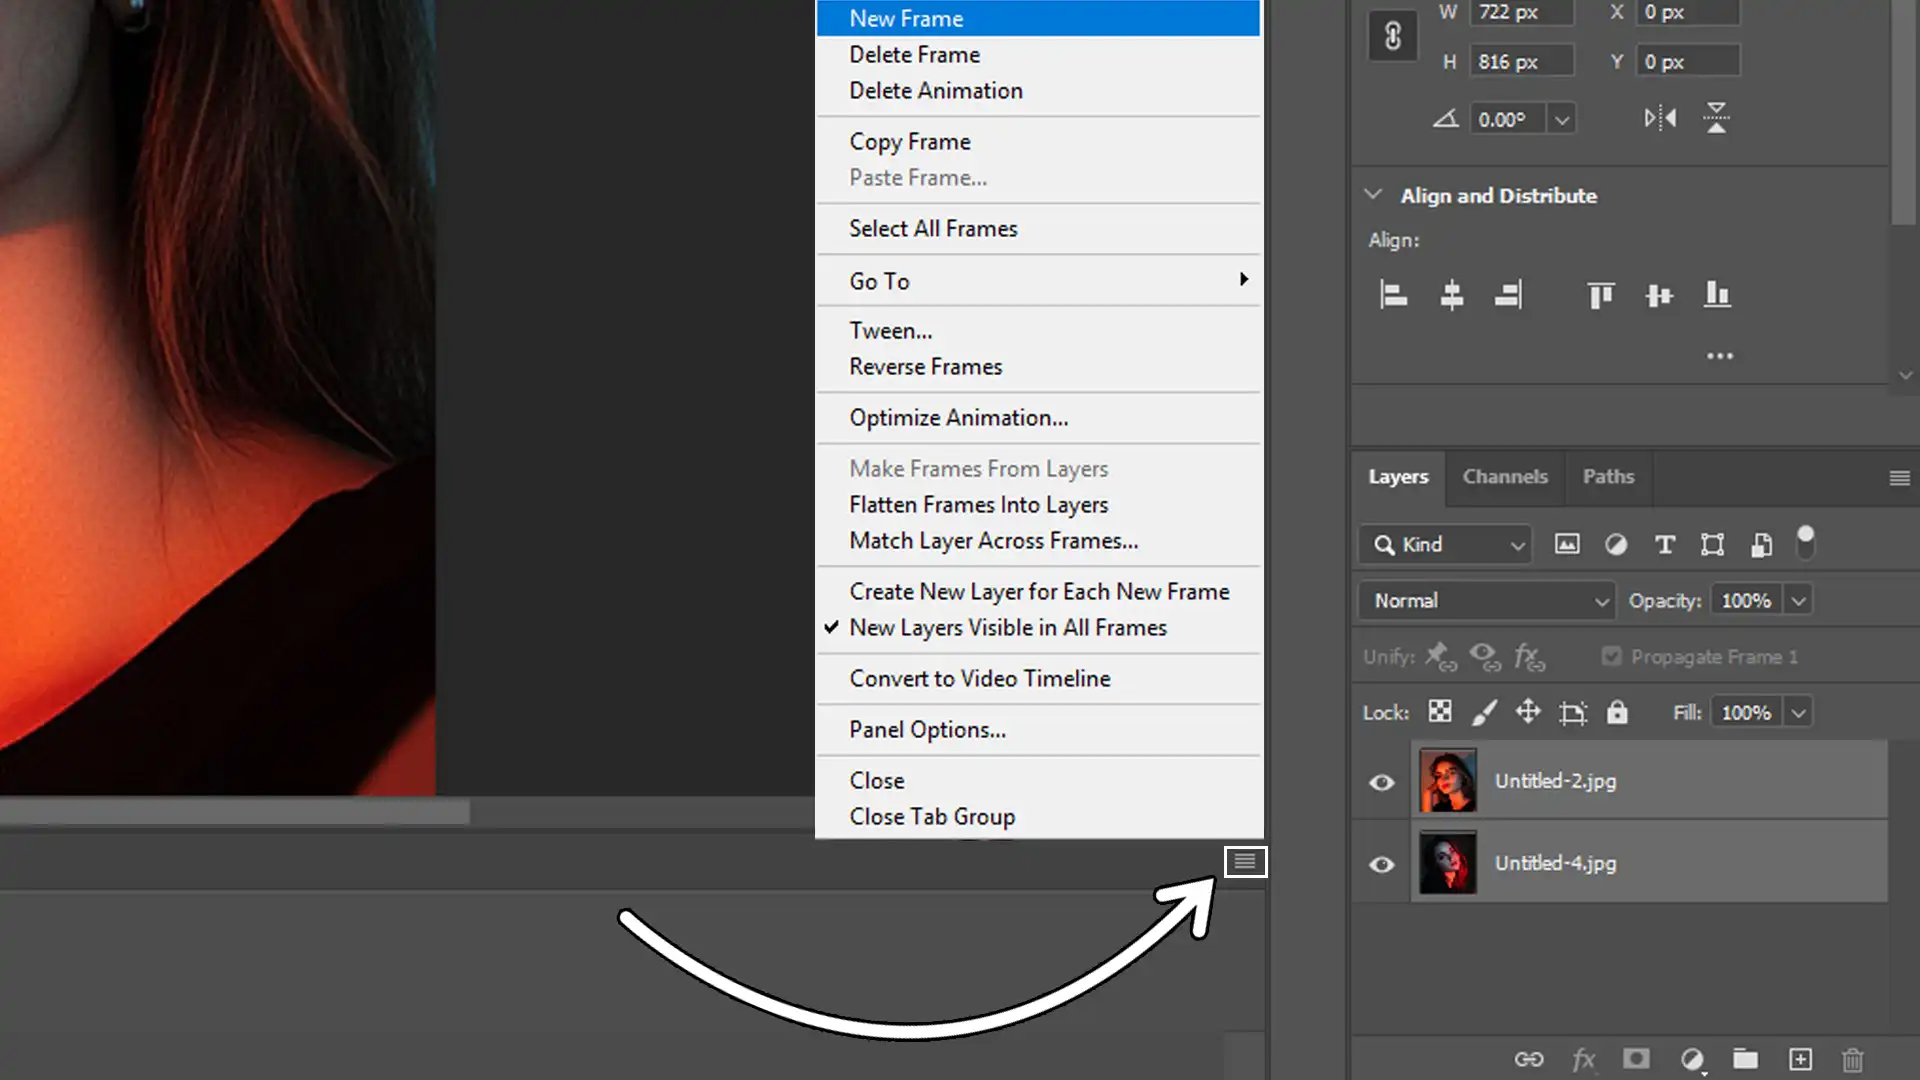
Play with the arrangement using the “new frame” option. Each shift or edit should reflect your overall vision for the GIF in Photoshop. The animated GIF changes based on how you manipulate all the frames.
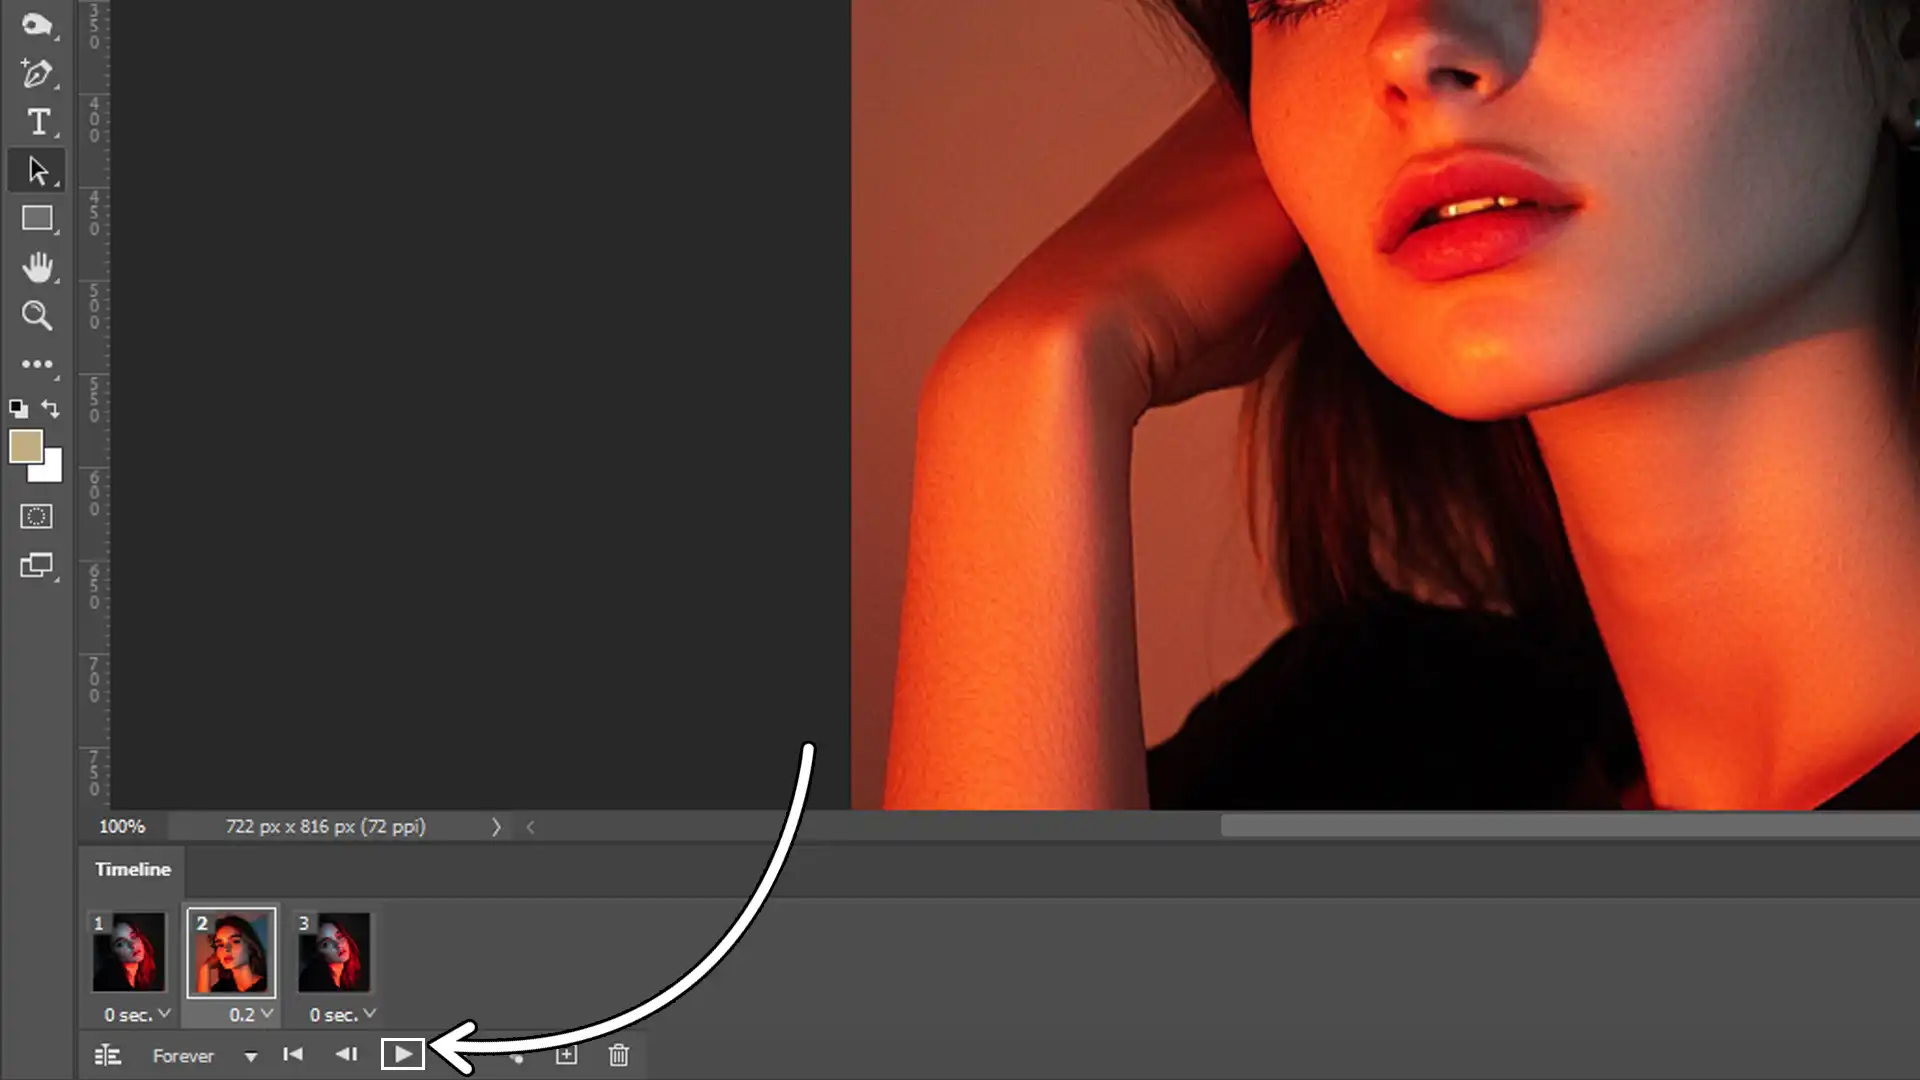
7. Playback and Tweaks
Use the play button to preview the animation. Make adjustments as necessary to match your expectations. Spending time here will guarantee that the final output is professional and engaging.
8. Save Your Creation
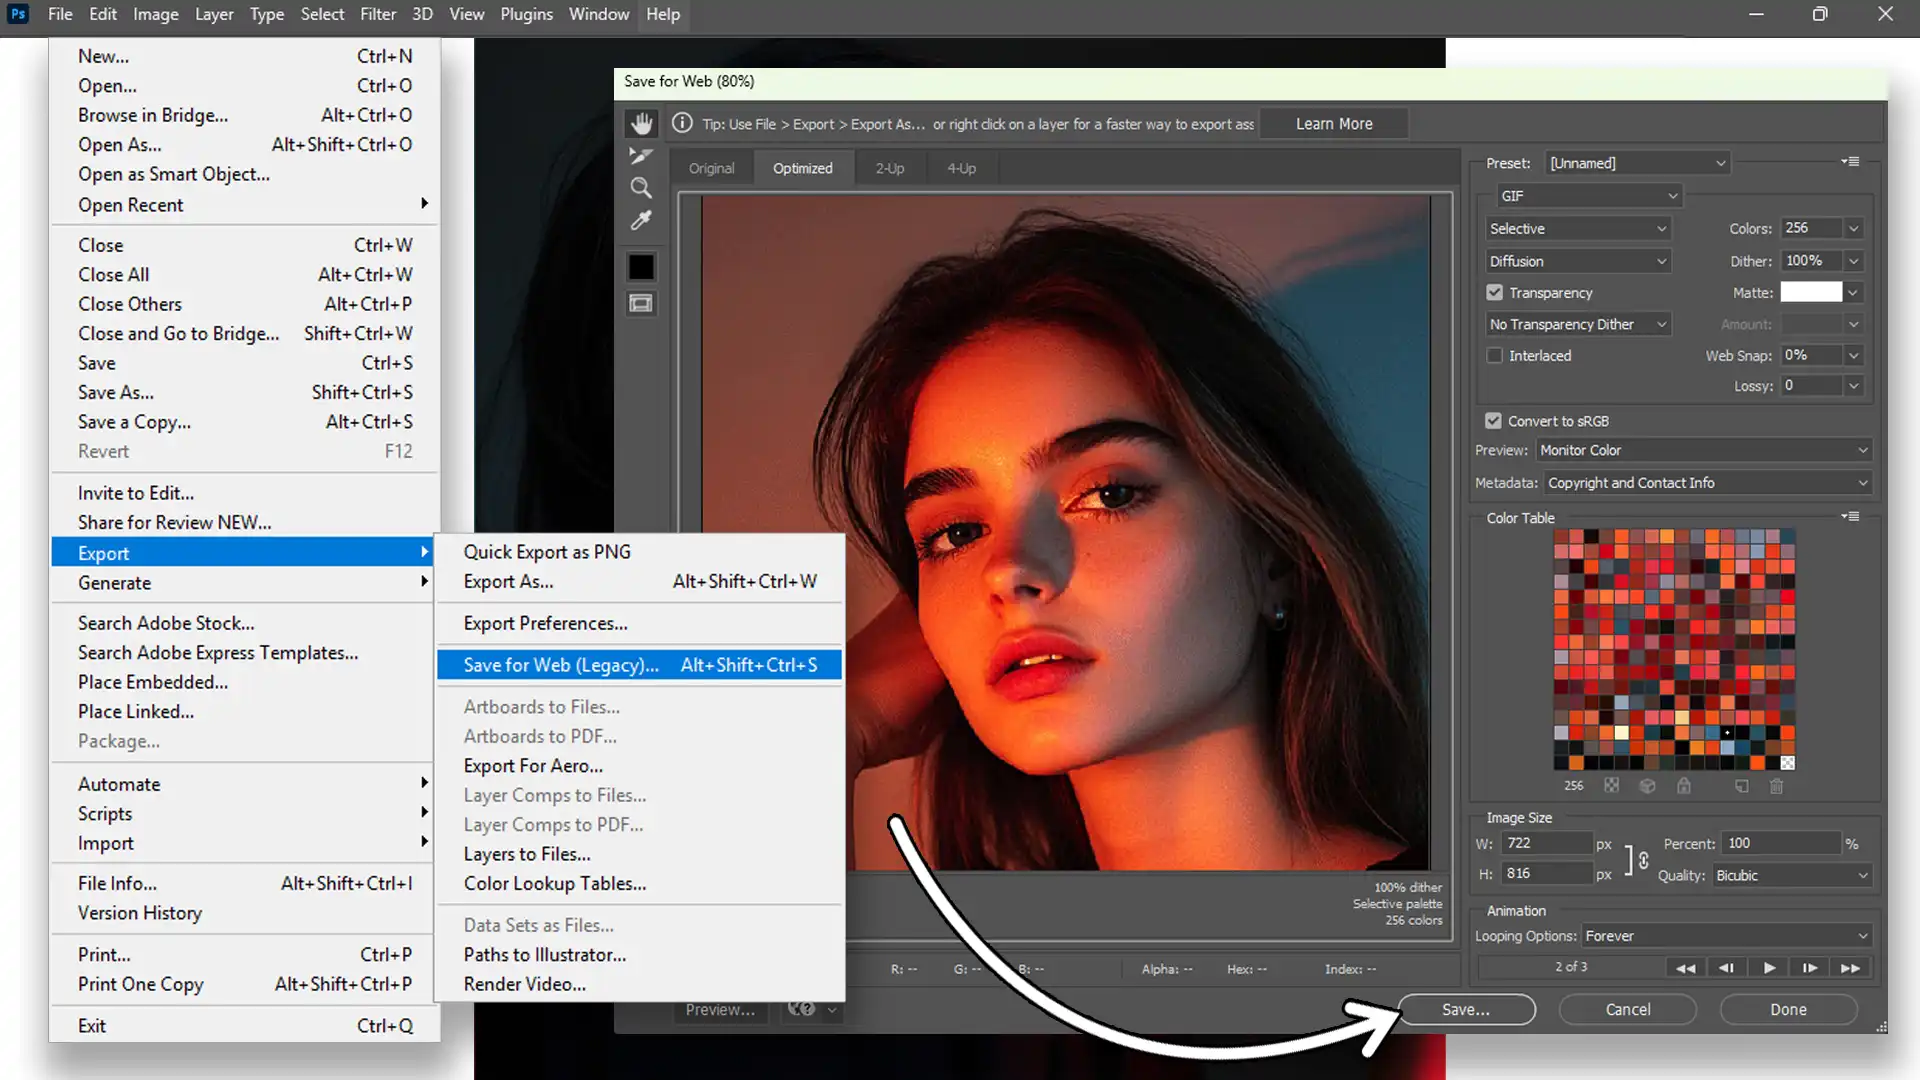
After making final adjustments, remember to save your work. Go to the File menu, select “Export,” then click “Save for Web Legacy,” and make sure to choose the GIF format. Once you are satisfied, click save.
Pro Tip: Keep your image sizesmall to ensure speedy loading. Small images improve the user experience, making your creation delightful.
If you need to adjust the layout, consider using the frame tool in Photoshop for precise placements.
Additionally, refer to the Photoshop shape tool guide for tips on creating interesting shapes and effects that can enhance your GIF.
Also, consider using the content-aware fill in Photoshop to seamlessly remove any unwanted elements from your frames, ensuring your GIF looks polished and professional.
How to Create an Animated GIF in Photoshop
Creating animated GIFs can be a fun way to bring your designs to life. In this section, we’ll explore the process of building animations, starting with understanding layered animation to make your GIFs smooth and engaging.
Understanding Frame Animation
This animation is the heart of a GIF. It involves a sequence of images or frames that change rapidly to give the illusion of motion. In essence, each frame is a still image. When you place them one after another quickly, it creates motion.
Start by opening the timeline window in Adobe Photoshop. You’ll also spot an option saying, “Make Frames From Layers.”This lets you use each layer as individual frames in your GIF.
If you’re new to this, consider checking out some learn Photoshop resources to get familiar with the basics.
Working with Animation Frames
Let’s get into the basics of making your own animated artwork. Here’s how you can create a GIF using Photoshop:
Add a new layer for each change you want in the GIF.
Organize these layers in the right order because each layer will become a new frame.
Select “Create Frame Animation” from the timeline window.
Click “Convert to Frame Animation,” and you are almost there.
Adjusting Frame Timing
The timing of your frames determines how fast or slow your GIF moves. Adjusting this is not rocket science.
Here’s how you do it:
Select an individual frame in the timeline window.
Set the duration by clicking on the number below the frame.
Choose between options like 0.1 seconds, 0.5 seconds, and so on.
Smooth transitions result in engaging GIFs. If it’s too fast, you’ll confuse people. Too slow, and they’ll lose interest. Find that sweet spot where your creation dances gracefully.
Pro Tip: If you’re ever in a hurry, press “Alt+Shift+R” to duplicate frames quickly. To increase efficiency, familiarize yourself with otherPhotoshop shortcuts to speed up your workflow.
Advanced GIF Techniques
Advanced GIF techniques can take your animations to the next level. In this section, we’ll explore how to enhance your GIFs by adding text and effects to make them more dynamic and engaging.
Adding Text and Effects
Want to make your GIFs more exciting? Let’s add some text and effects. Text gets your message across, and effects make it stand out.
Steps to Add Text and Effects
To enhance your GIF and make it more engaging, follow these steps to add text and effects that complement your animation. Here’s what to do:
Begin with a new layer.
Use the Text tool to add words that fit the scene.
Navigate to “Blending Options" to apply effects like Drop Shadow and Inner Glow.
Using Layer Masks
Layer masks are a simple way to control which parts of a layer are visible or hidden. In this section, we’ll explore how to use them to enhance your edits.
How to Use Layer Masks
To effectively use layer masks, follow these simple steps to control the visibility of your layers and refine your edits.
Start by creating a new layer above the target layer in the Layers panel, ensuring it's a separate layer for your adjustments.
Use a black brush to hide and white to reveal.
Play with opacity for subtle changes, achieving a neat, professional look.
Optimizing GIF Quality: How to Create an Animated GIF in Photoshop
Quality matters. AGIF file determines how polished your final creation looks. The balance of high-quality files without unstable file sizes here is important.
Tips for Optimizing GIF Quality
To enhance your GIF’s quality, consider adjusting the GIF colors and following these tips for a smoother and more efficient result. Here are some quick actions to take:
Use fewer colors and smaller dimensions.
Save with “Save for Web" for smooth, efficient GIFs.
When creating GIFs, you may run into a few common problems. In this section, we’ll cover some quick fixes, starting with how to handle large file sizes.
The following table highlights fundamental aspects of troubleshooting GIF problems, offering practical solutions to help you create smoother and more engaging animations.
Aspect
Overview
Dealing with Large File Sizes
Learn how to reduce GIF file sizes by minimizing colors, resizing dimensions, and limiting frames for optimal performance.
Fixing Playback Errors
Explore simple solutions to address playback issues, including checking file formats and testing on different devices.
Reducing Colors
Minimize your color palette using Photoshop’s “Save for Web” option to create smaller GIF files.
Testing on Different Devices
Playback issues can vary across devices; testing ensures consistent performance across platforms.
Tidying Up Frames
Review and ensure your frame sequence is consistent for smooth playback.
Dealing with Large File Sizes
Large file sizes can make sharing and loading GIFs difficult. In this section, we’ll look at a few simple ways to reduce file sizes without losing quality.
Solutions
To tackle large GIF file sizes, here are a few quick adjustments you can make to keep your GIFs lighter and easier to share.
Reduce Colors: Start by minimizing your color palette. Photoshop has a dandy option for this under “Save for Web.” Fewer colors mean a smaller file. Let’s call it GIF dieting.
Resize Dimensions: Tiny dimensions equal a small file. Consider resizing your masterpiece. Smaller previews are just as joyful.
Limit Frames: Before diving headfirst into an animation that rivals a feature film, remember: short and sweet is lovely. Removing unnecessary frames does wonders.
Fixing Playback Errors
Playback errors can be frustrating, but there are simple ways to fix them. In this section, we’ll explore a few solutions to get your GIFs running smoothly again.
Solutions
Here are a few quick steps you can take to troubleshoot and fix playback issues with your GIFs. Follow these to ensure everything runs smoothly.
Check File Format: Make sure you're using the correct format. GIFs should be saved in, you guessed it GIF format. Common oversight, easy fix.
Test On Different Devices: Sometimes the issue isn't the GIF, but where it's being played. Different devices and browsers affect playback. Test it out.
Tidy Up Frames: Review your new frame sequence. Double-check for any missing links in the flow. Consistency ensures smooth playback.
Pro Tip: For those looking to refine their skills further, learning essential tools in Photoshop can be a game-changer.
How to Make a GIF in Photoshop: Exporting and Sharing Your GIF
After you’ve finished creating your GIF, it’s time to show it off. Here’s how to make sure your GIF shines and grabs attention.
Export Settings
Exporting your GIF is like getting ready for an important event it’s exciting but needs a bit of preparation. First, make sure it’s the right size and format. Photoshop makes this easy. Here’s a quick guide:
File Size: A smaller size helps your GIF load faster, no one likes waiting for a slow GIF. Resize it if needed.
Format: Use the "Save for Web" option in GIF format.
Color: Opt for “Indexed Color” mode with fewer colors if possible; it keeps the document size manageable.
These settings guarantee your creation looks impressive and loads quickly online.
Sharing on Social Media
Now that your masterpiece is ready, it’s time to share it with the world (or at least your social network). Platforms like Twitter, Instagram, and Facebook are perfect for showcasing your skills.
Know Your Platforms: Every social media platform is different. Facebook might loop your GIF, while Instagram prefers shorter loops. Be ready for these differences.
Engaging Caption: Pair your GIF with a catchy caption. Something that makes people pause their scrolling.
Timing: Post when your audience is most active.
Pro Tip: Before posting, double-check the quality. A distorted GIF can undermine all your hard work.
Review it on multiple devices because, let’s face it, a tiny phone screen tells a different story compared to your widescreen monitor.
Frequently Asked Questions
How to Create GIFs in Photoshop?
Open Photoshop and load your images by choosing File > Scripts > Load Files into Stack.
In the Timeline window, click Create Frame Animation.
Open the same menu icon on the right of the Timeline panel and choose Make Frames From Layers.
Adjust the delay time on each frame according to your preference.
To preview your GIF, click the play button in the Timeline panel.
Finally, save your GIF by selecting File > Export > Save for Web (Legacy) and choosing GIF as the format.
What Steps Are Involved in Photoshopping a Picture into a GIF?
Start by opening your image in Photoshop.
Follow the steps to convert it into layers for each frame of your GIF, as detailed in the first question.
Use the Timeline panel to turn these layers into an animation.
Adjust timing and apply any desired effects to each frame.
Save your new GIF following the instructions above.
What Is the Process to Turn an Image into a GIF?
Open your image in Photoshop and duplicate the layer as many times as you want frames in your GIF.
Edit each layer according to how you want the frames to change over time.
Create a layered animation in the Timeline, and set each layer to appear sequentially.
Adjust timing and add transitions if needed.
Export your image sequence as a GIF using the Save for Web (Legacy) option.
How Do I Make an Animated GIF?
Collect or create the images you want to include in the GIF.
Load these images into Photoshop using the Load Files into Stack script.
Convert these stacked layers into a timeline animation.
Customize the animation timing and frame order to your liking.
Use the Save for Web (Legacy) function to save your project as an animated GIF.
Mastering how to make a GIF in Photoshop has truly changed the way I create. I’ve learned so much, and it’s opened up new opportunities for my designs.
If you’re looking to improve your skills, I highly recommend checking out the Photoshop Course. It helped me refine my techniques and understand the software better.
For those interested in photography, the Lightroom course is also a fantastic resource to enhance your photo editing skills. Both courses provide valuable insights and tips that are easy to follow.
Using these tools has boosted my confidence in digital design, making it easier for me to express my ideas in creative ways.
Whether you’re just starting out or want to sharpen your skills, these courses will guide you on your journey to success. Plus, don’t forget to explore Adobe Photoshop and Adobe Lightroom to unlock even more possibilities.
If this article has helped you, then Like and Share it with your friends
$2,061.00Original price was: $2,061.00.$1,061.00Current price is: $1,061.00. 27583
Download Your Free Guide Now!
Discover the secrets of photography with our printable guide! Master essential techniques like aperture, shutter speed, and ISO to create stunning images. Get your free printable PDF now and start turning your snapshots into masterpieces!