
Are you wondering how to import brushes into Lightroom to enhance your editing workflow? You’re in the right place.
Importing brushes can significantly elevate your photo editing game, giving you more creative control and precision. In this article, I’ll guide you through the simple steps to import brushes into Lightroom effortlessly.
Whether you’re a seasoned photographer or just starting out, this guide will help you make the most of your editing tools. Let’s dive in and unlock the full potential of your Lightroom software!
Table of Contents
How to Import Brushes into Lightroom
Importing brushes into Lightroom is a simple way to enhance your editing toolkit. Let’s start by getting familiar with how Lightroom brushes work.
Understanding Lightroom Brushes
Lightroom brushes help make photo editing easier. They allow precise adjustments on specific parts of an image. Using brushes in Lightroom can enhance details like shadows and highlights efficiently.
To help you get the most out of Lightroom brushes, here’s a quick overview of the key steps and tips for importing and using them effectively.
Aspect | Overview |
---|---|
Understanding Lightroom Brushes | Lightroom brushes allow precise adjustments to specific parts of an image, enhancing details like shadows and highlights. |
Downloading Lightroom Brushes | Find and download the brushes you need from websites offering free or paid brushes. They usually come in zipped folders. |
Locating the Lightroom Presets Folder | Open Lightroom Classic, go to Preferences, and click on “Show Lightroom Presets Folder” to locate where presets are stored. |
Importing Brushes into Lightroom | Copy and paste the unzipped brush files into the Local Adjustment Presets folder and restart Lightroom to load the new brushes. |
Troubleshooting Common Issues | If brushes don’t appear, double-check the file location and file type, then restart Lightroom to ensure changes take effect. |
Organizing Brush Presets | Organize brush presets into subfolders in Lightroom CC to keep your workspace tidy and efficient. |
Downloading Lightroom Brushes
First, find the brushes you need. Many websites offer free or paid brushes. Download the brush files to your computer. They usually come in zipped folders.
Locating the Lightroom Presets Folder
Open Lightroom Classic and go to the Edit menu if you’re on Windows or the Lightroom menu if you’re on Mac.
Then select Preferences. Navigate to the Presets tab within Preferences and click on Show All Lightroom Presets. If you need to store presets later, you can always return to Preferences and click on Show All Lightroom Presets again.
Importing Brushes into Lightroom
Importing brushes into Lightroom is a quick process that can greatly enhance your editing toolkit. Follow this step-by-step guide to get started.
Step-by-Step Guide
- Locate the download Lightroom folder containing your new brush presets. Unzip the Lightroom folder if it's compressed.
- Go back to the Lightroom local adjustment presets folder you opened earlier. Look for the Local Adjustment Presets folder.
- Copy and paste the unzipped brush files into the Local Adjustment Presets folder.
- Restart Lightroom to ensure the brushes show up properly.
Troubleshooting Common Issues
If you can’t see the new brushes, double-check the file location. Ensure you placed them in the Local Adjustment Presets folder.
Another common issue might be the file type. Lightroom brushes usually come as .lrtemplate files. If the brushes still don’t appear, try to restart Lightroom to ensure the changes take effect.
Pro Tip: Keep your Lightroom CC refreshes smooth by organizing your brush presets neatly into subfolders. This way, you spend less time searching and more time editing!
For more tips on how to use essential tools in Lightroom and avoid common photo editing mistakes, check out our other articles.
Local Adjustment Presets
Local adjustment presets allow you to make targeted edits to specific areas of your photos. Let’s explore what these presets are and how they work.
What are Local Adjustment Presets?
Local adjustment presets are specific settings applied to certain parts of a photo. They help edit parts of a picture without changing the whole image. These presets can adjust things like brightness, contrast, or sharpness in targeted areas.
Creating Custom Local Adjustment Presets
Creating your own local adjustment presets can help you tailor edits to fit your unique style. Let’s walk through the steps to create them.
Steps to Create Custom Presets
- Open Lightroom.
- Choose any image and make your adjustments using the Lightroom adjustment brushes or other tools.
- Once happy with the changes, go to the presets tab and select Create Preset.
- Give your new preset a name, and voilà ! You've created your own custom tool.
Applying Local Adjustment Presets
Using local adjustment presets can help you make targeted edits to your photos. Here’s how to apply them effectively.
How to Apply Presets
- Open Lightroom and choose an image.
- Go to the presets tab.
- Select your custom local adjustment preset.
- You'll see changes instantly on the specific parts of your image. For best results, adjust the settings as needed.
Pro Tip: Organize your local adjustment presets folder into subfolders in the develop presets folder. This keeps everything tidy and easy to manage within the develop presets section.
Understanding these steps makes editing easier. Using local adjustment presets, you can transform any image with precision and speed. Experiment and enjoy the process.
Lightroom Presets
Lightroom presets are fantastic tools. They save time and effort while editing photos. Think of them as pre-set filters that you apply to your images.
These filters can make your photos look stunning instantly. Whether you’re using Lightroom CC or Lightroom Classic, presets help achieve a consistent look.
They are important for anyone serious about photo editing. In addition to using presets, knowing how to import brushes into Lightroom can further enhance your editing capabilities, allowing you to apply more precise adjustments to your images. Additionally, understanding Lightroom shortcuts can further streamline your workflow.
Step-by-Step Guide to Install Presets
So, how do you install these Lightroom presets? It’s easier than you think:
- First, download the preset files from a trusted source.
- Next, open Lightroom.
- If you're using Lightroom Classic, go to the Develop module. In Lightroom CC, you'll find the Presets tab on the right panel.
- Double click it to expand.
- Then, double click on "Import Presets".
- Select your downloaded files and hit import.
Voila! Your other Lightroom presets are now ready to use. Make sure you save them in the Lightroom folder.
Backing Up Your Presets
Backing up your other Lightroom presets is significant. You don’t want to lose them, right? Follow these steps:
- First, locate the local adjustment presets folder. You can do this by going to Preferences under the Edit menu and clicking on Show Lightroom Presets Folder. Then, double-click the folder to open it and access your local adjustment presets.
- Copy this folder and save it somewhere safe.
- I recommend an external drive or cloud storage. This way, you can easily restore your precious presets if something goes wrong.
Using Lightroom Presets Effectively
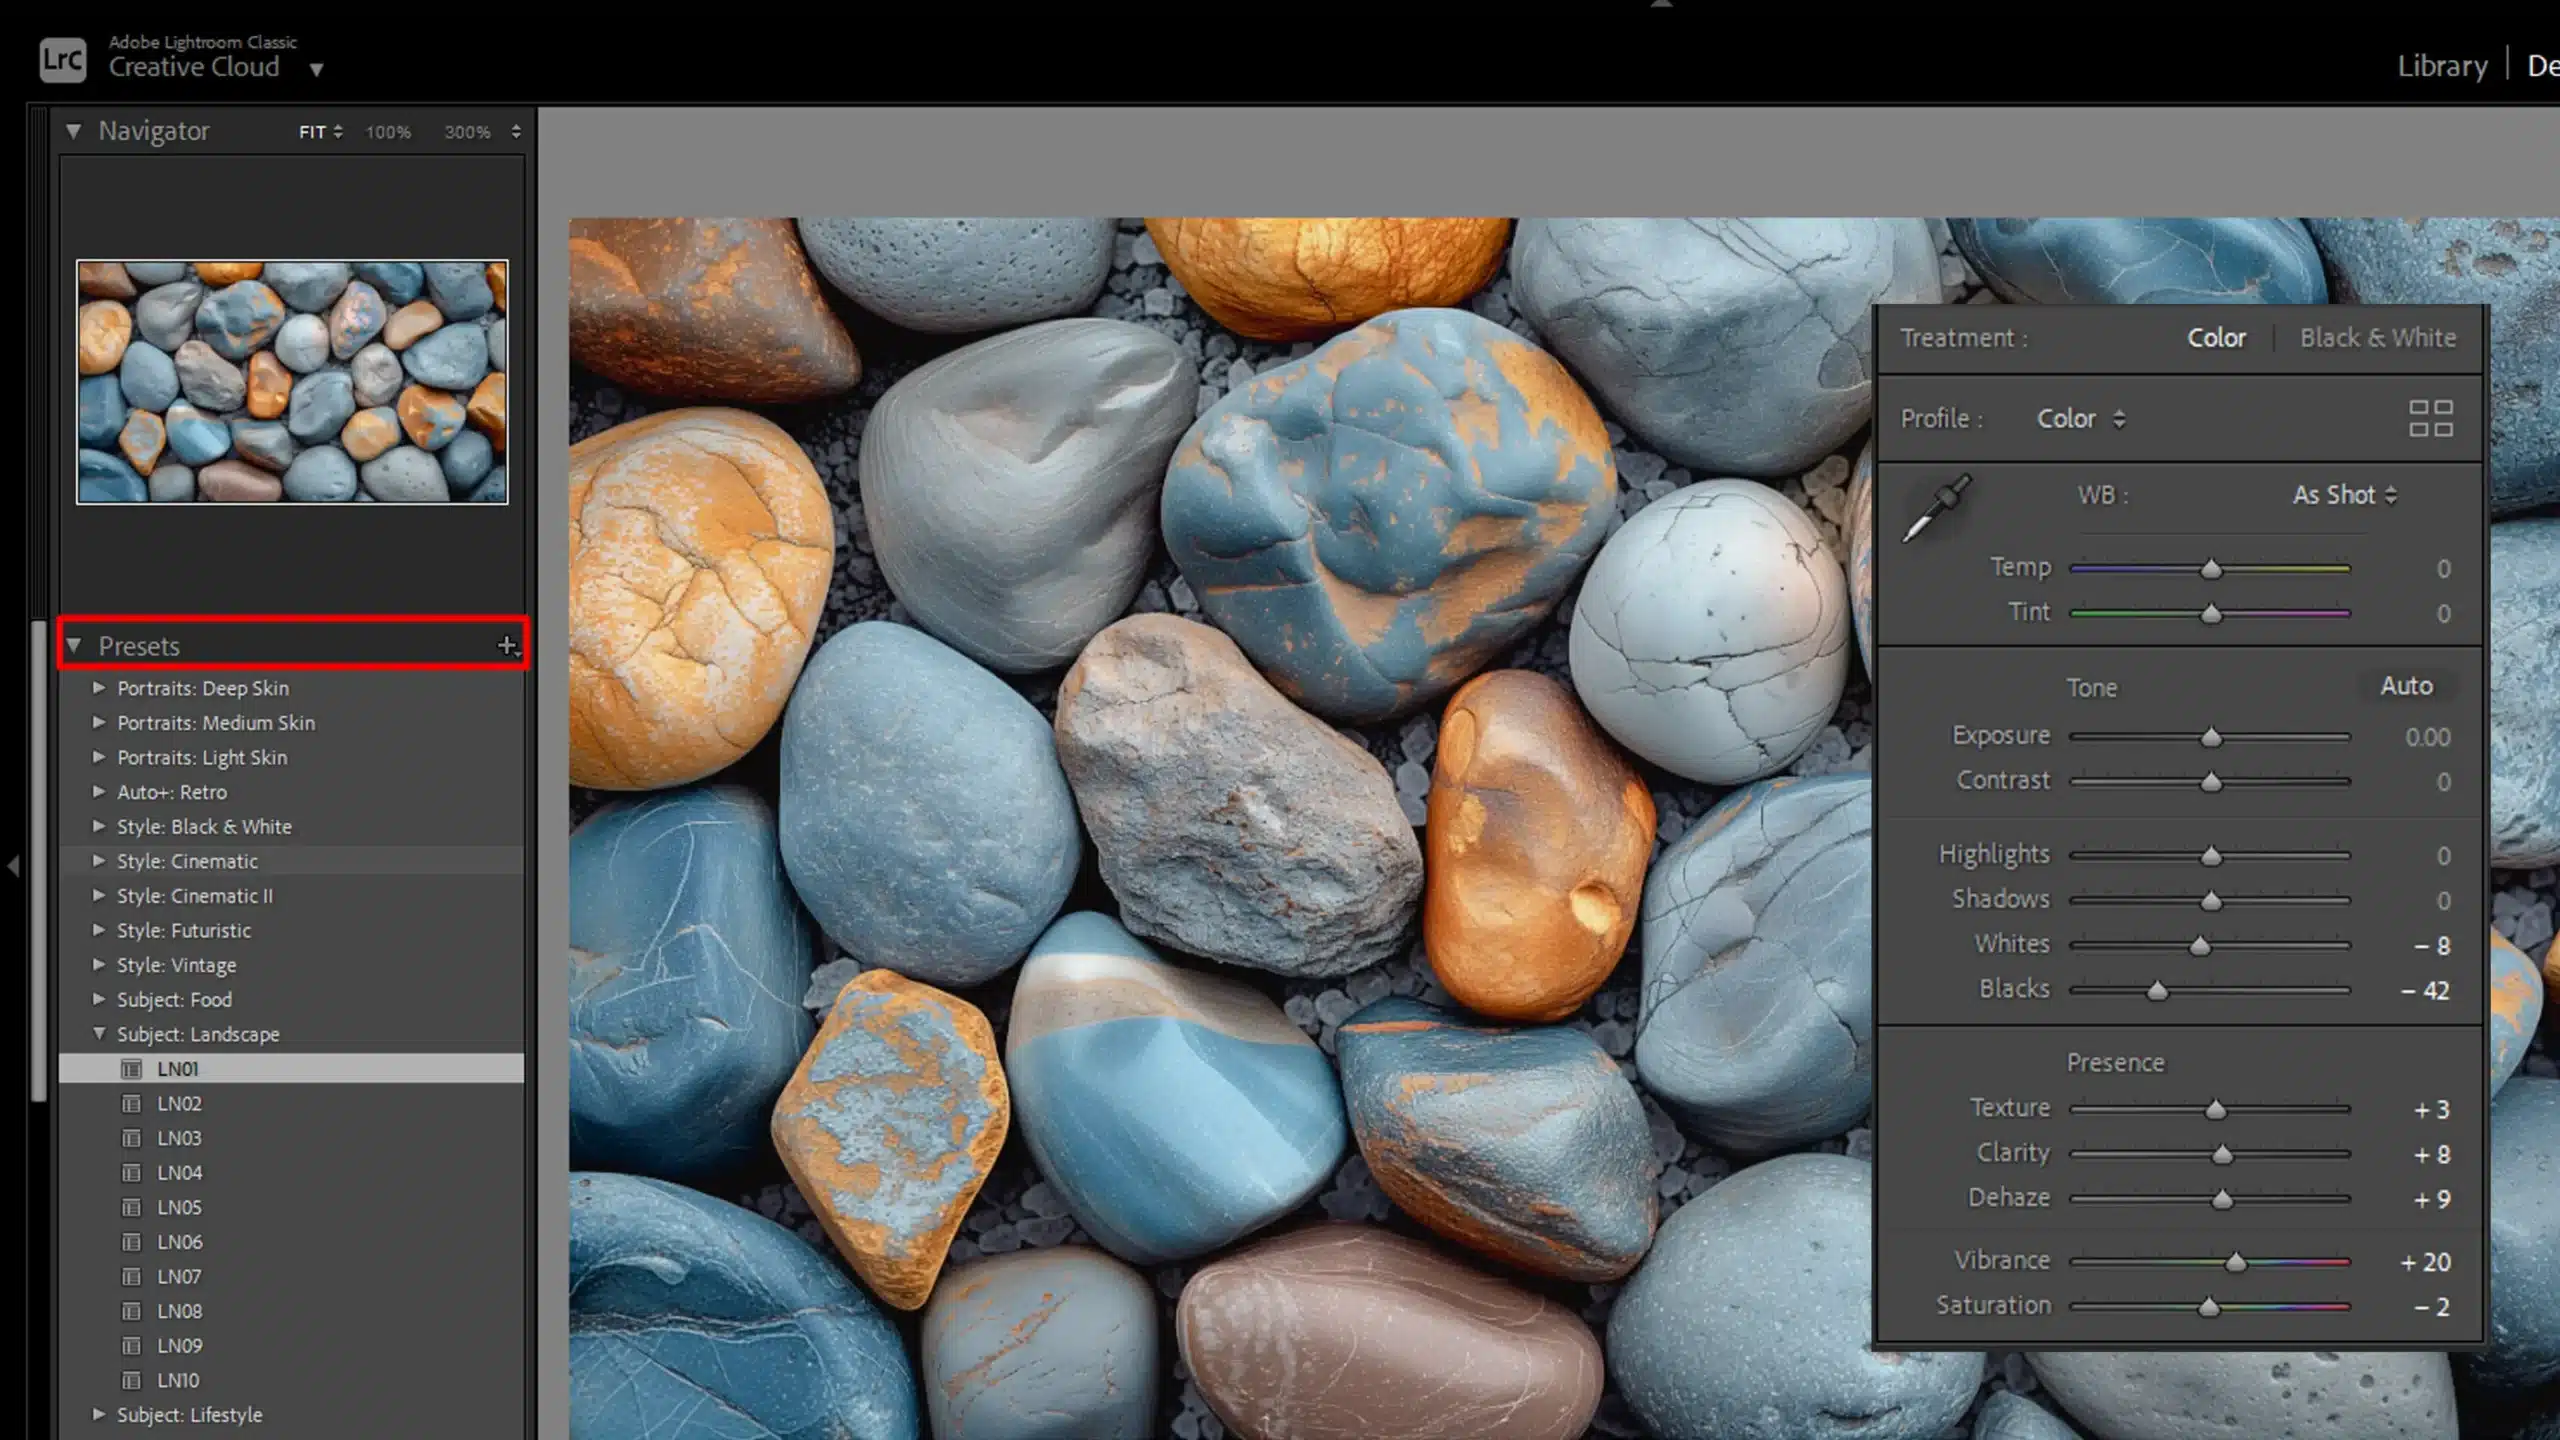
Now, let’s talk about using other Lightroom presets effectively. Simply applying a preset might not always produce the desired result.
You’ll often need to fine-tune settings afterward. Adjust the exposure, contrast, and other sliders to fit the specific needs of each photo.
This makes sure your image looks the best. Remember, presets are starting points, not final solutions. Remember, presets are starting points, not final solutions.
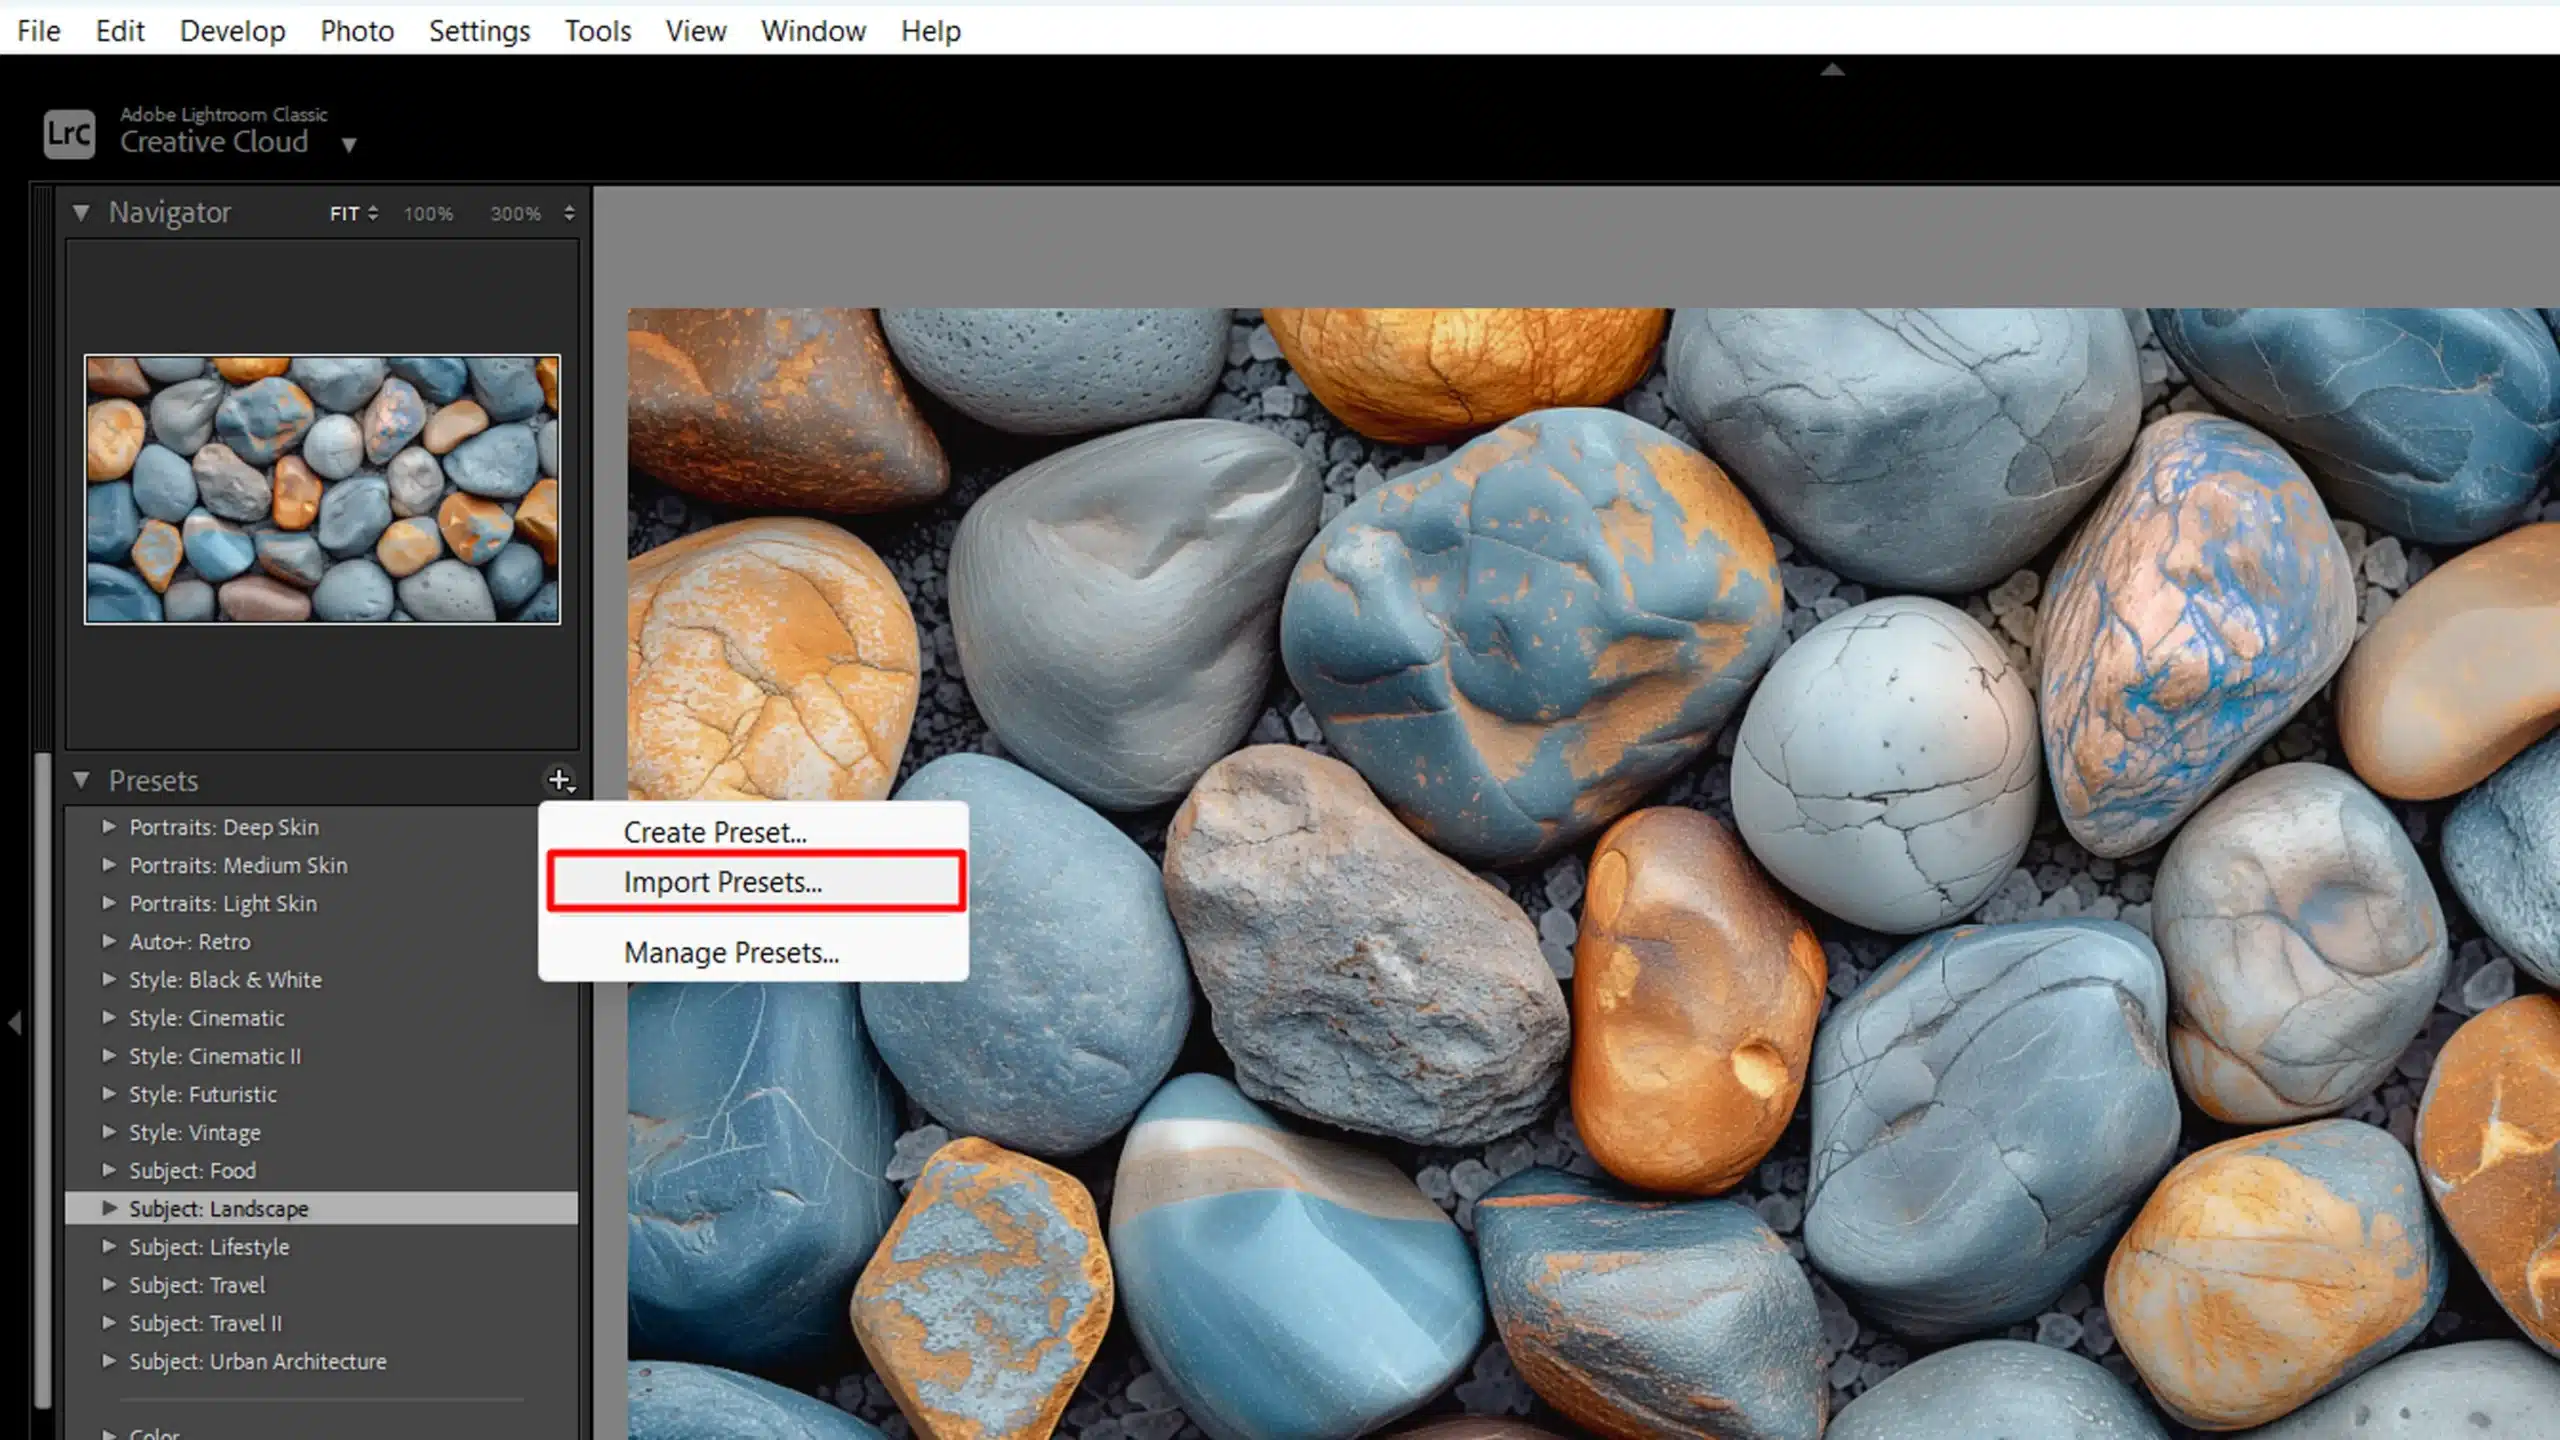
For those working with multiple images, mastering how to batch edit in Lightroom can help apply presets more efficiently across a series of photos.
Additionally, if you’re working on outdoor scenes, learning how to edit landscape photos can further refine your approach, and for detailed edits, understanding how to add texture in Photoshop can add that extra depth and realism to your images.
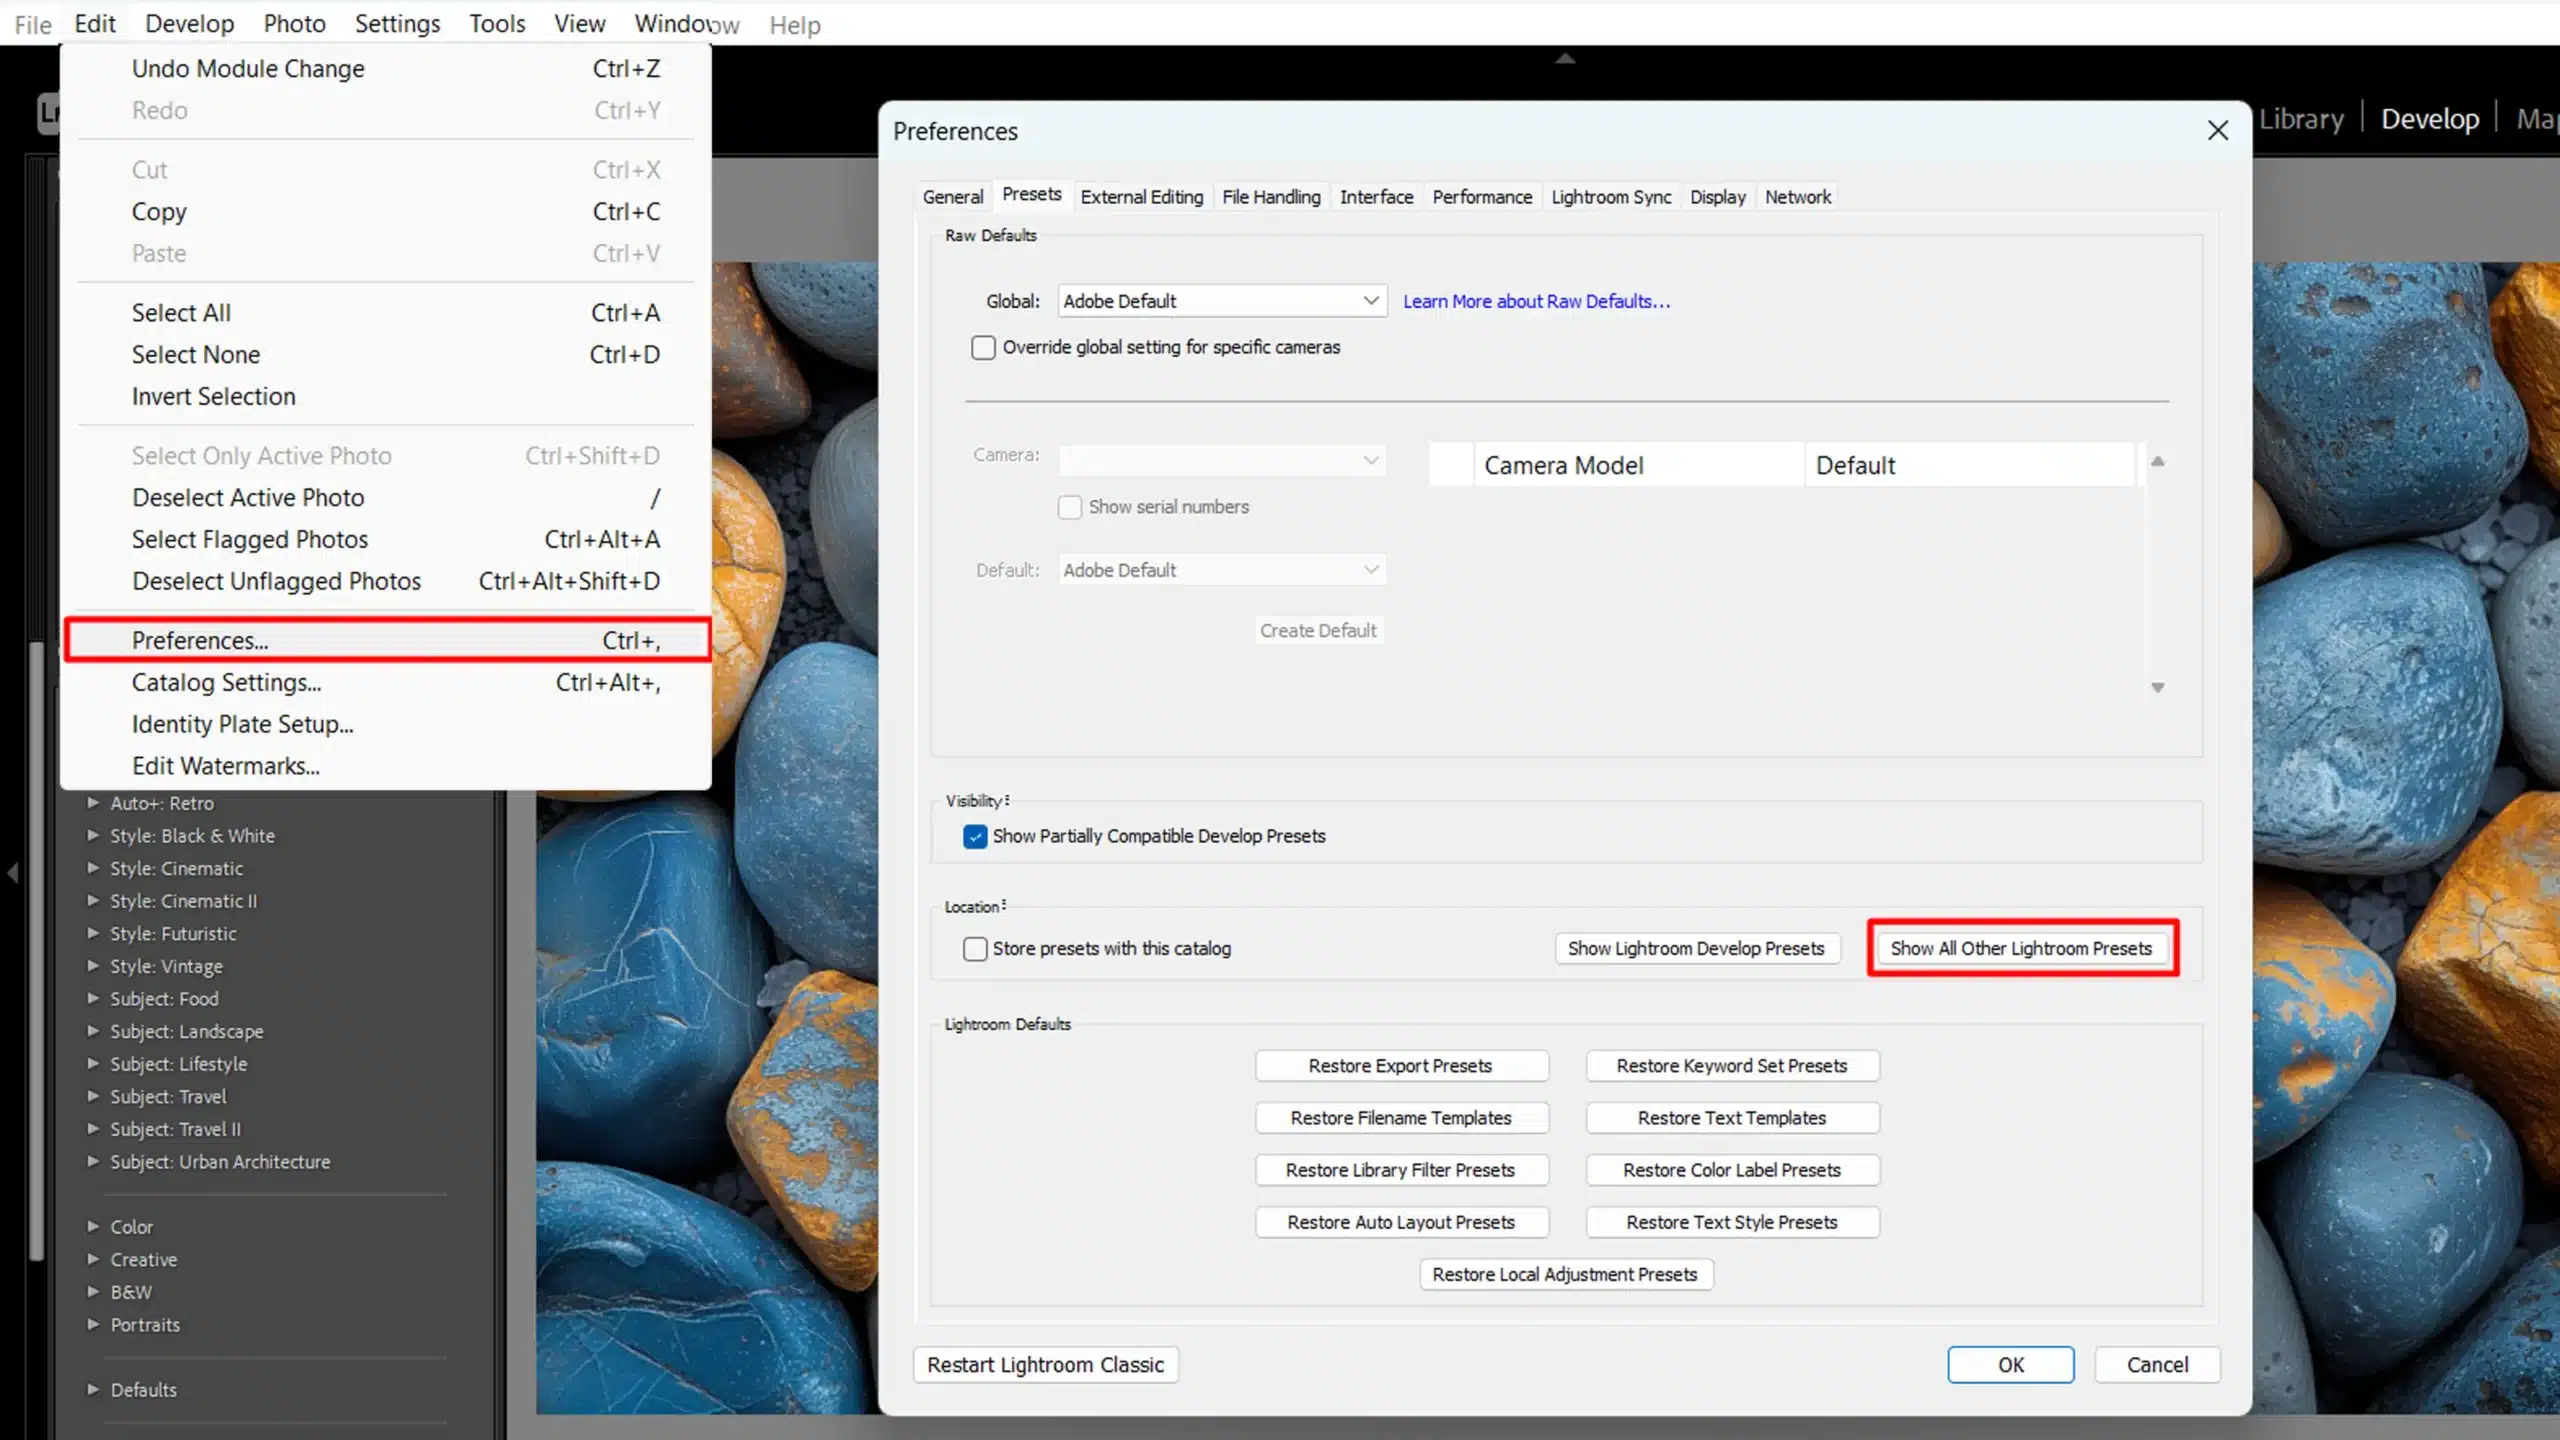
Pro Tip: Organize your presets into folders within the presets panel. This makes them easier to find and use. If changes don’t show up immediately, try to restart Lightroom to referesh the presets panel.
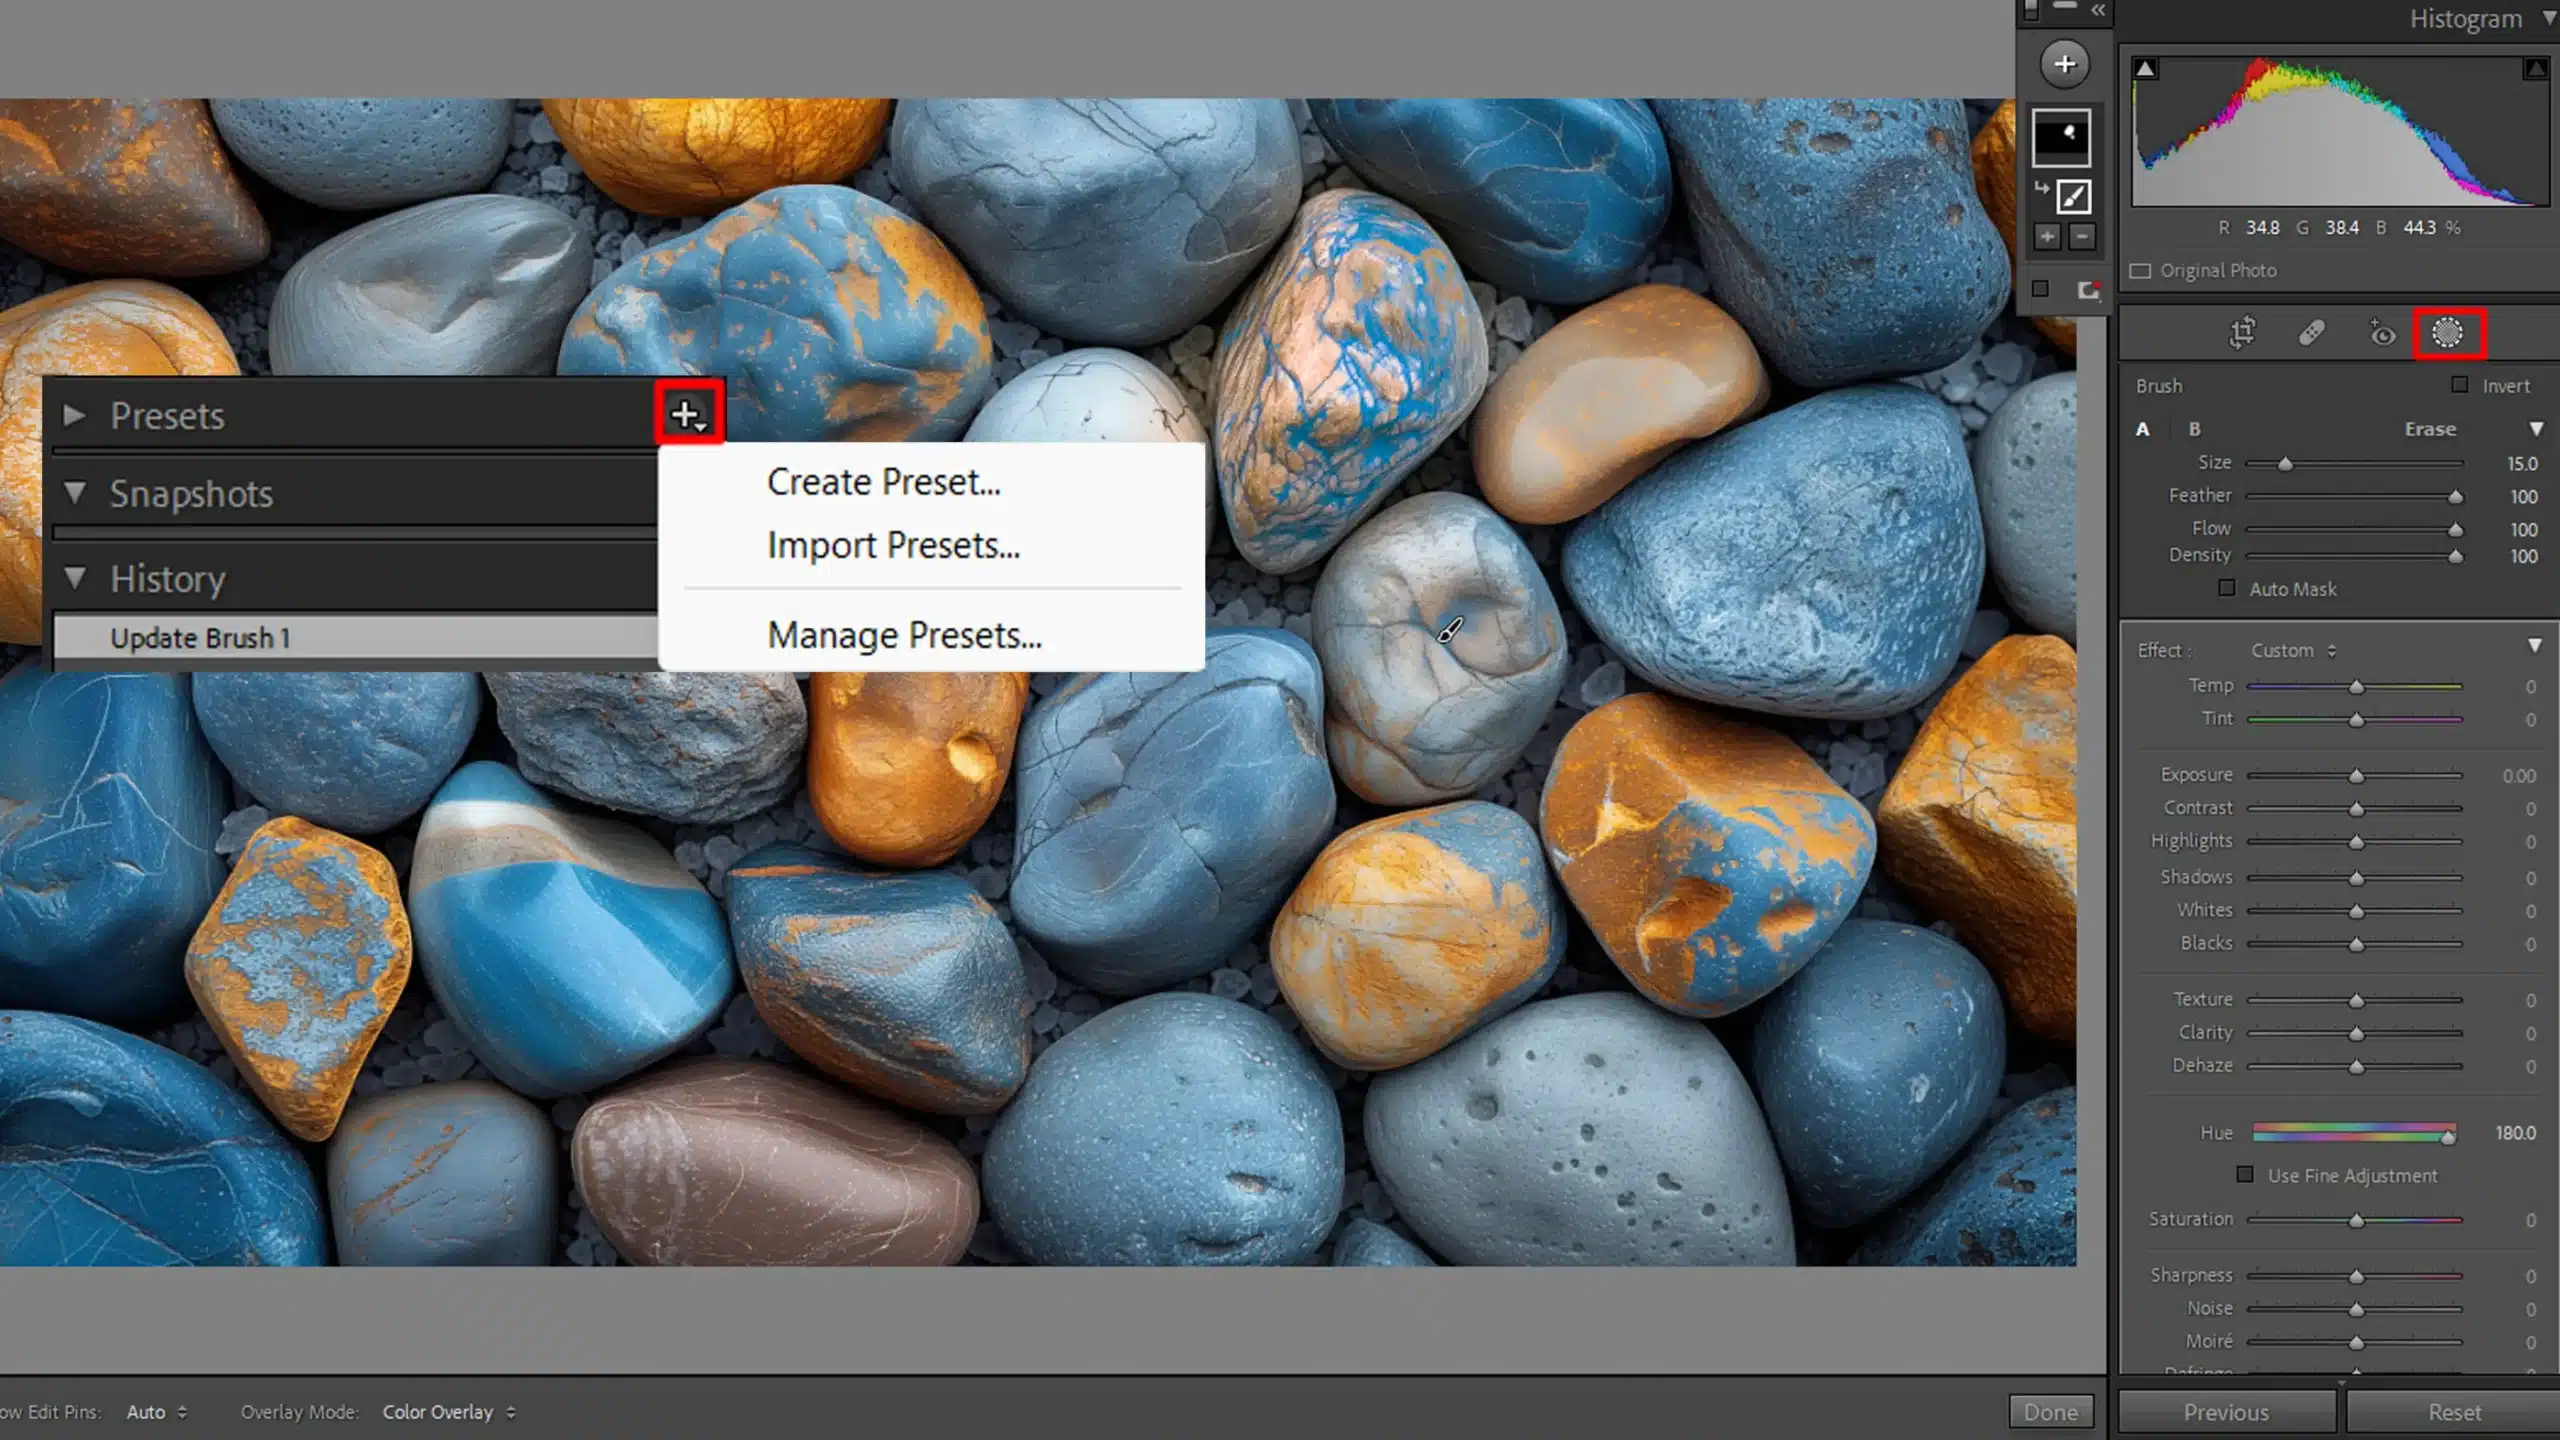
Additionally, if you’re looking to expand your editing capabilities, learning how to import brushes into Lightroom can further enhance your workflow by providing more creative control.
Keep them neat, stay efficient, and happy editing! For more advanced editing or when you need to dive into more complex adjustments, consider using Photoshop alongside Lightroom.
Understanding the difference between Photoshop and Lightroom will help you choose the right tool for each task.
Frequently Asked Questions
What steps can I take to access the brush tool in Lightroom?
- Open Lightroom and go to the Develop module.
- On the right panel, find the Adjustment Brush tool (keyboard shortcut: K).
- Click on it to activate the brush tool, then double-click to make selective adjustments to your photo.
How do I import brush presets?
- In Lightroom, go to the Develop module and select the Adjustment Brush.
- Click on the dropdown menu next to Effect to open the preset list.
- At the bottom of the list, choose Import and navigate to the location of your brush presets.
- Select the presets and click Import to add them to your Lightroom.
How do I copy and paste a brush in Lightroom?
- First, apply the brush adjustments to your photo as needed.
- Right-click on the pin of the brush adjustment you want to copy.
- Select Duplicate to copy and paste the adjustment in the same photo, or use Copy/Paste Settings to apply it to another photo.
Where are Lightroom brushes located?
- Lightroom brushes are not stored as separate files; they are part of the Lightroom catalog.
- To access your brushes, go to the Develop module and select Adjustment Brush.
- Your brushes in Lightroom and presets appear in the Effect dropdown menu under the Adjustment Brush settings.
Conclusion
Knowing how to import brushes into Lightroom has truly revolutionized my workflow. Being able to seamlessly integrate custom brushes has not only enhanced my editing capabilities but also saved me a tremendous amount of time.
I remember the first time I successfully imported a set of brushes; it opened up a whole new realm of creative possibilities for me. If you’re looking to elevate your photo editing skills, I highly recommend checking out this comprehensive Photoshop course and this in-depth Lightroom course.Â
Both courses offer valuable insights and practical tips that have been instrumental in my own journey.
Read more about Photoshop:Â