Have you ever wondered how to crop only one layer in Photoshop without affecting the rest of your project?
Whether you’re a seasoned designer or just starting out, mastering this skill can greatly enhance your workflow and creativity.
In this guide, I’ll walk you through the steps to precisely crop individual layers, making your edits more efficient and your final images more polished.
Imagine the possibilities-cleaner compositions, focused edits, and a more organized workspace.
Ready to dive in and elevate your Photoshop skills? Let’s get started!
Let’s tackle how to crop a single layer without affecting additional layers.
Using the Rectangular Marquee Tool
First, open the image you want in Photoshop.
Go to the Layers panel and select the layer you wish to crop.
Click on the rectangular marquee tool from the toolbar. Draw a selection around the area you want to keep.
Press Shift + Ctrl + I to inverse the selection
Hit the Delete key to remove the unwanted part.
The part outside the selection disappears, leaving the cropped section.
Applying a Layer Mask
Another method to crop a specific layer is by using a Layer Mask. This approach is non-destructive, meaning you can always revert changes if needed.
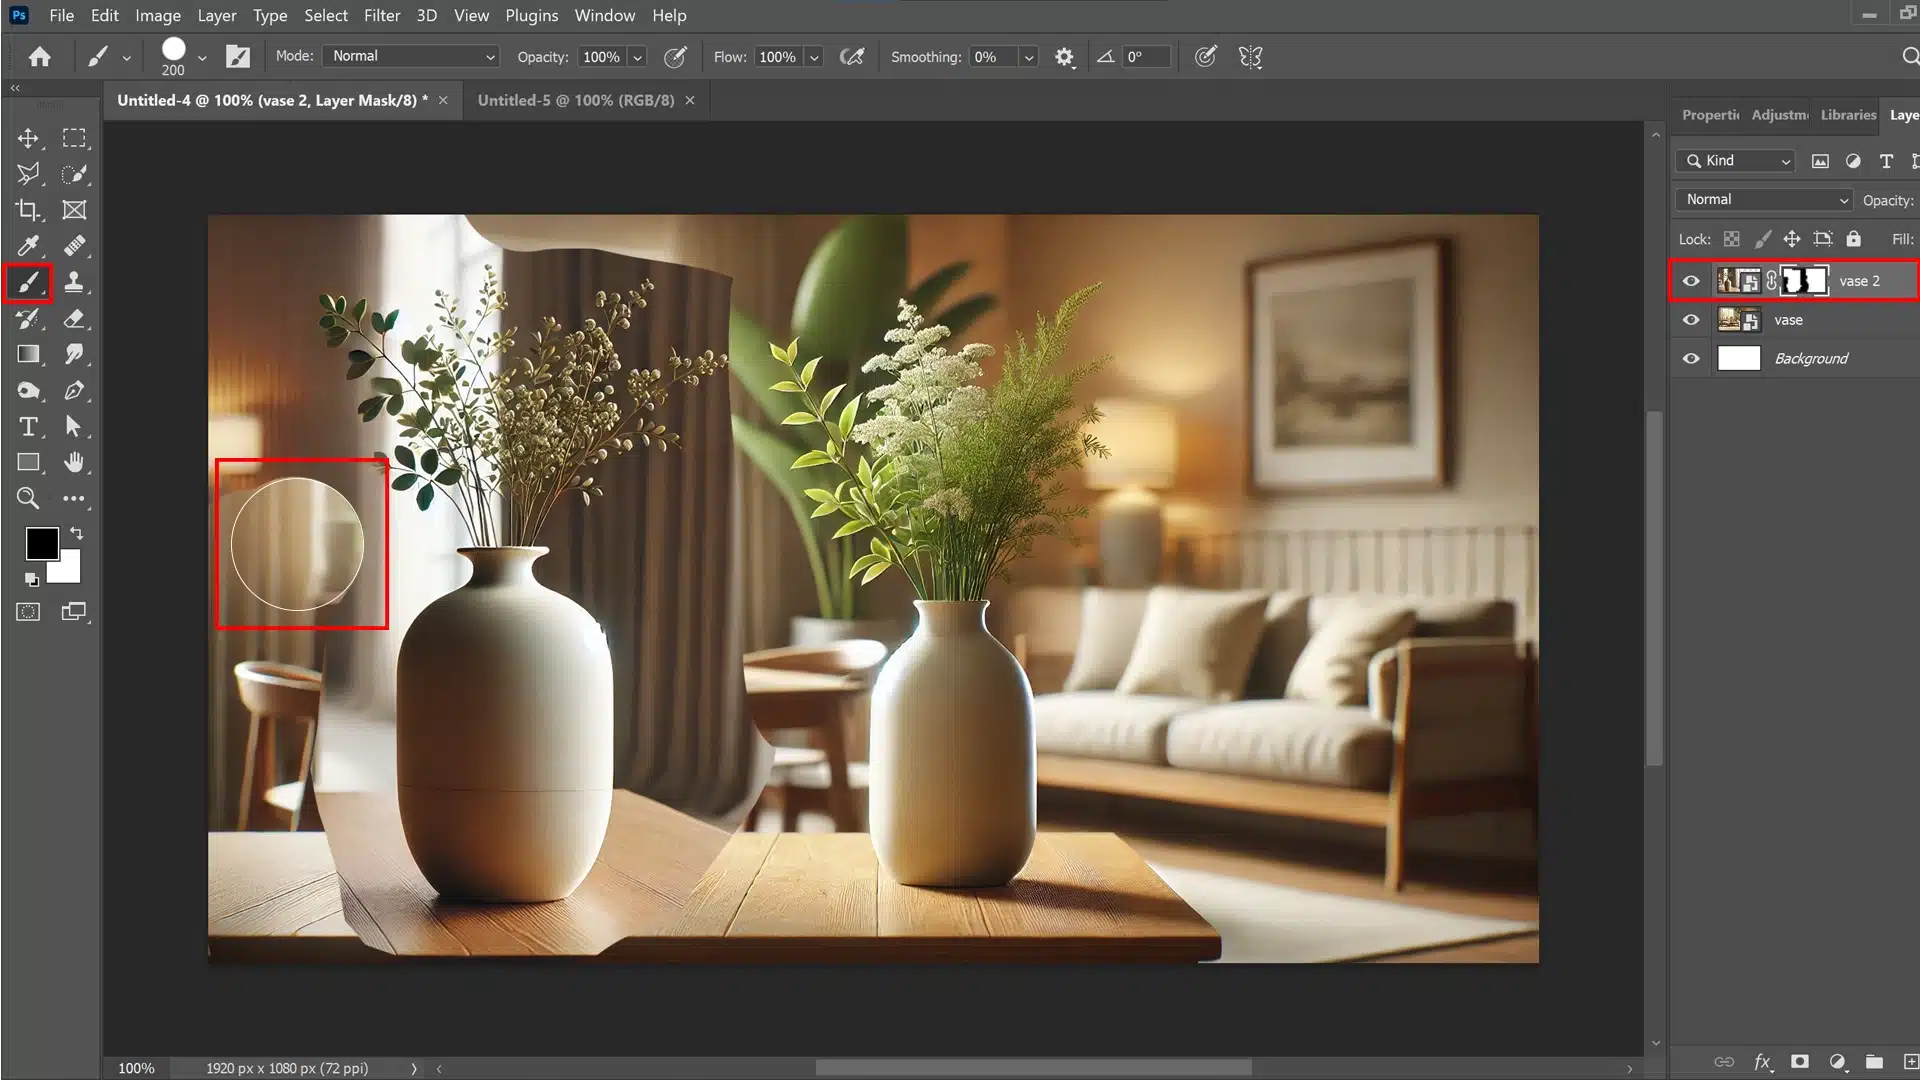
First, select the layer from the Layers panel.
Click the Layer Mask icon at the bottom of the Layers panel.
Use the Brush Tool to paint black on the Layer Mask over the areas you want to hide. It’s like a magic eraser that hides portions of your layer without deleting them.
If you make a mistake, just switch to white and paint over the masked area to reveal it.
Why Crop a Single Layer?
When working in Photoshop, cropping a single layer allows us to isolate and focus on specific parts of an image without affecting other parts of the project.
You may ask, “Why not just crop the entire canvas?” The answer lies in flexibility and precision.
Cropping a single layer lets us fine-tune details and offers greater control over the composition.
Benefits of Cropping a Single Layer
Most seasoned users know navigating the layers panelcan be a little daunting, especially with numerous layers.
Imagine trying to focus on one detail, but every layer gets in the way. Frustrating, right?
By singling out a layer, we reduce visual clutter and work more efficiently.
Plus, who doesn’t love a perfectly cropped layer that adds to a seamless design?
Common Methods for Cropping
Newbies often resort to the Rectangular Marquee Tool for cropping.
The process is simple:
Draw your selection around the desired area.
Press Shift + Ctrl + I.
Hit Delete.
But what if you want a non-destructive method to preserve the original content? This is where adding a layer mask comes in handy.
layer masks allow hidden areas to be revealed or concealed without deleting pixels.
This approach is like painting: one wrong brush stroke can be corrected effortlessly.
Tools to Master
Layer in Adobe Photoshop is multifunctional, and mastering each tool, such as the brush tool and quick selection tool, boosts productivity.
With these tools at hand, cropping becomes not just a task but a skill that enhances our digital artwork.
Knowing the correct techniques and tools helps streamline the editing process and produce professional results.
Cropping Numerous Layers
When you want to crop numerous layers, it’s essential to know a few strategies:
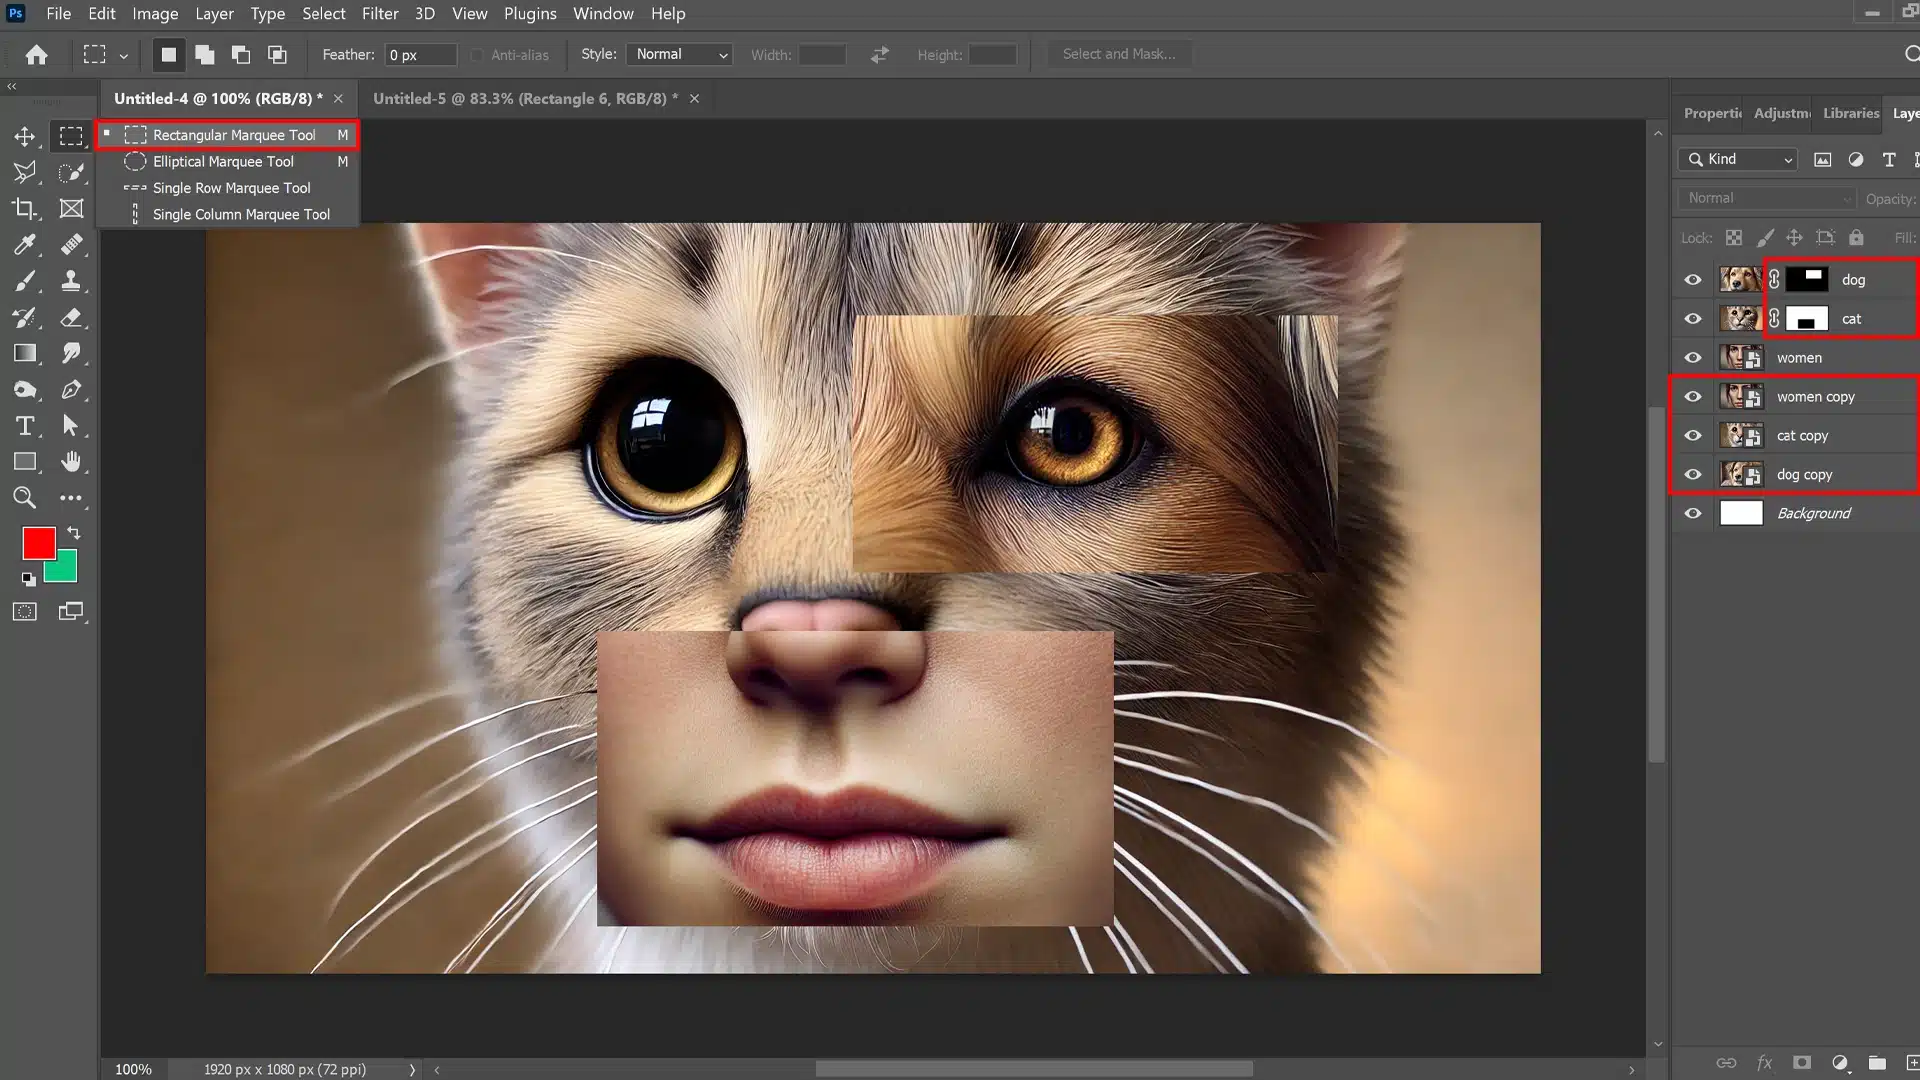
Select the layers you want to crop by holding down the Ctrl (Windows) or Cmd (Mac) key and clicking on each layer in the Layers board. This allows you to select more than one single layer at a time.
Use the Rectangular Marquee Tool to make your selection.
Go to the menu bar and choose "Edit" > "Free Transform." This action will let you crop numerous layers simultaneously.
To ensure non-destructive editing, always duplicate your layers before making any modifications. This way, you’ll retain your original work and avoid undesired changes.
Techniques to Crop Multiple Layers Efficiently
When you need to crop a layer or crop multiple layers, effective layer cropping is crucial for achieving precise results.
Start by grouping the layers you want to crop, and then use layer cropping techniques to crop a layer without affecting others.
For seamless editing, apply a mask or adjustment to crop a layer while preserving the integrity of the remaining layers.
By mastering how to crop a layer, you can enhance your efficiency and ensure consistency throughout your project.
Additionally, using the pen tool can help refine selections, especially when you want to crop layer with complex edges or intricate layer effects.
Using Crop Layers Option
Photoshop offers specific methods to trim layers without altering all the layers:
Use the Crop Tool found in the toolbar. To apply it to a exact layer in Adobe Photoshop, select that layer first. Then, make your crop selection utilizing the crop tool around the desired area.
If precision is the goal, layer masks can help. By adding a layer mask, you can conceal parts of the layer without deleting them. Select the layer, click on the "Add Layer Mask" icon at the bottom of the Layers panel, and use the brush tool to paint over areas you wish to hide.
For non-destructive cropping,smart objects are invaluable. Convert your layer to a smart object by right-clicking on the layer and selecting "Convert to Smart Object." Doing so allows you to resize and crop without losing image quality.
Pro Tip: Always work with a copy of your layer to safeguard your original image. Duplicate the layer before making significant edits.
Mastering these cropping techniques provides greater control and flexibility when editing.
By following these methods, you can easily adjust multiple layers and use tools like layer masks and smart objects to achieve your desired outcome.
Advanced Tips and Tricks
Here are some advanced tips and tricks about cropping only one layer in Photoshop:
Technique
Description
Benefit
Clipping Mask
Masks out parts of a layer without altering the original image.
Non-destructive editing; retains original layer.
Layer Mask
Hides parts of a layer using black and white brushes.
Allows easy adjustments and reversibility.
Gradient Tool on Layer Mask
Creates smooth transitions between visible and hidden areas.
Seamlessly blends images or parts of an image.
Rectangular Marquee Tool
Selects specific areas for cropping, copying, or filling with color.
Precise control over selected areas.
Shape Tool Combination
Combines Rectangular Marquee Tool with Shape Tool to create custom shapes.
Adds unique design elements quickly.
To enhance your workflow, consider using the clipping mask for a non-destructive approach to editing your cropped layer.
This method ensures that your background layer remains intact while allowing you to fine-tune the cropped image without altering the entire layer.
Optimizing Layer Masks
Many people start using Photoshop without fully understanding the power of layer masks.
Let’s demystify this tool.
Creating a Layer Mask
First, ensure your selected layer is visible. Tap on the layer thumbnail, which activates the mask icon at the bottom of the layers panel.
Click on it to create your first layer mask.
Non-Destructive Editing
Layer masks allow for non-destructive editing, meaning you can hide parts of your image without deleting anything.
You can edit the mask by painting black to hide and white to reveal different parts of your layer.
It’s like creating temporary windows that you can open and close at will.
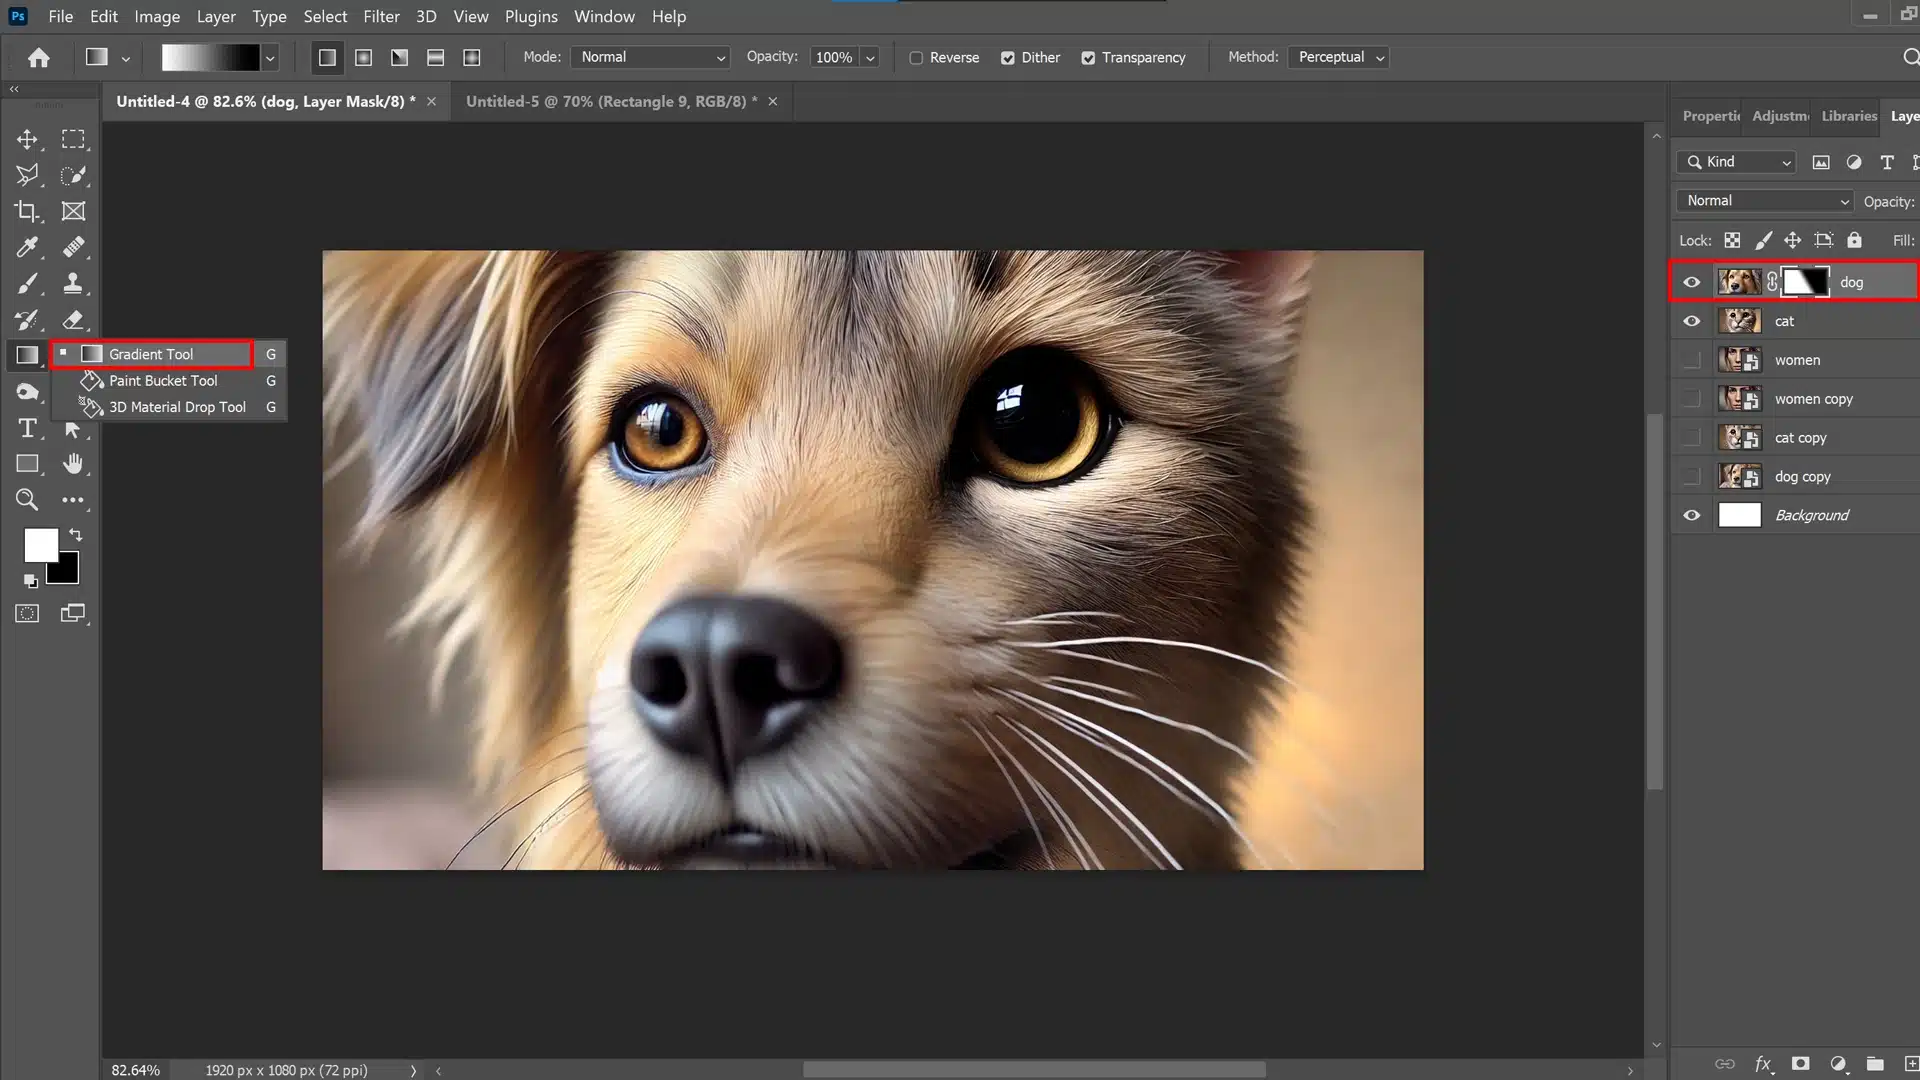
Using the Gradient Tool
A neat trick is to use the gradient tools on your layer mask. This produces smooth transitions between the visible and hidden areas.
Have you ever wanted to blend two images together seamlessly?
The Gradient Tools on a layer mask is your friend.
Creative Uses of the Rectangular Marquee Tool
The Rectangular Marquee Tools is more than just a selection tool; it’s your gateway to creative design.
Basic Usage
Begin by selecting the marquee tools from the toolbar. Choose the shape, in this case, the RectangularMarqueeTool.
Click and drag to outline the area you want to modify. Once you’ve made your selection, you can crop, copy, or even fill it with color to create unique designs.
Perfect Proportions
To achieve perfect proportions, hold down the Shift key while dragging. This constrains the selection to a square, maintaining the original aspect ratio.
Need more precision? Use the arrow keys to tweak your selection by single pixels.
Combining with the Shape Tool
Combine the Rectangular Marquee Tool with the Shape Tool to create custom shapes. Draw a rectangle, then convert it to a shape layer using the menu. Voilà! A customized design element.
Pro Tip: Always duplicate your layer before making adjustments. This way, your original stays untouched, and you can revert back if needed.
By mastering these techniques, you’ll find that working with multiple layers and masks in Photoshop becomes less daunting and more enjoyable.
Remember, practice makes perfect, and every mistake is a chance to learn.
Frequently Asked Questions
Can you crop a specific layer in Photoshop?
Yes, you can crop a exact layer in Photoshop by selecting the layer and using the crop tool. However, this will affect the canvas size, not just the layer. To specifically adjust only one single layer, use a layer mask or the selection tools to isolate and delete the unwanted parts.
How do I selectively crop in Photoshop?
Follow these steps to selectively crop in Photoshop:
To selectively crop in Photoshop, use the Marquee Tool or Lasso Tool to select the area you want to keep.
Once you have your selection, go to Image > Crop. This will crop the entire image to the selected area. To apply changes to a exact layer, ensure that the layer is active or apply a layer mask based on the selection.
How do I select only one layer in Photoshop?
Follow these steps to select only one layer in Photoshop:
To select only one layer in Photoshop, simply click on the layer in the Layers panel.
If you need to isolate this layer to view or edit it separately, you can Alt-click (Option-click on Mac) on the eye icon next to the layer. This will hide all other layers.
How do I turn off all layers except one in Photoshop?
Follow these steps to turn off all layers exept one layer in Photoshop:
To turn off all layers except one, hold down Alt (Option on Mac) and click on the eye icon next to the layer you want to keep visible. This action hides all other layers.
To turn all layers back on, Alt-click (Option-click on Mac) on the eye icon of any layer that is turned off.
Learning how to crop only one layer in Photoshop can really simplify your editing process and make your projects look more polished.
Whether you use the Rectangular Marquee Tool, a Layer Mask, or the Quick Selection Tool, mastering these techniques will give you more control over your images.
I remember when I first learned these methods. I was amazed at how much easier it made my workflow.
$2,061.00Original price was: $2,061.00.$1,061.00Current price is: $1,061.00. 27584
Download Your Free Guide Now!
Discover the secrets of photography with our printable guide! Master essential techniques like aperture, shutter speed, and ISO to create stunning images. Get your free printable PDF now and start turning your snapshots into masterpieces!