How to Change a Logo Color in Photoshop: A Quick Guide
How to Change a Logo Color in Photoshop: A Quick Guide
Are you wondering how to change a logo color in Photoshop? You’re in the right place! From boosting brand identity to refreshing your marketing materials, tweaking the color of a logo can make a massive difference.
In this article, I’ll guide you step-by-step through the simple yet powerful process of changing a logo’s color in Photoshop.
Whether you’re a seasoned designer or just starting out, you’ll find this guide easy to follow and highly effective. Get ready to transform your logo and make a lasting impression!
Table of Contents
How to Change a Logo Color in Photoshop
Understanding how to change a logo color in Photoshop is a skill valued by many. Whether refreshing a brand photo or simply trying new colors, getting a grip on this basic task is important.
Preparing Your Logo File
Let’s start with understanding the files we’ll work with. Often, we deal with common types like PNG files and SVG files. Each offers specific advantages, especially when you think about layering and color editing.
Open the logo file in Adobe Photoshop and ensure it’s an editable PNG file.
Delete the background using the Magic Eraser tool to create a transparent background.
Create a new layer for the logo by going to the Layers panel and clicking on the “New Layer” button.
Name the layer “Logo” to keep it organized.
Understanding Logo Layers
The logo layer in Adobe Photoshop helps you manage and modify different parts of your logo independently.
Every element lies on its own layer, like a stack of images. The layers panel shows these layers, allowing edits to one without affecting others.
Importance of Color in Branding
A logo’s colors communicate brand perception. Changing them alters how people see your business.
Maintaining consistency is critical. So, if you want to change the logo’s colors, think about the bigger picture.
Using the Color Overlay Tool for Logo Color Modification in Photoshop
Photoshop offers the color overlay tool, which is important in rapid color alterations within your logo. This function coats the logo with a new color without changing its foundational elements.
Additionally, understandingblending modes in Photoshop can enhance the effect, allowing for creative and seamless color transitions.
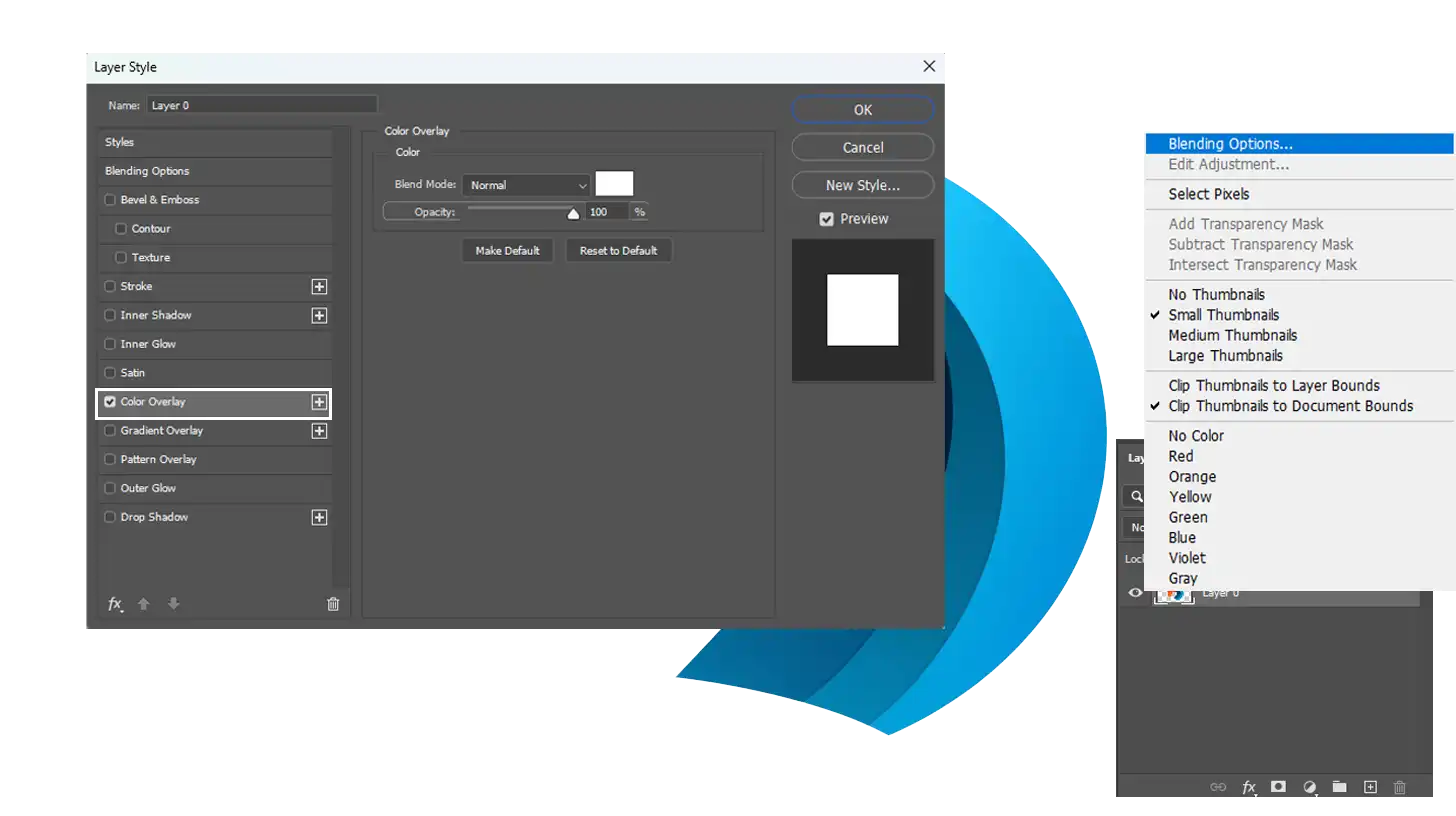
Accessing the Blending Options
To apply a color overlay, you first need to access the blending options for your selected layer. Follow these steps to get started.
Right-click your chosen layer.
Find "Blending Options" in the drop-down menu and click it.
A dialog box will pop up. Choose "Color Overlay," and you can start adjusting.
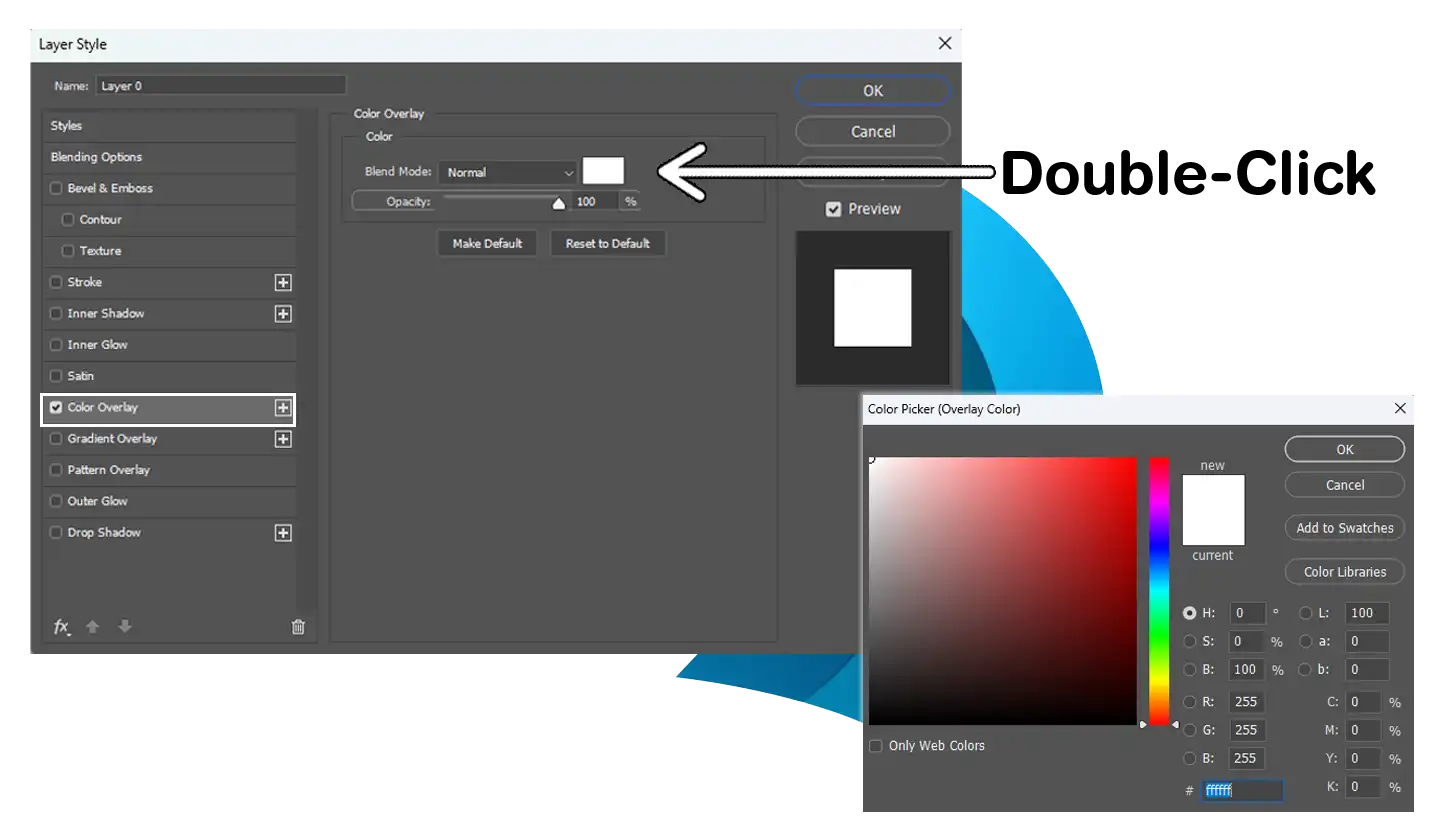
Adjusting the Color Overlay Settings
Decide the perfect shade with the color picker tool. This intuitive tool allows you to quickly adjust the logo color to your preference. Play with blending options like blend mode for effects.
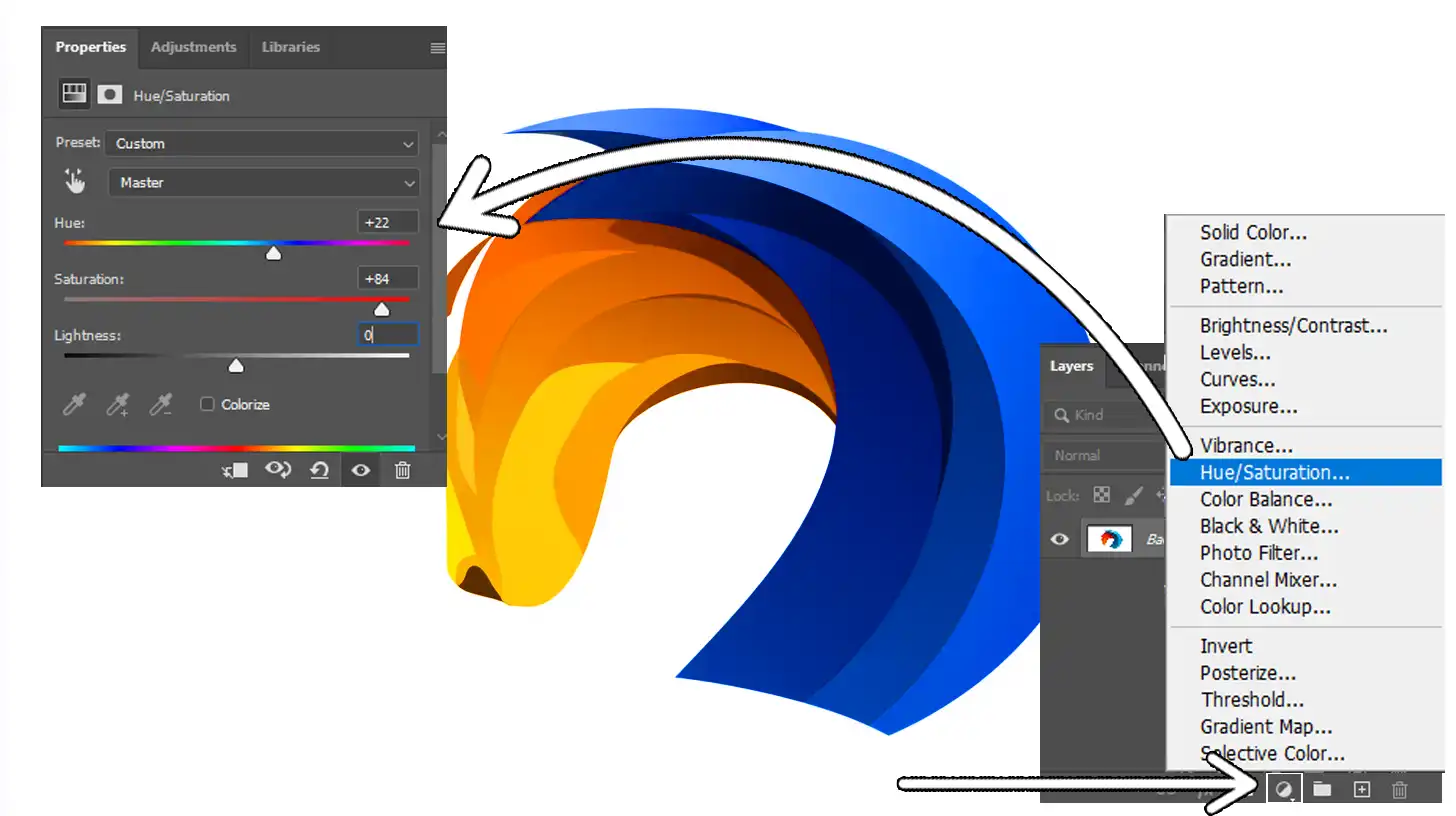
Changing Colors with the Hue/Saturation Tool
Adobe Photoshop allows varied methods for editing color in logos, with hue/saturation adjustments standing out. You access it in the adjustments panel and adjust sliders for hue or lightness until you achieve the desired output.
Pro Tip: Use the magic wand tool for selective color changes. Target specific areas with the precision of this tool, ensuring a clean update to your logo colors. Combining this approach with a layer color swap technique helps achieve versatile and seamless edits. For more advanced edits, consider using the replace color tool in Photoshop, which offers even greater control over color changes.
Advanced Techniques for Logo Color Modification in Photoshop
Changing a logo color may seem challenging, but it can transform your brand’s identity with just a few clicks. Adobe Photoshop makes this process straightforward and enjoyable.
I’m here to share advanced techniques that add precision and style to your logos. Whether you’re working with a PNG file or an SVG file, these tips will help you get started effectively.
Using Layer Masks for Precision
First up, using layer masks helps achieve precision in color adjustments. I’ve always found masks to be like the perfect magic wand tool, allowing specific parts of your image to go untouched while you focus on the rest.
You can also use the color picker to select the exact shades you want to work with
Steps to Use Layer Masks
Follow these steps to effectively use layer masks and select the areas you want to modify:
Double-click on your layer thumbnail to access the layers panel.
Grab your brush tool and paint over the parts you want visible.
Applying Gradient Maps for Unique Effects
If you’re looking to push creativity further, apply gradient maps. They transform the color in Photoshop in unique ways.
How to Apply Gradient Maps
Follow these steps to apply gradient maps and enhance your image with unique color transitions:
Head over to the drop-down menu in the layers panel.
Locate the gradient map option and click it.
A colorful dialog box appears, letting you choose how colors map across darks to lights in your image.
Adjusting these settings can result in a range of eye-catching effects and create an updated logo color that stands out.
Non-Destructive Editing with Adjustment Layers
Let’s talk about the wonders of non-destructive editing.Adjustment layers provide a flexible way to try out new color schemes without permanent changes.
Benefits of Adjustment Layers
To take advantage of adjustment layers in your design, consider the following benefits that will help you maintain your logo’s integrity while experimenting with colors and effects:
Input settings change, yet the original logo remains intact.
Layer Styles work well here, too, letting you bounce between settings with ease.
The power of the lightness sliders shouldn't be underestimated. They tweak brightness levels so effortlessly.
Remember, after you’ve tried any changes, simply click save, and you’ve got your masterwork stored.
As we venture into the world of Adobe Photoshop to explore our creativity, changing the color of a logo often becomes necessary.
This process can renew a brand’s image and align it with contemporary trends. To help you navigate the process of changing logo colors effectively, here’s a comparison of critical aspects to consider.
This table highlights important strategies and their benefits, providing you with a clear overview to guide your logo color transformation.
Aspect
Overview
Choosing the Right Color Palette
Consider colors that convey the right message, such as blues for trust and reds for passion.
Ensuring Consistency Across Different Media
Maintain consistent colors across platforms by using RGB for digital and CMYK for print.
Technical Aspects of Logo Color Change
Utilize layer masks and replacement color methods to ensure precision in color adjustments.
Benefits of Adjustment Layers
Adjustment layers allow changes while keeping the original logo intact, offering flexibility and ease of use.
Choosing the Right Color Palette
Selecting a color palette requires thoughtful consideration. Think about what colors represent:
Blues might signify trust.
Reds might denote passion.
It’s not just about picking colors; it’s about choosing shades that convey the right message. To begin, always work within a copy of your logo file. This way, you won’t lose the original design.
Ensuring Consistency Across Different Media
An important factor in maintaining your brand’s identity is consistency. The colors you choose should look the same whether they appear on a website, business card, or billboard. You keep the same hues by using:
RGB color mode for digital media.
CMYK for print.
Once you finalize the colors, save your logo in different file formats, such as a PNG file or others suitable for various platforms. This practice ensures consistent quality no matter where your logo appears.
Technical Aspects of Logo Color Change
When working with layers in Photoshop, use the layer mask option to safeguard areas of the image you don’t want to alter.
A well-designed layer mask can be your best friend, protecting the integrity of your original image while allowing you to change color without worry.
Using a replacement color method can also help to ensure precision. Remember to use the brush tool to paint details that enhance your new color choice.
Pro Tip: Whenever starting a project involving logos, always pay attention to anti-alias settings. This setting smooths the edges between the logo and its background, effectively reducing pixelation and enhancing the overall look.
Adjusting the anti-alias setting becomes necessary when you create or remake the edges of an image. For related practices, consider how to edit wildlife photos to better understand edge refinement and detail enhancement.
Troubleshooting Common Issues
While customizing logo colors, you may face challenges like unexpected color shifts. These shifts can arise from file formats or color profiles. Knowing how to address these issues will help you maintain your design’s intended appearance across different media.
Dealing with Unexpected Color Shifts
When colors suddenly change in your design, it’s frustrating. We need to find out why colors betray us. Often, it’s about the color modes or profiles used in Photoshop. Always check them first. Ensure you’re using the correct mode:
RGB for web
CMYK for print
Double-check your settings in the color picker tool. Sometimes, even a tiny, overlooked box can change your efforts.
Fixing Blurry or Pixelated Logos
A blurry logo screams “unprofessional.” It’s important to keep logos looking sharp. First, know your image resolution. Logos should be created at high resolutions, preferably above 300 DPIfor print.
If your file already seems blurry, uncheck the anti-alias option for clearer edges. In contrast, when starting anew, keep it enabled for smooth transitions between colors. Should your logo appear pixelated while scaling, check its file format.
Using vector files like .svg is a smart choice. Vectors adapt without quality loss. Adobe Illustrator is top-notch for vector editing, but that’s a talk for another day.
Pro Tip: When you create any file, always save a high-quality version first. This saves you from future headaches, especially if you later discover something that needs tweaking. Remember, it’s easier to shrink than enlarge while maintaining quality.
For those working in Photoshop, utilizing smart objects can help maintain image integrity during transformations.
Additionally, if you’re working with photographs, understanding the difference between RAW or JPEG format can significantly impact the quality of your edits.
Frequently Asked Questions
What is the process of recoloring a logo in Photoshop?
Open your logo file in Photoshop.
Select the layer that contains your logo.
Go to the menu and select 'Image', then 'Adjustments', and then 'Hue/Saturation'.
In the Hue/Saturation window, tick the 'Colorize' box and adjust the hue slider to change the logo color.
Click 'OK' to apply the changes.
How do I change the color of the logo?
Load your logo into Photoshop.
Choose the 'Magic Wand Tool' to select the area of the logo you want to change.
Once selected, find the 'Adjustments' option in the 'Image' menu.
Select 'Color Balance' and adjust the colors as needed.
Apply the changes by clicking 'OK'.
How to change the icon color in Photoshop?
Open the icon file in Photoshop.
Use the 'Quick Selection Tool' to select the icon.
From the 'Image' menu, go to 'Adjustments' and select 'Hue/Saturation'.
Adjust the hue to change the color of the icon.
Confirm your changes by clicking 'OK'.
What steps should I take to change the background color of a logo in Photoshop?
Open the logo file and select the background layer, or create a new layer behind the logo.
Select the 'Paint Bucket Tool' or use the 'Layer Style' dialog for more complex backgrounds.
Choose a new color from the color palette.
Click on the background to apply the new color.
If using 'Layer Style', select 'Color Overlay' and then choose your color.
Click 'OK' to save your new background color.
Conclusion
Learning how to change a logo color in Photoshop has truly transformed my creative process. It not only allows me to tailor designs to meet specific needs but also ensures that I maintain brand consistency. This skill has made it easier for me to tackle projects, whether for clients or personal use.
I found the Photoshop Course incredibly helpful in developing this ability. It walks you through everything from the basics to more advanced techniques.
Additionally, the Lightroom course provided me with essential skills in photo editing and organization that complement my Photoshop knowledge.
If you’re ready to enhance your design capabilities, I recommend these courses. They have boosted my confidence and made complex tasks feel manageable. If you don’t have Adobe yet, consider checking out Photoshop and Lightroom to get started.
If this article has helped you, then Like and Share it with your friends
$2,061.00Original price was: $2,061.00.$1,061.00Current price is: $1,061.00. 27583
Download Your Free Guide Now!
Discover the secrets of photography with our printable guide! Master essential techniques like aperture, shutter speed, and ISO to create stunning images. Get your free printable PDF now and start turning your snapshots into masterpieces!