Have you ever wondered how to export actions Photoshop to streamline your photo editing process?
If you’re like me, you appreciate any tool that can save time and enhance your workflow.
Imagine having your favorite editing steps ready to go, just a click away, no matter where you are or which computer you’re using.
That’s what exporting actions in Photoshop can do for you! This guide will walk you through the simple steps to exported actions, making your editing process more efficient and consistent.
Stick around, and by the end of this article, you’ll have a clear understanding of how to export Photoshop actions, making your creative life a whole lot easier.
Table of Contents
How to Create Photoshop Actions
Creating Photoshop actions can streamline your workflow and save you time. Here’s a quick guide to help you get started.
Short Step-by-Step Guide to Creating Photoshop Actions
To quickly set up Photoshop actions, follow these simple steps. Here’s a brief guide to get you started.
1. Open Photoshop
Start by launching your version of Photoshop.
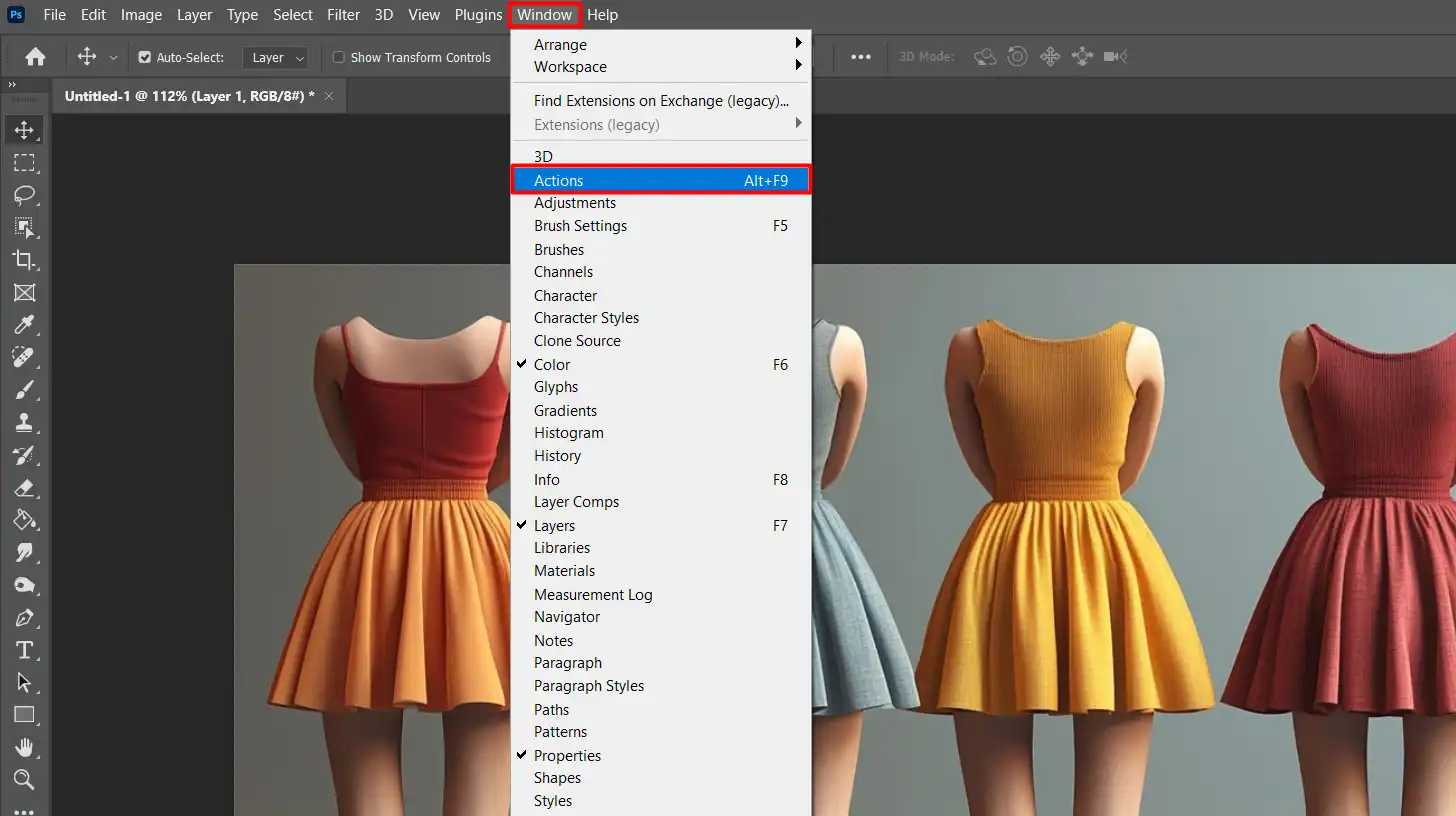
2. Access the Actions Panel
Go to the Window menu and select “Actions” or press Alt + F9 on your keyboard. The Actions Panel will appear.
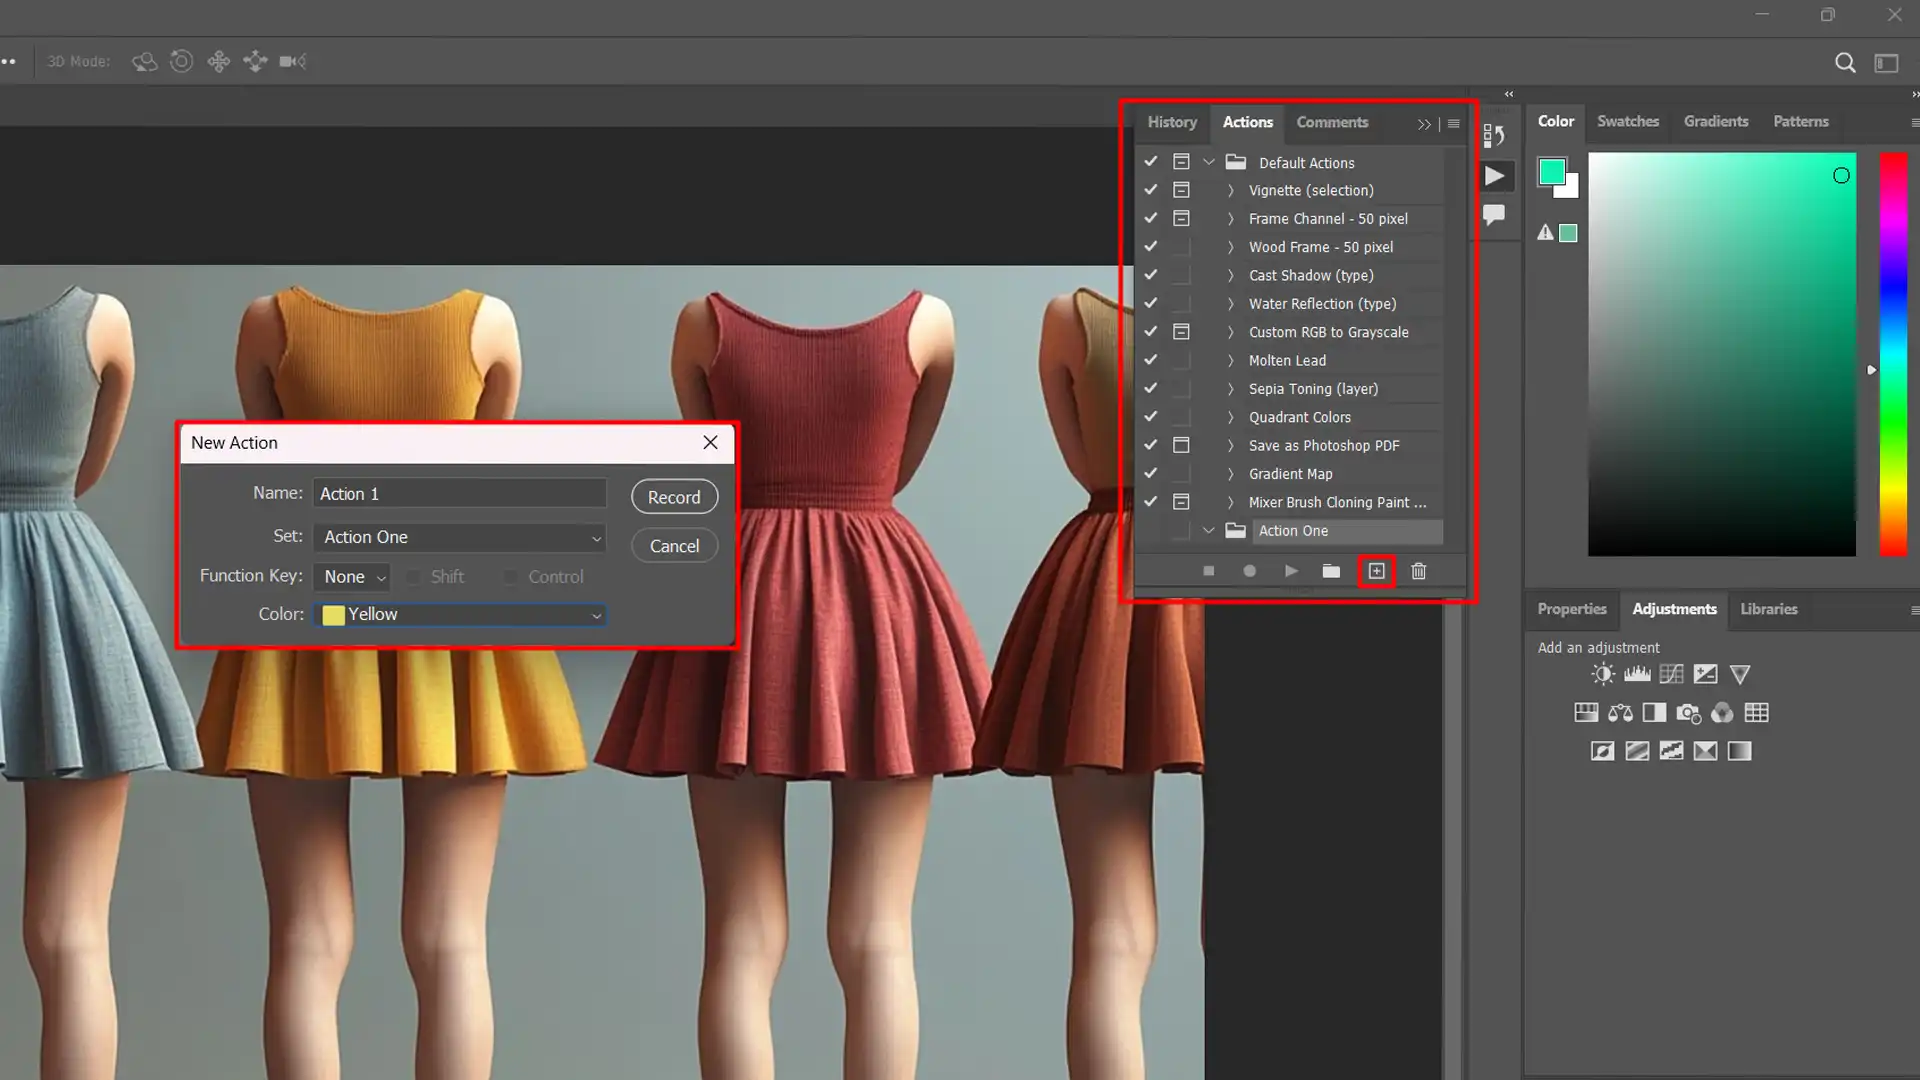
3. Create a New Action Set
Click the folder icon at the bottom of the panel. Name this set and click “OK”. It will help organize your actions.
4. Create New Action Button
Click this button, name your action, and choose the desired presets manager (such as Function Key or Color).
5. Record Your Steps
Press “Record”. Perform the steps you want to automate. Photoshop saves each step. When done, press the stop button.
6. Save Actions
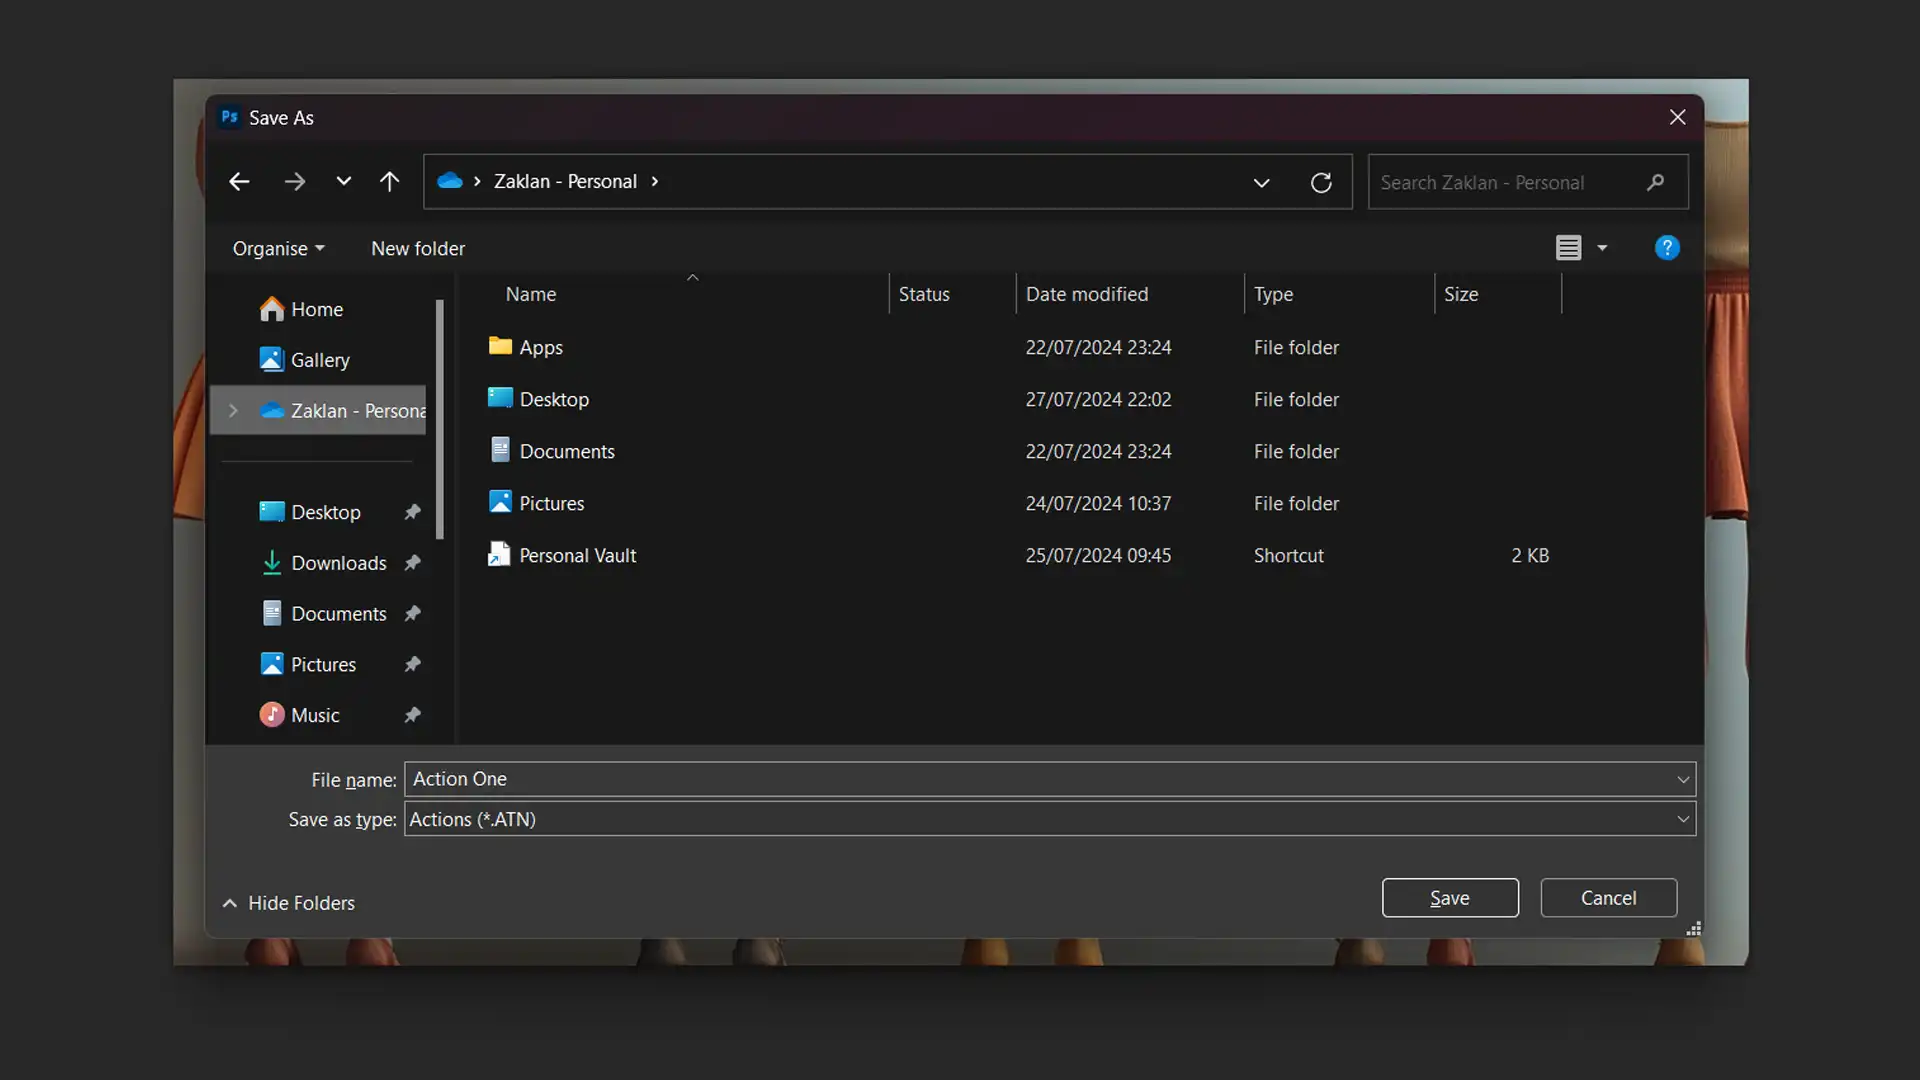
To save action, go to the menu in the Actions Panel, select “Save Actions” and choose a desired option for a location. This will create an .atn file.
Tips for Effective Actions
Use the Actions Set
Group related actions folder in one set. It keeps things organized.
Test Actions
Always test your action on a new file. Some steps may not always produce the desired results.
Export Actions
You can export Photoshop actions as .atn files for sharing or later use.
Simply choose “Save Actions” from the dropdown menu.
Loaded Actions
To load previously saved actions, click the menu icon in the Actions Panel, select “Load Actions“, and choose your .atn file.
Default Actions
Adobe Photoshop provides this feature. Familiarize yourself with them; they might save time.
Pro Tip: Always name your actions descriptively. It helps when you need to identify or share them later.
For portrait editing, consider creating specific Photoshop actions for portraits to speed up your workflow and achieve consistent results.
Additional Tips for Using Photoshop
Here are some quick tips to enhance your Photoshop experience. Let’s start with learning some useful shortcuts.
Learn Photoshop Shortcuts
Mastering Photoshop shortcuts can significantly speed up your workflow. For example, pressing Ctrl + Z undoes the last action.
Utilize Essential Tools in Photoshop
Familiarize yourself with essential tools in Photoshop like the Clone Stamp Tool and the Spot Healing Brush Tool to enhance your editing capabilities.
For precise selections, especially in portrait photography, try using the Photoshop select subject tool to quickly isolate the main subject in your images.
To add dynamic effects to your photos, experiment with the motion blur filter in Photoshop for a sense of movement and speed.
To enhance your graphic designs, explore the Photoshop shape tool for creating custom shapes and elements, adding a unique touch to your projects.
Why Export Photoshop Actions?
Automation: Exporting actions is a powerful way to automate repetitive tasks. It saves time and ensures consistency across your projects.
Sharing: Export actions in Photoshop allows you to share your custom workflows with others. Whether collaborating or teaching, it fosters creativity.
Backup: By exporting Photoshop actions, you have a backup in case something goes wrong. It’s always good to be prepared.
Before diving into the detailed steps of exporting Photoshop actions, let’s quickly compare the benefits and use cases of this feature. Here’s a brief overview:
Feature
Benefit
Example Use Case
Automation
Saves time by automating repetitive tasks
Batch editing multiple photos
Sharing
Easily share custom workflows with others
Collaborating with a team
Backup
Keeps a copy of actions for safety
Restoring actions after a system crash
Step-by-Step Guide to Exporting Photoshop Actions
Follow these simple steps to export your Photoshop actions and easily share or back them up.
Open Photoshop.
Go to the Actions Panel by navigating to Window > Actions or hitting Alt + F9.
Select the action set you want to export from the actions panel.
Click the menu in the top-right corner of the actions panel and select Save.
Choose the proper file type (.atn) and desired location. Then click save.
Confirm your settings in the dialog box and complete the process by clicking OK.
Make sure the exported actions function as expected by testing them on new files.
Common Issues and Solutions
Missing Actions: Sometimes a Photoshop action don’t appear in the actions panel. Ensure they’re placed in the correct Photoshop action folder. Compatibility: Different versions of Photoshop might not support all actions. Double-check compatibility before exporting.
Export Process: If the export Photoshop actions process fails, try restarting Adobe Photoshop or reselecting your Photoshop action.
Loading Actions: To import a Photoshop action, select “Load” from the menu in the actions panel and navigate to your saved .atn file.
File Issues: Make sure the .atn file’s location and export presets are accessible and not corrupted.
Easy Test: Avoid potential issues by running a quick, simple test. Create an action and execute it on multiple images to confirm it works smoothly.
Pro Tip: Organize your actions neatly within Adobe Photoshop. Group related actions into folders for better efficiency and findability. This helps keep your workflow smooth and project management seamless. After action creation, modifying any action can be done easily through the actions panel.
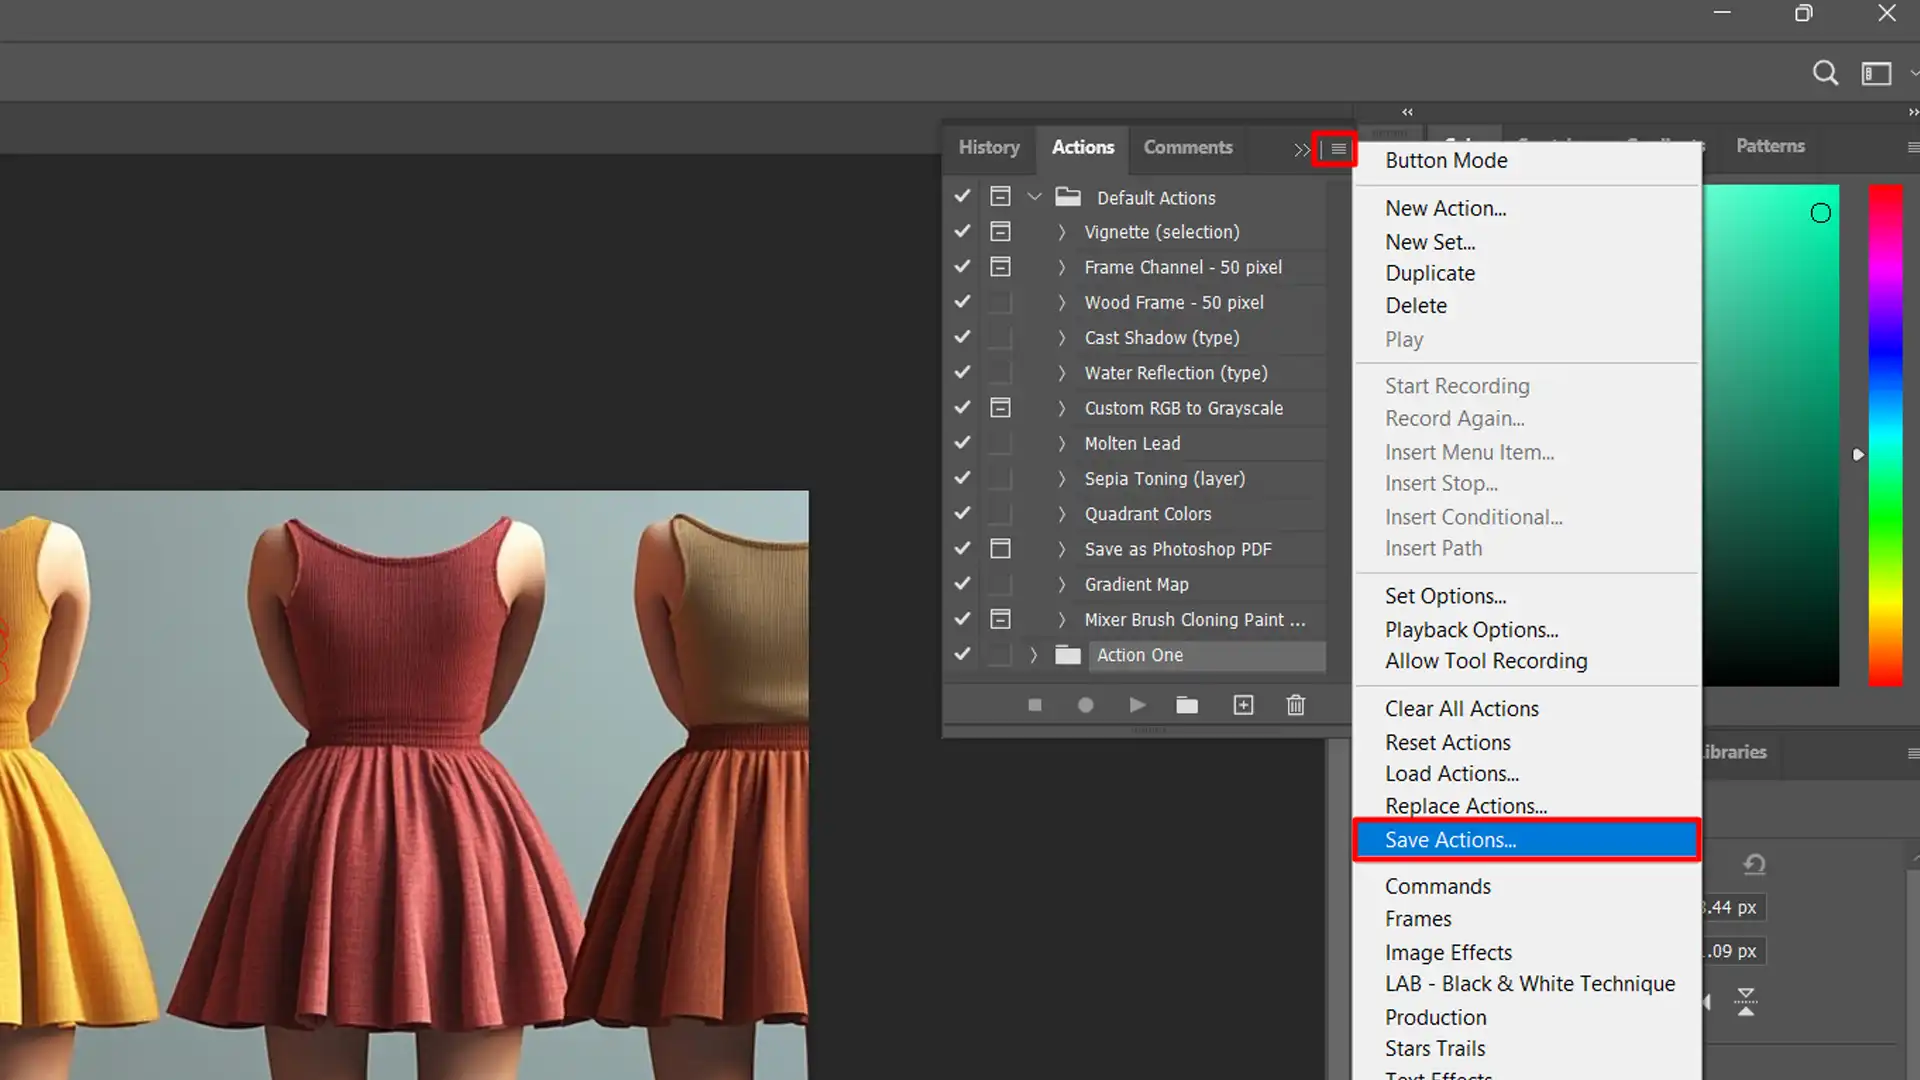
Save Actions
Saving actions preserves your hard work and allows you to reproduce the effects effortlessly.
Let’s explore why it’s helpful
Importance of Saving Actions
A saved action ensures consistency. Your edits look the same across multiple images.
It’s significant for professionals who need uniform results.
Think about maintaining a specific style for a brand or project. With saved actions, you standardize the process, ensuring all outputs remain uniform.
Moreover, it’s a backup. Sometimes, accidents happen.
You might delete an action by mistake. If you’ve saved it, you can easily reload it. Saved actions protect you from losing significant work due to unforeseen issues.
How to Save Actions in Photoshop
First, open Adobe Photoshop. Head to the Actions Panel by navigating to Window > Actions, or simply press Alt + F9. This panel is your control center for creating and managing actions.
Select the actions you need to save. Click the small menu icon at the top right of the Actions Panel. From the dropdown, choose "Save." It's that simple.
A prompt will appear, allowing you to put descriptive name your file and choose its following location. Make sure to select the .atn file type, which is the standard for Adobe Photoshop actions. Once done, click Save.
Remember, organization matters. Use descriptive names so you can find them later without hassle.
Test your saved action to verify it works as intended. Simply reload it using the “Load Actions” option in the Actions Panel menu, then try it on a new image.
Saving actions also comes in handy when you upgrade to a new version of Photoshop.
Your styles and workflows stay intact, eliminating any need to recreate actions from scratch.
Pro Tip: Regularly backup your action files to an external drive or cloud service. This ensures you never lose your work, even if your main device encounters issues.
For more tips on how to use essential tools in Lightroom or shortcuts, and to learn about Lightroom, which complements Photoshop by offering powerful editing and organizing features, including Lightroom export settings for Instagram, explore our detailed guides and resources.
Frequently Asked Questions (FAQs)
Can I export an action in Photoshop?
To export an action in Photoshop, first go to the Actions panel.
Find the action you want to export, click on the menu in the top right corner of the Actions panel, and select 'Export Actions'.
Choose a location to save the file, and your action will be exported as an .atn file.
How do I transfer actions from one Photoshop to another?
First, export the action from the original Photoshop using the steps mentioned above.
On the new Photoshop installation, go to the Actions panel.
Click on the menu and select 'Load'.
Navigate to the .atn file you exported, select it, and click 'Load'.
Can you download actions in Photoshop?
Yes, you can download actions for Photoshop from various online sources.
Once downloaded, you can install these actions by going to the Actions panel.
Click on the menu icon, select 'Load', and find the downloaded .atn file on your computer.
Select the file and click 'Load' to add it to your Photoshop actions list.
How do you save export options in Photoshop?
To save export options in Photoshop, use the 'Export As' feature found under the File menu.
Adjust your settings such as format, quality, and dimensions in the 'Export As' dialog box.
Click on 'Save' to keep your current settings as a preset for future use.
In conclusion, mastering export actions in Photoshop has significantly streamlined my workflow, making my editing process more efficient and less time-consuming.
By setting up and utilizing these actions, I’ve been able to maintain consistency across multiple projects and save a tremendous amount of time.
If you’re looking to enhance your skills further, I highly recommend checking out this comprehensive Photoshop course and this in-depth Lightroom course.
Both have been invaluable resources in my journey, offering detailed guidance and practical tips that have boosted my proficiency and confidence in using these powerful tools.
If this article has helped you, then Like and Share it with your friends
$2,061.00Original price was: $2,061.00.$1,061.00Current price is: $1,061.00. 27584
Download Your Free Guide Now!
Discover the secrets of photography with our printable guide! Master essential techniques like aperture, shutter speed, and ISO to create stunning images. Get your free printable PDF now and start turning your snapshots into masterpieces!