Have you ever wondered how to desaturate Photoshop images to achieve that striking, timeless black-and-white effect?
I’m here to guide you through the process.
Whether you’re a budding photographer or a seasoned designer, mastering this technique can add a new dimension to your work.
Imagine transforming your colorful photos into stunning monochrome masterpieces with just a few clicks. Intrigued?
Let’s dive in and explore how you can effortlessly desaturate in Photoshop
Table of Contents
Desaturate Photoshop Step-by-Step Guide
Desaturation, which removes color from an image, can highlight textures, shapes, and contrasts in a way that vibrant colors sometimes overshadow.
When I first started experimenting with this technique, I realized the power it has to transform a photo’s mood and storytelling ability.
Step 1: Open Your Image
Starting with the basics:
- Open Photoshop and load your image
- Go to File > Open, then pick the photo you want.
If you get stuck, check the Help menu for a Photoshop tutorial.
Step 2: Choose Your Desaturating in Photoshop Method
Decide how to desaturate in photoshop.
Options include:
- Desaturate Command
- Hue/Saturation Adjustment
- Black & White Adjustment
- Gradient Map Adjustment
Each method has its own perks.
Step 3: Apply Desaturation in Photoshop
Now, let’s get to work.
- Desaturate Command: Click Image > Adjustments > Desaturate. Simple and fast.
- Hue/Saturation Adjustment: Go to the Adjustments Panel, select Hue/Saturation, and slide the Saturation Slider to the left.
- Black & White Adjustment: Use the Black & White icon in the Adjustments Panel. Adjust contrasts as needed.
- Gradient Map Adjustment: Pick Gradient Map from the Adjustments Panel. Choose a gradient from black to white for a different look.
Step 4: Fine-Tune Your Image
Adjust settings for your final result.
Use the controls until you’re satisfied with your photo.
Remember, you can undo mistakes with Ctrl+Z (Windows) or Cmd+Z (Mac).
Pro Tip: Save your work as a PSD file to keep your layers and adjustments non-destructive. Follow these steps to get a professional look using Adobe Photoshop.
Methods to Desaturate Photoshop
I’ve discovered several methods to achieve this effect in Photoshop, each with its own unique benefits.
If you’re looking to experiment with this techniques, let me share with you my favorite methods to desaturate images in Photoshop.
Using the Desaturate Command
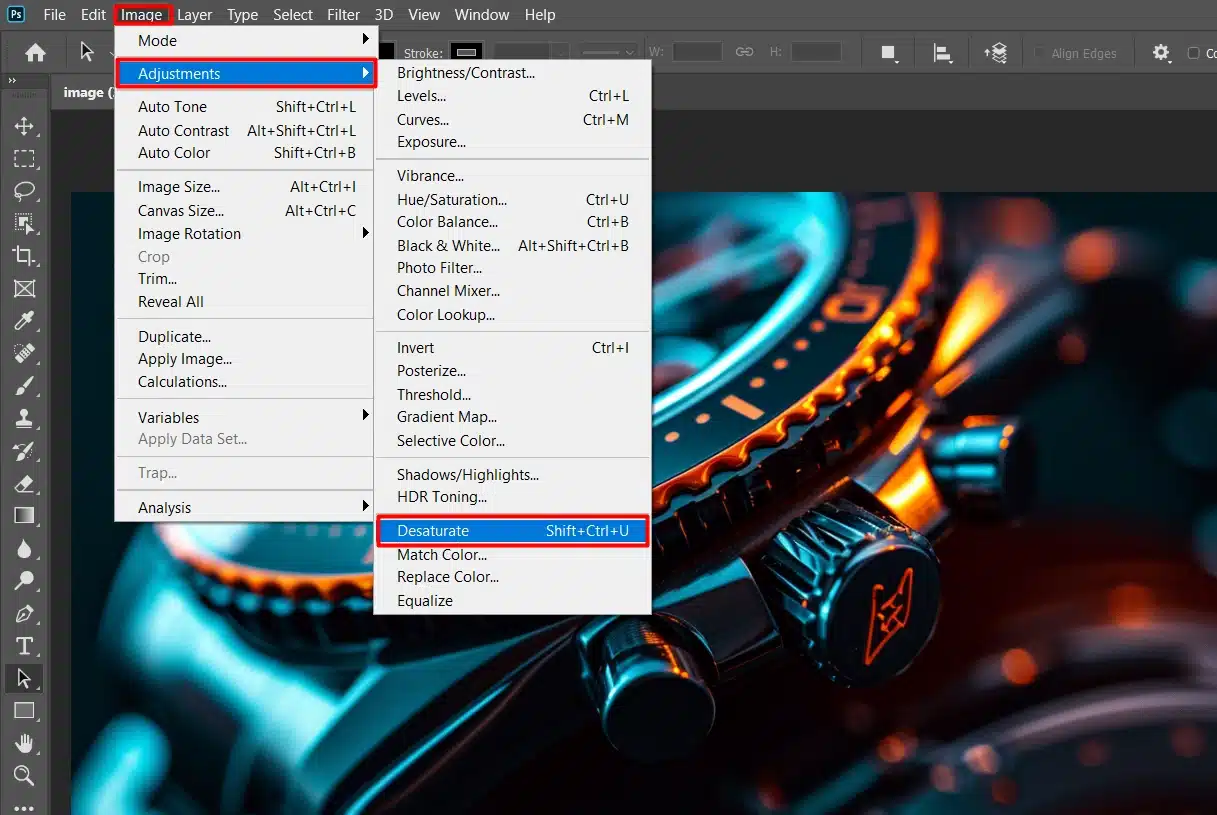
To desaturate in Photoshop, start with the desaturate command:
- Select the background layer.
- Go to the menu bar, click Image, then navigate to Adjustments, and choose Desaturate.
This will remove all the color from the selected layer instantly. The result is a quick, complete shift to black and white without adjusting each color channel.
Pro Tip: Learn the black and white shortcut to make this process easier.
Using the Hue/Saturation Adjustment
Another option is the Hue/Saturation Adjustment Layer:
- Click on the Adjustments Panel and select Hue/Saturation Adjustment Layer.
- Move the Saturation Slider all the way to the left.
This method lets you reduce saturation incrementally if you don’t want a fully black and white image. It also allows for non-destructive editing, meaning the original image is preserved underneath the adjustment layer.
Using the Black & White Adjustment for Desaturating Images in Photoshop
You can also use the Black & White Adjustment Layer:
- Go to the Adjustments Panel and click on the Black & White icon.
- Drag the sliders to see how each affects your final result.
This tool lets you control the contrast of individual colors within the photo, giving you more creative control.
Explore the reverse process of desaturation by adding color back into black and white photos or colorizing them, which can be an intriguing creative endeavor
Using the Gradient Map Adjustment
The Gradient Map Adjustment offers another unique method:
- Select the Gradient Map Adjustment Layer from the Adjustments Panel.
- Choose a Gradient that transitions from black to white.
This approach not only removes all the colors but can also add a different tonal quality to the image.
Pro Tip: To preview before committing, press Ctrl+Z (Windows) or Cmd+Z (Mac) to undo, letting you toggle between the original and desaturated version.
For changing the color of a layer in Photoshop, using a gradient map is an excellent technique, and the benefits of gradient maps for creative edits.
Advanced Ways to Make Your Photos Black and White in Photoshop
When converting images to black and white in Photoshop, there are several methods you can use to achieve different effects and levels of control. Here are some common methods, their steps, and benefits:
| Method | Steps | Benefits |
|---|---|---|
| Desaturate Command | Select layer, Image > Adjustments > Desaturate | Quick transformation to grayscale |
| Hue/Saturation Adjustment | Add adjustment layer, adjust Saturation slider to the left | Control over color intensity |
| Black & White Adjustment | Add adjustment layer, customize color sliders | Fine-tune contrast for different colors |
| Gradient Map Adjustment | Add adjustment layer, select black-to-white gradient | Adds artistic tonal variations |
Quick Desaturate Trick
First, try the Desaturate photoshop command:
- Select the background layer.
- Go to Image in the menu, then Adjustments, and hit Desaturate.
Boom! Your layer is now black and white. No need to mess with each color channel.
In Depth for Advanced Hue/Saturation Slider
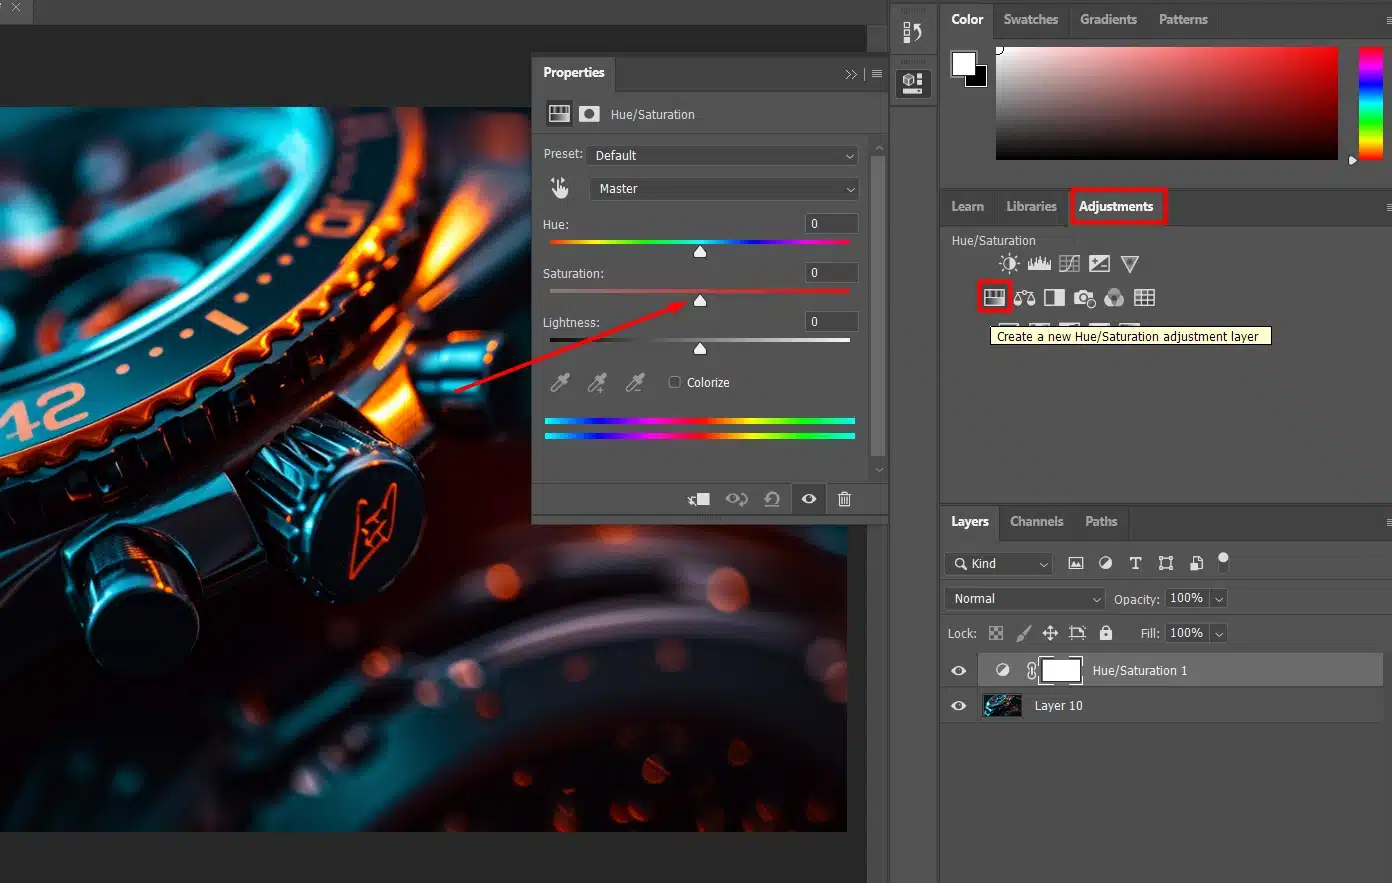
Next, check out the Hue/Saturation Adjustment Layer:
- Open the Adjustments Panel and pick Hue/Saturation.
- Drag the Saturation Slider to the left.
This way, you can gradually reduce color if you want some shades of gray. Plus, it keeps your original image safe under the adjustment layer.
Adjusting Black and White Layers
You can also use the Black & White Adjustment Layer:
- Find the Black & White icon in the Adjustments Panel.
- Play with the sliders to get the look you want.
This tool lets you tweak the contrast of each color in your photo.
In Photoshop, mastering the technique to color black and white images allows you to breathe new life into vintage photographs, transforming them into vibrant, colorful compositions.
Advanced Techniques for Gradient Desaturating Map
Try the gradient map adjustment for a different feel:
- Select the Gradient Map Adjustment Layer from the Adjustments Panel.
- Pick a Gradient that goes from black to white.
This not only makes your photo black and white but also adds a cool tonal effect.
Pro Tip: Want to see the difference? Press Ctrl+Z (Windows) or Cmd+Z (Mac) to undo and compare the original with the desaturated version.
Tips and Tricks for Better Results
These tips and tricks have made a significant difference in my workflow, enhancing the overall quality and impact of my desaturated images.
Let me share these with you to help you get the most out of your editing process.
Adjusting Contrast
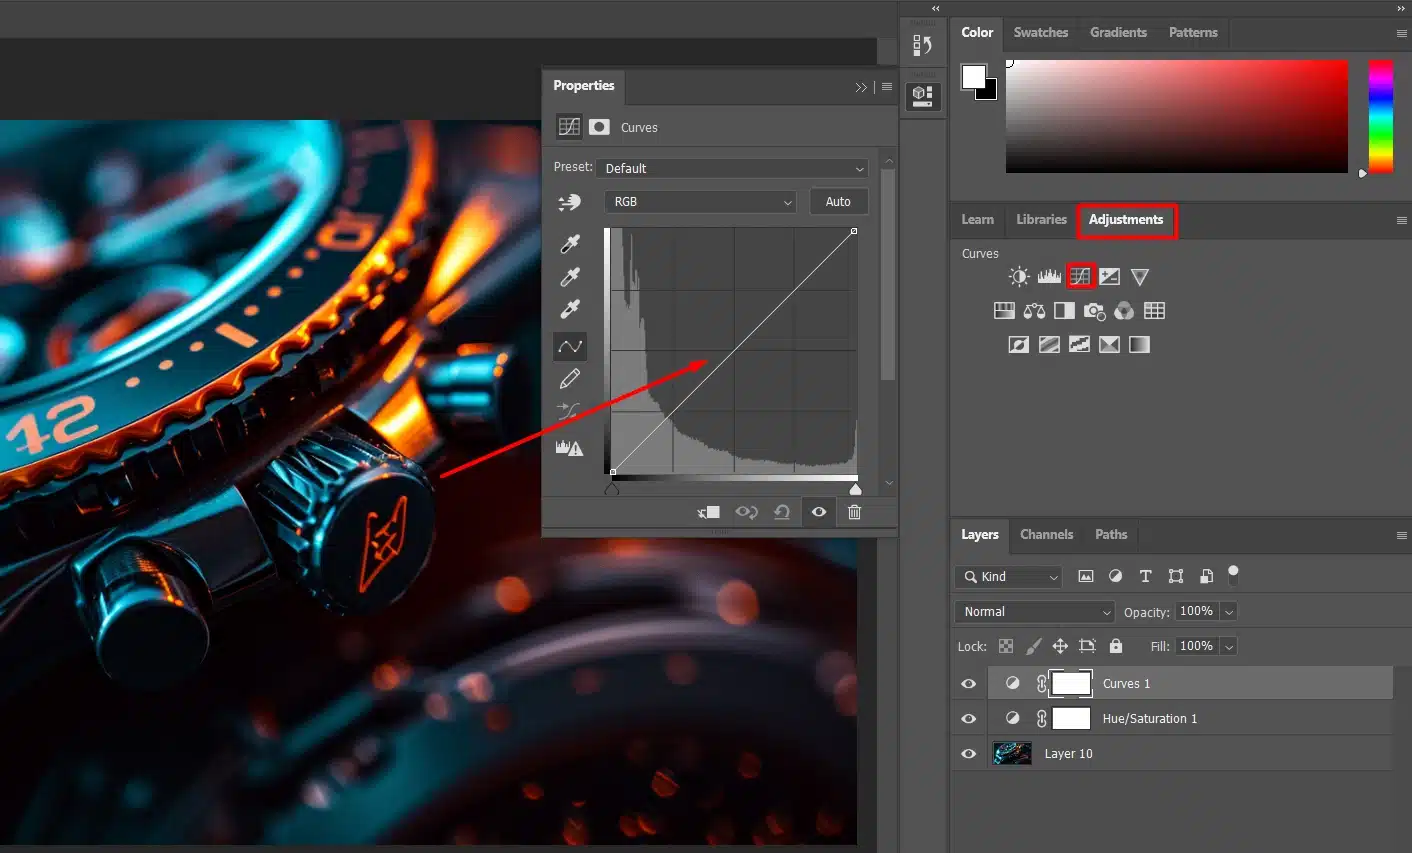
Contrast adjustments make your photo stand out. Use Curves or Levels in the Layers panel:
- Click ‘Adjustment Layer’
- Pick Curves
- Tweak until you're happy
Changes are non-destructive, so you can always modify them later.
Also, learning about adjusting the white balance in photography is crucial for ensuring accurate colour representation under different lighting conditions.
Using Layer Masks
Layer masks help you edit parts of an photo without touching the whole thing:
- Select your adjustment layer
- Click the ‘Add Layer Mask’ icon at the bottom of the Layers panel
- Use a brush tool to paint black on areas you want to hide and white to reveal parts
This method keeps your edits flexible and non-destructive.
Combining Multiple Methods Desaturate and Saturation
Combine methods like desaturate and saturation adjustment layers for dynamic effects:
- Desaturate areas with the Desaturate photoshop Command
- Use a saturation adjustment layer to enhance colors in selected parts
Blend different methods for a richer final result. This technique helps create unique images with a professional touch.
Pro Tip: Always work on a duplicate of your original photo. This way, if an edit goes wrong, something with the image, your original image remains untouched.
Using Content-Aware Fill to Desaturate in Photoshop
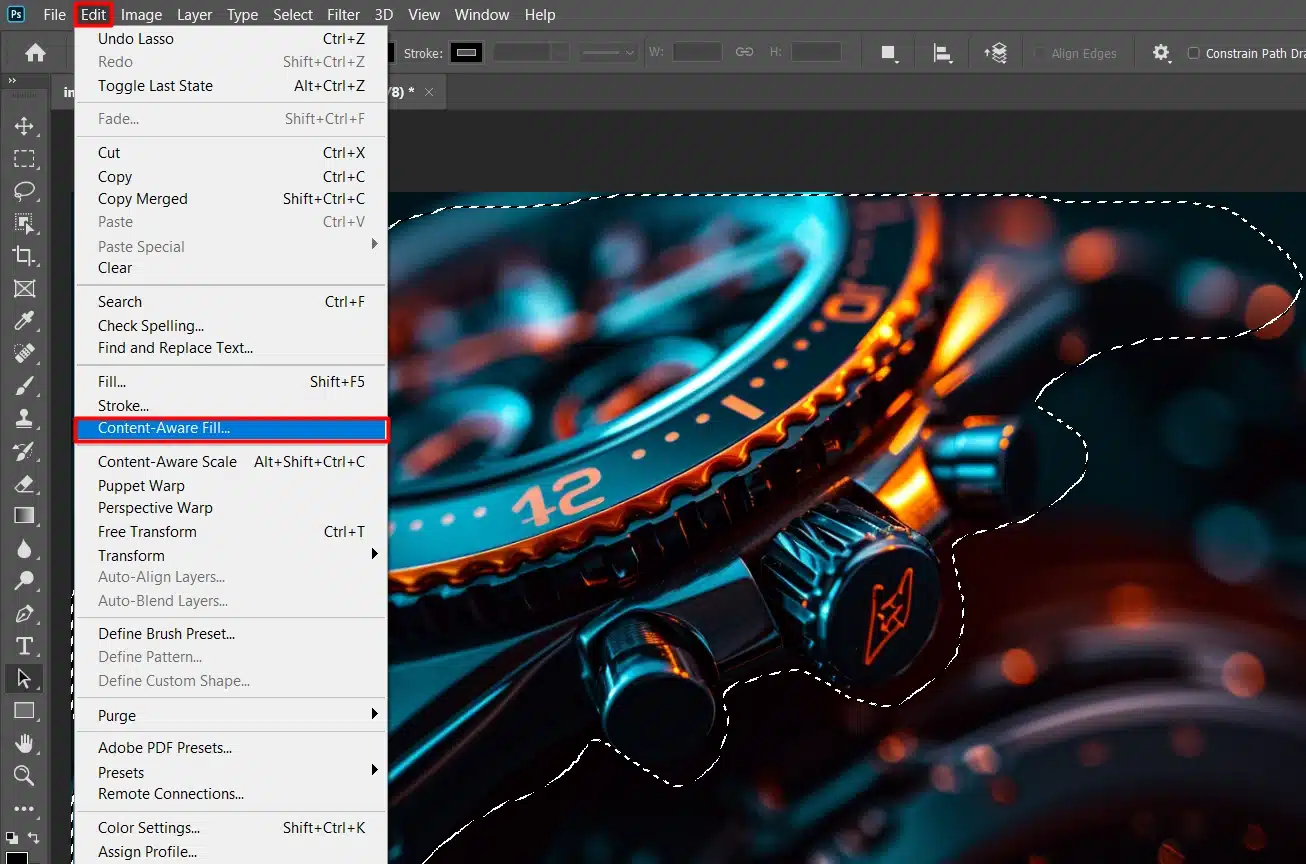
The content–aware fill is a powerful toolbar that can help you remove unwanted objects from your photos seamlessly:
- Select the area you want to remove using the Lasso Tool.
- Go to Edit > Content-Aware Fill
- Adjust the settings and click OK
This tool intelligently fills in the selected area, making it look like the object was never there.
Lightroom Shortcuts
Speed up your workflow with these essential Lightroom shortcuts:
- Press 'D' to switch to the Develop module
- Use 'R' to quickly access the Crop tool
- Hit 'G' to return to the Library grid view
Mastering Photoshop shortcuts and Lightroom shortcuts can save you a lot of time and make your editing process more efficient.
Common Mistakes to Avoid
As I navigated through the process of desaturating images in Photoshop, I encountered several pitfalls that hindered my progress.
Understanding and avoiding these common mistakes can save you time and frustration,
Over-Desaturation in Photoshop
Over-desaturation in Photoshop can be a big problem. It makes your photos look dull and lifeless. Nobody wants gray and colorless images, right?
Use the desaturate photoshop tool sparingly. Balance is key. Use a saturation adjustment layer to keep some colors vibrant. The goal is to enhance the photo’s natural beauty, not make it boring.
Over time, I’ve learned that achieving the perfect desaturated image involves more than just removing color. One critical aspect is managing white balance before editing your photos, especially when dealing with over-saturation.
White balance can bring out the true essence of your image, ensuring that it doesn’t lose its natural look.
Ignoring Image Details
Ignoring details when editing can ruin a good image. Don’t skip the finer points. Zoom in and focus on the small stuff.
- Use layer masks to make precise adjustments.
- Always work on a duplicate layer to keep your work non-destructive.
- Small tweaks can make a big difference.
- Pay attention to shadows and highlights as they add depth to your image.
Pro Tip: Use Envato Elements for high-quality tutorials that can help you master these techniques in Photoshop! You’ll find plenty of video tutorials that break down complex steps into manageable tasks.
Removing Shadows in Photoshop Tutorial
Adding or removing shadows can sometimes be distracting in your photos. Learn how to effectively remove them using tools like the patch tool. This will help in refining your image and making them look more like professional photo.
Desaturate Photoshop has been a game-changer in my editing process.
It has allowed me to create striking, timeless images with just a few clicks. By removing or reducing colors, I can focus on the essential elements of my photos.
With these skills, you’ll elevate your editing and bring your creative vision to life.
Frequently Asked Questions (FAQ)

How do I desaturate a picture in Photoshop?
To desaturate a picture in Photoshop:
- Open your image in Photoshop.
- Go to the menu and select Image > Adjustments > Desaturate. Alternatively, you can use the shortcut Shift + Ctrl + U (Windows) or Shift + Command + U (Mac).
- Your image will now be desaturated, turning it into grayscale without affecting the brightness or contrast.
What is the desaturate key in Photoshop?
The desaturate key in Photoshop is:
- Shift + Ctrl + U for Windows
- Shift + Command + U for Mac
What does it mean to desaturate an image?
Desaturating in Photoshop means removing its color, converting it to shades of gray. This process decreases the saturation of the colors, resulting in a black-and-white or grayscale image without altering the image’s brightness or contrast.
How do I desaturate one area in Photoshop?
To desaturate one area in Photoshop:
- Open your image in Photoshop.
- Select the area you want to desaturate using a selection tool (e.g., Lasso Tool, Marquee Tool, or Quick Selection Tool).
- With the selection active, go to Image > Adjustments > Desaturate or use the shortcut Shift + Ctrl + U (Windows) or Shift + Command + U (Mac).
- Only the selected area will be desaturated, leaving the rest of the image in color.
Conclusion
Desaturating in Photoshop has revolutionized my editing process, allowing me to effortlessly transform vibrant images into timeless black-and-white masterpieces.
By removing colors or adjusting saturation levels, I can emphasize the essence of each photo, focusing on details and textures. Whether you’re a beginner or seasoned editor, mastering these techniques can elevate your photography to new heights.
Explore my comprehensive courses on Photoshop and Lightroom to dive deeper into these editing tools.
With step-by-step guidance, you’ll refine your skills and unleash your creativity. Ready to take your photos to the next level? Check out my Photoshop Course and Lightroom Course today.
For more editing tips and tools, visit Adobe’s official pages for Photoshop and Lightroom. Start enhancing your photos today with these powerful editing tools!
Read more about Photoshop:


