
One way to enrich your digital art is through a watercolor effect in Photoshop.
With this tutorial you’ll learn how to do it. We’ll break it down into simple steps. You’ll get the tools and techniques to get pro results.
Don’t miss out on improving your Photoshop skills and making beautiful art.
Read on to learn how to master the watercolor in Photoshop.
Table of Contents
Step-by-Step Guide to Create a Watercolor Effect in Photoshop
Creating a watercolor effect in Photoshop is a great way to transform your photographs into beautiful, artistic creations.
Here’s a simple, reader-friendly guide on how to apply your first watercolor filter.
We’ll use some common Photoshop tools like the filter gallery, blend mode, and brush tool to get you started.
First Step for Creating Watercolor Effect
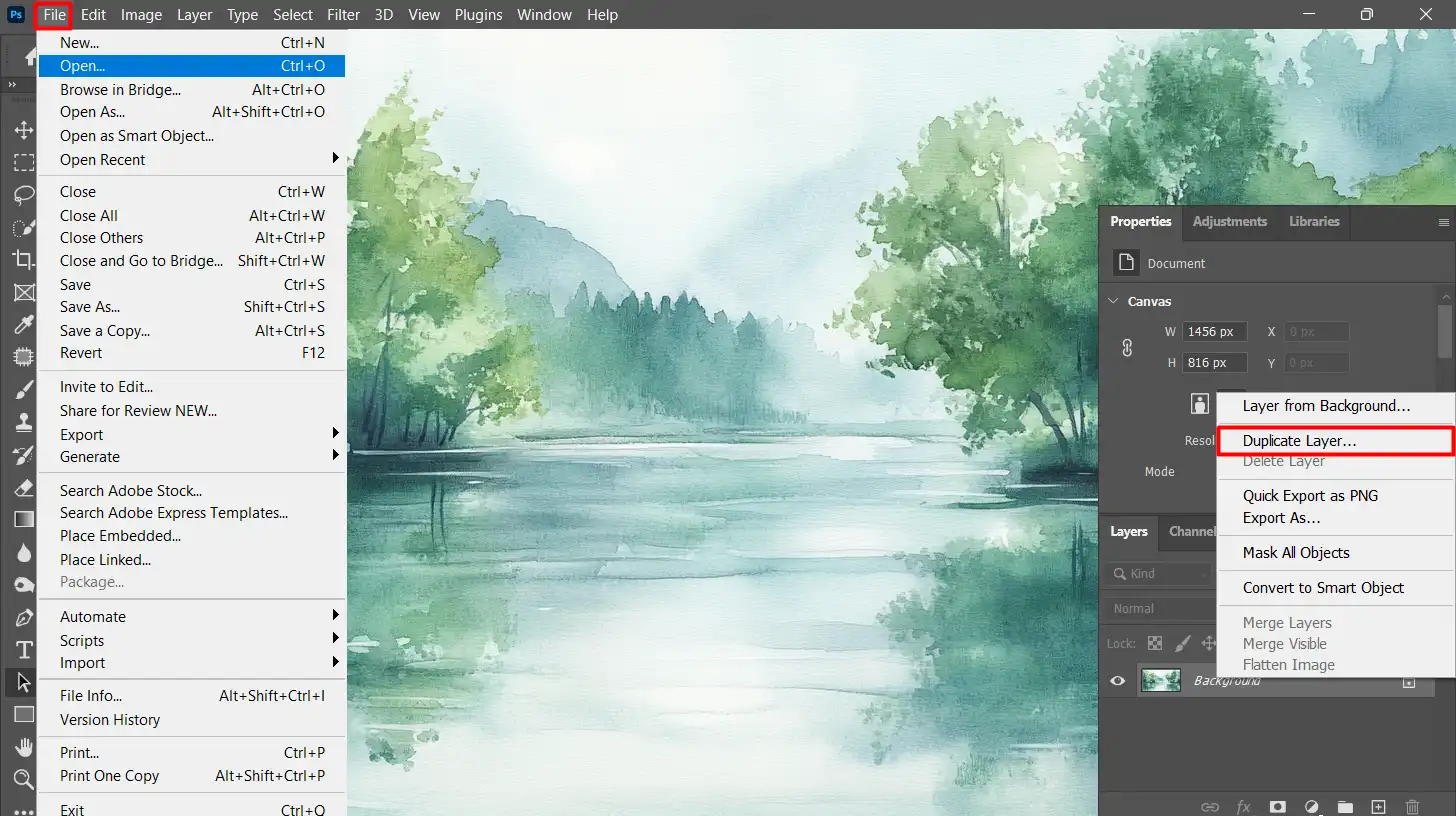
- Open your image in Photoshop.
- Duplicate the background layer to preserve the original. You can do this by right-clicking on the layer and selecting "Duplicate Layer."
Second Step - Converting to Smart Object
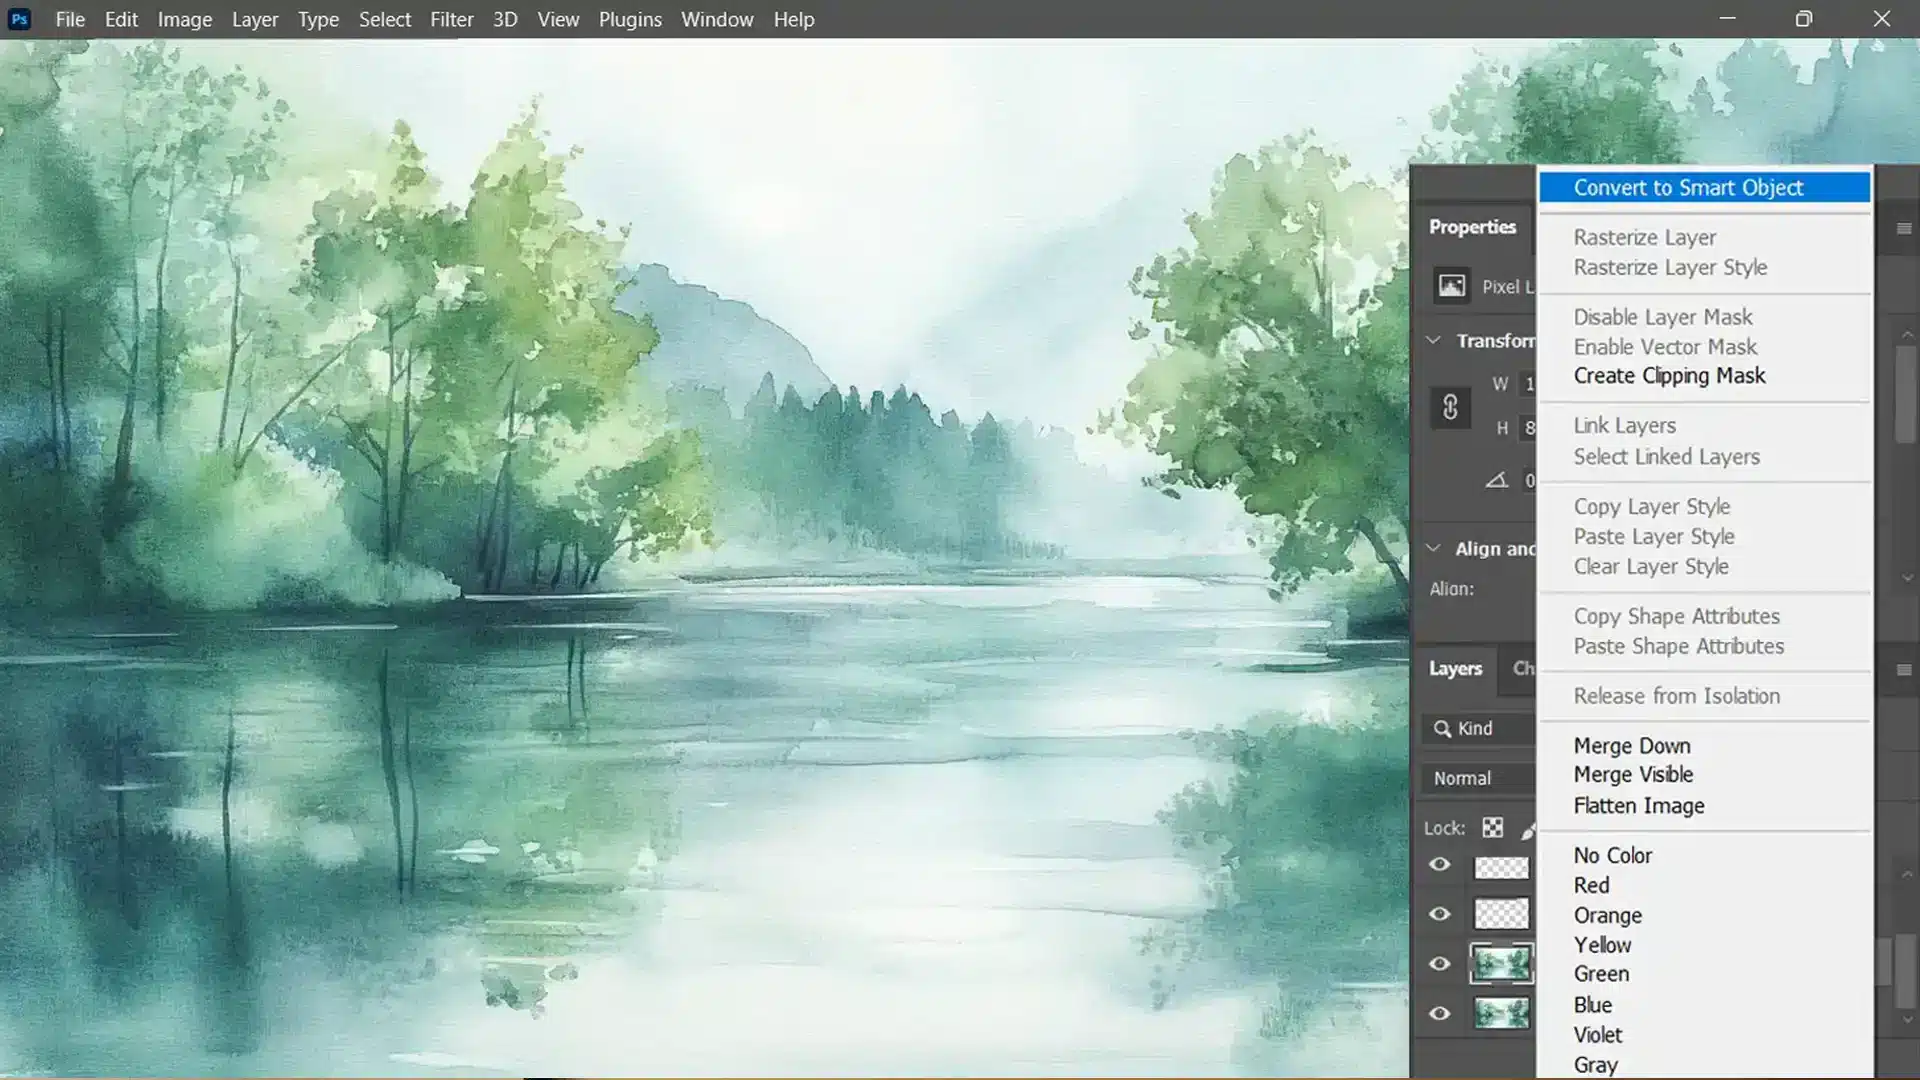
- Right-click on the duplicated layer and choose "Convert to Smart Object." This step allows you to apply smart filters non-destructively, meaning you can adjust them later without any loss of quality.
Third Step - Adding Filter Gallery
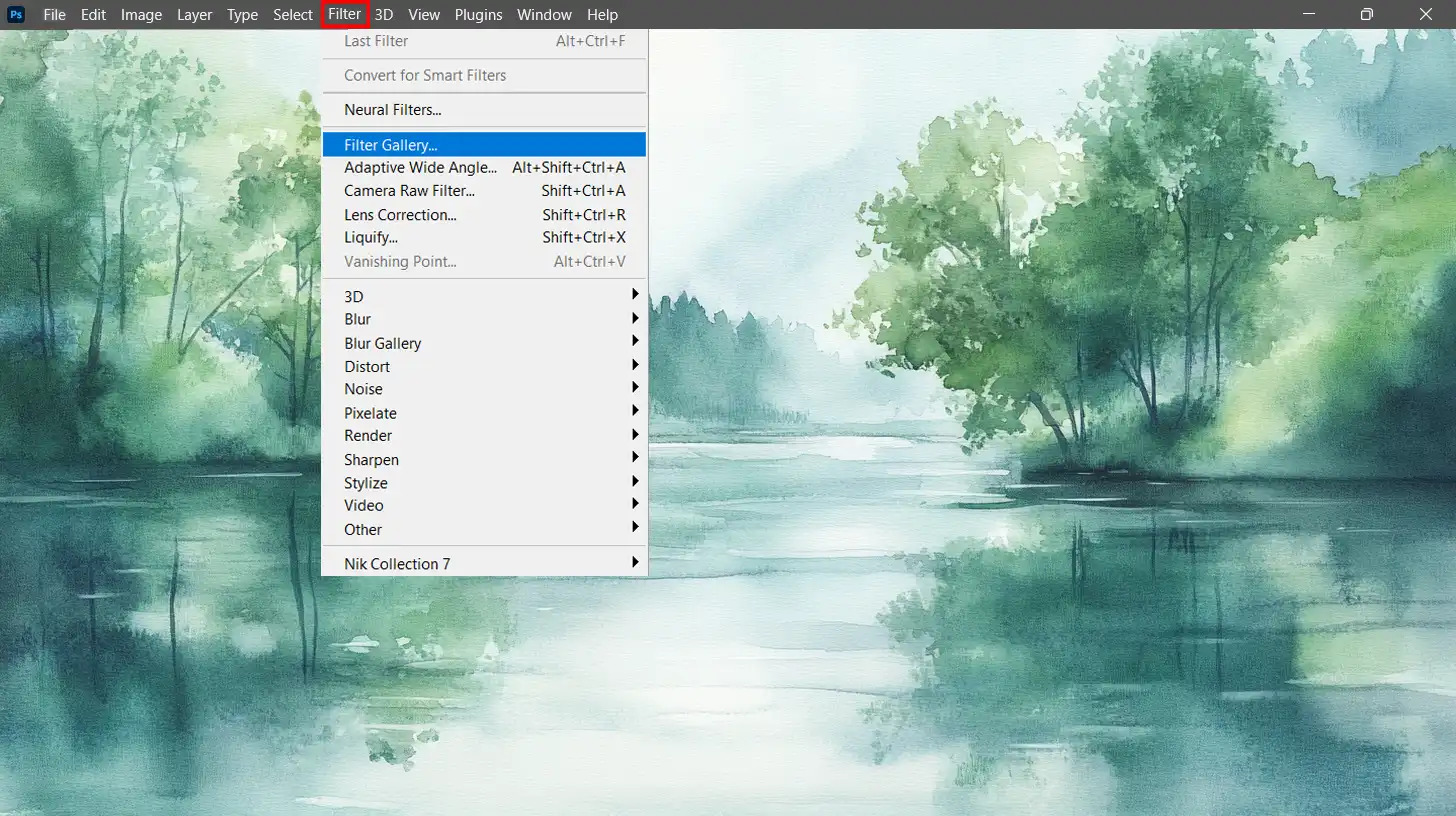
- Go to the top menu and select Filter > Filter Gallery.
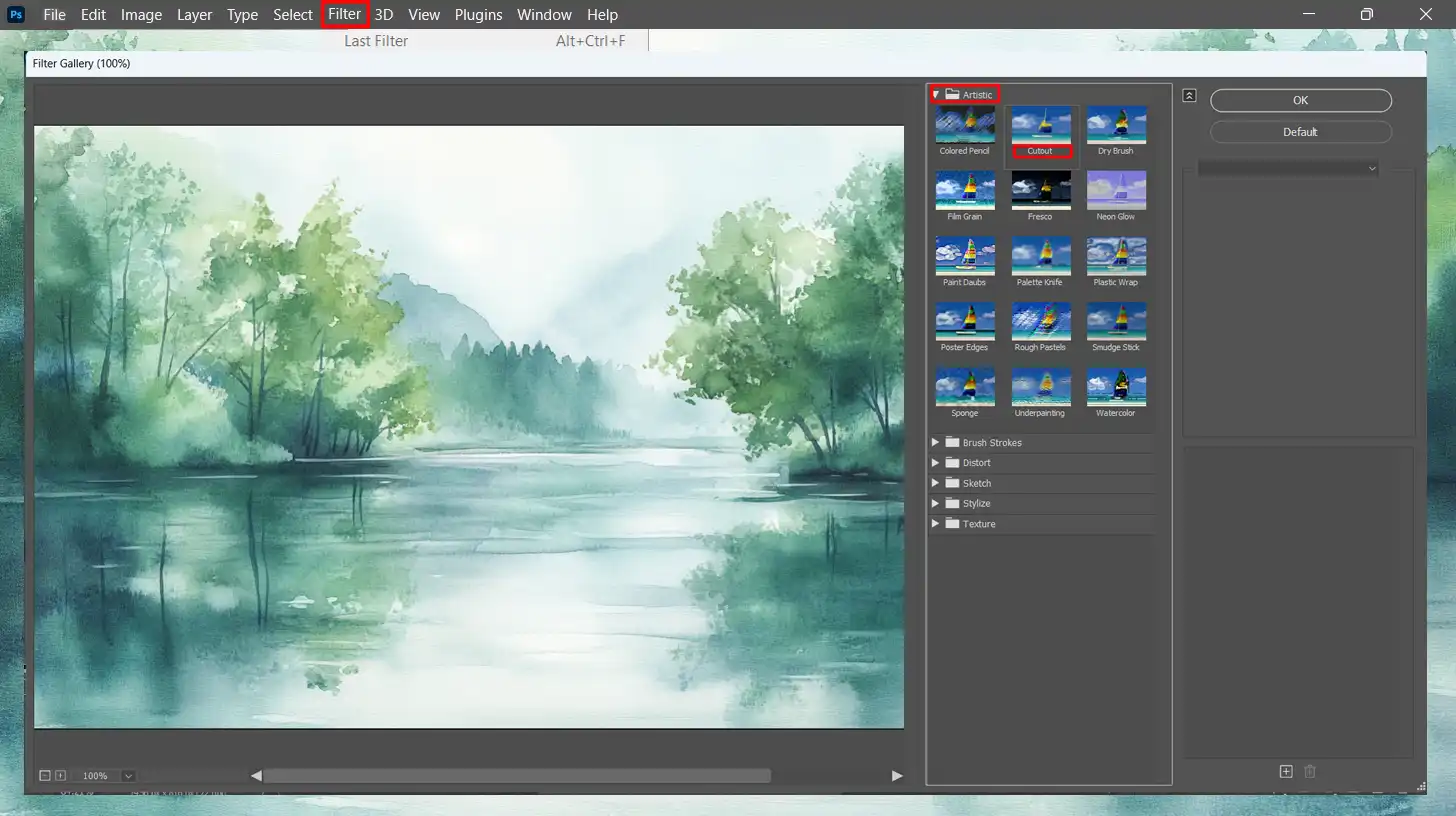
- In the FilterLookstic folder, select the Filter Gallery e Cutout filter. This filter helps simplify the image’s details and is a good base for a watercolor effect.
Fourth Step - Adjusting the Settings
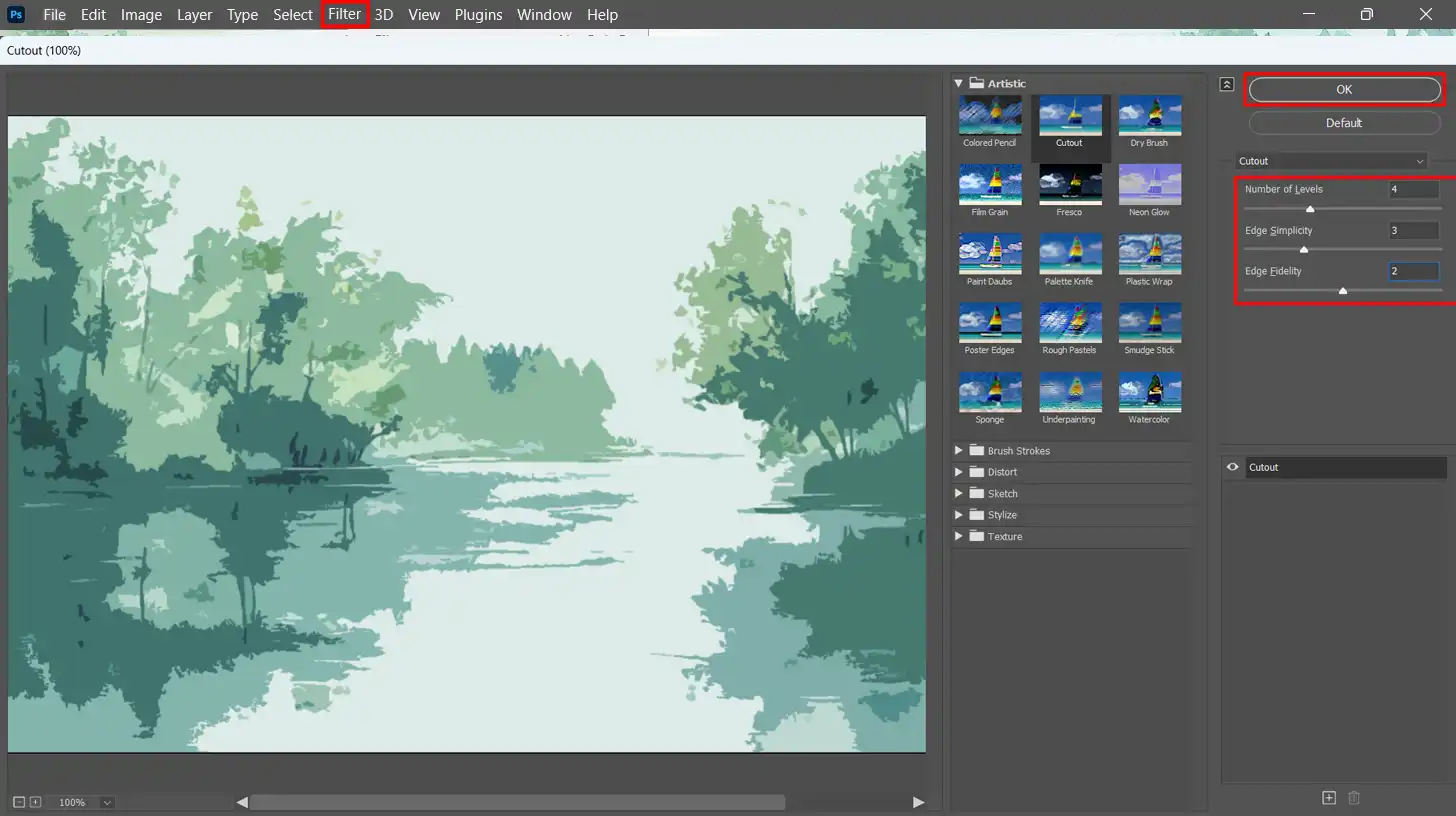
- Adjust the settings in the Cutout filter to get a stylized version of your photo. A typical setting to start with is: Number of Levels: 4 Edge Simplicity: 3 Edge Fidelity: 2
- Click OK to apply the filter.
Fifth Step - Choosing the Watercolor Filter
- With the layer still selected, go back to the Filter Gallery.
- This time, choose the Watercolor filter from the Artistic folder.
- Experiment with the settings like Brush Detail, Shadow Intensity, and Texture Coverage to create a watercolor effect. Adjust these until you like what you see, and then click OK.
Sixth Step - Using Brush tool for the Watercolor Filter
- Select the brush tool from the tool panel.
- Choose a watercolor brush from the brush presets. If you don't have one, you can download watercolor brushes from Adobe’s website or other reputable sources.
- Create a new layer above your watercolor effect layer.
- Using your chosen watercolor brush, gently dab on the new layer to add more texture and depth. Set the blending mode of this layer to "Multiply" to integrate it seamlessly with the layers below.
Seventh Step - Reducing the Effect
- If the effect is too strong in some areas, you can add a layer mask to the watercolor effect layer.
- Select the layer mask, choose a soft brush, and paint with black on the areas where you want to reduce the effect. Painting with white can bring back the effect if needed.
Final Step for Watercolor Effect
- Adjust the overall brightness and contrast to your liking.
- You can toggle the blend mode of the watercolor brush layer between "Multiply" and "Soft Light" to see which one best suits your image.
To help you understand and effectively use the various Photoshop filters, here’s a comparison table detailing the settings for the Cutout and Watercolor filters.
| Filter Setting | Value Range | Purpose |
|---|---|---|
| Cutout | ||
| Number of Levels | 2-8 | Controls the complexity of cutout edges. |
| Edge Simplicity | 1-10 | Simplifies the lines for a more abstract look. |
| Edge Fidelity | 1-3 | Adjusts how closely edges follow the original shapes. |
| Watercolor | ||
| Brush Detail | 1-14 | Adjusts the detail captured by the watercolor effect. |
| Shadow Intensity | 0-100% | Controls the depth of the shadows in the watercolor. |
| Texture Coverage | 0-100% | Determines how much of the texture is visible. |
Pro Tip: For a more authentic painting effect, consider adding a subtle texture overlay to your final artwork. This can simulate the texture of watercolor paper and enhance the overall appearance of your image.
You can also try to use the Photoshop oil paint filter to get that smooth, painted look in your images.
How to Resize Your Image in Photoshop for Optimal Watercolor Effect
Resizing your image correctly in Photoshop is important, especially when aiming to create a watercolor effect.
Proper dimension adjustments ensure that the watercolors look authentic and meticulously detailed, mimicking the fluidity and subtlety of actual watercolor painting.
Optimize your visuals by learning how to resize image in Photoshop. Easily adjust dimensions for web, print, or social media while maintaining quality and clarity.
Opening Your Image File
Firstly, open your image in Adobe Photoshop. Navigate through the File menu and select “Open,” or simply drag your desired image into the Photoshop workspace.
Ensure you are working with a high-resolution image, as this will significantly influence the quality of your watercolor effects.
Adjusting Image Dimensions
To adjust the image size, click on “Image” from the top menu, then select “Image Size.” Here, you can alter your document’s dimensions by percentage or specific values.
If your goal is to create a watercolor effect, maintaining a higher resolution might be beneficial as it retains more detail, which is paramount when applying water-like textures later on.
- Resolution: Keep it at or above 300 dpi for print or 72 dpi for web.
- Width/Height: Adjust depending on your requirements, but remember that increasing size excessively can lead to pixelation.
For artwork involving watercolor brushes, ensuring your canvas size accommodates intricate brush movements without losing detail is important.
In doing this part effectively, utilizing the smart object feature before resizing can be beneficial as it preserves original and sharpen image qualities, allowing scalable edits.
Maintaining Image Quality while Resizing
Maintaining quality during resizing is important; always use the ‘Constrain Proportions‘ option to maintain aspect ratio consistency across edits.
For artists targeting a delicate yet transformative effect such as a watercolor painting, toggling with settings such as ‘Bicubic Smoother’ (best for enlargement) or ‘Bicubic Sharper’ (best for reduction) positions you to keep clarity intact throughout manipulation processes:
- Select ‘Preserve Details’ under the resampling options.
- Adjust the noise level slider to refine the grain visibly caused by resizing.
- Utilize adjustment layers like Curves Adjustment Layer or Soft Light blending mode for final touch-ups, enhancing depth and vibrance similar to genuine watercolors.
By attentively adjusting these parameters, you optimize images distinctly prepared for further watercolor techniques within Photoshop, setting an ideal stage for invoking that authentic watercolor art experience digitally.
Applying the Initial Watercolor Filters and Textures
Transforming a standard photo into a stunning watercolor effect involves using specific Photoshop filters and textures.
This section will guide you through selecting the appropriate smart filters, adding textures, and tweaking settings to achieve a realistic watercolor appearance.
Enhance your creativity by exploring the types of filters in Photoshop. Learn how each filter transforms your images, helping you achieve stunning effects and elevate your editing skills effortlessly.
Selecting the Right Filter for Watercolor Effect
When aiming to create a watercolor effect in Photoshop and Lightroom, your first step should be to navigate the filter gallery.
Here, the ‘Dry Brush’ is particularly effective as it softens details in an image, mimicking the fluid and seamless nature of watercolor painting.
Head to Filter > Filter Gallery > Artistic > Dry Brush to access this. Make sure your layer is converted to a smart object before applying smart filters; this ensures non-destructive editing.
- Start by duplicating your background layer to preserve the original image.
- Apply the 'Dry Brush' to start crafting your desired effect.
Adding Textures to Enhance the Effect
Once you’ve applied your initial filter:
- Import a high-quality watercolor paper texture to overlay your image.
- Layer it above your filtered layer.
- Set its blending mode to "Multiply" or "Soft Light" for subtle textural effects that mimic real paper.
This texture layer adds depth and realism, enhancing the hand-painted feel of your artwork.
Don’t forget that managing these layers correctly using the layers panel is important for maintaining organization and control over visibility and editability.
Adjusting Filter Settings for Realistic Appearance
Adjustments in settings are significant:
- Return to your ‘dry brush’ filtered layer.
- Double-tap on its listing in the Layers panel if it's been transformed into a smart filter.
- Modify settings like brush size or detail based on desired intensity.
Using additional adjustment layers like brightness/contrast can also fine-tune colors and values, making them harmonious with typical watercolor aesthetics.
Here’s where Photoshop layering tutorial can be incredibly useful:
- Create new adjustment layers for brightness and contrast tweaks.
- Use a "Layer Mask" with softer edges employing gradient fills or soft brushes from the "Brush Panel" for targeted adjustments.
Utilizing these advanced techniques will help refine your digital painting into an authentic-looking watercolor piece imbued with both artistic flair and professional polish.
Pro Tip: Exploring different blending modes could yield pleasantly surprising results and add smooth skin to your images! Touch-ups with smaller detail-oriented tools, perhaps light-handed use of watercolor brushes, may still enhance finer aspects further.
To further enhance the watercolor effect, add texture in Photoshop by using an old paper texture. Import this texture and set its blending mode to “Multiply” or “Soft Light” to integrate it with your artwork, creating a more authentic, hand-painted appearance.
Layer Management for Complex Effects
Effective layer management is pivotal to harness the full potential of Photoshop, especially when crafting complex effects like a watercolor effect in Photoshop.
By skillfully organizing layers, leveraging appropriate blending modes, and using masks for precise editing, you can significantly streamline your workflow and enhance the artistic output.
Optimize your Photoshop workspace for effective layer management for complex effects. Arrange panels and tools to streamline handling multiple layers, enhancing your creative workflow seamlessly.
Organizing Layers for Edit Efficiency
Start by utilizing the layers panel efficiently. This involves naming each layer descriptively so that you can quickly identify them at a glance.
Group similar layers together; this not only declutters the panel but also makes it simpler to apply changes en masse without affecting unrelated elements.
For instance, when creating a watercolor effect, you might group all your watercolor brushes into one set for better coherence and control.
Blending Modes: Choosing the Right Options
Blending modes are significant tools in achieving nuanced artistic effects by dictating how layers combine with each other.
Each mode manipulates the pixels differently, so choosing the right one can either subtly enhance or dramatically transform your artwork’s appearance.
For watercolor artworks, “Multiply” and “Overlay” blend modes provide rich textures without overwhelming the delicate watercolor cues.
Exploring these options helps integrate paper texture seamlessly into the base image, mimicking authentic watercolor visuals.
Using Layer Mask for Fine Adjustments
Layer masks are incredibly powerful tools in Photoshop, allowing edits to be made on specific parts of a layer without permanently changing the underlying pixels.
To add more depth and realism to your Photoshop watercolor effect, use a soft brush tool from the brush panel to paint over a mask where adjustments are needed.
The beauty of this method lies in its non-destructive nature, allowing adjustments until achieving just the right touch of authenticity in your watercolor paintings.
By mastering these techniques within Photoshop’s expansive toolkit, ranging from smart object layers to detailed filter applications, you unlock new realms of creative possibilities tailored towards sophisticated visual narratives.
Refining the Watercolor Effect with Brush Techniques
When creating a watercolor effect in Photoshop, selecting the right tools and techniques is important for achieving realistic results.
Brushes play a pivotal role, especially when fine-tuning textures and color blending.
Choosing Watercolor Brushes for Watercolor Effects
Selecting the appropriate watercolor brushes can make a significant difference in your project. To achieve delicate watercolor effects, opt for brushes that mimic the soft, fluid patterns of actual watercolor paint.
You can find these in Photoshop under the brush tool menu, where various water-inspired brushes are available.
The choice of the brush depends on what aspect of your work needs emphasis, softer brushes allow gentle washes of color, while firmer brushes are great for detailed works.
Customizing Brush Settings for Better Control
To further enhance your control over the watercolor effect, adjusting brush settings in Photoshop is important. Changing aspects such as opacity, flow, and wetness can dramatically alter how paint is applied digitally.
Navigate to the brush panel to tweak these settings.
Incorporating different blending modes also enhances depth and texture through how colors interact on your background layer. Experiment with modes like “Multiply” or “Soft Light” to see how they subtly change the dynamics of your watercolor layers.
Applying Dry Brush Filter to Enhance Watercolor Textures
Applying custom brushes effectively across your artwork enhances its overall texture, making it resemble an authentic watercolor painting more closely.
Utilize layers effectively: Apply a rough ‘Dry Brush’ initially to simulate paper grain, followed by detailed brush strokes layered above using variable opacities.
Additionally, consider incorporating a subtle paper texture to add a tactile element to your digital creation, this small detail can significantly enrich visual appeal.
Use masks, an indispensable tool found through the “add layer mask icon“, to modify how textures overlap and blend across areas non-destructively.
With these brushing techniques tailored toward perfecting Photoshop’s versatile yet intricate watercolor effects, artists can push creative boundaries without relying solely on traditional mediums.
Final Touches: Adjusting Color and Brightness for Realism
Achieving a realistic look in your art involves more than just applying watercolor effects in Photoshop; it requires careful adjustment of colors and lighting.
After laying down the initial watercolor layers, take the time to refine these aspects to ensure your work not only stands out but feels vivid and dynamic.
Color Correction for a Vibrant Finish
Color correction is important to create a vibrant finish in your Photoshop watercolor effect. Start by targeting the hues that seem off-balance or do not contribute to the overall harmony of the piece.
Using adjustment layers, like Hue/Saturation or Color Balance, tweak these colors gently to enhance their intensity without losing naturalism.
This step ensures that your watercolor effect in Photoshop maintains its fluidity and charm while boosting its visual impact.
Enhance your work by mastering color image in Photoshop, essential for color correction for a vibrant finish. Learn techniques to adjust hues and tones for striking, lively images.
Using Brightness and Contrast for Depth
Depth can be enhanced by strategically managing brightness and contrast settings. By adjusting these levels, you can emphasize texture and detail, making each stroke of your watercolor brush stand out.
Increase brightness to highlight details that might be lost in darker areas and adjust contrast to deepen shadows, adding a dramatic flair that mimics traditional watercolor paintings’ depth.
Enhance your images by exploring the Photoshop histogram features, essential for using brightness and contrast for depth. Utilize histograms to balance light and shadow, creating more dynamic and visually appealing photos.
Adding Final Details with Overlays and Blending
The final stage involves using overlays combined with various blending modes to introduce subtle textures or nuances. A carefully chosen paper texture overlay can provide an authentic feel as if painted on real watercolor paper.
Utilize layers set to different blend modes like Multiply or Screen to see how they affect color vibrancy and depth perception, subtly enhancing the overall realism of your artwork without overpowering the initial watercolor effects created.
This process involves nuanced adjustments but pays off by transforming digital artworks into pieces indistinguishable from traditional hand-painted art.
Elevate your designs by learning to master Photoshop layer styles. Discover how to add depth, shadows, and effects to your layers for professional and eye-catching visuals.
Frequently Asked Questions

Creating a watercolor effect in Photoshop is a great way to transform your photographs into beautiful, artistic creations.
Here’s a simple, reader-friendly guide on how to apply your first watercolor filter.
We’ll use some common Photoshop tools like the filter gallery, blend mode, and brush tool to get you started.
How do you create a watercolor effect in Photoshop?
To create a watercolor effect in Photoshop, first, open your image and duplicate the background layer. Add a smart object to preserve the original image.
Navigate to the filter gallery and select the watercolor effect, adjusting settings for brush detail, texture, and lighting to achieve a soft, painted appearance.
How do you make a watercolor texture in Photoshop?
Begin by importing your chosen paper texture into Adobe Photoshop and placing it on a layer above your artwork.
Set the blending mode to soft light to subtly incorporate the watercolor texture. Fine-tune the effect with the opacity slider for a realistic watercolor look on your creation.
How do I turn a picture into a watercolor?
Any picture can be turned into a watercolor effect in Photoshop by applying the watercolor painting effect from the filter gallery.
To enhance the authenticity, merge a paper texture overlay and adjust it with blend modes, preferably multiplying it to simulate the absorbent quality of the watercolor paper.
How do you make a painting effect in Photoshop?
To achieve a painting effect in Photoshop, start with the smudge tool to soften details.
Use the filter gallery, select the dry brush filter for texture, and play with layer mask and blending mode to mix colors artfully. Experiment with watercolor brushes for a touch of irregularity and depth.

Conclusion
Recently, I used the watercolor effect in Photoshop on a photo of my garden, and it turned out beautifully, transforming it into a piece of art that now enhances my living room.
If you’re eager to, I recommend checking out these excellent courses for similar creative techniques. I recommend checking Photoshop or looking to refine your skills in Lightroom; these courses provide clear, step-by-step instructions to help you excel.
Start your creative journey by signing up for the Photoshop course or Lightroom course today.
Dive in and discover the artist in you!
Read more about Photoshop:


Course

Light Effect Photoshop


Lightroom Course 2025

Adobe Photoshop Course 2025

Photo Editing Course


