Black and White Images Convert: Quick Photoshop Guide
Black and White Images Convert: Quick Photoshop Guide
Are you looking to transform your color photos into stunning black and white images convert in Photoshop?
You’re in the right place.
By the time you finish reading this, you’ll have all the tools and know-how to create striking black and white photos that capture attention and evoke emotion.
Whether you’re a photography enthusiast or a professional, learning how to convert images to black and white in Photoshop can add a timeless quality to your work.
Ready to elevate your photography game?
Let’s dive in and explore the step-by-step process to convert your photos into captivating black and white masterpieces.
Table of Contents
How to Convert Images to Black and White in Photoshop
Converting your colorful photos to black and white can give them a timeless, classic look. There are various ways to do this in Adobe Photoshop.
Let’s explore some of these methods.
Using smart objects can enhance your ability to convert images efficiently. They allow for non-destructive edits, ensuring you can tweak and perfect your conversions without losing quality.
This flexibility is especially useful when experimenting with different styles or effects.
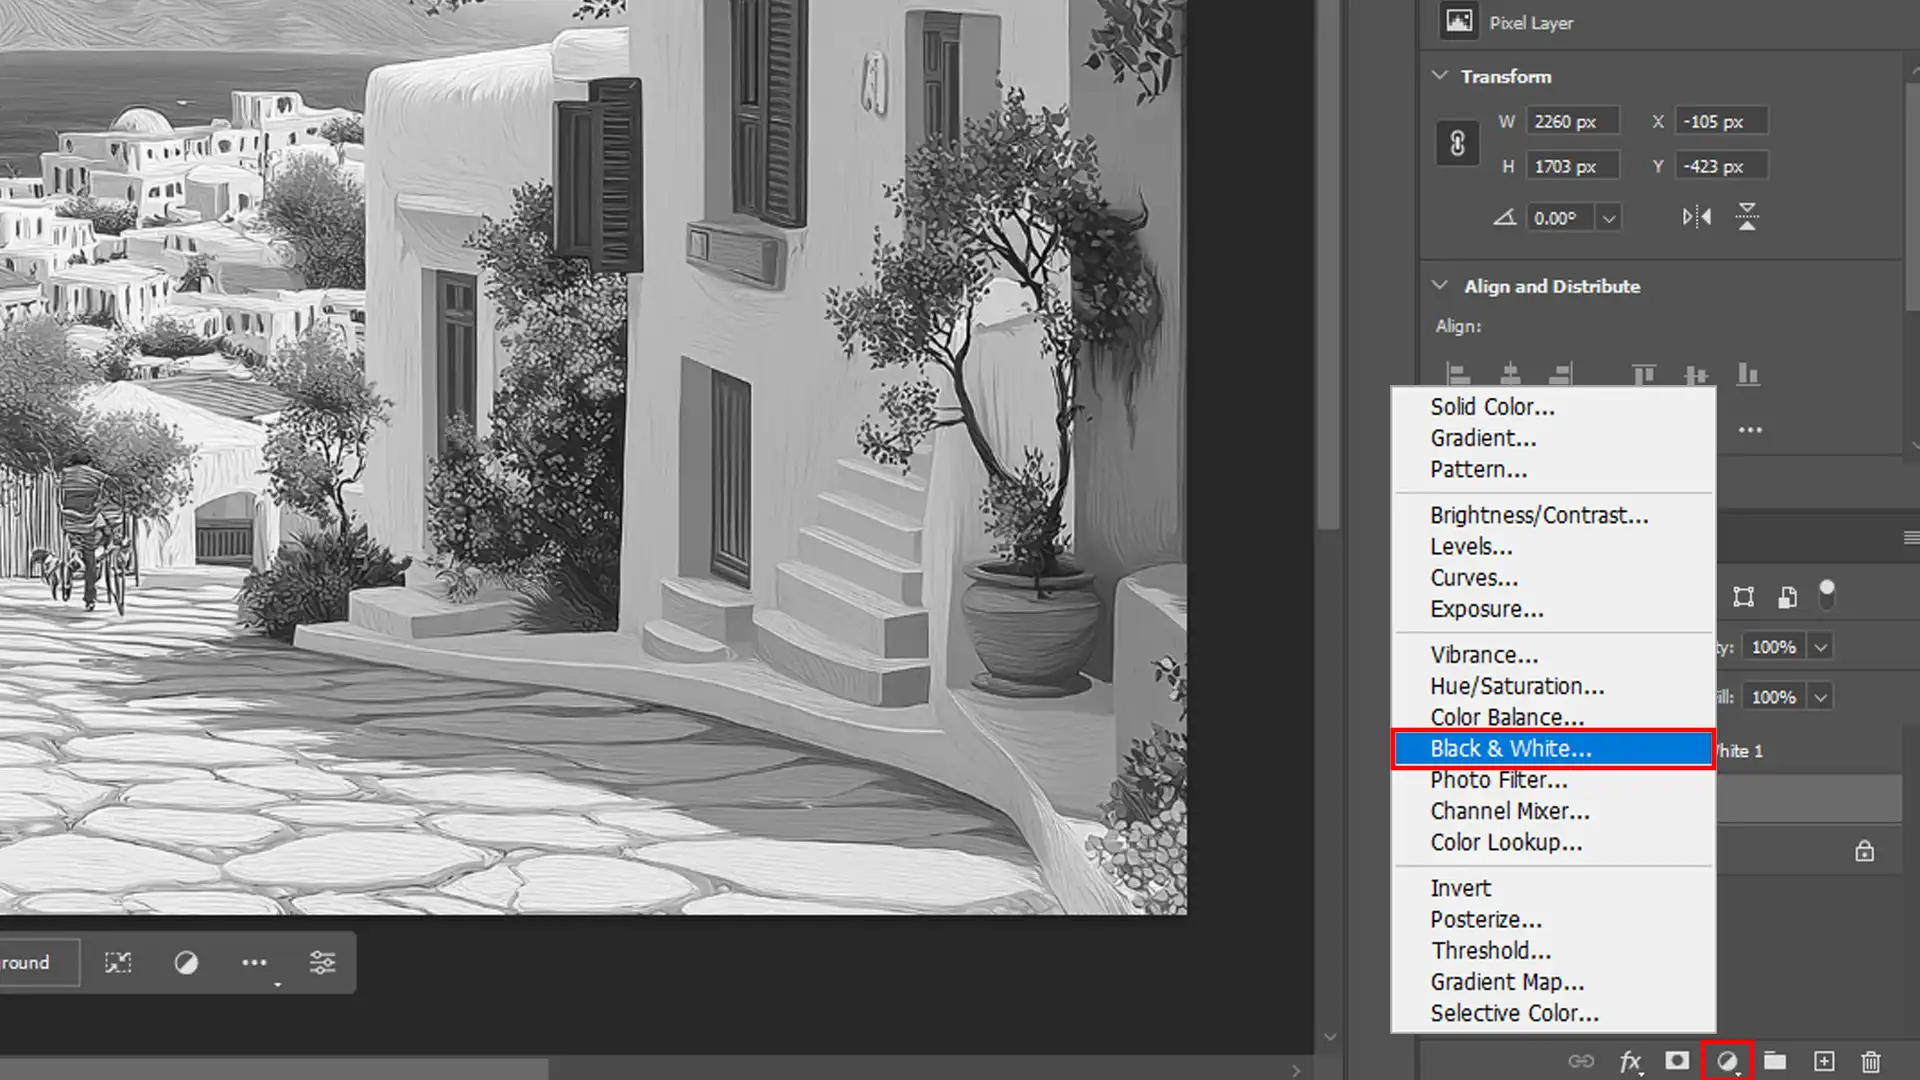
Using the Black and White Adjustment Layer
This method allows more control over how colors are converted.
To start:
Open your color photo in Photoshop.
Go to the Layers panel.
Select the New Adjustment Layer button.
Choose Black and White from the dropdown menu.
Adjust sliders to tune the conversion for the best effect.
This method permits you to tune how each color converts to grayscale, thats how you make an image black and white image mode.
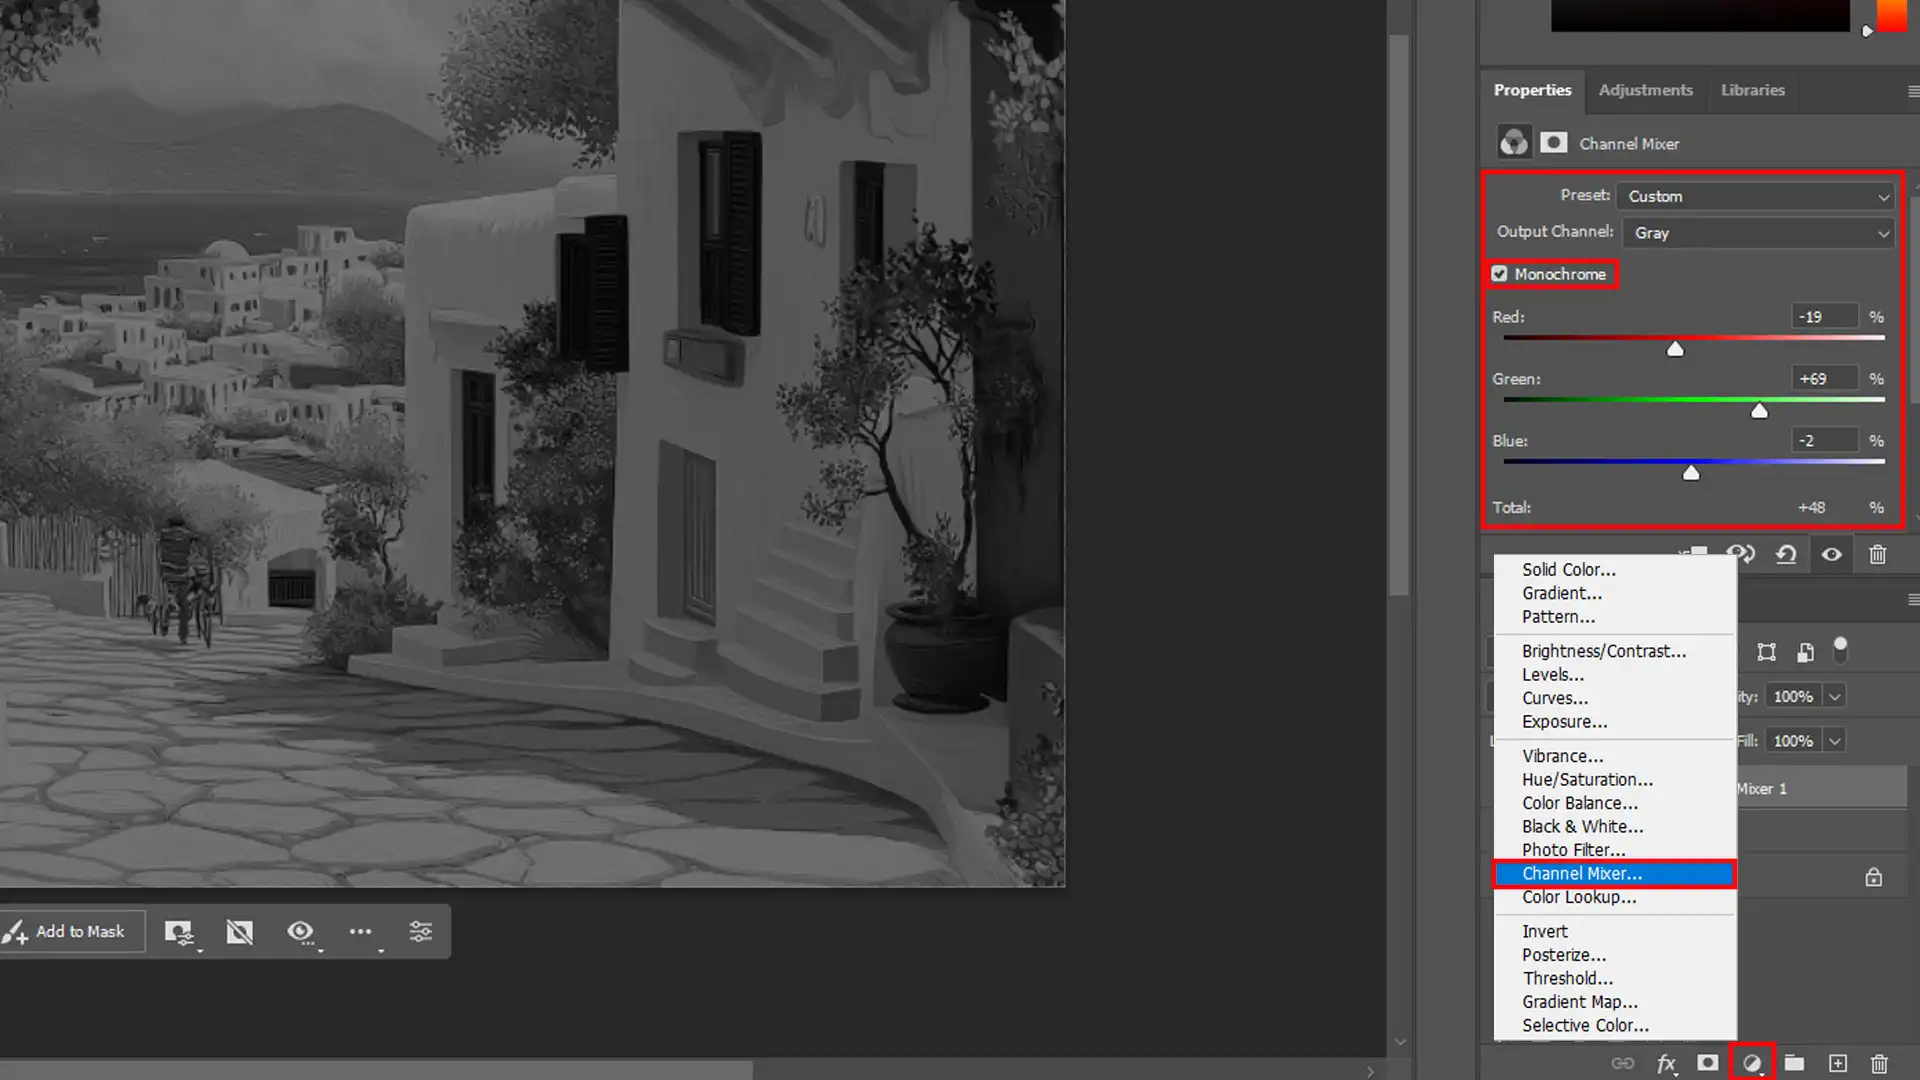
Using the Channel Mixer for Black and White Images Convert
If you want even more control over your black and white photo, try the Channel Mixer:
Open your image in Photoshop.
Create a new adjustment layer by clicking on the Layers panel.
Select Channel Mixer from the menu.
Check the Monochrome box.
Adjust the Red, Green, and Blue sliders to achieve the desired effect.
By playing with these sliders, you can make an image black and white by emphasizing certain tones or contrast levels.
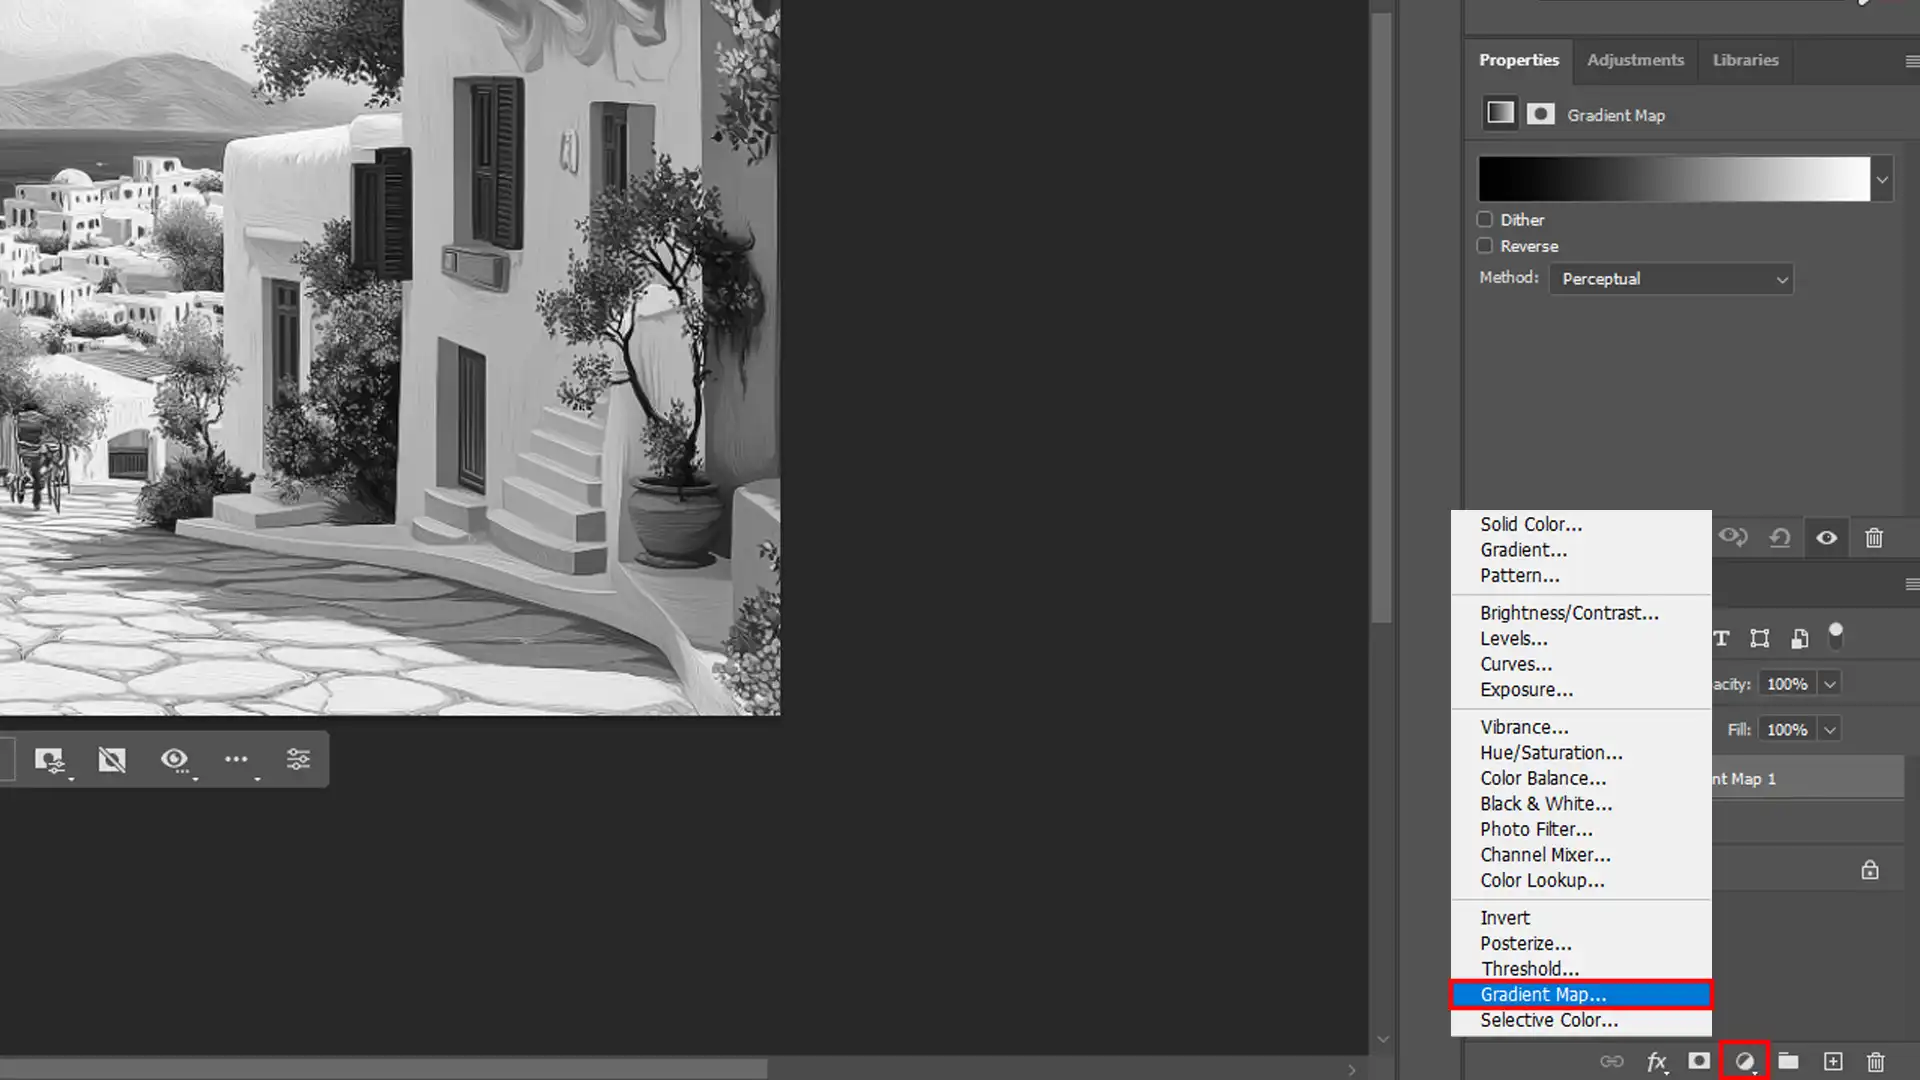
Using the Gradient Map for Black and White Images Convert
The Gradient Map tool offers another elegant solution for black and white conversion:
Open your image in Photoshop.
Go to the Layers panel and select New Adjustment Layer.
Click on Gradient Map from the menu.
Adjust the gradient to a black and white gradient if needed.
The Gradient Map lets you map colors to the selected gradient, which can provide more depth in your black and white version.
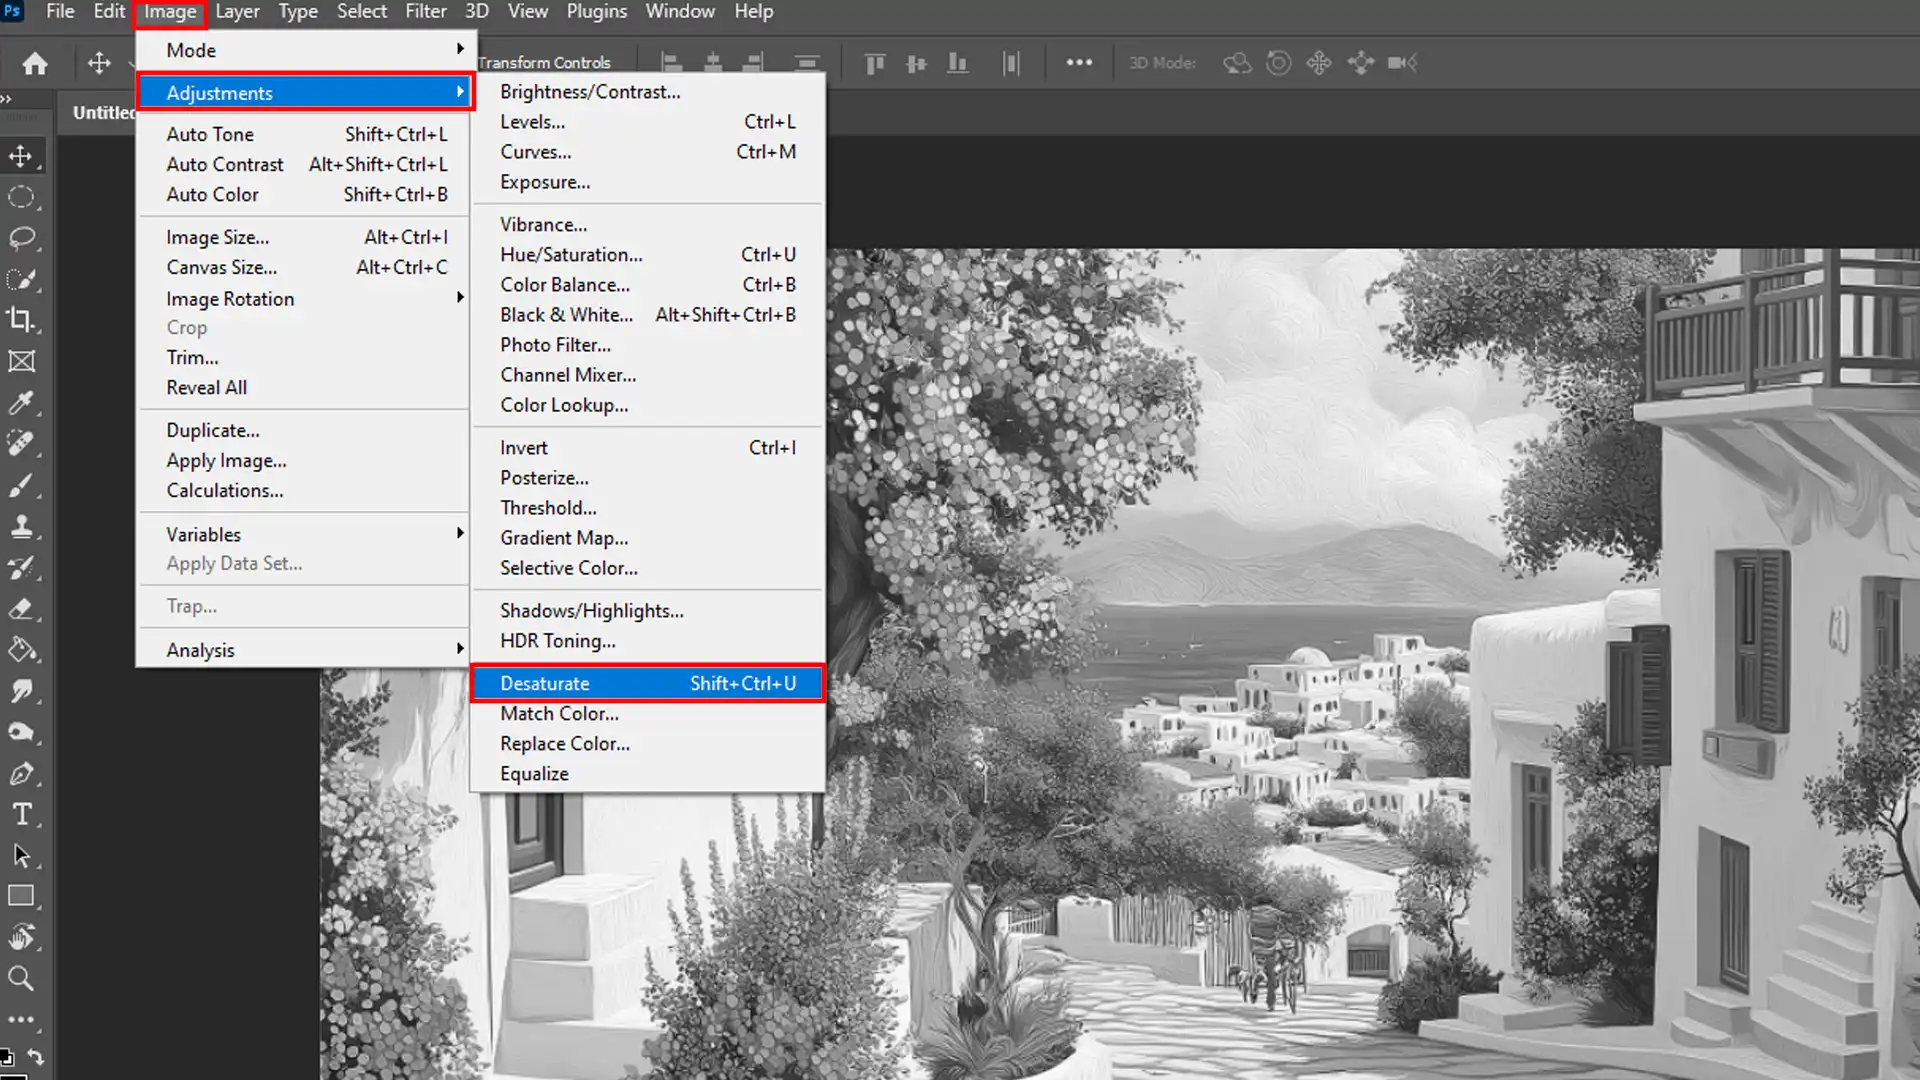
This quick method will strip all color from your photo, converting it to grayscale instantly.
However, it doesn’t provide the same level of control as other methods.
Pro Tip: After converting images to black and white, experiment with contrast and brightness adjustments to enhance the final look.
Tips for Better Black and White Photography
To achieve striking results, focus on enhancing contrast and texture when practicing black and white photography.
Understanding Light and Shadow
In black and white photography, we don’t rely on colors to tell the story. Light and shadow become your best friends.
Observe how light falls on subjects. Shadows add depth. Highlights draw attention.
Experiment with different light sources.
Natural light creates soft shadows.
Artificial light gives hard edges.
Understand how light affects an image. Be mindful of contrasts.
Composing for Black and White
Composition in black and white is all about shapes, lines, and textures. Without color, your eye focuses on structure. Strong lines guide viewer’s eyes. Patterns create interest.
Rule of thirds still applies. Place points of interest along these lines. Balance subjects to avoid a cluttered feel. Simplify the scene.
Incorporate negative space. It gives breathing room. Emphasizes main elements.
Mastering white balance in photography is crucial for better black and white photography. Proper white balance ensures your grayscale images maintain correct tonal relationships.
It helps achieve the perfect contrast and depth in your black and white shots.
Using Filters and Effects
Filters can transform an image. Graduated filters help balance exposure. Enhance skies or foregrounds.
The Targeted Adjustment Tool is handy. Adjust specific parts of the image. Boost contrast where needed. Fine-tune details.
In Photoshop, black and white Adjustment Layer lets you control intensity.
For more control, use Channel Mixer. Check Monochrome. Experiment with sliders.
Gradient Map offers another conversion method. It maps colors to a gradient. Adjustments give you results faster. Very effective.
Pro Tip: Always keep an original copy of your color photos. Non-destructive editing allows for better results!
This process not only revives the detail and depth but also helps in achieving a timeless quality in your photos.
Common Photo Editing Mistakes to Avoid
Avoiding over-editing and maintaining natural tones are crucial for preventing common photo editing mistakes.
Overdoing the Contrast
Contrast is vital in black and white photos, but too much can ruin the photo. When you increase the contrast excessively, details in the highlights and shadows get lost.
This makes the black and white image look artificial and lacks depth. Always aim for a balance that maintains details.
In black and white conversion, subtle changes work best.
Use adjustment layers cautiously. Adjust both the highlights and the shadows.
This keeps the image from looking too stark. Practice finding that sweet spot where everything is clear yet dynamic.
Ignoring the Details
When converting images to black and white, details are your friends. Overlooking small elements can turn a potential masterpiece into a dull photo.
Textures, lines, and contrasts need attention. They add character and depth to your image.
Pay close attention to every part of the image. Use tools in Lightroom and Photoshop to fine-tune details. Adjust the exposure and contrasts.
Sharpening areas that matter retains clarity. Colored photos become more interesting when converted thoughtfully.
In black and white photos, details carry the emotion.
An eye for details transforms simple scenes into striking black and white photos. Inspect edges, shadows, and highlights.
Pro Tip: Always keep an original copy of your color photos. This non-destructive editing practice allows you to revert to the original anytime. It saves effort and ensures you always have a backup plan.
Advanced Techniques for Black and White Conversion
Exploring advanced techniques for black and white conversion can unlock new creative possibilities and enhance the depth and detail of your monochrome images
Here are some advanced techniques and their specifications:
Method
Control Over Tones
Complexity
Best Use
Black and White Adjustment Layer
High
Easy
Customizing color to grayscale
Channel Mixer
Very High
Moderate
Adjusting specific color tones
Gradient Map
Moderate
Moderate
Adding depth with gradients
Desaturate Option
Low
Very Easy
Quick conversion without adjustments
Hue/Saturation Layer
Moderate
Easy
Basic color adjustments
Dodging and Burning
Converting to black and white in photoshop is just the start. Dodging and burning allows you to add depth.
Dodging lightens parts of your photo while burning darkens them.
To get started:
Create a blank adjustment layer and change the blending mode to the adjustment layer to Overlay.
Use a soft brush with low opacity, set to white or black.
Brush the areas you want to lighten or darken.
Remember, subtlety is key. Overdoing it can make your photo look unrealistic.
Take your time and check your work often.
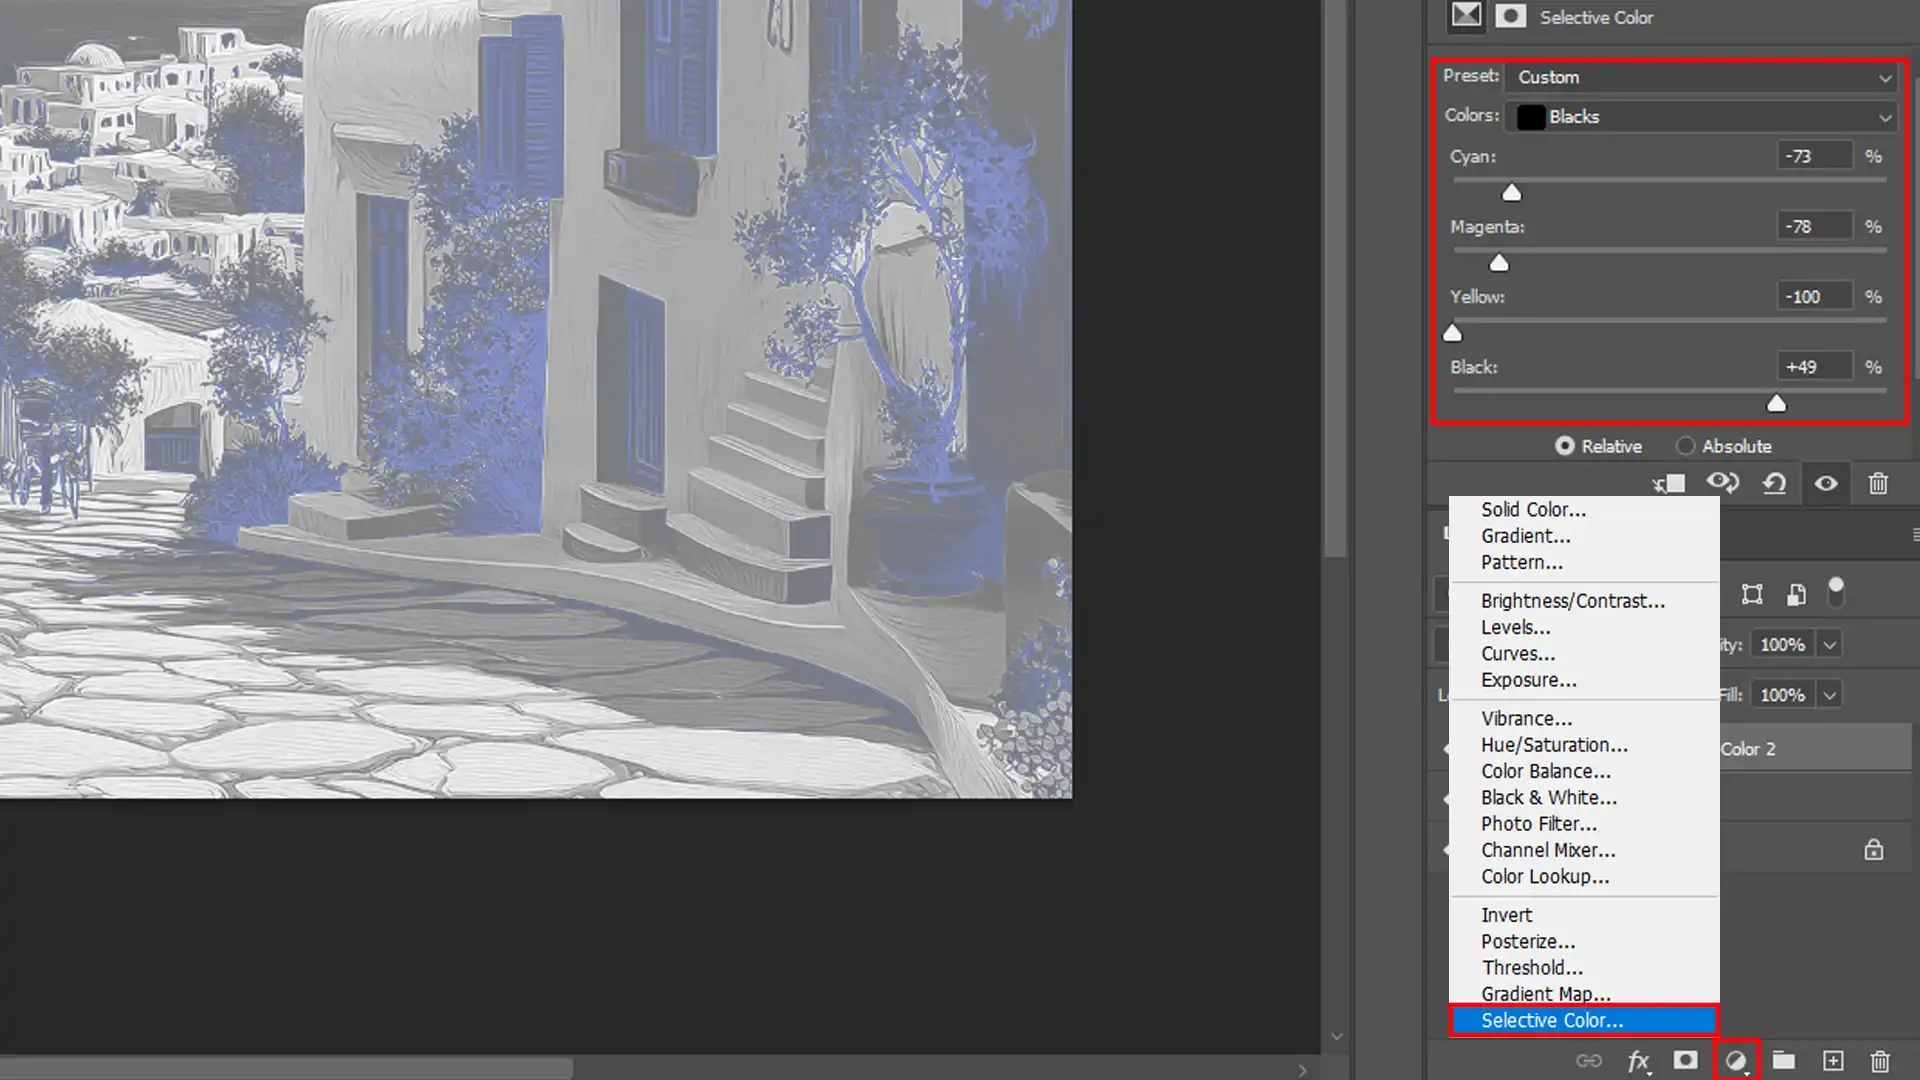
Selective Color Adjustments
Selective color adjustments can make certain parts of your image stand out.
Start by converting your image to black and white using the Black and White adjustment layer in Photoshop.
Then:
Use sliders to adjust the contribution of each color to the black and white in photoshop image.
This technique can bring out details that are lost in a simple black and white conversion.
You might notice how different colors in the original color image black and white affect the tones. Experiment until you find the right balance.
When exploring color adjustments, mastering techniques for adjusting white is crucial for achieving accurate results.
This process ensures that your whites are true to life, enhancing overall image quality.
Using Layers and Masks
Layers and masks offer control over your black and white conversion. Create multiple adjustment layers to control different parts of your image.
For example:
A Brightness/Contrast adjustment layer can be used on the sky.
A Levels adjustment layer can be used on the foreground.
Masks allow you to target specific areas without affecting the rest of the image.
This method helps you focus on enhancing specific elements in your image black and white in photoshop.
Remember to use a feathered brush to avoid harsh transitions.
Pro Tip: Always keep an original copy of your work. Non-destructive editing can save you a lot of time and effort. You don’t want to lose the details you worked so hard to bring out.
By understanding and utilizing these techniques, you can take your black and white conversions to the next level.
For more advanced techniques, consider exploring Photoshop shortcuts and learning how to use the patch tool for even more refined edits.
When mastering advanced techniques in Photoshop, knowing black and white shortcuts can significantly speed up your workflow.
These time-saving tips integrate seamlessly with advanced techniques, enhancing your editing efficiency.
Frequently Asked Questions (FAQs)
How to Convert an Image into Black and White in Photoshop?
Easy steps to convert image into Black and White:
Open your image in Photoshop.
Go to the 'Image' menu, select 'Adjustments', then choose 'Black & White'.
You can adjust the sliders to fine-tune the grayscale effect to your liking.
Click 'OK' to apply the black and white in photoshop effect.
How do I Vectorize a Black and White Image in Photoshop?
Follow these steps to Vectorize a Black and White image:
Open your black and white image in Photoshop.
Select the 'Magic Wand Tool' from the toolbar to select the areas you want to vectorize.
Once selected, go to the 'Paths' window and click on 'Make Work Path from Selection'.
Adjust the 'Tolerance' to get the right level of detail.
Go to 'File', select 'Export', then choose 'Paths to Illustrator' to complete the vectorization.
How do I Convert a Picture to Black and White?
Four easy steps to convert a picture to Black and White:
Open the picture in Photoshop.
Navigate to 'Image' > 'Adjustments' and select 'Black & White'.
Adjust the conversion settings to get the desired black and white effect.
Click 'OK' to apply the changes.
How do I Change a Photoshop File from Black and White to Color?
Follow these steps to change the photoshop file:
Open the black and white file in Photoshop.
Go to the 'Image' menu, select 'Mode', and choose 'RGB Color' to enable color editing.
You can now colorize the image using tools like 'Brush' or by adding color to your adjustment layer and blending them.
In conclusion, converting color images to black and white can give your photos a timeless feel.
Whether you use the Black and White Adjustment Layer for precise control, the Channel Mixer for adjusting tones, or the simple Desaturate option, each method offers unique advantages.
Personally, I find that experimenting with these techniques can really bring out the best in your images.
$2,061.00Original price was: $2,061.00.$1,061.00Current price is: $1,061.00. 27584
Download Your Free Guide Now!
Discover the secrets of photography with our printable guide! Master essential techniques like aperture, shutter speed, and ISO to create stunning images. Get your free printable PDF now and start turning your snapshots into masterpieces!