80s Text Effect Photoshop: Creating Vibrant and retro Designs
80s Text Effect Photoshop: Creating Vibrant and retro Designs
In this article, I’ll guide you through creating an 80s text effect Photoshop. Imagine those vibrant, neon-lit movie posters and arcade game titles. This effect captures that retro magic.
Whether you’re designing for fun or aiming to captivate an audience, this tutorial will make your text pop with that unmistakable 80s vibe.
Get ready to dive into a step-by-step process that will transform your ordinary text into a dazzling blast from the past. Stay tuned, and let’s bring the 80s text effect back to life!
Table of Contents
Creating Your Workspace for 80s Text Effect Photoshop
To start creating a stunning 80s text effect, you’ll need to set up your workspace in Photoshop. Let’s begin by opening the application.
Opening Photoshop
It’s as simple as launching the app. You double-press the Photoshop icon. It loads, simple enough.
Prepared to start creating? Perfect. Let’s move on.
Creating a New Document
Let’s create a new document:
Go to File in the top menu.
Choose 'New'. A box appears.
Fill in the details. Set the width and height. I recommend 1920x1080 pixels. These settings will give you a good canvas size.
Now that we have the canvas prepared, it’s moment to talk about 80s retro designs. Think bright colors and bold fonts. Let’s make it happen step by step.
Applying the 80s Text Effect Photoshop
Now that your workspace is ready, it’s the right moment to bring the 80s vibe to life. Let’s start by adding the text to your canvas
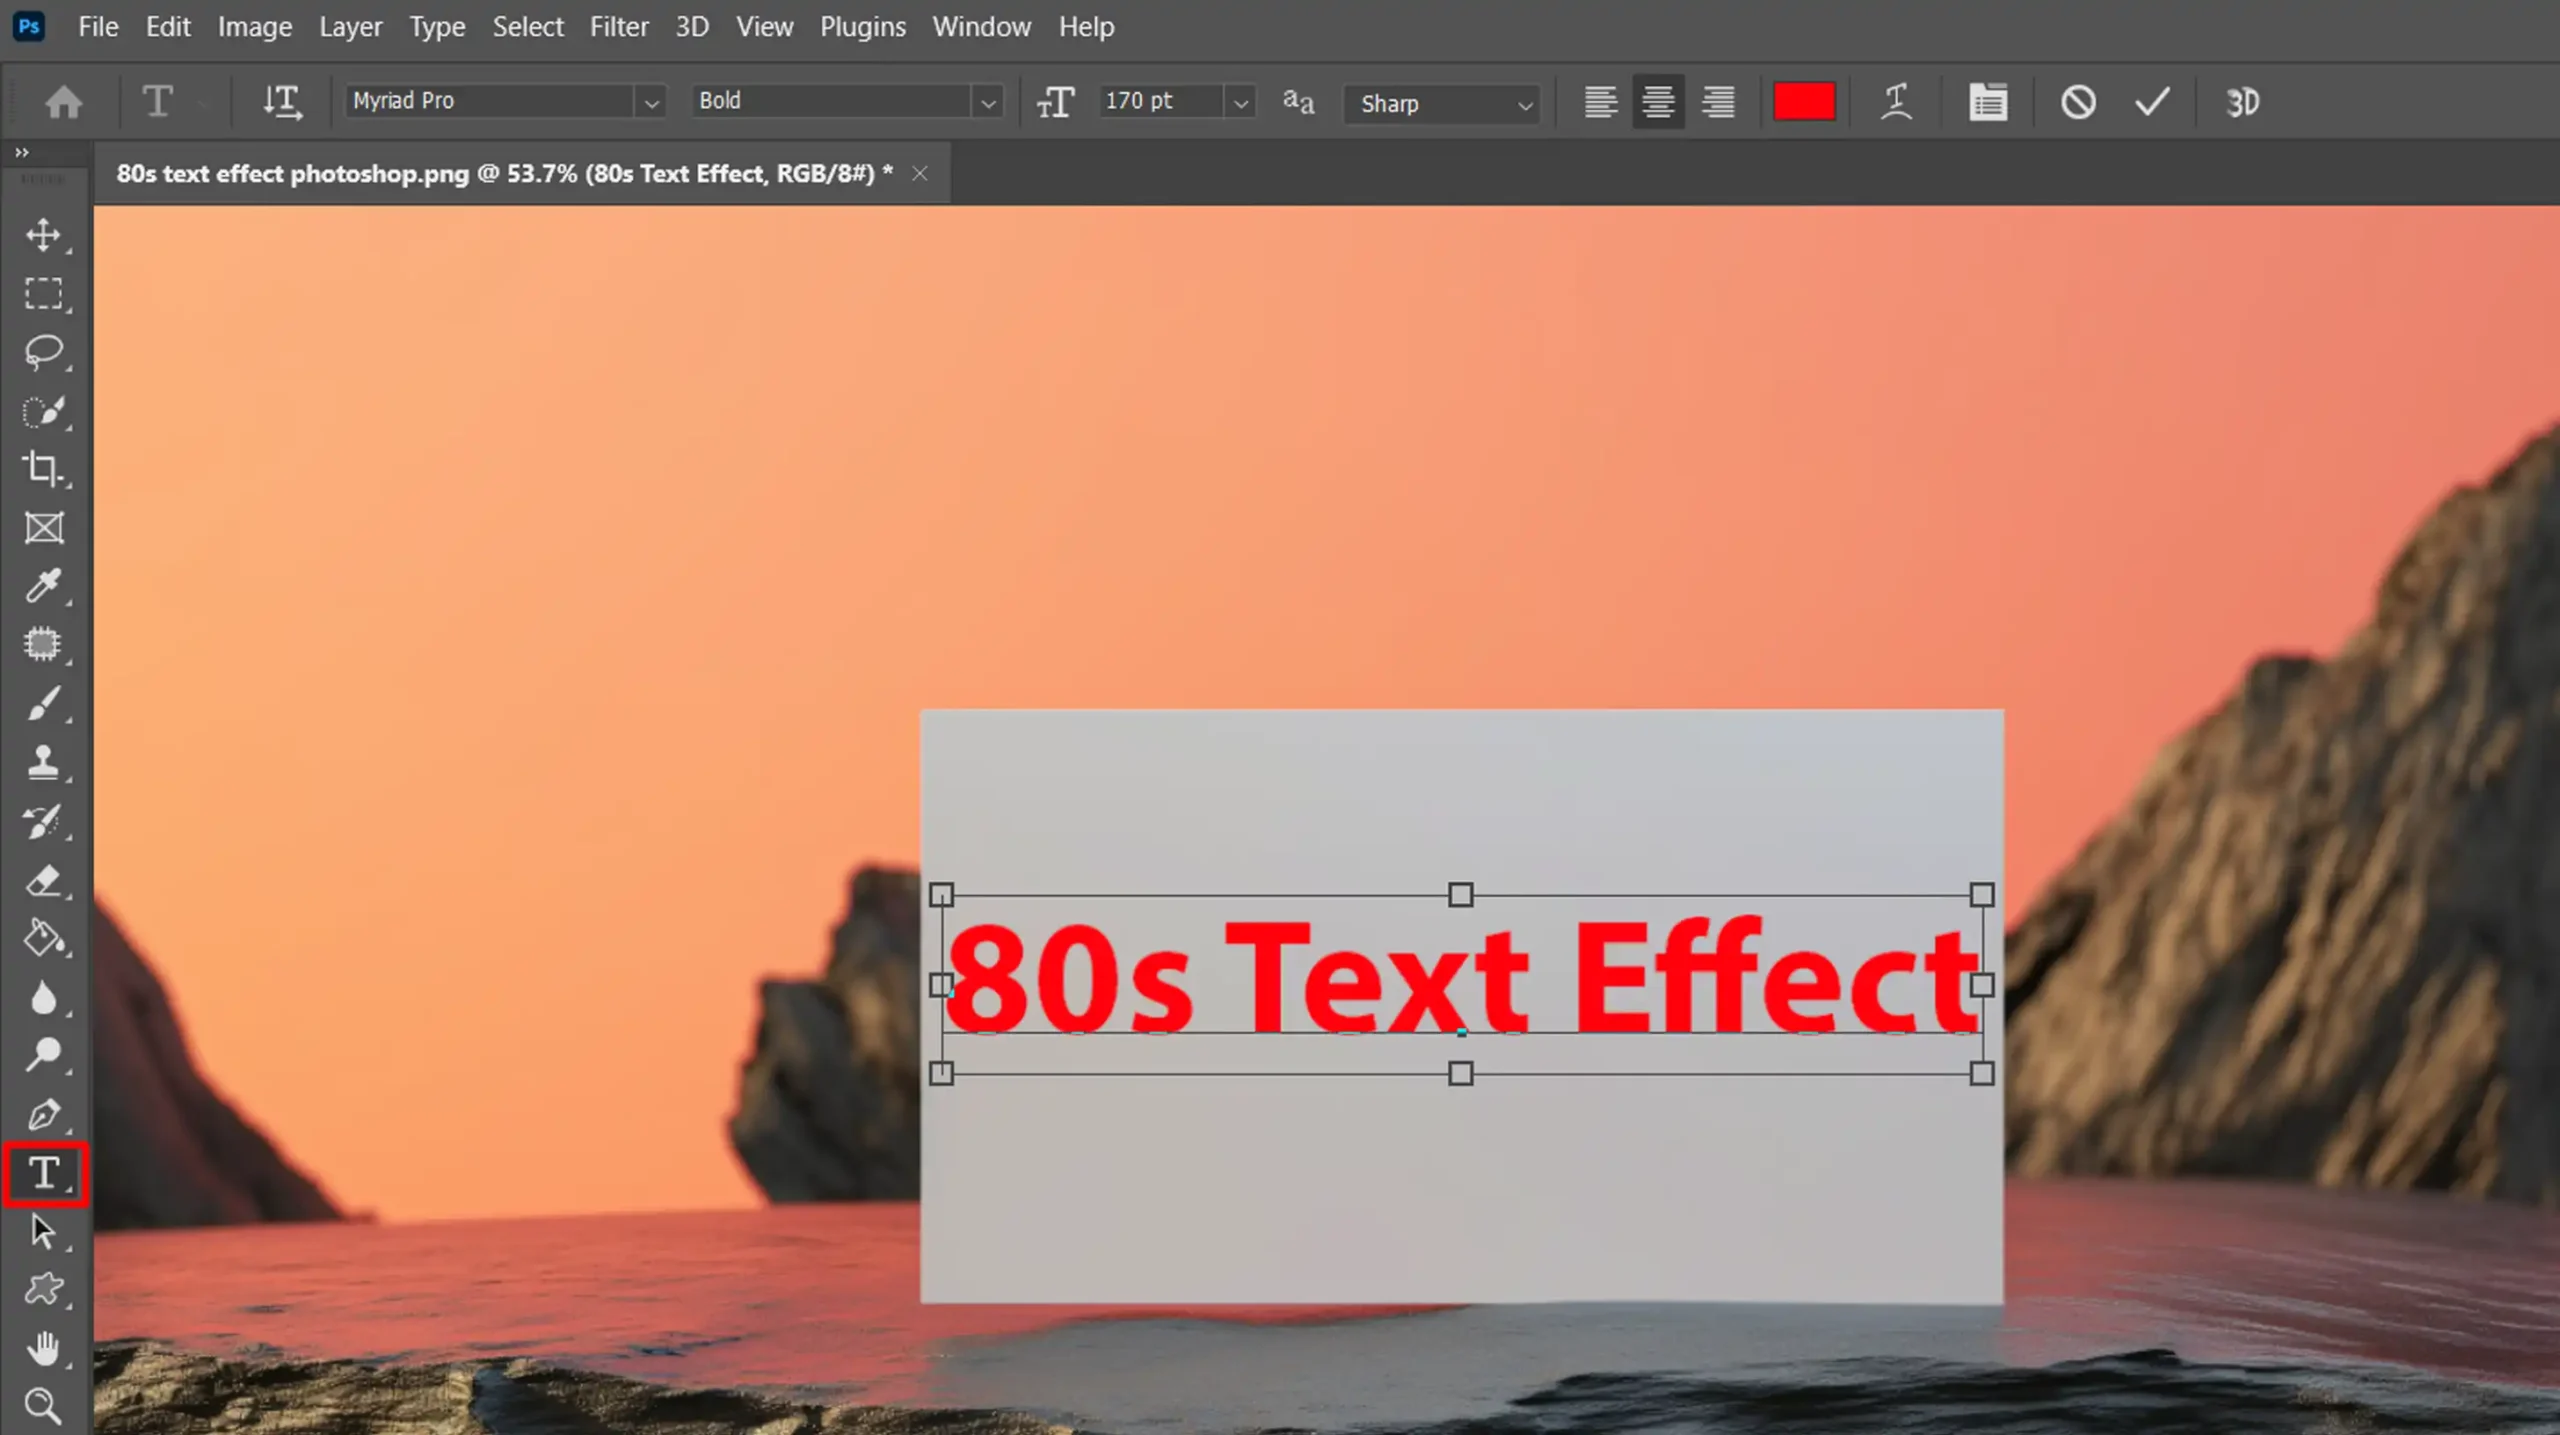
Adding the Text
Select the Text Tool (T). Click on the canvas. Type your text. Type something simple for now. You can edit later.
Choose a bold font. Something that screams retro. The 80s were all about standing out.
Double-Click to Edit the Text
Go to Layer Styles. Double-click your text layer. A box opens with options:
Start with the Gradient Overlay. Choose your tones for the gradient. Bright red and deep blue pair well.
Next, add a Stroke. Make it thick. Around 6 pixels. This gives it a bold outline.
Adding More Effects
Now, let’s add some extra effects:
Look for Bevel & Emboss in the Layer Styles. This adds depth. Play around with the settings. See what you like.
Next, try adding an Outer Glow. It gives your text a neon effect. Choose a color that complements your gradient.
Polishing Your 80s Text Effect Photoshop: Workspace Setup and Textures
Check your text. Does it look good? If not, go back to your Layer Styles. Adjust as needed.
Once happy with it, go to File, then Save As. Choose your preferred format.
Saving for Future Use
For quick upcoming designs, save your workspace:
Go to Window, Workspace, and New Workspace.
Name it something related to your 80s text effect Photoshop project. This makes it easier to recreate next time.
Pro Tip: Use textures. They add a unique feel to your text.
Search for free chrome textures online. Apply them on overlay mode. This gives a polished look.
Search for high-quality textures and apply them in overlay mode for a polished, distinctive look that enhances your overall design.
Ready to impress? Try different tones and effects on your text. Experiment, edit, and perfect your design.
Crafting Retro Text Effect in Photoshop
Curious about how to create a stunning 80s retro text effect?
This guide provides step-by-step instructions designed specifically for those with little to no experience in Photoshop.
Choosing the Right Font
The first step in our process is selecting the perfect font. You’ll want something bold and reminiscent of that unique 80s retro vibe.
Towards this end, you can explore various free fonts available online.
Once you’ve found a font that suits your needs, download and install it on your computer. Remember, fonts play a significant role in defining the overall feel of your text.
Applying Gradient Overlay
Next, we’ll move on to the fun part: implementing the gradient overlay.
Open your text layer. Navigate to Layer Styles and select ‘Gradient Overlay.’
Experiment with gradient techniques by choosing vibrant pigments; bright reds, blues, or neon shades are ideal for a retro effect. This will immediately give your text that unmistakable 80s flair.
Adding Layer Styles to your 80s Text Effect Photoshop
Layer styles allow you to customize your text further. Open Layer Styles under the ‘Layer’ menu.
There are two important effects you’ll want to add: Bevel and Emboss, and Drop Shadow.
Bevel and Emboss
Bevel and Emboss add depth to your text. Open the Layer dialog and select ‘Bevel and Emboss.’
Set the depth and size to medium. This gives your text a 3D appearance, making it pop from the screen.
Drop Shadow
The drop shadow adds a finishing touch to your retro text effect. In the same Layer Styles dialog, find and enable ‘Drop Shadow.’
Adjust the distance and spread until you’re happy with the look. This gives a more grounded feel, adding subtle elegance.
Pro Tip: To perfect your design, place textures like free chrome layers over your text.
Set the texture layer mode to ‘Overlay.’ This gives the text an added level of sophistication and complexity.
When working with the “Drop Shadow” effect in your 80s text design, mastering Photoshop shadows can help you make depth and a more authentic retro look.
This approach can give your 80s text design a cool, layered appearance with a shiny finish, making it stand out even more.
By following these steps, you can easily design a captivating 80s retro text effect.
These effects not only enhance the visual appeal but also add personality to your text, making it stand out.
Enhancing the 80s Text Effect Photoshop Artwork
In this guide, we will delve into advanced techniques to enhance your 80s retro text effect in Photoshop. We’ll focus on adding glows and highlights as well as incorporating background elements.
To achieve a striking 80s text effect in Photoshop, consider incorporating the following important elements.
These aspects will help enhance the visual appeal and authenticity of your design
Aspect
Details
Glow Effect
Adds neon glow around the text for a vibrant look.
Highlights
Emphasizes important areas with a soft white brush.
Background Elements
Includes gradients, grids, and chrome textures.
Adding Glows and Highlights
One effective way to make your 80s retro text pop is by adding glows and highlights. Follow these steps:
Create a new layer above your text layer.
Select the Brush tool and set your color to white.
Double-click on the new layer to open Layer Style options.
Select Outer Glow and adjust the spread and size until you achieve the desired glowing effect.
For highlights, use the same Brush and lightly paint over areas you want to emphasize.
Remember to adjust the opacity for a more blended look.
These techniques will add extra depth and glam to your retro text.
enhance the retro vibe of your 80s text effect, consider using warp text techniques in combination with adding glows and highlights.
This approach can create a more dynamic and visually striking design that captures the essence of vibrant 80s graphics.
Incorporating Background Elements
A stunning background can enhance your 80s text even further. Here’s how:
Create a new layer beneath your text layer.
Use a Gradient to design a vibrant background gradient.
Add elements like grids, stars, or chrome textures to complement your text's theme.
You can use free textures available online or edit your own patterns.
Blend these elements by adjusting their opacity or using blend modes like Overlay or Screen.
A cohesive background makes your design stand out and adds depth.
Pro Tip: Combining these elements will help you achieve a captivating retro text effect that rocks the iconic 80s look.
Review and Exporting 80s Text Effect Photoshop Design
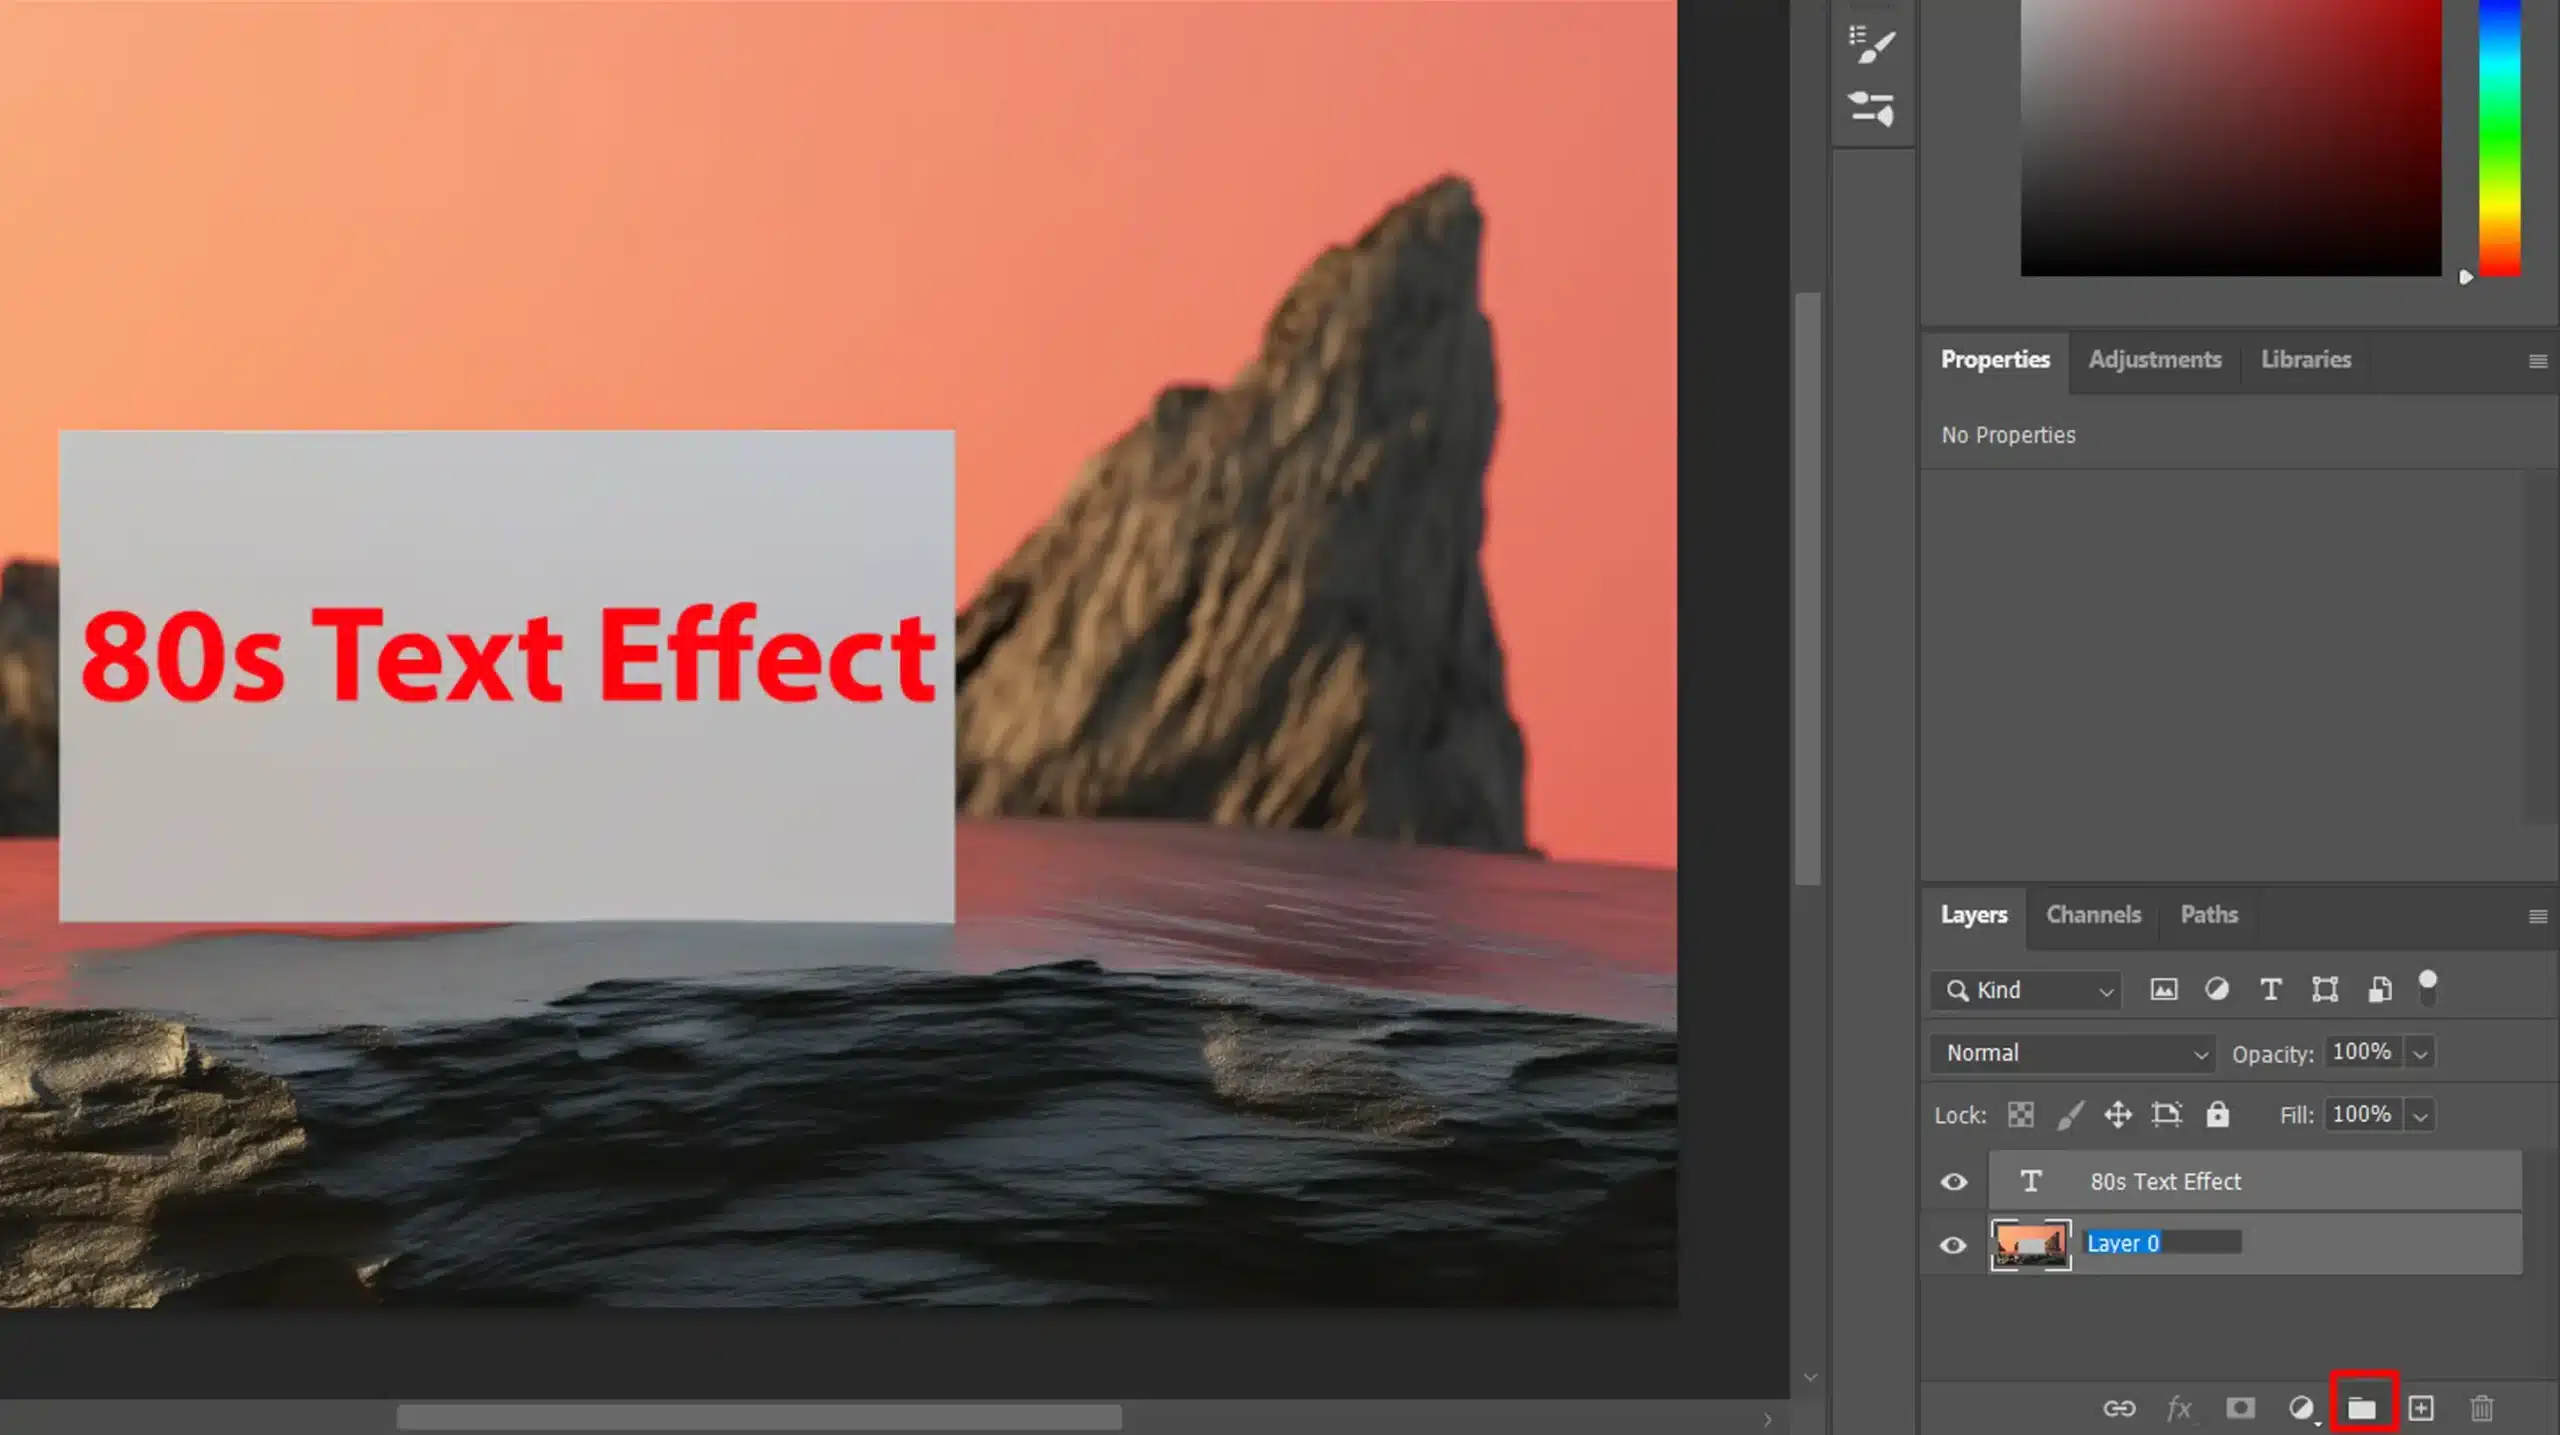
Before finalizing your 80s text design, let’s take a moment to review your artwork and ensure everything looks perfect.
Reviewing Your Design
At this stage, we review the artwork. Check all layers. Ensure each layer looks right. Is your 80s retro look spot on?
Significant Areas to Review:
Highlights and Shadows: Have they been placed effectively? Consider using the Dodge and Burn tools for precise adjustments.
Glow Effect: Did the outer glow add the depth you wanted?
Fine Details: Zoom in to look for any rough edges or places that need smoothing. Fix these issues quickly using tools like the spot healing brush tool.
Overall Balance: Do the elements come together well? It’s not difficult to overlook the small things, but this is an important step.
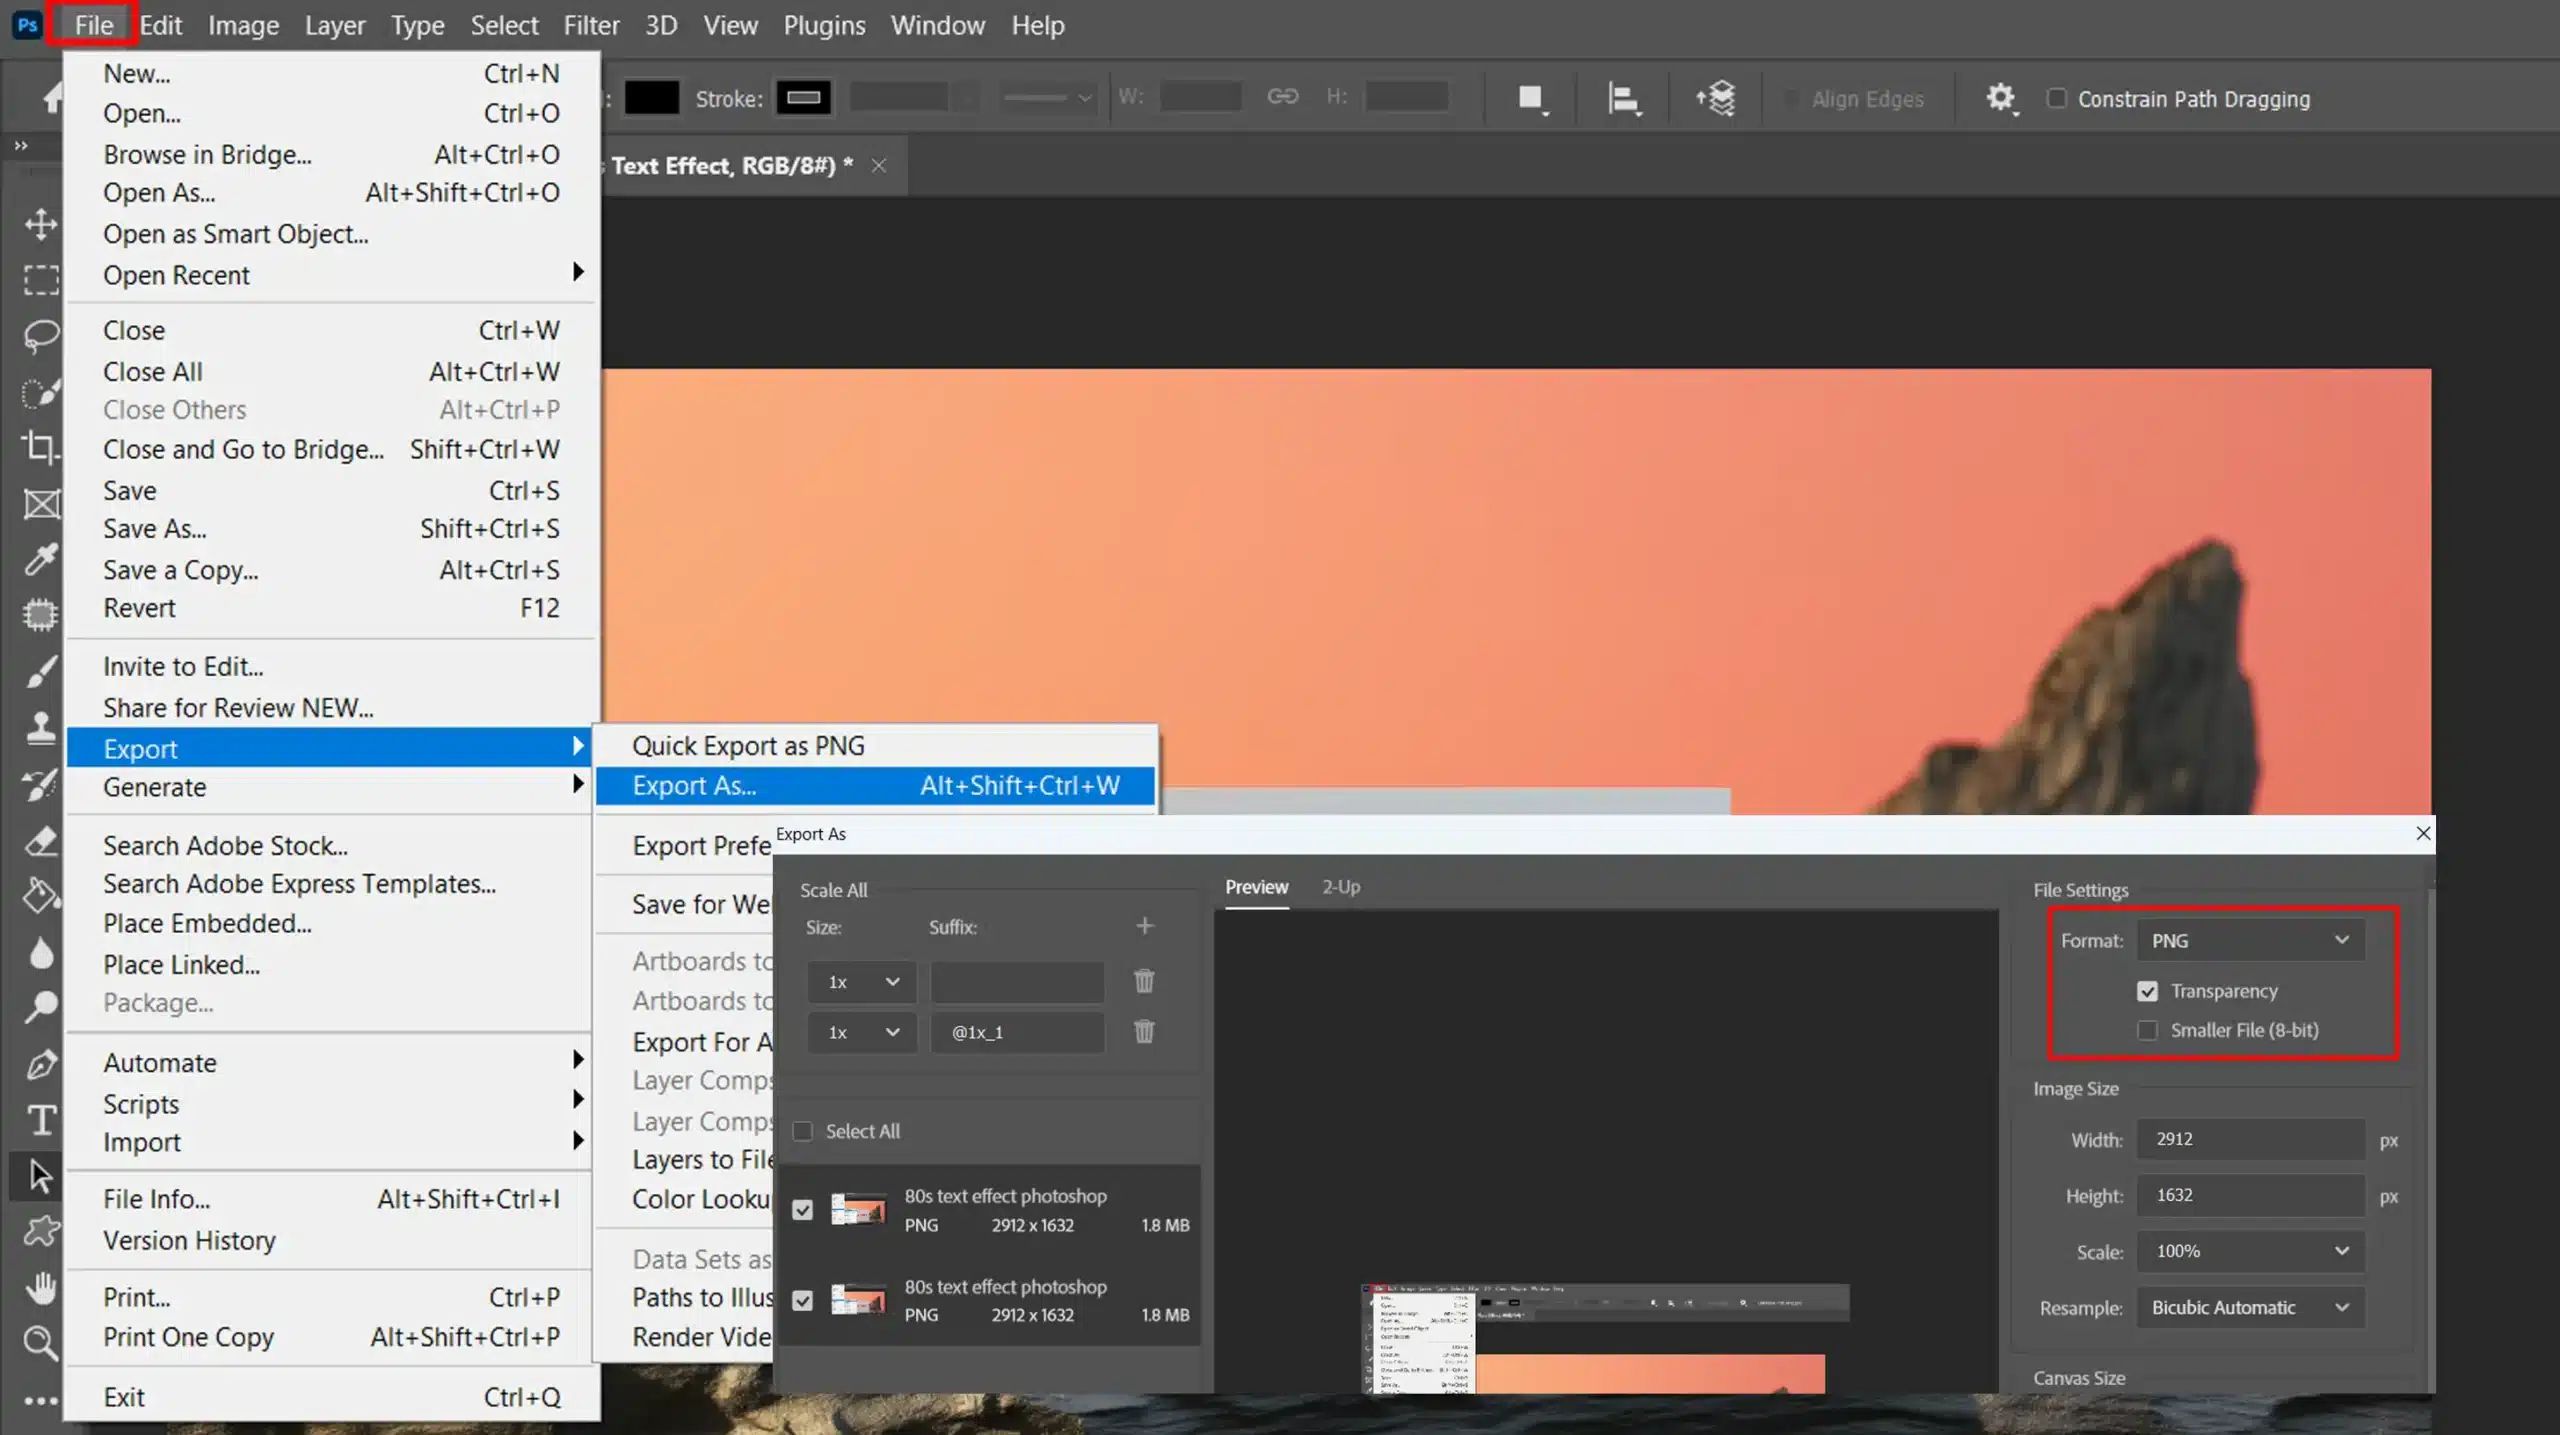
Exporting Your Image
Once you are satisfied, it is time to export. This step is important for sharing your creation. First, save the editable file. It’s always good to have a backup.
Steps to Export:
Go to the "File" menu.
Select "Export As."
Pick your image format:
For the web, use JPEG or PNG.
For print, consider TIFF.
Check the resolution settings:
For the web, 72 PPI works.
For print, aim for 300 PPI.
Double-press to confirm the settings. Your image should look crisp!
Review the final export. Any flaws at this stage? Better to catch them now than later. Fix them if needed and replace the exported file.
Pro Tip: Always keep your free textures organized. They make edits and designs much simpler.
Practical Applications for 80s Text Effect
If you’re venturing into Photoshop and Lightroom, the 80s text effect is an interesting technique to explore.
It’s not just for fun; it has some genuine practical applications. Let’s dive into where you can use this effect.
Use in Marketing
Many companies use retro themes to evoke nostalgia in their marketing.
Promotions using 80s text effects stand out. They catch your eye and make you remember.
The bold use of chrome and neon brightens any ad. You can edit text layers to tweak pigments, making it fit your brand.
Applying an 80s text effect does just that. It’s a great way to draw attention to important announcements.
Double-click on the text layer to edit fonts and experiment with different looks. You can also use Lightroom and its shortcuts to speed up your workflow when preparing images for social media.
Event Posters
Create posters for themed events or parties using this effect.
It instantly sets the right vibe, reminding everyone of the good old days.
Adjust editing settings to change the intensity based on the event type, be it a concert or a casual get-together.
Personal Projects
Sometimes, you just want to have some fun with your personal designs.
Use this effect in your digital scrapbook or even on family photos. No-cost templates available online can be a great starting point.
No-cost Resources Online
There are lots of No-cost resources to help you master this technique:
Free tutorials
Free templates
Free textures
Common Mistakes to Avoid in 80s Text Effect Photoshop Artwork
When diving into 80s retro designs in Photoshop and Lightroom, it’s easy to stumble. Let’s avoid those common pitfalls together.
Important Areas to Focus On
To ensure your design is polished, pay attention to these important areas. Let’s start with the significance of managing your layers effectively.
Ignoring Layers
Layers are significant. They help you keep track of different types of edits. Group similar edits.
Name your layers. It keeps your project organized. Organized efforts lead to better results. Don’t overlook this simple step.
Overusing Filters
Filters add flair but use them wisely. Too many filters can clutter your image.
Choose one filter that fits your project. Less is often more. Keep it subtle and impactful.
Forgetting About Resolution
High resolution is significant for print materials. If you’re posting online, know the right type of resolution.
Blurry images turn people away. Always check your settings before you complete a project. Resolution plays a significant role.
Skipping Shortcuts
Shortcut keys save time. They also make your workflow smooth. Spend some time learning them. It pays off in the long run.
Familiarize yourself with essential tools in Lightroom and Photoshop shortcuts to speed up your editing process.
Adjusting Colors Incorrectly
Color correction is important. Use the right adjustment layers.
Test your tones on different devices. Make sure pigments look good everywhere. Missteps here can ruin your project.
Not Saving Copies
Always save a copy before major edits. This step allows you to go back if needed. It’s a simple but effective habit.
Avoiding Tutorials
Tutorials are gold. They offer a wealth of knowledge. Never think you know it all.
Keep learning. It enhances your skills. Consider exploring Lightroom training sessions to stay updated.
Pro Tip: Always preview your edits in full screen. It gives you a better perspective of your creation.
Now, let’s get into action. Avoid these mistakes and transform your artwork.
Frequently Asked Questions
What’s the Best Way to Create 80s Text in Photoshop?
Open your Photoshop project and select the Text tool.
Type your desired text and choose a bold, retro-style font.
Add bright neon colors typical of the 80s, such as hot pink, bright blue, or lime green.
Add a layer style; go to 'Layer' > 'Layer Style' > 'Outer Glow' for a neon effect.
Experiment with 'Layer' > 'Layer Style' > 'Stroke' to add an outline, commonly used in 80s text designs.
What’s the Best Way to Create an 80s Filter in Photoshop?
Start by adjusting the color balance. Go to 'Image' > 'Adjustments' > 'Color Balance'.
Shift tones towards reds, magentas, and blues to get that vibrant 80s look.
Add a gradient map by going to 'Layer' > 'New Adjustment Layer' > 'Gradient Map' and choose a preset that includes neon tones.
For a vintage feel, add a slight blur: 'Filter' > 'Blur' > 'Gaussian Blur'.
Finish off with a vignette effect by creating a new layer, using the 'Elliptical Marquee Tool' to create an oval shape and fill it with black. Invert the selection and add a feather to blend it smoothly.
How to Make Text Look Old in Photoshop?
Create or open your text layer.
Add a texture overlay: Find a paper or metal texture and place it over your text layer. Use the 'Create Clipping Mask' option by right-clicking between the layers.
Adjust the blending mode of your texture layer to 'Multiply' or 'Overlay' to let the text show through with a worn effect.
Use the 'Burn Tool' from the toolbar to darken edges or specific areas, adding to the aged look.
Optionally, add small cracks or tears by using a fine, rough brush on a new layer above the text.
How Do You Add Effect Text in Photoshop?
Select your text layer and explore 'Layer' > 'Layer Style' to find various effects like Drop Shadow, Bevel & Emboss, and Stroke.
For a distressed look, add noise: 'Filter' > 'Noise' > 'Add Noise'.
Experiment with warp text by clicking on the 'Warp Text' tool in the top toolbar when the text tool is active.
Use the 'Displacement Map' to edit the text to appear as if it's interacting with the background texture. This requires creating or using a pre-existing displacement map image.
Combine multiple effects to create a unique look tailored to your project's needs.
In conclusion, mastering the “80s text effect Photoshop” has truly transformed my designs. The nostalgic and vibrant style instantly grabs attention, making my work stand out.
By applying these techniques, I’ve added a unique flair to my graphics that clients and audiences love.
If you’re eager to enhance your Photoshop skills, I highly recommend checking out this comprehensive Photoshop course.
And for those looking to elevate their photo editing prowess, the Lightroom course is an excellent resource. Embracing these tools has significantly improved my creative workflow, and I’m confident it will do the same for you.
If this article has helped you, then Like and Share it with your friends
$2,061.00Original price was: $2,061.00.$1,061.00Current price is: $1,061.00. 27583
Download Your Free Guide Now!
Discover the secrets of photography with our printable guide! Master essential techniques like aperture, shutter speed, and ISO to create stunning images. Get your free printable PDF now and start turning your snapshots into masterpieces!