Are you looking to transform your images and take them to the next level?
I’m here to guide you through the incredible possibilities with Photoshop and Lightroom.
Whether you’re a beginner or a seasoned pro, these tools can elevate your photography game.
Imagine having the skills to turn ordinary photos into stunning visual masterpieces.
Intrigued?
Stick around as I reveal essential tips and tricks that can make a dramatic difference in your editing process.
By the end of this article, you’ll be equipped with the knowledge to enhance your creativity and produce jaw-dropping images that captivate any audience.
Let’s dive in!
Table of Contents
How to Transform Image Files
Transforming image file is a fundamental skill in digital editing technology, allowing you to adjust and enhance your visuals for various applications.
Whether you’re working with photos, graphics, or design elements, understanding how to apply transformations such as resizing, rotating, and cropping can significantly impact the final display of your image.
Step-by-Step Guide
Are you ready to change your pictures?
Follow these simple steps:
Open your photo-editing program: Locate your image and load it into the software by clicking "File" then "Open". This initial step is crucial as it sets the foundation.
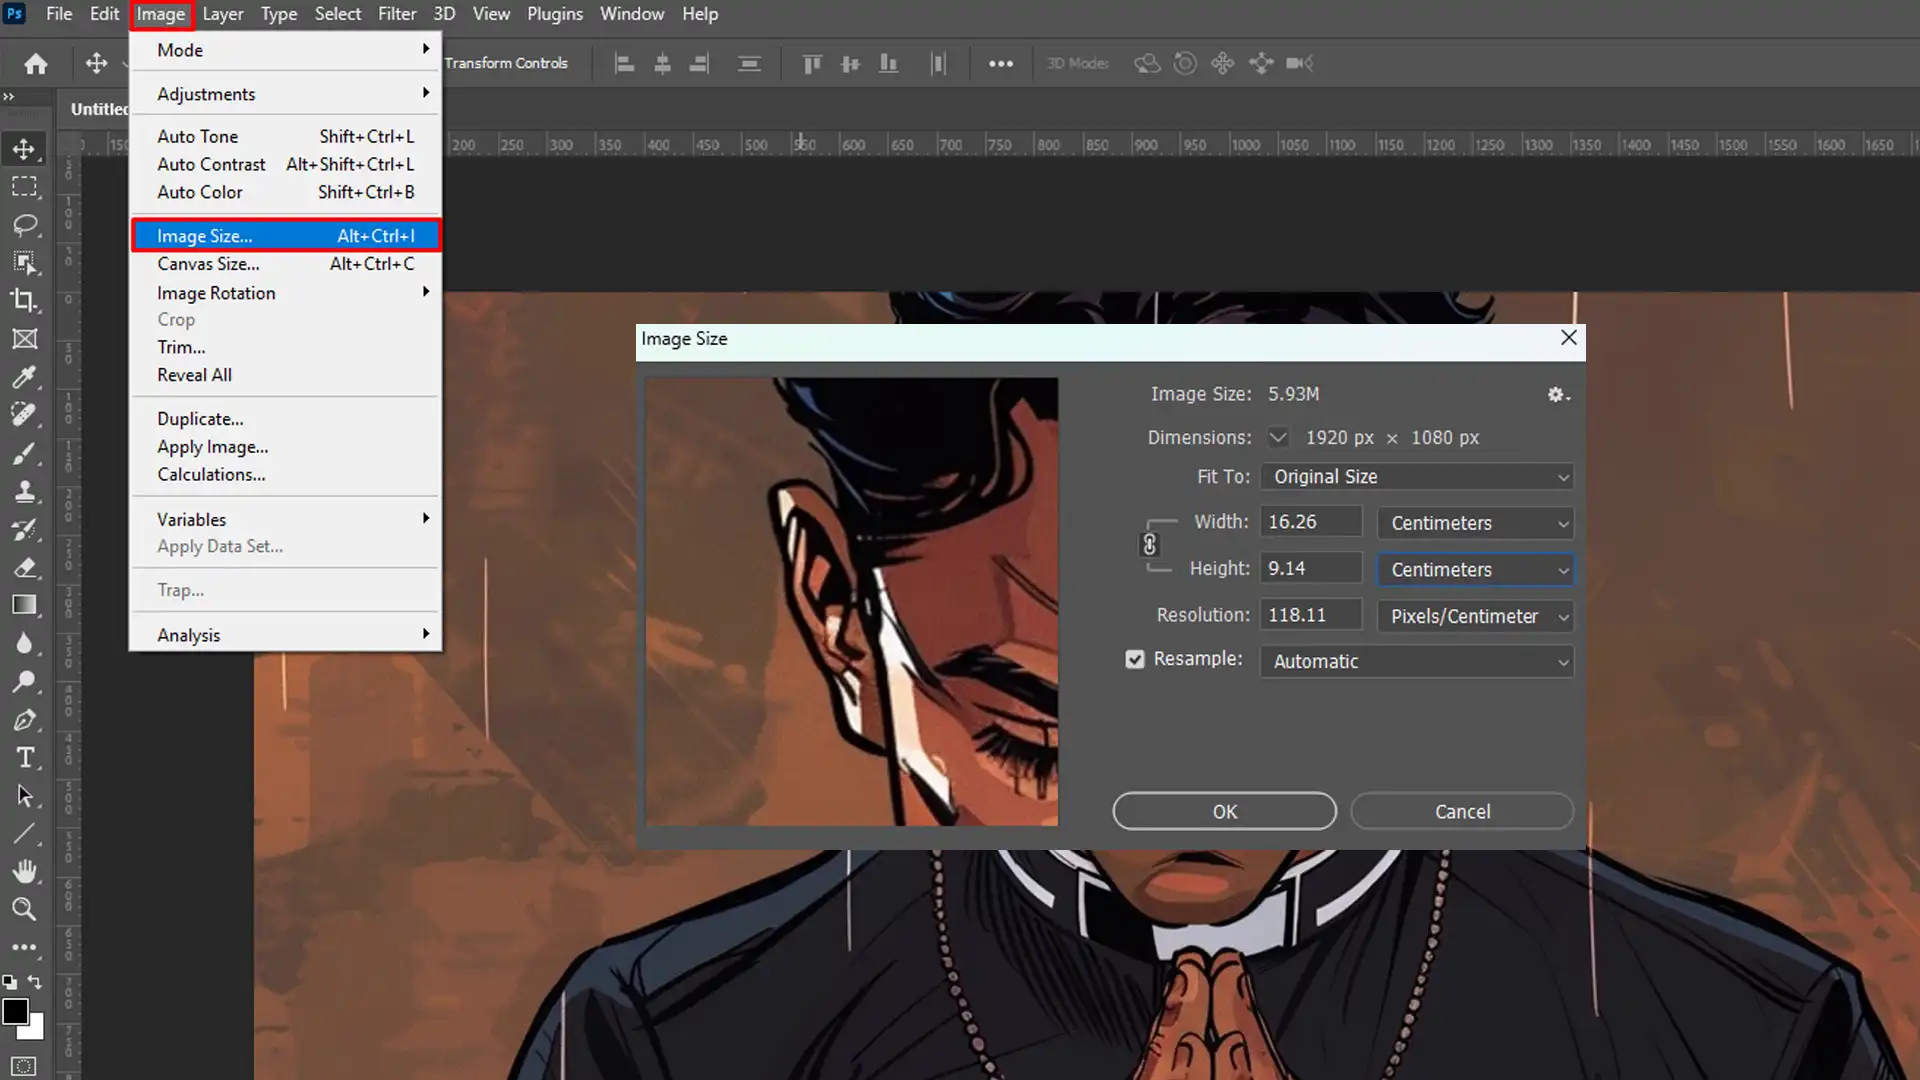
Choose the tool for your transformation needs:Resizing: Find the resize option under "Image". Adjust the dimensions by specifying the pixel or percentage values you want. Always keep an eye on the aspect ratio to maintain your image's proportions.
Crop: Select the crop tool. Click and drag to form a selection. When satisfied, apply the transformation by hitting enter or clicking "Crop". For more precision, learn how to crop in Photoshop.
Rotation: Locate the rotate option, then choose the angle. Options like 90 degrees or flipping horizontal/vertical are common choices.
Advanced transformations: Think layers. Create a new layer by selecting "Layer" then "New Layer". This allows for non-destructive editing, enabling you to edit different parts of your image without affecting the rest.
Tools You Need to Transform images
To transform images, you need the right applications. Here are some essentials:
Software: Adobe Photoshop and Lightroom. These tools provide extensive functionality for transforming images. If you're new, consider learning Photoshop through various tutorials.
Hardware: Reliable computer with good processing power. This ensures quick editing and rendering times.
Accessories: A graphic tablet can give you more precision if you edit frequently.
Common Mistakes to Avoid
During transformations, pitfalls can emerge.
Knowing them ahead helps prevent issues:
Ignoring aspect ratio: This can distort your images. Always lock the aspect ratio when resizing.
Overcropping: Be careful not to remove critical parts of your photos.
Skipping the backup: Always save a copy before starting major transformations.
Forgetting layers: Not using layers can mean irreversible changes. Use layers for safe editing.
Learning to effectively transform image file takes practice, but it is doable with diligence.
Don’t rush through the steps.
Each transformation stage holds specific implementation details that enhance your final product.
Remember, simpler is often better. Keep your transformations subtle and purposeful.
Pro Tip: Use Photoshop shortcuts for quick transformations. It boosts your editing speed and efficiency.
Advanced Techniques to Transform Images
In this section, we’ll delve into sophisticated methods for enhancing and transforming images using advanced tools and techniques.
Whether you’re aiming to achieve artistic effects or precise adjustments, these advanced techniques will help you take your image editing skills to the next level.
Using Software Tools for Image Editing
Using software tools like Photoshop and Lightroom can turn your photos from meh to wow.
When exploring using software tools for photo editing, understanding the difference between Photoshop and Lightroom is crucial. These tools offer distinct features tailored for various editing needs.
These tools offer an extensive range of options.
Rescale and Transform Images
When you need to rescale, find the resize option in the menu. Enter your desired dimensions while keeping the aspect ratio locked to avoid distortion.
Choose the Right Tool for Each Task
For Transformation the tools are :
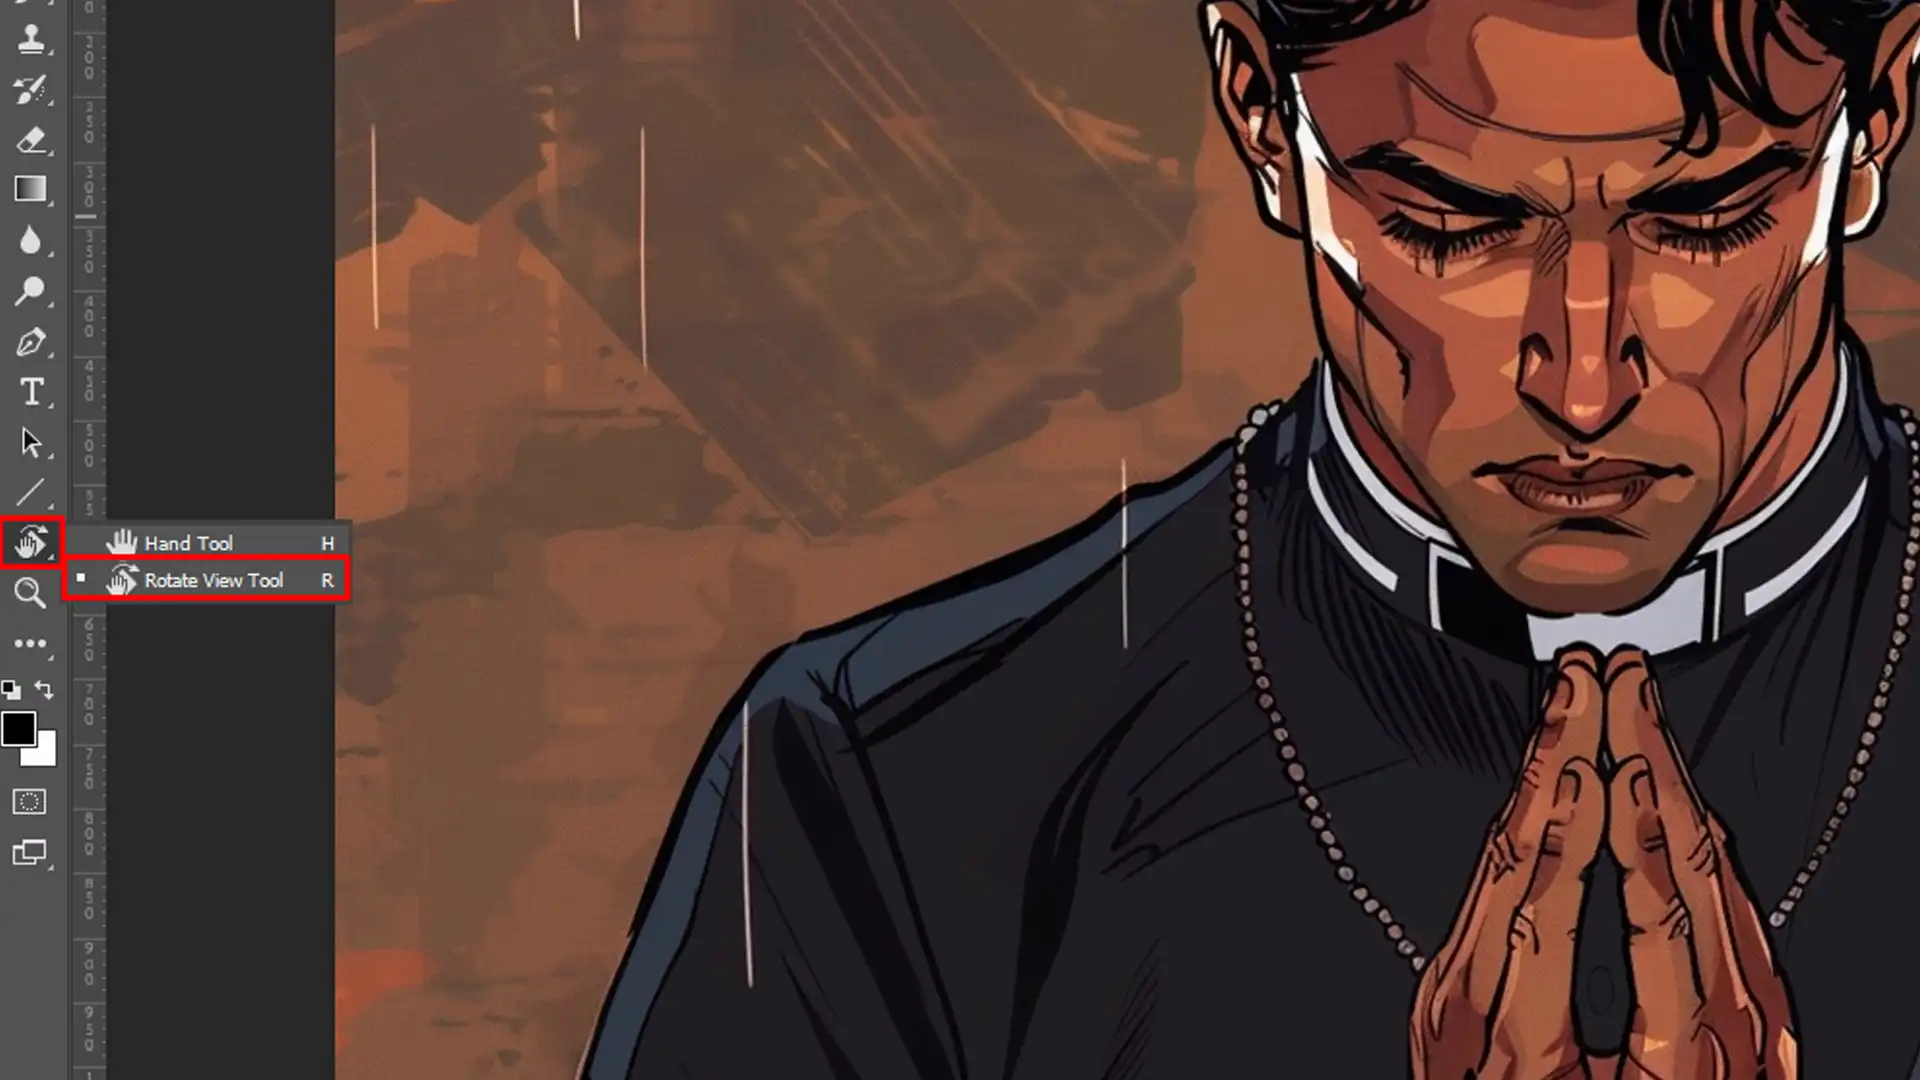
Rotate: Want to rotate? Easy. Choose the rotate option, and pick your angle. Whether it's 90 degrees or just a slight tweak, you can rotate it with just a few clicks.
Crop: Cropping is another essential. Select the crop tool, draw your selection, and hit enter. Boom, you're done!
Layers are your best friends; they let you edit without ruining everything you’ve already done.
Always use layers for any changes. This way, you can switch back if something doesn’t look right.
Online Tools for Image Transformation
If downloading software is not your thing, why not try online tools?
Websites like Pixlr and Canva allow quick transformations.
It’s all about the interface here, which is mostly drag-and-drop. Everything from resizing to adding filters can be done online.
No need to download software, which saves your computer’s processing time.
Simply upload your image, choose your transformation, and export. It’s as easy as pie.
But remember, online tools may not offer the same versatility as dedicated software.
Batch Processing for Multiple Images
Transforming multiple images one by one can be time-consuming.
Enter batch processing.
First, you batch process using software like Lightroom. Select your photos, apply your desired transformation, and voila!
All your normal, vector and raster images are updated simultaneously.
Changing the aspect ratio, rotating, or cropping becomes less tedious this way. You save loads of time, letting you focus on other important tasks.
You can even maintain color profiles and metadata during the process. Just ensure all your pictures are in the same format to streamline things.
Transform Images with Just a Few Clicks
Are you ready to dive into the world of image transformations?
Don’t worry!
We’ll keep it simple and fun.
Quick Tips and Tricks for Image Adjustment
First things first, open your photo-editing software.
You have your image loaded up?
Resize and Image Adjusment
Head over to the “Image” menu and click on “Resize”.
Enter the new dimensions, but make sure to lock the aspect ratio.
This keeps your image looking good.
Rotate and Image Adjusment
Need to change the orientation?
Use the rotate option. Easily rotate by 90 degrees or just a little bit for that perfect angle.
Crop
Choose the crop tool, click and drag to select the area you want to keep.
Hit enter, and you’re done!
Layers
Layers are your best friends in Photoshop or Lightroom.
Want to make changes without messing up the whole image?
Create a new layer for each transformation. It keeps everything organized and makes it easier to reverse any edits.
Batch Process
Got multiple images to edit?
Batch processing is your lifesaver. Select all your photos, apply the same edits, and save time.
Best Practices for Image Transformation
Now, here’s how to make sure your transformations come out just right.
Watch the Aspect Ratio
Always keep the aspect ratio consistent when resizing. It prevents your images from looking distorted or squished.
Don’t Overcrop
Be cautious with cropping. Highlight the subject but don’t cut out important parts of the image.
Other concept, like is the crop factor, is useful for understanding how sensor size affects field of view and focal length, but over-relying on it can distort images and compromise quality by reducing resolution and altering perspective.
Backup Your Files Before Image Editing
Before editing, always save acopy of the original file.
If something goes wrong, you’ll have the original to fall back on.
Use Layers Wisely while Image Editing
Implement layers for different transformations.
This approach allows for non-destructive editing and offers more flexibility.
Keyboard Shortcuts to Transform Image Fast
Want to speed up your workflow?
Learn and use keyboard shortcuts.
They can make editing much faster and easier!
And there you have it!
Quick, simple steps to transform your images using Photoshop or Lightroom.
Pro Tip: To maintain the quality of your images, always check the file dimensions after editing.
Large files might slow down your computer, while smaller sizes can save storage without sacrificing quality.
Mastering Image Transformations
Transforming images effectively involves a range of techniques and tools.
Whether you’re adjusting the rotation, applying transformations, or manipulating shapes, mastering these skills will enhance your ability to create stunning visuals.
Transforming Images: An Overview
Understanding the basics of these transformations can significantly improve your editing workflow.
Rotate: Adjusting the angle of your image can help you achieve the perfect orientation. Use rotation tools to turn your images by specific degrees or flip them horizontally or vertically.
Transformation Techniques: Apply transformations to rescale, rotate, or distort images. These techniques can help in fitting images into specific shape or formats.
Creating and Shaping Images
Creating and shaping images involves manipulating pixels and applying various techniques to achieve the desired effect. This process is essential for transforming high-class visuals.
Shape and Size: Adjust the shape and size of your images by using cropping and resizing tools. This ensures your image shape fits perfectly within a designated space.
Pixels and TIFF: Work with pixel dimensions and consider using TIFF files for high-class outputs. TIFF files preserve image class and detail, making them ideal for professional use.
Applying Effects to Your Image
Applying effects can dramatically change the appearance of your images, adding depth and interest.
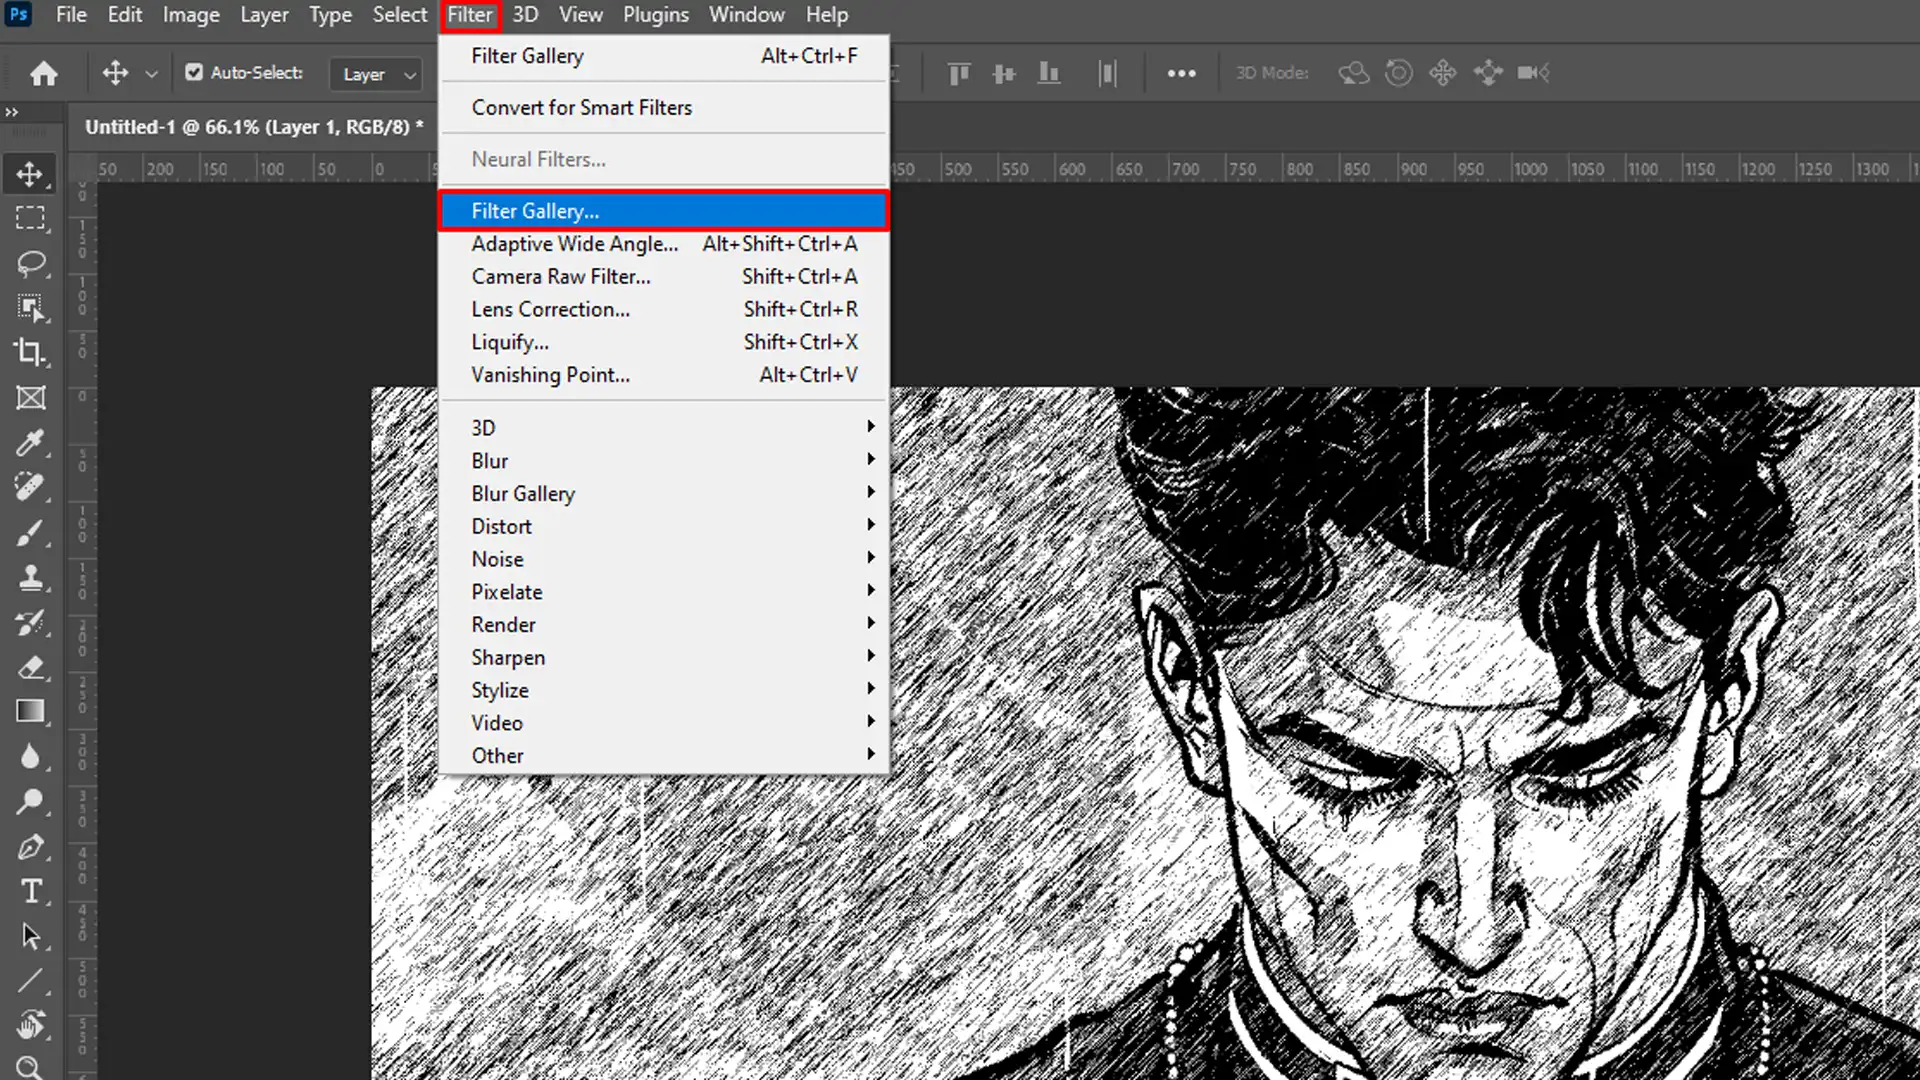
Apply Effects: Use photo editing software to create and apply effects like filters, color adjustments, and rotate effects. These effects can enhance your image and make it stand out.
Video or Animation Transformations: In addition to still images, transformations can be applied to video footage. Adjusting video frames, applying filters to the video, and resizing clips are essential for creating engaging video content.
By mastering these techniques, you’ll be able to transform images and videos with precision, creating visually appealing content that captures attention and communicates your message effectively.
Scaling Layers Proportionally when Transforming Image
When working with images, especially in design and photo editing, it’s crucial to maintain the correct proportions to avoid distortion.
Scaling layers proportionally ensures that your images retain their original aspect ratio as you resize them.
This technique is essential for achieving a balanced and visually appealing result, whether you’re adjusting the size of a single layer or multiple layers in your project.
Feature
Photoshop
Lightroom
Scaling Method
Proportional scaling using the Transform tool
Basic scaling options for photos
Aspect Ratio
Maintains aspect ratio by default
Maintains aspect ratio when resizing
Control
Detailed control with handles and options
Simple control with slider adjustments
Precision
High precision for detailed edits
Good precision for general adjustments
Flexibility
Flexible with multiple layers and objects
Limited to single photo adjustments
Both Photoshop and Lightroom offer effective ways to scale layers proportionally, with Photoshop providing more detailed control and flexibility, while Lightroom offers straightforward scaling options for quick adjustments.
Let’s dive into a crucial Photoshop and Lightroom skill: scaling layers proportionally.
Scaling, or resizing, is about changing the size of your image without distorting its aspect ratio. It ensures your image retains its original shape.
Attention
Ever wondered why your images sometimes look squished or stretched after resizing? This happens when you don’t scale proportionally. Imagine a balloon; if you squeeze one side, the other side bulges out.
Interest
But don’t worry, keeping the aspect ratio consistent is easy:
Open your photo in Photoshop or Lightroom.
Select your layer, then go to the tool options bar.
Find the scale tool.
Hold down the Shift key. This will lock the aspect ratio, ensuring your photo scales proportionally.
Desire
Why should you care?
Maintaining the original proportions makes your photos look professional.
It keeps heads from looking squished and buildings from looking like they’re falling over.
Also, proper scaling lets you crop or focus on details without losing quality. Your images stay sharp, and any text or objects remain true to their original shape.
Action
Time to put this into action!
Open a photo and practice.
Select the layer you want to rescale.
Hold down the Shift key and drag the corners to your desired size.
Feel the ease as your image effortlessly maintains its proportions.
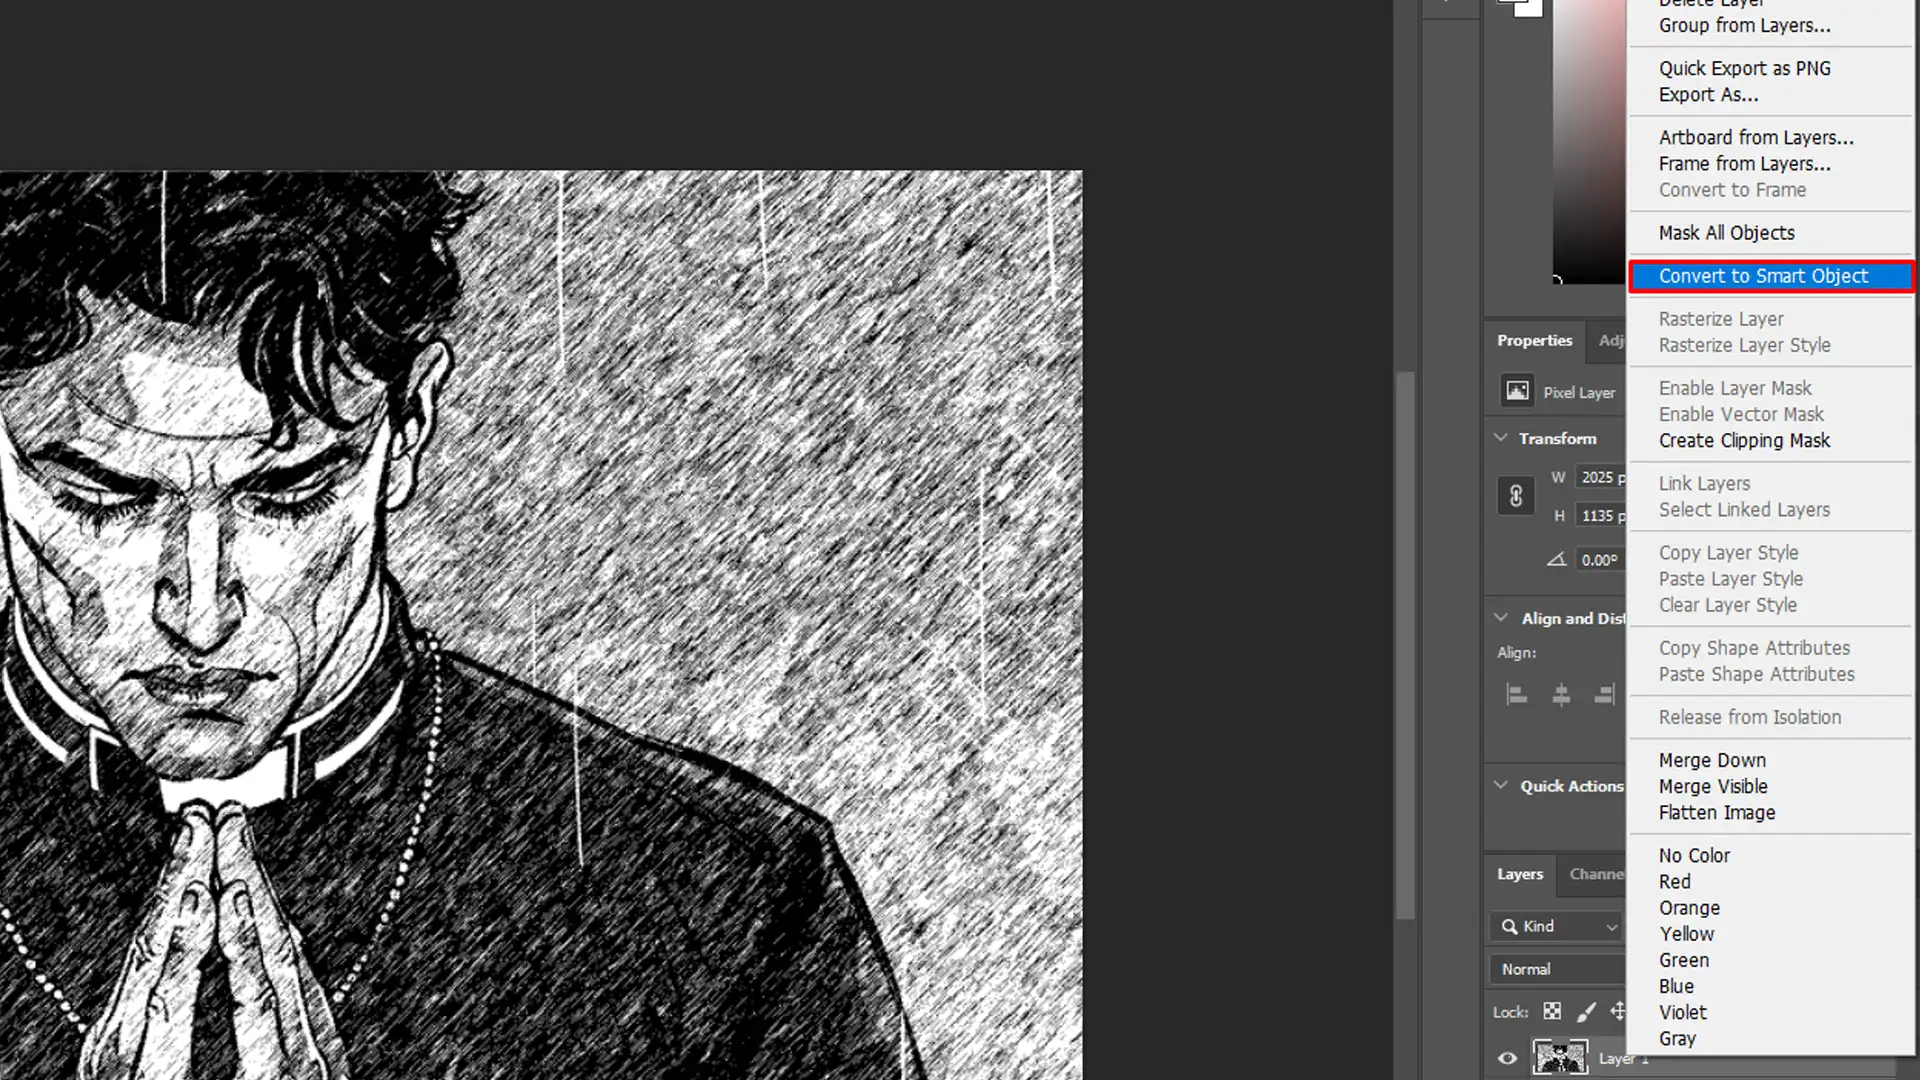
Pro tip: Always convert your layer into a Smart Object before scaling. This way, you can resize up and down without losing any quality.
It’s a small step that makes a big difference!
Common Issues and Troubleshooting while Image Editing
Let’s dive into some common headaches and their fixes.
By the end, you’ll be a bit more confident in tackling them head-on.
Before Making Image Adjusments
Ever uttered a curse or two while trying to transform an image?
I hear you!
Many people run into common pitfalls that mess up their hard work. Let’s dive in and save you some headaches.
Challenges in Basic Image Transformation
Transforming images, whether it’s resizing, cropping, or rotating, can seem like a piece of cake. But wait, even the simplest tasks have a way of tripping us up.
Common Pitfalls
Here are some examples of pitfalls to avoid:
Ignoring Aspect Ratio: Always keep the aspect ratio locked when you resize. This stops your photo from looking squished or stretched.
Overcropping: Be careful with the crop tool. You don’t want to cut out essential bits of your image, do you?
Forgetting Layers: Use layers to make non-destructive edits. Layers let you undo changes without wrecking everything.
Skipping Backup: Save a copy of the original image before you start any transformation. If things go south, you'll still have the untouched version.
Incorrect File Formats: Always save in the correct format. Did you know that saving in PNG keeps transparency, while JPG doesn’t?
Mastering Transformations for Stunning Photos
Nailing these transformations can make or break your photos. Imagine turning those bland snaps into eye-catching gems!
Effective Layer Utilization
Resize Smartly: Find the right balance in dimensions and file size.
Rotate Precisely: Achieve that perfect angle without distorting your image's shape.
Use Layers Effectively: Maximize your photo editing by layering effects.
Maximizing Quality with Smart Objects
Ready to transform like a pro?
First, load your image. Then, select the tool for the job, whether it’s resize, rotate, or crop.
Don’t forget to hold down the Shift key for proportional scaling!
Pro Tip: Convert your layers to smart objects before making transformations. It allows you to resize, rotate, or apply effects without losing quality.
Start your journey to mastering image transformations now, and see instant improvements in your photos.
Image Quality Problems on the Image Adjustments
When adjusting images, maintaining high quality can be challenging.
This section will address common image quality issues that arise during adjustments, such as loss of sharpness, color distortion, or pixelation.
Grainy or Blurry Photos
Ever wonder why your photos sometimes look grainy or blurry?
The issue often lies in resolution and image quality.
When you resize or scale photos without keeping an eye on the resolution, the result can be a poor-quality image.
Always check the “pixels per inch” (ppi) value to ensure clarity. If you’re working in Photoshop, you can use the Photoshop Upscale Image feature to maintain grade while resizing.
Low Contrast
Another problem could be low contrast.
Adjusting the contrast can make your image pop! Look for the ‘Contrast’ slider in Photoshop or Lightroom to make your photos stand out.
For quick adjustments, consider using Lightroom Shortcuts to speed up your workflow.
Color Imbalances
Sometimes, you might encounter color imbalances.
This happens due to incorrect white balance settings. Using the eyedropper tool to fix this can give your images a natural look.
File Format Issues
Choosing the wrongfile format can lead to unintended consequences.
If you save images in formats like GIF or BMP, they may not retain quality.
For photos, it’s best to use JPG or PNG.
JPG: Compresses the image; useful for smaller sizes but loses some quality.
PNG: Great for maintaining detail without losing transparency.
TIFF and BMP: Avoid unless you need high resolution for print.
GIF: Can slow down loading times, and gif may lose quality due to its limited color palette and compression.
Remember to convert between formats or other types sparingly to avoid degradation.
Use format options wisely to keep your images crisp.
Software Compatibility
Running into software issues can be frustrating.
Older software versions may not support new features.
Always update your software. It’s free and ensures new transform tools are available.
Device and Operating System Compatibility
Compatibility issues also arise when switching between different devices or operating systems.
Files saved in default format output on one device might not open on another.
Saving your work in universally accepted formats like PNG, JPG, or TIFF avoids this issue.
Graphic Drivers
Lastly, consider checking if your graphic drivers are up to date. This simple fix often solves unexpected behavior in the software.
Pro Tip: Before applying any major transformation, save a backup!
This keeps your original image safe, allowing you to revert if things go south.
There you have it , quick and effective solutions to common issues.
Frequently Asked Questions
How can I reshape an image?
Reshape the image in simple steps:
Open your image editing software or app.
Select the 'Resize' or 'Crop' tool from the menu.
Adjust the dimensions manually or choose a preset size.
Apply the changes and save your reshaped image.
How to transform an image with AI?
To transform an image with AI in step-by-step:
Choose an AI image transformation tool or software.
Upload the image you want to transform.
Select the type of transformation you wish to apply (e.g., style transfer, enhancement).
Start the transformation process and wait for it to complete.
Download or save the transformed image
How to convert an edited photo to an original online?
Easy steps to convert and edited photo to an original:
Find an online tool that offers to revert edits on photos.
Upload your edited photo to the platform.
Use the tool's features to reduce or remove filters and adjustments.
Process the photo to restore it to its original state.
Save or download the original version of the photo.
How to convert a photo to an illustration?
Follow these steps to convert a photo to illustration:
Select a photo that you would like to convert into an illustration.
Use an online photo-to-illustration converter or software.
Upload your photo and choose the desired illustration style.
Apply the conversion, and preview the illustration.
Adjust settings if necessary and finalize the illustration.
$2,061.00Original price was: $2,061.00.$1,061.00Current price is: $1,061.00. 27585
Download Your Free Guide Now!
Discover the secrets of photography with our printable guide! Master essential techniques like aperture, shutter speed, and ISO to create stunning images. Get your free printable PDF now and start turning your snapshots into masterpieces!