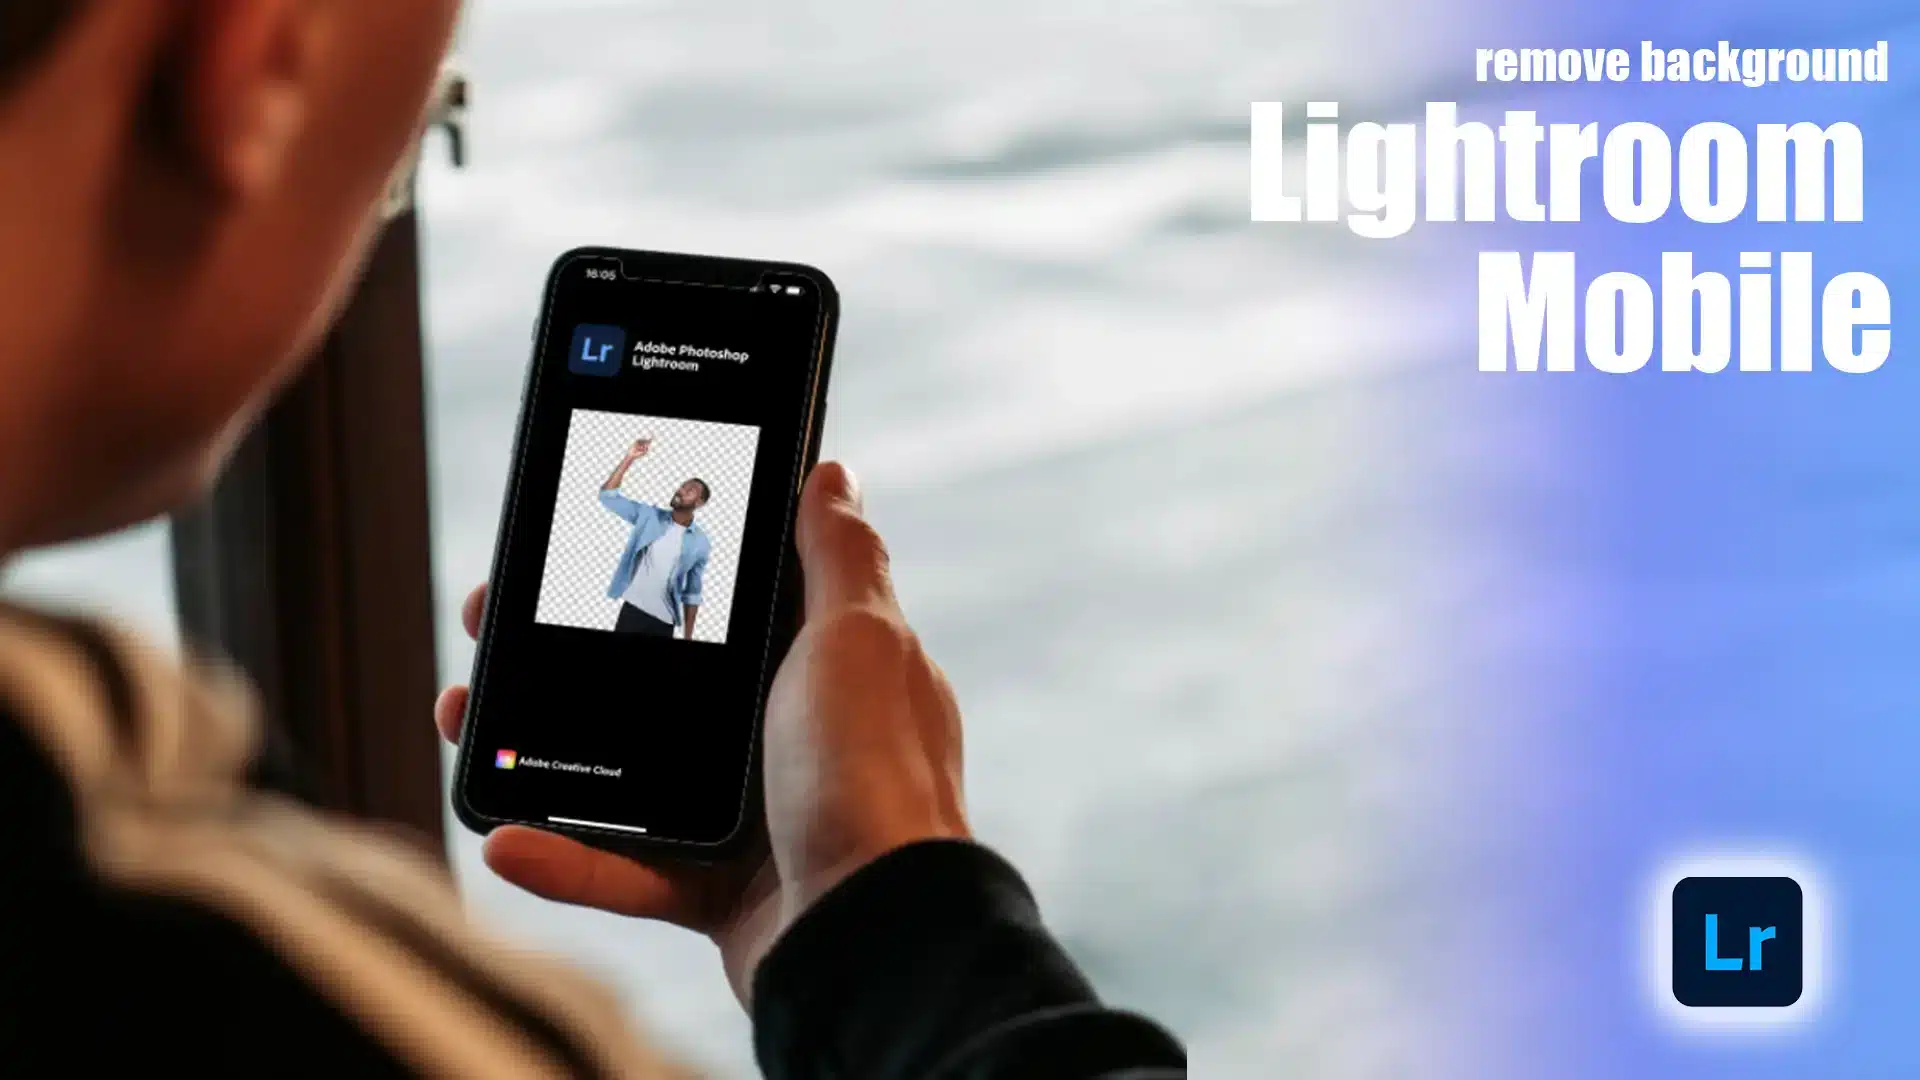
Have you ever wondered how to remove background in Lightroom Mobile? If you’re like me, you’ve probably faced challenges trying to get that perfect, clean look for your photos on the go.
Imagine the satisfaction of transforming a cluttered image into a professional masterpiece, all from your phone. Intrigued? You’re in the right place.
In this article, I’ll guide you through a straightforward process to achieve just that. You’ll be amazed at how simple it is to elevate your photo editing skills.
Table of Contents
How to Remove Background in Lightroom Mobile?
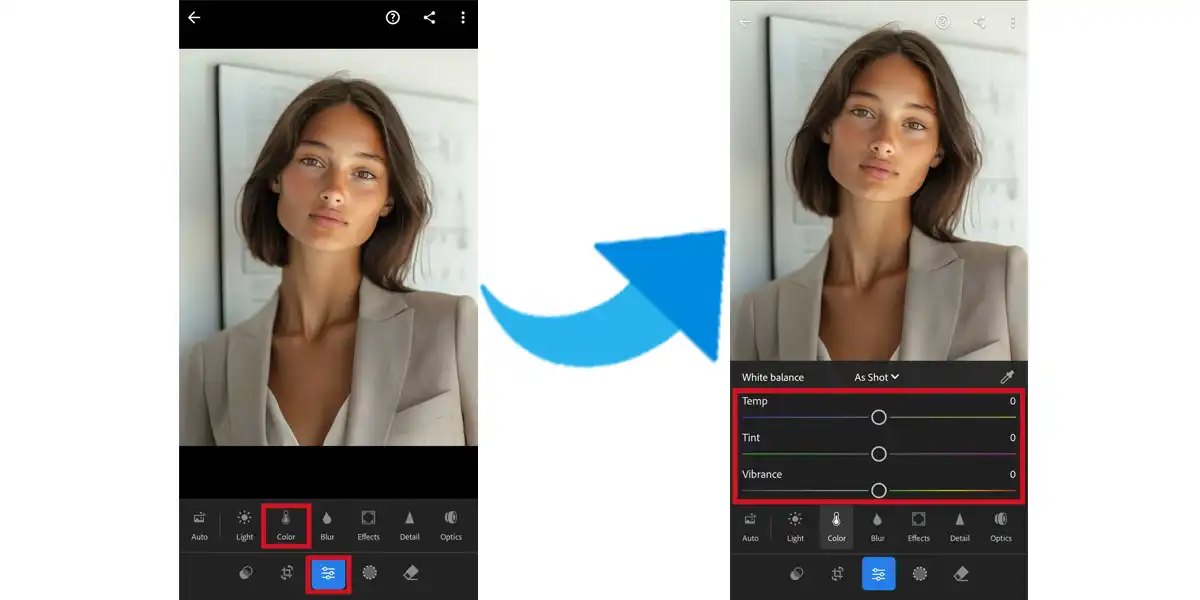
Removing backgrounds in Lightroom Mobile allows you to change background settings, whether to a white background, black background, or something more creative.
Here’s a quick guide to help you get started.
Step-by-Step Guide to Remove Background
We know you want to make that subject pop in your photo by removing the background. Follow these steps for a smooth editing experience:
Open the Lightroom app on your mobile device.
Import the image you want to edit.
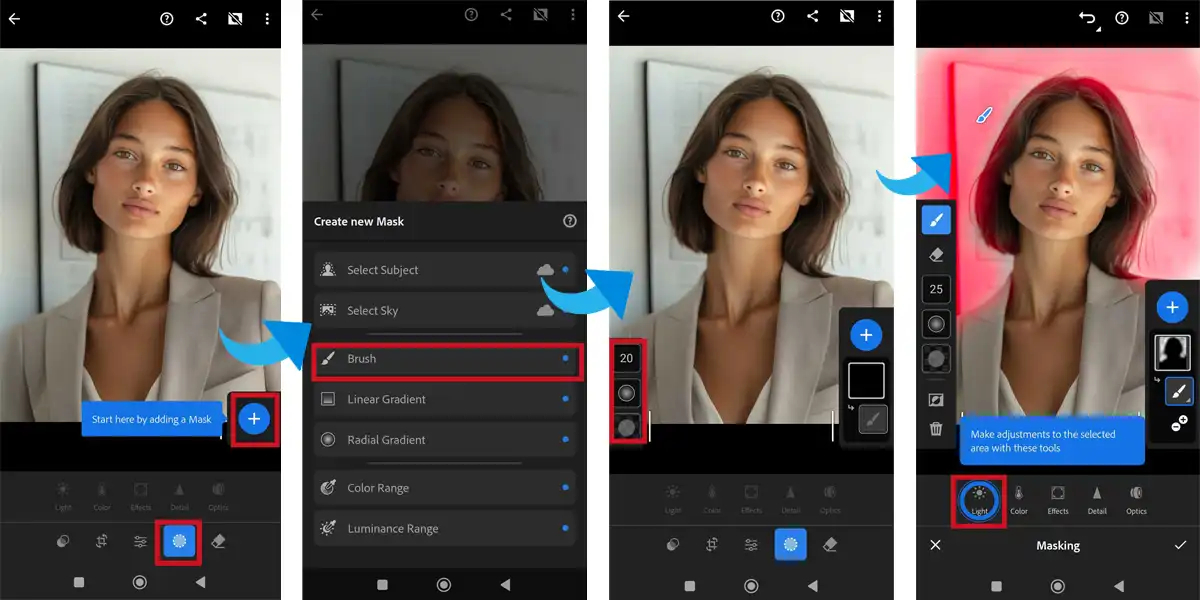
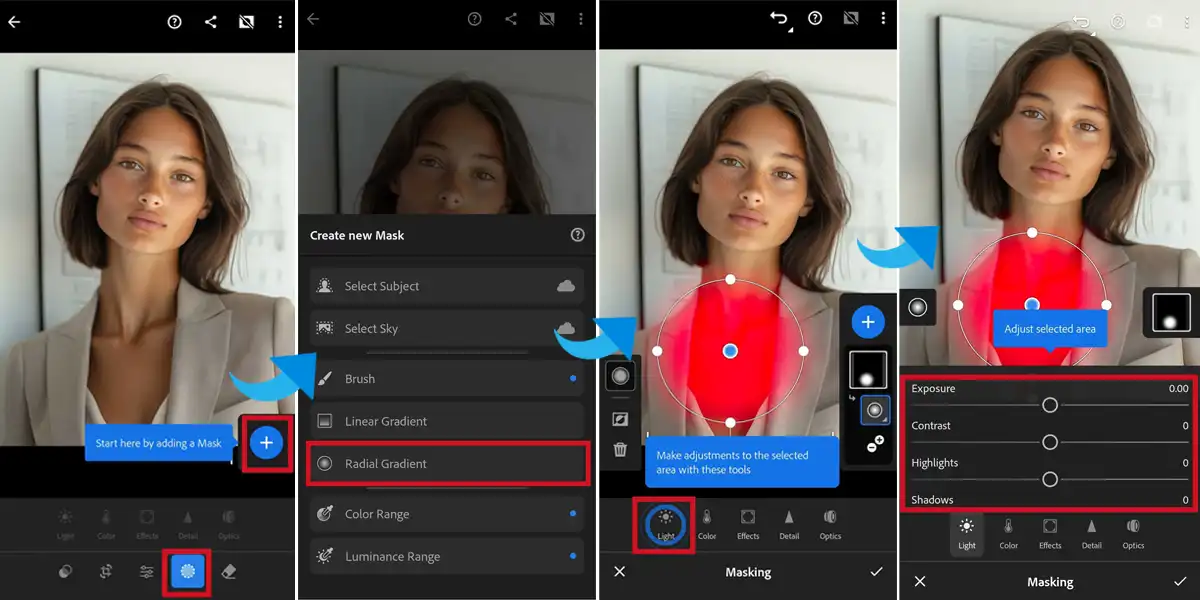
Tap on the masking tool.
Select ‘Brush’ from the masking options.
Choose the appropriate size by adjusting the slider.
Start masking the area around your subject carefully.
Fine-tune with the eraser if you stray outside the subject lines.
Export your edited image and admire your work!
Tools Needed to Remove Background
The Lightroom Mobile offers several tools to aid in removing backgrounds:
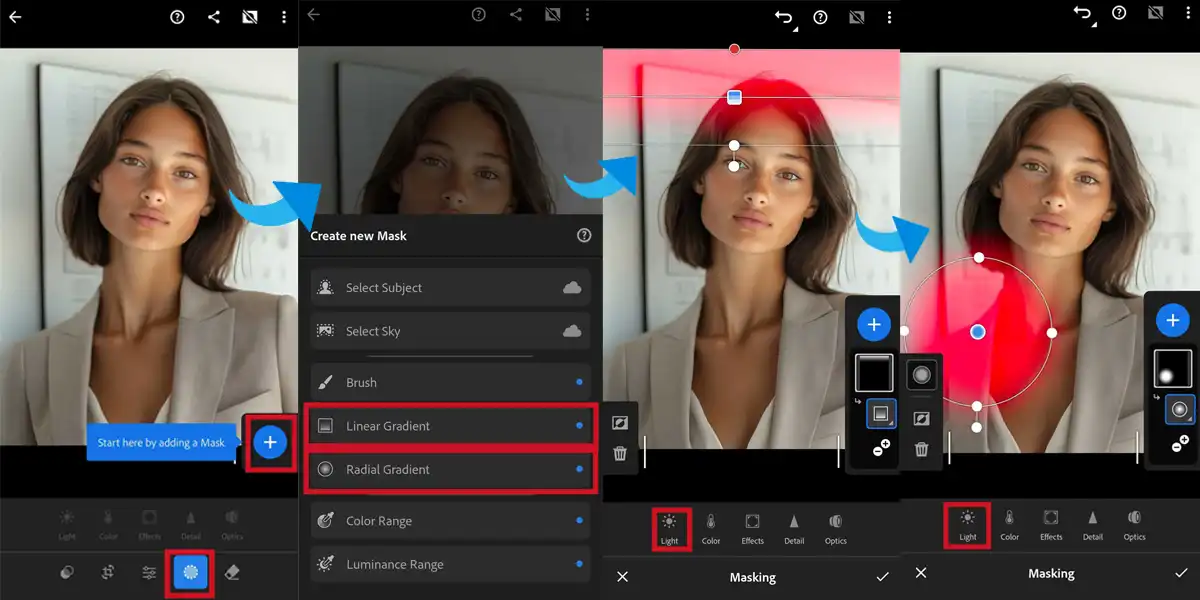
Masking Tool: This is your main tool. It helps in selecting the area you want to edit.
Brush Tool: It is used to color over areas you wish to mask or unmask on your image. Adjust the size as needed.
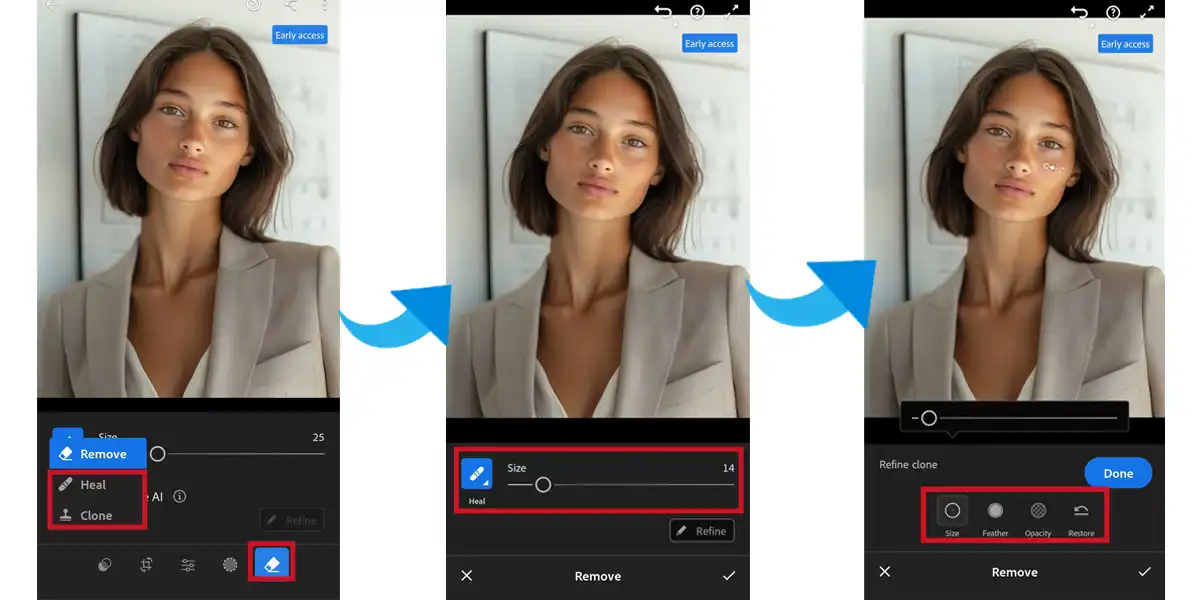
Healing Brush Tools: Use these if you need to remove small distracting elements during the editing process.
Common Mistakes and How to Avoid Them
Even seasoned editors stumble. Here are common pitfalls and tips to avoid them:
Adjust Brush Size: Using a brush that’s too big can result in sloppy masks. Adjust the brush size for more precision.
Over-Masking: Remember not to erase parts of your subject. Use the eraser carefully.
Ignoring Details: Pay attention to hair and edges. These often get neglected.
Auto-Mask Error: Don’t rely entirely on auto-mask. Manual adjustments are usually needed.
Pro Tip: Always zoom in while working on the edges for accuracy.
What is Lightroom Mobile?
Lightroom Mobile brings Adobe Lightroom’s editing tools to your device, making photo enhancement easy on the go. Let’s explore what it offers.
Overview of Lightroom Mobile
Lightroom Mobile is a powerful photo-editing tool that provides flexibility for Adobe Lightroom on your mobile device. It is designed for both amateurs and professionals who want to edit their images on the go.
Characteristics of Lightroom Mobile
Lightroom Mobile app is available on the Play Store and offers several qualities that make it a versatile tool for image editing. Some of its important characteristics include:
Adjustment Brush Tool: Allows precise edits to specific areas of your images.
Healing Brush Tools: These are useful for removing distracting elements from your images.
Masking Tool: Helps you isolate parts of your image for detailed adjustments.
Color Correction Tool: Aids in achieving perfect color balance and tone.
Radial Gradient: Adds vignette effects to draw attention to the subject.
Using these functions, you can enhance images, change backgrounds, and adjust individual elements to create standout images.
For tips on how to take professional photos with your phone, mastering the characteristics of Lightroom Mobile is significant. By leveraging its powerful tools and features, you can transform your mobile shots into stunning, high-quality images.
Why Use Lightroom Mobile?
You can edit images anywhere, making it suitable for travel and outdoor photography.
Non-destructive editing means your original image remains untouched, preserving your work.
Seamless integration with Adobe Lightroom ensures that edits made on mobile sync with desktop versions.
One significant benefit is the ability to remove background in Lightroom Mobile, which simplifies preparing images for various uses.
For amateurs and pros alike, the app adds a flexible layer of creativity to photo editing. Its intuitive interface makes complex tasks manageable , and the app is conveniently accessible on the Play Store.
If you’re tackling unwanted elements or need to remove background, Lightroom Mobile has extensive capabilities for you.
This technique helps to create a depth-of-field effect that brings focus to your subject while softening the surroundings, giving your images a more polished and artistic appearance.
Using the Adjustment Brush Tool
This brush in Lightroom Mobile lets you refine specific photo areas, adjusting exposure, color, and sharpness for precise enhancements without altering the whole image.
What is the Adjustment Brush?
This tool in Lightroom allows you to selectively apply adjustments to specific parts of your image. It’s like a digital paintbrush that enables focused edits, helping you highlight or correct certain areas without affecting the rest of the image.
This tool is important for photographers who want to make precise adjustments, such as removing shadows or enhancing specific details.
How to Use the Adjustment Brush
Step-by-Step Guide:
Open Lightroom and import your photo.
Select the Adjustment Brush from the toolbar. It looks like a little brush.
Adjust the brush size using the slider to fit the area you wish to edit.
Paint over the parts of your image where you want to apply adjustments.
Use sliders for attributes like exposure, contrast, and saturation to make the required changes.
Fine-tune your selection with the eraser if you go outside the lines.
After finishing your adjustments, deselect the brush tool by clicking on the Done button.
Tips for Effective Use
Zoom In: When masking around detailed areas, always zoom in for better accuracy. This is one of the significant Lightroom shortcuts that can save you time.
Use a Soft Brush: A soft brush helps blend your adjustments smoothly into the rest of the image.
Feathering: Adjust the feather setting to soften the edges of your adjustments.
Fine-tuning: If you accidentally mask an unwanted area, use the Eraser tool for precision cleaning.
Remain Patient: Great edits take time. Carefully work your way around complex elements like hair or tiny elements.
Using the Adjustment Brush in Lightroom makes it easier to control specific aspects of your photo. You can remove background distractions, highlight important details, or adjust exposure selectively.
Pro Tip: Try using the Overlay option to see where you have painted. This feature visualizes your adjustments in a bright color, making it easy to spot mistakes.
Dealing with Unwanted Objects
Removing distracting elements from your images can greatly improve their composition and focus. In this section, you’ll learn how to spot these distractions and decide which ones to eliminate for a cleaner and more engaging image.
Identifying Unwanted Objects
These elements in your images can distract and take away from the main subject. To identify them, visually scan your photo for any elements that draw attention away from your primary focus.
These could be stray people in the background, unnecessary items, or irregularities like litter. Once identified, you can use Lightroom’s many tools to address these issues.
Techniques to Remove Unwanted Objects
You have several techniques to remove these elements, each suitable for different scenarios:
Clone Stamp Tool: It allows you to copy a part of the image and overlay it on the object you want removed.
Healing Brush: Ideal for correcting small imperfections. Just brush over the unwanted element, and Lightroom blends it seamlessly with the surrounding area.
Content-Aware Fill in Photoshop: Content-aware fill automates much of the process, intelligently filling in the gaps left by the removed object.
Maintaining Image Quality
Removing distracting elements should not compromise image quality. Follow these steps to ensure high-quality results:
Zoom in to work accurately around edges and complex areas.
Use feathering for smooth transitions and maintain a natural look.
Adjust settings like exposure and contrast after object removal to ensure consistent lighting and tone.
Always review the entire image after editing to catch any remaining inconsistencies.
Dive into powerful editing tools and features in Lightroom Mobile that go beyond basic adjustments. Learn how to enhance your photos with more precision and creativity using advanced techniques for stunning results.
The table below provides an overview of tools and strategies to help you make precise adjustments, enhance creativity, and optimize your workflow for professional-looking results.
Aspect
Overview
Selective Edits
Target specific areas of a photo for precise adjustments like exposure, clarity, and texture using the ‘Selective’ tool.
Curves Adjustment
Control brightness, contrast, and tone by manipulating the curve in the ‘Light’ panel for detailed tonal enhancements.
Creative Color Adjustments
Use the ‘Color Mix’ tool to adjust hues in specific areas to evoke different moods, enhancing the creative expression in your photos.
Advanced Effects
Apply effects like grain, vignette, and texture through the ‘Effects’ panel to add depth and drama to your images.
Optimized Workflow
Improve efficiency by creating custom presets and organizing photos into folders and albums within the app.
Export and Backup Strategies
Export images directly to social media or cloud storage, and ensure regular backups to avoid data loss across devices.
Exploring Advanced Features
Lightroom Mobile offers powerful tools to take our photo editing to the next level. We start by exploring features such as selective edits, curves, and split toning.
Selective edits allow us to target specific areas of a photo, making precise adjustments. Curves give us control over brightness, contrast, and tone.
Split toning adds color gradations to highlights and shadows. To begin:
Open your desired image in Lightroom.
Tap on the "Selective" button (a circular icon) to add masks to the areas you want to edit.
Fine-tune exposure, clarity, and texture on the isolated parts.
To work with curves, go to the "Light" panel and tap "Curve."
Adjust the curve by dragging points to enhance the image's tonal range.
Creative Editing with Lightroom Mobile
Creativity shines with the advanced features in Lightroom Mobile. First, think about the mood you want to evoke: warmth for sunsets or cool for landscapes.
Use the “Color Mix” tool to manipulate hues in targeted areas. Touch the “Color” panel and select “Mix.” From there, adjust the sliders for individual colors to suit your vision. To enhance your subject:
Change the background to either a black or white background to make your subject pop.
Use the "Brush" tool to carefully brush white or any color over unwanted elements and create a seamless effect.
For dramatic effects, the "Effects" panel lets you play with grain, vignette, and texture.
To excel in long exposure phone photography, integrating creative editing with Lightroom Mobile can elevate your results. Mastering these techniques allows you to capture dynamic and visually stunning images with ease.
Optimizing Workflow
Streamlining your workflow in Lightroom Mobile is important for efficiency. Importing photos directly from your camera roll or synced albums saves time. Creating custom presets for frequent edits reduces repetitive tasks.
To apply, simply navigate to the “Presets” tab and save your adjustments. For better organization:
Create folders within the app for different projects, like family photos or travel.
Make use of ratings and flags to highlight the best shots.
Keep a step-by-step guide handy for common tasks, ensuring you never miss a step.
Maximize efficiency by exporting images directly to social media or cloud storage. This is especially important when working on multiple devices. Always back up regularly to prevent data loss.
Pro Tip: When you’re working to remove background elements, try combining the “Selective” tool with the “Brush” tool to fine-tune those tricky edges. It makes the final product look polished and professional.
For even more precision, consider learning how to remove background in Photoshop, a powerful technique that offers enhanced control over complex backgrounds and can be applied in tandem with Lightroom adjustments.
Additionally, you can remove shadows in Photoshop to refine the look further, ensuring that no unwanted shadows disrupt the clarity of your edited image.
Frequently Asked Questions
How do I remove background in Lightroom mobile?
Open your image in Lightroom mobile.
Select the Selective tool from the bottom menu.
Tap the + icon and choose the Brush tool to paint over the background you want to remove.
Adjust the brush settings for size and feather to better select the background.
Once selected, reduce the exposure and contrast to make the background less visible, \n or use the Heal tool to replace it.
When it comes to enhancing your images on the go, knowing the best mobile photo editing apps is crucial. Among these, mastering the unique tools offered by Lightroom Mobile can significantly improve your edits.
Can I change the background in Lightroom mobile?
Currently, Lightroom mobile does not support direct background replacement.
To change a background, use the Selective and Heal tools to erase the current background and then overlay a new one using a different app or software that supports layers and compositing.
How do I remove unwanted background in Lightroom?
Open your photo in Lightroom and select the Heal tool from the right panel.
Click on the unwanted background elements you wish to remove.
Lightroom will automatically choose a sample area to replace the selected part. If it's not perfect, you can drag the sample point to a better spot.
Adjust the opacity and size to smoothly blend the replacement into the rest of the image.
Can you remove objects in Lightroom mobile?
Yes, you can remove them using the Heal tool in Lightroom mobile.
Select the Heal tool from the Selective Edits menu.
Tap on the object you want to remove. Lightroom mobile will automatically replace it with a nearby texture.
If needed, adjust the source point for a better texture match.
Learning to remove background in Lightroom Mobile has made a big difference in my photo editing. It’s a straightforward tool that helps me make my images look cleaner and more professional. Whether I’m working on a portrait or a product photo, removing backgrounds quickly on my phone saves me time and effort.
If you’re looking to improve your editing skills, I suggest checking out this Photoshop Course and this Lightroom Course. These courses have really helped me understand more advanced techniques and have made my edits look even better.
To dive deeper into editing with Adobe tools, you can explore Photoshop or Lightroom Mobile. Both offer amazing possibilities for creative editing and mastering them can truly change how you work with images.
If this article has helped you, then Like and Share it with your friends
$2,061.00Original price was: $2,061.00.$1,061.00Current price is: $1,061.00. 27583
Download Your Free Guide Now!
Discover the secrets of photography with our printable guide! Master essential techniques like aperture, shutter speed, and ISO to create stunning images. Get your free printable PDF now and start turning your snapshots into masterpieces!