Perfect Water Reflections: How to Create Stunning Visuals
Perfect Water Reflections: How to Create Stunning Visuals
Have you ever wondered how to create a reflection in water using Photoshop?
Here’s a simple way to do it.
This article will teach you how to turn your photos into attention grabbers with realistic water reflection effects.
Let’s get started!
Table of Contents
Step-by-Step Guide to Creating Water Reflection in Photoshop
Step 1: Open Your Image in Photoshop
First, open your image in Photoshop. This is your starting point. Just go to File > Open and select the image you want to work on.
Step 2: Duplicate the Background Layer
Then, you need to duplicate the background layer. This is super easy. Just right-click on the background layer in the Layers Panel and select Duplicate Layer.
You can also use the shortcut Ctrl+J (Cmd+J on Mac). This step ensures you have a backup of your original image.
Select the duplicated layer and click the Edit > Transform > Flip Vertical. This will flip the image upside down, making it look like a reflection in water.
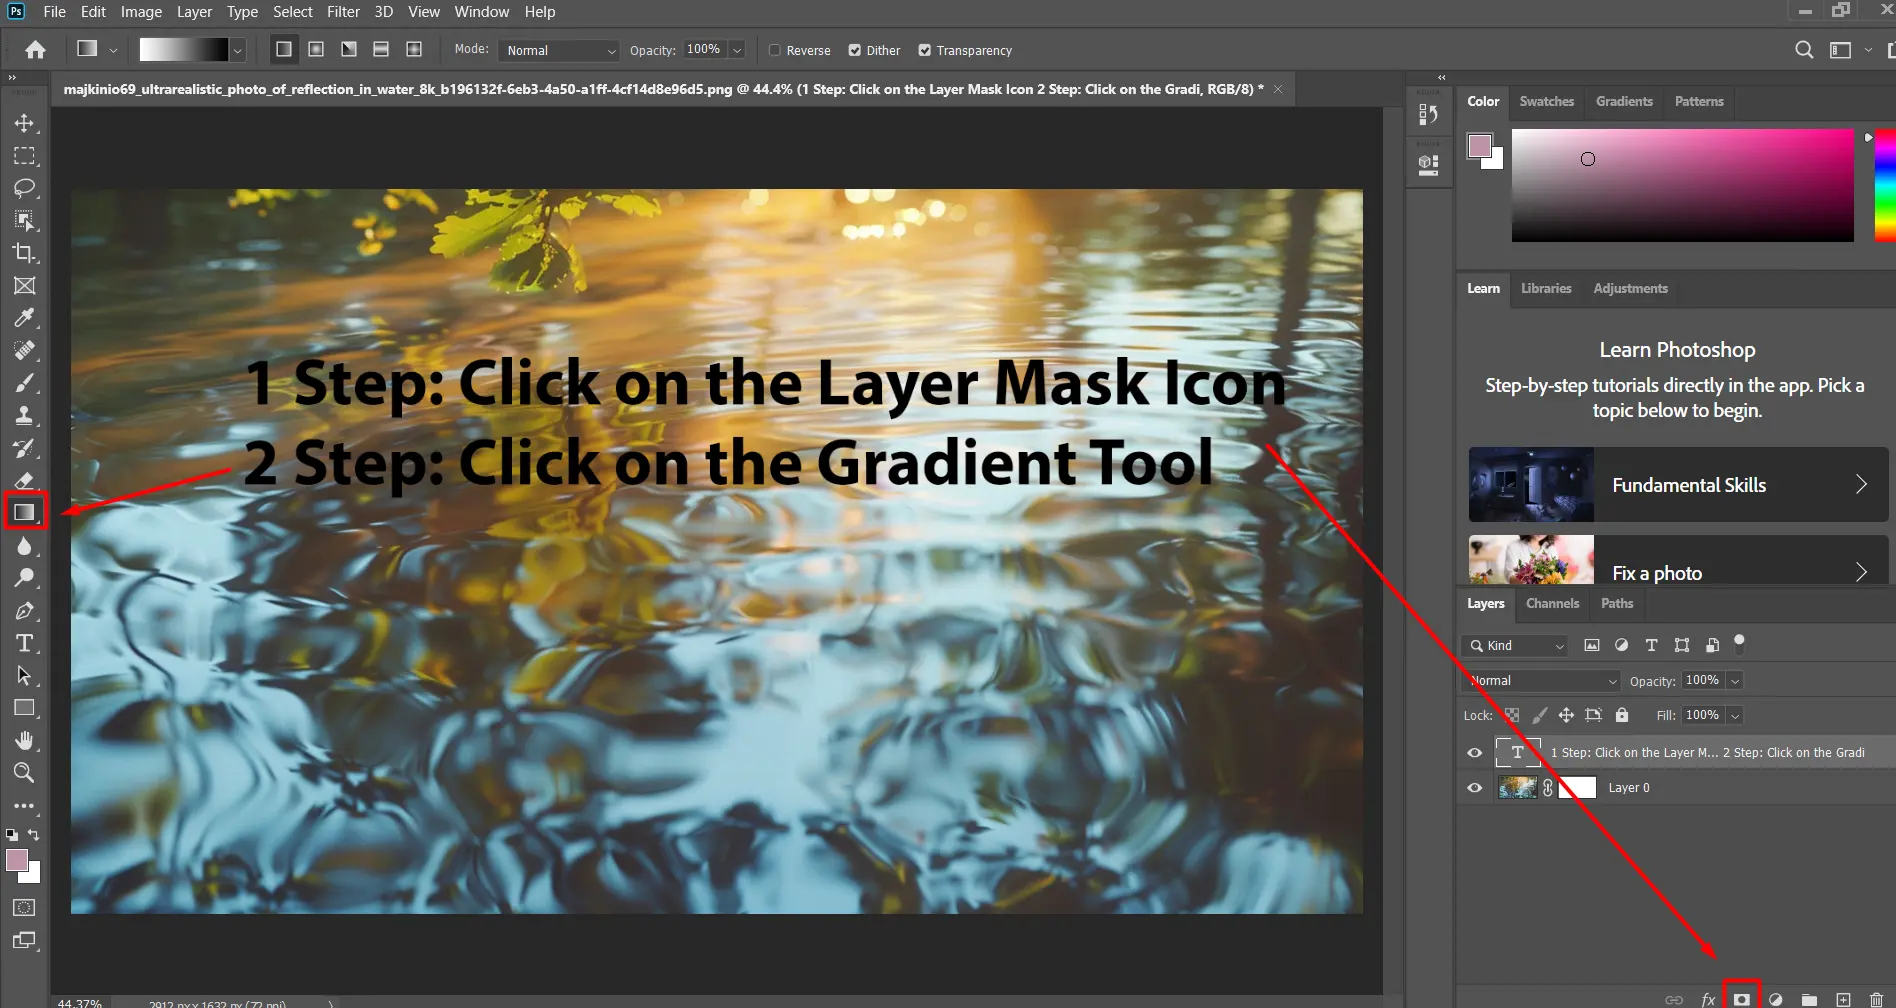
Step 4: Add a Gradient Layer Mask
To blend the reflection smoothly, add a gradient mask.
Click on the Layer Mask Icon at the bottom of the Layers Panel. Then, select the Gradient Tool from the toolbar. Make sure your gradient is set from black to white.
Click and drag from the bottom of the flipped top layer upwards to create a smooth transition.
Step 5: Adjust the Gradient for Realistic Reflection
Fine-tuning the gradient is crucial for a realistic water reflection. Double-click on the layer mask thumbnail to open the Properties Panel.
Adjust the gradient until the reflection looks natural. You might need to experiment a bit to get it just right.
Pro Tip: Use the green channel to refine the details of the reflection, ensuring it blends seamlessly with the water surface. Use a soft brush to manually paint on the layer mask for more control over the reflection’s appearance.
Step 6: Add Ripple Effect
To make the reflection look like it’s on water, add a ripple effect.
Go to Filter > Distort > Displace. A dialogue box will be displayed. Adjust both the horizontal and vertical scales to around 10. Click OK, and then select a displacement map file.
Adjust the layer opacity to make the reflection more subtle. You can also select filter Gaussian Blur to soften the edges. If needed, use the Move Tool to reposition the reflection layer.
Pro Tip: For an extra touch of realism, add a new blank layer and use the Brush Tool to paint some highlights and shadows on the water facet.
Tips for a More Realistic Water Reflection
When creating reflections in Photoshop, you can choose between a basic technique and an advanced technique. Each method offers different features and requirements.
The table below compares these techniques, focusing on their differences in quality, complexity, realism, skill level, time investment, customization options, additional resources, common mistakes, and final results.
This will help you select the best approach based on your needs and expertise.
Feature
Basic Technique
Advanced Technique
Quality of Reflection
Good
Excellent
Complexity
Simple
Moderate to High
Realism
Moderate
High
Skill Level Required
Beginner
Intermediate to Advanced
Time Investment
Low
Moderate to High
Customization Options
Limited
Extensive
Additional Resources Needed
None
Possibly Displacement Maps
Common Mistakes Addressed
Yes
Yes
Final Result
Decent Reflections
Professional-grade Reflections
Use High-Quality Images For The Water Reflection
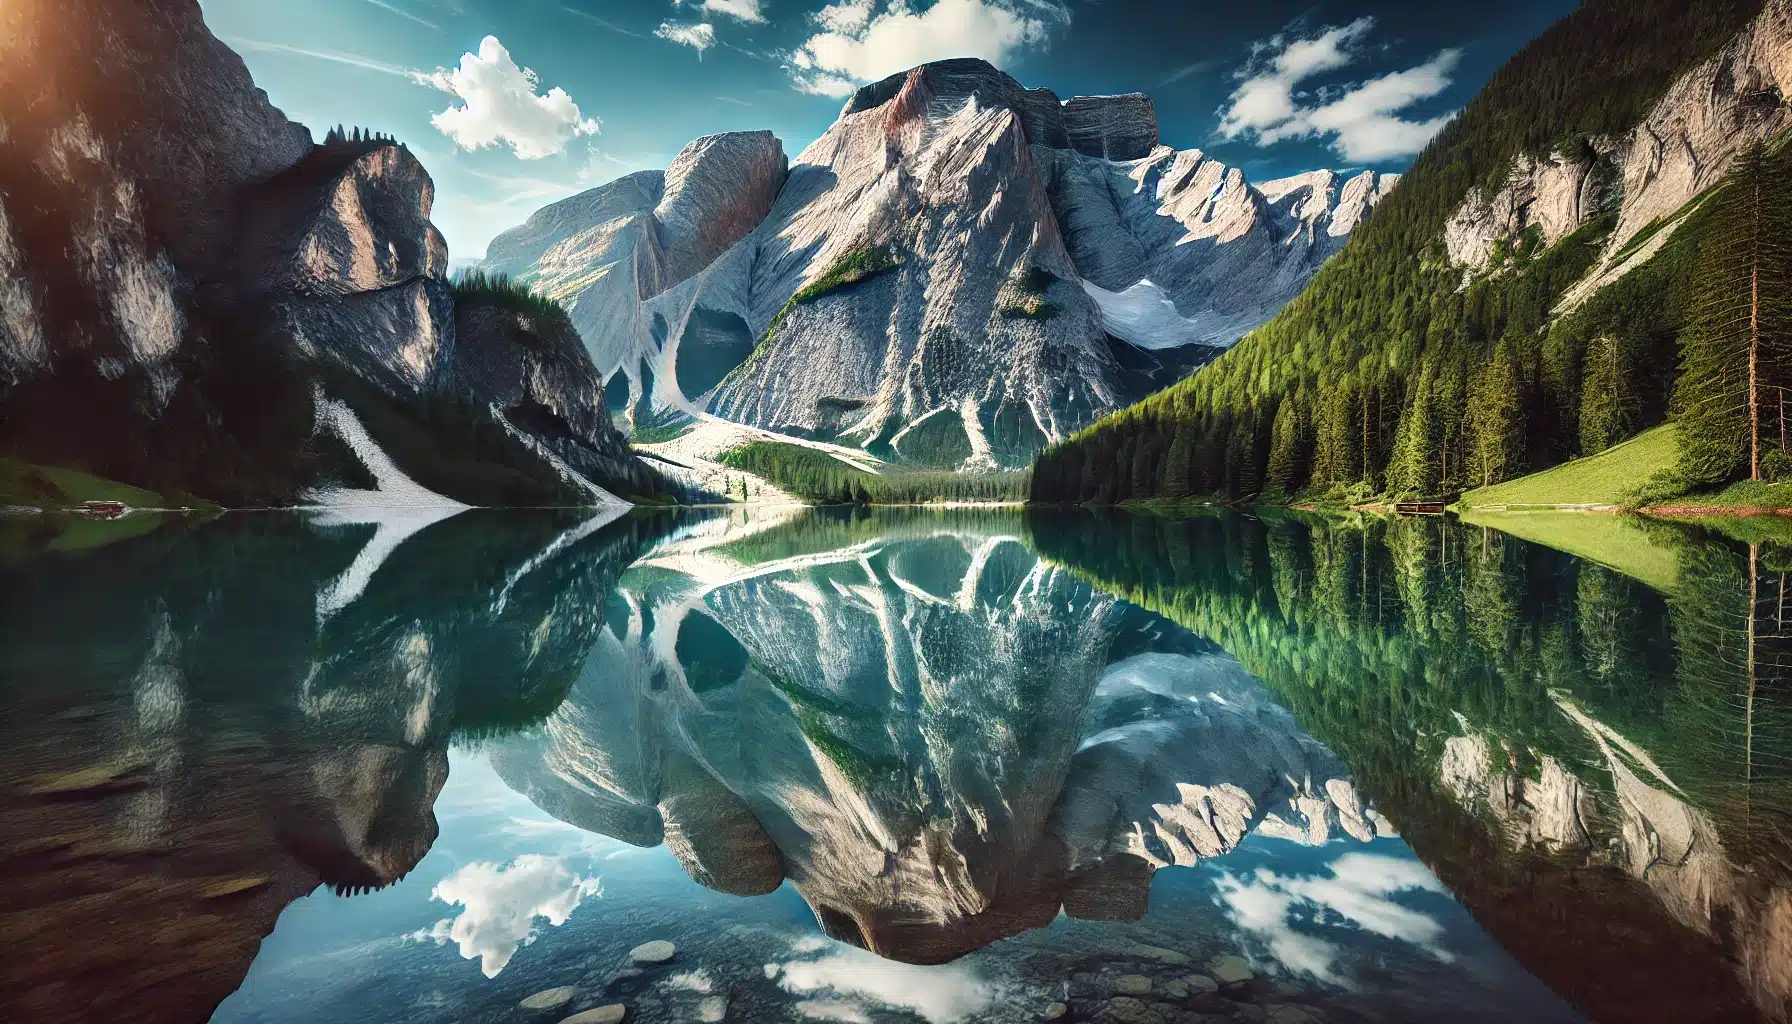
Start with a high-quality image.
The better the original photo, the more realistic your water reflection will look. Make sure your image is clear and has good lighting.
The Displace Filter can add more realism to your water reflection. Go to Filter > Distort > Displace. A dialogue box will be displayed. Adjust both the Horizontal and Vertical Scales to around 10. Click OK, and then select a displacement map file. This will add a wavy effect to your reflection.
Add Motion Blur
To make the reflection look more dynamic, add a Motion Blur effect. Go to Filter > Blur > Motion Blur. Set the angle to match the direction of the water flow and adjust the distance to your liking.
Use Adjustment Layers
Adjustment layers can help you fine-tune the colors and contrast of your reflection. Use the Levels or Curves adjustment layers to match the reflection with the original image.
Experiment with Blending Modes
Blending modes can add different effects to your reflection. Try using the Soft Light or Overlay blending modes to see how they affect the reflection.
Use the Free Transform Tool
The Free Transform Tool can help you adjust the size and position of your reflection. Press Ctrl+T (Cmd+T on Mac) to activate the tool and make your adjustments.
Common Mistakes to Avoid While Making Reflection in Water
Overlooking the Importance of Layer Management
One of the most common mistakes is not managing two layers or more properly.
Layers are the backbone of any Photoshop project. If you don’t keep them organized, you’ll end up confused and frustrated.
Name Your Layers: Always name your layers. Instead of "Layer 1" or "Layer 2," use descriptive names like "Reflection Layer" or "Background."
Group Related Layers: Use the folder icon at the bottom of the Layers Panel to group related layers. This keeps your workspace tidy.
Use Adjustment Layers: Instead of making permanent changes, use adjustment layers. This way, you can always go back and tweak your edits.
Pro Tip: Use the shortcut Ctrl+G (Cmd+G on Mac) to group selected layers quickly.
Ignoring the Power of Layer Masks
Layer masks are essential for non-destructive editing. Ignoring them can lead to irreversible mistakes.
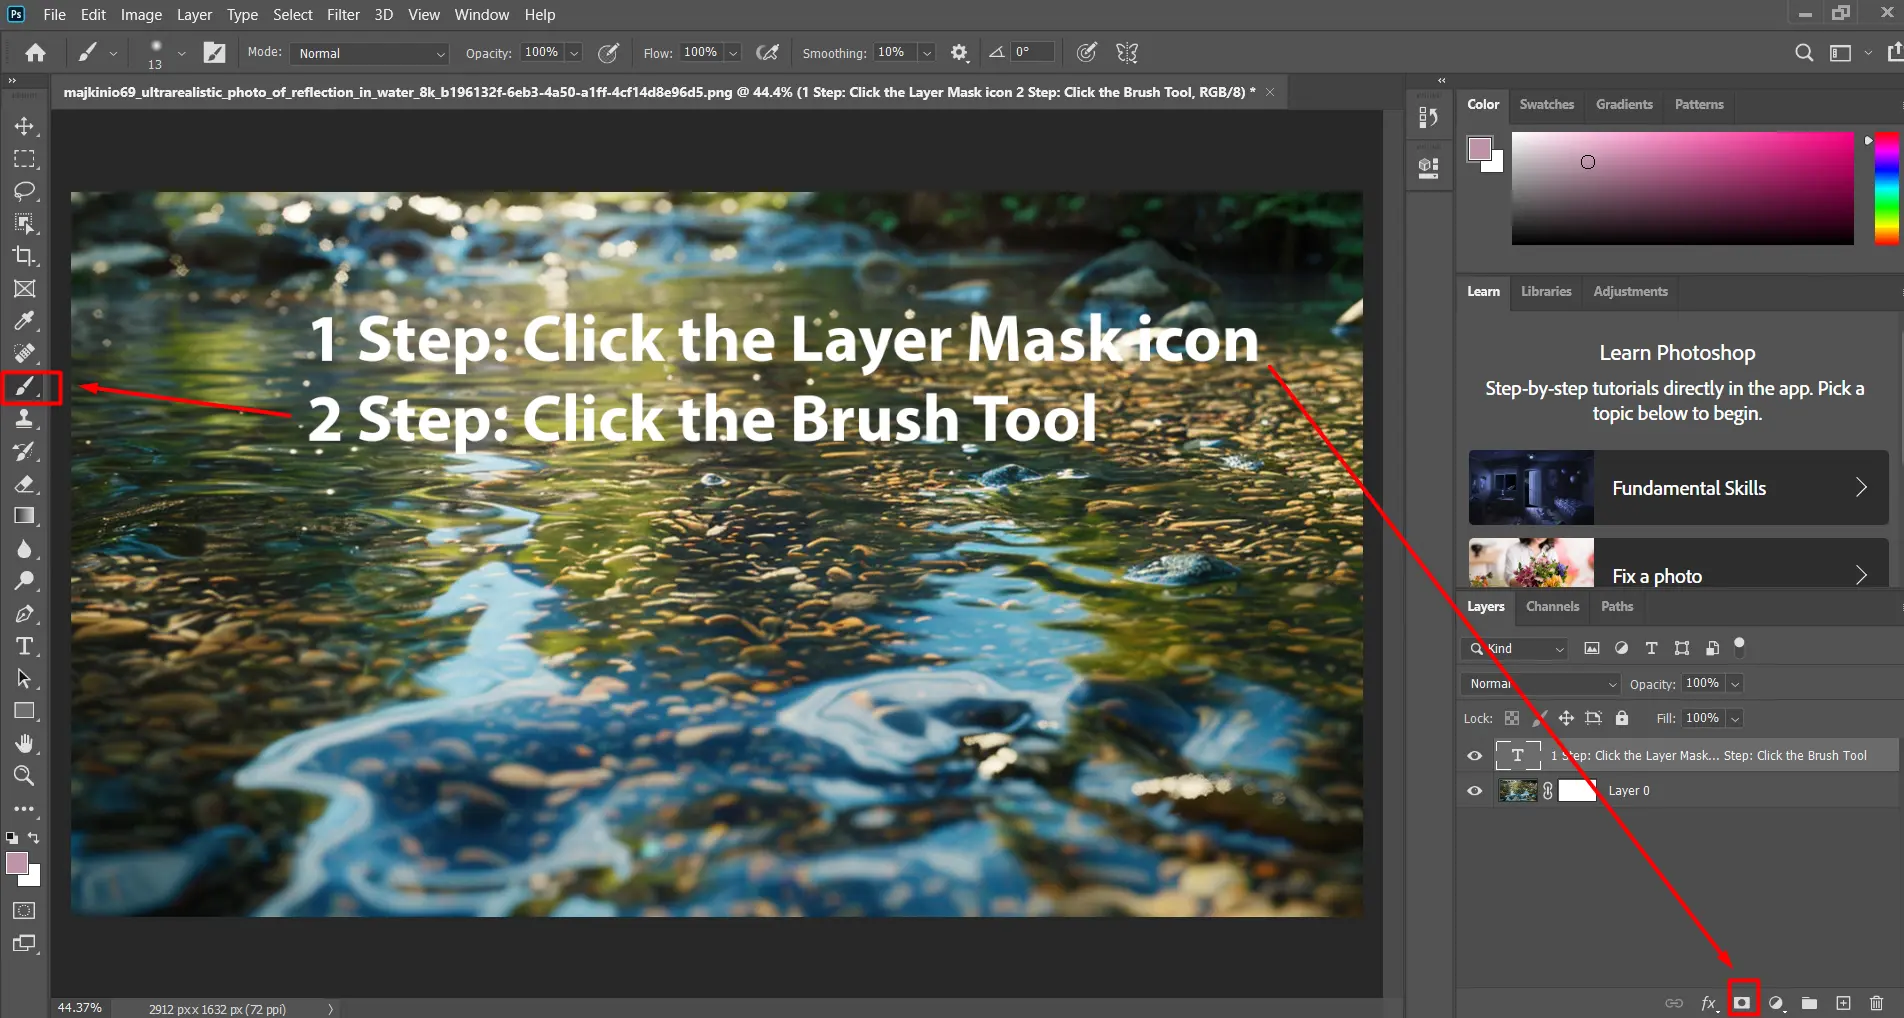
Add a Layer Mask: Click the layer mask icon at the bottom of the Layers Panel to add a mask to your layer.
Use the Brush Tool: Use a soft brush to paint on the mask. Black hides parts of the layer, while white reveals them.
Refine the Mask: Double-click the mask thumbnail to open the Properties Panel and refine the mask edges.
Forgetting to Duplicate Layers
Always duplicate your layers before making significant changes. This way, you have a backup if something goes wrong.
Duplicate Layer: Right-click on the layer and select "Duplicate Layer" or use the shortcut Ctrl+J (Cmd+J on Mac).
Work on the Duplicate: Make your edits on the duplicated layer to preserve the original.
Misusing the Transform Tools
Transform tools like “Edit > Transform > Flip Vertical” are powerful but can be misused.
Use Free Transform: Press Ctrl+T (Cmd+T on Mac) to activate Free Transform. Hold the Shift key to maintain proportions.
Flip Vertical: Use "Edit > Transform > Flip Vertical" to create reflections. Make sure to align the reflection layer properly.
Pro Tip: Use the anchor point to control the pivot of your transformations.
Overdoing Filters and Effects
Filters and effects can enhance your image, but overdoing them can make your work look unnatural.
Use Smart Filters: Convert your layer to a smart object before applying smart filters. This allows you to adjust the filter settings later.
Adjust Filter Settings: Don't just apply a filter and leave it. Adjust the settings to achieve a subtle effect.
Pro Tip: Use the “Filter > Blur > Gaussian Blur” to soften edges and make reflections look more natural.
Neglecting the Use of Displacement Maps
Displacement maps are crucial for creating realistic water reflections. Neglecting them can make your reflections look flat.
Create a Displacement Map: Open a new document, add noise, and apply a Gaussian Blur. Save this as your displacement map.
Apply the Displace Filter: Go to "Filter > Distort > Displace," set the horizontal and vertical scale, and select your displacement map.
Not Using the Canvas Size Correctly
Incorrect canvas size can mess up your composition.
Adjust Canvas Size: Go to "Image > Canvas Size" to adjust the canvas. Make sure you have enough space for your reflection.
Anchor Point: Use the anchor point to control where the canvas expands.
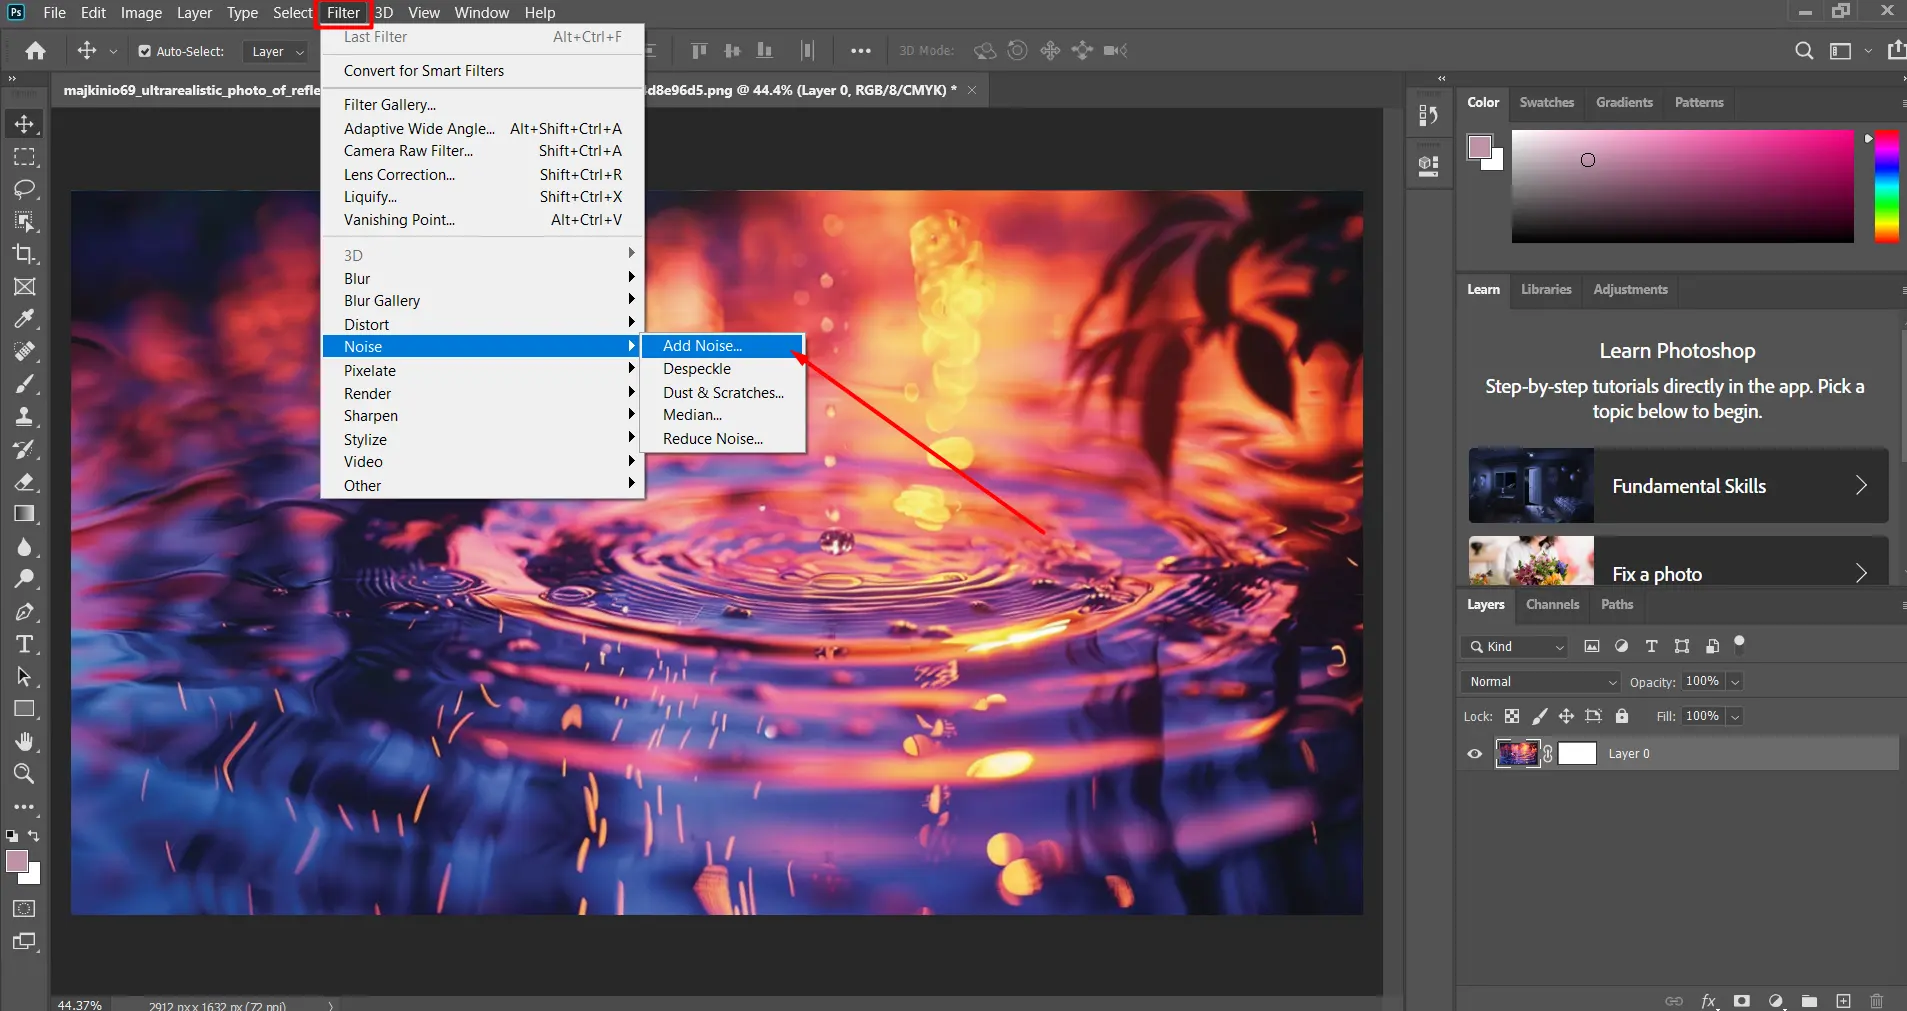
Skipping the Final Touches
Final touches can make or break your image. Skipping them is a big mistake.
Add Noise: Go to "Filter > Noise > Add Noise" to add a bit of texture to your reflection
Pro Tip: Always save your work as a PSD file, PSD file keeps all your separate layers and adjustments intact.
By avoiding these common mistakes, you’ll be well on your way to creating stunning water reflections in Photoshop.
Advanced Techniques for Water Reflection in Photoshop
Using Displacement Maps for Realistic Ripples in Water Reflection
To make your water reflection more realistic, use a displacement map. This technique adds natural-looking ripples to your water reflection.
First, create a grayscale image of your water texture. Then, apply the displacement map to your reflection layer.
This will distort the reflection, mimicking real water ripples.
Creating Custom Water Textures
Creating custom water textures can elevate your water reflection effects. Firstly, generate a new layer and filling it with a blue gradient.
Apply the filter blur gaussian to soften the texture. Next, select filter distort displace option to add a wavy effect.
Blending Modes for Enhanced Reflection Effects
Blending modes can dramatically improve your water reflection effects. Set your reflection layer to “Overlay” or “Soft Light” to blend it seamlessly with the water texture.
Experiment with different blending modes to find the best look. Adjust the opacity of the reflection layer to fine-tune the effect.
Enhancing Water Reflection with Color Adjustments
Color adjustments can significantly enhance the water reflection in your photos. Let’s explore some techniques to make your reflections more vibrant and realistic.
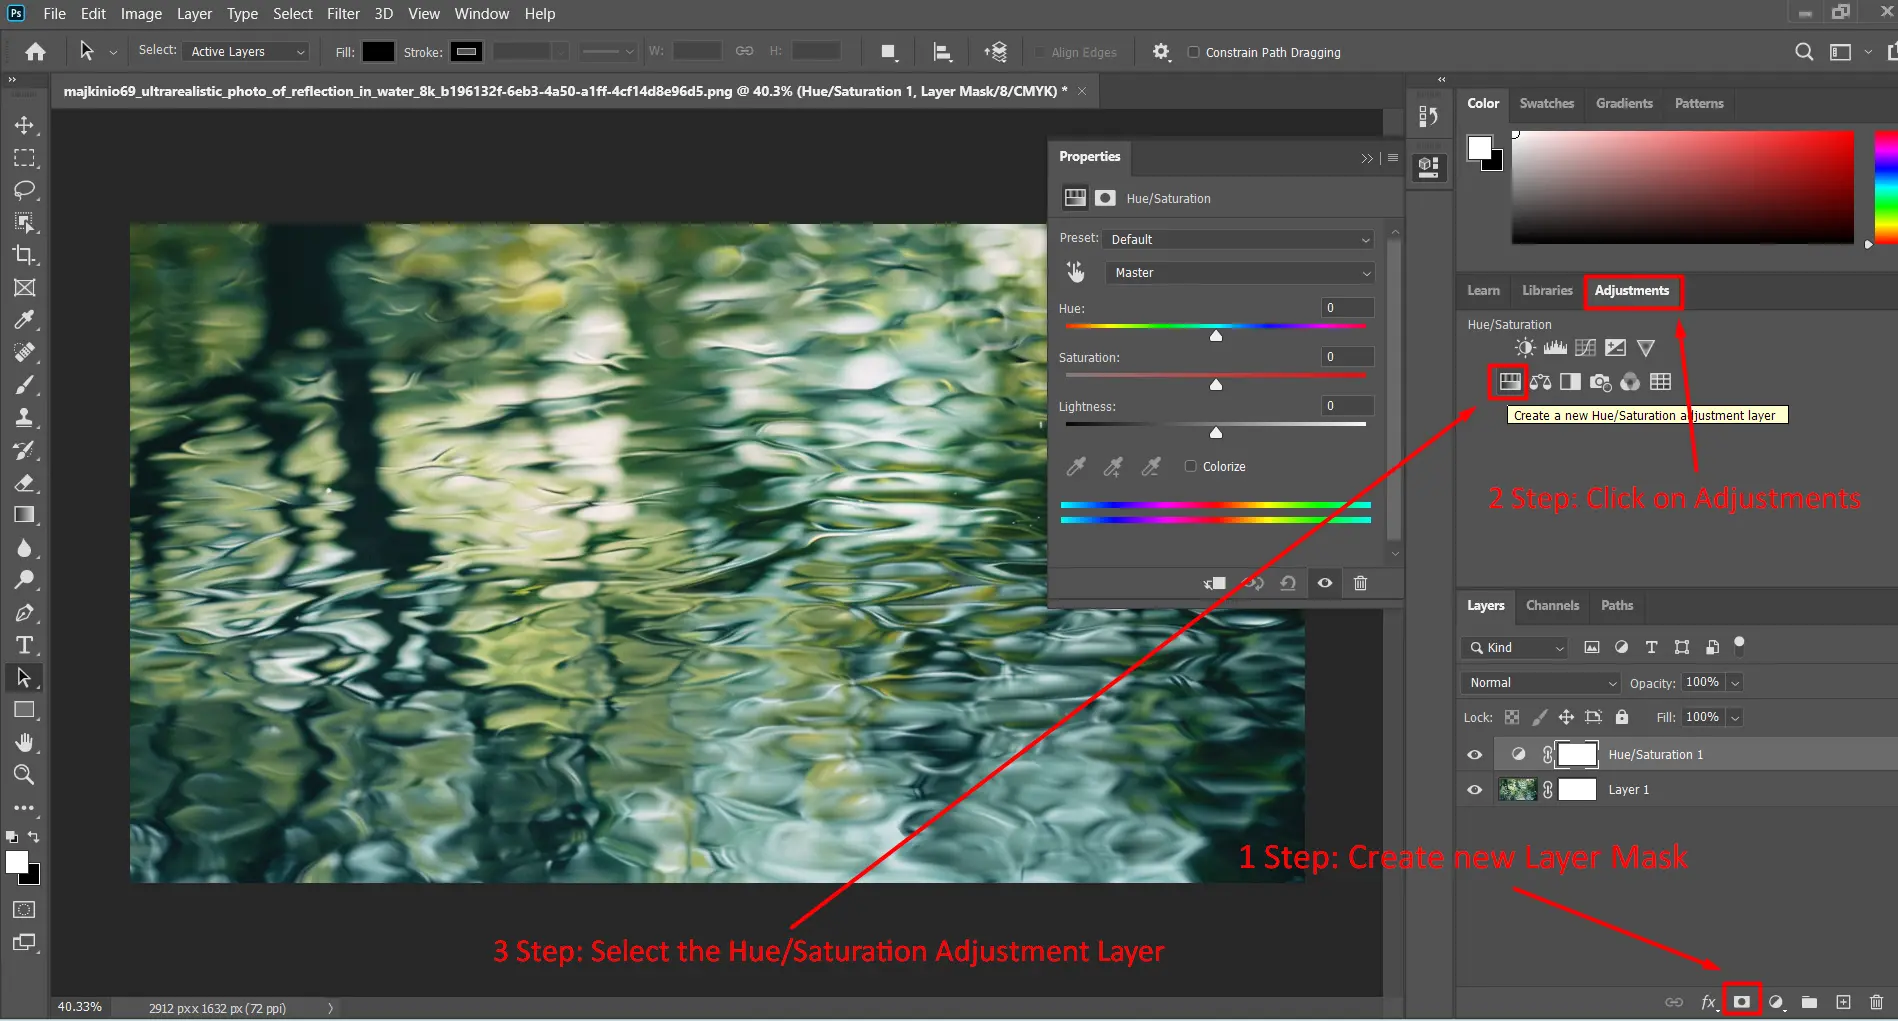
Adjusting the Hue and Saturation can make your reflection image stand out. By tweaking these settings, you can enhance the colors in the water, making them more vivid.
Fristly, Create a New Layer: Go to the layers panel and create a new layer.
Then, Add an Adjustment Layer: Select the Hue/Saturation adjustment layer.
Finally, Adjust Settings: Play with the sliders to achieve the desired effect.
Using Curves for Better Contrast
Using curves can help you add depth and contrast to your water reflection. This method is perfect for making the reflection stand out.
Firstly, Create a New Layer: Again, create a new layer in the layers panel.
Now, Add an Adjustment Layer: Choose the Curves adjustment layer.
Finally, Adjust the Curve: Drag the curve to enhance the contrast between the reflection and the rest of the image.
Applying Gradient Maps for Color Harmony
Gradient maps can unify the colors in your reflection image, creating a harmonious look. This technique is great for artistic effects.
Firstly, Create a New Layer: Start by creating a new layer.
Then, Add an Adjustment Layer: Select the Gradient Map adjustment layer.
Now, Choose a Gradient: Pick a gradient that complements your image.
Finally, Adjust Blending Mode: Set the blending mode to Soft Light or Overlay for a subtle effect.
Frequently Asked Questions
How to Create Reflection on Water in Photoshop?
To create a reflection on water using Photoshop, follow these simple steps:
First, Open Your Image: Start by opening the image you want to edit in Photoshop.
Then, Copy the Subject: Select the part of the image you want to reflect in the water. You can use the Lasso Tool for this. Then, press Ctrl+C to copy.
Afterwards, Paste and Flip: Press Ctrl+V to paste the copied selection. Then, go to Edit > Transform > Flip Vertical to flip the pasted image vertically.
Now, Adjust Opacity: Reduce the opacity of the flipped layer to make the reflection look more realistic. You can find the opacity option in the Layers panel.
Finally, Apply a Blur: Optionally, you can apply a Gaussian Blur (Filter > Blur > Gaussian Blur) to make the reflection look more like it's on water.
How to Make Water Reflective?
To enhance the reflectiveness of water in a photo:
Firstly, Select the Water: Use the Quick Selection Tool to select the area of the water.
Then, Add a Reflection: Follow the steps above to add a reflection to the selected water area.
Now, Enhance the Color: Adjust the color balance (Image > Adjustments > Color Balance) to make the water look more vibrant and reflective.
Finally, Increase Brightness: Increase the brightness and contrast (Image > Adjustments > Brightness/Contrast) to give the water a shiny look.
How Do I Add a Reflection in Photoshop?
Adding a reflection in Photoshop can be done by:
Firstly Select Your Image: Open the image where you need to add a reflection.
Then, Copy the Reflective Element: Use the Marquee Tool to select the element that should reflect and copy it.
Afterwards, Paste and Transform: Paste the copied element and use Edit > Transform > Flip Vertical to flip it.
Now, Adjust Placement: Move the flipped element below the original to simulate a reflection.
Finally, Blend and Blur: Lower the opacity and apply a slight Gaussian Blur for realism.
How Do I Remove a Reflection from Water in Photoshop?
To remove unwanted reflections from water:
First, Select the Reflection: Use the Lasso Tool to carefully select the reflection in the water.
Then, Use the Content-Aware Fill: Right-click the selection and choose Fill. In the Fill dialog, select Content-Aware and click OK. Photoshop will attempt to remove the reflection.
Now, Clone Stamp for Cleanup: Use the Clone Stamp Tool to touch up any areas where the content-aware fill did not perfectly blend.
Finally, Deselect and Review: Press Ctrl+D to deselect the area. Review and touch up any remaining inconsistencies as needed.
These steps should help you manipulate reflections in water using Photoshop, whether you’re adding or removing them.
In conslusion, mastering the art of reflection in Adobe has truly transformed my editing skills.
By using techniques like the reflection layer and adjustmentlayers, I’ve been able to create stunning water reflection effects that elevate my images. The layers panel and tools like the crop tool and rectangularmarqueetool make the process seamless.
$2,061.00Original price was: $2,061.00.$1,061.00Current price is: $1,061.00. 27582
Download Your Free Guide Now!
Discover the secrets of photography with our printable guide! Master essential techniques like aperture, shutter speed, and ISO to create stunning images. Get your free printable PDF now and start turning your snapshots into masterpieces!