Photoshop Your Way to the Perfect : Say Cheese Like a Pro
Photoshop Your Way to the Perfect : Say Cheese Like a Pro
Have you ever wondered how to perfect Photoshop smile in your photos?
Whether you’re a budding photographer or just someone who loves to tweak images, mastering this skill can make a world of difference.
Imagine transforming a dull expression into a radiant, captivating smile that lights up the entire picture.
In this article, I’ll walk you through the steps to easily enhance smiles using Photoshop.
By the end, you’ll be able to turn any frown upside down, making your photos more engaging and memorable.
So, let’s dive in and discover how to create picture-perfect smiles that leave a lasting impression.
Table of Contents
Preparing Your Image for Photoshop Smile Editing
When starting your project, the first step is choosing the appropriate image. You need to consider the subject’s smile and other facial characteristics.
Generally, pick a high-resolution photo for better results. The sharper the photo, the easier it is to work with.
Before editing the smile, understanding a few techniques for face editing is crucial for perfecting your Photoshop smile.
Learn advanced methods to enhance smiles effortlessly and achieve a natural look.
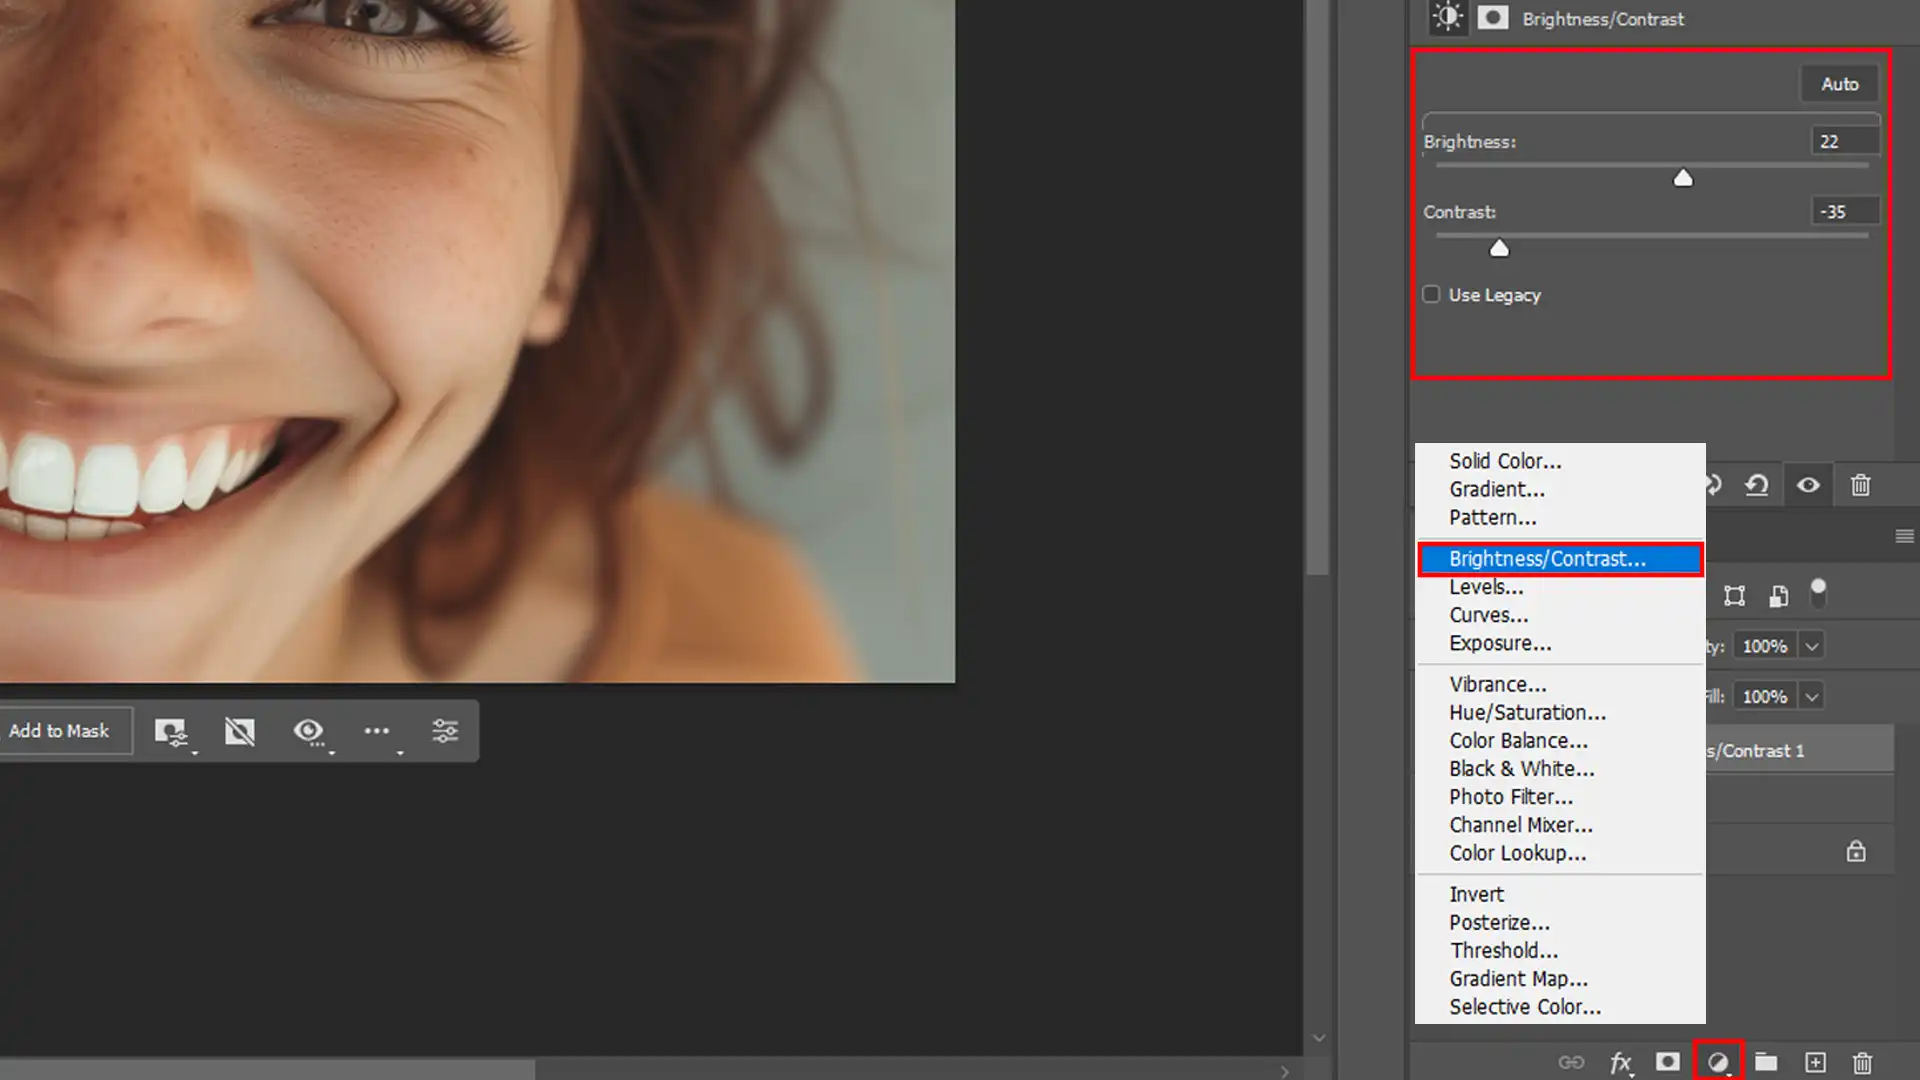
Basic Image Adjustments
Once you’ve selected your photo, it’s time to make some basic adjustments:
Begin with the brightness and contrast to enhance the overall look.
Use the zoom tool to get a closer view of the facial characteristics.
Adjusting the color balance can sometimes highlight the subject's face in a more flattering way.
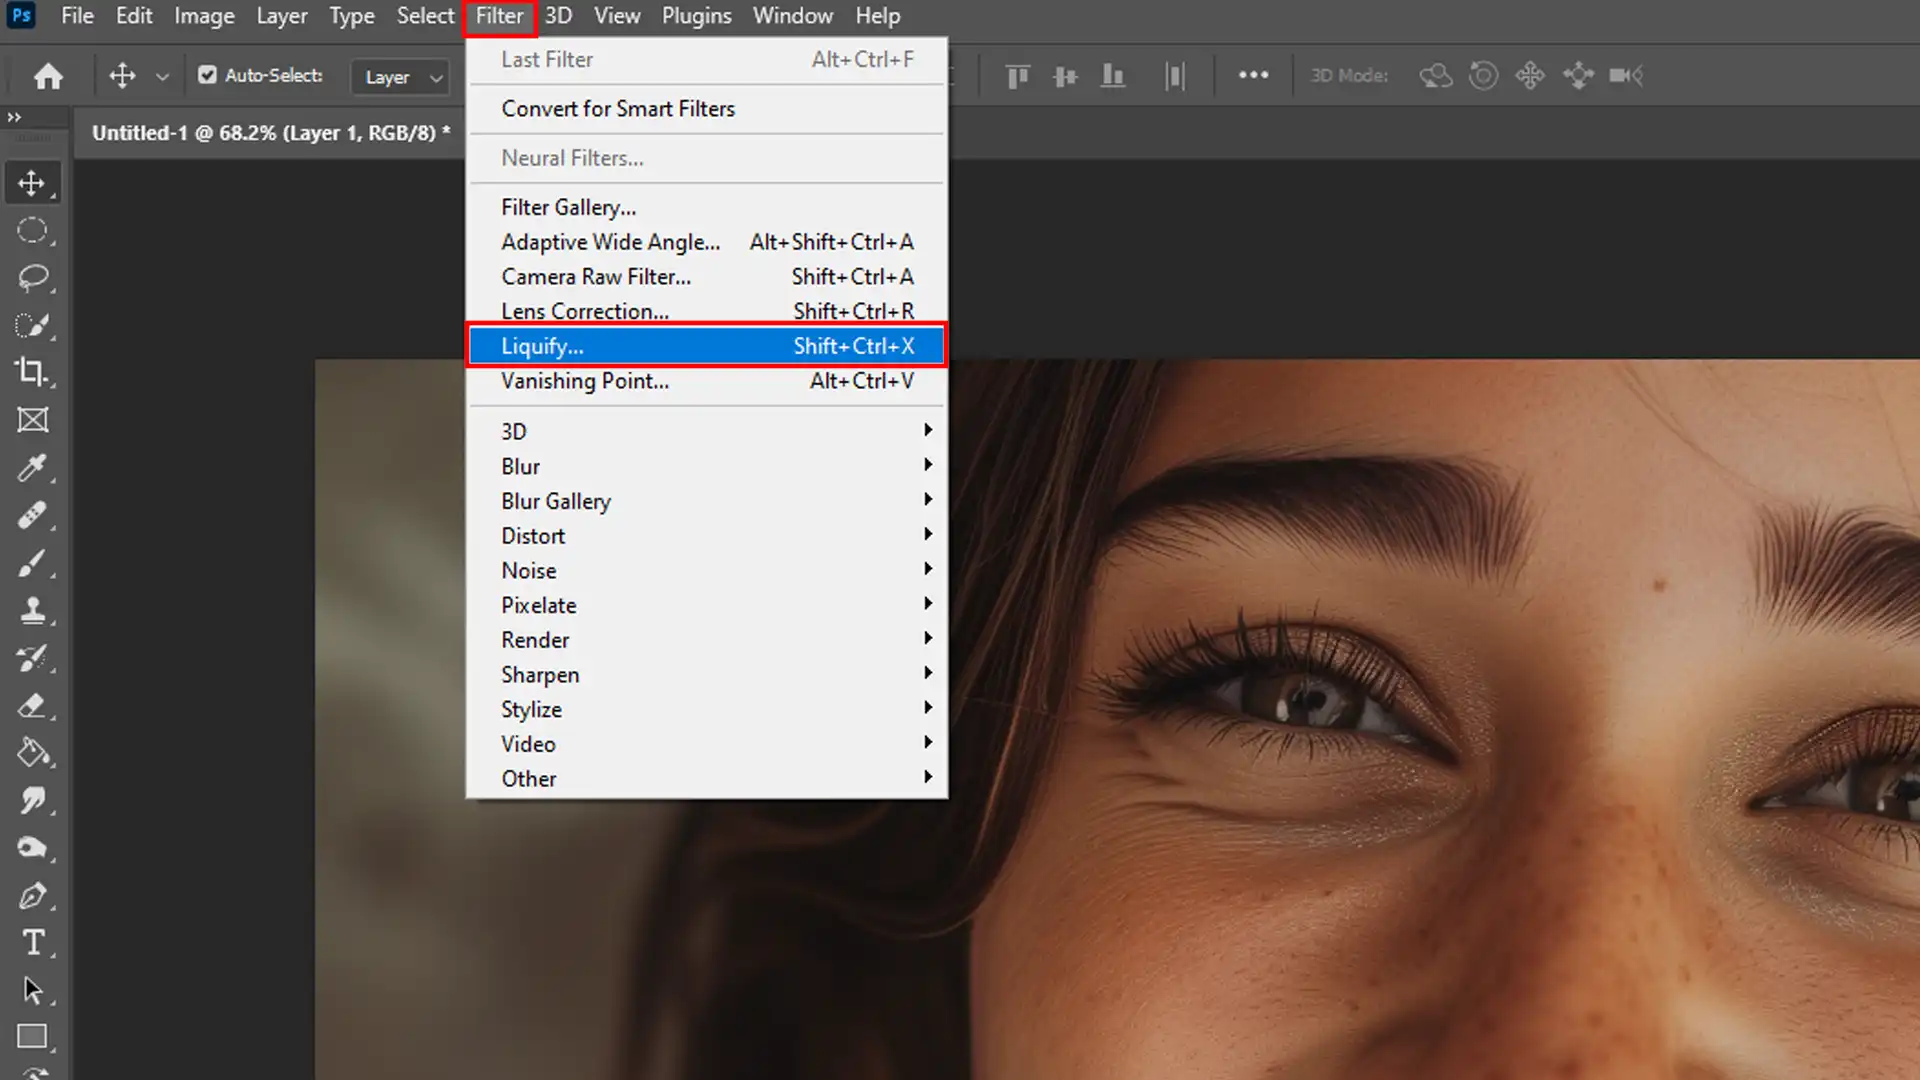
Liquify Filter
One of the most efficient tools in Photoshop is the liquify filter. Head over to the filter options and choose “Liquify”.
Here, you will use the forward warp tools and face tool to make detailed adjustments. The liquify filter helps you edit various parts of the face, including the upper lip and lower lip.
A few simple clicks can transform a frown upside down, creating a more positive look.
Zoom Tool and Hand Tool
In cases where you need precise control, the zoom tool and hand tools come in handy.
Zoom into the area you wish to edit, such as the smile or other facial features.
Use the hand tool to navigate around the image smoothly. This technique provides you the flexibility to refine minute details on the subject’s face.
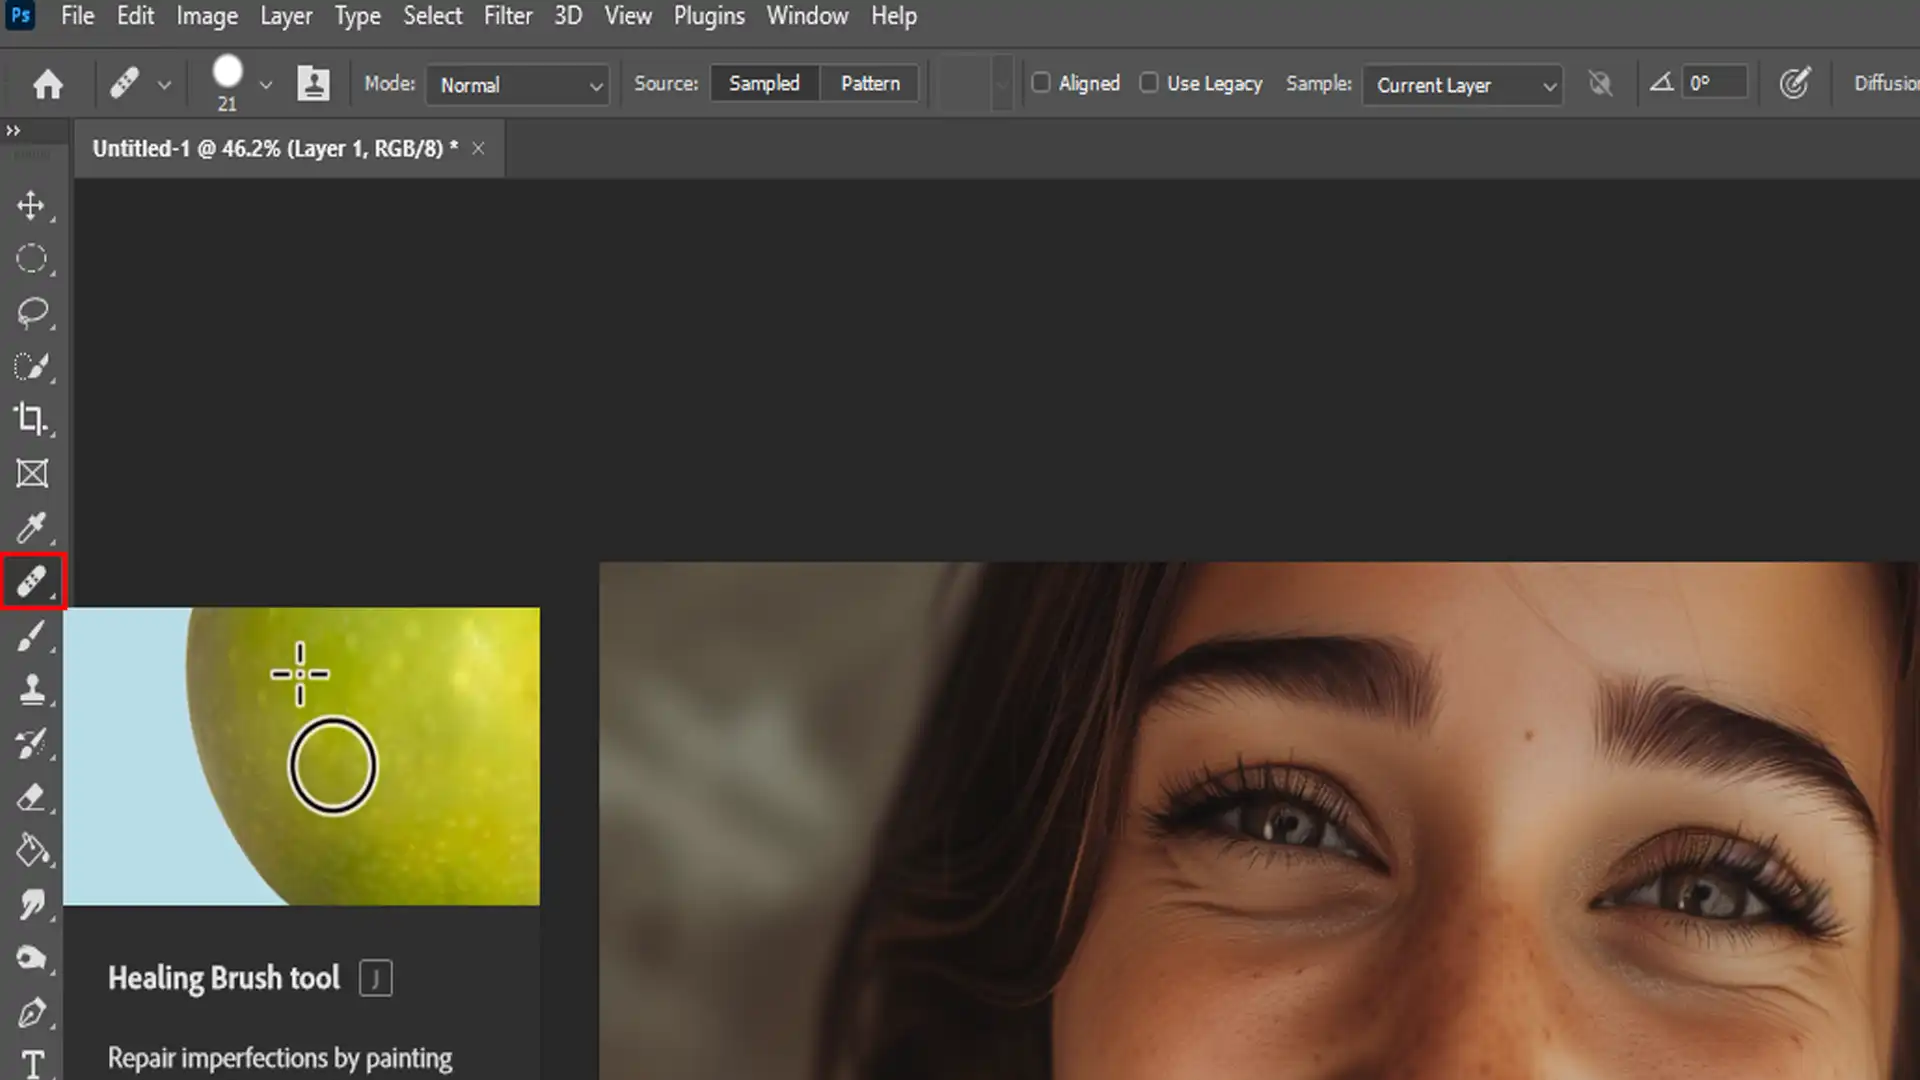
Healing Brush Tool
The healing brush tools is excellent for removing minor blemishes while maintaining the skin’s natural texture.
Set an appropriate brush size and click on the imperfection to eliminate it. This makes the entire face more appealing and smooth.
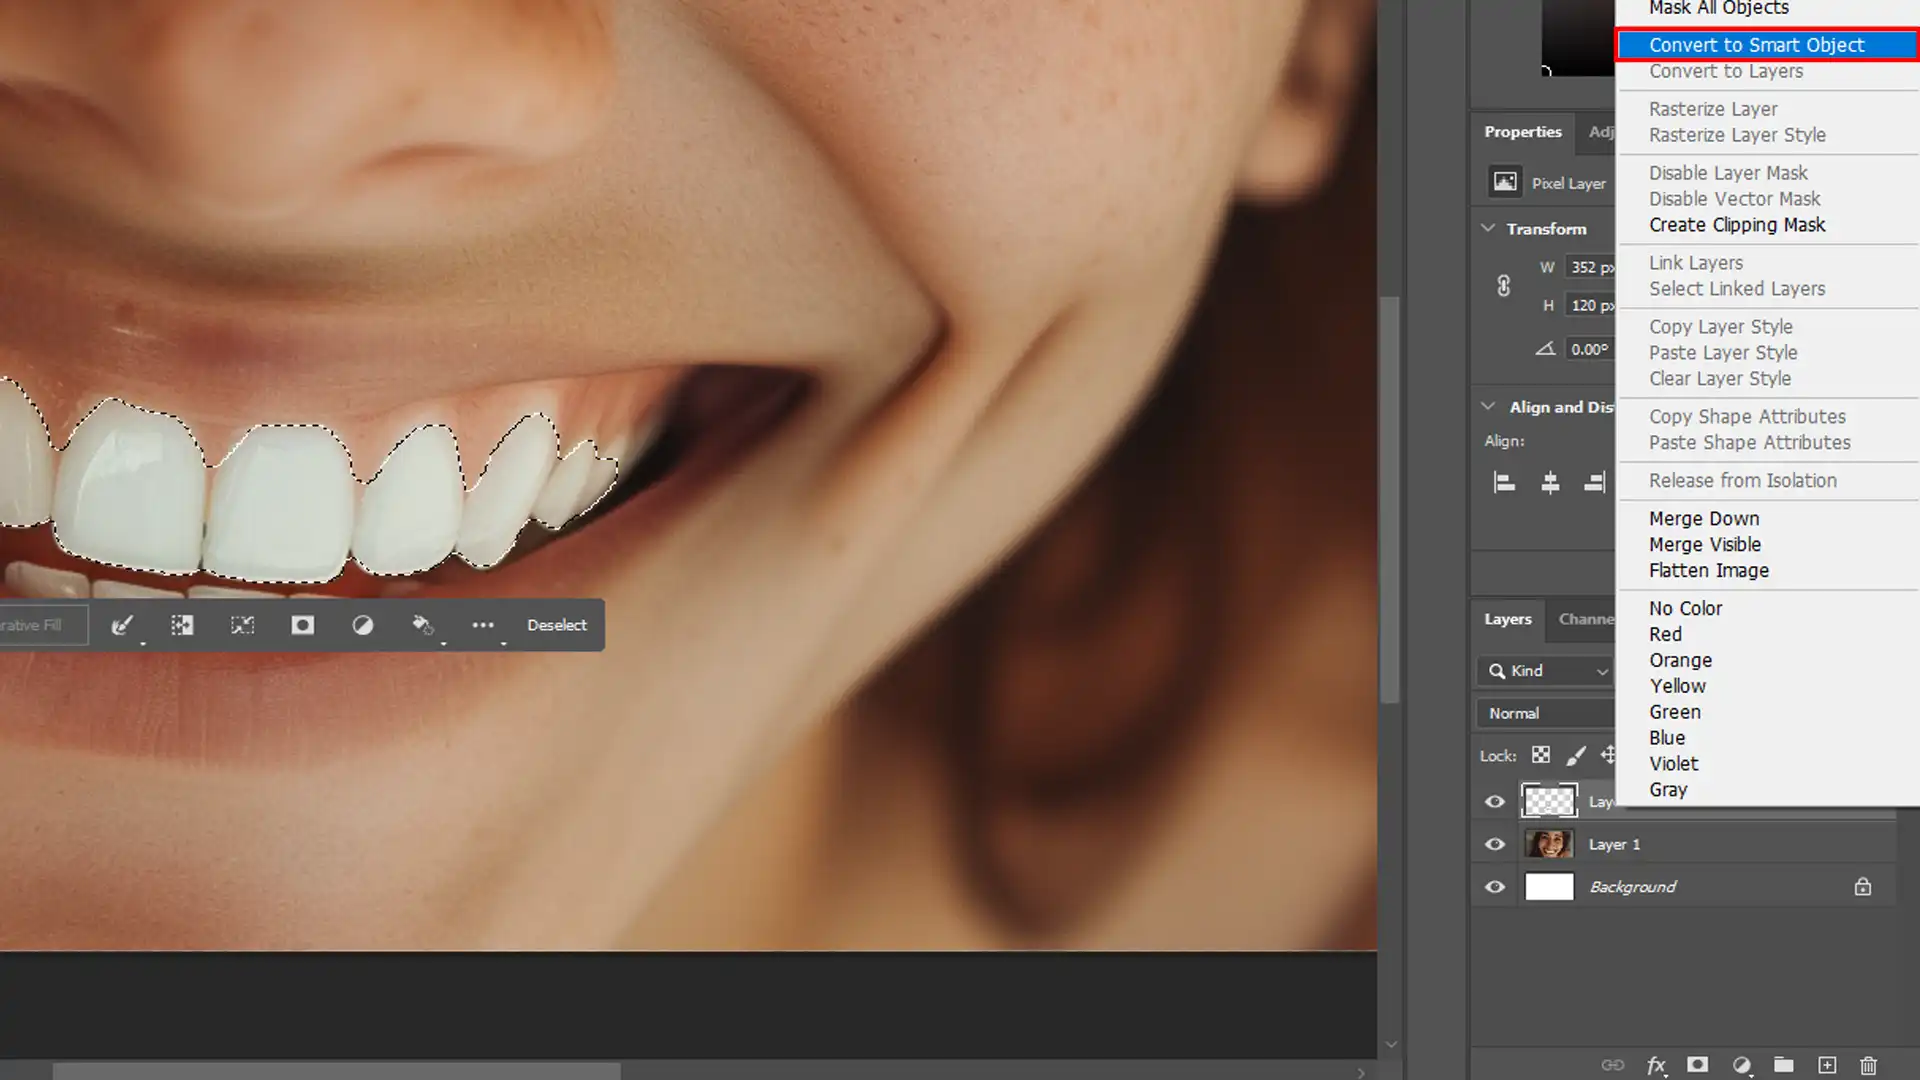
Using Smart Objects
Converting your layers into smart objects allows non-destructive editing. When you want to change something later, smart objects are a lifesaver.
Go to the layers panel, right-click on your layer, and choose “Convert to Smart Object”.
Duplicating Layers
Before making significant changes, it’s wise to duplicate the layer to keep the source image intact.
Right-click on the layer in the layers panel and select “Duplicate Layer”.
Making a duplicate layer lets you revert if necessary without losing your progress.
Adding a Smile in Photoshop
Our primary goal here is to add a smile to the subject’s face. Go back to the liquify filter and select the face tool again.
Drag upward at the corners of the mouth gently to add a smile. Use the forward warp tools to adjust the lower lip and upper lip subtly.
This can turn a neutral expression into a perfect smile effortlessly.
Save Your Work Regularly
Always remember to save your work frequently. Saving regularly ensures that you won’t lose your progress due to unexpected issues.
Achieving the desired look takes practice, but with patience and consistent efforts, you can make anyone smile in Photoshop.
Keep experimenting and learning new techniques to master this art.
Using warp text techniques can add a creative touch to your portraits. This method helps customize text overlays in your portraits, making them more engaging and personalized.
Using the Liquify Filter for Photoshop Smile Editing
Creating a smile in Photoshop is easier than you might think.
By using Photoshop’s liquify filter, you can achieve stunning results. Here, we’ll walk through the steps to make your subject smile effortlessly.
Accessing the Liquify Filter
First, open your image and convert it into a smart object to allow non-destructive editing.
Then, navigate to Filter in the menu and select the Liquify filter.
Adjusting Facial Features
Inside the liquify filter, choose the face tool.
Select the mouth area. Use the tools to adjust the upper and lower lips. Gently push up the corners to create the appearance of a smile.
Creating a Natural Smile
When adjusting the upper lip and lower lip, make sure the changes look natural. Focus on the entire face for balance.
Small adjustments can make a big difference.
Fine-Tuning the Smile
Once you add a smile, it’s crucial to fine-tune it. Use the forward warp tools to smooth out any inconsistencies.
Check the layers panel to compare with the original image. This helps ensure that your smile looks just right.
Pro Tip: Remember, always save your work regularly while using the liquify filter. Doing so will protect your progress and make sure that you don’t lose any of your hard work. Happy editing!
For more advanced techniques, consider exploring the content-aware fill or learning how to remove shadows to enhance your images even further.
Enhancing the Smile with Other Tools
To enhance the smile, you can use various tools in Photoshop, such as the Healing Brush to smooth imperfections and the Dodge Tool to add natural highlights.
Using the Healing Brush Tool
The Healing Brush Tool proves useful for removing small imperfections around the smile.
Any blemishes that detract from a natural look can be easily smoothed away.
First, create a new layer to work on to ensure non-destructive editing.
Open your background layer, and select the Healing Brush Tool from the toolbar. Identify any unwanted spots or lines around the smile area, such as shadows or wrinkles.
Hover over these areas and click to blend them seamlessly with the surrounding skin. This keeps the adjustments subtle while maintaining a realistic finish.
A crucial part of this process involves regularly zooming out to review the adjustments. This ensures the overall image retains its authenticity.
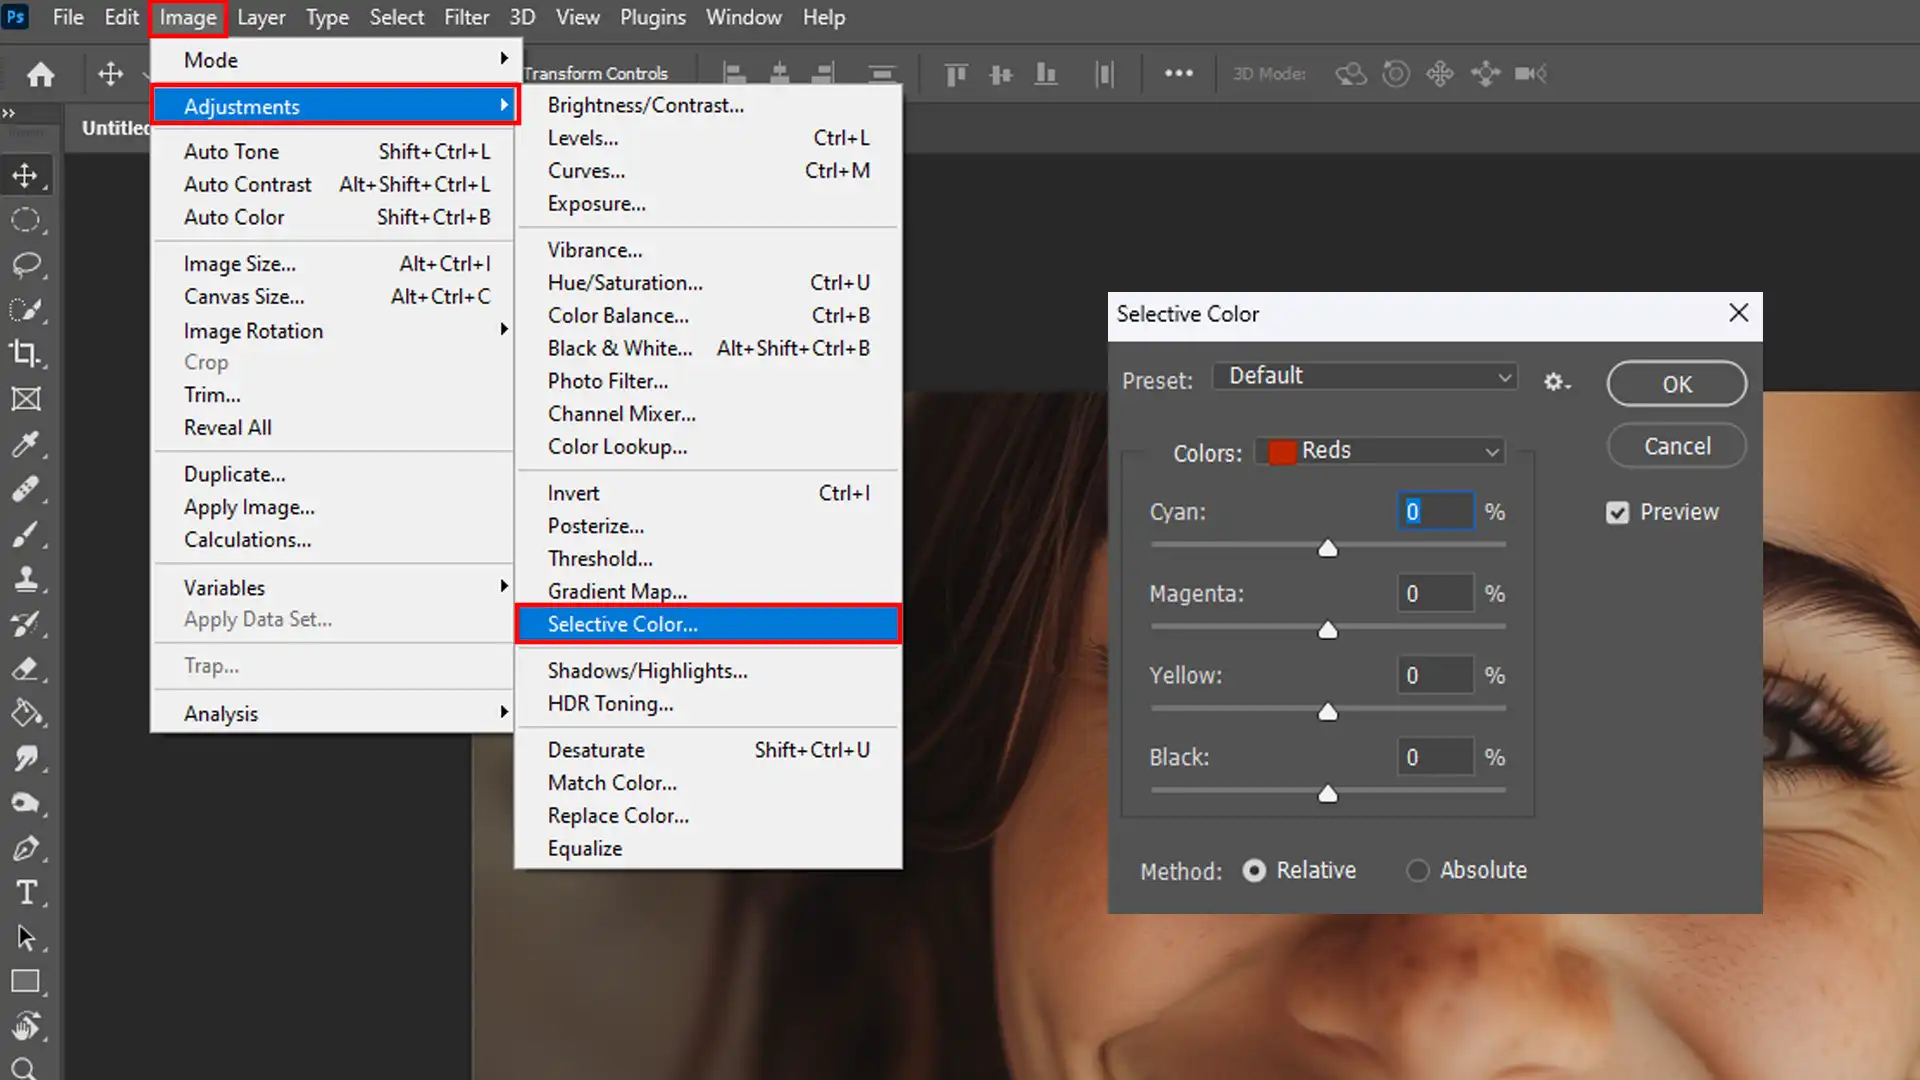
Adjusting Skin Tone and Texture
After achieving a convincing smile, it’s time to ensure the surrounding skin looks consistent.
For this, focus on adjusting the skin tone and texture. Working on a smart object layer allows you later changes without compromising quality.
First, duplicate your background layer by dragging it to the "Create New Layer" icon in the layers panel.
Convert this layer into a smart object. This layer can now handle multiple adjustment layers without degradation.
Use the "Selective Color" adjustment layer to tweak skin tones subtly. Navigate to "Layer" > "New Adjustment Layer" > "Selective Color".
Target reds and yellows to adjust warmth and balance. Slight adjustments often make significant differences.
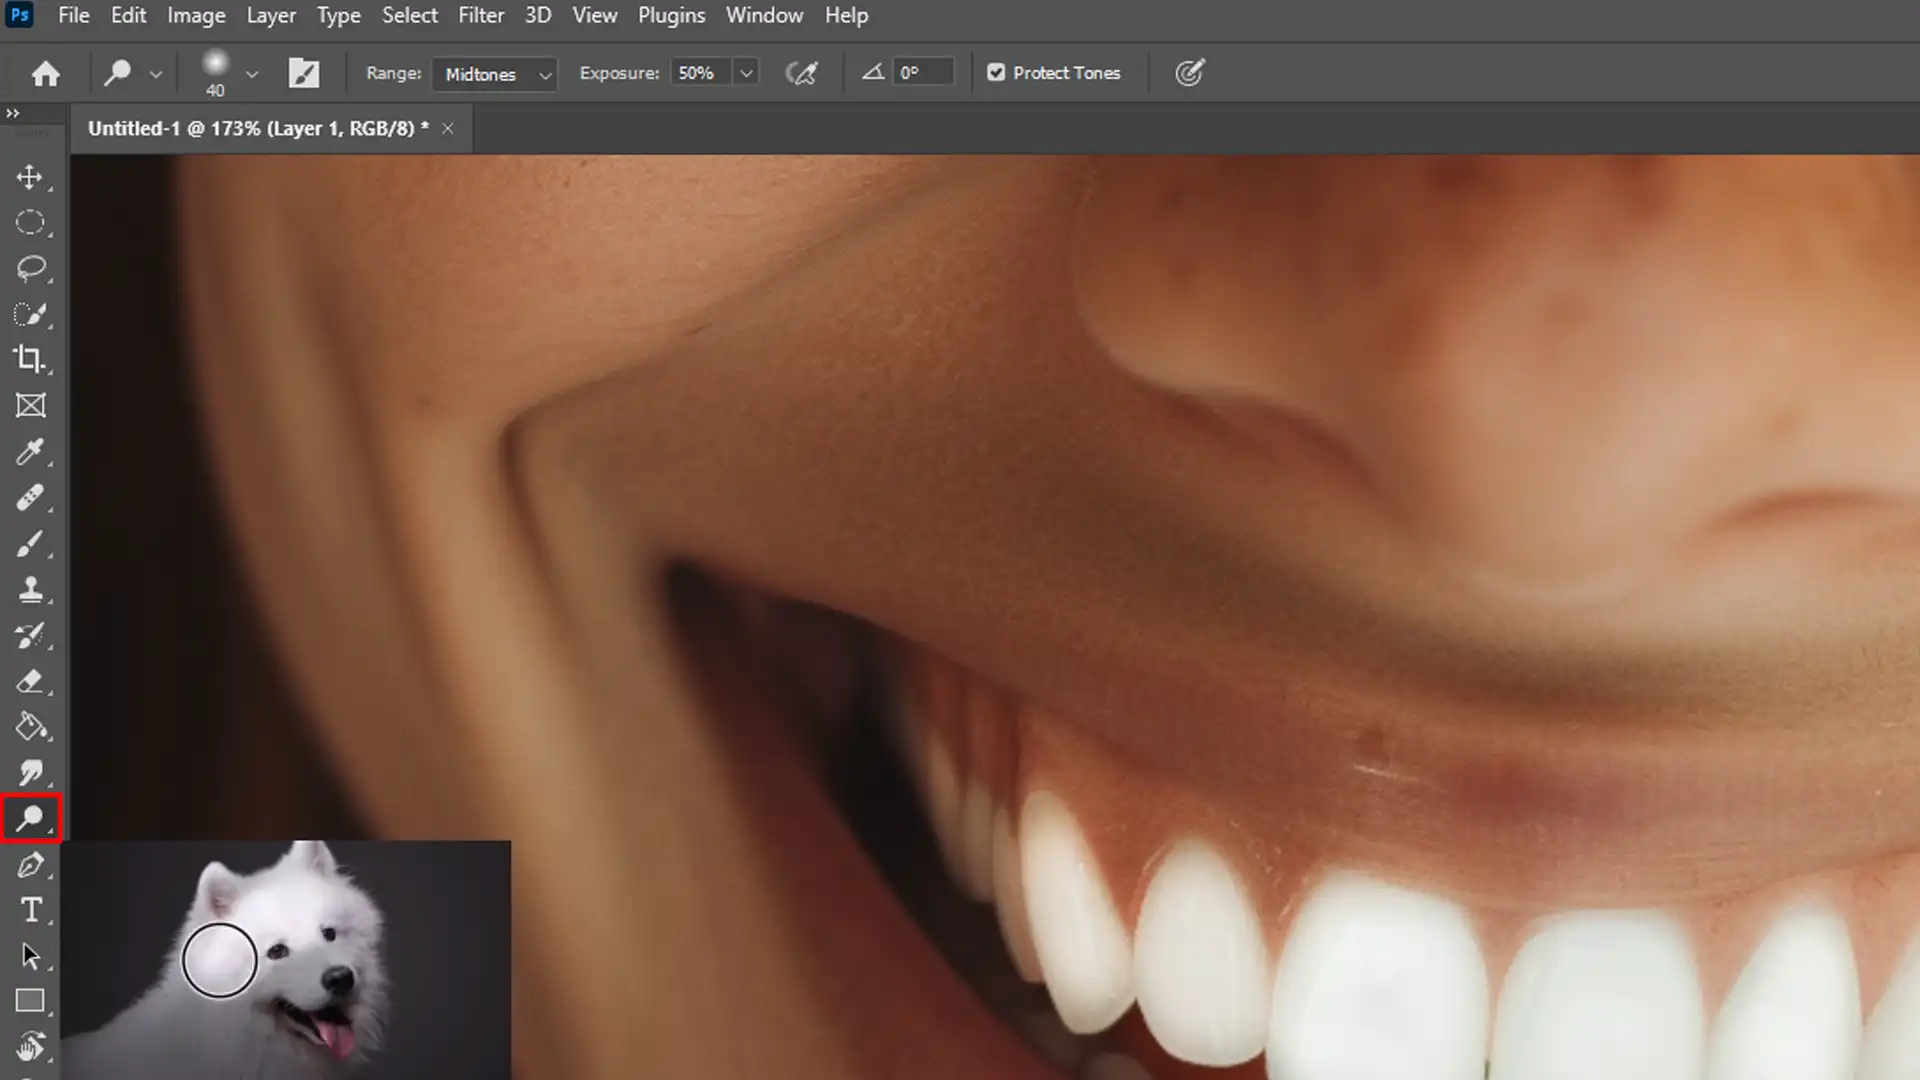
Brightening Teeth
Now let’s cover one of the most critical elements of achieving a perfect smile: brightening the teeth.
Teeth must appear white without looking unnatural. Create a new adjustment layer specifically for this task.
Select the “Hue/Saturation” tool from the adjustment layer options.
Lower the saturation while slightly increasing the lightness.
Carefully mask out everything except the teeth on this layer to isolate the effect.
Another trick is using the “Dodge Tool” for spot brightening. Set the range to “Midtones” and reduce exposure to around 10-15%. Lightly brush over the teeth to add subtle brightness.
Pro Tip: Always check the before-and-after views by toggling the layer visibility to compare your progress with the original image.
This practice helps maintain a realistic yet enhanced appearance.
By now, your skills for creating a smile in Photoshop should be much sharper. Enhancing the smile doesn’t stop at lifting the corners of the mouth, it extends to eliminating imperfections, ensuring skin tone consistency, and perfecting that pearly white smile.
Keep experimenting with the tools and techniques mentioned. Every photo session can present new challenges and learning curves, ensuring your growth as an editor.
Final Touches and Saving Your Image
First, take a moment to review the edits. This is the final step before you save your work. Look closely at the smile you’ve worked on in Photoshop.
Zoom out and see if it looks natural.
Use the face tool to make subtle adjustments. The forward warp tool can help you tweak the smile if needed.
Make sure both the upper lip and lower lip look balanced and natural.
Applying Final Adjustments
Now it’s time to apply final adjustments. Maybe the skin tone needs a quick tweak. Use adjustment layers to fine-tune the colors.
Check the brightness and contrast. Using Photoshop’s liquify filter can offer additional control for small fixes.
With Photoshop’s Liquify filter, you can easily tweak subtle details, like adjusting the shape and size of the lower lip, for a perfectly polished result.
Work on a smart object layer to maintain quality. If another refinement is necessary, this allows for non-destructive editing.
Ensure you are working within the layers panel to stay organized.
Saving and Exporting Your Image
Finally, let’s save your work:
Always save a PSD file first. This preserves all your layers and settings.
Then, export the image in the format you need, like JPEG or PNG.
If you plan to share it online, make sure to optimize the file size without losing quality.
Go to the export option and select “Save for Web”. This tool helps reduce the size while keeping that new smile in Photoshop sharp and clear.
Pro Tip: Convert your final image into a smart object before applying filters to keep everything editable. This reduces the need to backtrack through multiple steps and keeps everything neat.
For those looking to streamline their workflow, learning shortcuts can be a game-changer.
Additionally, understanding the difference between Photoshop and Lightroom can help you decide which software best suits your editing needs.
Common Mistakes and How to Avoid Them While Adding a Smile to Your Photos
Common mistakes in photo editing include over-retouching and ignoring layer adjustments. Here are some common mistakes and how to avoid them.
Mistake
Description
How to Avoid
Over-Editing the Smile
Results in an unnatural appearance
Use subtle adjustments, start with slight tweaks
Ignoring Other Features
Affects facial harmony and balance
Adjust cheekbones and eyes for a cohesive look
Not Using the Right Tools
Ineffective or imprecise edits
Use forward warp and Liquify filter, convert to smart object
Always use subtle edits and regularly review your changes for a natural look.
Over-Editing the Photoshop Smile
Over-editing the smile often results in an unnatural appearance. Be cautious when using Photoshop’s liquify filter.
Simply moving sliders can cause significant distortions. To avoid this, work in small adjustments. Adjust the smile gradually.
Start with a slight upward movement of the mouth corners. Use tools such as the forward warp tool for controlled tweaks.
Small, precise changes help maintain natural facial expressions. Keep the smile subtle and realistic.
Watch out for over-stretching. Overly exaggerated smiles look fake. Instead, aim for slight enhancements.
Ignoring Other Facial Features
Enhancing a smile often requires adjusting more than just the lips. Don’t ignore other features.
Pay attention to the cheekbones and eyes. Balance the facial expression for a cohesive look. Keep a natural proportion.
Remember to involve the background layer. Blend any changes seamlessly. Use the face tool for accurate alterations.
Keep checks on the symmetry of the face. An overly edited smile contrasts poorly with the rest.
Take the whole face into account for harmony.
Not Using the Right Tools
Selecting the correct tools in Photoshop is crucial for effective edits. Utilize the forward warp tool for detailed modifications.
It provides control over specific areas.
Employ Photoshop’s liquify filter for more expansive changes. This filter allows for broader adjustments.
Convert the smile layer into a smart object for non-destructive edits. Should you make mistakes, you can revert easily without starting over.
The face tool offers parameters tailored for facial characteristics. Experiment with various tools, but prioritize accuracy and subtlety.
Final Tips
To wrap up, beginners often face a steep learning curve with Photoshop.
Convert layers to smart objects before any alteration. This tip simplifies adjustments, maintains quality, and allows backtracking.
When using Photoshop’s Liquify filter, smart objects ensure that you can edit and refine your changes non-destructively, preserving the original layer details.
To elevate your photography with a focus on smile enhancement, mastering editing techniques is key. Learn how to perfect smiles and add that professional touch to your photos.
Choosing the right camera lens is essential for capturing stunning portraits. A high-quality lens will enhance the detail and depth of your portraits, making them truly stand out.
Advanced Techniques for Photoshop Smile
Advanced techniques for enhancing a smile in Photoshop include using the Liquify filter for precise adjustments and layer masks to refine subtle details for a natural, polished look.
Creating a Custom Photoshop Smile Brush
Let’s discuss a crucial tool in Photoshop, creating a custom smilebrush. Many of us have different techniques, but it’s worthwhile to know how a custom brush can transform your edits.
First, you want to open your brush settings and create a new brush preset. Adjust the brush’s hardness and size to suit your editing needs.
Because each smile is unique, having a brush tailored to different types can save you time.
Next, you apply this brush to specific areas around the lips.
For example, use it along the upper lip to smoothen and lift it naturally. A custom brush offers consistent results.
You’ll find you can make small tweaks without changing the overall appearance drastically.
So, take a minute to set up your custom brush.
Using Layer Masks for Precision
Layer masks bring precision to accomplishing a natural smile in Photoshop.
They’re invaluable for keeping your original image intact while making versatile edits.
Create a duplicate layers of the original image.
Apply a layer mask to gain control over editing only the masked area.
When working on the smile, use the forward warp tool and tweak small sections at a time.
This way, you avoid overdoing changes. Remember, the goal is to make subtle edits.
You’ll notice an immediate difference when you review your work, making every effort worthwhile.
Layer masks are like safety nets. If you make a mistake, you can easily correct it without affecting the entire photo. It feels like having the undo button for specific parts continually ready.
Layer masks are a must for anyone serious about photo editing.
Combining Multiple Tools for Best Photoshop Smile
No single tool can achieve the ideal smile image in Photoshop, combining them will provide the best results.
Start with Photoshop’s liquify filter to reshape the lips slightly.
Drag upward or pull down using the forward warp tool for minor adjustments.
It’s not enough to just use one method. Follow up with refined edits using more detailed tools. The liquify filter offers an extensive ability to manipulate images, so experiment with it. However, pay attention to other features, like the lower lip, to ensure a balanced look.
You can use Photoshop’s Liquify filter to make precise adjustments to the lower lip, enhancing the overall symmetry and appearance.
Each tool has strengths. Forward warp tool is excellent for broad adjustments.
Liquify filter can add smoothness and subtlety to changes.
Combining multiple tools can make your edits look professional and natural.
Mastering these will elevate your Photoshop skills exponentially.
Pro Tip: Use a light touch when working on smiles. It’s easy to over-edit and make things look unnatural. Small, gradual changes often yield the best results.
To brighten a smile using advanced techniques, start by mastering the basics and then move on to more refined methods.
This guide will help you achieve a radiant smile with expert precision.
Frequently Asked Questions
How to Fake a Smile in Photoshop?
Making a fake smile in Photoshop in a few steps:
Open the image in Photoshop.
Select the 'Liquify' tool from the 'Filter' menu.
Choose the 'Forward Warp' tool to adjust the corners of the mouth gently upwards.
Use the 'Smoothing' tool to blend and smooth the adjustments.
Preview and apply the changes when satisfied with the smile.
How Do I Add a Smile to a Picture?
Follow these steps to add a smile to a picture:
Load your image into Photoshop.
Access the 'Liquify' feature under the 'Filter' menu.
Use the 'Forward Warp' tool to curl the mouth edges upward.
Adjust the brush size for precision as needed.
Click 'OK' to apply the changes and create a smile.
How to Make Someone Smile in Photoshop?
Easy ways to make someone smile in Photoshop:
Start by opening your image in Photoshop.
Navigate to 'Filter' and select 'Liquify'.
Select the 'Face Tool' specifically designed for facial features.
Adjust the smile by moving the handles around the mouth to create a smiling effect.
Apply the changes once you're happy with the new smile.
How to Warp Smile in Photoshop?
Follow these steps to warp a smile in Photoshop:
Open the desired image in Photoshop.
Go to the 'Filter' options and choose 'Liquify'.
Pick the 'Forward Warp' tool to manipulate the mouth edges.
Gently push the sides of the mouth upward to form a smile.
Use the 'Reconstruct' tool if needed to fine-tune the adjustments.
Creating the perfect Photoshop smile can really enhance your photos. I’ve found that with a few simple tools and techniques, you can turn a bland expression into a vibrant one.
By following these steps, like using the Liquify filter and making basic adjustments, you’ll see how easy it is to brighten up a smile.
From personal experience, mastering these techniques has made a huge difference in my photo edits.
$2,061.00Original price was: $2,061.00.$1,061.00Current price is: $1,061.00. 27584
Download Your Free Guide Now!
Discover the secrets of photography with our printable guide! Master essential techniques like aperture, shutter speed, and ISO to create stunning images. Get your free printable PDF now and start turning your snapshots into masterpieces!