Have you ever tried using the Photoshop stroke to enhance your images?
This tool can brilliantly outline your texts or objects, adding depth and interest to any project.
Whether you’re a budding artist or just dabbling in digital art, mastering this simple yet effective feature can transform your creations.
Moreover, let’s dive into some easy tips to help you use this tool like a pro and bring your artistic vision to life!
Table of Contents
How to Apply Strokes in Photoshop
Finalizing your strokes can enhance your projects significantly.
Using the Layers Panel While Working with Strokes in Photoshop
The Layers Panel in Photoshop plays an important role when working with strokes.
Therefore, by managing your layers effectively, you can apply strokes to specific elements without affecting the rest of your design.
Saving Your Stroke Settings for Future Use
Preserving your stroke options ensures consistency across different projects.
To save your stroke effect, navigate to the Layers Panel and select the layer to which you applied the stroke.
First, open the layer styles by double-clicking on the layer thumbnail.
Then, click on “New Style” within the dialog box.
Lastly, name your style, then hit "OK."
Next time, you can effortlessly apply this saved style to any other layer via the Layer Style library.
Exporting Images with Custom Strokes
Using custom strokes lets you create unique images that fit various uses.
After applying a stroke style:
Ensure each stroke is as desired using the Stroke Command.
Go to the File Menu and select "Export As" or "Save for Web."
This method preserves your strokes in formats like PNG, JPEG, or GIF while maintaining quality.
Optimizing Workflow for Faster Stroke Application
To speed up applying strokes:
First, utilize the Layers Palette efficiently by grouping layers.
Second, apply strokes through the Layer Styles panel under a single group.
Lastly, store frequently used settings in presets accessed from the Options Bar.
These actions streamline tasks, helping you finish your portrait editing faster!
Moreover, by following these steps, you’ll be able to save time and produce better quality images in Adobe Photoshop every time you add a stroke.
Advanced Stroke Techniques for Professional Effects
Mastering advanced stroke techniques can significantly enhance the professionalism of your designs.
This section will explore specialized approaches to using strokes in Photoshop.
Mastering the Stroke Dialog Box in Photoshop
The stroke dialog box in Photoshop is significant for adding outlines to your images, text, and adding shapes, enhancing their visual impact.
This feature allows you to create and customize strokes, giving your designs depth and emphasis.
Mastering the stroke dialog box in Photoshop enhances text designs by outlining elements like the Photoshop text box. This allows for clearer, more impactful typography.
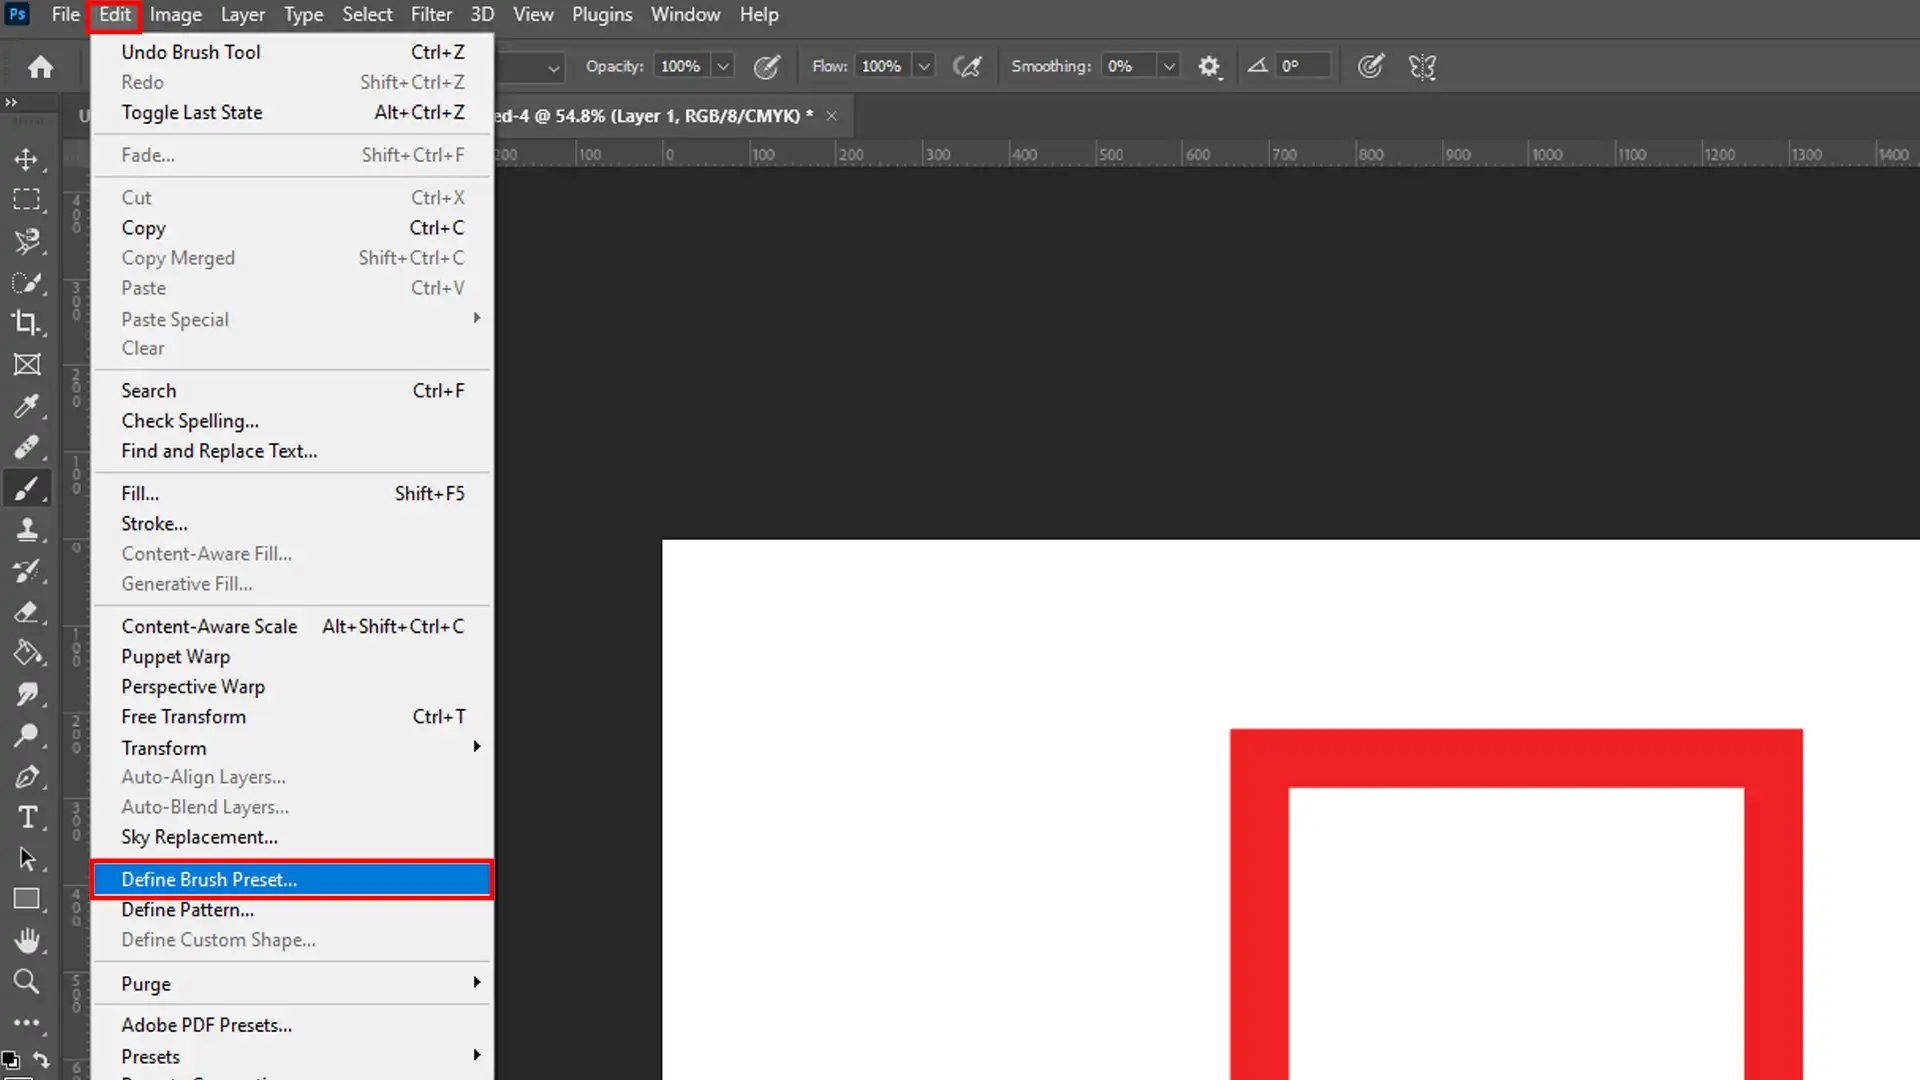
Creating and Applying Custom Stroke Brushes
Custom stroke brushes add uniqueness to your work.
Use the Brush tool from the toolbox.
First, open Photoshop and create a new document.
Then, from the menu, select File > New.
Lastly, go to Edit > Define Brush Preset after making a shape using the selection tools.
Steps to Apply Custom Stroke Brushes:
First, choose your brush from the Brushes panel.
Second, adjust settings in the options bar.
Lastly, apply them by brushing over your desired area.
Using custom stroke brushes allows you to create detailed and personalized strokes quickly.
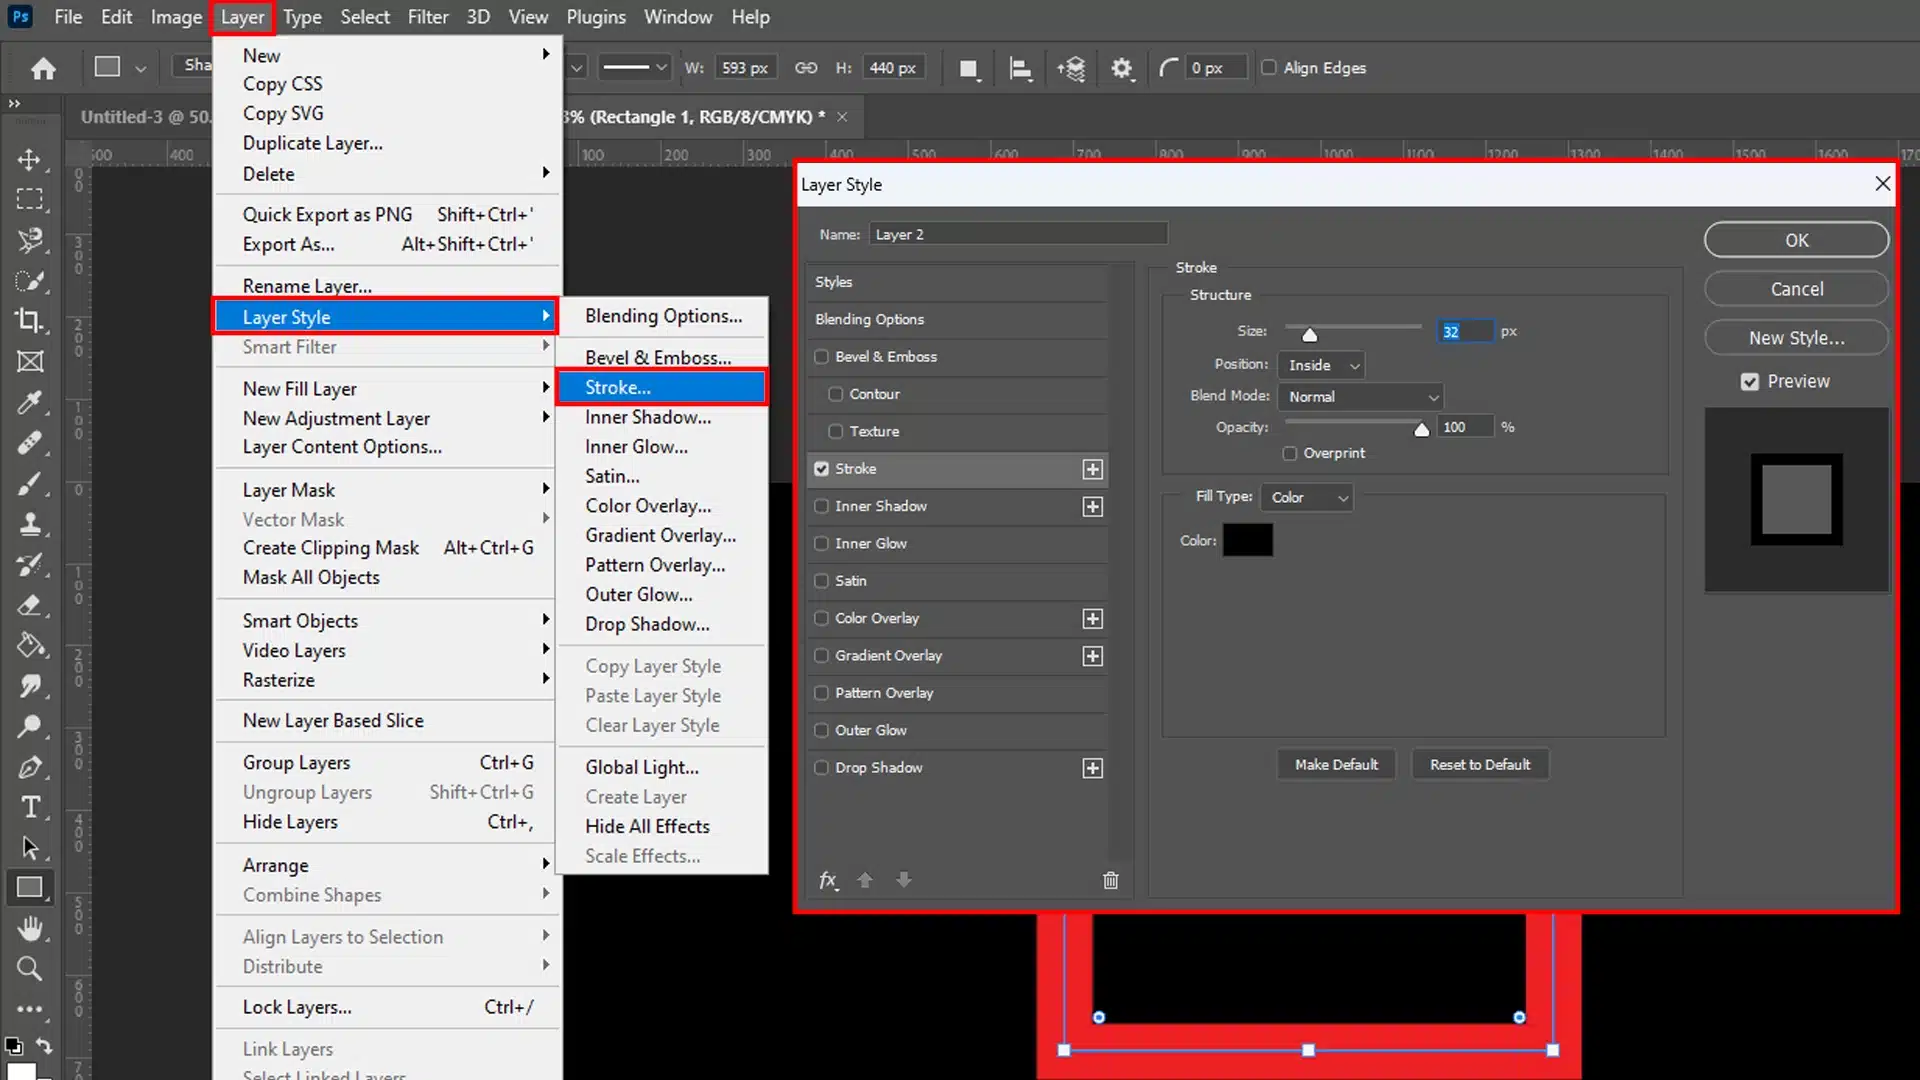
Using Layer Styles for Enhanced Stroke Effects
Layer styles are critical for enhancing strokes with effects like shadows, glows, and bevels.
Begin by selecting your layer in the layers palette:
Right-click on the layer and choose Blending Options.
Select Stroke Effect from the list on the left.
Adjust fill settings such as stroke size and position in the dialog box.
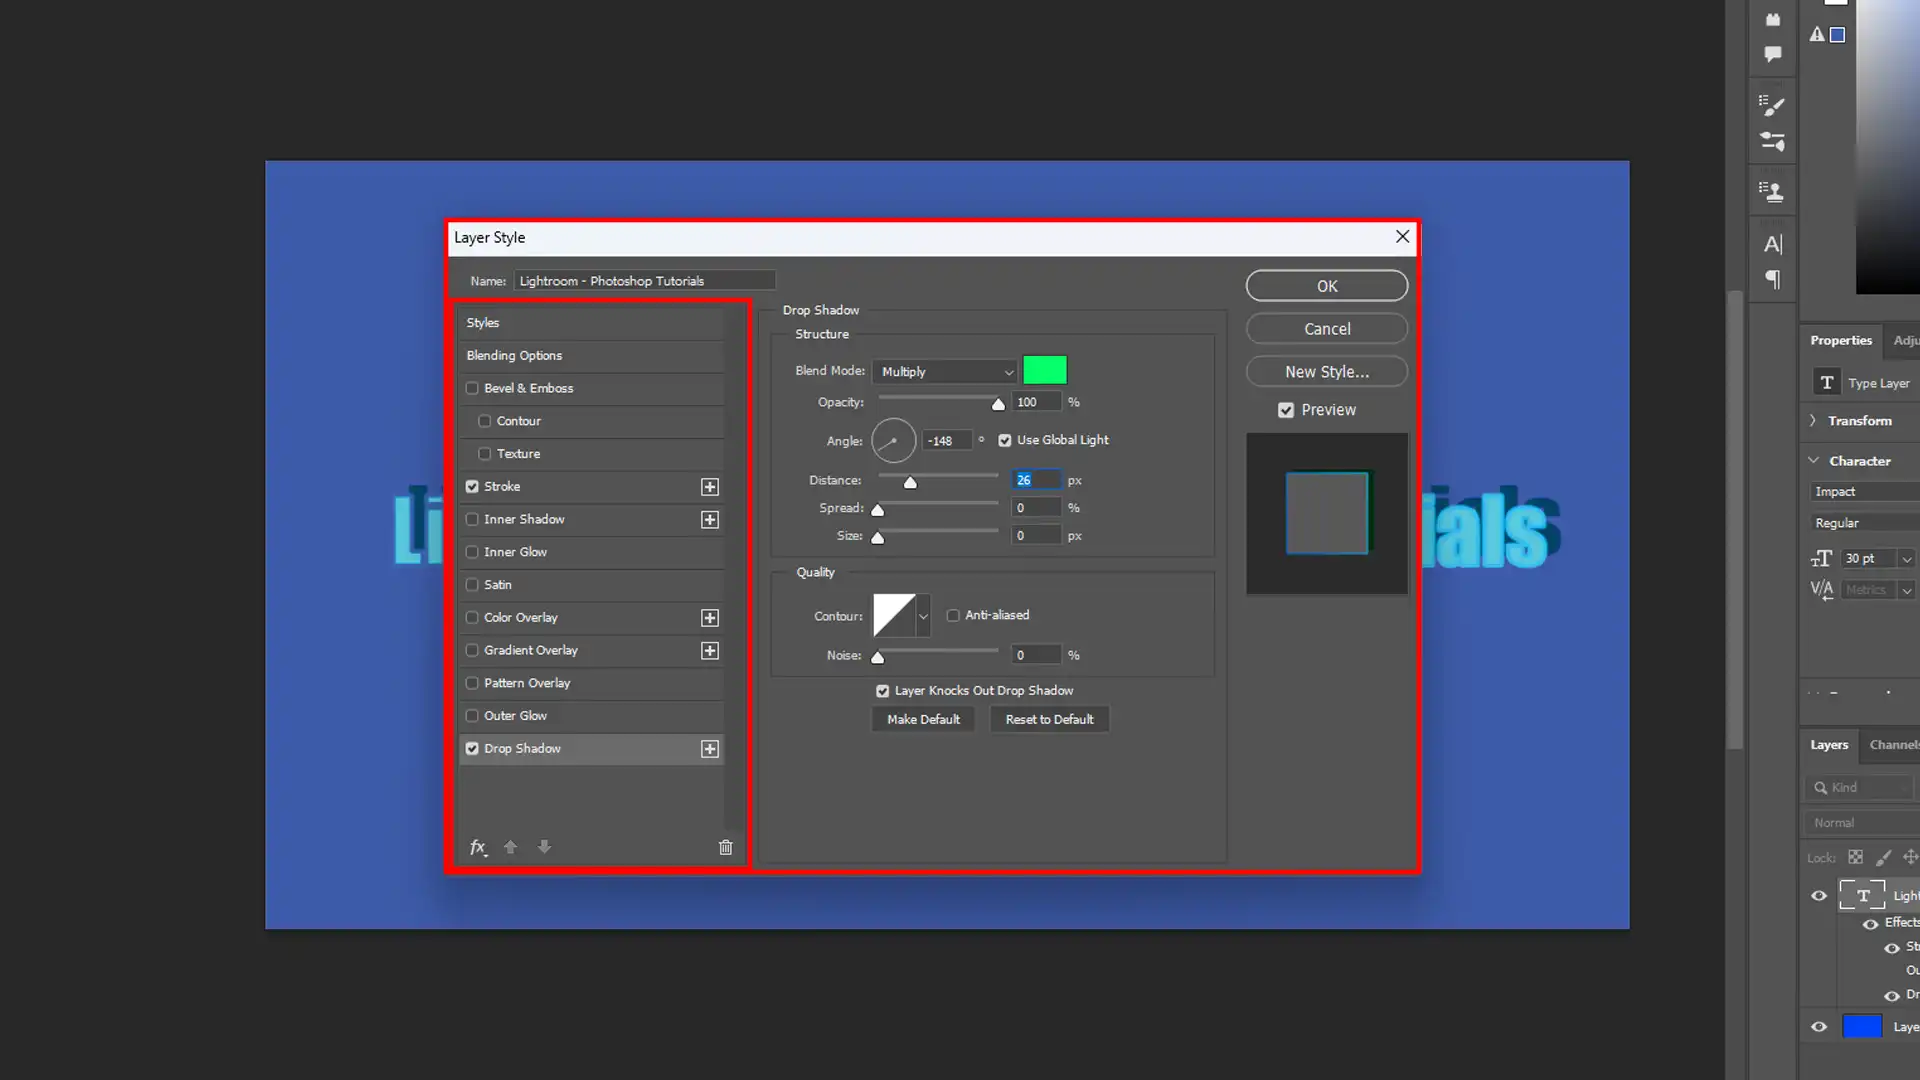
Another example is using a drop shadow along with a stroke:
Open Layer Styles, then click Drop Shadow.
Configure Opacity Value and Blend Mode as needed for depth effects.
Excel at combining different layer styles for complex visual effects.
Incorporating Custom Pattern and Textures into Strokes
Incorporate custom pattern or textures into your strokes for innovative design outcomes:
Access it through Edit > Fill to ensure you're working on a new layer.
Choose among pattern libraries or upload your files
Using Photoshop masking is signfiicant when incorporating custom patterns and textures into strokes. It provides control over where textures appear, enhancing stroke effects.
Follow these steps to integrate textures:
Apply a patterned border by duplicating layers with different fills.
Adjust blending mode like overlay or multiply within each layer style dialog box for seamless integration.
For even more control, experiment with blending mode adjustments within each effect applied to simulate real life materials effectively on digital canvases.
To create unique and dynamic designs, try combining the Photoshop painting effect with incorporating custom patterns and textures into strokes.
This adds depth and a painterly feel to your strokes, enhancing your artwork with intricate details and textures that mimic real-world materials.
Using the Photoshop oil paint filter can further elevate this effect, adding a realistic, hand-painted touch to your designs.
Using Selection Tools for Enhanced Stroke Application
To refine your strokes, use the rectangular marquee tool or the Elliptical Marquee Tool to select specific areas. Adjust the foreground color to fit your design needs, making sure the foreground color enhances your stroke’sappearance.
A well-chosen foreground color can significantly impact the overall visualappeal of your design.
Shape tools can also be used to createprecise shapes for applying strokes, with all adjustments visible in the documentwindow.
Optimizing Stroke Effect for Different Media Outputs
When working with stroke effectsin Photoshop, you need to tailor your settings based on the final output medium.
Moreover, both print and web media have distinct requirements affecting resolution, color management, and visibility.
Adjusting Resolution and Stroke Thickness for Print vs. Web
You’ll adapt resolution and stroke thickness depending on the intended medium for optimal results.
Print Media:
Maintain a higher resolution (300 DPI or more).
Use thicker settings to ensure that you have the stroke visible.
Access the dialog box to set precise values.
Utilize the fill dialog box effectively for broader strokes.
Understanding the Fill Dialog Box in Photoshop
The filldialog box in Adobe Photoshop is a powerful tool to create solid color lines , patterns, or gradients to selected areas of your image. Whether you’re filling a layer, a selection, or a path, the Fill Dialog Box offers various options to customize your fill according to your project’s needs.
Personal Example: I once had a client for a fashion photography project on which thin lines became almost invisible when printed. Increasing stroke thickness instantly solved the issue.
Web Media:
Reduce resolution to 72 DPI for faster loading times.
Keep strokes thinner but still clear enough at different screen sizes.
Use the Photoshop stroke feature to finetune them.
ProTip: Always view your designs at their actual size within the browser to assess their appearance accurately.
Medium
Recommended Resolution
Stroke Thickness
Print
300 DPI
Thicker Strokes
Web
72 DPI
Thinner yet Visible
Color Management for Strokes in Various Display Environments
Different screens display colors differently.
Proper color management ensures consistency across devices.
Neutral Color Spaces:
Stick to sRGB for most web environments due to its broad compatibility.
Use CMYK to check how colors shift through a printed proof for prints.
Pro Tip: Adjust using the color picker feature within Photoshop for accurate hues..
Ensuring Consistent Colors Across Devices:
First, identify your predominant device audience (monitors, tablets, etc.)
Then, use calibrated monitors to get true to life previews.
Lastly, adjust concealment factors to allow the same stroke look on all screens, preferably tested using the Adobe suite's preview options, like in Photoshop CC.
Example: In my experience creating web graphics, I noticed that maintaining an sRGB profile kept color tones consistent between desktop and mobile views.
Moreover, below is how you can ensure uniformity:
Display Environment
Color Profile
Web
Stick with sRGB
Print
Convert design files into CMYK before printing
Cross Device
Preview stroke effects across multiple device simulations in Photoshop
Proper resolution adjustments and excellent color management will significantly enhance any project’s visual appeal, regardless of its final form, print or digital.
Utilizing tools like the stroke command guarantees tailored optimization that efficiently matches every conceivable output requirement while ensuring user engagement remains intact!
Troubleshooting Common Issues with Photoshop Strokes
Dealing with stroke issues when working in Photoshop can be frustrating. However, here, we will tackle common problems and their fixes.
Fixing Pixelated Strokes on High-Resolution Images
Pixelation often occurs when strokes don’t scale appropriately on high-resolution images.
To avoid this:
Check Your Resolution: Ensure your document's resolution matches your project's requirements.
Use Vector Shapes: Instead of raster layers, use the shape tools to keep strokes crisp at any size.
Example: Once, I worked on a 300 DPI poster and noticed pixelated edges around the text. Switching to vector shapes instantly solved the problem.
Using the path selection tool can help in fixing pixelated strokes on high-resolution images by refining the edges.
This tool allows precise adjustments for smoother, clearer stroke quality.
Resolving Stroke Displacement During Layer Adjustments
Sometimes, strokes shift during layer movements or transformations.
Therefore, here’s how to fix this:
Align Precisely: Use grid lines and snapping features to maintain alignment.
Consistent Rules: Apply consistent rules via the stroke dialog box, ensuring no movement while resizing.
Important Stroke Options
Here is a breakdown of important stroke settings in Photoshop. Use this table to quickly understand and adjust stroke properties for your designs.
Setting
Description
Width
Adjusts stroke thickness
Position
Inside, Center, Outside
Opacity
Controls transparency
Blending Mode
Changes how a layer interacts with others
Use the following tips to efficiently manage your layers and styles in Photoshop for better precision and control over your designs.
Link Layers: Link affected layers in the layers palette for synchronized adjustments.
Proper Use of Styles: Utilize appropriate settings within your layer style, like keeping strokes centered for less displacement.
Integrating Photoshop Strokes with Other Design Tools
Integrating strokes in Photoshop with other design tools like Illustrator and After Effects can enhance your workflow.
Therefore, this guide will help you synchronize strokes and export paths for animation.
Synchronizing Stroke Styles with Illustrator
Photoshop makes it easy to sync stroke styles with Illustrator.
If you maintain consistency, following these steps helps.
Select the Layer: First, choose the layer where the stroke is applied.
Use Paths Panel: Then, go to the Paths panel menu. Convert your stroke to a path.
Export Path: Lastly, export the path as an Illustrator file by heading to File > Export > Paths to Illustrator.
Open in Illustrator: Open this file in Illustrator and apply similar stroke options.
Customize Stroke Style:
This table outlines important options within Photoshop’s stroke and color settings. Use it to efficiently adjust stroke properties and ensure color consistency in your designs
Panel
Option
Stroke Options
Change weight
Adjust cap and corner
Color Swatch
Pick same color
Fill Dialog Box
Ensure matching fill
By following these steps, you’ll ensure your Photoshop stroke maintains its characteristics when opened in Illustrator.
Exporting Stroke Paths to After Effects for Animation
Animating strokes created in Photoshop within After Effects involves a few quick steps for professional results.
Prepare Stroke Path: First, ensure the stroke path is complete and precise.
Convert Text Layers to Shapes: Then, if animation involves text, convert text layers into shape paths using the layer style options.
Export as EPS: Lastly, export the paths as an EPS file, which After Effects reads quickly.
Import into After Effects:
Import your EPS into After Effects.
Use Layer > Create Shapes from Vector Layer option.
Animate Path:
This table provides significant tools for managing stroke effects in animations. Use it to fine-tune color transitions, opacity, and positioning for clearer, smoother animations.
Tool
Role
Blend Mode
Ensures smooth transition of colors
Opacity
Adjusts visibility during stroke effect
Create Solid Color Lines
Adds clarity to animations
Position
Manages starting point of animation
By syncing through precisely defined paths, animating your strokes becomes more dynamic while retaining the original properties from Photoshop.
Both methods ensure synchronization between powerful Adobe tools for cohesive designs and stunning animations!
Frequently Asked Questions
How to do a stroke in Photoshop?
To create a stroke in Photoshop, select the layer to which you want to apply the stroke.
Go to the "Edit" menu, choose "Stroke (Outline) Selection," pick your desired stroke settings (color, width, and location), and click OK.
Moreover, the stroke will appear around your selected layer or shape.
Why can't I Stroke in Photoshop?
If you can't apply a stroke in Photoshop, ensure the layer you're working with is not locked or set as a background layer.
Also, confirm that you have selected a part of the layer or used a path.
Therefore, when using specific tools, strokes can be applied to layers, selections, or paths from the "Edit" menu or the options bar.
How to make Line Stroke in Photoshop?
Select it: First, choose the Line tool from the toolbar with your cursor.
Shape it: Second, ensure that the Shape is selected in the top menu.
Color it: Then, adjust the color under Stroke Options using the Color Picker.
To create a line stroke in Photoshop, first, draw it using the Line Tool. If you want to thicken it, adjust the stroke width in the Stroke settings to achieve the desired thickness.
How do I make a Stroke Only in Photoshop?
Select Shape Tool & Set to Shape: Choose a Shape Tool (e.g., Rectangle, Ellipse), and set it to "Shape" in the top menu.
Set Stroke & Disable Fill: In the options bar, set the Stroke color and width, then set the Fill color to "None" (white box with red line).
Draw & Adjust Stroke: Draw your shape, then adjust stroke thickness, style, and alignment in the Properties panel if needed.
Using Photoshop stroke feature has really improved my designs. Adding strokes to images or text can make them stand out, and it’s a simple way to add some depth and style.
By applying the tips from this article, I now feel more confident creating clean and precise strokes in my projects.
Whether I’m working on logos, posters, or social media graphics, strokes have become a go-to tool for adding that extra touch.
If you’re interested in learning more, I highly recommend checking out this Photoshop Course for step-by-step tutorials. You can also explore advanced editing techniques in the Lightroom Course to take your skills even further.
$2,061.00Original price was: $2,061.00.$1,061.00Current price is: $1,061.00. 27584
Download Your Free Guide Now!
Discover the secrets of photography with our printable guide! Master essential techniques like aperture, shutter speed, and ISO to create stunning images. Get your free printable PDF now and start turning your snapshots into masterpieces!