Welcome to this Lightroom tutorial! If you’re looking to enhance your photo editing skills, you’re in the right place.
I know how overwhelming it can be to navigate through the myriad of features in Lightroom, but don’t worry, I’m here to guide you. Imagine transforming your photos from good to stunning with just a few clicks.
Intrigued?
By the end of this article, you’ll have the knowledge and confidence to make your images pop. Keep reading, and let’s get started on this exciting journey together!
Table of Contents
Lightroom Tutorial for Beginners
Lightroom is a photo editing and organizing software developed by Adobe. It allows photographers to manage, edit, and share their photos.
You use Lightroom to make basic edits such as cropping, adjusting exposure, and correcting color. The software also manages your Lightroom catalog, which helps keep track of all your photos.
This is essential for photographers who shoot in RAW and need to maintain high quality in their images.
Why Use Lightroom for Photo Editing?
Lightroom offers a range of tools that simplify the photo editing process:
- Perform post-processing tasks quickly and efficiently.
- Keep your original file intact, allowing you to always go back to your original photo.Keep your original file intact, allowing you to always go back to your original photo. This ensures that any modifications you make are reversible and your original photo remains unchanged for future reference.
Importing images from your memory card to your computer is straightforward, thanks to Lightroom.
Once imported, you can switch between different modules like the Library Segment for organizing images and the Develop module for advanced refining.
This seamless workflow minimizes the time you spend fumbling around.
Organize Your Photos Efficiently with Lightroom Tutorial
In the Library Segment, you can create collections to group similar photos. Use keywords to find images easily. It also offers filters to narrow down your search results.
Exporting Your Final Photo
Lightroom offers a variety of output configurations to ensure your final photo looks its best. You can choose the format, quality, and size of your exported images.
The process is user-friendly, even if you’re new to revising.
Lightroom Shortcuts to Save Time
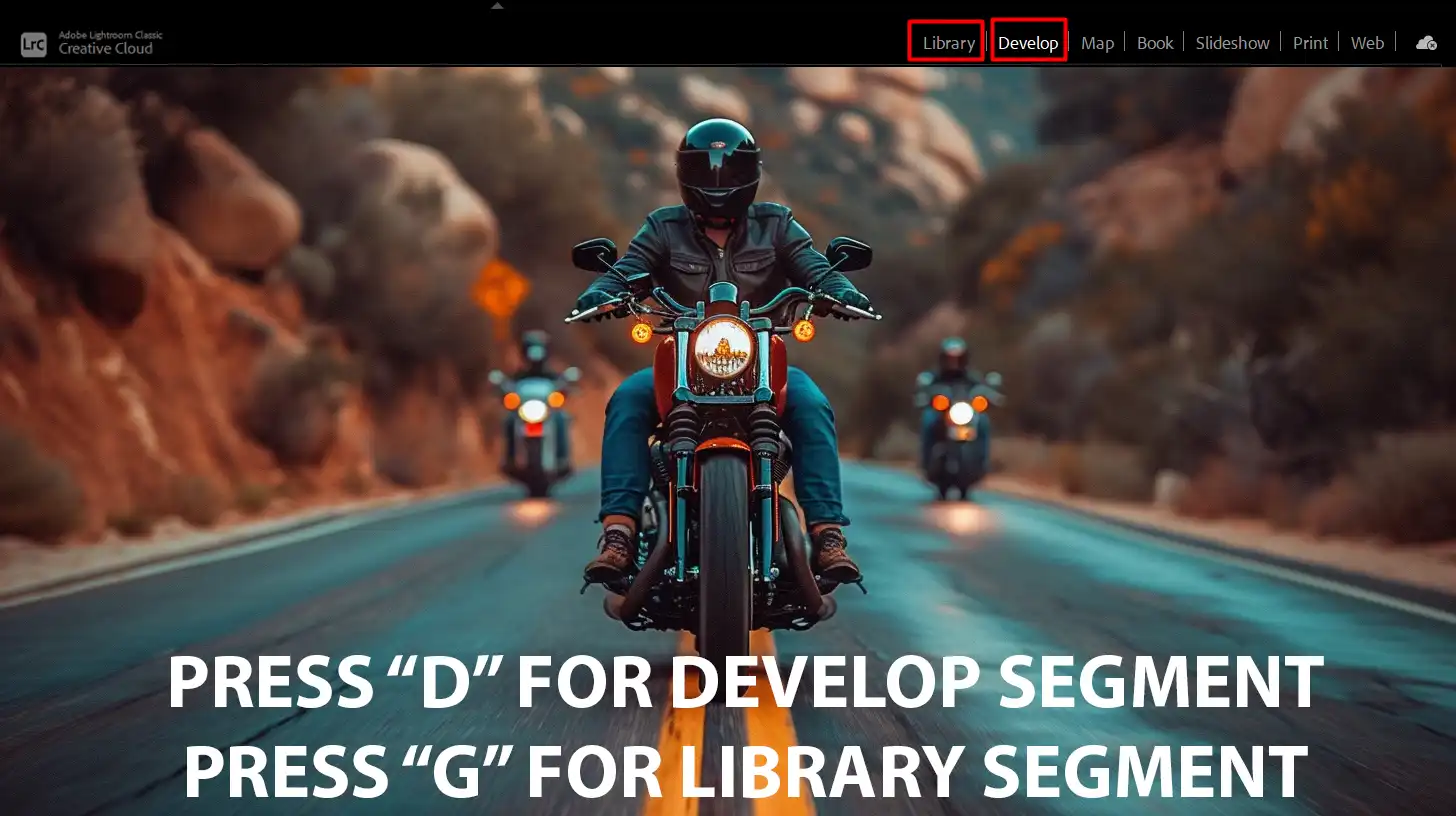
Learning some essential Lightroom shortcuts can significantly speed up your workflow. For example, pressing “D” switches you to the Develop Segment, while “G” takes you back to the Library Segment.
These shortcuts help you navigate through the software more efficiently.
Lightroom vs. ON1 Photo RAW
While Lightroom vs. ON1 Photo RAW is a standard comparison, it’s worth exploring both programs. Both offer robust editing features, but ON1 Photo RAW provides additional flexibility with layer-based editing.
Comparing these two can help you decide which software best suits your needs. Embrace Lightroom and see how it transforms your photography workflow.
Lightroom Tutorial: Getting Started with Lightroom
Lightroom simplifies photo editing and organizing. This guide takes us through the basics. We’ll cover installation, workspace setup, and importing images.
Installing Lightroom
- First, download Lightroom from the Adobe website. Choose between Lightroom Classic or cloud-based Lightroom. Follow the installation instructions.
- Once installed, open Lightroom on your desktop. Sign in with your Adobe ID. This ensures access to all your photos and settings.
Setting Up Your Workspace
- After installing, set up your workspace. Go to the "Edit" menu on a Windows computer or "Lightroom" on a Mac. Click "Preferences."
- In Preferences, set your default catalog location. This keeps your Lightroom catalog organized on your hard drive. Adjust general settings to fit your workflow.
Understanding Modules
The workspace includes unique modules like Library and Develop:
- The Library module helps organize photos. It allows you to categorize and tag your images, making it easier to organize and retrieve them when needed.
- The Develop Segment performs all the edits. Familiarize yourself with these tools.
Pro Tip: Always shoot in RAW or JPEG format if possible. RAW photos retain more details during post-processing and give more room for modification compared to the original photos.
For more advanced modifying, consider learning about Lightroom shortcuts to speed up your workflow.
Basic Photo Editing with Lightroom Tutorial
The Develop module is where the magic happens in Lightroom. This is where you perform most of your photo edits. Every slider and button you see helps you tweak the photo in different ways. You will like this module because it allows real-time adjustments to images.
You’ll find tools for altering exposure, contrast, highlights, shadows, whites, and blacks here. Don’t let the names scare you. Just think of them as ways to improve different parts of your photos.
Basic Adjustments
Start with basic adjustments. These include:
- Exposure: Affects how light or dark your photo is.
- Contrast: Adjusts the difference between the light and dark areas of your image. Increase for a punchier photo, decrease for a gentle look.
- Color Corrections: Use temperature and tint sliders to correct any color balance issues in your original photo.
Cropping and Straightening
Next, move to cropping and straightening. An essential step for composition:
- Click on the crop icon in the Develop module.
- Drag the corners to crop the image as needed.
- Use the angle slider or drag along the edge of your photo to straighten a crooked horizon.
This results in a neat, well-composed picture and helps remove distractions from the edges.
Using Presets
Presets are a time-saver. Consider them your best friend in Lightroom tutorials. These are pre-configured settings that make your photos look excellent with one click:
- Lightroom comes with various built-in presets.
- You can also create your own or download them from the web.
- Apply a preset, and then you only have to make minor adjustments.
Pro Tip: Always shoot in RAW format if possible. It retains more details than JPEG, giving you a broader scope for post-processing. Don’t forget to save your work periodically to avoid losing your edits.
If you’re new to photo editing, consider taking some Lightroom training guide to master the tools in the Develop module more effectively.
This will help you get comfortable with basic adjustments, cropping, and using presets, allowing you to enhance your photos with confidence
Lightroom Tutorial: Advanced Editing Techniques
Lightroom offers multiple tools to refine your photos. These advanced techniques help improve and enhance image quality.
Enhance your Photoshop and Lightroom skills today by enrolling in our comprehensive Adobe Photoshop & Lightroom training. Unlock advanced techniques and transform your photo editing expertise!
Using the Tone Curve
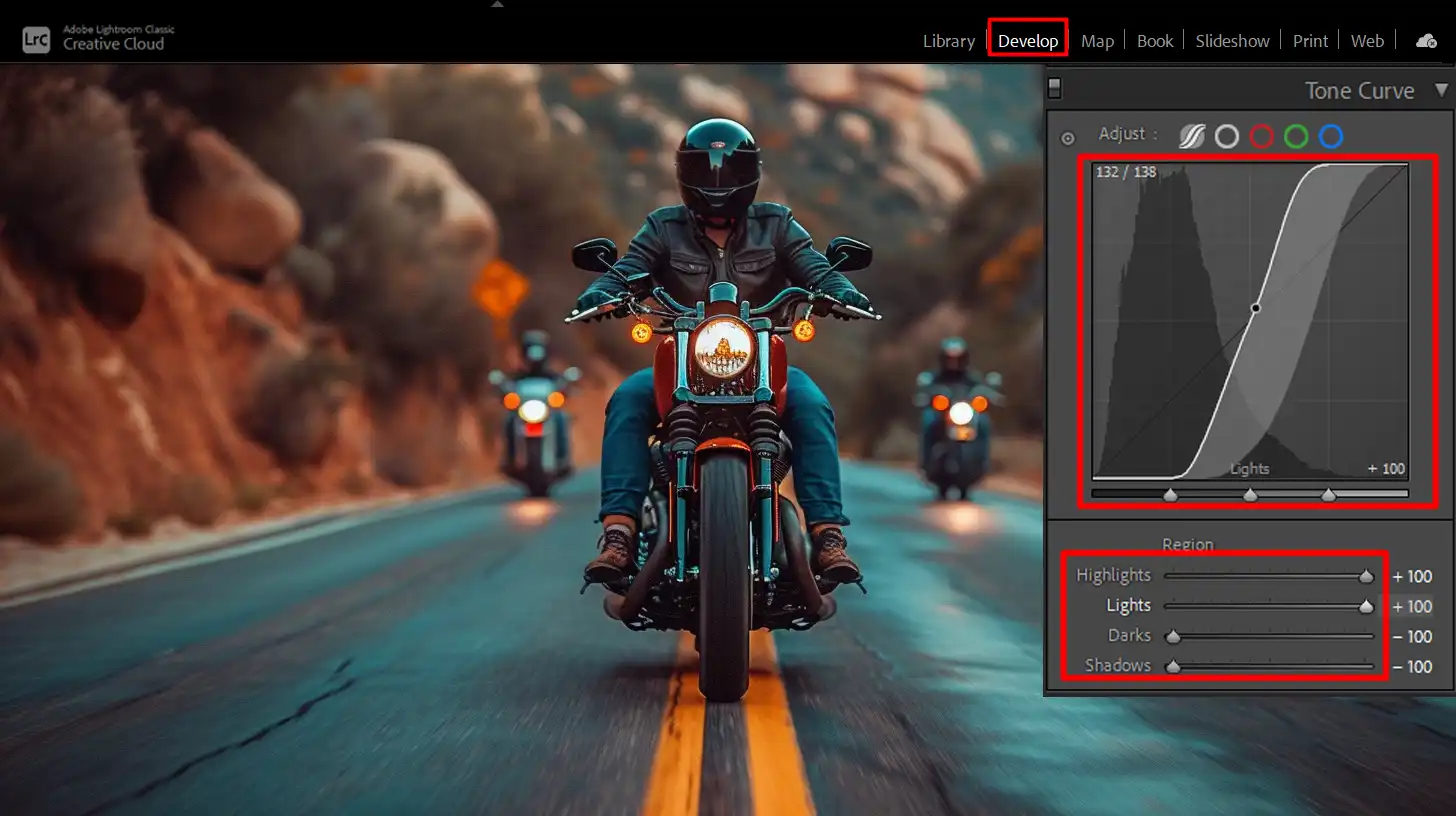
The tone curve lets you make precise adjustments to the photo’s tones. Start with a simple S-curve. This enhances both contrast and brightness, making your photo pop. Adjusting the sliders affects highlights, lights, darks, and shadows.
Example: If you pull the mid-tones down, it darkens the overall image but preserves the darker areas. Don’t be afraid to experiment; the goal is to refine your image without overdoing it.
Steps for Using the Tone Curve
- Open the Tone Curve panel.
- Create an S-curve by adjusting the points on the curve.
- Fine-tune the highlights, lights, darks, and shadows using the sliders.
- Experiment and adjust until you achieve the desired effect.
Color Grading
Color grading adds creative flair to your photos. You adjust color balance individually for shadows, mid-tones, and highlights. Use the color wheels to introduce colors into specific areas.
Pro Tip: For a cinematic look, try a teal and orange scheme. Add teal to shadows and orange to highlights. This technique can evoke different moods cool, warm, dramatic, or serene. Play around until you find what works for your style.
Steps for Color Grading
- Open the Color Grading panel.
- Select the shadows, mid-tones, or highlights wheel.
- Introduce colors by adjusting the color wheels.
- Fine-tune the balance and saturation to achieve the desired look.
Selective Adjustments
Selective adjustments give you control over specific parts of an image. Use tools like the Adjustment Brush, Graduated Filter, and Radial Filter. Want to brighten just one area?
Click the Adjustment Brush, paint over that part, and increase the exposure. These tools allow for targeted changes-making skies bluer, faces lighter, or backgrounds softer.
Pro Tip: When using the Radial Filter, try increasing sharpness around eyes for portraits. It draws focus where you need it most.
Tools for Selective Adjustments
- Adjustment Brush
- Graduated Filter
- Radial Filter
Noise Reduction and Sharpening
Even the best photos can suffer from noise, those pesky little dots you see in low light or high ISO images. To combat this, Lightroom provides noise reduction controls.
Navigate to the Detail panel. Under ‘Noise Reduction‘, increase the Luminance slider slowly. Be cautious not to lose too much detail. On the flip side, sharpening ensures that your images stay crisp. Adjust the Amount slider under the ‘Sharpening’ section.
Note: Over-sharpening can create halos around subjects. Keep the effect subtle for best results.
Pro Tip: Always compare before and after to see if your adjustments need fine-tuning. This is easily done by pressing the backslash (\) key.
To master advanced Lightroom editing, practice using tools like the Tone Curve and Radial Filter for fine-tuning your images. These techniques will help you achieve professional-level results by enhancing both the details and overall quality of your photos
Steps for Noise Reduction and Sharpening
- Open the Detail panel.
- Increase the Luminance slider under 'Noise Reduction' gradually.
- Adjust the Amount slider under 'Sharpening' carefully.
- Compare before and after adjustments using the backslash (\) key.
Organizing Your Photos with Lightroom Tutorial
To keep your photos organized, use collections. Collections group your photos. It’s like creating a virtual album. You can have a collection for each event or theme. This method simplifies navigating through large photo libraries.
Steps to Create a Collection:
- Click on the plus icon next to collections and name it.
- Drag and drop photos into their relevant collections.
Voila! Organization made easy.
Keywording and Metadata
Keywords and metadata are important for finding your photos quickly. Light up the Keywording panel on the right in Lightroom. Add words like “birthday,” “beach,” or “pets”. This way, typing a keyword will showcase all related images. Metadata also includes camera settings.
Steps to Add Keywords and Metadata:
- Select a photo.
- Go to the metadata panel.
- Fill in the details.
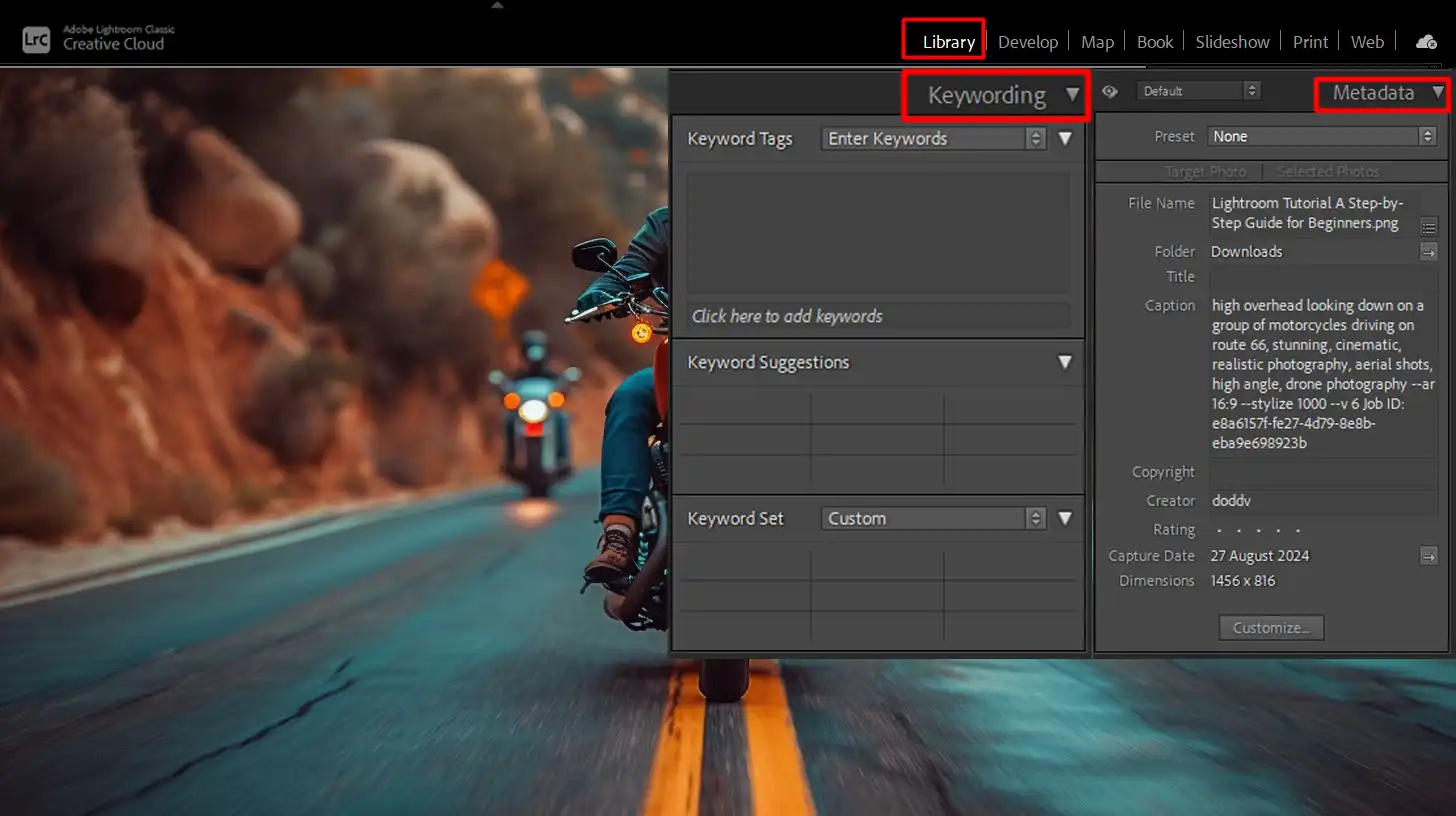
This practice aids in efficient sorting.
Rating and Flagging
Rating and flagging help to sift through heaps of images effectively. Use stars to rate your photos, from one to five. Choose as per your preference, thumbs up for the good ones, crosses for the discardables. Flags help to mark your top picks.
Keyboard Shortcuts for Rating and Flagging:
- Press 'P' for a flag.
- Press 'U' to unflag.
- Press 'X' to reject.
This method highlights which photos deserve further post-processing attention.
Pro Tip: To save time, automate your keywording process. Lightroom offers batch-altering options to apply the same keyword across multiple photos at once. This trick keeps everything methodical. Additionally, consider using Lightroom shortcuts to speed up your workflow.
Sharing on Social Media
Posting your photography on social media can boost engagement and reach. You need to consider a few specifics:
- Export Configuration should align with platform requirements. Different platforms have different preferred dimensions and file sizes.
- To maximize impact, add some post processing tweaks specifically tailored to each network's audience.
- Go to Lightroom’s export configuration, select “specific dimensions,” and set it according to the platform's guidelines (e.g., Instagram favors 1080px).
Once you’ve done this, upload your images directly from your computer or mobile devices. Simple and effective!
Creating Slideshows and Photo Books
If you want to tell a more extended narrative with your photos, consider creating slideshows or photo books. Lightroom facilitates both:
- For slideshows: Select your images, click on "Slideshow" module, and adjust settings like slide duration and transitions. Export as a video file.
- For photo books: Arrange photos in the "Book" module, choose a layout, and export to PDF or directly order from Blurb, a printing service integrated with Lightroom.

Pro Tip: Batch export similar project files if you manage multiple photography guides. This saves time and makes handling your library in Lightroom more efficient.
When sharing on social media, using the right export settings is important to maintaining image quality and maximizing engagement.
Be sure to check out Lightroom Export Settings for Instagram to ensure your photos meet the platform’s preferred dimensions and quality standards.
Lightroom Classic vs. Lightroom CC
If you’re diving into photo refining, you’ve probably heard about Lightroom. But did you know there are two versions? Let’s break down the important differences and figure out which one suits your needs the best.
Deciding between Lightroom Classic and Lightroom CC? Here’s a quick comparison of their key features to help you choose the right version for your photography needs.
| Aspect | Overview |
|---|---|
| Lightroom Classic | Runs locally on your computer, provides advanced editing tools, perfect for handling RAW images, and best suited for professional photographers. |
| Lightroom CC | Cloud-based, allows access to your photos from any device, ideal for photographers who prefer simplicity and mobility with quick edits. |
| Target Users | Lightroom Classic: Advanced users seeking in-depth editing features. Lightroom CC: Beginners or those who value ease of access and basic editing tools. |
| Storage | Lightroom Classic: Stores files locally on your computer. Lightroom CC: Stores photos in the cloud for access across devices. |
| Editing Tools | Lightroom Classic: Offers a comprehensive suite of advanced tools for detailed adjustments. Lightroom CC: Provides simpler, streamlined editing options for quick refinements. |
| Performance | Lightroom Classic: Best for working on high-resolution images with extensive edits. Lightroom cloud editor: Optimized for speed and access across devices, even on mobile. |
Lightroom Classic and Raw Images
When Lightroom pro version runs on your computer. You can organize and edit your photos using a local library.
It offers robust tools for raw images and complex edits. If you’re looking to make use of essential tools in Lightroom, this version provides a comprehensive suite for detailed adjustments.
Lightroom CC
Lightroom CC is cloud-based. It stores your images online, so you can edit them from any device. This is handy if you switch between your desktop and mobile devices. For those who prefer mobility and ease of access, Lightroom CC is a great option.
Which One Should You Use?
If you’re deciding between Lightroom and Lightroom CC, consider whether you need to perform basic edits or if you require all the edits and advanced tools that come with a more comprehensive setup.
Lightroom Classic
Choose Lightroom Classic if you want comprehensive tools. It’s great for professional photographers who need advanced settings.
If you’re into detailed photo editing, understanding the difference between Photoshop and Lightroom can help you decide when to use each tool effectively.
Lightroom CC
Lightroom CC is perfect if you prefer simplicity and mobility. It’s easier for beginners to grasp and works well for quick edits on the go.
Considerations
Consider your workflow and how you import, save, and print your images.
Pro Tip: When you’re ready to share or print your masterpieces, use the export configuration smartly. This aligns with platform requirements and gives your photos the best quality.
Lightroom Tutorials and Resources
New to Lightroom, or perhaps just looking to improve your skills?
Lightroom has a wealth of resources, including guides for both desktop and mobile platforms, so you can build on the techniques mentioned earlier and take full advantage of its features.
Best Online Tutorials
Online guides are a great way to learn Lightroom, especially for those of us who prefer visual learning.
Top Online Guide Platforms:
- Adobe's Official Tutorials: Offers a comprehensive library of guides covering everything from the basics to advanced techniques.
- YouTube: YouTube is a goldmine for learning Lightroom. Channels like "Phlearn," "Peter McKinnon," and "Fstoppers" provide high-quality content regularly.
- Lynda.com (LinkedIn Learning): This platform offers detailed, structured courses on Lightroom that are taught by industry experts.
- CreativeLive: This platform focuses on creative professionals and offers excellent Lightroom workshops and classes.
Recommended Books and Courses
If you prefer to learn at your pace, books and online courses can be very handy.
Notable Books and Courses:
- Photoshop Lightroom Classic Classroom in a Book: This book offers hands-on projects to help you master Lightroom. It also includes practical exercises on how to use Photoshop tools to enhance and edit your images more effectively.
- "The Photoshop Lightroom Classic CC Book for Digital Photographers" by Scott Kelby: This book breaks down complex topics into easy, manageable steps.It provides clear explanations of how to integrate Photoshop techniques with Lightroom for enhanced photo adjusting.
- Udemy: Udemy provides numerous lightweight yet thorough courses on Lightroom at competitive prices. Many of these courses also cover how to use Photoshop in conjunction with Lightroom for advanced photo modifying techniques.
- Masterclass: This platform has photographic art courses helmed by celebrated photographers like Annie Leibovitz, offering you insights into their craft. These courses often include tips on how to use Photoshop to enhance and edit your images like a professional.
Pro Tip: When exploring advanced editing techniques, it’s helpful to understand the difference between Adobe Photoshop and Photoshop Elements. As pivotal tools in the digital workflow of photographers and visual artists, Adobe programs bridge the gap between capturing an image and its final presentation.
This knowledge will guide you in selecting the right tools for your projects, especially when following books and courses that integrate both Photoshop and Lightroom for professional-level editing.
Lightroom Tutorial: Tips and Tricks for Better Editing
When you work with Lightroom, efficiency is significant. One significant way to speed up your workflow is by using keyboard shortcuts.
Just like in Photoshop, these can save you a lot of time. Mastering shortcuts can help you quickly manage and edit your file, ensuring a smoother experience across both Lightroom and Photoshop.
Key Shortcuts:
- Hitting the "D" key switches you to the Develop module instantly.
- Pressing "G" takes you to the Library.
Another tip is to leverage presets. Presets can standardize your post-processing, giving each image a consistent look with just one click.
You can buy or create them and store them in an easy-to-find folder within the Lightroom interface.
Lightroom Tutorial: Advanced Techniques for Professionals
For those who want to take their altering to the next level, understanding how to use advanced techniques is significant.
- Adjustment Brushes: Allows for fine-tuned edits on specific parts of an image, unlike global adjustments.
- Lens Correction and Dehaze Tools: Lens Correction and dehaze tools can dramatically improve the visual quality of photos by correcting distortions and clarifying images. Ideal for landscape photographic art.
Pro Tip: Always make a habit of frequently backing up your Lightroom catalog. Losing all your hard work due to a technical glitch can be heartbreaking.
As a photographer, it’s also wise to back up your Photoshop file to ensure that all your creative work is protected and safe from unexpected issues.
Frequently Asked Questions

How long does it take to learn Lightroom?
The time it takes to learn Lightroom depends on your dedication and prior experience. For a beginner:
- 1-2 weeks to become comfortable with basic tools.
- 1-2 months for mastering intermediate editing skills.
- 3-6 months for advanced techniques and workflow efficiency.
Which skills can I learn from a Lightroom guide as a beginner?
- Importing and organizing photos: Learn how to import photos into Lightroom and manage your photo library efficiently.
- Basic editing techniques: Understand how to adjust exposure, contrast, and color to enhance your images.
- Working with presets: Discover how to use Lightroom’s built-in presets for quick edits or create your own custom presets.
- Exporting and saving images: Learn how to export your edited photos in various formats and for different platforms.
What are the best basic editing tools to use in Lightroom tutorial for beginners?
- Crop Tool: Allows you to crop and straighten your images for better composition.
- Exposure Slider: Adjusts the overall brightness of your image.
- White Balance: Corrects the color temperature of your photos to make them look natural.
- Tone Curve: Refines the brightness and contrast in specific areas of your image.
- Clarity and Vibrance: Enhances the midtones and colors, giving more punch to your photos.
What are the important features covered in a Lightroom tutorial?
- The Develop Module: Focuses on photo editing, including adjustments for exposure, color, tone, and more.
- Adjustment Brushes and Filters: Covers tools for applying selective edits to specific parts of your photo.
- Presets and Profiles: How to use or create presets for consistent editing styles.
- Photo Management: Teaches organizing, cataloging, and rating photos for easier workflow
- Export Configuration: Explains the options for exporting images with different resolutions and formats for print or online sharing.

Conclusion
In this Lightroom tutorial, we’ve covered some important aspects of using Lightroom to enhance and organize your photos. From basic adjustments to managing your photo library, Lightroom can make your photo editing process smoother and more efficient.
If you want to dive deeper into both Photoshop and Lightroom, check out my Photoshop Course and Lightroom Course. These courses offer step-by-step guides to help you master the software. Also, you might want to explore Adobe’s Photoshop and Lightroom for the latest features. Keep practicing, and soon, you’ll be creating stunning photos with ease!
Read more about Photoshop:


Course

Light Effect Photoshop


Lightroom Course 2025

Adobe Photoshop Course 2025

Photo Editing Course


