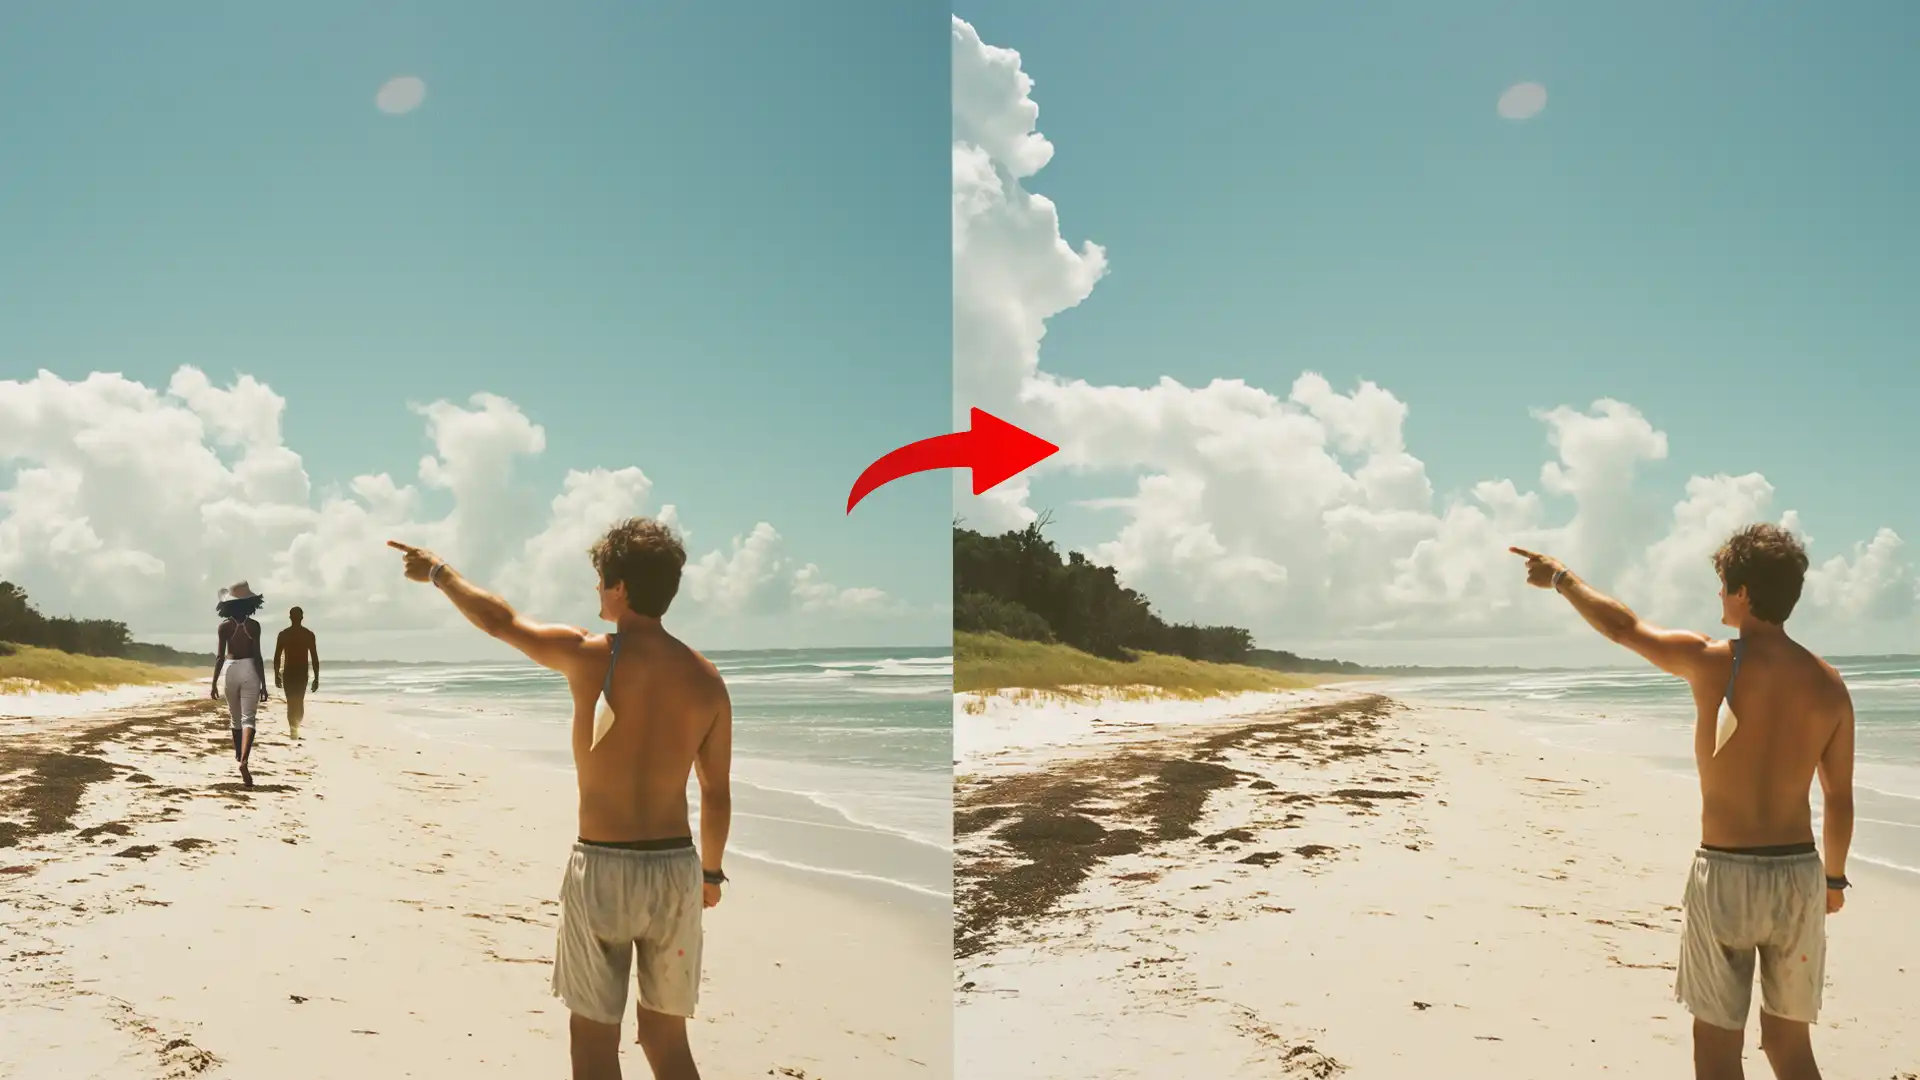
Ever found yourself with a perfect photo marred by an unwanted person in the background? In this article, I’ll show you how to use Lightroom to remove person from your images seamlessly.
Imagine having the power to edit your photos just the way you want, eliminating distractions and focusing on the subject that truly matters.
Whether you’re a seasoned photographer or a casual hobbyist, mastering this skill can elevate your photo editing game to the next level.
Stay with me, and you’ll discover the step-by-step process to make your photos shine, free from unwanted elements.
Ready to dive in?
Table of Contents
Understanding Tools for Removing People in Lightroom
Sometimes, we capture the perfect shot, but unexpected elements ruin it. The bustling tourists in a serene landscape, an accidental photobomb in a family portrait, or distracting elements can disrupt the visual appeal.
These elements can be anything from unwanted objects to entire people who somehow manage to sneak into your otherwise perfect images.
At times, removing these elements brings focus to the main subject. With tools in Lightroom, removing people is straightforward and time-efficient.
Overview of Lightroom Tools
Let’s dive into how to use some of the essential tools in Lightroom to remove objects.
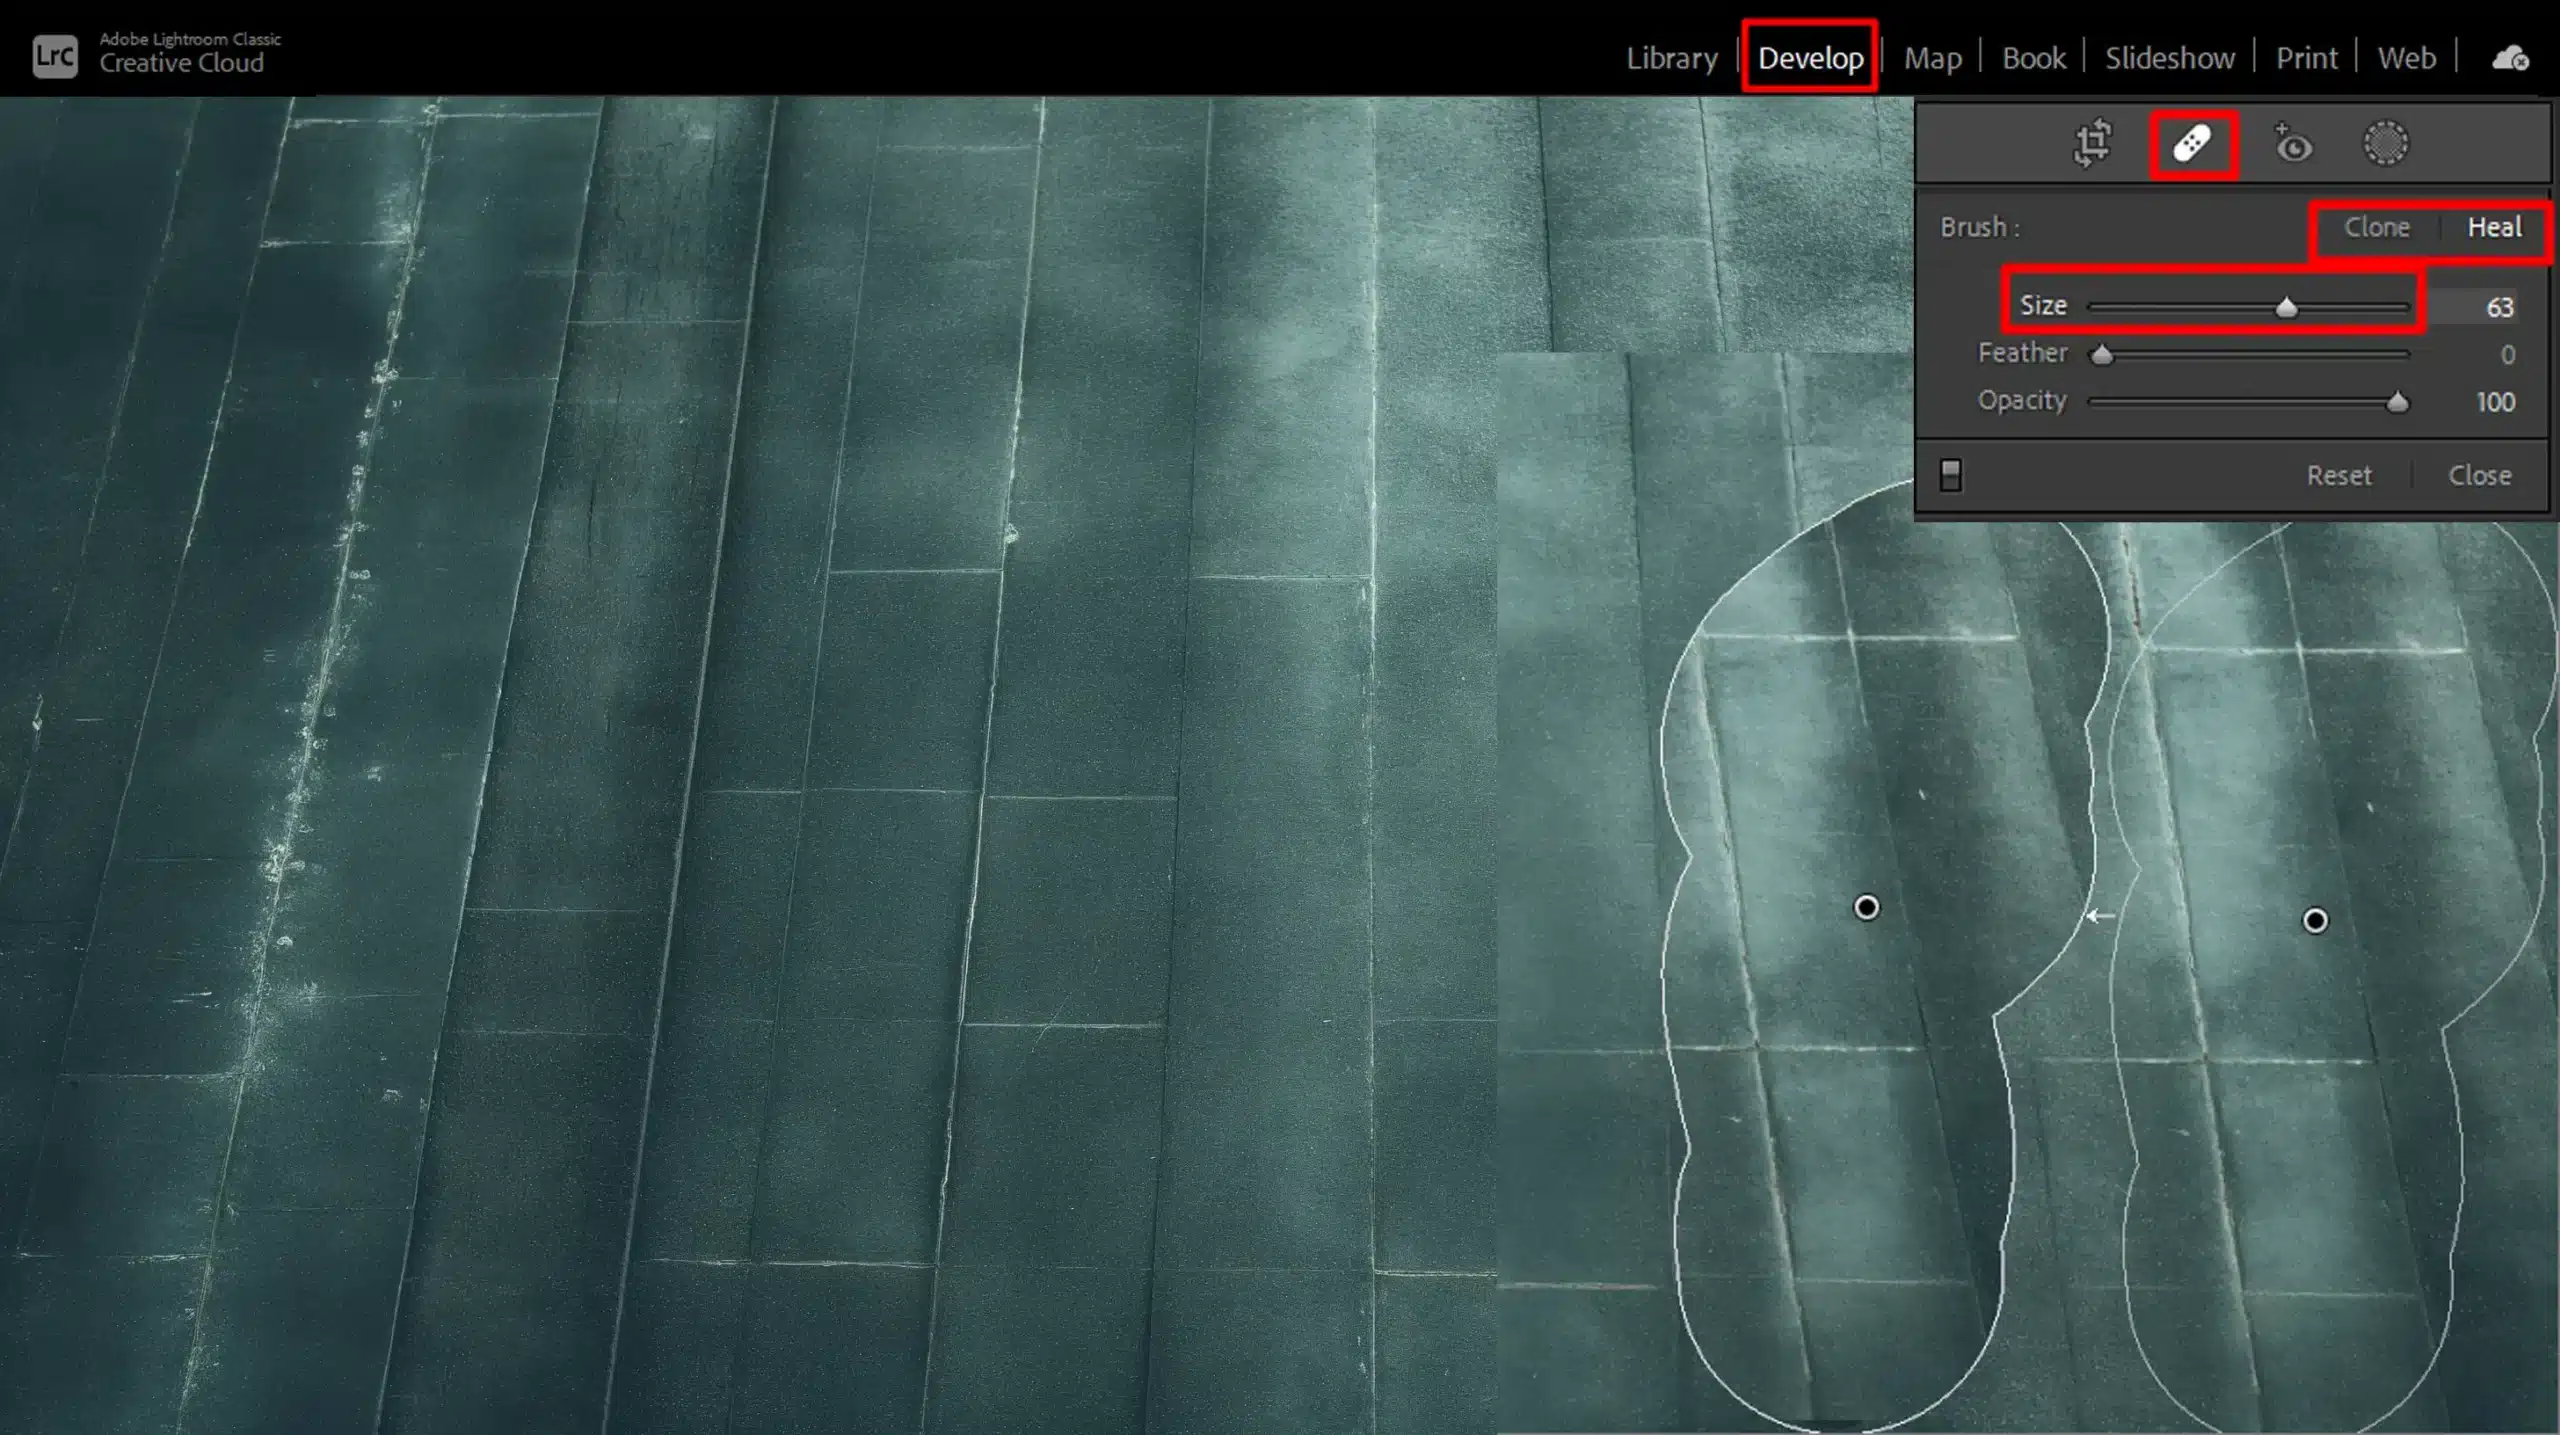
First, open your image in the Develop Section. You will primarily use the Spot Removal Tool. It has two modes: Clone and Heal. The clone tools copies one part of your image to another.
It’s great for removing unwanted objects with more uniform backgrounds. The heal tools, on the other hand, blends the area with nearby pixels, making it perfect for more multifaceted backgrounds.
You can also use the content-aware remove for even better results. This tool analyzes the surrounding area and automatically samples a suitable replacement.
First, select the tool. Adjust the brush size according to the area you want to remove. Apply the tool and let Lightroom intelligently replace the unwanted element. The refined button can help you fine-tune your edits if needed.
For more control, Lightroom offers various features that can adjust the sample area or source area, ensuring a seamless blend.
How to Use the Spot Removal Tool
- Select the Spot Removal Tool.
- Choose between Clone and Heal mode.
- Adjust the brush size to fit the area you want to edit.
- Click on the unwanted person or object to remove it.
- Fine-tune if necessary, using the refine button for better precision.
Managing Complex Backgrounds
Removing people or objects from complex backgrounds like a busy street or a textured wall can be trickier.
The Content-Aware Remove tool works well in such scenarios as it seamlessly blends elements.
Sometimes, manual adjustments using the clone tools or heal tool become necessary for more complex objects.
Using Advanced Techniques
When dealing with larger or more complex objects, break down the process into smaller sections.
First, remove the significant parts, then address the remaining fragments using smaller brush sizes. Regularly zoom in and out to ensure your edits look natural.
The healing brush helps blend edges and avoids hard lines where replacements meet the source image.
The Clone Stamp Tool in Photoshop is a key component when using advanced techniques for photo editing.
By mastering this tool, you can refine and perfect your images with precision.
Tips and Tricks
Using a combination of tools grants a more polished result. Sometimes, adjusting the light and color after removing objects maintains consistency in the photo. Regular practice makes these techniques second nature.
Pro Tip: Always keep an original copy of your image before making any significant edits. This way, you can revert to it if needed.
Use the bandage icon to switch to the Spot Removal Tool in Adobe Lightroom quickly.
Essential tools in Photoshop are crucial for applying effective tips and tricks in your edits.
Understanding these tools enhances your workflow and results.
Using the Clone Tool to Remove Unwanted Elements
The Clone Tools in Lightroom is a lifesaver for those looking to clean up their images effortlessly. It’s especially useful to remove objects or people who don’t belong in your shot.
You can think of it as a digital copy-and-paste feature where you can replicate a portion of an image and replace an unwanted part.
This tool in Lightroom works well for simple backgrounds and uniform textures like blue skies or grassy fields. It’s user-friendly, and once you get the hang of it, you’ll be cloning away unnecessary objects like a pro.
Step-by-Step Guide to Using the Clone Tool
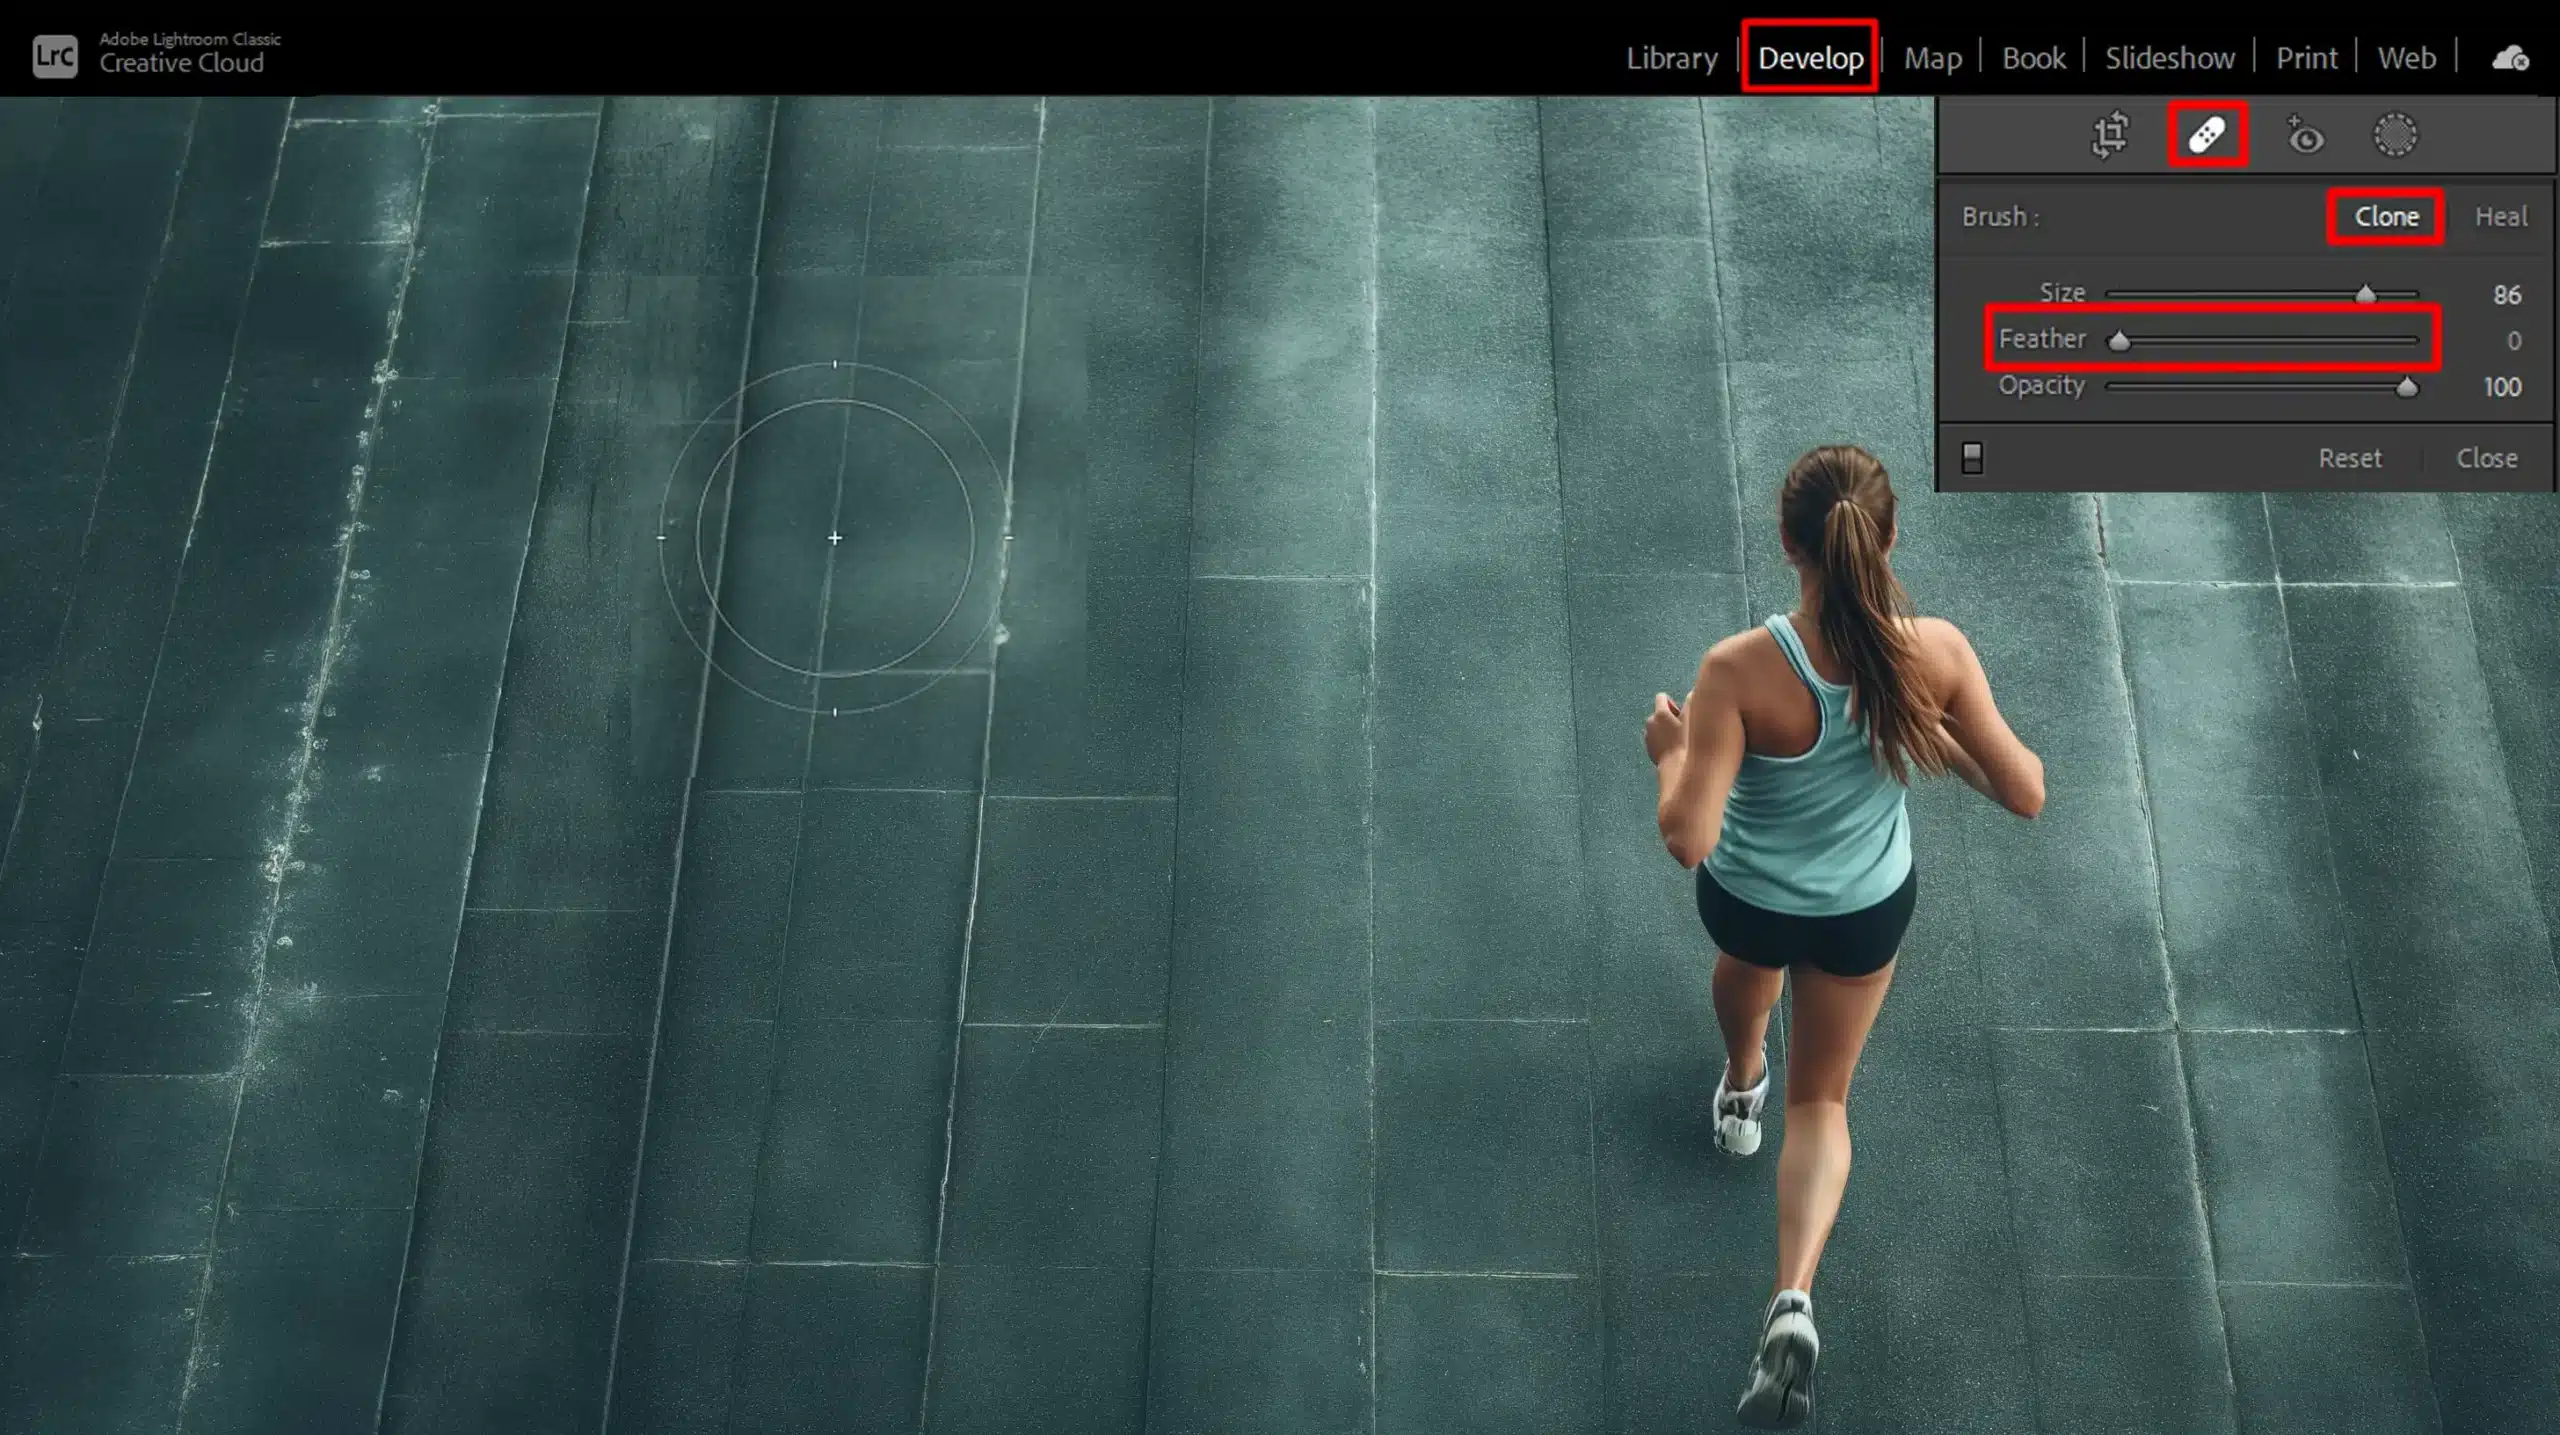
- Open Lightroom and navigate to the Develop Module.
- Select the Clone Tools from the toolbar.
- Adjust the Brush size to fit the area you want to clone.
- Click on the unwanted area in your photo. Lightroom will automatically sample a replacement area. You can move the sample area if needed to achieve a better match.
- Fine-tune the cloned area by adjusting opacity and feathering settings until the replacement pixels seamlessly blend with the rest of the image.
Remember, practice makes perfect. Use smaller brush sizes for detailed work, especially when working with textured backgrounds or edges. A little patience can make a big difference in the final outcome.
Tips for Effective Cloning
- Blend Edges Carefully: Use the feathering option to create softer edges that blend smoothly with the surrounding pixels.
- Keep Original Copies: Always duplicate your original image before making significant edits.
- Multiple Small Clones: For larger undesired elements, break them down into smaller sections and address each part separately.
- Regularly Zoom In and Out: This ensures that your cloned areas look natural both up close and from a distance.
For complex fixes, don’t hesitate to use a combination of tools, including the healing brush and the clone tool. Each has its unique strengths and together, they create a polished final image.
Pro Tip: When dealing with busy backgrounds or intricate details, mixing the clone tool with the Content–Aware Fill in Photoshop feature can yield stellar results. This combination leverages the strength of both tools for seamless editing.
Using the Heal Tool for Removing Unwanted Objects
The Heal Tools in Lightroom is a lifesaver for editing photos. Unlike the Clone Tool, the Heal Tools blends undesired elements with the surrounding area.
This makes it indispensable for more complex fixes. You find this tool in the Develop Section, readily available for your next editing session.
Step-by-Step Guide to Using the Heal Tool
Begin by opening your image in Lightroom. Navigate to the Develop Module and select the Healing Tool.
Adjust Your Brush
Modify the brush size according to the area you want to heal.
Smaller brushes are ideal for minor blemishes.
Larger brushes handle more substantial repairs.
Select the Unwanted Area
Click on the undesired elements you want to remove. Lightroom will pick a target area for blending automatically. If it doesn’t look right, you can adjust it manually.
The goal is to make the fix look as natural as possible.
Fine-Tune Your Adjustments
Use the opacity and feathering sliders to further blend the healed area. This ensures that the edited part matches the surrounding image.
Common Mistakes and How to Avoid Them
Avoid overusing the healing tool. It can lead to unnatural-looking edits. Sometimes, multiple small adjustments work better than one large one.
Not Zooming In
Always zoom in to see the finer details of your edits. Small errors can become noticeable when you print or view the image on a larger screen.
Ignoring Feathering
Feathering smooths the edges of your correction. Not using it can make the healed area stand out.
Relying Only on the Heal Tool
Combine the healing tool with content aware remove features for better results. Often, using another feature like content aware remove works wonders for intricate edits.
Choosing the Wrong Target Area
Selecting an inappropriate target zone can make the fix look weird. Always make sure the target area closely resembles the unwanted area.
Pro Tip: When working on detailed backgrounds like power lines against a blue sky, zoom in and take your time. Patience is key for a clean edit.
For those looking to elevate their editing skills, understanding the difference between Photoshop and Lightroom can be beneficial.
Each tool offers unique features that can enhance your workflow.
Advanced Techniques for Removing People in Lightroom
Removing undesired elements from photos is a common challenge. Lightroom offers powerful tools to assist with this task.
Below, we’ll explore advanced techniques to achieve seamless results when you need to remove objects, people, or other disruptions in your images.
Combining Tools for Best Results
Using a single tool might not suffice for intricate edits. Combining multiple tools often yields the best results:
- Spot Removal Tool: Useful for smaller areas, such as blemishes or tiny unwanted pixels. Select "Heal" or "Clone" modes for different needs.
- Content Aware Remove: Perfect for larger sections. This feature intelligently fills the area based on surrounding pixels, ensuring the edit looks natural.
- Manual Adjustments: Always refine the automated edits. Adjust opacity, feathering, and source points for the best match.
Mix and match these tools to see which combination works best for your specific photo.
Using Layers and Masks
Layers and masks are fundamental in photo editing. They offer control and non-destructive edits:
- Adjustment Layers: Introduce subtle changes without altering the source image. Use these layers to tweak shadows, highlights, and color tones.
- Masks: These create precise edits by isolating areas. Paint over sections to apply or remove effects selectively.
- Refine Edits: If your initial attempt isn't perfect, you can always go back and adjust the mask or layer settings. Retouch until satisfied.
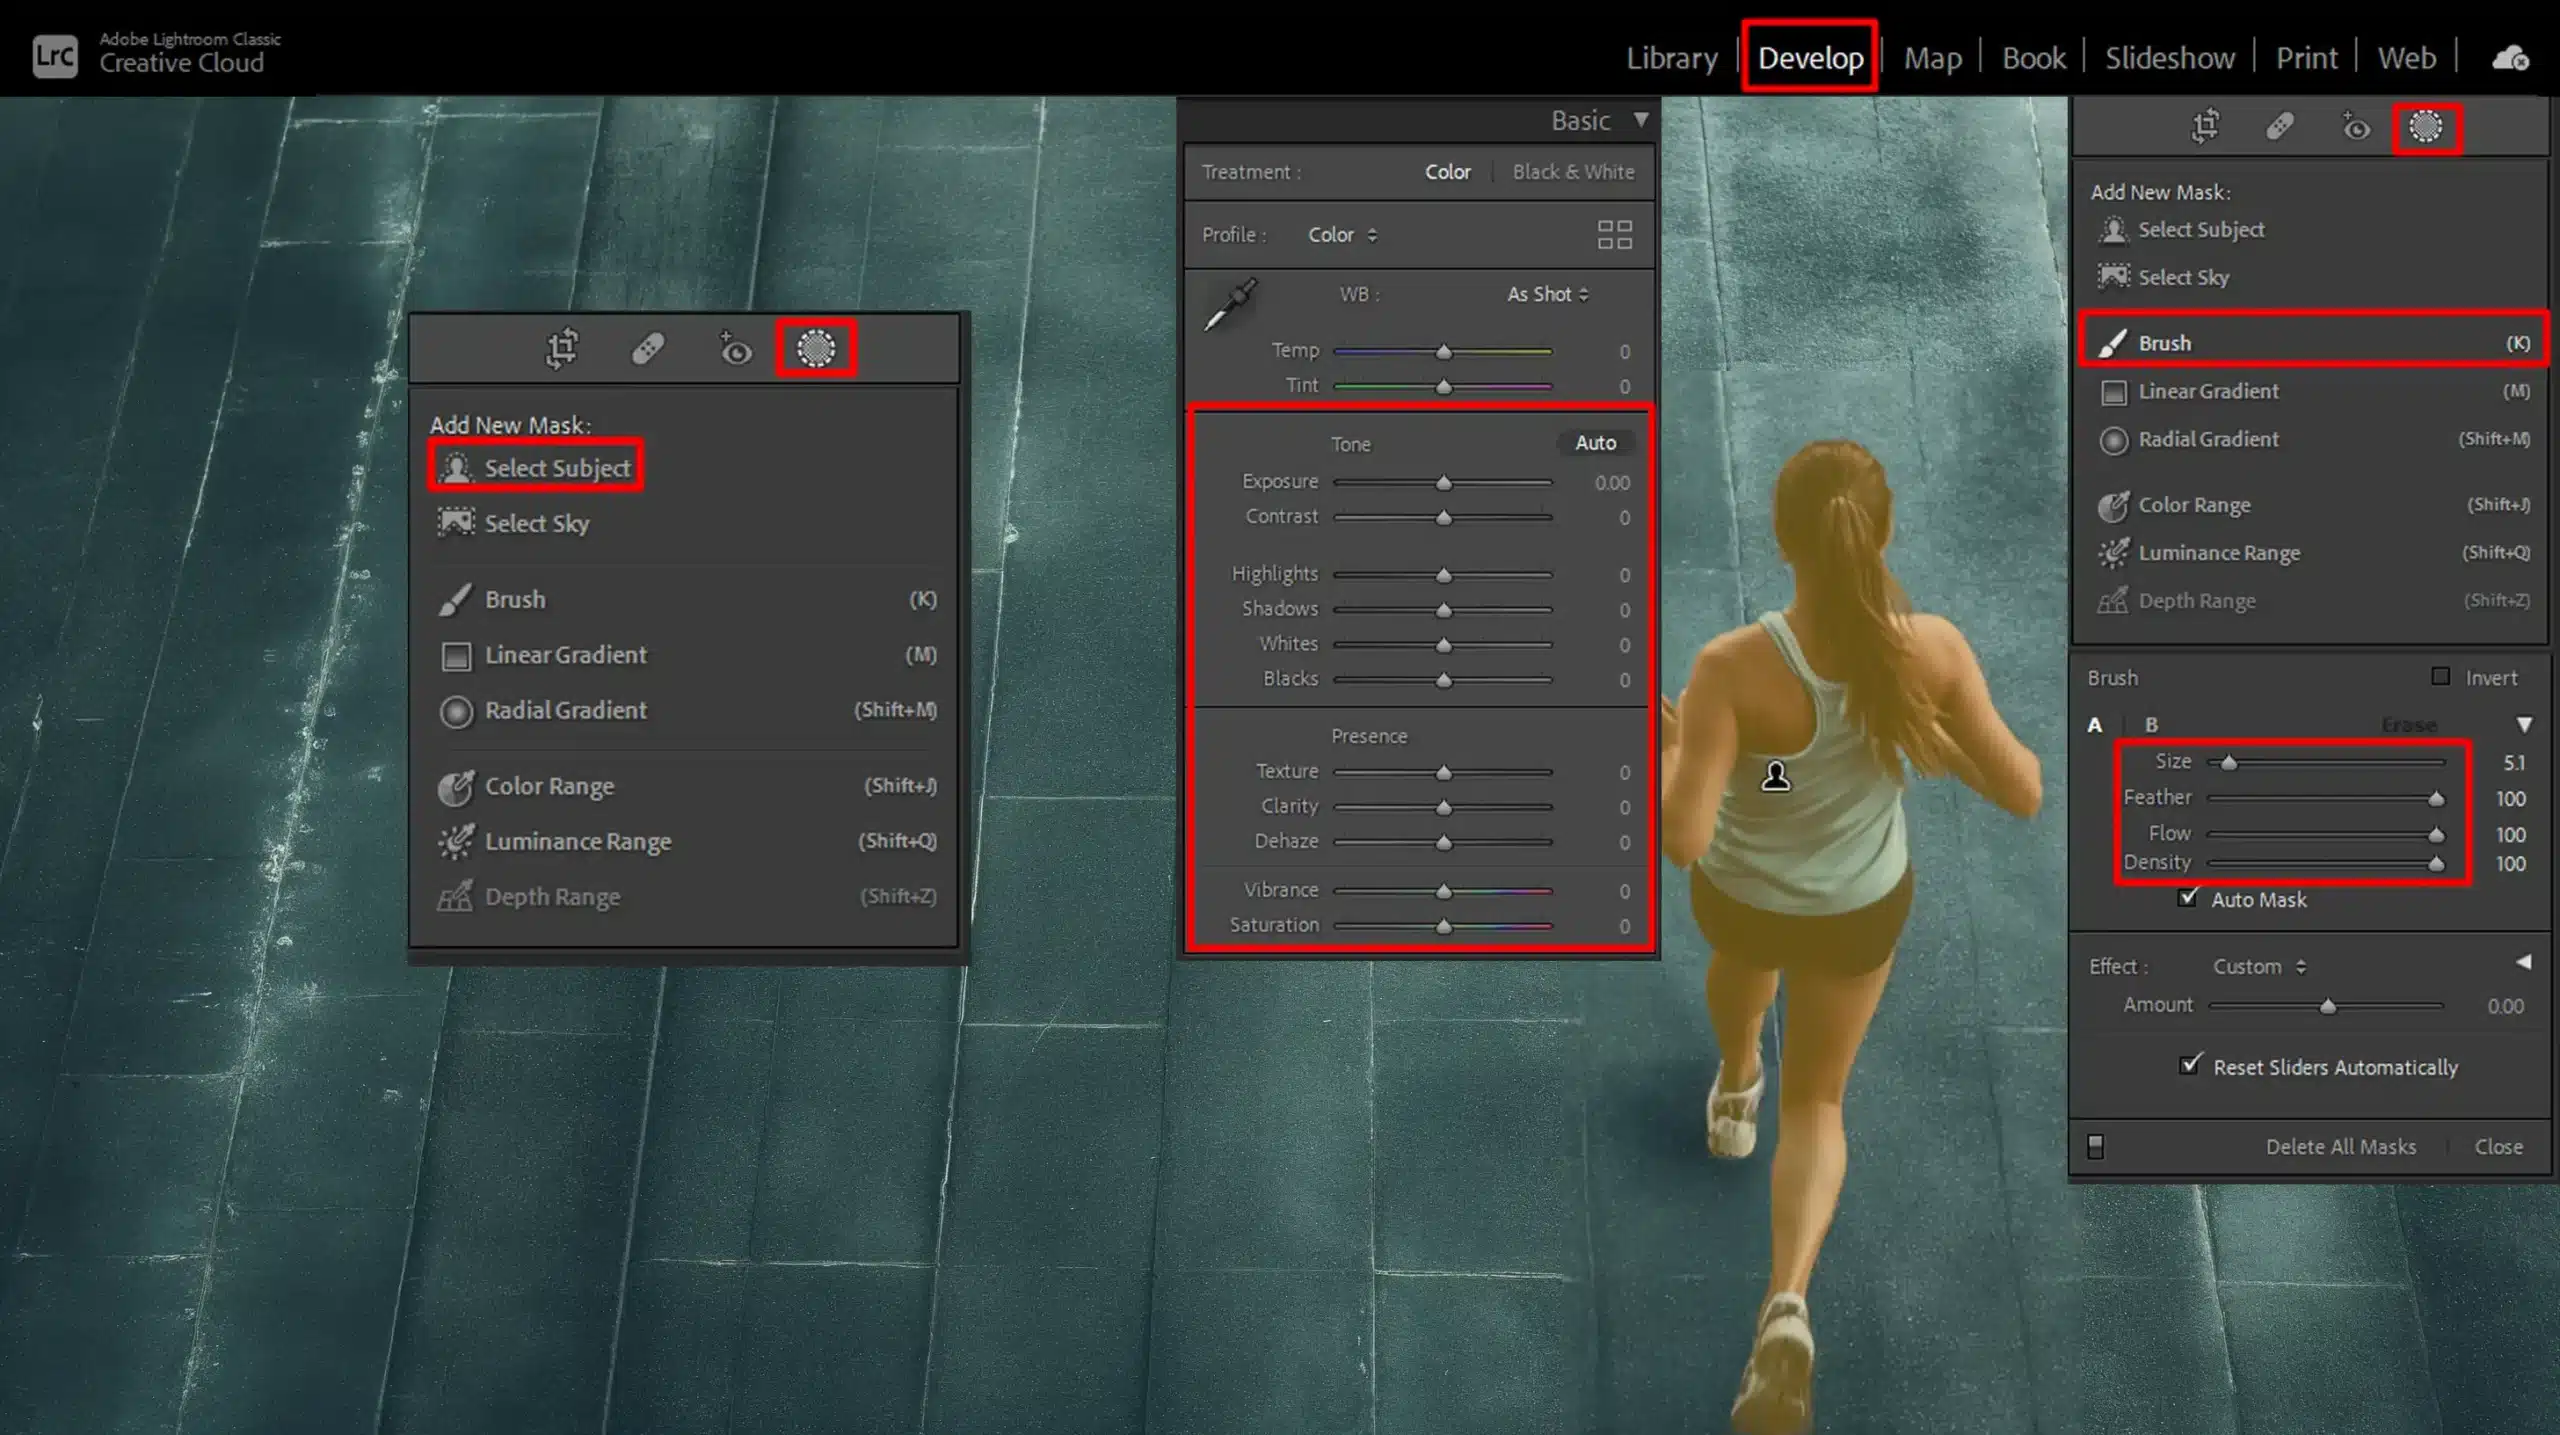
Remember, precision and patience are key when using layers and masks effectively.
Editing Shadows and Highlights
Shadows and highlights play a crucial role in making an edit look realistic:
- Match Lighting: Ensure the area's lighting matches the surrounding environment. Use the brush tool to adjust luminosity subtly.
- Feathering: Smooth out transitions. Use feathering to blend edges seamlessly.
- Color Balance: Maintain consistency in color tones. Use the color balance sliders to achieve a uniform appearance.
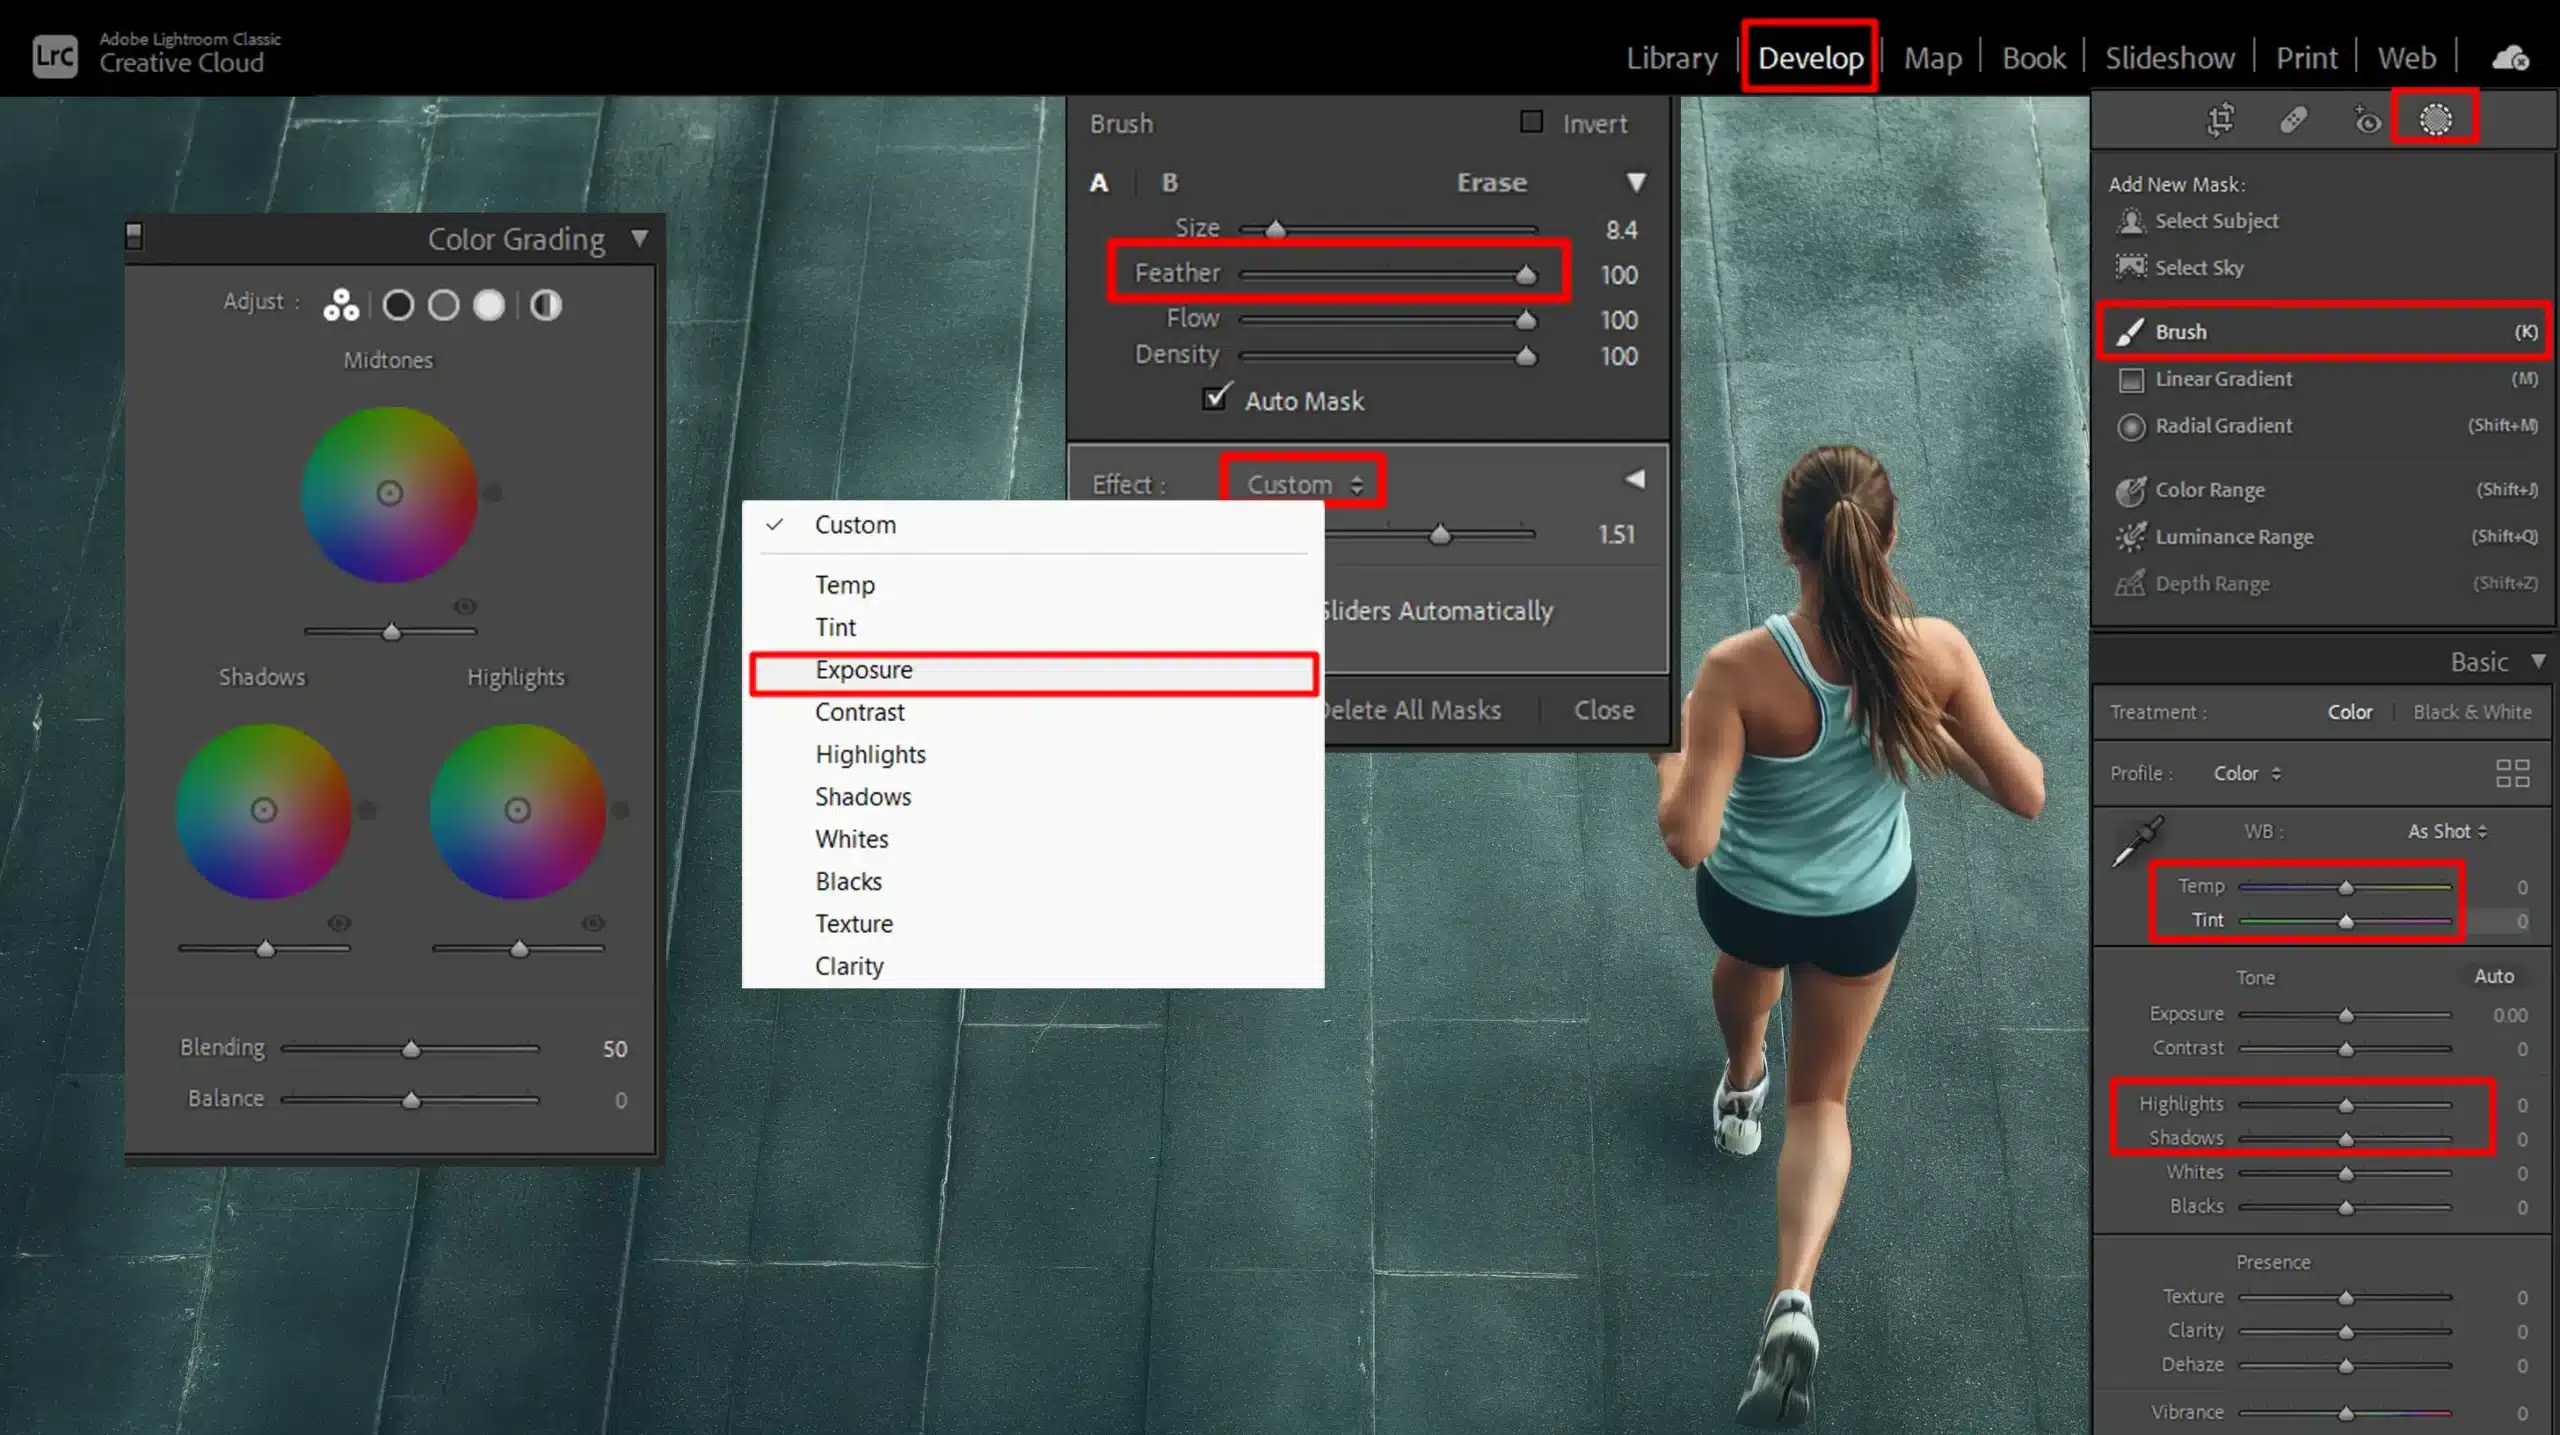
Attention to detail here makes your edits indistinguishable from reality.
Pro Tip: When performing complex edits, take regular breaks. These pauses help you return with fresh eyes, allowing you to spot areas needing improvement.
With practice and attention to detail, removing undesired elements using Lightroom becomes easier. The goal is to make the edits look natural and seamless, enhancing the photo’s overall appearance.
Practical Examples and Case Studies
First things first, let’s dive into some practical examples. Photos speak louder than words. Seeing the results can make the techniques more understandable. Before and after examples show you how simple tweaks make a significant impact.
Imagine a photo with a random bystander in the background. Using the Content-Aware Fill in Photoshop tool, that distraction disappears.
The final image looks cleaner and more focused on the main subject.
Removing a background in Photoshop is a powerful technique for many projects. Practical examples and case studies reveal how this method can enhance your images and streamline your workflow.
| Aspect | Overview |
|---|---|
| Understanding Your Drone’s Camera and Settings | Learn about key camera settings like ISO, shutter speed, aperture, white balance, and picture profile/color mode to enhance image quality. |
| Flight and Safety Precautions | Conduct pre-flight checks, practice basic maneuvers, and understand no-fly zones to ensure safety and compliance. |
| Essential Add-Ons for Enhanced Photography | Utilize accessories like ND filters, extra batteries, and carrying cases to improve the photography experience. |
| Creative Techniques and Composition | Explore different angles and composition techniques to capture unique and visually interesting shots. |
| Advanced Flying Techniques | Develop skills in advanced flying maneuvers such as orbiting, revealing, and tilt-revealing to create dynamic footage. |
| Editing and Post-Processing | Use color correction, cropping, and HDR processing to refine images and bring out their best qualities. |
| Staying Current with Regulations | Stay informed about FAA guidelines and local laws to ensure legal and safe drone operation. |
Case Study: Removing Tourists from Landmark Photos
Visiting a landmark only to find it swarmed with tourists. You want a clean shot. This is where Photoshop comes to the rescue. Here’s an interesting case study:
A photographer visited the Eiffel Tower on a busy day. Tourists were everywhere. Using the remove an object in Photoshop, the photographer erased the tourists. The final image showcases the tower in all its glory, uninterrupted.
How did they do it? They selected each tourist and clicked “Remove”. It took patience and practice but paid off handsomely.
Case Study: Cleaning Up Street Photography
Street photography captures the essence of urban life. Yet, it often includes undesired elements like trash cans or power lines. Again, Lightroom and Photoshop come to the rescue.
Here’s a quick example:
A street photographer snapped a bustling New York street. But a pile of garbage ruined the aesthetic. Using the Adobe AI feature in Photoshop, they removed the trash seamlessly.
The result? A cleaner, more pleasing image.
The Adobe AI feature works wonders by filling in gaps intelligently. It’s like magic but grounded in technology. In this case, it analyzed the surroundings and filled in the space accurately.
Generative AI in Lightroom offers advanced capabilities for removing a person from an image by intelligently analyzing and synthesizing surrounding areas.
This technology provides seamless integration, ensuring that the edited area blends naturally with the rest of the photo.
Pro Tip: Always zoom in and out frequently while editing to catch minor details.
Using the Spot Healing Brush Tool in Photoshop is essential for cleaning up street photography.
Practical examples show how this tool effectively removes unwanted distractions from your shots.
Frequently Asked Questions

Can you remove a person from a photo in Lightroom?
- Yes, you can remove a person from a photo in Lightroom using the spot removal tool or the clone/heal options to paint over the person you want to remove.
Does Lightroom have object removal?
- Lightroom offers basic object removal capabilities through the spot removal tool, which can be used to remove small objects or imperfections.
How do I get out of people mode in Lightroom?
- To exit people mode in Lightroom, simply click on another module like 'Library' or 'Develop'. People mode is part of the 'Library' module where faces are tagged and organized.
How do I delete a profile in Lightroom CC?
- To delete a profile in Lightroom CC, go to the 'Profile Browser', right-click on the profile you wish to delete, and select 'Delete'. Note that you cannot delete default profiles provided by Lightroom.
Conclusion
Removing a person from your photo in Lightroom is easier than you might think.
From my own experience, I’ve found that using the Spot Removal Tool, whether you choose Clone or Heal, can make a huge difference in achieving a clean edit.
By mastering these techniques, you can focus on what really matters in your images and create stunning results.
If you’re interested in diving deeper, check out my Photoshop Course and Lightroom Course for more tips and tricks.
For additional learning, you can explore a range of online courses to further enhance your skills.
You can also explore the latest features in Adobe Photoshop and Adobe Lightroom to enhance your editing skills even further.
Read more about Photoshop:


