Lightroom Macro: Enhance Your Close-Up Photography
Lightroom Macro: Enhance Your Close-Up Photography
As a photographer, discovering the power of a Lightroom macro can be a game-changer. Imagine automating repetitive tasks to save time and enhance your workflow efficiency.
Many of us are searching for ways to streamline our editing process without sacrificing quality.
In this article, I’ll get into the world of Lightroom macros, showing you how they can transform your editing routine.
Let’s explore how these handy tools can elevate your photography game to the next level.
Table of Contents
Understanding the Lightroom Macro
So, you’ve heard about Lightroom macros, and you’re curious about how they can revolutionize your editing experience.
Let’s take a closer look at what they are and how they can benefit you.
What is Lightroom Macro?
In simple terms, a Lightroommacro is like a script. It automates repetitive tasks in Adobe Lightroom.
Macros let you apply the same settings or edits across multiple images with just one click.
Imagine editing hundreds of images without having to repeat the same steps over and over.
Elevate your editing workflow with important Lightroom accessories. These tools enhance Lightroom’s capabilities, streamlining processes and unlocking creative potential for photographers seeking optimal results.
Benefits of Using Lightroom Macro
Saves Time: No more wasting hours on repetitive tasks. One macro can speed things up immensely.
Consistent Edits: Ensures all your photos have a uniform look. No detail gets missed.
Easy Workflow: Simplifies the editing workflow. Creating macros organizes your editing plan.
Setting up these macros could transform how you use Lightroom Classic. Imagine the professional touch added to your images without much effort.
Creating Your Own Macros
Ready to run your own Lightroom macros?
Follow these steps:
Open Lightroom Classic.
Navigate to your Develop module.
Make the desired edits to your image.
Save these settings as a preset.
Use the saved preset as a macro to bulk edit your images.
Lightroom Classic’s tools like presets and macros make editing not only easier but also fun.
Setting Up Lightroom Macro
First, you need to have Lightroom Classic installed on your computer. Once you have it sorted, you’ll move on to adding the plugin for macros.
Download the suitable macro plugin for Lightroom Classic. This step involves navigating to the plugin website or resource center, where you'll find various options. Choose one that promises easy setup and integration with Lightroom.
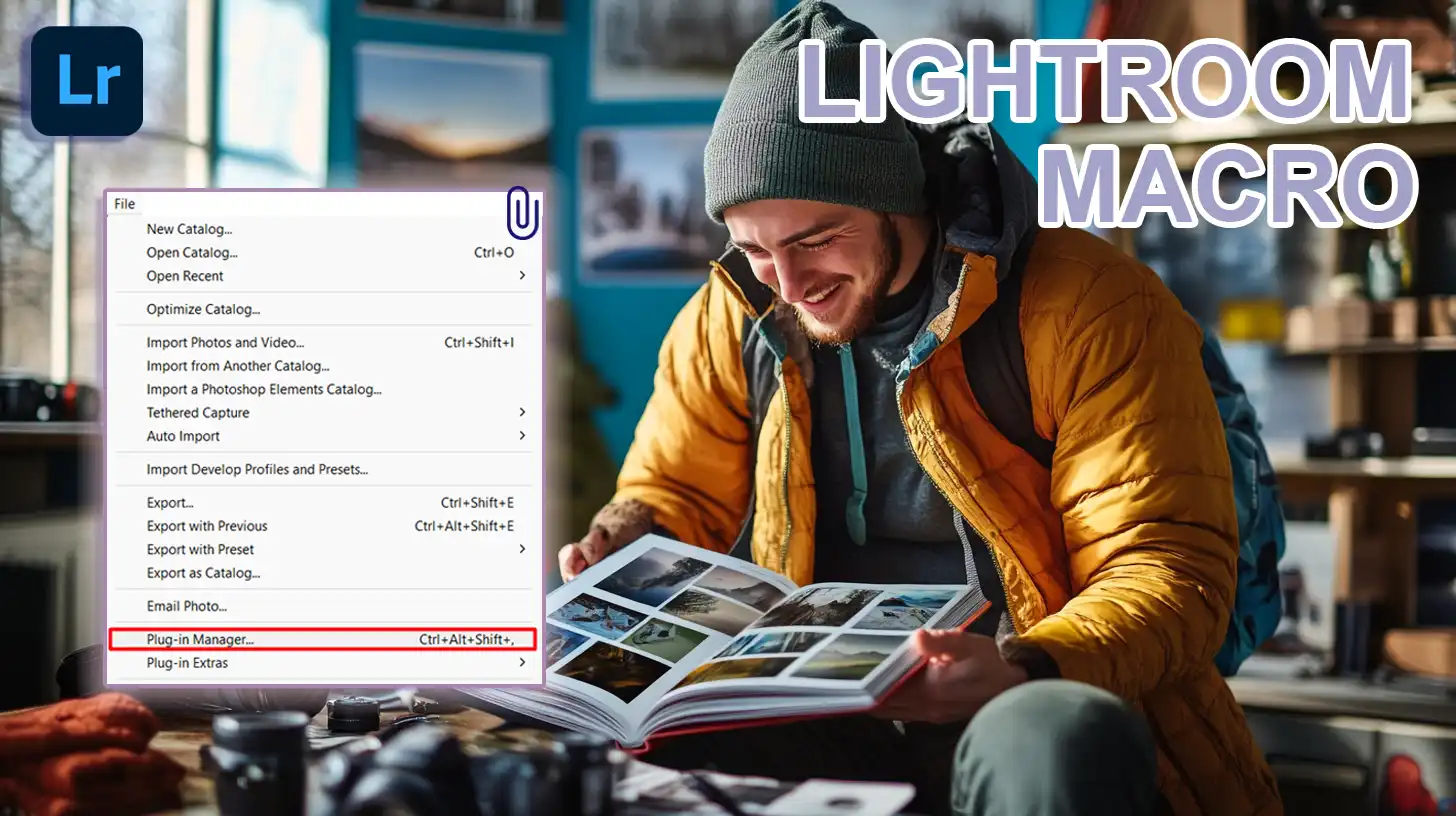
After downloading, open Lightroom Classic, go to the 'File' menu and select 'Plugin Manager'.
Click 'Add'. locate your downloaded plugin, and then hit 'Add Plugin'. That's pretty much it for the installation part. Lightroom should now recognize the new plugin.
When setting up Lightroom macros, using the best plugins for Lightroom can enhance your workflow even further.
Explore the top plugins in Lightroom to streamline your editing process and make your macros even more effective.
Configuring Lightroom Macro Settings
Now, let’s move on to configuring the macro settings.
What do we mean by this?
Essentially, setting up how you want your macros to function within Lightroom Classic to save you even more time.
Begin by opening the 'Plugin Manager' again, click on your newly added plugin, and then go into its settings panel.
You'll see various configuration options such as hotkeys, macro categories, and editing sequences.
Set up the hotkeys for your frequently used functions. This ensures smooth and quick operation without continual mouse clicks.
Configure the categories based on your editing needs. For example, have different macros for color correction, exposure adjustments, or cropping. This categorization optimizes your edit workflow.
Save these settings and start using them right away. A clear benefit is the speed at which you can now perform repetitive tasks that would otherwise take forever.
Pro Tip: To get even faster, create Lightroom presets before setting your macros. Then, integrate these presets into your macros for a seamless workflow transition from start to finish.
Using Lightroom Macro for Editing
If you love editing your photos but hate repetitive tasks, Lightroom macros can be a game-changer.
Let’s start with how you can simplify your editing process using Lightroom Classic.
Basic Editing with Lightroom Macro
First, open Lightroom Classic. Already done with that? Perfect.
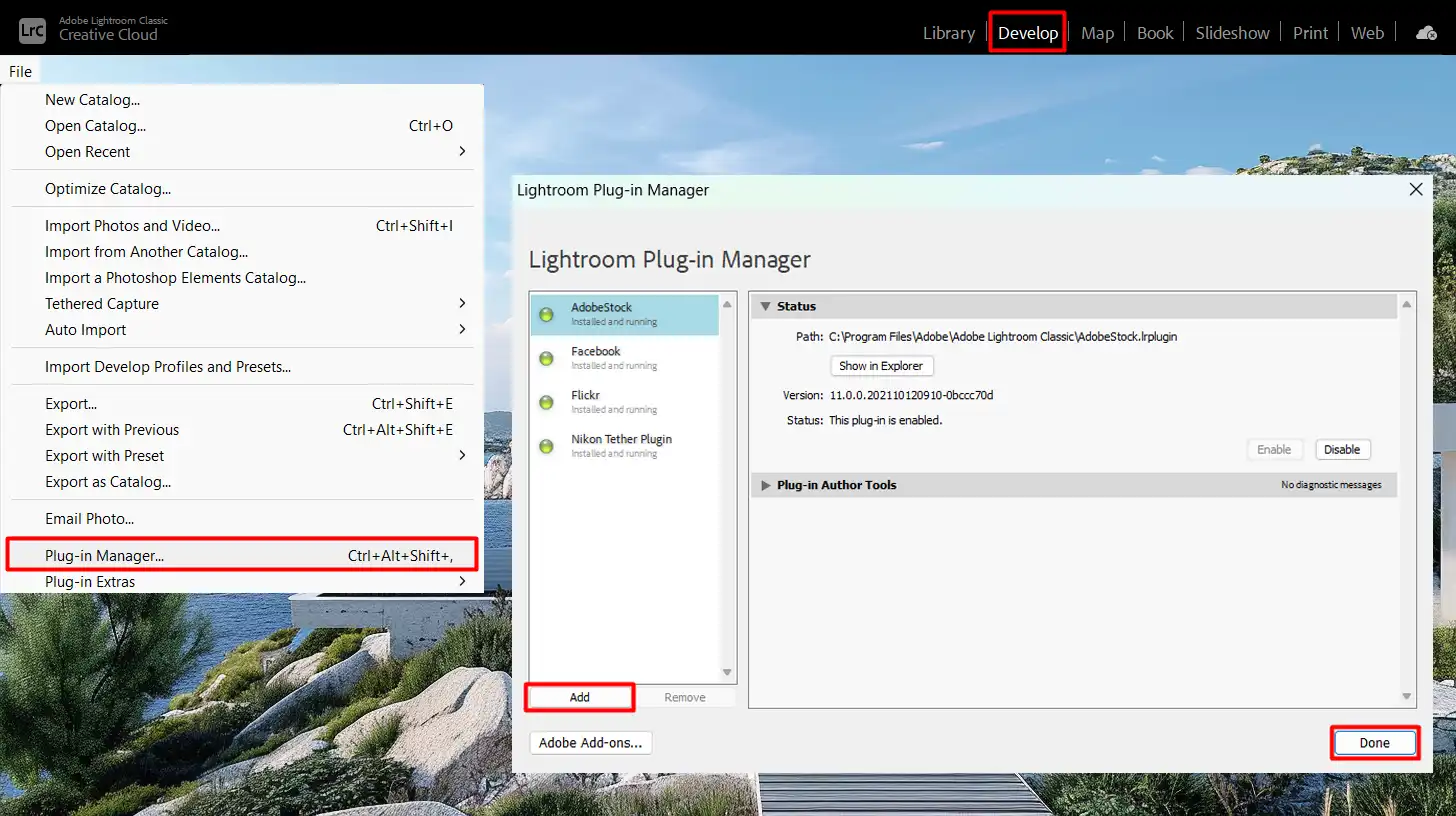
Next, head over to the ‘File’ menu and select ‘Plugin Manager’.
Once there, click on ‘Add’ to locate the macro plugin you previously downloaded. Click ‘Done’ after adding it. You’ll find the macro plugin listed in the ‘Plugin Manager’, ready for configuration.
Set up hotkeys for basic edits you frequently use, like exposure adjustments or color tweaks. This simplifies your workflow considerably.
Master basic editing macros by learning how to rotate an image in Lightroom. This important skill streamlines your editing process, seamlessly integrating fundamental adjustments for efficient workflow.
Advanced Editing Techniques
Advanced editing techniques can match your complex photography needs. Using macros, set automated workflows for tasks such as:
Multi-layered adjustments
High dynamic range (HDR) editing
Batch processing
Layering multiple adjustments at once saves time. HDR editing, for example, becomes much simpler.
You capture more details in shadows and highlights without manually tweaking each layer.
Batch processing also becomes efficient. You apply a series of edits to hundreds of photos with just one macro command.
Mastering Photoshop essential skills can elevate your use of macros. By refining these techniques, you can streamline your editing process and achieve more precise, creative results.
Common Issues and Fixes
Even the best tools can have issues. Common problems include:
Macro not executing
Incorrect edits being applied
Lag during batch processing
If a macro doesn’t execute, check the plugin settings to see if the right commands are tied to the correct keys.
For incorrect edits, make sure you’ve correctly set the parameters.
Running Lightroom Classic on a heavily loaded system, especially on Windows, can cause slowdowns.
Creating Lightroom presets ensures consistent photo quality across your entire collection with just one click, speeding up your workflow and making the most of your macro photography edits.
You can edit your macro photography faster, macro photography allows you to explore the beauty in small-scale subjects, turning everyday objects into stunning, detailed images.
By focusing on the fine details, you can uncover hidden textures and patterns that make each shot unique.
Lightroom Presets and Macro
Understanding Lightroom presets saves time and ensures consistent edits. Presets are pre-saved adjustments that you apply with one click.
Imagine adding a professional filter to multiple photos at once. Much like Instagram filters, presets offer a way to give your images a coordinated look quickly.
Proper settings ensure your detailed close-ups retain quality on social media, seamlessly blending macro excellence with optimal sharing practices.
Creating Custom Presets
Creating Custom Presets is a great way to streamline your editing process in Lightroom. Follow these steps to design a preset that fits your style and speeds up your future photo editing.
Edit a photo to your liking. Adjust exposure, contrast, colors, and other settings until you get the desired look.
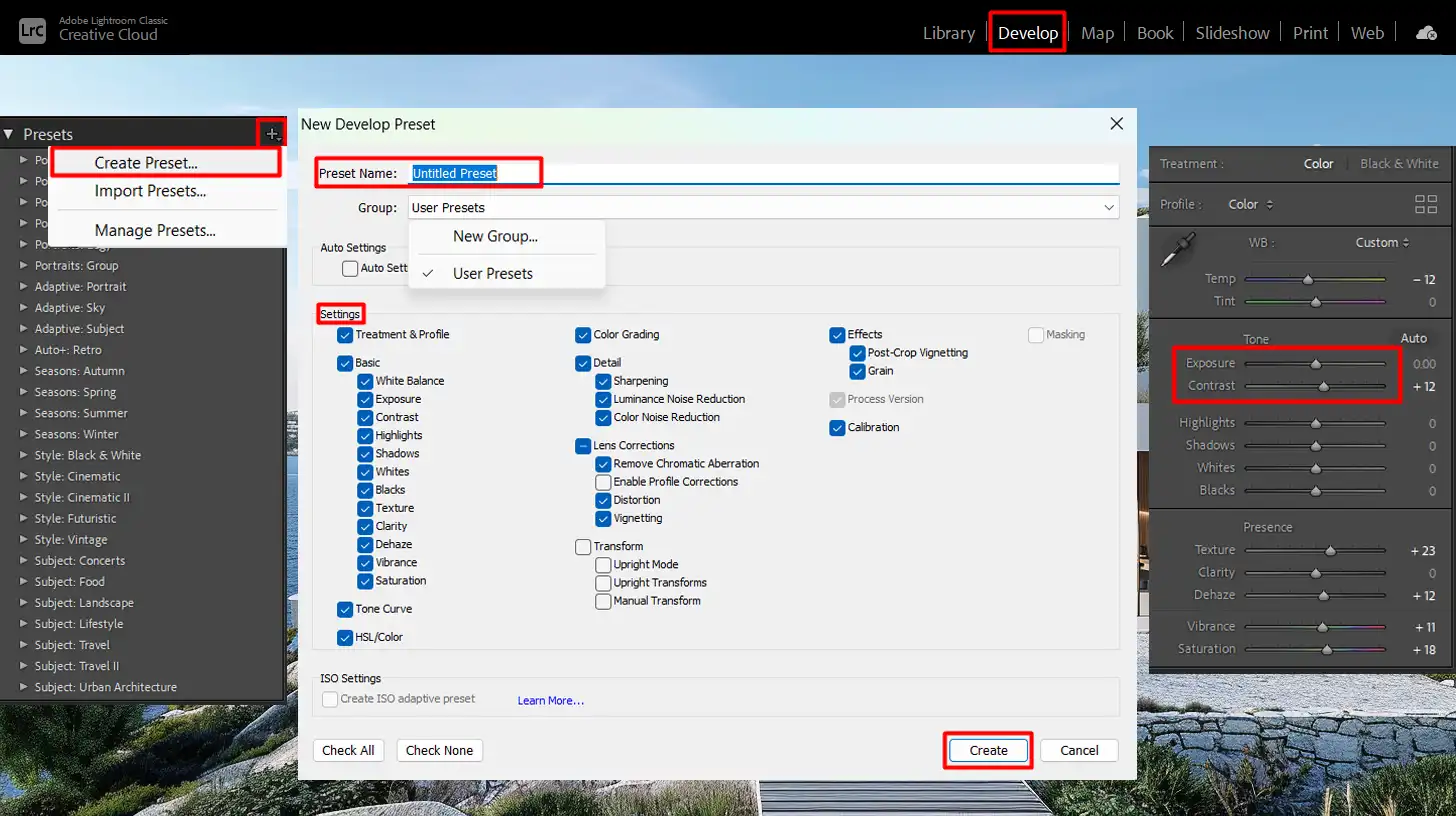
When satisfied with the edit, go to the 'Develop' module. Click on the '+' icon next to 'Presets' in the left panel. Select 'Create Preset'.
Give your preset a name. Check the settings you want to save. Click 'Create' to add your custom preset to the list.
Create stunning visual stories with a Lightroom collage using custom presets for making a collage. These presets streamline the process, allowing you to craft personalized layouts effortlessly within Lightroom.
Applying Presets with Macro
Macros automate repetitive tasks. Set up a macro to apply your favorite preset with a hotkey.
Open Lightroom and go to the photo you want to edit.
Open the plugin manager and add your macro plugin. Configure it to your needs.
Set a hotkey for applying your preferred preset. Next time you need that effect, press your hotkey.
Running into issues? Check the macro plugin settings or restart Lightroom. Simple steps fix most problems.
Pro Tip: Save time by creating a series of presets for different scenarios. Indoor shots, outdoor shots, night scenes, you name it. This makes editing faster and more consistent across various conditions.
Adobe Lightroom Shortcuts
To further streamline your workflow, familiarize yourself with important Lightroom shortcuts.
These shortcuts can significantly speed up your editing process and make applying presets even more efficient.
Macro tips for Macro Photography
While you’re enhancing your editing skills, don’t forget to explore macrophotography. Capturing close-up details can add a new dimension to your portfolio.
Use Lightroom presets to bring out the intricate details in your macro shots.
Each offers unique tools that can enhance your close-up editing and make your macro images stand out.
Adobe Lightroom Integration
In today’s tech-heavy world, Lightroom is a lifeline for photographers. Knowing how to use it alongside macros can seriously boost your efficiency.
We’ll break down how this integration works and how to make the most of it.
How Lightroom Macro Works with Adobe Lightroom
If you’re new to Lightroom, think of presets as pre-saved adjustment settings. They help speed up your editing process by allowing you to edit photos quickly without manually adjusting every single setting.
Now, macro tools add automation to this mix.
Using macros in Lightroom means you can assign complex sequences of tasks to a single hotkey.
To set it up:
Open Lightroom and go to the plugin manager.
Add a macro plugin, configure it, and set a hotkey.
Apply your preset with a single keystroke.
This kind of task automation is particularly helpful when you have batches of photos that need similar edits. Imagine the time saved when a single button applies your preferred preset across numerous images.
Streamline your editing workflow by learning how Lightroom merges multiple photos with macros. Utilizing macros automates repetitive tasks, enhancing efficiency when combining images for panoramas or HDR, and ensures consistent, high-quality results.
Maximizing Efficiency with Integration
Alright, now that you know how macros work, let’s talk about maximizing this integration. Create a set of presets tailored for different scenarios you’ll often encounter.
For instance:
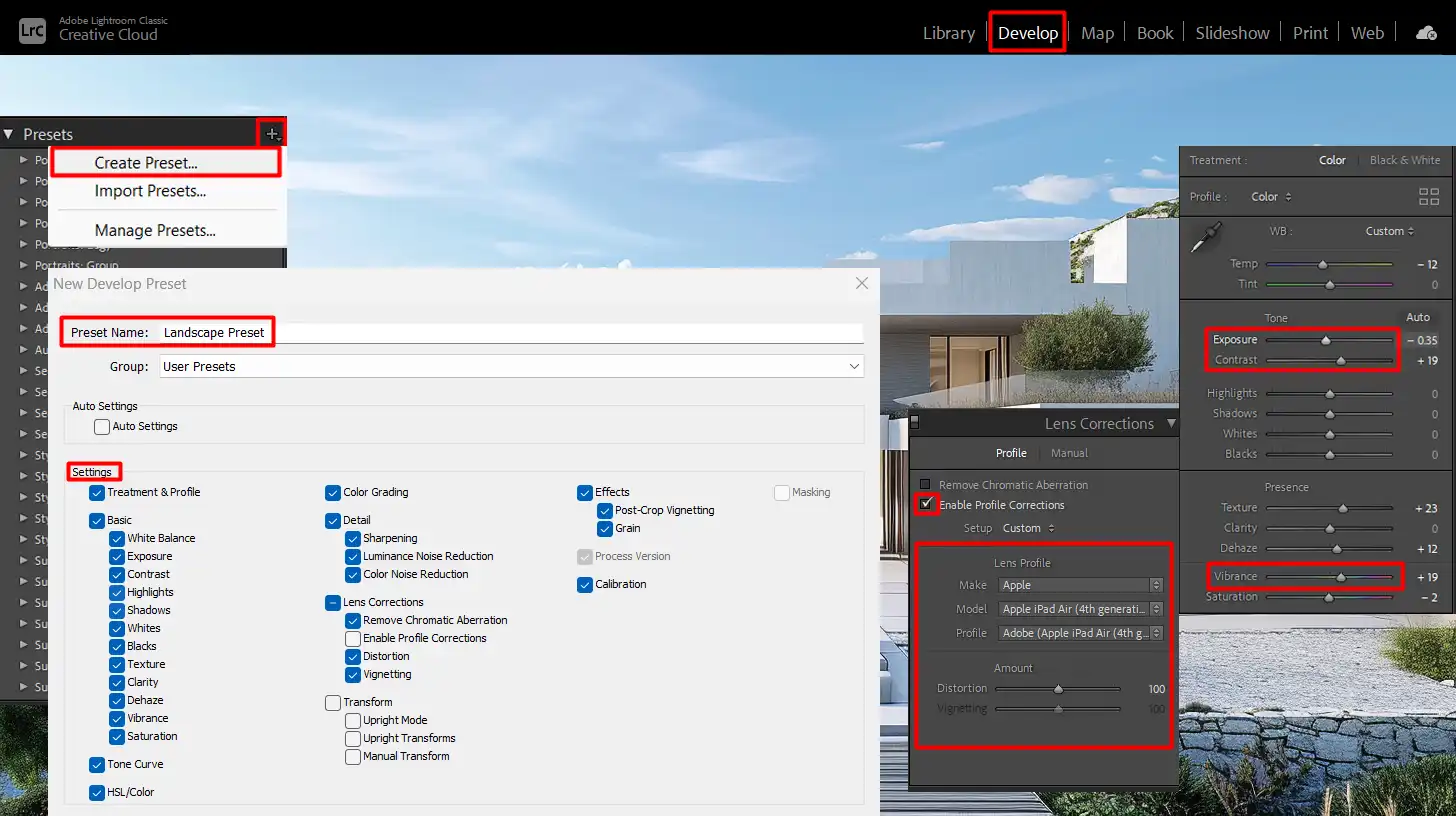
One preset for landscape photography.
Another preset for portrait photography.
Alright, now that you know how macros work, let’s talk about maximizing this integration. Create a set of presets tailored for different scenarios you’ll often encounter.
For instance:
Once you configure these presets, you can automate their application using macros. This eliminates repetitive tasks and standardizes your editing process.
Not only do you save time, but you also ensure consistency across all your edited photos.
It’s worth learning some important Lightroom shortcuts to make things even smoother.
significant commands like:
'G' for the grid view.
'D' for the develop module.
These shortcuts help you quickly navigate through the software, making your workflow more efficient.
Pro Tip: Always backup your custom presets. It ensures you can easily restore them if something goes wrong.
Lightroom and macros are your best friends for efficient photo editing. Master them, and watch your productivity soar!
For those interested in Adobe Lightroom integration, an iPhone camera review can show how its features work seamlessly with Lightroom.
Discover how the camera’s advanced capabilities enhance your editing experience in Lightroom.
Tips and Tricks for Lightroom Macro
Mastering Lightroom can be a game-changer for photographers, whether you’re a professional or just starting out.
Here’s a quick guide to help you get the most out of Lightroom macros.
Aspect
Create Presets
Use Hotkeys
Batch Editing
Dial in Precision
Organize Workflows
Efficiency
High
High
High
Medium
Medium
Consistency
High
Medium
Medium
Medium
High
Time-Saving
Medium
High
High
Medium
Medium
Complexity
Low
Low
Low
Medium
Medium
Quick Tips for Better Results
Create Presets: Save your common adjustments as presets to avoid repetitive edits. This ensures consistency across your photos.
Use Hotkeys: Assign macros to hotkeys for speed. Press one key instead of multiple clicks. It's a time-saver.
Batch Editing: Apply your presets to a group of photos at once. This is great when you're editing a large set of images.
Dial in Precision: Use macro settings to fine-tune adjustments. Precision is key, and macros make it simpler.
Organize Workflows: Structure your workspace for easy access to frequently used tools and macros. An organized workspace leads to efficiency.
Common Mistakes to Avoid
Avoid Over-Editing: Overuse of presets can make your photos look unnatural. Less is often more.
Backup Presets: Always backup your custom presets. Losing them can set you back.
Customized Hotkeys: Avoid assigning macros to complex hotkey combinations. Keep it simple for muscle memory.
Update Regularly: Make sure you're using the latest version of Lightroom. Updates often include helpful features and fixes.
Remember Context: Ensure that your macros fit the specific needs of the photo session. What works for landscapes may not work for portraits.
Pro Tip: Use macros to automate exporting processes. Set up a macro for exporting your images with specific size and format settings. This reduces manual work, leaving more time for creativity.
Frequently Asked Questions
How to Edit Macro Photos in Lightroom?
Start by importing your macro photo into Lightroom.
Adjust the exposure and contrast to enhance the image's details.
Use the sharpening tools to bring out the textures.
Apply noise reduction if the image shows any graininess.
Experiment with color balance to make the colors pop or look more natural.
What Does the Macro Setting Do?
The macro setting on a camera or lens allows you to focus on subjects very close to the lens.
It's ideal for capturing detailed and small subjects like insects and flowers.
This setting adjusts the lens elements to enhance close-focus performance.
Can I Edit a Macro?
Yes, you can edit macro photos to improve or alter their appearance.
Editing can include adjusting exposure, color, sharpness, and composition.
Tools like Lightroom provide a range of features to help refine your macro photographs.
Is There AI in Lightroom?
Lightroom incorporates AI technologies to assist in tasks like selecting subjects and enhancing details.
AI features can also help in improving the lighting and composition of photos automatically.
These tools are designed to streamline the editing process and achieve professional results.
Using a Lightroom macro can significantly improve your photo editing process. By automating repetitive tasks, you can save time and achieve a consistent look across your images with just a few clicks.
From personal experience, incorporating macros has made my editing workflow smoother and more efficient, allowing me to focus more on creativity rather than repetitive adjustments.
If you’re new to Lightroom or want to deepen your editing skills, check out the Photoshop Course and the Lightroom Course for more tips and techniques.
For the best tools to enhance your editing, explore Adobe Photoshop and Adobe Lightroom from the official Adobe website.
These tools, combined with Lightroom macros, can take your photo editing to the next level.
If this article has helped you, then Like and Share it with your friends
$2,061.00Original price was: $2,061.00.$1,061.00Current price is: $1,061.00. 27584
Download Your Free Guide Now!
Discover the secrets of photography with our printable guide! Master essential techniques like aperture, shutter speed, and ISO to create stunning images. Get your free printable PDF now and start turning your snapshots into masterpieces!