Lightroom ISO: Understanding and Adjusting for Perfect Exposure
Lightroom ISO: Understanding and Adjusting for Perfect Exposure
In this article, I will guide you through mastering Lightroom ISO adjustments to elevate your photography.
Understanding how to manipulate ISO settings can dramatically impact the quality of your images, reducing noise and enhancing clarity. Are you ready to unlock the secrets of professional photo editing?
Imagine transforming your photos from good to breathtaking with just a few tweaks.
Stay with me, and I promise you’ll gain valuable insights that will take your editing skills to the next level.
Let’s get starterd and make your photos stand out!
Table of Contents
Understanding Lightroom ISO
ISO in photography controls how sensitive your camera’s sensor is to light. Think of it as your camera’s light gathering power.
Higher Lightroom ISO values make your camera sensor more sensitive to light, while lower Lightroom ISO values do the opposite.
It allows photographers to shoot in various lightconditions without changing lenses or settings constantly.
To grasp an understanding of Lightroom ISO, it’s important to know what ISO sensitivity is. This concept helps in adjusting ISO settings effectively.
How ISO Affects Your Photos
Setting a highISO can help you take photos in low light but also introduces more noise, also known as digital noise, into your images.
Noise looks like grain or speckles, reducing the quality of your final image. Using lower Lightroom ISOvalues can produce cleaner images but may require longer exposure times.
You have to balance ISO with shutter speed and aperture to achieve the desired image clarity.
ISO in Lightroom: An Overview
Lightroom ISO offers tools for managing ISO settings and applying noise reduction effectively.
In Lightroom Classic, the Develop Module provides access to ISO controls, allowing photographers to adjust ISO values post-capture.
The Detail Panel is important for luminance noise reduction and improving image quality in high ISO images. Create ISO adaptive presets to streamline your editing process and maintain consistency across multiple photos.
Pro Tip: Use the Masking control slider in the Detail adjustment panel to selectively apply noise reduction, preserving important details in your photos.
Lightroom Classic offers powerful tools to manage your photo’s ISO settings. With a few tweaks, you can enhance your images and make them pop.
Let’s get into some important techniques for this.
Setting ISO in Lightroom Classic
Start by opening Lightroom Classic and navigate to the Develop Module. Here, ISO settings come into play when you are adjusting exposure.
Look for the Basic Panel, where you can start making the changes:
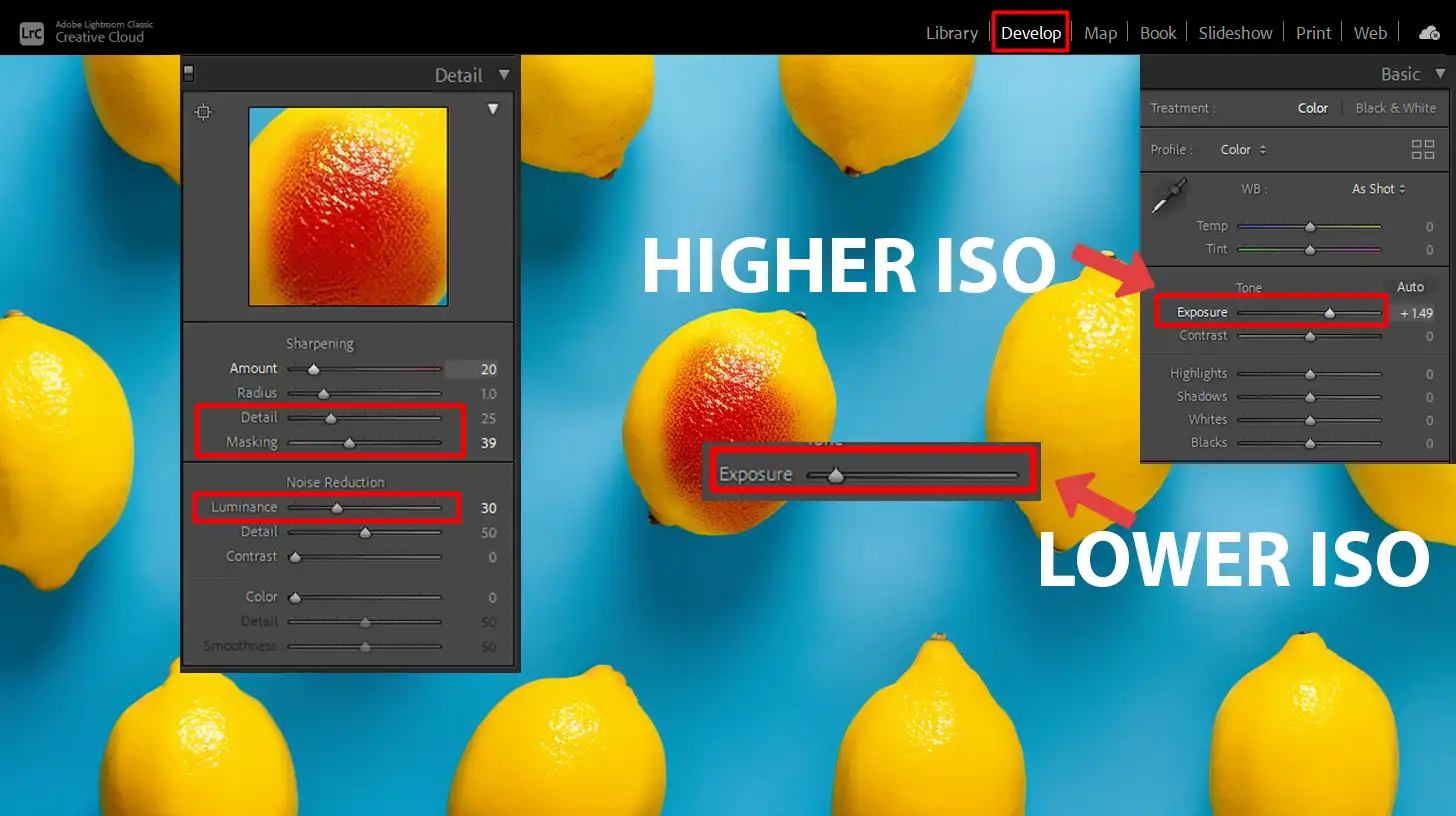
Increase the ISO with caution. Higher ISO means more sensitivity, but it also brings noise.
Lower ISO provides cleaner images but needs better light.
When using ISO in Lightroom Classic, knowing how to utilize manual mode is significant for precise control. This technique allows for better adjustment of ISO settings.
Adjusting ISO for Different Lighting Conditions
Photographing in low light? Boost the ISO to brighten your shot. But beware; noise will come along.
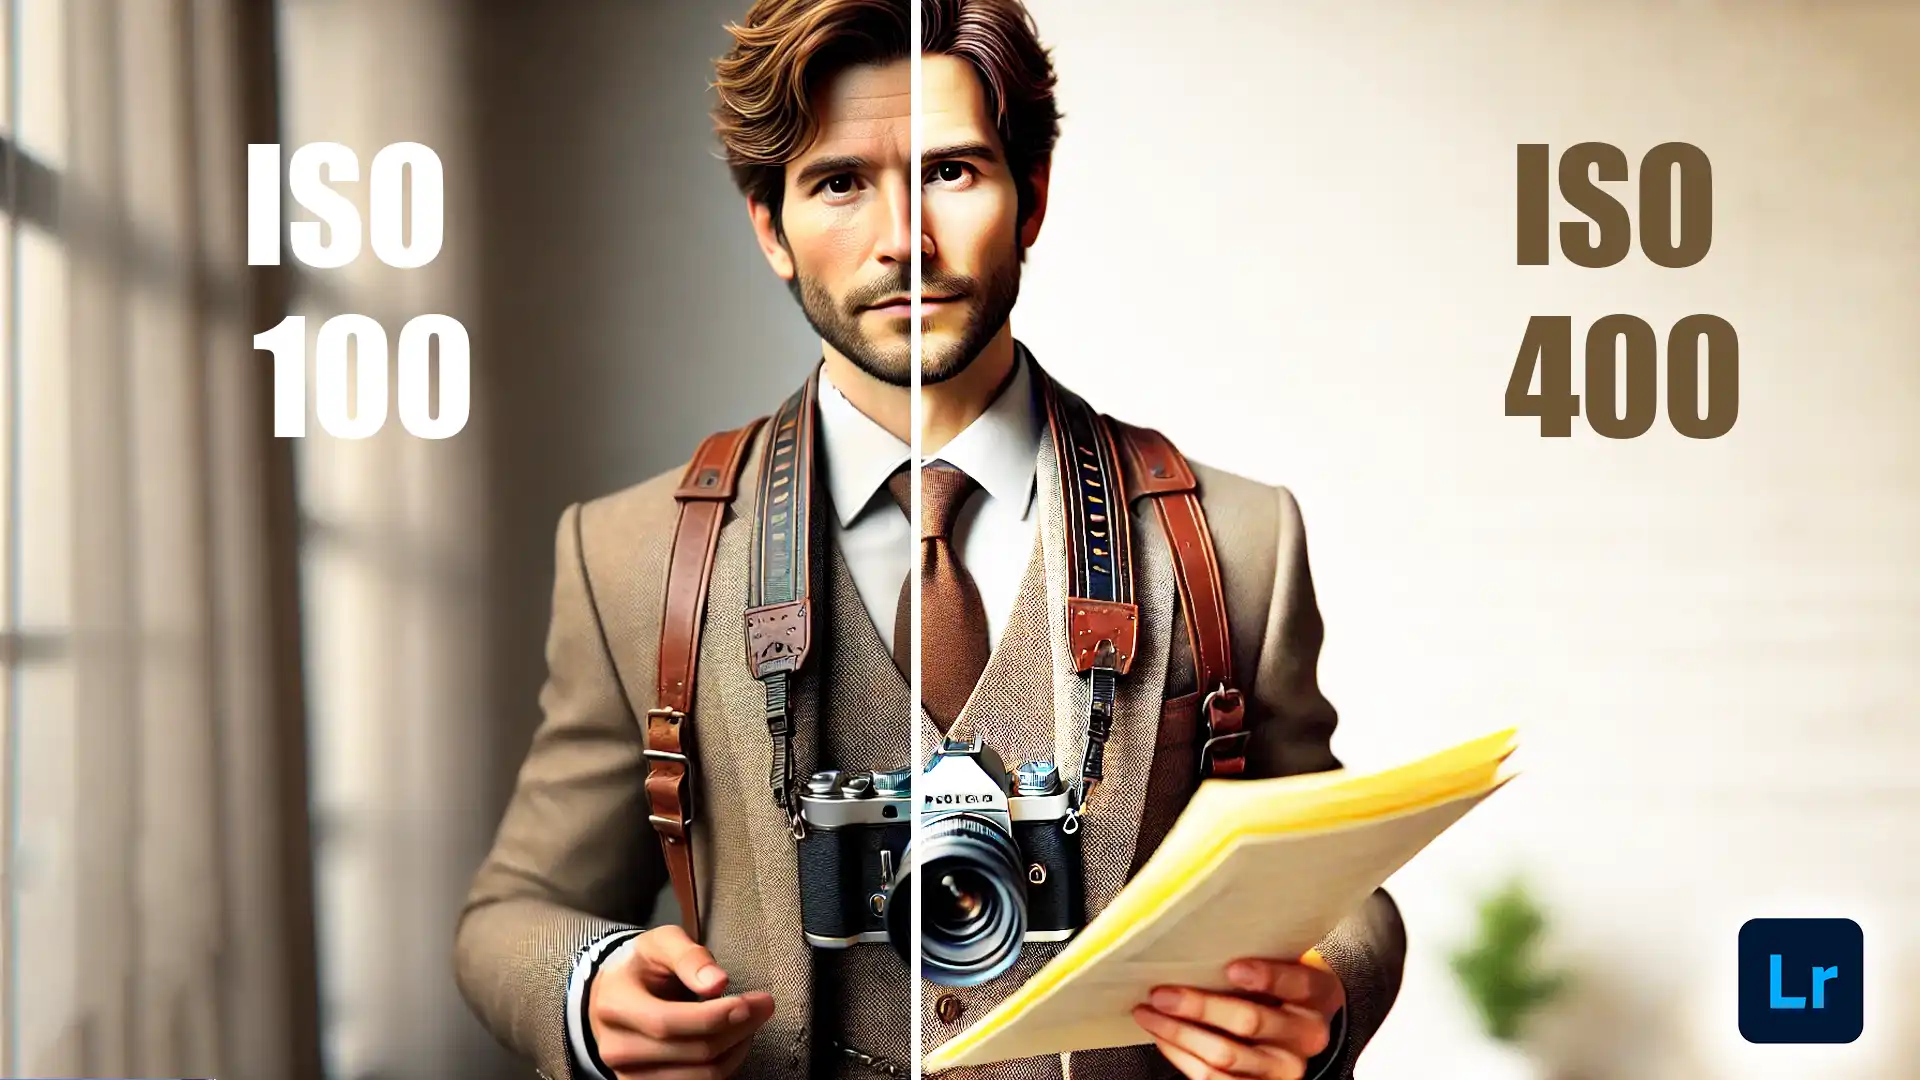
For bright conditions, keep the ISO low, around ISO 100 to ISO 200. This results in clearer and better-quality pictures.
Remember that using RAW files gives you more flexibility later when editing. You can adjust the ISO settings without losing quality.
When photographing in varying illuminance levels, using an ISO adaptive preset can help manage noise and maintain image clarity by automatically adjusting ISO settings and noise suppression to match your shooting environment.
Common Mistakes with ISO in Lightroom
One common mistake is pushing the ISO too high, thinking it will solve all issues. Nope! High ISO introduces more noise, especially in digital photography.
Another mistake is not using the luminance noise reduction feature in the Detail Adjustment Panel of Lightroom Classic.
This tool helps balance the unwanted graininess without affecting image details.
Many users also ignore setting up ISO adaptive presets. These can save your time and ensure consistency.
To create ISO adaptive presets, go to the presets panel and set different ISO speeds for various lighting scenarios.
Trust me, it makes life easier!
Pro Tip: Use the Masking Slider in the Detail Adjustment Panel along with luminance noise reduction.
This ensures that the noise reduction process selectively targets the areas that need it the most, leaving other details intact.
Understanding these errors can enhance your editing skills.
For more advanced editing techniques, consider exploring Lightroom Shortcuts to streamline your workflow.
Noise Reduction in Lightroom Classic
Noise reduction in Lightroom Classic can be greatly enhanced by using an ISO adaptive preset, which adjusts noise reduction settings based on the ISO level of each image to ensure optimal clarity and minimal grain.
Feature
ISO Adaptive Presets
Manual Noise Reduction
Automatic Adjustments
Yes
No
Consistency Across Photos
High
Variable
Ease of Use
Easy
Moderate
Customizability
Moderate
High
Time Efficiency
High
Moderate
What is Noise in Photography?
Noise in photography often resembles grainy texture or colored speckles on your images. LightroomISO plays a big role. High Lightroom ISO speeds increase noise, while low Lightroom ISO speeds produce cleaner photos.
Have you ever taken a photo in low light and noticed tiny dots?
That’s noise. We need to manage noise to ensure high-quality images.
In photography, understanding what noise is important for effective editing. If you’re wondering how to add noise in Photoshop, noise can enhance texture or correct digital artifacts, impacting your photo’s overall quality.
How to Reduce Noise in Lightroom Classic
First, open Lightroom Classic and head to the Develop Module. Look for the Details Panel. It’s where magic happens.
To reduce noise, navigate to the luminance noise reduction slider.
Move it slightly right. Always start small.
You can also use Lightroom ISO adaptive presets. They make life easier by maintaining consistency. Set up the Lightroom ISO adaptive presets in the Presets Panel, adapt based on lighting conditions.
Make sure to review all the files before finalizing edits.
Best Practices for Noise Reduction
Avoid pushing ISO too high.
Keep it low, and remember: better lighting equals less noise.
Professional photographers recommend staying around ISO 400 for a good balance. If using higher ISO speeds, apply targeted corrections.
Use the masking controlslider in the Detail Adjustment Panel for precise adjustments. Note your personal taste and preferences will shape your approach.
Explore ISO adaptive presets to speed up your workflow.
Pro Tip: Use shift click on targeted areas to apply uniform changes. This way, your photos stay consistent across various shots.
Embrace these tips and your editing will look more professional.
How to Create ISO Adaptive Presets
Creating an ISO adaptive preset allows you to automatically adjust your photo settings based on different ISO levels, ensuring consistent quality and optimal exposure.
ISO adaptive preset helps you tailor noise suppression and exposure adjustments for varying lighting conditions, ensuring that each shot maintains consistent quality and clarity regardless of the ISO level.
For images with the lowest ISO, you can fine-tune other adjustments to enhance detail, while for high ISOs, the preset can help manage noise and maintain clarity.
What are ISO Adaptive Preset?
ISO Adaptive Preset automatically adjust based on the ISO speed of a photo. These presets streamline the editing process and help create consistent images across varied lighting conditions, which is important in photography.
You might be tired of manually tweaking settings for each image – a common struggle.
How to Create ISO Adaptive Preset
Follow these steps to create ISO adaptive preset:
Open Lightroom Classic.
Edit a photo with desired settings. Pay attention to noise reduction and sharpening.
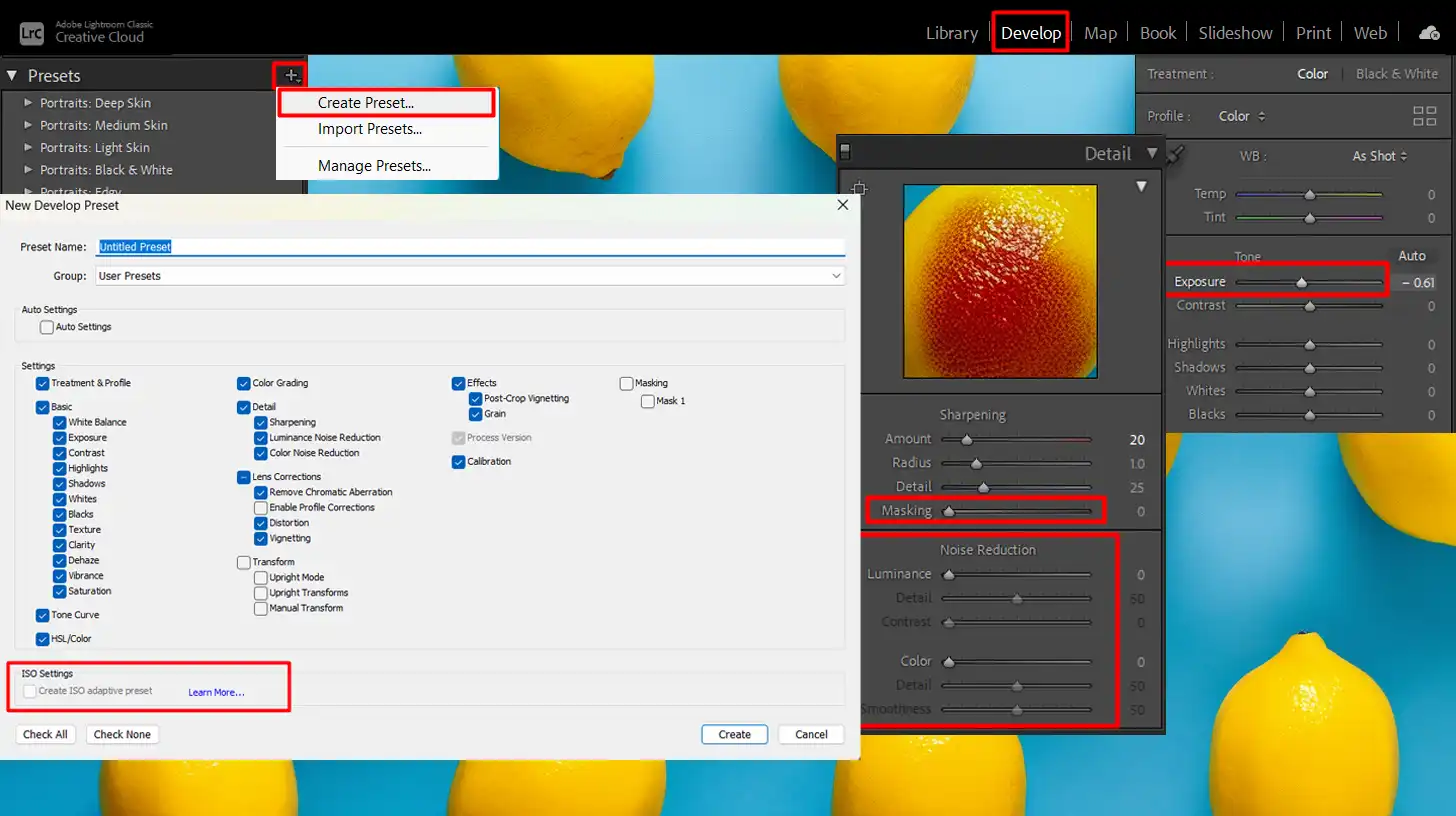
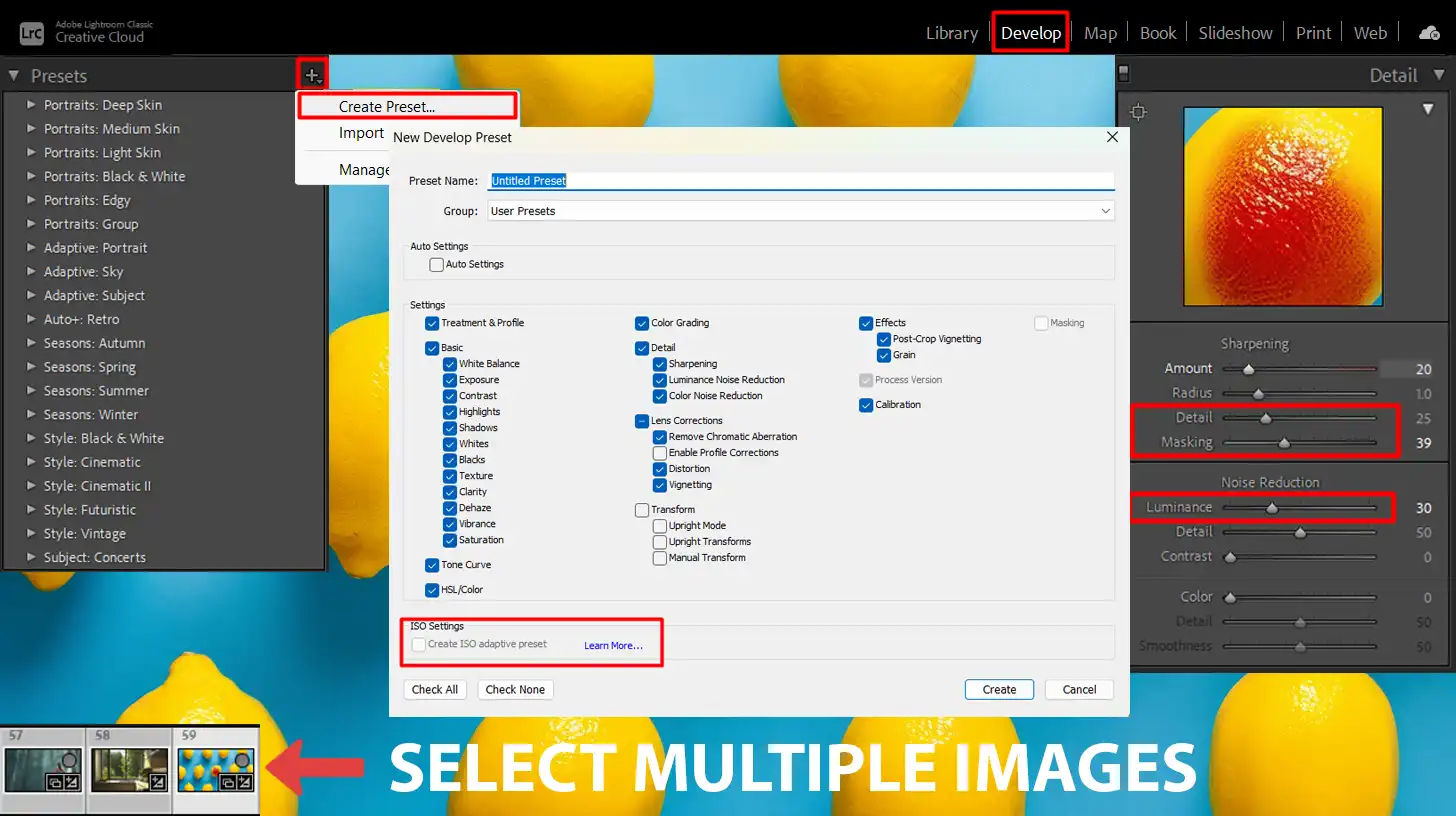
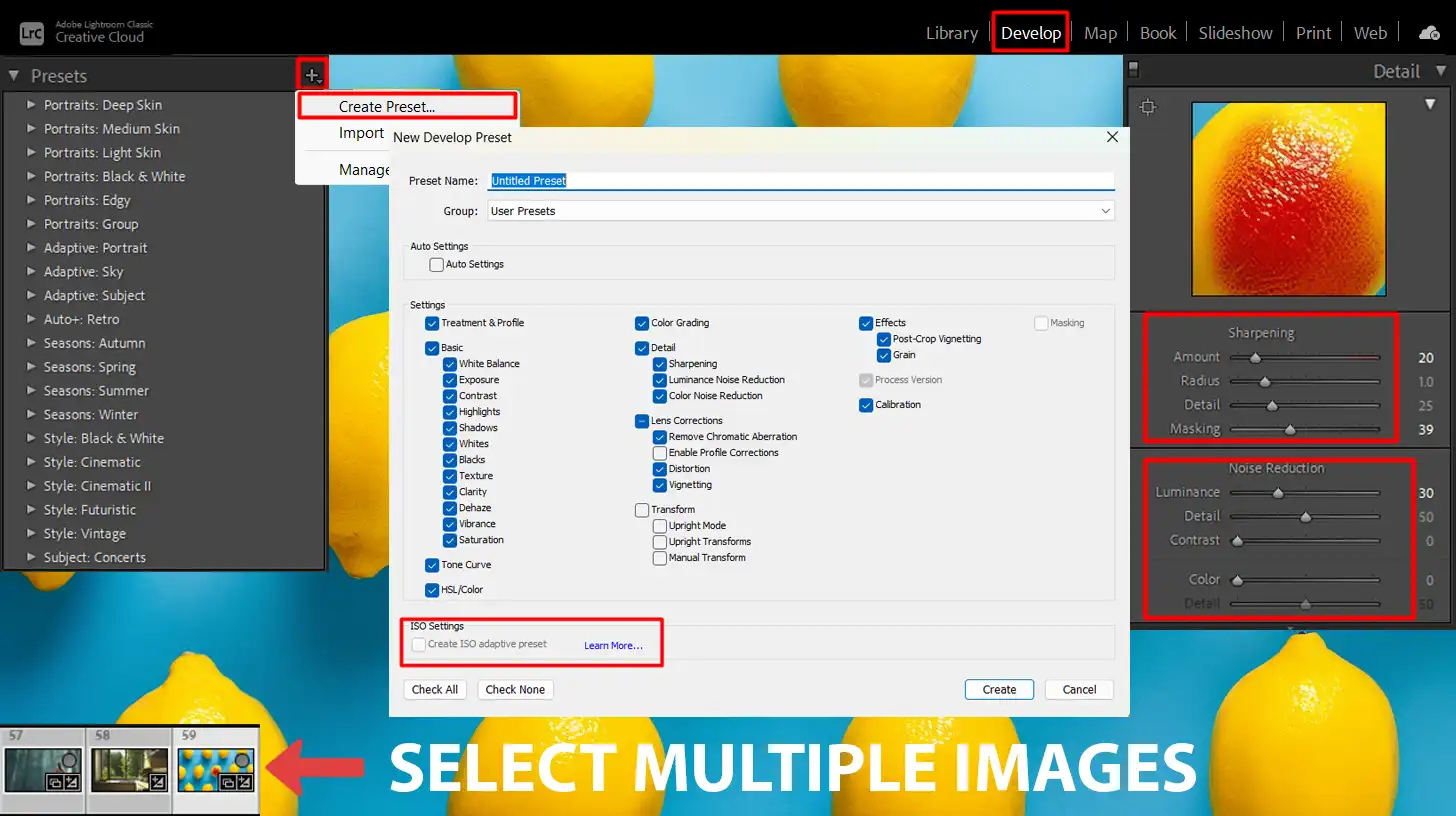
Save as a new preset. Right-click and select "Create Preset".
In the Preset dialog box, select "ISO Adaptive Presets" and save.
Benefits of Using ISO Adaptive Preset
Some benefits of using ISO adaptive preset:
Consistency: Each image maintains similar quality, regardless of lighting.
Efficiency: Saves time—no need to edit each photo individually.
Flexibility: Adjusts to different ISO speeds, ensuring optimal results from ISO 100 to ISO 6400.
Pro Tip: When shooting, aim for an ISO speed around ISO 400. It balances noise and clarity, enhancing your edits.
The voted inline feedbacks view can help improve your process. You receive valuable insights on which settings work best.
Try applying a metadata filter. It helps organize your photos efficiently in Lightroom Classic.
For those who want to delve deeper into photo editing, learning about the difference between Photoshop and Lightroom can provide a better understanding of which software to use for specific tasks.
To enhance your photos, understanding the benefits of using ISO adaptive presets is significant. Learn about types of filters in Photoshop to complement these presets for optimal results.
Frequently Asked Questions
Can you adjust ISO in Lightroom?
No, you cannot directly adjust the ISO setting of a photo in Lightroom once it's taken. ISO is set during the capture process in your camera. However, you can adjust the exposure and brightness, which can mimic some effects of changing ISO settings.
How do I find the ISO of a photo in Lightroom?
In Lightroom, open the photo you're interested in.
Navigate to the ‘Library’ module.
On the right side panel, look under the ‘Metadata’ section where you'll find the ISO value along with other details like aperture, shutter speed, and camera model.
How do I fix grainy photos in Lightroom from high ISO?
Open your grainy photo in Lightroom and switch to the ‘Develop’ module.
Scroll down to the ‘Detail’ panel.
Adjust the ‘Luminance’ slider under ‘Noise Reduction’ to reduce grain. Be mindful not to overdo it as it can make your photos look overly smooth.
You can also tweak the ‘Detail’ and ‘Contrast’ sliders to fine-tune the noise reduction effect.
What format are Lightroom pictures?
Lightroom can handle various image formats, but the most common ones are RAW, JPEG, TIFF, and PSD.
When you import photos, Lightroom creates a catalog file, which doesn't alter your original files but stores information about how you edit the photos.
For exporting, you can choose different formats depending on your needs, including JPEG, TIFF, PNG, and DNG.
$2,061.00Original price was: $2,061.00.$1,061.00Current price is: $1,061.00. 27585
Download Your Free Guide Now!
Discover the secrets of photography with our printable guide! Master essential techniques like aperture, shutter speed, and ISO to create stunning images. Get your free printable PDF now and start turning your snapshots into masterpieces!