Are you looking to enhance your photos with stunning, high-dynamic range effects? Lightroom HDR plugins might be just what you need.
In this article, I’ll guide you through the best plugins available, helping you transform your ordinary images into extraordinary masterpieces.
Through simple steps and expert tips, you’ll learn how to maximize your editing potential. Whether you’re a seasoned photographer or just starting out, these plugins can elevate your work to new heights.
Let’s get started and unlock the full potential of your photos!
Table of Contents
What are Lightroom HDR Plugins?
Lightroom HDR plugins are tools that help you create HDR images in Adobe Lightroom. HDR stands for High Dynamic Range, a technique that captures a wider range of light and dark areas in photos.
These plugins make merging multiple captures and enhancing dynamic range easier.
Why Use HDR Plugins in Adobe Lightroom?
HDR plugins in Lightroom offer several benefits:
Enhanced Dynamic Range: HDR plugins allow you to achieve a greater dynamic range in your images, capturing details in both shadows and highlights.
Time Efficiency: Using plugins can automate the process of merging multiple captures, saving time compared to manual HDR creation.
Consistency: Plugins often come with HDR presets, ensuring consistent results across multiple images.
User-Friendliness: Many plugins integrate seamlessly into Lightroom, allowing easy access through the Lightroom plugin menu.
These tools simplify complex edits, making it possible to create stunning HDR photos with just a few clicks. When you restart Lightroom after installing a new plugin, you’ll see it listed under the available editing tools.
Pro Tip: Try using free versions of various plugins to find the one that best suits your needs before purchasing the full functionality.
Top Lightroom HDR Plugins
Lightroom users often seek ways to enhance their workflow and achieve stunning HDR photos. Lightroom HDR plugins provide a means to do this efficiently and effectively.
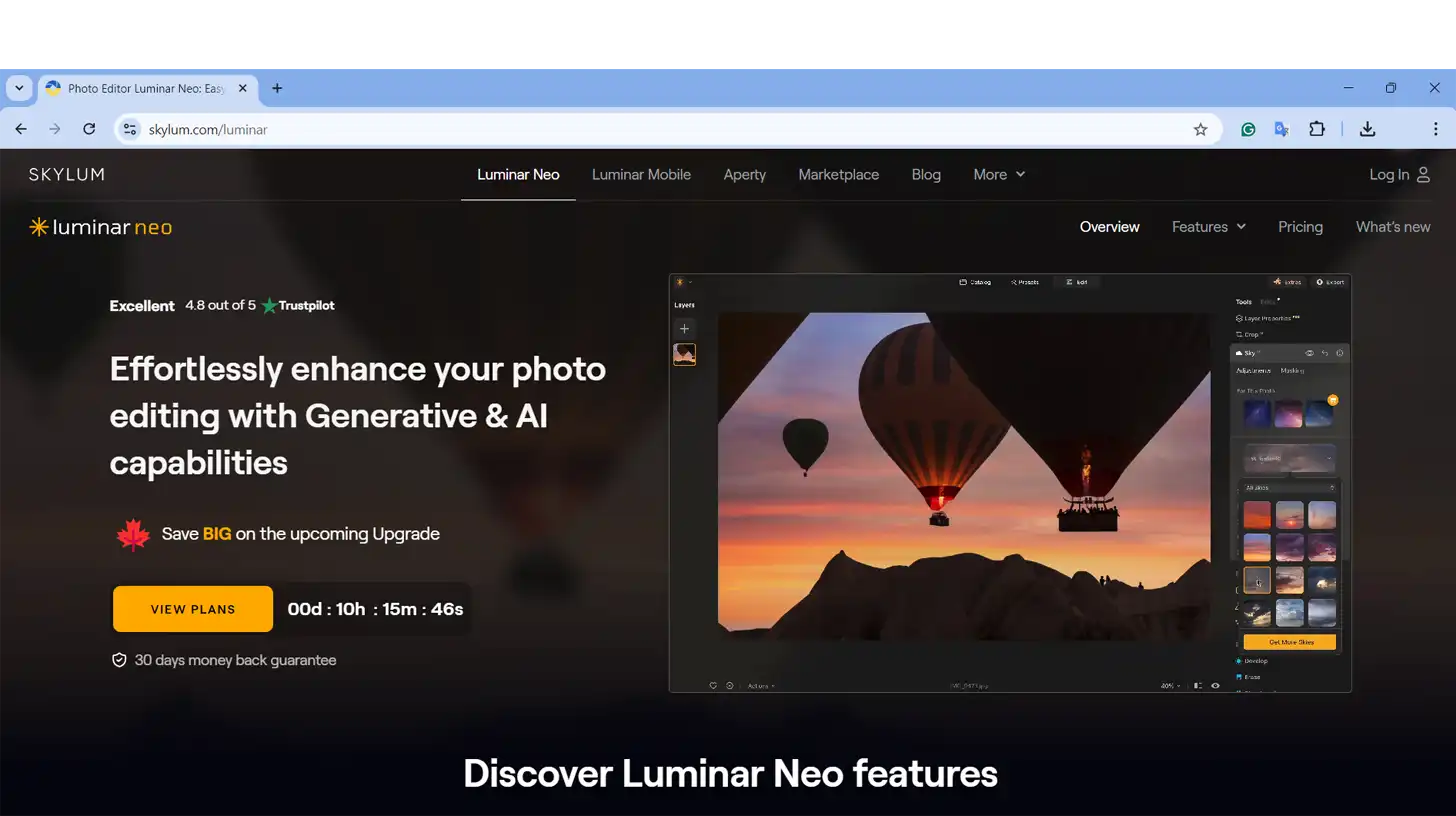
Luminar Neo: Features and Benefits
Luminar Neo stands out among the best Lightroom plugins. It integrates seamlessly with Lightroom, making it a valuable addition for photo enthusiasts. Luminar Neo offers:
AI-powered tools: Automatically enhance images with minimal effort.
Batch processing: Efficiently processes multiple photos at once.
Creative controls: Let you fine-tune the appearance of your HDR photos.
Its simplicity and powerful features make it a top choice for Lightroom users.
Aurora HDR: Features and Benefits
This software is also highly regarded for HDR processing in Lightroom. It’s known for its advanced technology and ease of use. It offers:
Batch processing: Saves time by handling multiple unprocessed files simultaneously.
Customizable HDR presets: Provides various styles for different photo effects.
Many Lightroom users appreciate the enhanced control and quality that Aurora HDR brings to their edits.
Topaz Adjust: Features and Benefits
Topaz Adjust: This feature is another popular Lightroom plugin that uses artificial intelligence to enhance photos with creative effects and adjustments, making your images stand out. Topaz Adjust offers:
Dynamic range enhancement: Brings out details in both shadows and highlights.
Custom presets: Easily apply consistent looks to your photos.
Non-destructive editing: Keeps the original unprocessed files intact while editing.
These features make Topaz Adjust a favorite among those who want to create impactful HDR photos without complex edits.
Classic Lightroom Presets
Classic Lightroom presets simplify the editing process by offering pre-made settings that can be applied with a single click. In Lightroom Classic, you can access these presets directly from the library. Benefits include:
Consistency: Apply the same style across multiple photos.
Efficiency: Save time in post-processing by using ready-made settings.
Customization: Adjust presets to suit your personal style.
Presets are significant for any Lightroom user looking to enhance their workflow and achieve polished results quickly.
Always save your edited images in different file formats to ensure they maintain quality across various platforms. For optimal results, consider the difference between RAW or JPEG format when saving your files
Step-by-Step Guide: How to Install Lightroom HDR Plugins
If you love editing photo raw files, you likely know that Lightroom is significant. Adding HDR plugins can elevate your work even more.
Below is a step-by-step guide to installing and using Lightroom HDR plugins. This table highlights each significant aspect, making it easy to follow and get started with enhancing your editing process.
Steps to Install Lightroom HDR Plugins
Installing Lightroom HDR plugins can enhance your editing process and work seamlessly with Lightroom presets. Let’s start with the first step: downloading the plugin.
First Step: Download the Plugin
Start by finding a reputable source to download your Lightroom HDR plugins. Ensure it suits your version of Lightroom. It can be either a free version or a paid one based on your needs.
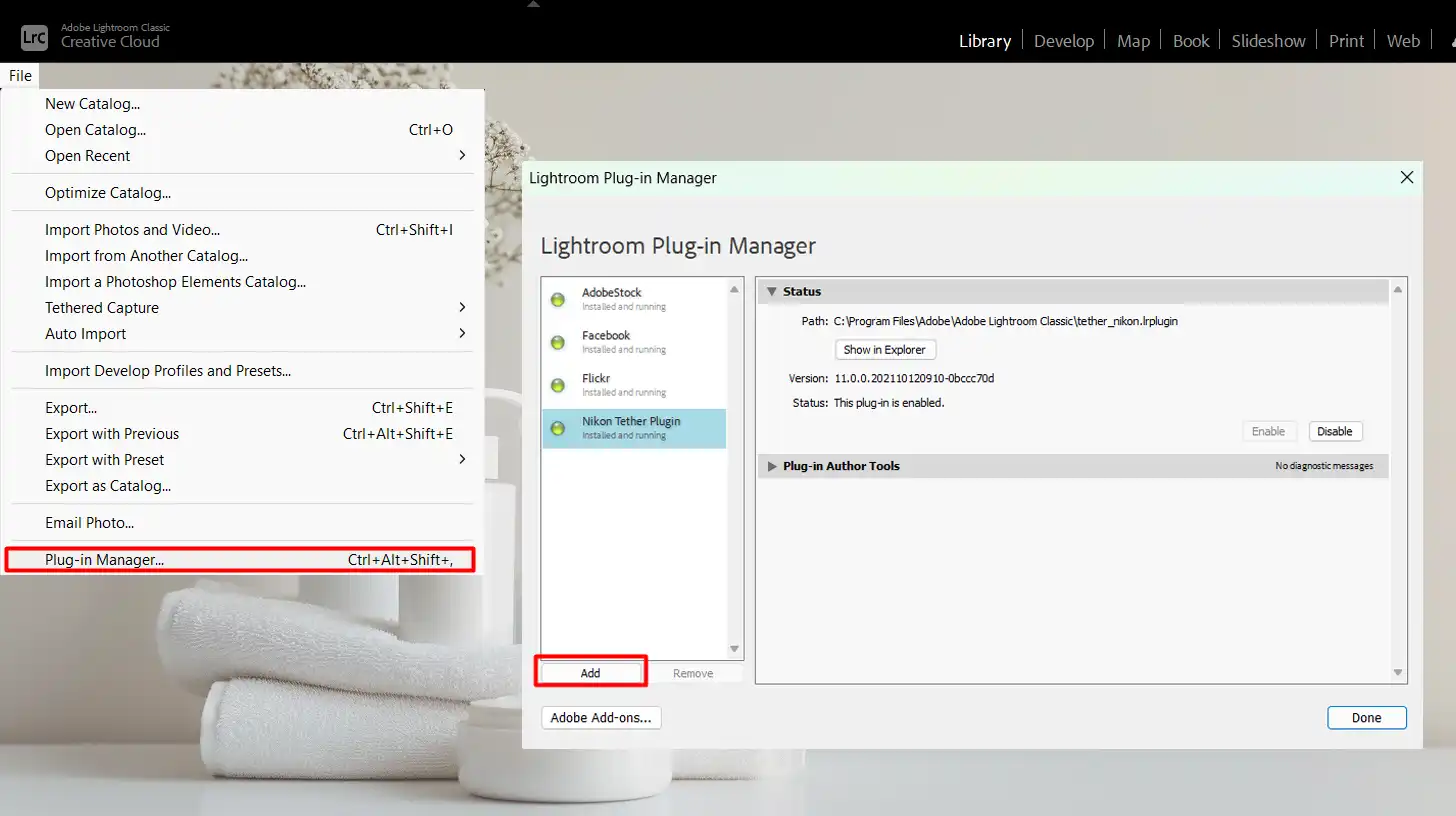
Second Step: Locate the Plugin Folder
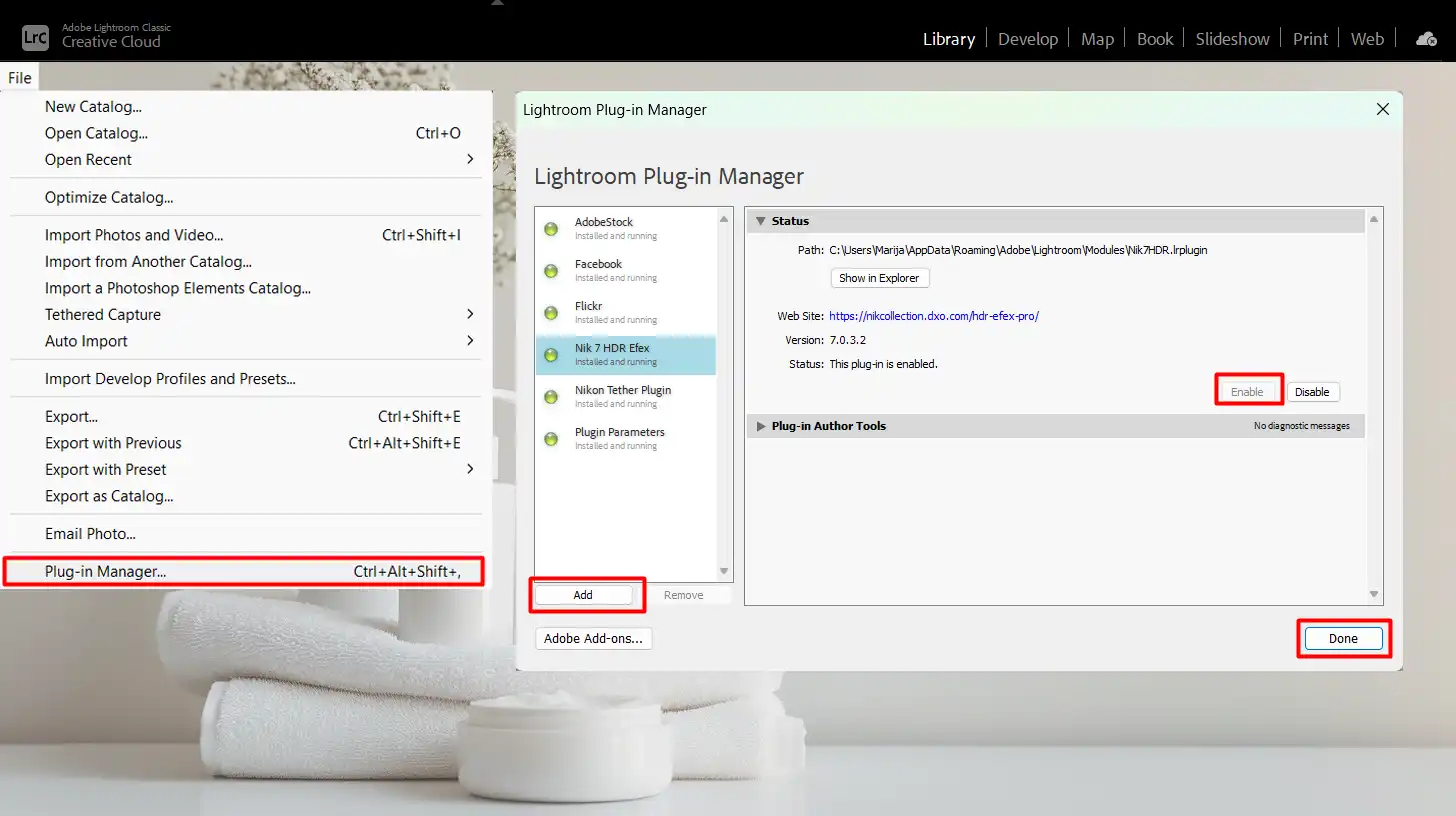
Open Adobe Lightroom, then navigate to the File dropdown. Select “Plugin Manager.” This shows a list of all installed Lightroom plugins. Click “Add” to locate your downloaded plugin.
Third Step: Install and Enable the Plugin
After locating the folder where your plugin is saved, click “Install.” Ensure you enable the plugin by selecting it from the list and clicking “Enable.” Now you’re ready to enrich your Lightroom library with stunning HDR effects!
Fourth Step: Use the Plugin
With the plugin installed, return to your Lightroom collection. Import some photo raw images and start editing. Apply your new HDR preset to see how it transforms your pics into vibrant works of art.
Fifth Step: Customize Presets
Don’t stop at the default settings. Customize your Lightroom presets to achieve a natural look suited to your style. You can easily save these adjustments as a new Lightroom preset for future use.
Pro Tip: Keep your workspace organized. Consistently maintaining your Lightroom collection helps you easily locate and apply your favorite best Lightroom plugins efficiently.
Invest in Lightroom training to master your plugins and keep your workspace organized. Consistently maintaining your Lightroom collection helps you easily locate and apply your favorite best Lightroom plugins efficiently.
So, what are you waiting for? By following these steps, you can make your Lightroom edits more dynamic and powerful with Lightroom HDR plugins!
Using HDR Plugins for Stunning HDR Photos
HDR plugins can greatly improve your photo editing, helping you create stunning images. Let’s begin by setting up an efficient HDR workflow.
Setting Up Your HDR Workflow
Let’s begin with setting up your HDR workflow:
Obtain reputable Lightroom plugins that match your Lightroom version. This step ensures compatibility and smooth functionality of the plugin.
Launch Adobe Lightroom and head to the "File" menu, there you’ll find "Plugin Manager." Click "Add" and find your downloaded HDR plugin.
Click "Install" followed by "Enable." This straightforward process activates your Lightroom plugin, making it ready to use in your edits and projects.
Return to your Lightroom catalog and import your RAW or JPEG format images. Using Lightroom plugins can significantly enhance your photos, producing professional HDR results.
Tips for Capturing HDR Photos
Capturing HDR photos requires specific techniques. Here are some practical tips to get started:
Use a Tripod: This ensures stability and eliminates movement between shots.
Bracket Your Shots: Take multiple captures of the same scene, typically three to five shots.
Avoid Moving Subjects: Opt for static scenes to prevent ghosting in your final image.
Perfect Your Timing: Shoot during the golden hour for dynamic lighting.
These tips will help create a perfect base for using HDR presets and achieving a natural-looking image that’s breathtaking.
Editing Techniques with HDR Plugins
Editing with HDR plugins in Lightroom is the next step:
Once imported, apply an HDR preset to your photos. The presets streamline the process, adding balanced lighting and contrast.
Monitor adjustments closely. Modify the preset settings to suit unique aspects of your images. Fine-tuning can turn a good photo into a masterpiece.
Save your customized settings as Lightroom presets for consistency across your work.
Organize your library. A clutter-free workspace boosts efficiency. Using Lightroom Classic, or Lightroom Classic CC, provides extensive tools for managing and editing. This organization helps keep track of your best adjustments and favorites.
Finally, share your polished photos. Show the world the stunning visuals achieved with HDR plugins.
Pro Tip: When working with RAW or JPEG format images, always create virtual copies before applying Lightroom plugins. This allows you to experiment freely without altering your original files.
Best Practices for HDR Photography
When working with HDR photography, using Lightroom presets can help achieve the desired look.
Aspect
Best Practices
Choosing HDR Presets
Experiment with different presets like “Bright & Airy” or “Cinematic” to enhance contrast and dynamic range. Tweak settings to match your style.
Balancing Exposure
Adjust exposure levels to correct shadows and highlights. Gradually balance underexposed and overexposed areas for a cohesive image.
Adjusting Contrast
Use contrast sliders to enhance image details. Avoid excessive contrast to maintain detail and achieve a realistic look.
Shooting Format
Shoot in RAW format to retain maximum detail and flexibility during post-processing, making adjustments smoother.
Let’s explore how to choose the right HDR preset.
Choosing the Right HDR Preset
When working on your photos in Adobe Lightroom, selecting the correct HDR preset is important. Without the right preset, your images might lack the desired effect.
HDR presets help to enhance the contrast and dynamic range of your photos. They add depth and detail, especially when RAW images are used. It’s about finding a balance that suits the essence of the scene. Some preset examples are:
Bright & Airy
Cinematic
Each has different effects. Experiment to see what works best for your image. Start with the basics and tweak the settings to match your unique style.
Balancing Exposure and Contrast
Balancing exposure and contrast is important for achieving a natural-looking image. Begin by setting proper exposure levels. Underexposed areas should be brought up gradually, while overexposed regions need reducing to ensure a balanced frame.
You can adjust highlights and shadows using the sliders in Lightroom. Play around with contrast to make the image pop.
Remember, too much contrast can cause you to lose details. Always aim for a harmonious look that stays true to reality. Use a Lightroom plugin if necessary.
Pro Tip: Try to shoot in RAW format to retain maximum detail and flexibility during post-processing. Unprocessed files provide more data for you to work with, making adjustments smoother.
Advanced Techniques with Lightroom HDR Plugins
Explore advanced techniques with Lightroom HDR plugins, including how to create custom Lightroom presets for a personalized editing style.
Creating Custom HDR Presets
Let’s start by diving into custom HDR presets. These are unique settings you can adjust to create the exact look you want and enlarge photos with enhanced details.
By creating and saving your own presets, you avoid repeating the same steps every time.
Steps to Create Custom HDR Presets:
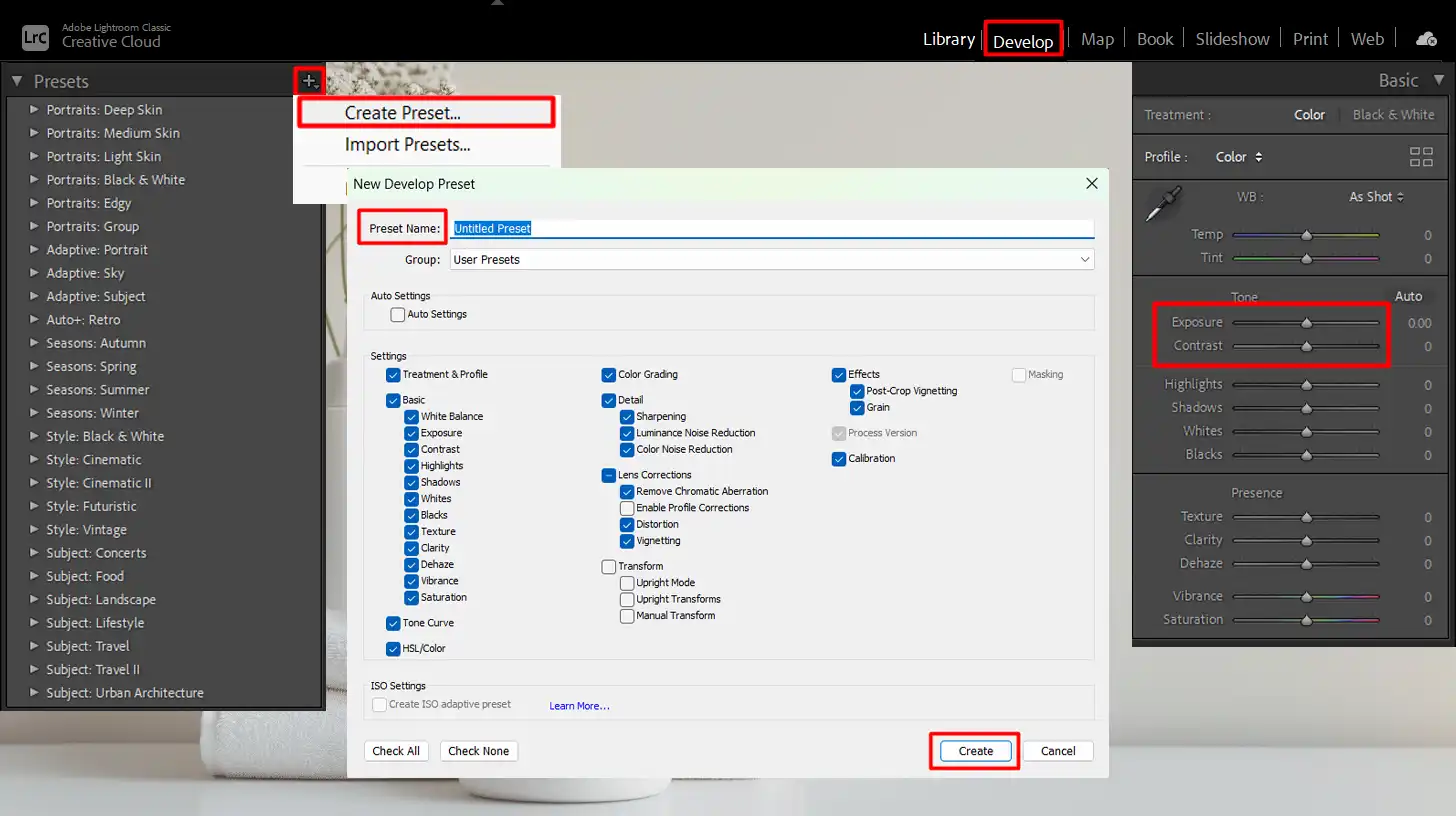
First, open your photo in Lightroom.
Apply basic adjustments like exposure and contrast.
Once you're happy with these, navigate to the "Presets" panel on the left.
Click the "+" button to create a new preset.
Name it something you'll remember and hit "Create."
Congrats! You’ve just made a custom preset. This is handy when dealing with similar lighting conditions or styles.
Pro Tip: Do some trial runs to fine-tune your settings. It might take a few attempts to get the perfect “natural-looking photo.”
Batch Processing HDR Photos
Now, onto batch processing HDR photos. If you’re like me, time is precious. Batch processing allows you to apply the same preset to multiple photo raw files at once, saving hours.
Steps for Batch Processing:
Start by selecting all the photos you want to edit. You can do this by holding down "Shift" and clicking on your photo selection.
Navigate to the "Develop" module.
Open the "Presets" panel on the left.
Click on your custom preset.
Click "Sync." A dialog box appears.
Check the settings you wish to apply to all selected photos and click "Synchronize."
All your selected photos now sport the same stunning preset.
This technique isn’t just for HDR images. It also works well with “photo raw” files. This ensures you’re working with the most data possible, allowing for more detailed edits.
Pro Tip: Don’t forget to check each photo raw file individually. Sometimes, one-click fixes don’t work perfectly across the board.
For more advanced editing, consider exploring the “Lightroom HDR Merge” feature. It allows you to combine multiple exposures into a single high-dynamic-range image, giving you even more control over your final result.
Frequently Asked Questions (FAQs)
Can you do HDR in Lightroom?
Yes, Lightroom supports High Dynamic Range (HDR) processing. You can create HDR images by combining multiple images with different exposure levels directly in Lightroom.
How to add Aurora HDR to Lightroom?
To add this tool as a plugin in Lightroom, first ensure you have Aurora HDR installed. Then, in Lightroom, go to the ‘File’ menu, select ‘Plug-in Manager’, and then ‘Add’. Navigate to your installation and add it to Lightroom.
How do I automate HDR merge in Lightroom?
Automating HDR merge in Lightroom can be done by selecting the bracketed photos, right-clicking, and choosing 'Photo Merge' followed by 'HDR'. To further automate the process, you can create presets or use the 'Auto Align' and 'Auto Tone' options during the HDR merging process.
Can you add plugins to Lightroom?
Yes, you can add plugins to Lightroom. Go to the ‘File’ menu, choose ‘Plug-in Manager’, and then click on ‘Add’. From there, you can select the plugin files you want to install.
Using Lightroom HDR plugins has completely changed how I edit my photos. These plugins help me bring out more detail and add depth to my images, making them stand out.
It’s been great for transforming dull photos into something more vibrant and eye–catching. If you want to step up your editing skills, I highly suggest checking out this Photoshop Course and this Lightroom Course.
Both courses have helped me get the most out of these plugins, showing me tips and tricks I didn’t know before. Whether you’re new to photo editing or have been doing it for a while, mastering Lightroom HDR plugins can really take your work to another level.
Plus, using tools like Photoshop and Lightroom makes the process smooth and efficient. Dive into these tools, and you’ll see your editing improve quickly.
If this article has helped you, then Like and Share it with your friends
$2,061.00Original price was: $2,061.00.$1,061.00Current price is: $1,061.00. 27584
Download Your Free Guide Now!
Discover the secrets of photography with our printable guide! Master essential techniques like aperture, shutter speed, and ISO to create stunning images. Get your free printable PDF now and start turning your snapshots into masterpieces!