Lightroom Crop for Instagram: Quick Guide to Perfect Image Dimensions
Lightroom Crop for Instagram: Quick Guide to Perfect Image Dimensions
Have you ever struggled with getting your photos to look just right on Instagram? I know the feeling. One important trick that can make a huge difference is learning the best practices for a Lightroom crop for Instagram.
In this article, I’m going to share some simple yet powerful tips to help you resize and crop your images perfectly for Instagram.
Imagine your photos standing out in your followers’ feeds, catching their eye with precision and style.
By the end of this guide, you’ll be confident in your ability to make every photo Instagram-ready.
Let’s dive in and transform your Instagramgametogether!
Table of Contents
Image Aspect Ratio for Instagram
For Instagram, it’s important to use the correct image aspect dimensions when applying a Lightroom crop in Instagram to ensure your photos display optimally across different devices and screen sizes.
Common Aspect Ratios
Instagram uses several common aspect ratios:
1:1 ratio for square images
4:5 ratio for vertical images
16:9 ratio for horizontal images
Understanding these ratios helps you maximize your image quality. These aspect ratios help fit the entire image into Instagram’s frame without awkward cropping.
Remember, incorrect aspect ratio can impact image quality. It is important to note that image sizing and aspect ratio directly affect how your photos look once uploaded.
Proper settings for Instagram ensure your photos appear professional and clear, and knowing how to change aspect ratio in Lightroom will help you achieve the ideal dimensions for each post.
Choosing the Best Aspect Ratio
Choosing the best aspect ratios depends on what you want to showcase:
A square image usually works best for balanced content.
Vertical images often highlight portraits or tall objects effectively.
Horizontal images are perfect for landscapes.
Adjusting the crop tools in Lightroom lets you stick to the appropriate aspect ratio. Lightroom crop for Instagram is a helpful feature to get this right.
Lightroom settings are also significant for image sizing. Ensure you tweak your settings for Instagram to maintain image quality. Always check and adjust your export settings.
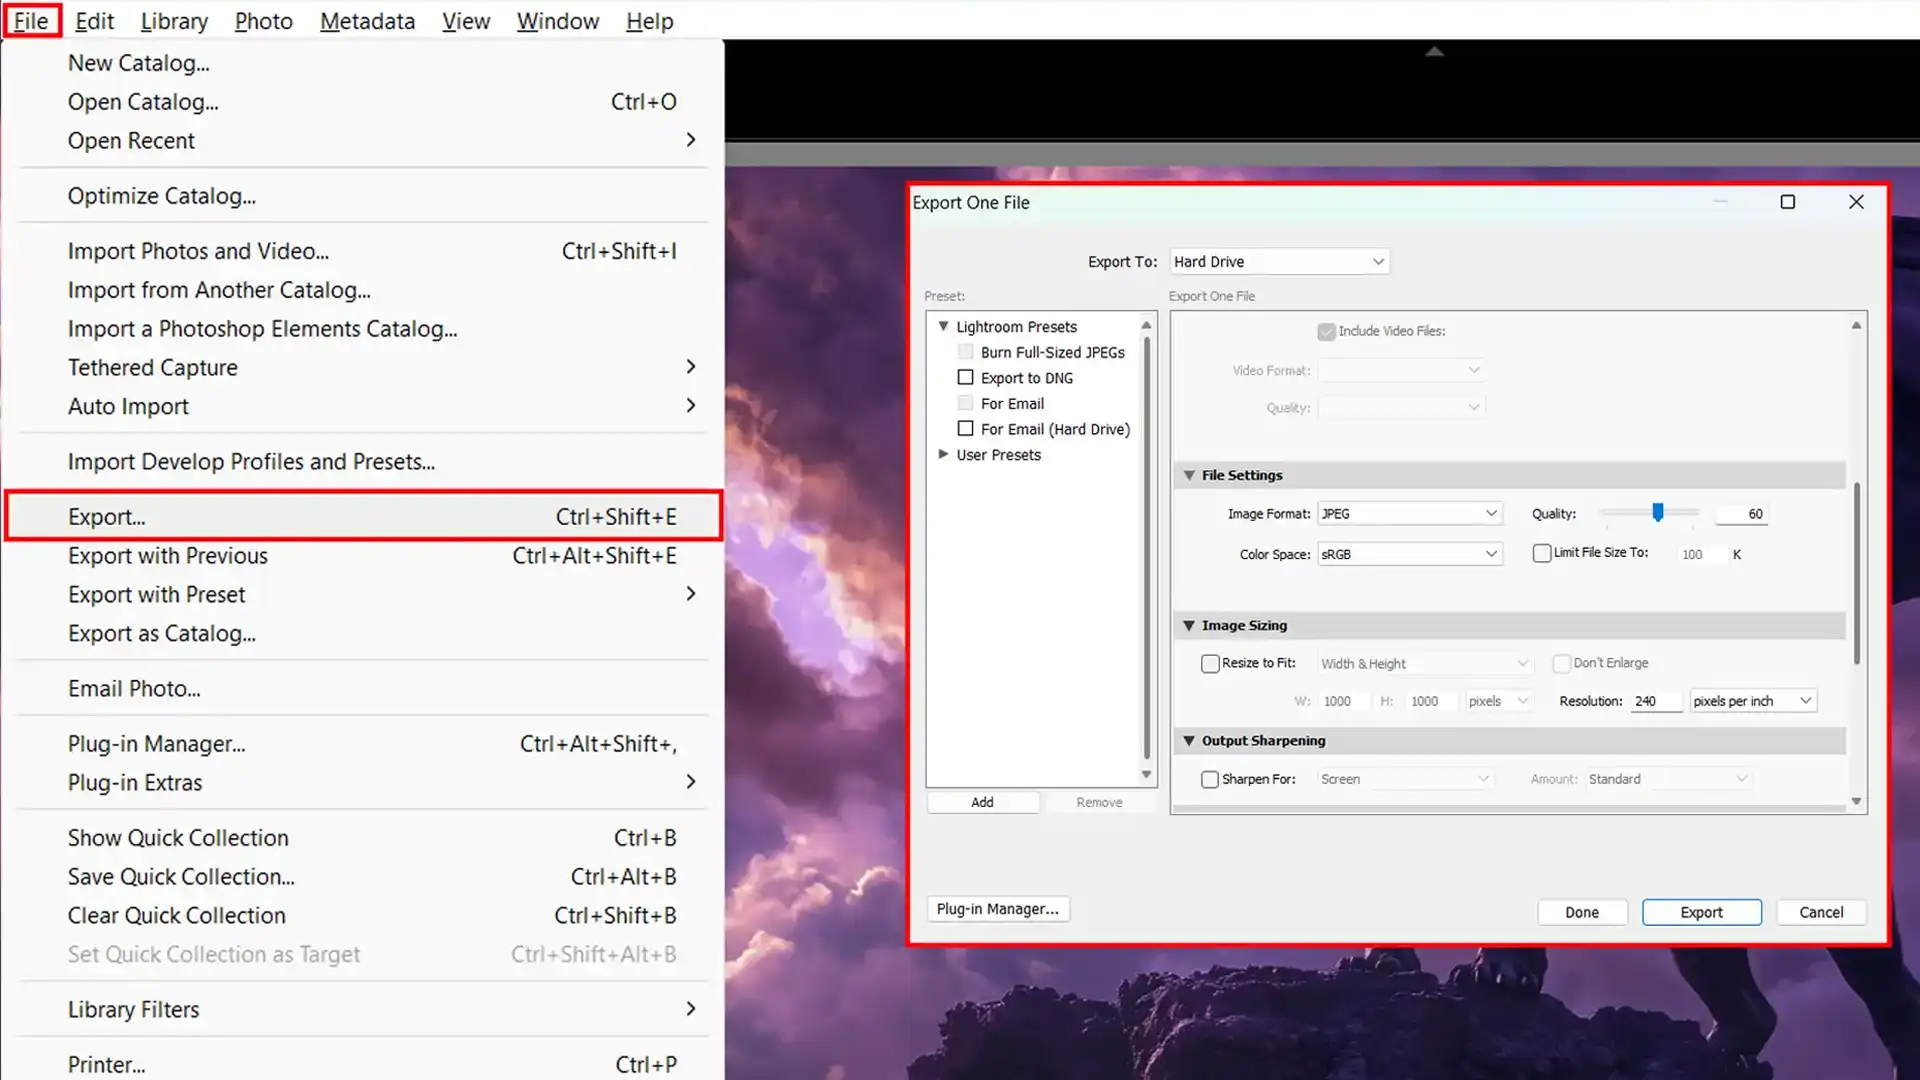
Exporting Your Images
When exporting, the export dialog box is your friend. It helps set the file size and image format right. Files settings should align with Instagram’s needs.
To ensure top-notch image resolution, you might need export presets tailored for Instagram. These export presets save time and maintain consistency across your posts.
Using the best Lightroom export options makes a difference in image quality.
Additional Tips
Lastly, focus on color space and output sharpening. The right color space keeps colors vivid, while proper final image sharpening maintains crispness.
Pro Tip: Always preview your images before posting to avoid surprises. Little tweaks in the Lightroom crop for Instagram, using a free crop in Photoshop, or learning how to crop in Photoshop can lead to significant improvements in image quality.
Best Aspect Ratio for Exporting in Lightroom for Instagram
The best aspect dimensions for exporting images using a Lightroom crop in Instagram are 1:1 for square posts and 4:5 for vertical posts, ensuring your content fits perfectly within the platform’s display requirements.
Square Photo 1:1 Ratio
Using the crop tools in Lightroom, select a 1:1 aspect ratio. This ensures your square image fits perfectly on Instagram.
Adjust your image sizing to 1080×1080 pixels for optimal image quality. This keeps the file size manageable while maintaining a high resolution.
Before exporting, review your export settings in the export dialog box and ensure the color space is set to sRGB.
Landscape Photo 1.91:1 Ratio
For horizontal images, the 1.91:1 aspect ratio works well.
Set your image size to 1080×566 pixels. Select ‘Limit File Size To’ in file settings to keep quality high. In Lightroom, choose ‘Screen’ for output sharpening under export presets.
Portrait Photo 4:5 Ratio
When working with vertical images, apply the 4:5 aspect ratio. Set your image size to 1080×1350 pixels.
Ensure your Lightroom export settings cater to high image quality. Check ‘Include Metadata’ under export settings if needed.
Adjust the export preset accordingly.
Instagram Stories 9:16 Ratio
For stories, use a 9:16 aspect ratio. Opt for a minimum resolution of 1080×1920 pixels. This maintains good image quality. Make sure the color space remains in sRGB.
Verify export settings to enhance the entire image before posting.
Pro Tip: Always preview your images in Instagram’s story feature to ensure perfect fit and quality. Learning how to edit photos in Lightroom for Instagram can also help you fine-tune your images, ensuring they meet Instagram’s resolution and quality standards before posting.
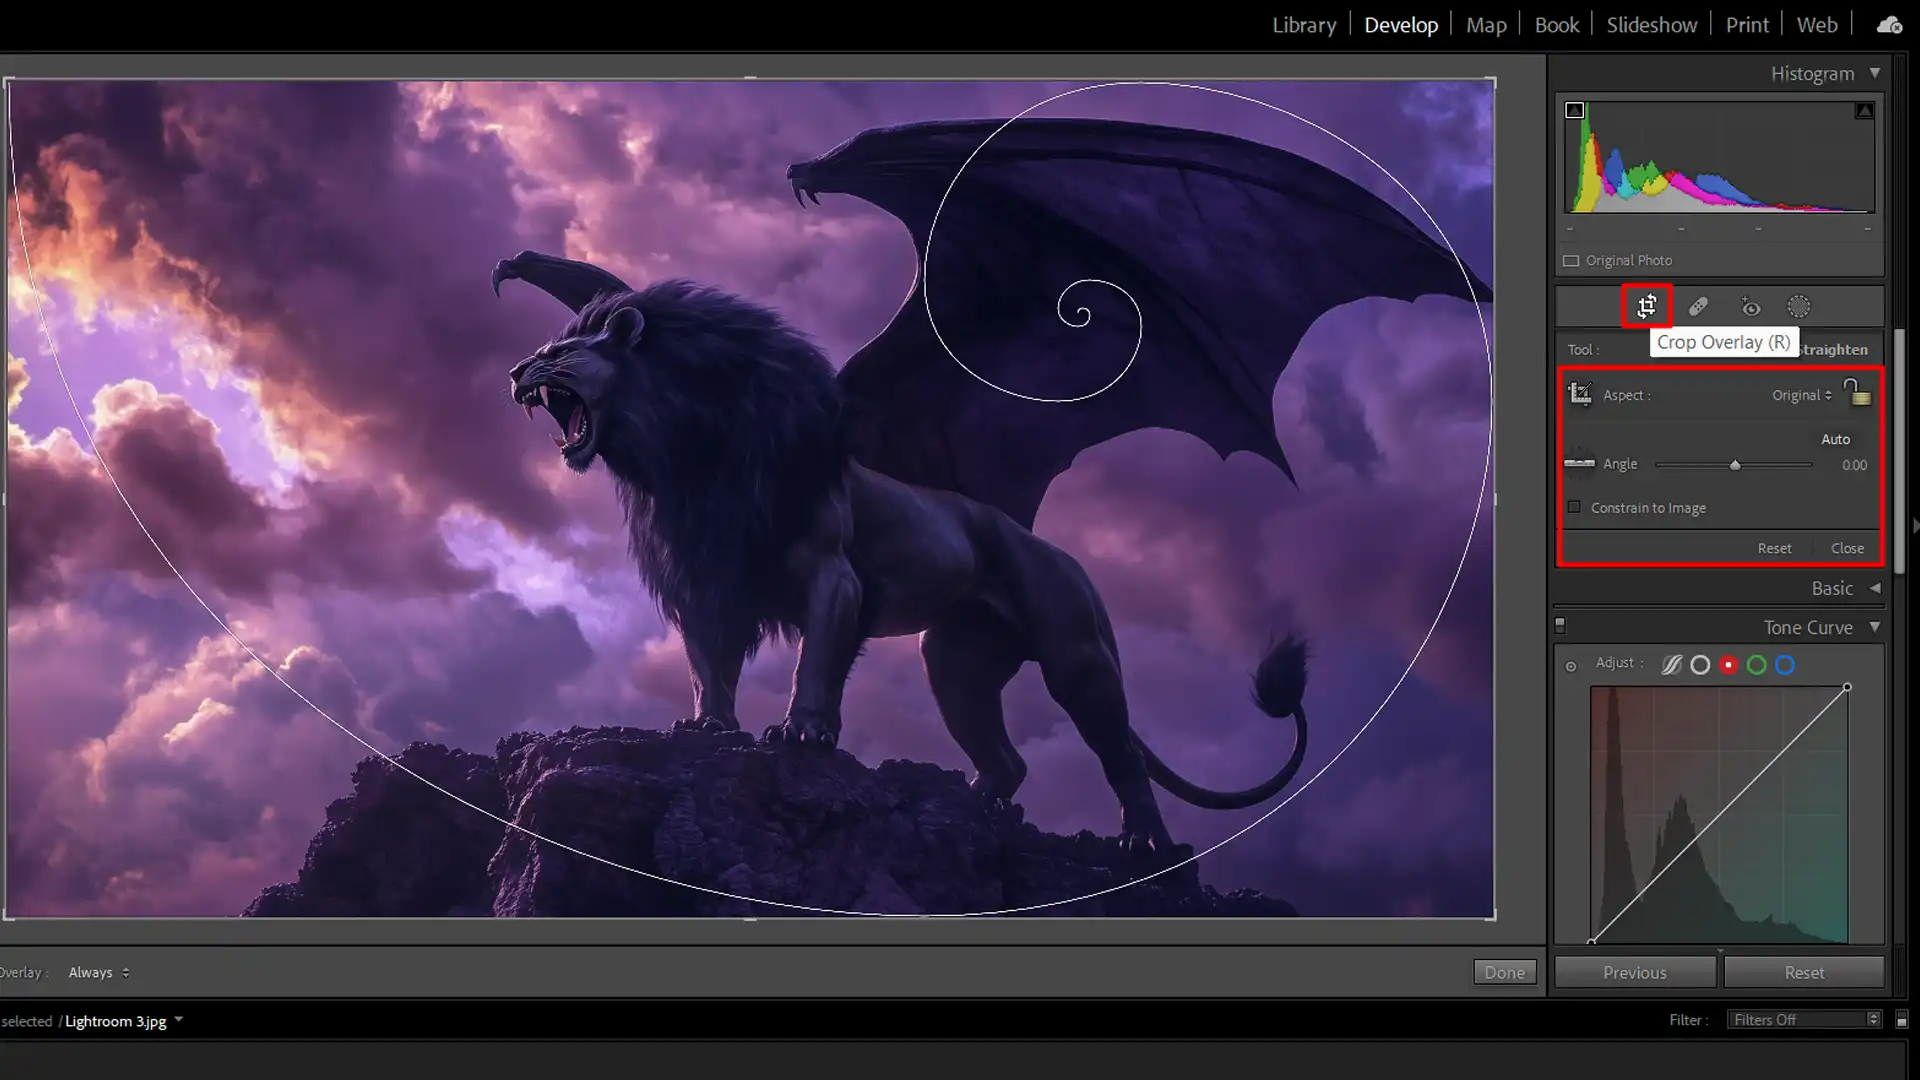
Using the Crop Tool in Lightroom
To start, open your image in Lightroom, and navigate to the Develop module.
Here, you’ll see the crop tools icon on the right-hand panel. Click it to open the crop overlay. In this mode, you can select various aspect ratios or drag the edges to create a custom crop.
This is the simplest way to adjust your image size. Keeping the original crop tools is important for maintaining the integrity of your composition.
Setting Custom Crop Sizes
For more precise editing, you can set custom crop sizes by selecting the “Enter Custom” option from the drop-down menu. Input your desired dimensions.
The aspect ratio is important here, as it ensures your images fit well on platforms like Instagram. Remember, maintaining a consistent ratio helps in presenting a cohesive portfolio.
For instance, a vertical image at 4:5 aspect ratio works well for portraits, whereas landscape photos benefit from a 16:9 aspect ratio.
Tips for Perfect Crops
For effective cropping and improved composition in your photography, keep these practical tips in mind.
Implementing these strategies will enhance your images and highlight your main subjects:
Use the grid: The grid overlay helps in aligning elements within your photo.
Adjust focus: Center the main subject of your image to draw attention.
Leverage presets: Save time by using Lightroom export presets. You can find them under the export dialog box. These presets help you maintain consistent export settings such as aspect ratio and image format.
When you’re ready to export, double-check your file settings. Select the correct color space (usually sRGB for web usage), and adjust the file size if needed.
Remember, export settings determine the final image quality and compatibility with various platforms.
Pro Tip: Try using the golden ratio overlay for a professional composition that draws the viewer’s eye naturally.
Enhancing Image Quality for Instagram With Photoshop
Sharing top-notch images on Instagram requires some fine-tuning in Lightroom. This guide breaks down a few steps you should follow to make your photos stand out.
Optimizing Resolution
First, focus on resolution. High resolution makes images clearer. Set your export settings to use appropriate dimensions for Instagram.
Generally, an image size of 1080×1350 pixels works well. Ensure you choose JPEG under image format for a good balance between quality and file size.
Adjusting Sharpness and Clarity
Next, let’s talk about sharpness and clarity. Begin by going to the Details panel. Adjust the sharpness slider until the edges of elements in your image look defined.
Also, the clarity slider should not be pushed too far, just enough for an appealing but natural look.
Sharp images catch more attention on feeds.
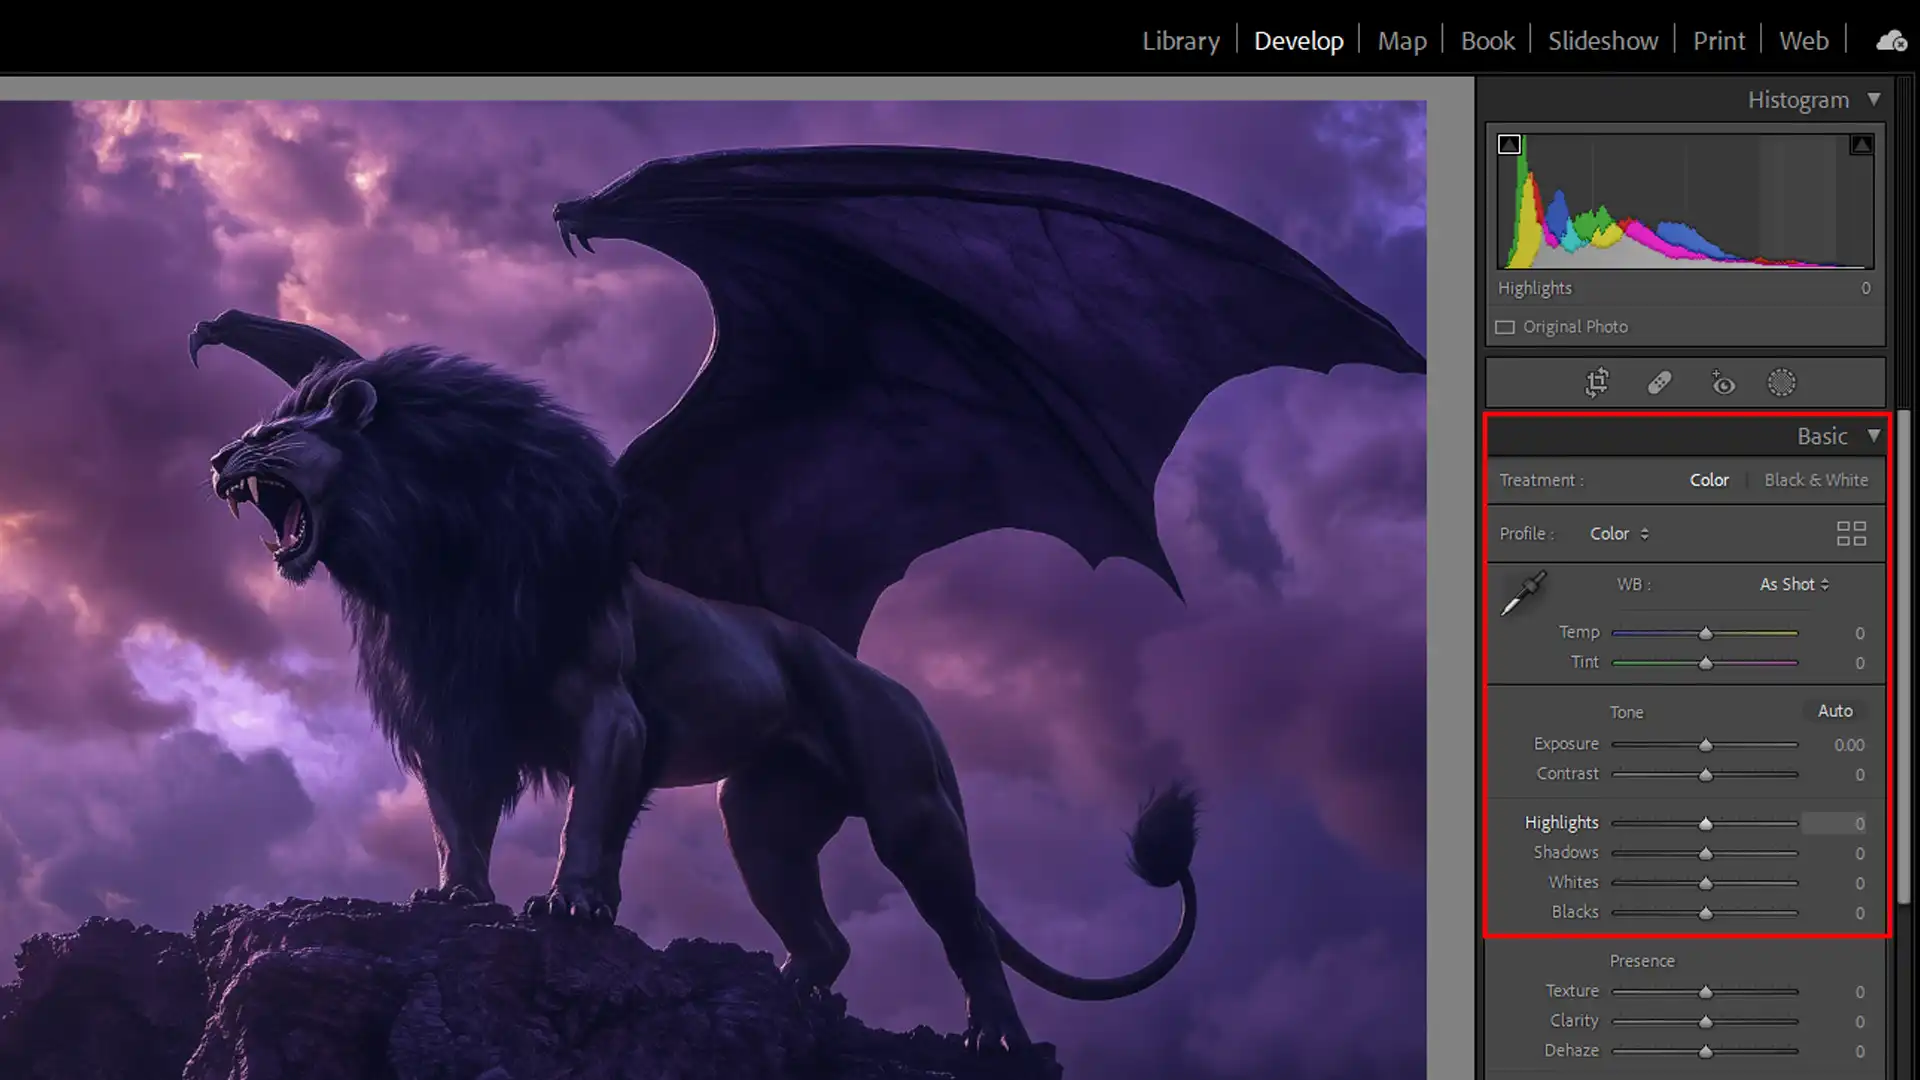
Balancing Colors and Exposure
Finally, work on colors and exposure. Adjusting these will make your photos pop. Go to the Basic panel to tweak exposure and contrast. Make sure the highlights and shadows balance without losing detail.
Also, don’t overlook the color space setting. Using sRGB will ensure your colors remain consistent across devices.
After balancing exposure, dive into the color sliders. They will allow you to enhance specific colors, making your photo eye-catching.
Pro Tip: Sync your settings using export presets under the export dialog box for consistency across all your photos. This saves time and keeps a uniform look in your feed.
Proper use of image crop and export presets will keep your workflow efficient and your posts consistently stunning.
By following these tips, you streamline your process while producing high-quality, vivid images for Instagram, ensuring they captivate your audience effectively.
Best Lightroom Export Settings for Instagram
When it comes to sharing your photos on Instagram, using the right export settings is important. Follow these steps to ensure your images maintain their quality and appeal.
After adjusting your settings, click the export button to save your image, and make sure you choose the correct export location to easily find and upload your photo to Instagram.
Choosing the Right Instagram File Format
JPEG is your best bet for Instagram. It retains image quality while keeping the file capacity manageable. Other formats might be too large or not compatible.
When choosing a file format, JPEG provides a balanced compromise between quality and file size, making it an ideal file format for social media platforms like Instagram.
Setting the Correct Resolution
Set your export settings to 1080×1350 pixels. This ensures your images fit Instagram’s standards and display correctly.
Resizing the image makes it look sharp and professional.
Ensuring Optimal Compression
Aim for a balance between quality and file size. Over-compressed images lose detail, while under-compressed images might not upload properly. Use Lightroom’s export preset options to streamline this process efficiently.
After setting your preferred quality and size, click the export button and select the appropriate export location to ensure your image is both optimized and easily accessible for Instagram.
Additional Tips
To further enhance your photography, consider these additional tips.
Make sure your JPEG color space is set to sRGB. This color space ensures that your images look consistent across different devices, keeping your audience engaged with vibrant colors.
For better results, avoid pushing the clarity slider too much, which keeps the image looking natural. Tune the sharpness in the Detail panel sparingly.
Pro Tip: Use Lightroom’s export preset feature to save your settings for future projects. It saves time and guarantees consistency in your images.
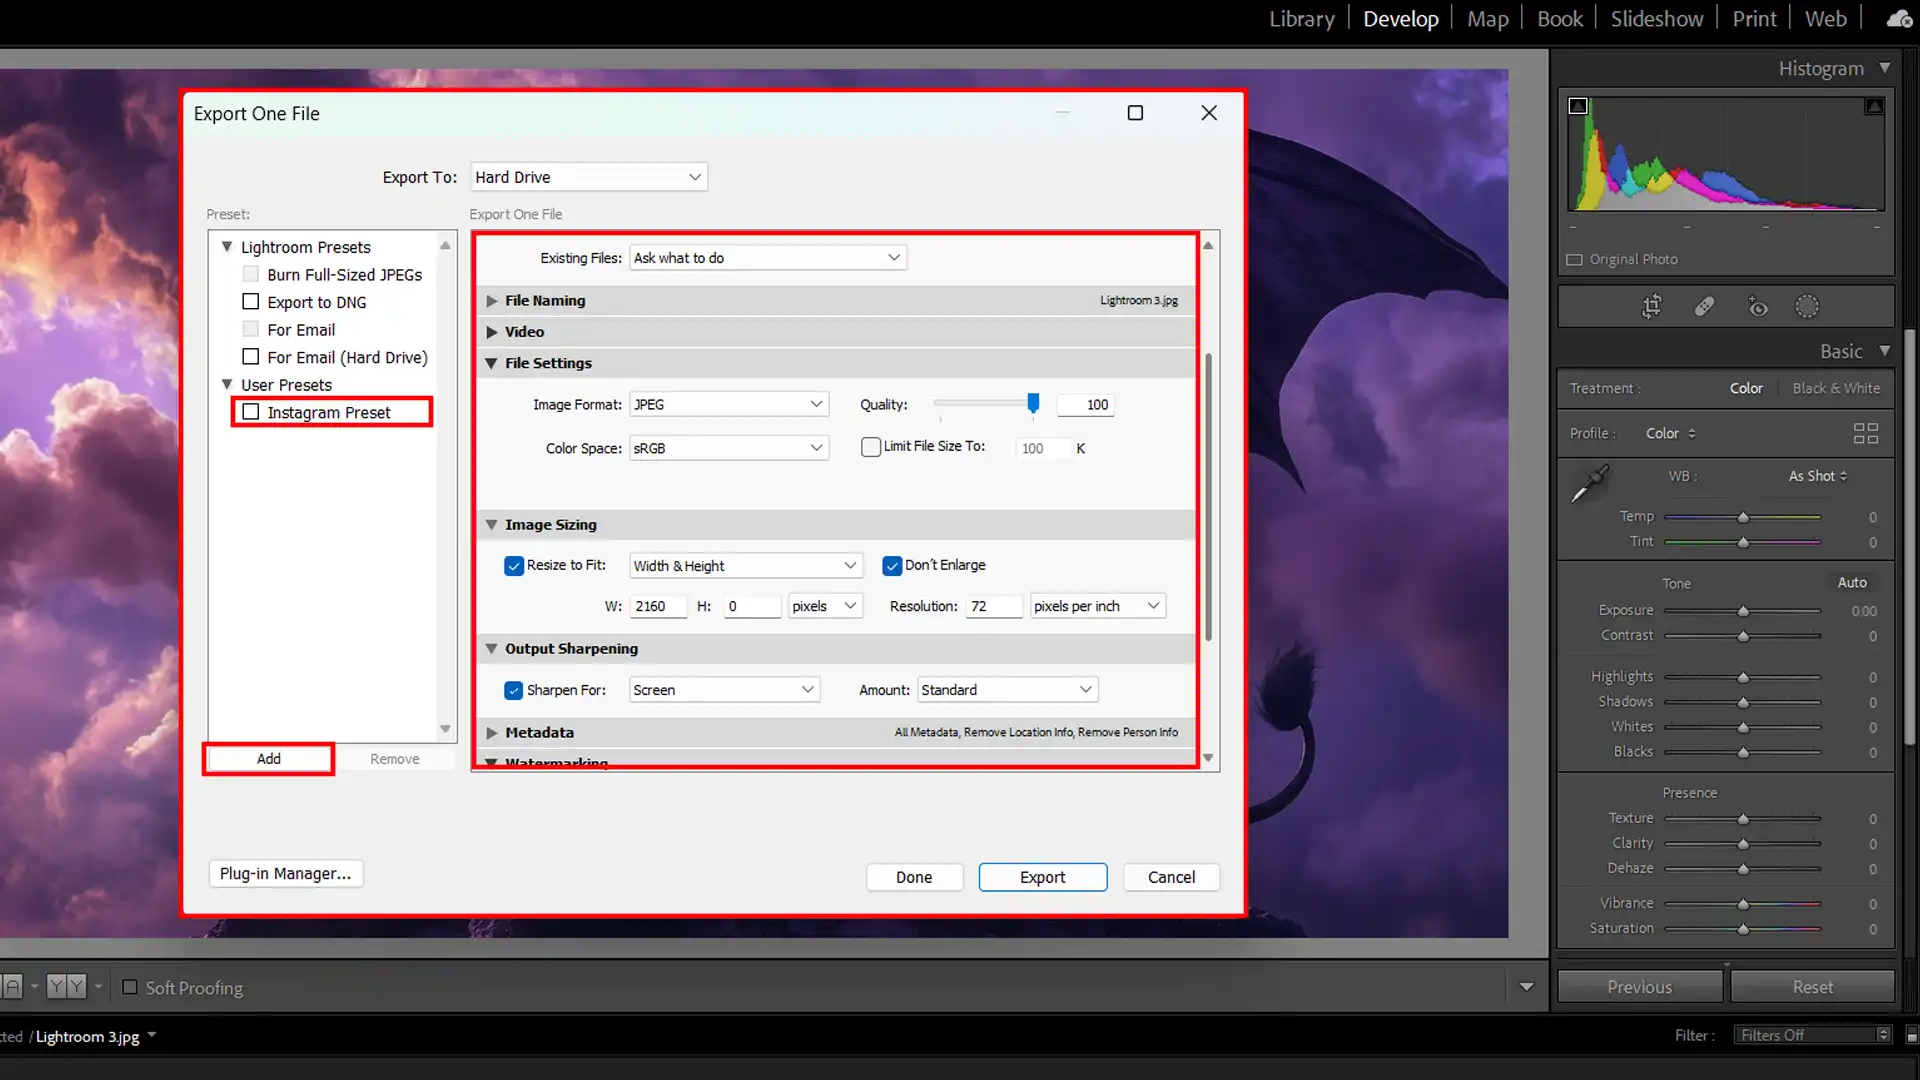
How To Create A Lightroom Export Preset
Creating a Lightroom export preset simplifies your workflow. An export preset saves time by using the same export settings for different images automatically.
How to Install Lightroom Export Presets for Instagram
Navigate to the preset file you downloaded and click 'Import'.
Your new export preset is now ready to use.
Why Use Export Presets?
Understanding the benefits of using export presets can significantly improve your workflow. Here are some reasons why incorporating them into your editing process is advantageous:
Speeds up your editing process
Ensures consistency across your photos
Makes sharing your photos easier
How to Customize Export Presets
Customizing your export presets allows you to tailor your workflow to fit your specific needs. Follow these steps to create presets that enhance your editing experience:
Open the Export dialog box.
Adjust image quality, image size, color space, and other settings according to your preference.
Save these settings as a new preset.
Name your preset something memorable so you can easily find it later.
Image Size and Aspect Ratio
When setting up your preset, consider the image aspect ratio. For Instagram, the best aspect dimensions are 1:1 (square) and 4:5 (vertical).
You can use the crop tools to adjust to these ratios. Make sure your image size meets the platform’s requirements for better resolution.
Image Quality and File Settings for Lightroom Crop for Instagram
The image clarity slider should be set based on your needs. Higher quality means better visuals but larger file size. In the file settings section, choose the image format that suits your purpose. WEBP is commonly used for online sharing.
Additional Lightroom Export Settings for Instagram
To optimize your photos for Instagram, consider these important export settings that will enhance your images and meet the platform’s requirements:
Choose the appropriate colorspace, usually sRGB for web use.
Enable output sharpening based on whether the image is for screen or print.
Set the image sizing to match the requirements of the platform you'll be using.
Using the Export Preset
Whenever you need to export an image, just select your saved preset in the export dialog box. This will apply all the settings you’ve configured instantly.
Pro Tip: Always test your best export settings and presets with a few different images to ensure they meet your desired standards.
Common Mistakes and How to Fix Them
To help you avoid pitfalls when exporting your images for Instagram, here are some common mistakes photographers make and effective solutions to address them.
By following these tips, you can ensure your photos maintain their quality and appearance on the platform:
Aspect
Overview
Incorrect Image Size for Lightroom Crop
Instagram prefers images at 1080×1350 pixels. Set your Lightroom export settings to this resolution for sharp images.
Wrong File Export Settings
Save images as JPEGs to maintain manageable file sizes without losing quality.
Color Space Mismatch
Ensure your export settings are set to sRGB to maintain color consistency on Instagram.
Ignoring Export Preset Options
Utilize export presets to save time and maintain consistency across your images.
Wrong Image Sizing
Maintain a maximum aspect ratio of 4:5 to avoid cropping or distortion during uploads.
Incorrect Image Size for Lightroom Crop for Instagram
Getting the right image size is important. Too big or too small? Both can ruin your photos.
Instagram likes images at 1080×1350 pixels.
Easy fix: set your Lightroom export settings to this resolution. Your image looks sharp, no more blurriness.
Wrong File Lightroom Export Settings for Instagram
Save your images as JPEGs. Why?
The file capacity remains manageable without losing quality. PNG or TIFF files are too large. Adjust your Lightroom export settings to JPEG for the best results.
This is especially important when considering the difference between RAW or JPEG format for social media uploads.
Color Space Mismatch
Instagram uses an sRGB color profile. If you choose Adobe RGB or ProPhoto RGB, your colors may look off.
Switch your export setting to sRGB. This ensures color consistency.
Ignoring Export Preset Options
Export presets save time. Set them once and apply to all future images. Lightroom offers easy-to-use preset options.
In my experience, getting the right aspect ratio and export settings makes a significant difference in how your images look on Instagram.
Using the proper Lightroom crop for Instagram helps ensure that my photos appear sharp and professional when shared. I’ve learned that paying attention to these details really pays off.
If you’re looking to improve your skills and dive deeper into using these tools, I recommend checking out my Photoshop Course and Lightroom Course. They provide step-by-step guidance to help you refine your editing process.
If you haven’t yet explored Adobe’s tools, you can find Photoshop and Lightroom on their official website. Embrace these tools, and you’ll see a positive change in your photography journey!
If this article has helped you, then Like and Share it with your friends
$2,061.00Original price was: $2,061.00.$1,061.00Current price is: $1,061.00. 27583
Download Your Free Guide Now!
Discover the secrets of photography with our printable guide! Master essential techniques like aperture, shutter speed, and ISO to create stunning images. Get your free printable PDF now and start turning your snapshots into masterpieces!