Are you wondering how to seamlessly edit and organize your photos with ease? If so, you’re in the right place. Lightroom Amazon Prime Photos offers a powerful solution for both casual photographers and professionals.
Imagine having the ability to enhance your images, manage your photo library, and sync your edits across devices effortlessly. In this article, I’ll guide you on how to make the most out of Lightroom Amazon Prime Photos.
Whether you’re looking to perfect your editing skills or simply want to keep your photo collection in order, this guide will provide you with the tools and tips you need.
Let’s dive in and unlock the full potential of your photography!
Table of Contents
Understanding Lightroom Amazon Prime Photos
Adobe Lightroom is a photo editing software that many photographers use. It’s not just for pros, beginners find it helpful too.
Lightroom allows you to organize, edit, and export your images quickly.
The software offers tools for basic edits, like cropping and exposure correction. It also provides more advanced options like color grading.
What is Amazon Prime Photos?
Amazon Prime Photos is a photo storage service available to Amazon Prime members. It gives you unlimited photo storage.
You can access your images from any device with an internet connection. You can also create albums, share images, and even order prints directly from the app.
Why Use Lightroom with Amazon Prime Photos?
Using Lightroom with Amazon Prime Photos offers several benefits:
- Easy Backup: Once you finalize your edits in Lightroom, simply upload them to Amazon Prime Photos for safekeeping. This ensures your images are stored in high resolution.
- Accessibility: You have easy access to your photos from anywhere. You don't need to worry about hard drive failures or losing your data.
- Unlimited Storage: Amazon's unlimited storage means you won't run out of space. You can import a large number of images without worrying about storage limits.
By using both services together, you streamline your workflow from editing to storage.
Steps to Integrate Lightroom with Amazon Prime Photos
- Download and install Adobe Lightroom. Once installed, open the software.
- Create new folders in Lightroom to organize your upcoming photo imports. The software's folder management helps keep your workspace tidy.
- Start importing your images into Lightroom. Use the import feature to bring images from your camera or storage device. Organize them into the previously created directories.
- Edit your images as needed. Use Lightroom’s tools to adjust exposure, brightness, and other features. For more advanced edits, consider using Photoshop for tasks like Removing Shadows in Photoshop or utilizing the Content-Aware Fill in Photoshop.
- Save your final edits. Make sure you execute the export option to save images in your considered folder.
- Open your Amazon Prime Photos account. Use the upload option to add your edited images. Select the folders where you want your images to be saved.
- Use the available options in Amazon Prime Photos to create albums and further organize your uploads.
Pro tip: Keep your images organized from the start. Create folders based on events or dates to make finding specific images easier later.
For instance, you can name your folders by month, such as “Jun 2023”, “Jul 2017”, and so on. These small steps help in managing your growing collection efficiently.
Setting Up Lightroom for Amazon Prime Photos
The journey begins with downloading Adobe Lightroom:
- Navigate to the Adobe website and find the download option for Lightroom.
- Click on the download button and follow the instructions.
- Once it's done, open the application and let it install. Installation usually takes a few minutes, so bear with it.
Creating an Adobe Account
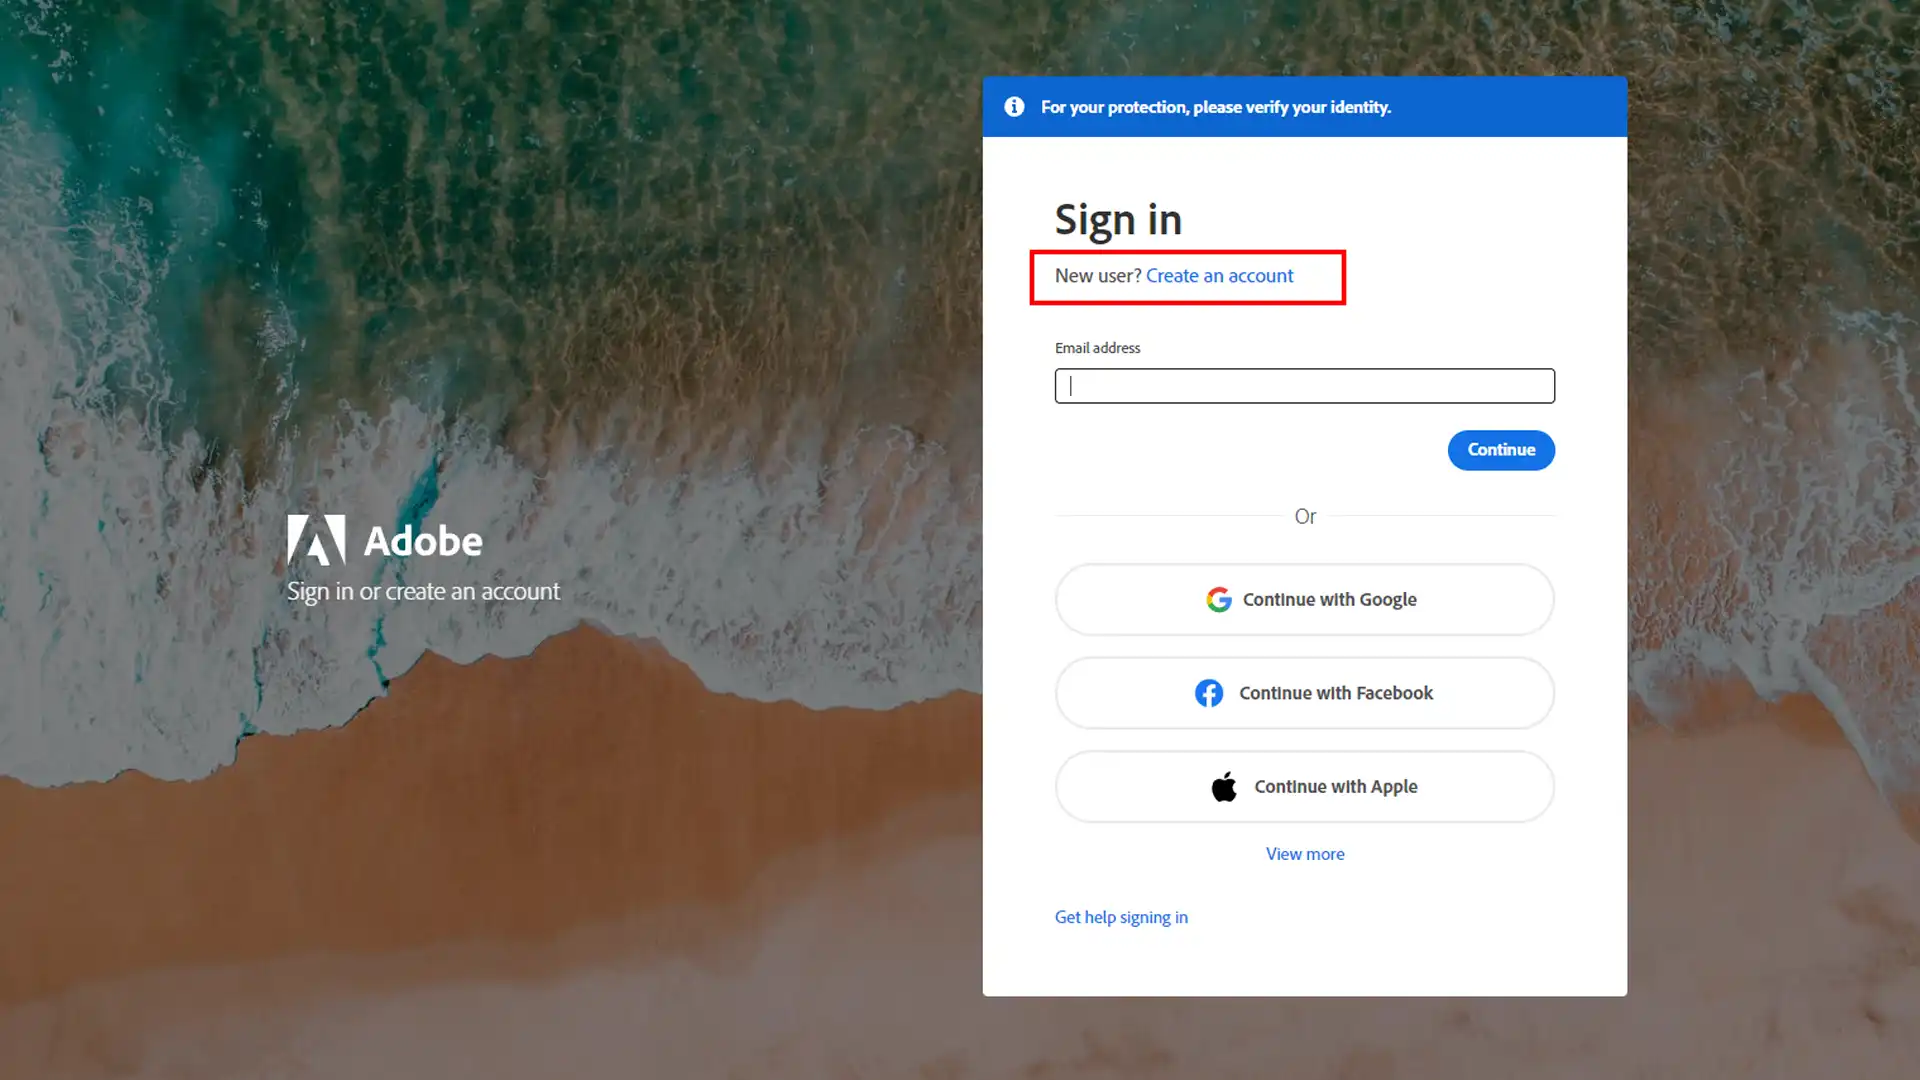
Next, let’s create an Adobe account, which is necessary to use Lightroom:
- Open the software and click on the "Sign Up" button.
- Fill in your details - name, email, and password.
- Confirm your email. You have an Adobe account.
Ensure your details are easy to remember but secure. This way, you can access Lightroom on any device.
Setting Up Amazon Prime Photos
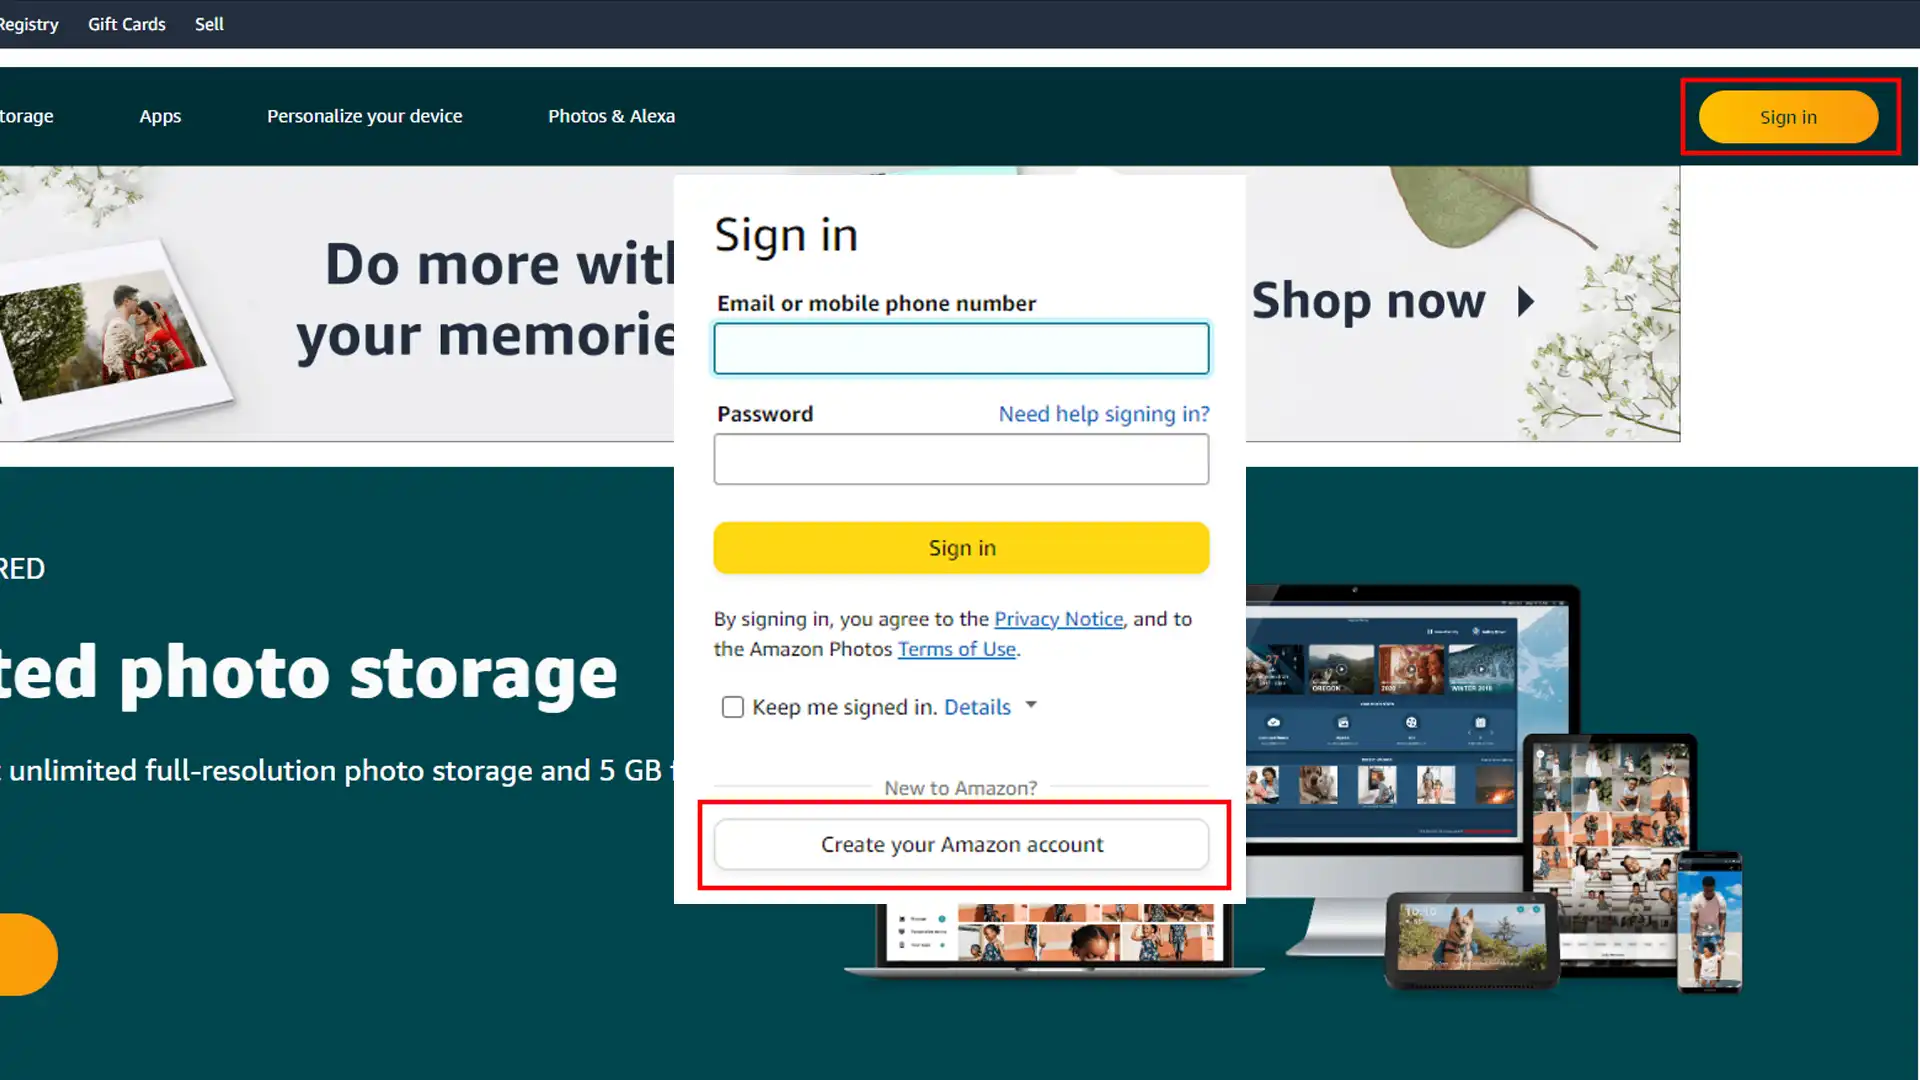
Now, we move to setting up Amazon Prime Photos:
- Log in to your Amazon account.
- Navigate to the Amazon Photos section. If you're a Prime member, you have access to unlimited photo storage.
- Download the Amazon Photos app for easier management and follow the prompts for setup.
Now, you’re ready to start using Amazon Prime Photos with Lightroom.
Linking Lightroom with Amazon Prime Photos
To link Lightroom with Amazon Prime Photos, you need to export your images from Lightroom first:
- After editing your images, select them and click on the export option.
- Set your file format and save the location, then hit export.
- Open Amazon Photos and upload the exported images by clicking 'Add Photos'.
- Organize them into albums for better access.
Pro Tip: Save time by creating folders in Lightroom based on events or dates. This keeps everything organized and speeds up finding your images when you need them.
Cconsider using Lightroom shortcuts to streamline your editing process.
These shortcuts can significantly speed up your workflow, making it easier to manage large batches of images before exporting them to Amazon Prime Photos.
For those interested in exploring more advanced features, learning about the essential tools in Lightroom can enhance your editing capabilities and help you achieve professional-quality results.
Importing Images from Amazon Prime to Lightroom
Begin by accessing your Amazon Prime Photos portal through your Amazon account. Once logged in, locate the specific images you wish to import into Lightroom. Utilize the search functionality to filter images by dates, tags, or events.
| Step | Amazon Prime Photos | Adobe Lightroom |
|---|---|---|
| Accessing Images | Log into Amazon Prime Photos | Open Adobe Lightroom |
| Selecting Images | Click on images, use Control/Command to select | – |
| Import Function | Download images to your computer | Click ‘Import’, select downloaded images |
| Organizing Images | – | Create new folders, move images accordingly |
| Applying Keywords/Tags | – | Use metadata panel to add keywords and tags |
| Check Compatibility | Ensure images are downloaded in supported formats | Verify image format and resolution settings |
Selecting Images for Import
Click on the images you want to import to Lightroom. You can select multiple images by holding down the Control (or Command) key while clicking.
Ensure the selected images are highlighted before proceeding.
Using Lightroom's Import Function

- Open Adobe Lightroom and navigate to the 'Library' module.
- Click on the 'Import' button at the bottom left corner of the screen.
- A new window will appear, allowing you to select the images saved from Amazon Prime Photos.
Organizing Imported Images into Folders Lightroom
Start by creating new folders within Lightroom to sort your imported images. Go to the ‘Folders’ panel, right-click, and select ‘Add Folder’ to name and create a new folder. Move your imported images into these new folders for better organization.
Using Keywords and Tags
Make good use of keywords and tags for efficient photo management. After importing your images, apply relevant keywords to help categorize them further. These steps ensure that your Lightroom library remains organized and easy to navigate.
Pro Tip: When importing images from Amazon to Lightroom, always double-check the format compatibility and resolution settings to maintain photo quality. If you encounter any issues, consider using Lightroom Shortcuts to streamline your workflow.
Additional Tip: For those interested in expanding their editing skills, explore the Difference Between Photoshop and Lightroom to understand which software best suits your needs.
Editing Images in Lightroom
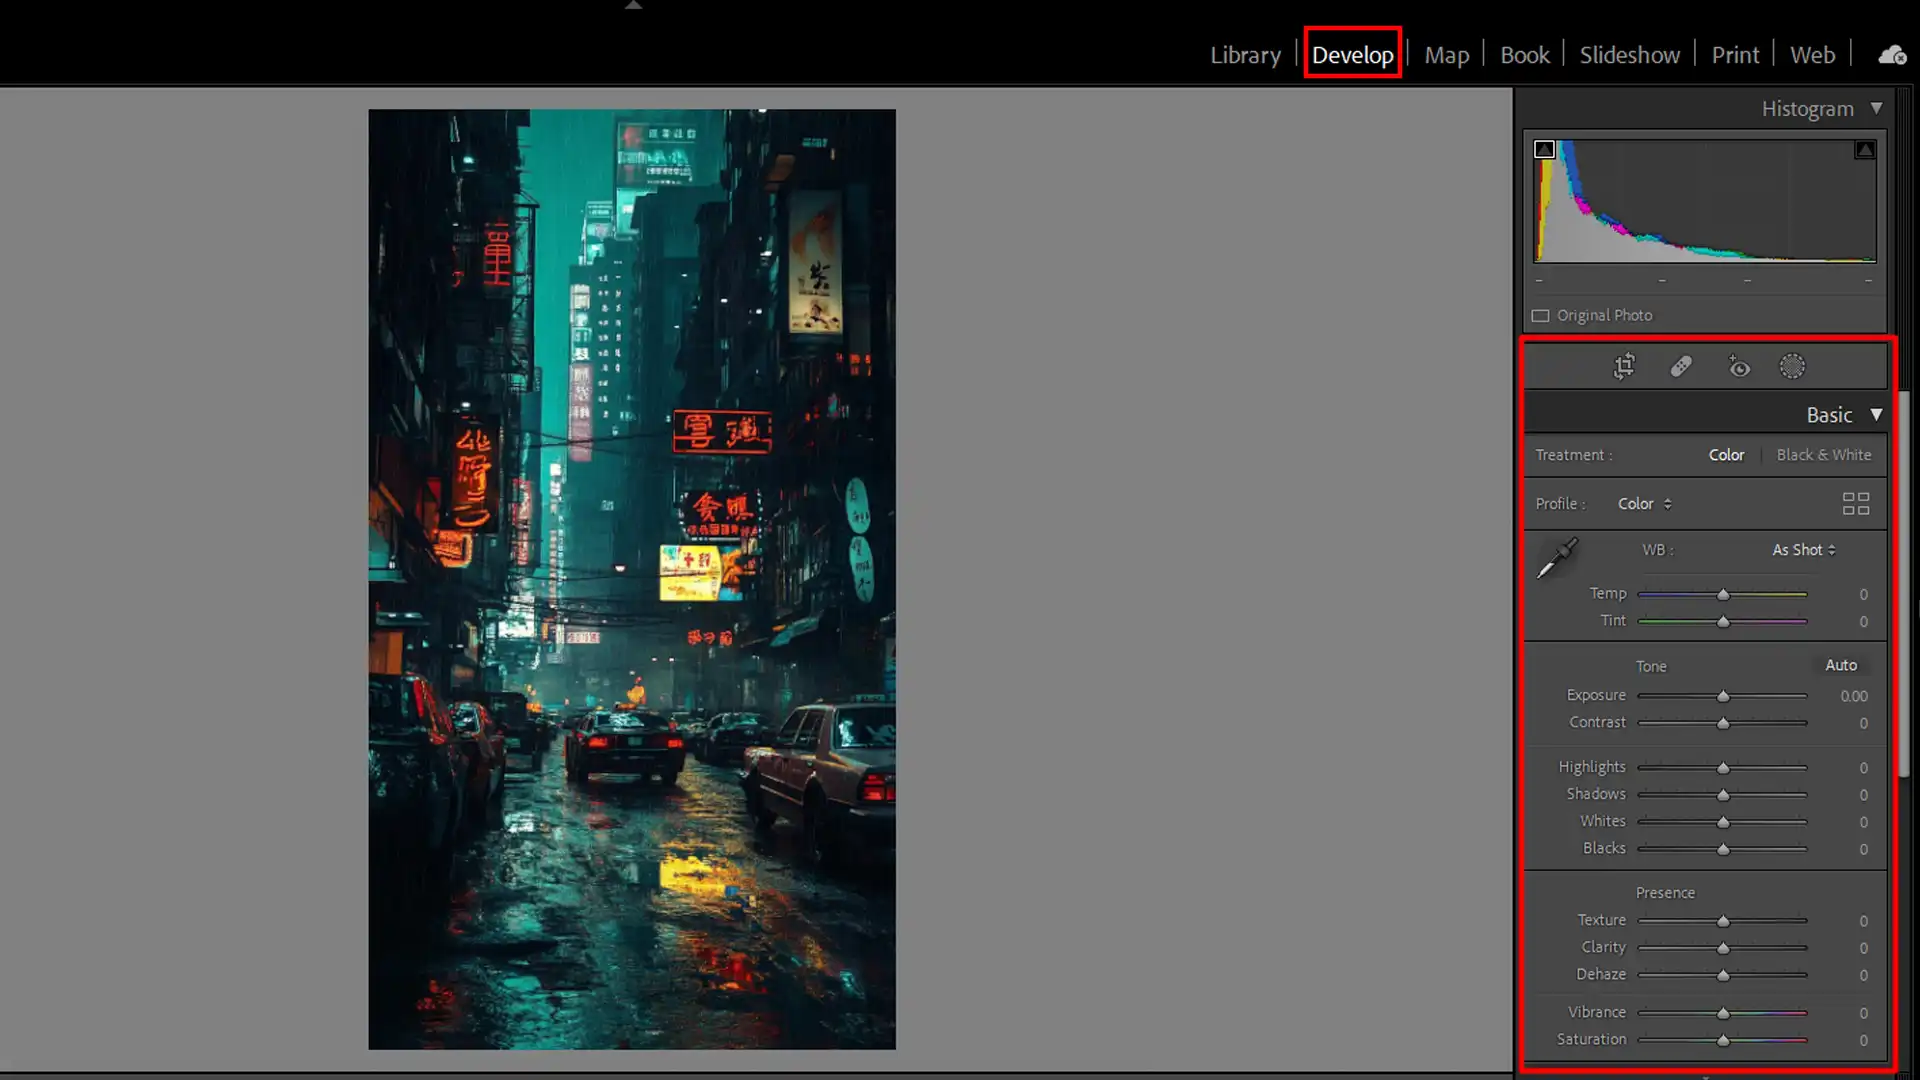
First, let’s dive into the essential tools in Lightroom.
These tools help you with fundamental adjustments:
- Cropping: Frame your image better.
- Brightness: Ensure your photo looks clear.
- Contrast: Make your images pop.
- Saturation: Give your images vibrant colors.
- Sharpening: Achieve clear details.
Basic edits are like seasoning food – a little goes a long way.
Advanced Editing Techniques
Now, let’s move to advanced techniques:
- Tone Curve Adjustments: Better shadows and highlights.
- Split Toning: Add colors to shadows and highlights separately.
- Radial Filter: Focused adjustments.
- Graduated Filter: Add depth to landscapes.
- Dodging and Burning: Enhance specific areas.
The advanced techniques need practice, but it definitely pays off in your final results. Think of it like cooking a gourmet meal ,time consuming but rewarding.
Using Presets in Lightroom
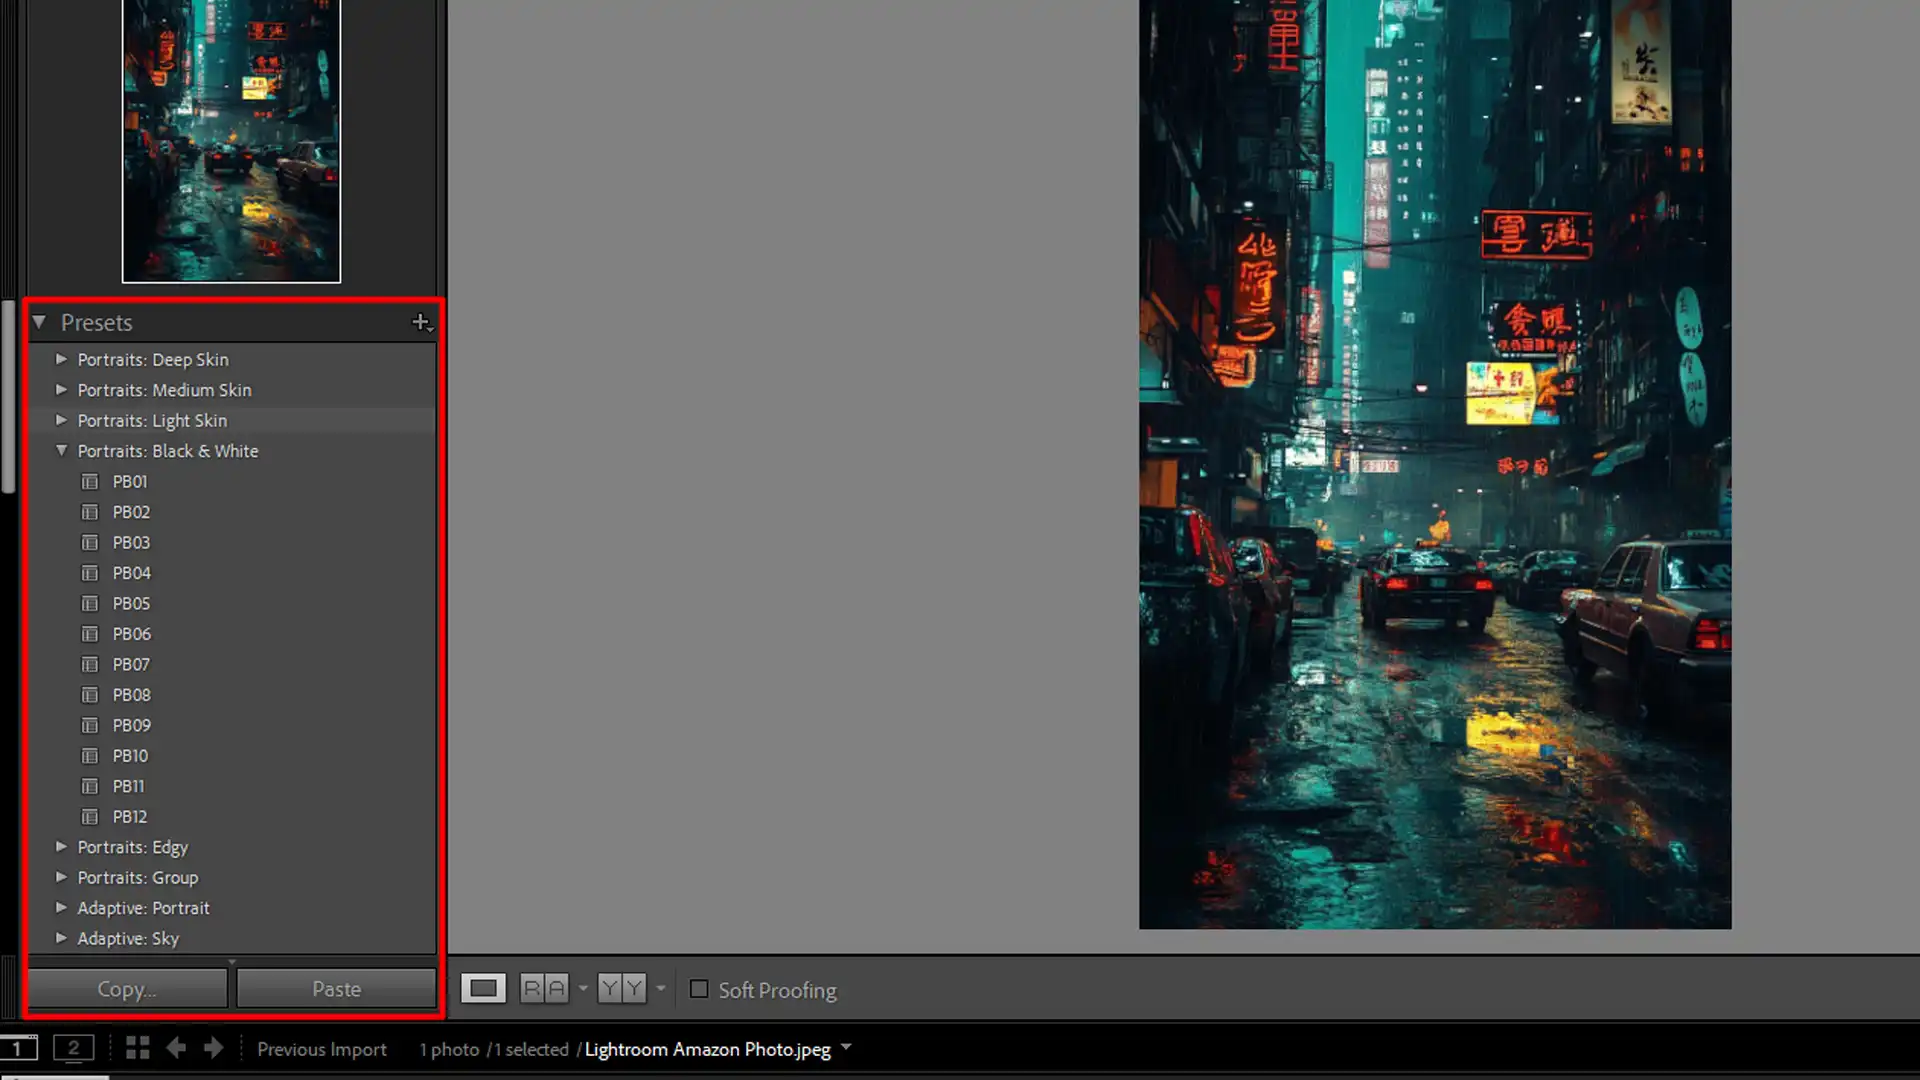
Presets can save you a lot of time.
They are pre-made settings you apply to your photos:
- Color Presets: Give your images a consistent look.
- Black and White Presets: Provide classic charm.
- Vintage Presets: Add an old-school vibe.
They are like recipes; follow them to get consistent results each time. And the best part? You can tweak them to better suit your style.
Saving and Exporting Edited Photos
Once edits are complete, it’s time to save and export:
- Click on 'Export' in the Library module.
Select the desired format:
- JPEG: Common for sharing online.
- TIFF: Better for high-quality prints.
Media management:
- Set the resolution based on the final use. Higher resolution gives better prints.
- Consider creating albums to keep track of related images.
- Always export a copy to avoid losing the original file.
Saving the file properly is like sealing your masterpiece. It ensures it stays perfect when you revisit it.
Pro Tip: Always keep an eye on the histogram while editing. It helps maintain a balanced exposure.
For more detailed edits, consider learning how to use lens correction in Lightroom to fix any distortions in your images.
Backing Up Images to Lightroom Amazon Prime
Backing up images is important. It saves your memories and protects your hard work. Imagine losing a year’s worth of edits!
When you backup, you ensure images remain accessible. Think of it as a digital safety net. You sleep easy, knowing your images are secure.
Setting Up Automatic Backup
Let’s make this easy:
- First, open Amazon Prime Photos. You need an Amazon account.
- Now, time to configure. Click the 'Settings' gear icon.
- Under settings, find 'Auto-Save'. Turn it on.
- Select folders you want. Done!
Amazon Prime Photos will now automatically import your selected images.
Manual Backup Process
Sometimes, you might need to do things yourself:
- Start by opening Amazon Prime Photos.
- Click 'Upload'.
- Select the images you want to upload.
- Dragging and dropping images works too.
- Be sure to select high-res for best quality.
- Create new albums to keep things organized. Don't just dump everything in one place.
Pro Tip: Always double-check your backup. Make sure all your images are there before deleting anything from your device.
Additional Tips for Photo Management
For those who use Adobe Lightroom, consider setting up Lightroom Shortcuts to streamline your workflow before backing up. This ensures that your edits are consistent and efficient.
Troubleshooting Common Issues
So, you sit down to work on your photos, and suddenly, you can’t connect to Amazon Prime Photos. I hate when that happens, but let’s fix it:
- First, check your internet connection. If it’s slow or unreliable, it impacts your cloud accessibility.
- Next, try restarting your device. Sometimes, a simple reboot solves connectivity problems.
- If the issue persists, log out of Amazon Prime Photos and log back in. A fresh session might clear things up.
Import Errors
You’ve selected your best shots and hit “import”. But wait, there’s an error message.
Here’s what you can do:
- First, ensure that your files are compatible. JPG and PNG usually work well. If there's a file format issue, convert them before trying again.
- Check available storage. Amazon Prime Photos won't accept new images if space is maxed out.
- Double-check for corrupted files, as they might cause import issues.
- Lastly, keep your software updated. Outdated versions sometimes struggle with import processes.
Editing Problems
Imagine this: you are about to make the perfect edit, but tools don’t work as expected. Here are some steps to troubleshoot:
- Check if your software is up-to-date. Sometimes updates patch the editing tools.
- Ensure that your images load completely before you begin editing. Half-loaded pictures can behave oddly.
- If problems persist, restart the editing software. Some glitches resolve upon reboot.
- For more professional edits, understanding limitations between Photoshop and Lightroom aids smoother workflow.
- Consider using Lightroom shortcuts to speed up your workflow. Efficiency saves time and frustration.
Backup Failures
You’ve worked hard on those edits and it’s time to back them up.
But the backup fails.
Try these solutions:
- First, verify storage space. Insufficient storage affects backups.
- Next, review the backup settings. Misconfigured settings often lead to failures.
- Restart the backup process manually. Automatic backups sometimes encounter glitches.
- If issues continue, reset your cloud storage credentials in the settings menu.
Pro Tip: Always double-check your backups before deleting originals to prevent data loss.
Tips and Best Practices
Keeping your photo library organized is essential. Start by creating a clear folder structure.
For example, organize by year and then by event or subject. This method makes it easier to find photos later.
Secondly, use tags and keywords. Tags help to quickly locate specific images. You can tag photos by location, people, or even mood. It’s a bit tedious but pays off in the long run.
Lastly, backup your library regularly. Use both local and cloud storage. This ensures you won’t lose important photos.
Using Lightroom's Features Effectively
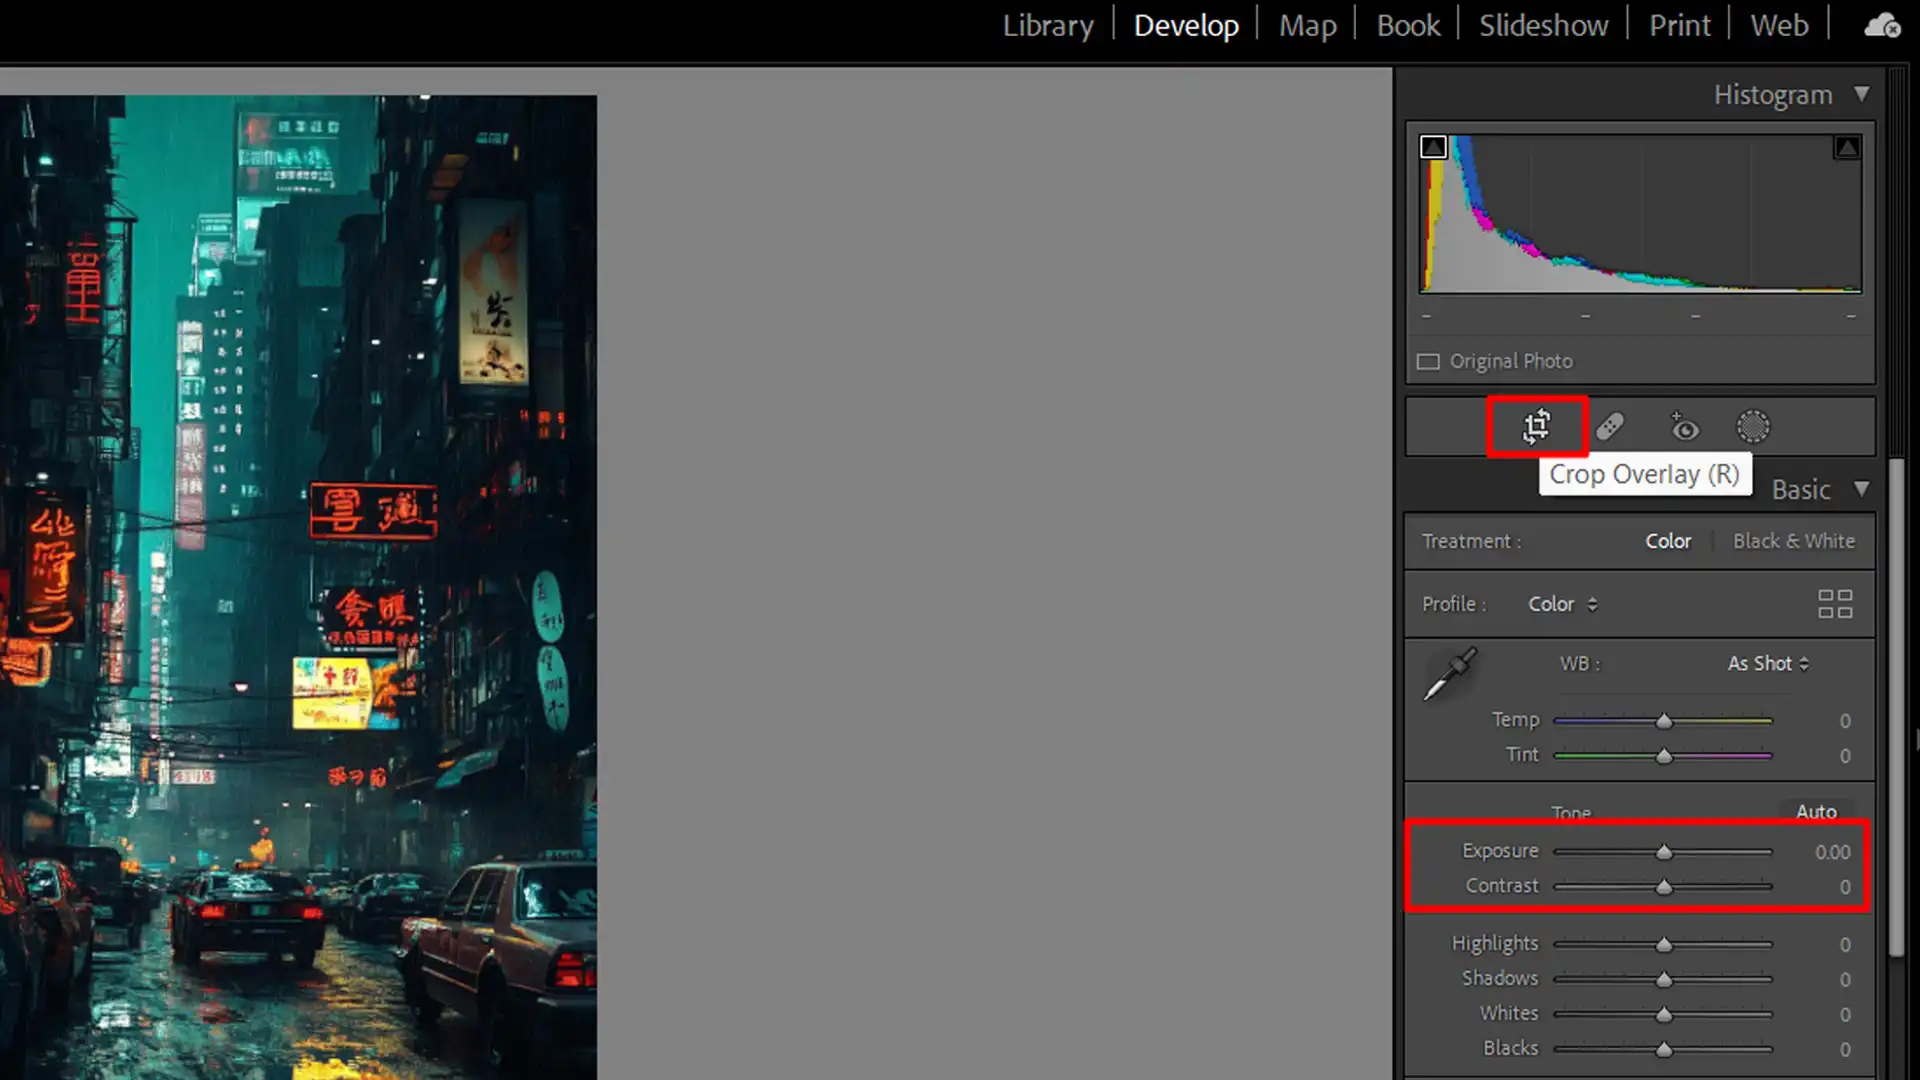
Lightroom offers many features to enhance your photos.
First, familiarize yourself with the basic tools:
- The Crop tool helps to frame your subject better.
- The Exposure slider allows you to adjust brightness.
Remember, small adjustments often have the most impact.
Next, use presets to speed up your editing workflow. Presets save a set of edits that you can apply to multiple photos. They are perfect for maintaining a consistent style. You can even download free presets from various websites.
Lastly, learn to use the Lightroom catalog system. Catalogs store information about your photos and edits. This feature makes it easy to manage large libraries. Separate catalogs by project or type of work for better organization.
Understanding the different types of lenses can significantly impact your photo quality. By using Lightroom’s features effectively, you can enhance images captured with various lenses.
Maintaining Photo Quality
Maintaining photo quality starts with shooting in RAW format. RAW files contain more data than JPEGs. This extra data provides more flexibility when editing. Download photo editing software that supports RAW files.
Also, avoid over-editing your photos. Too much editing can degrade image quality. Aim for natural-looking enhancements. Less is often more when it comes to photo editing.
Lightroom’s non-destructive editing features help here. You can always revert to the original photo if needed.
Finally, regularly calibrate your monitor. Screen colors can drift over time. A calibrated monitor ensures accurate color representation.
Pro Tip: Always double-check your settings before exporting your final images. This ensures you maintain the high quality of your edits.
For more advanced techniques, consider learning how to use lens correction in Lightroom to fix distortions or removing shadows in Photoshop for cleaner images.
Choosing between a prime vs zoom lens affects your shot’s clarity. To ensure maintaining photo quality, understanding lens differences is key.
Efficient Photo Management
- Create a clear folder structure for organizing your photo library by year and event/subject.
- Use tags and keywords to quickly locate specific images.
- Regularly backup your photo library using both local and cloud storage.
- Familiarize yourself with Lightroom's basic tools like the Crop tool and Exposure slider.
- Use presets to speed up editing and maintain a consistent style.
- Learn to use Lightroom's catalog system to manage large libraries efficiently.
- Shoot in RAW format for more flexibility in editing.
- Avoid over-editing to maintain natural-looking enhancements.
- Regularly calibrate your monitor for accurate color representation.
- Double-check settings before exporting final images to maintain quality.
Professional-Looking Images
Using tools like Lightroom and Photoshop effectively needs practice and patience. But once you’ve got the hang of it, your photos will look more professional.
Keep experimenting and learning new techniques. Remember, the goal is to enhance your photos while keeping them natural.
Pro Tip: Always shoot in RAW format whenever possible. This gives you more flexibility when editing your photos in Lightroom. Now go on, start editing, and let your creativity shine!
Effective Amazon product photography tips are fundamental to achieving professional-looking images. By following these strategies, you can enhance your product visuals for a polished appearance.
Frequently Asked Questions

How do I import images from Amazon Prime Photos into Lightroom?
- Download the images from Amazon Prime Photos to your computer.
- Open Adobe Lightroom and go to the 'Library' module.
- Click on the 'Import' button at the bottom left corner.
- In the Import window, select the downloaded images from your computer.
- Click 'Import' to add the images to your Lightroom library.
Can I sync my edited photos from Lightroom to Amazon Prime Photos?
- Finish editing your photos in Lightroom.
- Export the edited images to a location on your computer.
- Upload the exported images to Amazon Prime Photos through its web interface or app.
- Ensure that your settings in Amazon Prime Photos are configured to store high-resolution images for the best quality.
What are the benefits of using Amazon Prime Photos with Lightroom?
- Easy Backup: Amazon Prime Photos offers unlimited storage, making it easy to back up your high-resolution edits.
- Accessibility: Access your images from any device with an internet connection, ensuring that your photos are always within reach.
- Organized Storage: Keep your photo collection organized with features like albums and easy sharing options.
Is there a way to automate the import process from Amazon Prime Photos to Lightroom?
- Currently, there is no direct automation feature for importing photos from Amazon Prime Photos to Lightroom. However, you can streamline the process by:
- Regularly downloading images from Amazon Prime Photos to a specific folder on your computer.
- Using Lightroom’s ‘Import’ feature to batch-import from that folder.

Conclusion
In conclusion, using Lightroom with Amazon Prime Photos has truly simplified my photo editing and storage process. Whether you’re a casual photographer or just starting, this combo makes it easy to enhance your images and keep them safe.
I’ve found it incredibly useful for backing up my edits and accessing my photos from anywhere.
If you’re looking to get started, check out my Photoshop Course and Lightroom Course for more tips and tricks.
For top-notch photo editing software, consider Adobe Photoshop and Lightroom.
Read more about Photoshop:


Course

Light Effect Photoshop


Lightroom Course 2025

Adobe Photoshop Course 2025

Photo Editing Course


