Are you curious about how to vectorize an image in Photoshop? You’ve come to the right place! Imagine transforming any image into a sleek, scalable vector graphic that retains its quality no matter the size. Intrigued?
I promise it’s easier than you think. In this article, I’ll guide you step-by-step through the process. By the end, you’ll be able to turn any photo or illustration into a high-quality vector image.
Ready to dive in and unlock a new skill? Let’s get started!
Table of Contents
Understanding How to Vectorize an Image in Photoshop: A Guide to Vector Graphics
When working in Photoshop, it’s important to understand the difference between a vector image and a raster image.
While a vector image uses lines and shapes for scaling without losing quality, a raster image is made up of pixels, which can become blurry when resized. Let’s explore how a vector image works in Photoshop.
What Are Vector Graphics?
Vector graphics are images created with mathematical formulas. We use lines, shapes, and points instead of pixels. This means they are scalable without losing quality.
For example, a logo designed as a vector can be resized from a business card to a billboard without any quality loss.
Advantages of Using Vector Images
Here’s why using vector images can improve your design flexibility and quality.
- Resolution-independent: They look crisp at any size, unlike raster images, which can pixelate.
- Smaller file size: Vectors are generally more compact than raster images, making them easier to store and share.
- Easy editing: You can easily change colors, shapes, and sizes without degrading the image quality.
Vector Images vs Raster Graphics
The main difference between vector and raster graphics lies in their construction. Raster images, like JPG images, are made up of pixels, tiny square color units. Common formats include JPG and PNG.
In contrast, vector files utilize mathematical equations. While raster images are great for complex photographs, vectors excel with clean, scalable designs.
How to Vectorize an Image in Photoshop: A Short Overview of the Steps
It’s important to understand how to vectorize an image in Photoshop:
- Open your original image in Photoshop.
- Use the Pen Tool to outline the parts of the image you want to convert into vector format.
- Convert your raster image to a smart object before you begin. This helps in preserving quality during scaling.
- Trace around the object with the Pen Tool, and then right-click to select "Make Work Path" from the drop-down menu.
- Fill the path with a solid color layer to finalize your vectorized image.
- Save your creation as a Smart Object or Photoshop EPS file to keep all vector data intact.
Pro Tip: Always make sure to keep your work organized by naming your layers panel clearly. This saves you a lot of time when you need to revisit the project later.
For even more precision, consider following a Photoshop masking guide, which can enhance your vectorizing process by allowing for detailed layer management and selections.
How to Vectorize an Image in Photoshop: Exploring Vector Formats
Vector formats differ from raster images because they use mathematical equations to create art. This means you don’t lose quality when you zoom in or scale the image.
In Adobe Photoshop, understanding vector formats is important for creating sharp and adaptable graphics, including when working with Photoshop EPS files.
Common Vector Formats
Several vector file formats are commonly used:
- EPS (Encapsulated PostScript): Widely used and compatible with various software like Adobe Illustrator and Photoshop.
- PDF (Portable Document Format): Keeps the quality intact and can be embedded easily into websites and documents.
- SVG (Scalable Vector Graphics): Perfect for web use as it’s lightweight and retains quality regardless of size.
Choosing the Right Vector Format
Choosing the right vector format depends on your project needs:
- EPS files work well for printing because they contain detailed file data.
- PDFs offer versatility and can be viewed on various devices.
- SVG files are excellent for web use due to their scalability without loss of quality.
Managing Layers and Shapes
The Layers Panel helps manage your elements efficiently. Use the shape tools to design geometric vector drawings, and rely on vector data to ensure your images are crisp and detailed at any size.
Pro Tip: To adjust the color of your entire vector design without losing quality across different image file types, use the direct selection tool to select your drawing and then change the color through the layers panel.
Additionally, understanding the difference between Photoshop and Illustrator can help you decide which software is best suited for your vector graphic needs.
How to Vectorize an Image in Photoshop
In Photoshop, vector art is created using mathematical shapes, making it scalable without losing quality. Unlike pixel-based images, vector art allows for smooth resizing and editing, which is perfect for logos and illustrations.
Preparing Your Image
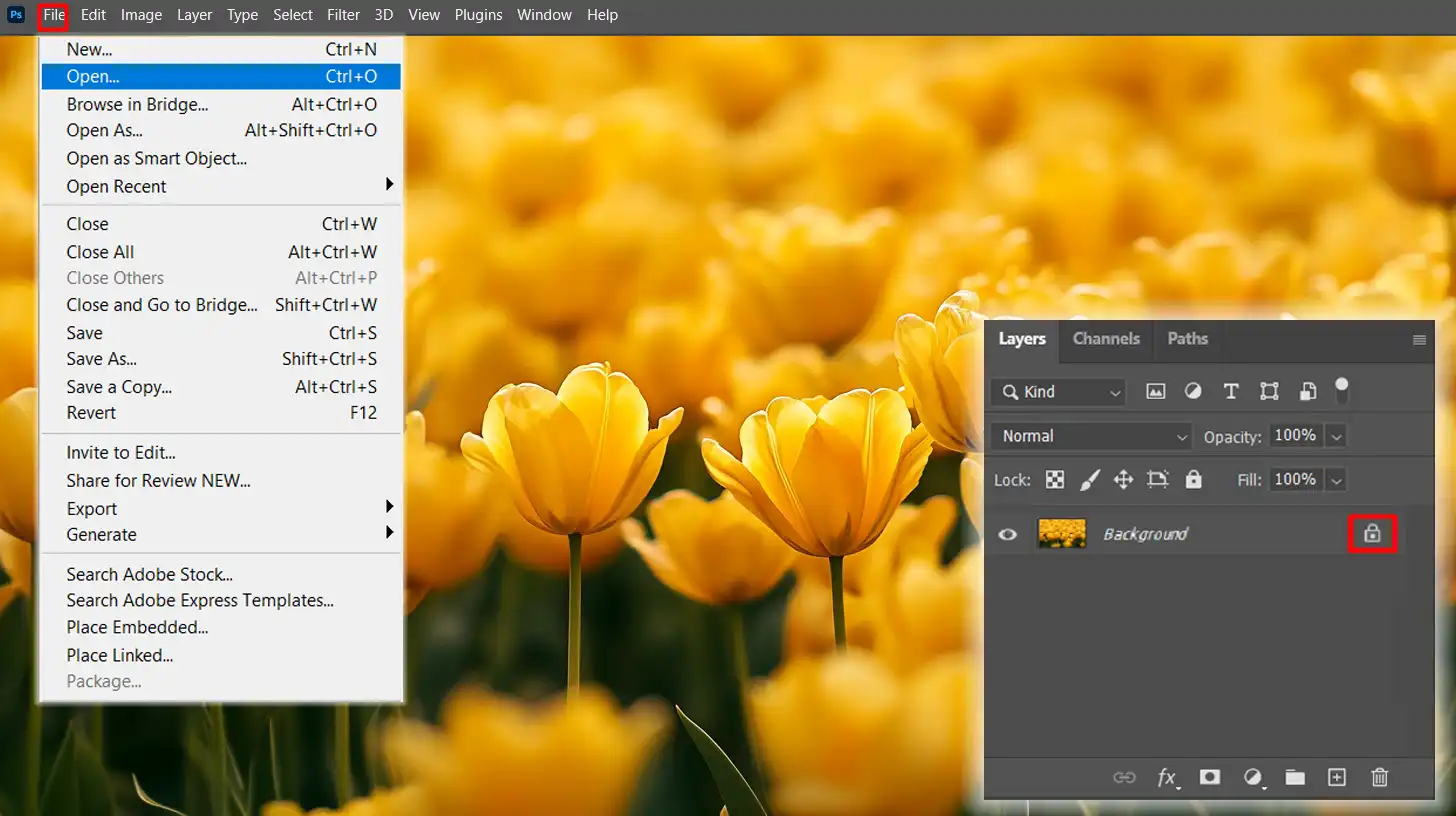
First, open your image in Photoshop. It’s important to start with a high-resolution raster image for the best results. Low-resolution images might look blurry or pixelated when vectorized.
Make sure to have the Layers Panel open. This helps you work with different parts of the image on separate layers. Also, unlock the ‘Background‘ layer to make it editable.
Using the Pen Tool for Vectorization
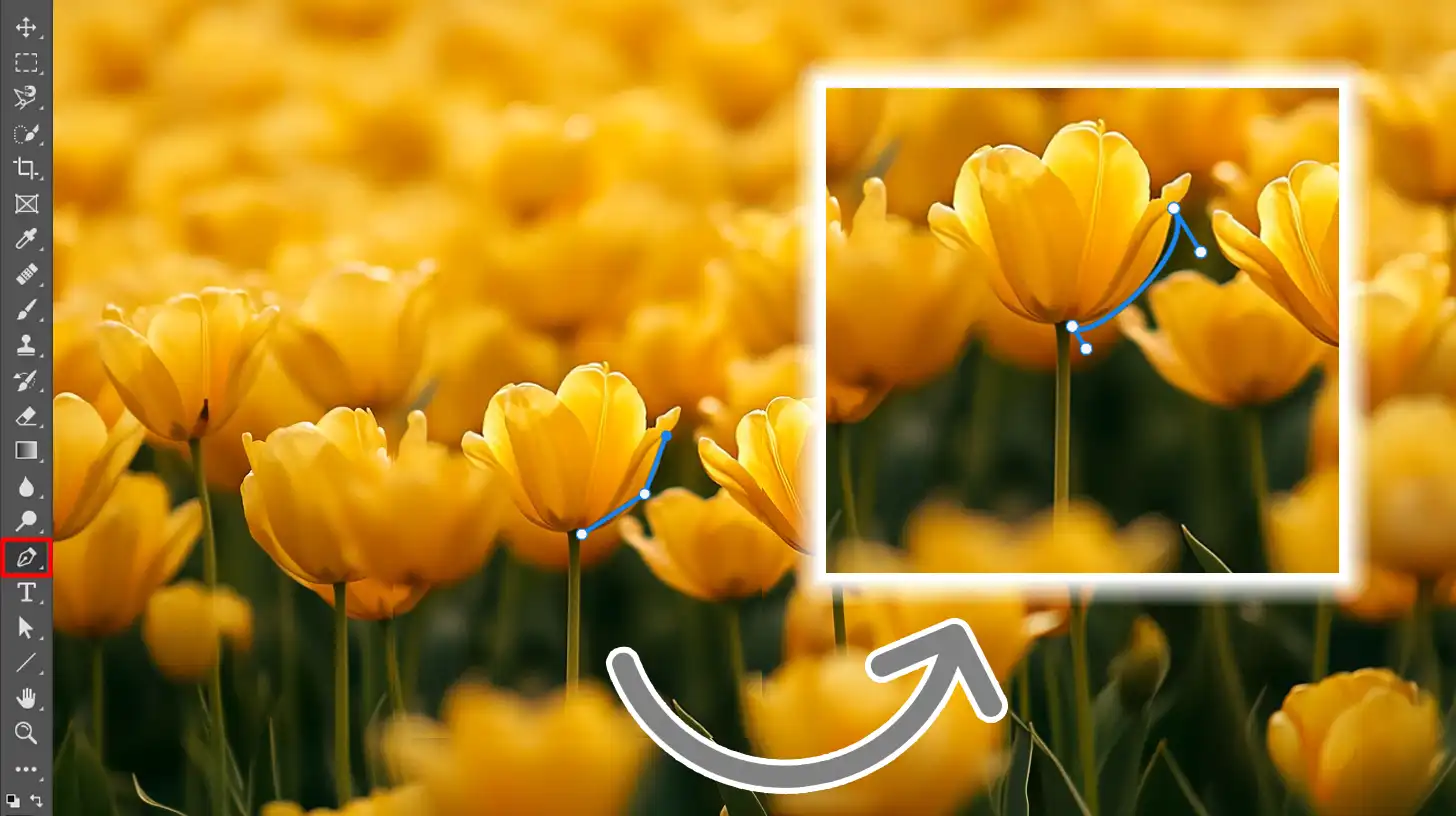
To begin vectorizing, select the pen tool from the toolbar. It’s the best tool for creating precise paths around the edges of your image. Click to place anchor points and create straight lines.
Click and drag to make curves. Remember, fewer points make smoother paths. If you make a mistake, press Ctrl + Z to undo it and try again.
Adjusting Paths and Curves
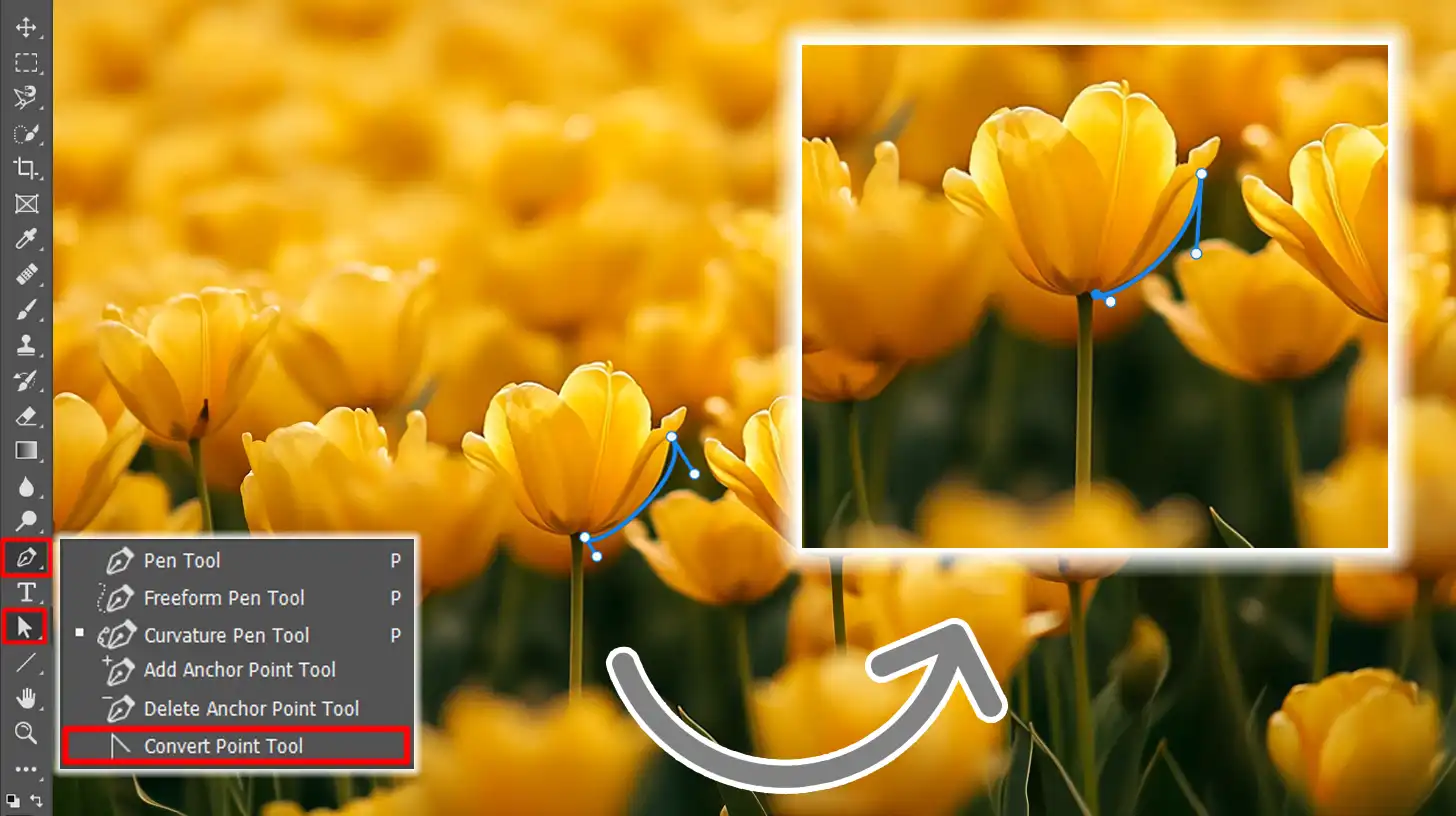
Once you’ve drawn paths, switch to the Convert Point Tool by holding the Pen Tool. Adjust curves to match the contours of your image.
Use the Direct Selection Tool (white arrow) to fine-tune paths. Modify anchor points to correct any inaccuracies. Refining paths is important for a clean vector image.
Saving Your Vector File
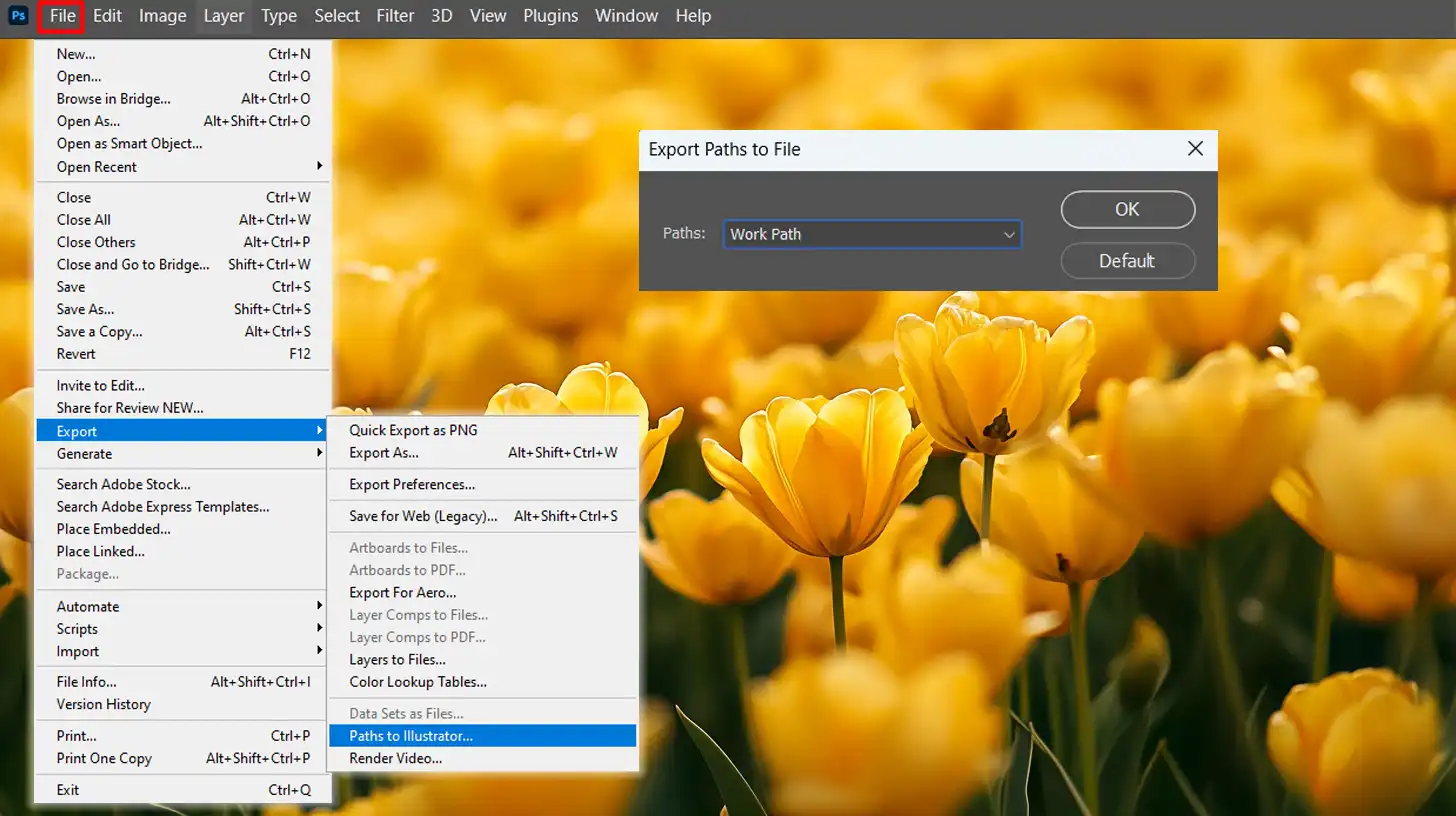
After finalizing your paths, save your vector image. Go to File > Export > Paths to Illustrator. This creates an EPS file you can edit in Illustrator later. Alternatively, export as SVG for web use.
Choose your preferred file format based on where you’ll use the images. Always keep a copy of the original Photoshop document in case you need to make changes later.
Troubleshooting Common Issues
If your paths don’t look right, double-check your anchor points and handles. Use the Angle Tool to adjust angles. For jagged lines, zoom in and add more anchors.
Ensure visible layers are active; hidden layers can cause confusion. Do you have issues with color? Use the Brush Tool to fill paths accurately. Practice makes perfect here.
Pro Tip: Want to create vector art even faster? Combine the pen tool with magic wand selection tools and the path selection tool in Photoshop for complex shapes. For more advanced techniques, consider learning about content-aware fill in Photoshop to seamlessly integrate elements into your vector art.
Tips for Working with Vector Files in Photoshop
Working with a vector file in Photoshop can greatly enhance your design workflow, allowing you to create flexible and scalable graphics. Below, you’ll find some actionable tips to help optimize your use of your vector art design in Photoshop.
Here’s a quick comparison of some best practices for working with vector files in Photoshop. These tips can help you optimize your design process, improve performance, and collaborate more effectively.
| Aspect | Overview |
|---|---|
| Optimizing Vector Assets for Performance | Start with simpler vectorized images to make adjustments easily and maintain file performance. |
| Start Small | Work on small sections of your image to prevent overwhelm and keep your system running smoothly. |
| Layer Management | Group related layers into folders and organize them to quickly locate and edit parts of your vector image. |
| Turn off Unneeded Layers | Keep only active layers visible to improve performance while working on your design. |
| Save in Common Formats | Use widely accepted file formats like EPS to make sharing and collaboration easier with other designers. |
| Use Version Control | Track different versions of your work with clear naming conventions for efficient project management. |
| Comment Within Your Files | Add annotations within Photoshop to provide instructions and notes for your team to understand design choices. |
Optimizing Vector Files for Performance
When working to optimize vector assets, it’s helpful to start with a smaller, simpler vectorized image. By doing so, you can make adjustments easily and maintain performance without overwhelming the file size or complexity.
Start Small
Begin with small sections of your image rather than tackling the entire project at once. Small steps can prevent overwhelm and keep your system running smoothly.
Layer Management
Organize your layers well. Group related layers (such as different parts of a character or separate elements) into folders. Keeping things organized will help you locate and edit parts of your vector image faster.
Turn off Unneeded Layers
Only keep active layers that you are immediately working on visible. Hide others to improve performance.
Collaboration and Sharing Your Vector Art Design
When sharing your vector art design, it’s important to use formats that are widely recognized. This ensures that others can easily view and edit your work, making collaboration smoother.
Save in Common Formats
The most widely accepted file format is the EPS file. This makes it easier for collaborators to open and edit the files in their own software.
Use Version Control
Keep track of different versions of your work. Use clear naming conventions like VectorProject_v1, VectorProject_v2, etc.
Comment Within Your Files
Use annotations to add comments or instructions for your team. This can be done directly within Photoshop and helps your team understand your design choices.
Frequently Asked Questions

How do I turn an image into a vector in Photoshop?
- Open Photoshop and load your image.
- Select the Pen Tool from the toolbar or press P on your keyboard.
- Create paths by clicking around the edges of the image you want to convert.
- Once the paths are created, right-click and choose Make Selection. Adjust the settings as needed and click OK.
- Go to the Paths panel, save your path, and then export it as a vector file (AI, EPS).
How do I convert an image to a vector?
- Open your image in Photoshop.
- Use the Pen Tool or Shapes Tool to trace over your image.
- Convert these paths into a vector shape by right-clicking and selecting Define Custom Shape.
- Save your new vector shape by going to File > Export > Paths to Illustrator.
Where is the vector tool in Photoshop?
- The vector tools in Photoshop are located in the toolbar.
- Look for tools like the Pen Tool, Rectangle Tool, Ellipse Tool, and Custom Shape Tool.
- These tools allow you to create vector shapes and paths directly in your project.
Does Photoshop have vector images?
- Photoshop supports vector images primarily through its vector shape tools.
- You can create and manipulate path objects which can be scaled without losing quality.
- While Photoshop is not a pure vector graphics editor like Illustrator, it provides sufficient vector capabilities for most design needs.

Conclusion
Learning how to vectorize an image in Photoshop has significantly improved my design workflow. It’s allowed me to create scalable, high-quality graphics that stand out in my projects.
My skills have grown exponentially since mastering this technique, and I can’t emphasize enough how it has streamlined my creative process.
If you’re aiming to improve your skills like I did, I recommend checking out the Photoshop course and Lightroom course. Both have been great resources for refining my techniques, and I’m sure they’ll help you, too.
For anyone interested in diving deeper into Photoshop, Adobe Photoshop offers the best tools for detailed design work.
For those looking to manage and enhance photo collections, Adobe Lightroom is perfect for fine-tuning your images. Give it a try, practice often, and you’ll see your graphic design skills take off.
Read more about Photoshop:


