Are you struggling with how to undo in Photoshop? Trust me, we’ve all been there. Whether you’re a beginner or a seasoned designer, making mistakes is part of the creative process.
But don’t worry, Photoshop has a range of powerful tools to help you easily reverse those slip-ups. In this article, I’ll guide you through the different methods to undo actions in Photoshop, ensuring you can swiftly correct any errors and keep your creative flow uninterrupted. Intrigued?
Keep reading to discover tips and tricks that will make your Photoshop experience smoother and more enjoyable.
Table of Contents
How to undo in Photoshop
To undo actions in Photoshop, you have several options that allow you to easily reverse changes. Let’s explore how you can use different tools, like the History Panel, to manage your edits effectively.
Navigating the History Panel
Learning how to undo in Photoshop is important for any user. The history panel is where this journey begins. It logs all actions performed during an editing session.
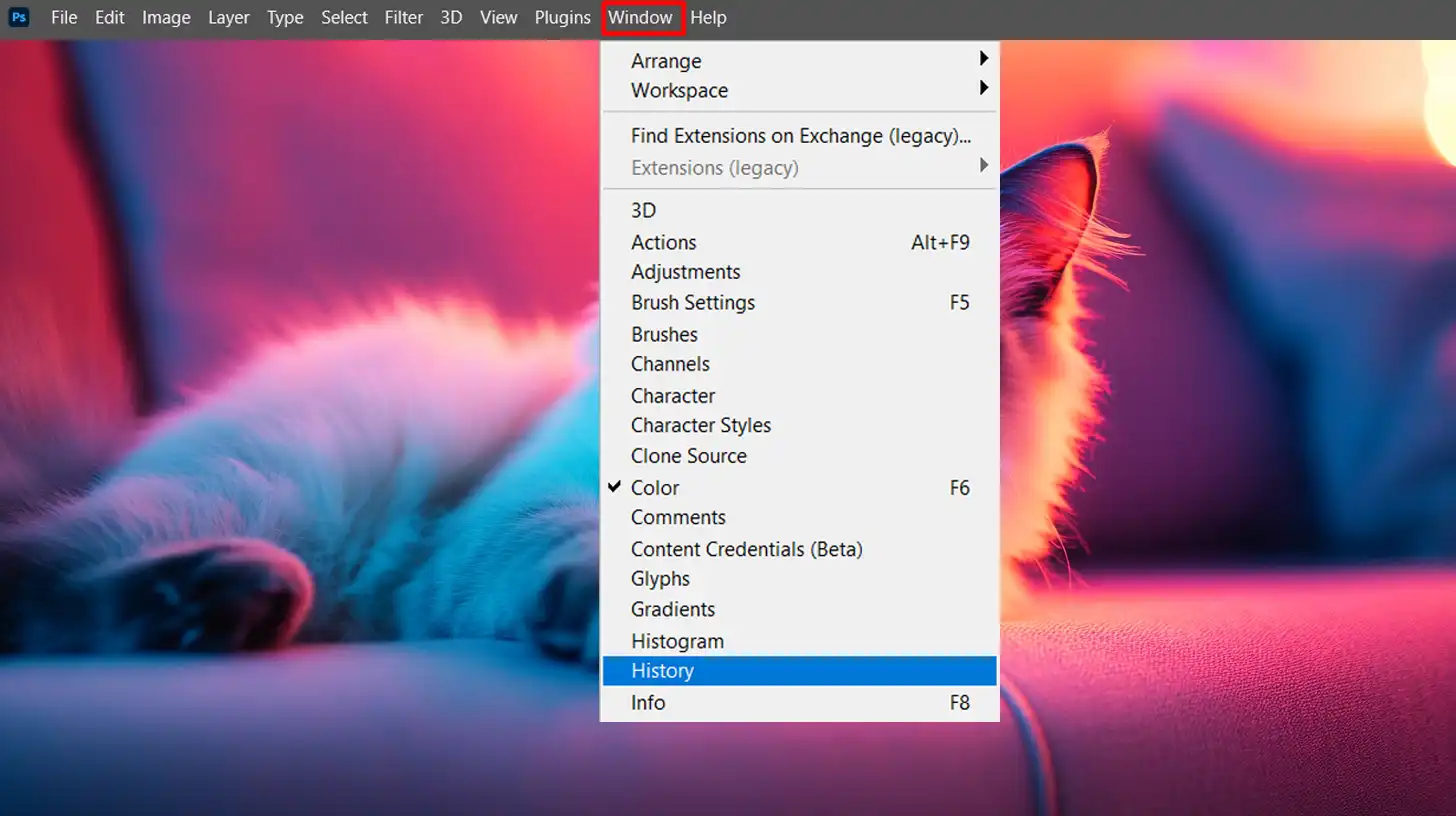
To navigate it, open it from the Window menu. You will find each history state listed as a step. Click on any state to revert back to it instantly. The topmost state is the most recent change. If you make a mistake, simply click on a previous state to undo it.
The step backward command (Ctrl+Alt+Z) or the forward command (Shift+Ctrl+Z) also allows you to move through states sequentially. Remember, you can reverse multiple steps this way.
If you’ve got an intricate editing process, the history panel will be your best friend. It not only makes it easy to go back but also keeps track of changes efficiently.
Customizing History States
Customizing history states allows for greater control over the editing process. By default, Photoshop CC records up to 50 states.
However, you can adjust this number in the Preferences under Performance. Increasing the number will use more memory but provides flexibility if you want to undo multiple steps.
The history options menu offers additional tweaks. Here, you can set Photoshop to automatically create new states or keep the last saved version. Use these settings to ensure your editing history is tailored to your needs.
Additionally, the history brush tool is a unique feature that allows painting with the data from a specified history state. This functionality is great for fine-tuning adjustments. Simply select the desired state and use the brush to apply its attributes.
Remember, saving your projects often prevents data loss and maintains a reliable recovery point. Make it a habit to save before major edits; reverting to the previously saved version can be a lifesaver.
Pro Tip: Enable the legacy undo mode if you prefer using older undo methods. This option is found in the edit menu under Keyboard Shortcuts. It uses the familiar Photoshop shortcuts: Ctrl+Z for undo and Ctrl+Shift+Z for redo.
How to Undo in Photoshop Using the Art History Brush Tool
This tool allows you to paint with stylized strokes using data from a specific point in your editing history. It’s great for adding unique effects and bringing a creative touch to your images.
What is the Art History Brush Tool?
This tool in Adobe Photoshop is a unique feature. It allows users to paint with stylized strokes from different history states. It’s not your usual brush. It captures complex textures and patterns.
Imagine you could blend the past states of your image into your current work. That’s what this tool does. Think of it as a time machine for your artwork.
Creative Uses of the Art History Brush
So, how can we use this amazing tool creatively? The possibilities are vast.
For instance, if you’re exploring how to add texture to your image, the Art History Brush allows you to blend different history states to introduce new patterns and surfaces that enhance the visual appeal:
Restoration: Use it to restore parts of an original image. Perfect for fixing old photos.
Artistic Effects: Create interesting effects by blending different history states.
Textures: Use it to add textures that weren't there before.
Backgrounds: Have fun with your background layer. Blend it to create unique looks.
Fine Tune Adjustments: Make small yet powerful changes without affecting the entire image.
Pro Tip: Always save your work frequently and create multiple layers to experiment without worries. This way, you can move back and move ahead easily using the history panel.
This feature allows you to selectively restore parts of an image from a previous state, making it useful for refining specific areas without affecting the whole composition.
Understanding the History Brush
The History Brush is a useful tool when learning how to undo in Photoshop, as it allows you to paint back parts of an earlier version of your image onto the current version.
This means if you make a mistake or change your mind, you can use the History Brush to fix it without starting over. You can find the History Brush in the toolbar, looking like a paintbrush with a clock.
To activate the History Brush:
Select the History Brush Tool from the toolbar.
Choose a history state from the History Panel; this is the past version you want to paint back in.
Start painting your image where you want to apply that history state.
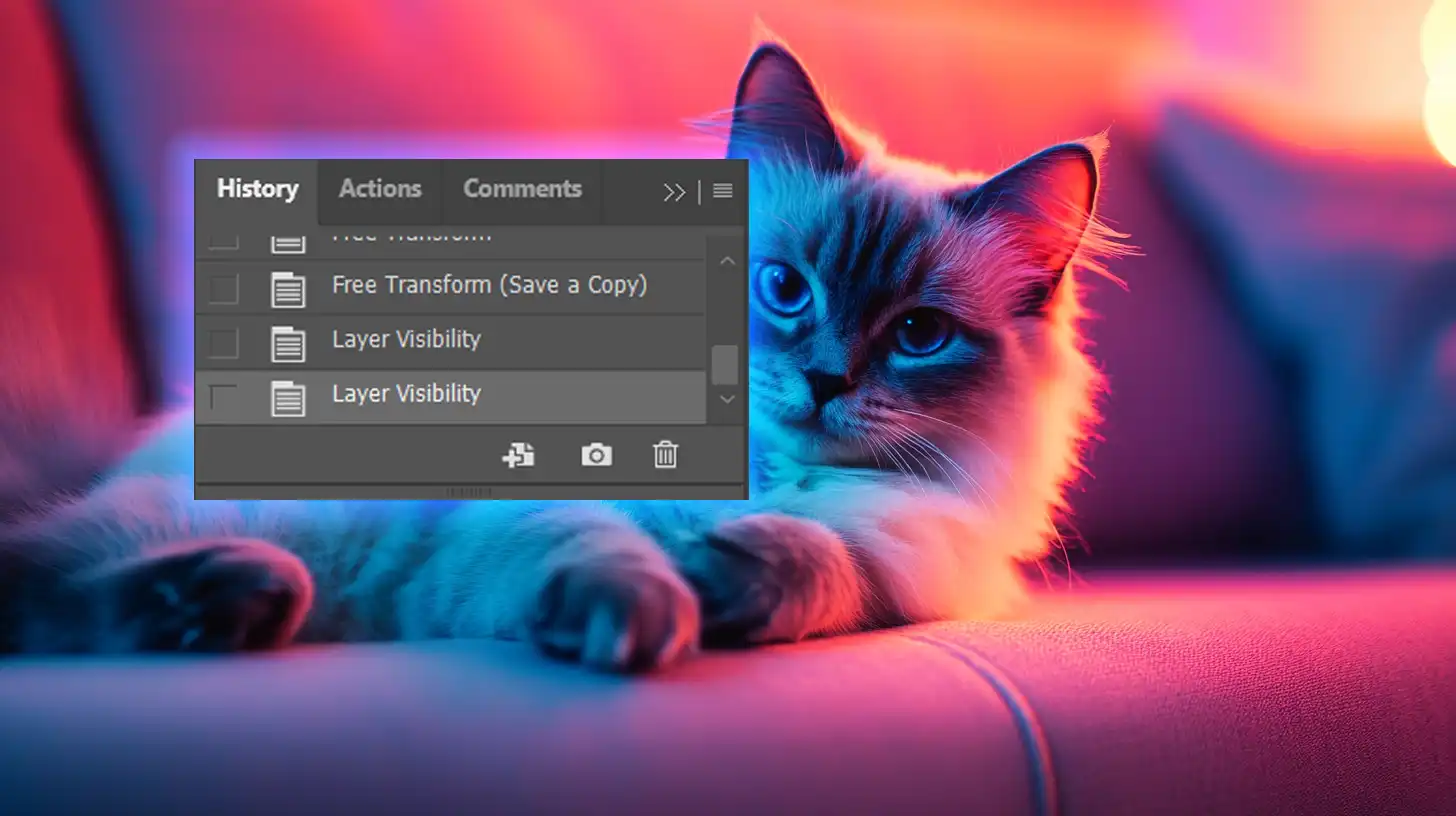
The History Panel is significant here. It keeps track of every change you make to your image file. Each time you make a change, it creates a new state.
By using the History Panel, you can choose which state to revert to and make specific edits only to that part of the image.
Practical Applications of the History Brush
You might wonder where you’d use the History Brush in your day-to-day editing. Here are a few practical applications:
Restoring old photos: If you have an old, damaged photo, you can use it to bring back details from the original image.
Creating artistic effects: Blend different states to make unique textures or effects, bringing parts of previous edits into your work.
Making corrections: Fix mistakes without erasing your whole progress. Just step backward in your history and use the tool to make the needed adjustments.
Fine-tuning adjustments: Adjust specific areas without affecting the whole image, making your edits more precise.
Don’t forget that using the History Panel gives you more control over your edits. You can navigate through different states and use the undo/redo command as needed. It’s like having multiple versions of your artwork stacked up, and you decide which parts you want to keep or change.
Pro Tip: Save your work often and use layers to experiment with different ideas. This way, layer visibility allows you to see the impact of each change without committing to it right away.
How to Undo in Photoshop with the Step Forward Feature
Step Forward is a helpful feature when learning how to undo in Photoshop, allowing you to redo changes one step at a time and efficiently progress in your work.
Using Step Forward Effectively
Understanding how to manage your editing steps in Photoshop can make a big difference. This feature helps you move your work forward, step by step, without redoing everything from scratch.
It’s important to know how to leverage this tool to streamline your photo editing process in conjunction with the undo redo functions.
Accessing the Step Forward Feature
You can find the Forward command under the Edit menu.
Alternatively, use the keyboard shortcut Shift + Ctrl + Z (or Shift + Command + Z on Mac).
This saves time and makes the process smoother.
Using Step Forward
A good way to use this feature is after you’ve made several changes and want to review the adjustments.
Simply go to the Edit menu or use the shortcut to move ahead in your change log. When combined with the history panel, it becomes even more powerful by letting you see a timeline of your changes.
Common Mistakes When Using Step Forward
While this feature is incredibly useful, it’s easy to misuse. Here are some common mistakes:
Not Saving Your Work
Relying too much on this command without saving your work is a common mistake. Regularly savingyour progress is important because it ensures that you don’t lose your changes if something goes wrong.
Neglecting the Use of the History Panel
The history panel allows you to see all the changes you’ve made. Without it, users often find themselves confused about their progression. Always refer to the history panel to keep track of your adjustments. It’s a visual roadmap of your work.
Overusing Step Forward
Avoid using this feature command excessively. Overusing it can clutter your history, making it hard to navigate through your steps. Instead, use it thoughtfully, alongside undo functions and the history panel, to maintain clear control over your work.
Pro Tip: Combine this feature with undo-redoshortcuts to effectively manage your editing history and avoid common photo editing mistakes. Practice and familiarization with these tools will significantly enhance your workflow.
Advanced Tips for Undoing in Photoshop
Working in Photoshop can get messy. We all make mistakes. But thankfully, Photoshop makes it easy to undo those mistakes. Let’s dive into some tips to master undo techniques.
This table outlines important methods you can use to effectively manage your editing history, ensuring that you can easily correct mistakes and streamline your workflow.
Aspect
Overview
Undo Command
Press Ctrl + Z (Cmd + Z on Mac) to undo your last action. Ideal for quick corrections.
Step Backward
Use Alt + Ctrl + Z (Option + Cmd + Z on Mac) to undo multiple steps without accessing the History Panel.
Step Forward
Redo changes sequentially using Shift + Ctrl + Z (Shift + Cmd + Z on Mac) to move forward through your edit history.
History Panel
Access a full list of your editing actions and jump to any previous state for easy corrections.
Legacy Undo Shortcuts
Enable in Preferences to use older undo shortcuts, offering familiarity for experienced users.
File Menu Revert
Use the Revert command under File Menu to return to the last saved version, acting as a reliable fallback.
Check History States
Adjust history states in Preferences to ensure enough steps are recorded for multi-step undo.
Combining Undo Techniques
When you want to know how to undo in Photoshop, remember that there are several methods to combine for effective editing:
Undo Command: The simple Ctrl + Z (Cmd + Z on Mac) handles the basics. This undoes your last action.
Step Backward: Go one step back with Alt + Ctrl + Z (Option + Cmd + Z on Mac). Useful when you need to undo more than one step without opening the history panel.
Move ahead: Redo commands with Shift + Ctrl + Z (Shift + Cmd + Z on Mac). This method revisits steps chronologically, allowing a thorough review of edits.
History Panel: This feature lists all actions performed. You can jump to any previous state of your document from here.
Legacy Undo Shortcuts: For seasoned users familiar with older shortcuts, enabling legacy undo shortcuts from the Preferences menu may feel more intuitive.
File Menu Revert: Find your last saved version via the Revert Command under File Menu. It's a reliable fallback.
Troubleshooting Undo Issues
Sometimes, the undo function in Photoshop doesn’t work as expected. Here’s what you can do:
Check History States: Go to Preferences under the Edit menu. Ensure ample history states (steps recorded) are set to avoid running out quickly.
Enable Legacy Undo Shortcuts: For those familiar with older versions, reverting to legacy undo shortcuts can resolve muscle memory mishaps.
Overwritten Documents: Use the revert command to return to the last saved state if recent changes overrun your document.
Multiple Undos Not Working: If the multi-step undo isn't functioning correctly, ensure you're using Alt + Ctrl + Z (Option + Cmd + Z on Mac).
Pro Tip: Use Photoshop’s CC libraries to save different versions. This way, reverting to an earlier edit is always possible, giving flexibility and peace of mind.
Frequently Asked Questions
How do you undo multiple times in Photoshop?
Open Photoshop and select your project.
To undo multiple actions, press Ctrl+Alt+Z (Windows) or Cmd+Option+Z (Mac) repeatedly until you reach the desired step.
You can also use the History Panel to click directly on the step to which you want to revert.
What does Ctrl Z do in Photoshop?
Pressing Ctrl+Z (Windows) or Cmd+Z (Mac) in Photoshop will undo the last action you performed.
If you press it once more, it will redo the action you just undid.
How to reverse in Photoshop?
To reverse an action, simply use the undo shortcut: Ctrl+Z for Windows or Cmd+Z for Mac.
If you need to reverse multiple actions, use Ctrl+Alt+Z (Windows) or Cmd+Option+Z (Mac) as many times as needed.
Why can't I undo anymore in Photoshop?
If you can't undo anymore, it might be because you've reached the limit of your history states.
To increase this limit, go to Edit > Preferences > Performance and adjust the History States slider.
Remember, increasing history states can consume more of your computer's memory.
Mastering how to undo in Photoshop has been a game-changer for me. It’s saved me from countless mistakes and allowed me to experiment freely, knowing I can always revert back.
If you’re looking to deepen your understanding of Photoshop, I highly recommend checking out this comprehensive Photoshop course. For those who want to enhance their skills in Lightroom, this Lightroom course is equally invaluable. Both have been instrumental in my journey as an editor, and I believe they can help you, too.
For the latest tools, you can also check out Adobe Photoshop to explore its editing capabilities or explore the creative possibilities of Adobe Lightroom.
Remember, practice makes perfect, and with the right tools, you can bring your creative ideas to life!
If this article has helped you, then Like and Share it with your friends
$2,061.00Original price was: $2,061.00.$1,061.00Current price is: $1,061.00. 27584
Download Your Free Guide Now!
Discover the secrets of photography with our printable guide! Master essential techniques like aperture, shutter speed, and ISO to create stunning images. Get your free printable PDF now and start turning your snapshots into masterpieces!