How to Rotate an Image in Photoshop: Quick and Easy Guide
How to Rotate an Image in Photoshop: Quick and Easy Guide
Are you struggling with how to rotate an image in Photoshop? You’re not alone. Many people find this seemingly simple task confusing.
Don’t worry, I’ve got you covered! In this article, I’ll walk you through the steps to rotate your images effortlessly. Imagine being able to adjust your photos with precision, making them look just right for your projects.
By the end of this guide, you’ll be rotating images like a pro, giving your work the polished look it deserves.
Ready to transform your images?
Let’s dive in!
Table of Contents
Understanding Image Rotation in Adobe Photoshop
Rotating images opens up creative possibilities. You can adjust photos for better composition or correct orientationmistakes. It’s an fundamental skill when working with digital images in tools like Photoshop.
Let’s dive into how to rotate an image effectively.
Why Rotate an Image?
Correct Orientation: Sometimes, photos don’t come out perfect. Rotating an image addresses this quickly.
Enhance Composition: Rotating can improve visual impact, making elements align more harmoniously.
Creative Designs: Want to create abstract art? Rotating parts of an image can be just the thing you need.
How to Rotate an Image in Photoshop
If you want more visual control, the transform tool is your friend. Select the layer you want to rotate from the Layers Panel.
Ensure your layers panel shows the layer thumbnail for easy identification.
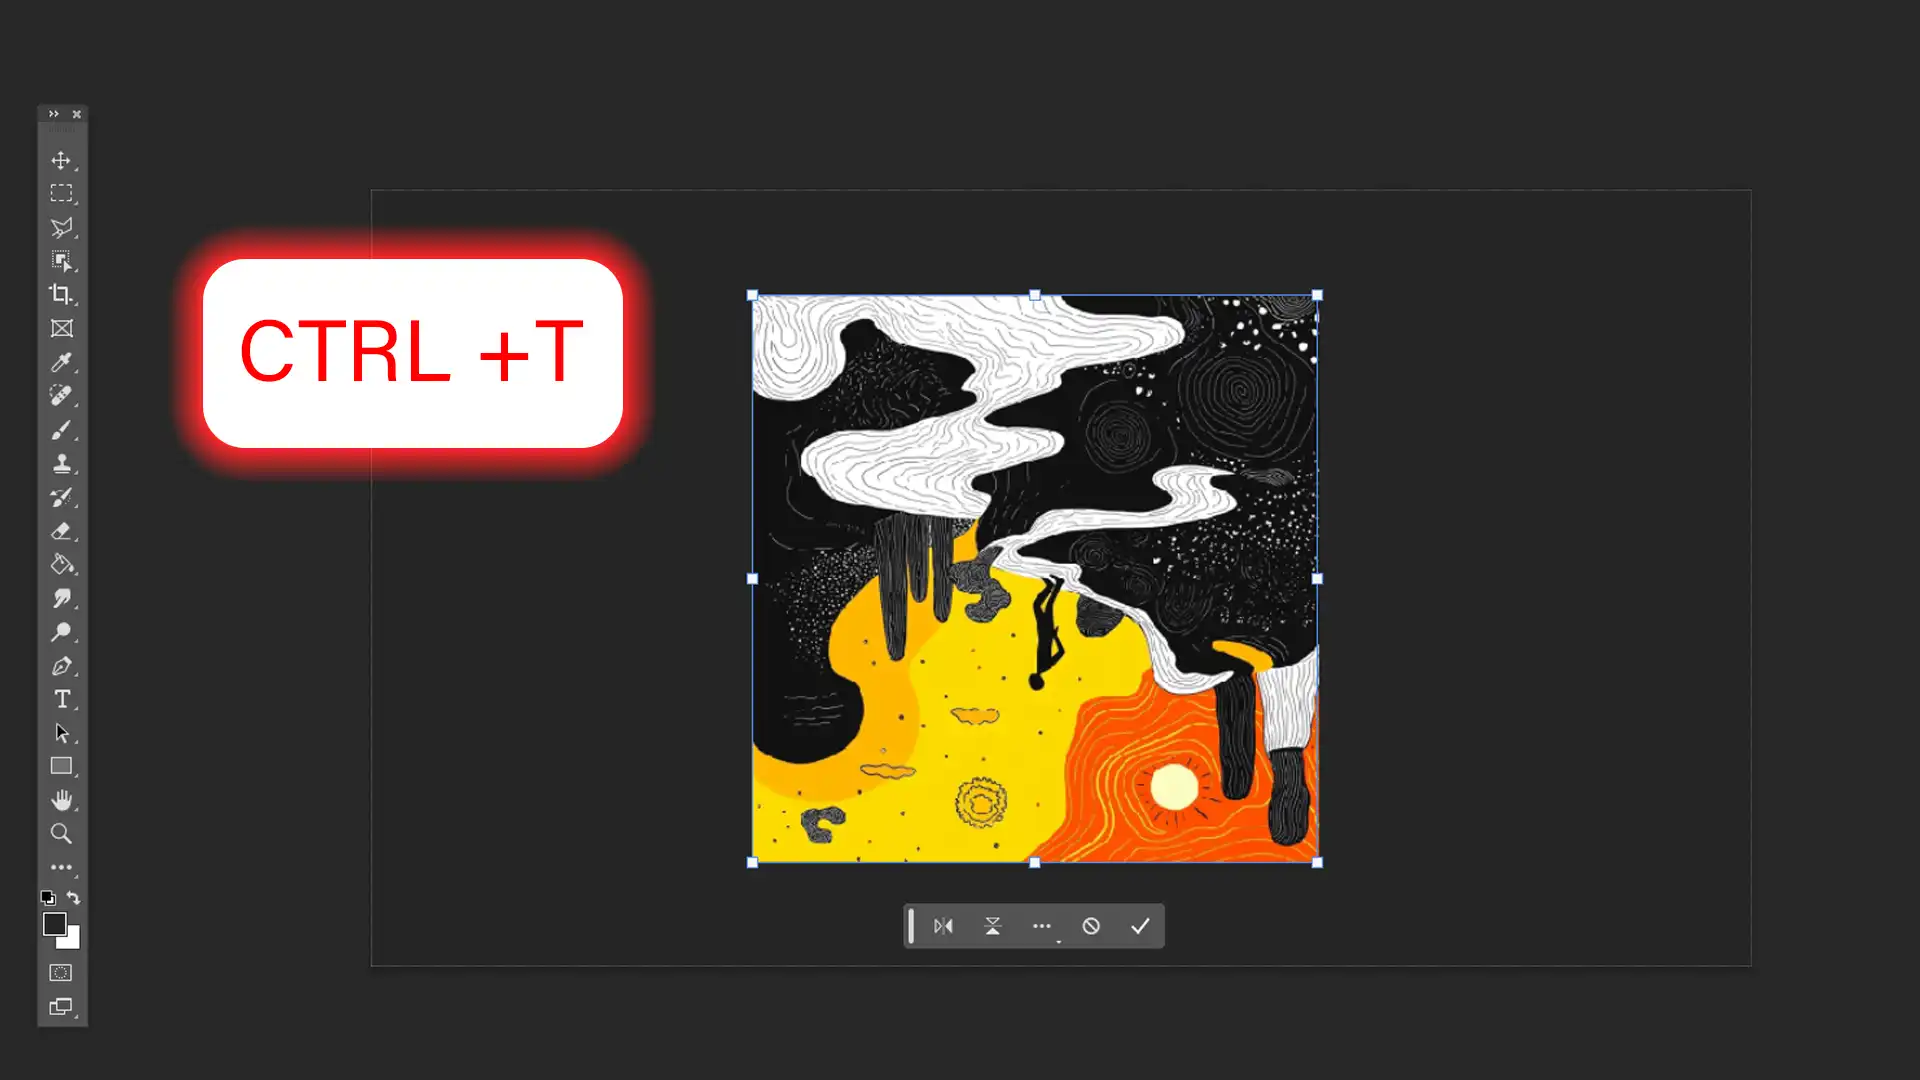
Go to Edit > Free Transform or press Ctrl+T (Cmd+T on Mac).
A enclosing box with handles appears around your image.
Place your cursor outside the enclosing box until it turns into a curved arrow.
Click and drag to rotate to your desired angle. Hold the Shift keyboard key for precise angles.
Master rotating image and canvas by learning how to rotate canvas in Photoshop. This important skill allows you to adjust your photos precisely, enhancing your editing workflow effortlessly.
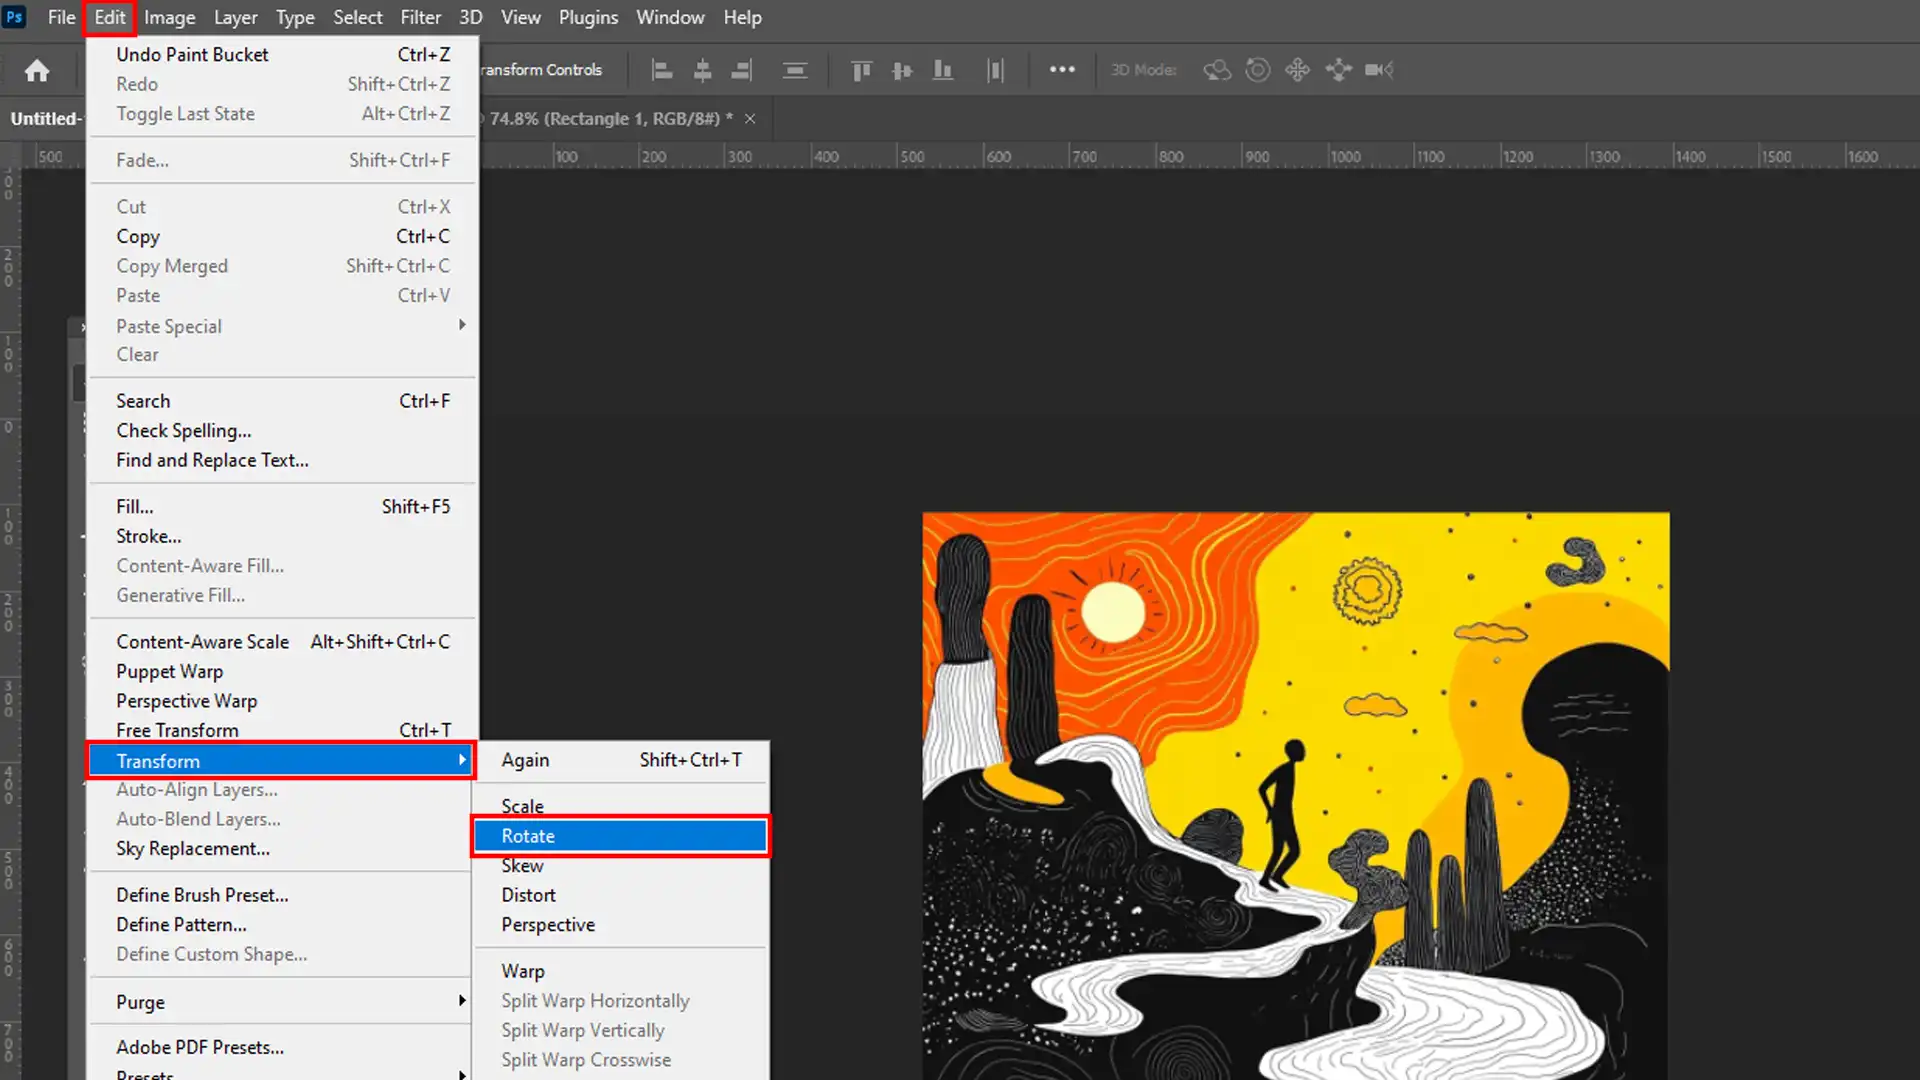
Using Menu Bar Commands
For quick and specific rotations, use the menu bar. These options rotate your image at standard angles, like 90 degrees clockwise or anticlockwise.
Here’s how to do it:
Go to Image > Image Rotation. Select your desired angle from the dropdown menu. Choices include 90° Clockwise, 90° Counter-Clockwise, and 180°.
Select “Flip Canvas Horizontal” or “Flip Canvas Vertical” for flipping options.
Observe the changes and make adjustments as needed.
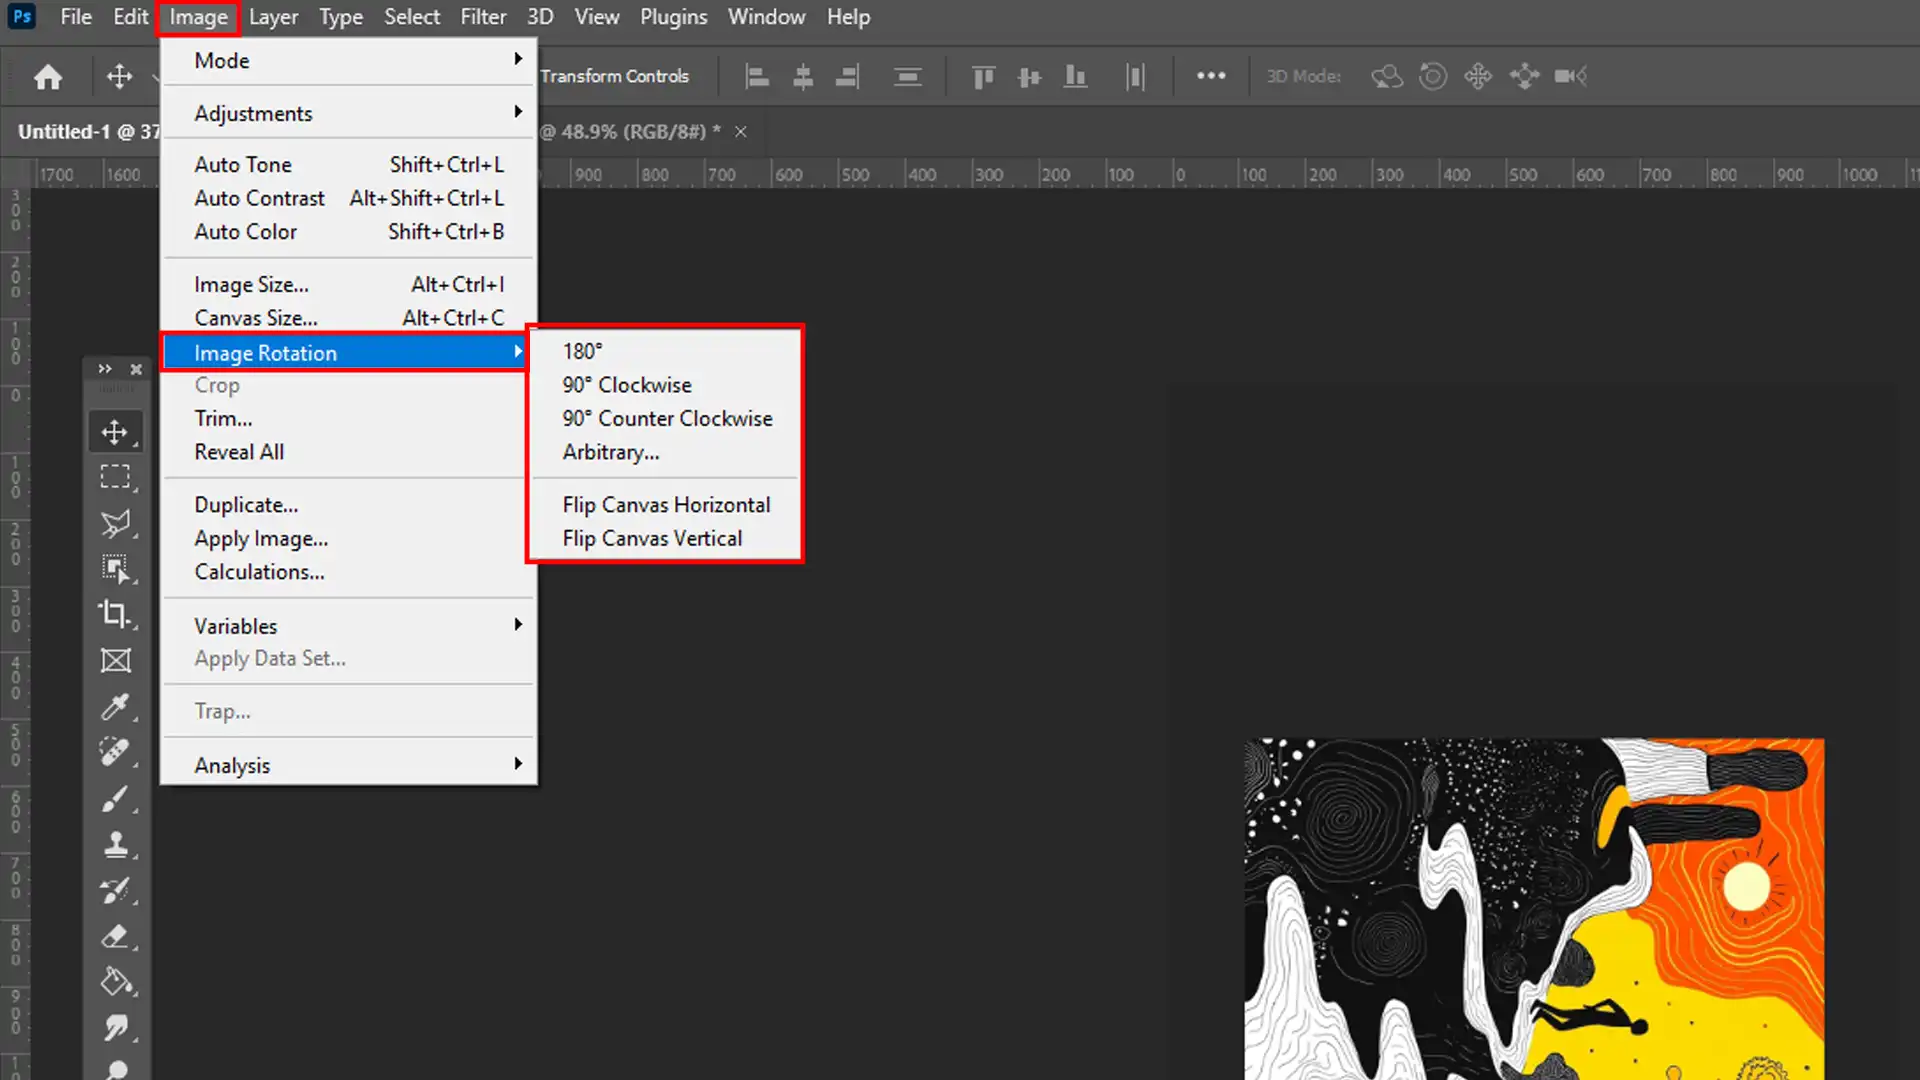
Transforming Multiple Layers
If you need to rotate numerous layers simultaneously, you can select multiplelayers in the layers panel. Hold down the Shift key, click on the layers you want, then follow the same process using the transform tool.
Ensure all selected layers are visible. Rotate them as one unit using the steps mentioned above.
Explore the Photoshop layering tutorial to learn how to transform multiple layers effectively. Mastering layering techniques allows you to create stunning visuals with precision and ease.
Ensuring Layers are Visible
Sometimes, layers halfway through an editing session become invisible. Ensure your layers window shows the visibility icon (eye icon) next to each layer’s thumbnail is active.
If the layer is invisible, click on the eye icon. This ensures your edited work is saved correctly.
Pro Tip: Always keep a backup of your original image! This way, if you’re not satisfied with the result, you can start fresh without any loss.
Utilize the auto-save feature in Photoshop to ensure a reliable backup of your original image. This feature helps protect your work from unexpected loss, giving you peace of mind while editing.
Get Lightroom Today! Unlock your creativity with Lightroom and elevate your photo editing game!
Step-by-Step Guide to Rotate an Image
Rotating images can be both fun and practical, whether to create art or correct orientation. Here is a simple and clear guide on how to rotate an image in Photoshop.
You can also check how to rotate images in Lightroom to adjust your photos. This guide helps you align images accurately, enhancing your edits.
Using the Free Transform Tool
The Free Transform Tool gives you visual control over the rotation.
Select the layer you want to rotate in the Layers window.
Go to Edit > Free Transform or press Ctrl+T (Cmd+T on Mac).
Rotate the image using the bounding box handles.
Hold Shift forprecise angles. Release Shift for free rotation.
Pro Tip: Ensure the layers window is visible and check the eye icon for selected layers.
Rotating the Entire Image
If you need to rotate the entire image or quickly flip it, use the navigation bar commands.
Steps:
Go to Image > Image Rotation in the navigation bar.
Choose from standard angles like 90° Clockwise, 90° Counter-Clockwise, or 180°.
For flips, select Flip Canvas Horizontal or FlipCanvas Vertical. This will turn the entire image upside down or horizontal.
Pro Tip: Always keep a copy of the original image before making changes.
Additional Tips for Efficient Editing
To further enhance your editing skills, familiarize yourself with basictools in Photoshop like the quick selection tool and content-aware fill. These tools can help you make more preciseadjustments and corrections to your images.
If you follow these steps, your newly rotatedimage should be ready for any creative or practical purpose you have in mind. Remember, practice helps you get better and more efficient with these fundamental tools in Photoshop.
Advanced Techniques for Image Rotation
In Adobe Photoshop, mastering the rotation of images can enhance your editing skills.
Let’s explore advanced techniques for picture rotation. This guide will ensure you navigate image orientation like a pro in no time.
Advanced techniques and manipulations include how to transform image techniques in Photoshop. These methods allow you to modify and perfect your photos, making your edits more professional and creative.
Using Layer Transformations
To begin, select the layer you want to rotate. Ensure the layers panel is visible, and the eye icon appears next to the layer. This selection keeps the layer from becoming a hidden layer’s thumbnail or an invisible layer.
Then, use the keyboard shortcut Ctrl+T (Cmd+T on Mac) for free transform. This method allows you to rotate the image easily.
Grab the bounding box handles and rotate the image. Holding the Shift keyboard key makes rotation accurate, snapping to 15-degree angles.
Releasing the Shift keyboard key lets you rotate freely. You might want to check your layer for optimal positioning.
Remember, holding down the shift keyboard key maintains a precise angle, which is useful for keeping things straight. Releasing it allows more flexibility for creative angling.
Mastering Photoshop keyboard shortcuts can significantly enhance your editing efficiency. These shortcuts streamline your workflow, allowing for faster transformations and adjustments, saving you valuable time.
Adjusting Image Orientation
If you need to rotate the entire image, go to the file menu and select picture rotation.
There are several options:
90 degrees clockwise
90 degrees counter-clockwise
A full 180-degree turn
Additionally, you can flip the layer upside down or flip the layer horizontally by using the flip horizontal or vertical commands. These functions allow quick changes to your image orientation.
Remember, making a duplicate of your original work ensures you retain a backup.
To access specific rotation options, use the Image > Image/Picture Rotation path. Here, you can customize the level of rotation or flip your canvas. Utilize the flip vertical or flip horizontal options for mirror effects.
Pro Tip: Use the crop tool in Photoshop to adjust your canvas size after rotating. This ensures no unwanted areas remain.
Practice these techniques to develop muscle memory, enhancing your efficiency. Keep learning with our tutorials, and you’ll be a Photoshop whiz in no time!
For more advanced tips, consider exploring how to use the Content-Aware Fill in Photoshop to seamlessly fill in gaps after rotation or how to remove shadows in Photoshop for cleaner edits.
Enhance your image rotation with the free crop tool in Photoshop. After rotating, cropping helps you refine the frame, ensuring your photos are perfectly aligned and visually appealing.
Troubleshooting Picture Rotation Issues
To effectively troubleshoot picture rotation issues, ensure the layers panel visible and select image rotation while checking that no layer invisible.
Issue
Description
Solution
Invisible Layer
The layer you want to rotate is not visible.
Click the eye icon next to the layer in the Layers panel.
Pixelation
Low-resolution images become blurry when rotated.
Use high-resolution images to maintain clarity.
Misalignment
Edges of the image don’t line up properly after rotation.
Zoom in to check alignment and adjust as needed.
Incorrect Rotation
The image rotates at an unexpected angle.
Use the Free Transform tool (Ctrl+T) for precise adjustments.
Common Problems and Solutions
Rotating an imagein Photoshop sounds simple, but it can cause issues. Common problems include invisible layers, pixelation, and misalignment.
The good news is that these are solvable:
Start by ensuring your layers window is visible. If a layer is invisible, click the eye icon next to it.
Avoid pixelation by using high-resolution images. Low-res images become blurry when rotated.
Check the alignment by zooming in on the edges. Misalignment disrupts the visual flow.
Use Ctrl+T (Cmd+T on Mac) for free transform. This helps in manual adjustment without deformations.
Rotate using the handles, and hold Shift for precise 15-degree movements.
Ensuring Proper Image Alignment
Alignment is extra important to a professional finish. Misaligned images look off.
Steps to ensure proper alignment:
Select the image inPhotoshop you want to align.
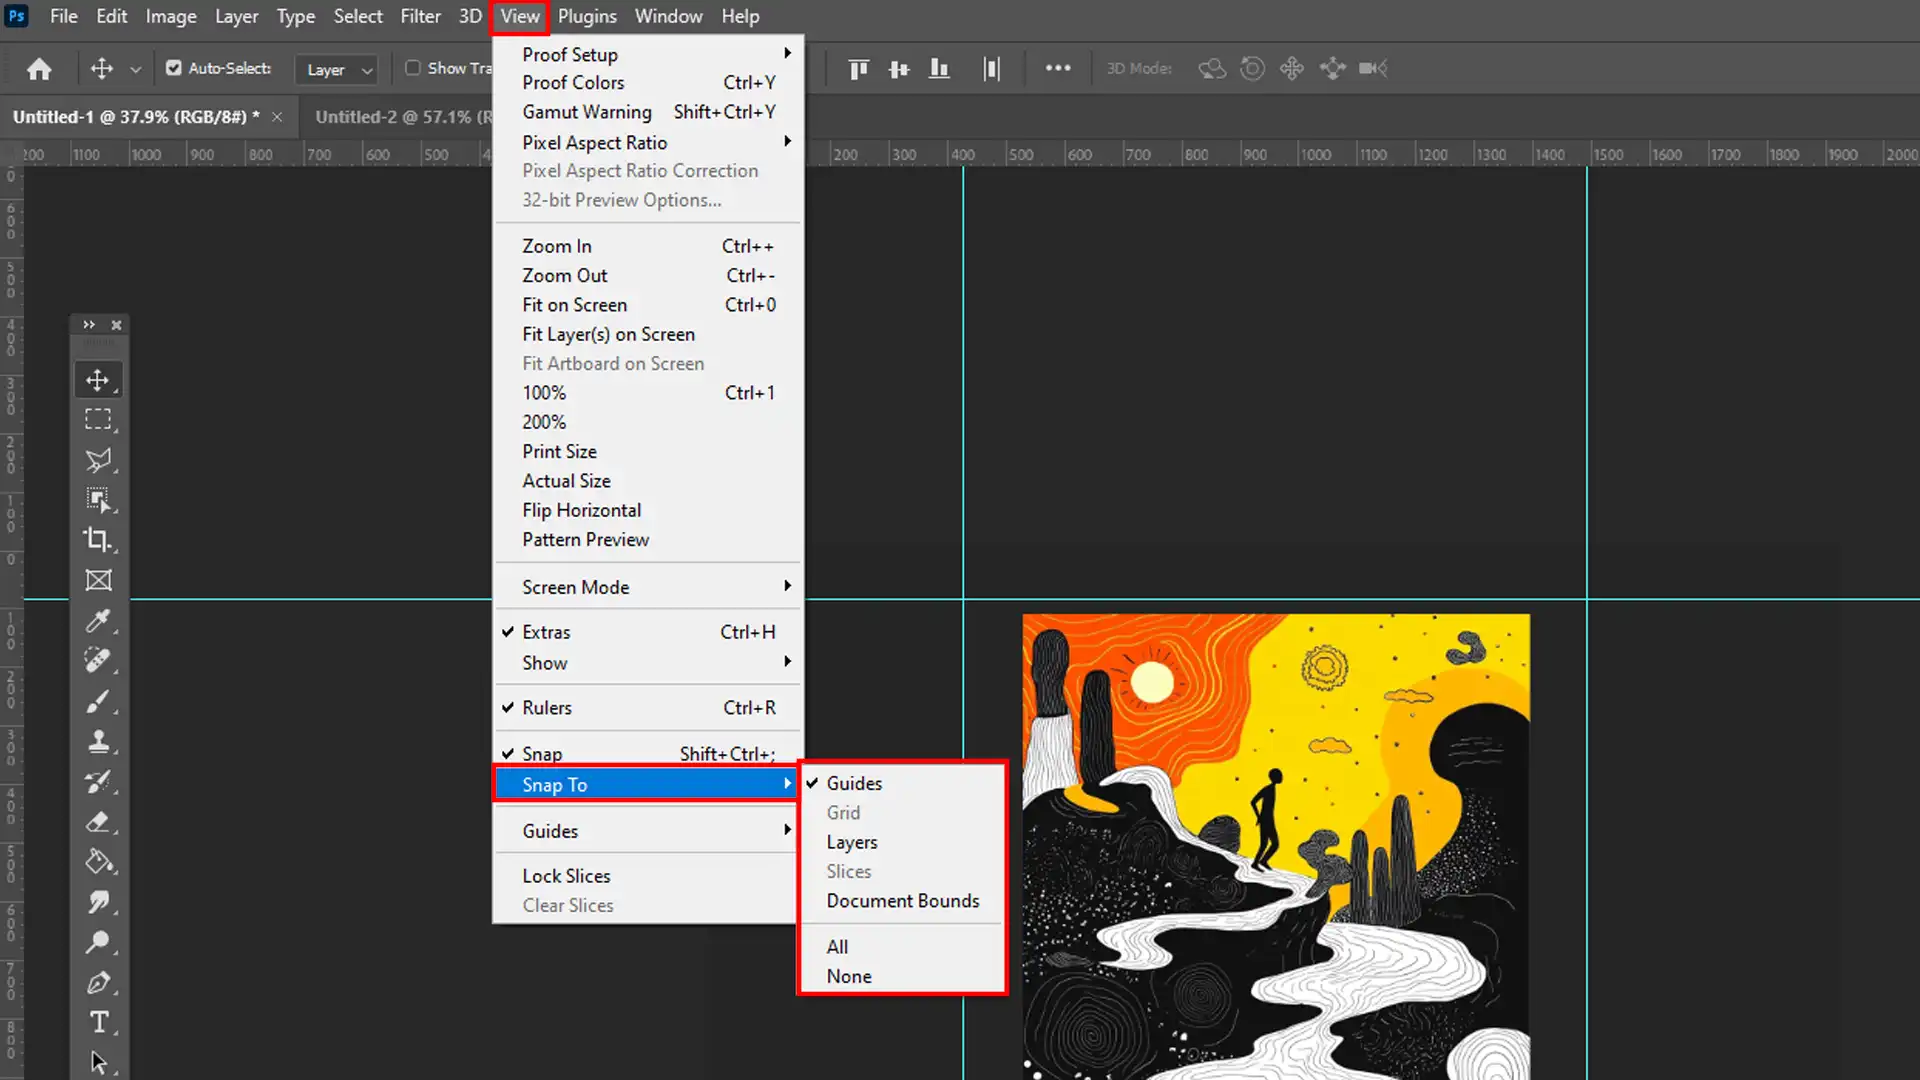
Access View > Snap to make elements snap to guides.
Check the rulers and gridlines from the window menu.
If you rotate, ensure the horizon line remains level.
For exact rotations, use Edit > Transform > Rotate. Rotate by degrees, clockwise or counter clockwise.
Flipping helps in alignment. Use Image > Image/Picture Rotation to flip: flips layer upside down or flips layer horizontally.
Ensure the image rotate command aligns with other elements. Precision counts here.
Pro Tip: Use the perspective crop tool after rotating to remove unwanted edges. This refines the final look and ensures uniformity.
Enhance your edits with the Photoshop mirror layer. This technique complements image rotation by creating symmetrical designs, adding balance and creativity to your photos effortlessly.
Frequently Asked Questions
How do I rotate the picture in Photoshop?
Open your image in Photoshop.
Select the image layer you want to rotate from the Layers window.
Go to Edit > Transform > Rotate.
Click and drag outside the bounding box corners to rotate your image freely. Alternatively, you can enter a specific rotation degree in the top toolbar.
Press Enter to apply the rotation.
How do I rotate a selection in Photoshop?
Use the selection tool of your choice (e.g., Marquee or Lasso Tool) to select the area you want to rotate.
Go to Edit > Transform > Rotate.
Click and drag outside the selection to rotate it, or enter a specific angle in the top toolbar for precise control.
Hit Enter to confirm the rotation.
What is the shortcut key for rotate in Photoshop?
To temporarily rotate the view of your canvas, press and hold the R key.
While holding R, click and drag your mouse cursor to rotate the view.
Release the R key to return to your previous tool.
How do I rotate the image?
Open the image in Photoshop.
Select the image layer you wish to rotate.
Go to Edit > Transform > Rotate or press Ctrl+T (Cmd+T on Mac) to activate the free transform tool.
Drag outside the corner handles of the bounding box to rotate the image freely. Use the top toolbar to input a specific rotation angle for precision.
Learning how to rotate an image in Photoshop can greatly improve your photo editing skills. I remember when I first started using Photoshop; I found rotating images to be a bit tricky.
However, with practice and the steps I shared, it became second nature. Whether you’re straightening a horizon or creating a unique design, knowing how to rotate your images makes a big difference.
If you’re eager to divedeeper into Photoshop course and Lightroom course, I recommend exploring my courses. They offer valuable insights that can help you enhance your editing skills even further.
Start rotating those images and let your creativity shine!
If this article has helped you, then Like and Share it with your friends
$2,061.00Original price was: $2,061.00.$1,061.00Current price is: $1,061.00. 27584
Download Your Free Guide Now!
Discover the secrets of photography with our printable guide! Master essential techniques like aperture, shutter speed, and ISO to create stunning images. Get your free printable PDF now and start turning your snapshots into masterpieces!