Ever wondered how to remove background in Lightroom?
You’re in the right place! Whether you’re a budding photographer or a seasoned pro, mastering this skill can elevate your photos to the next level.
Imagine transforming your portraits by isolating your subjects perfectly, making them pop against a clean backdrop.
Intrigued?
Stay with me as I walk you through the steps to achieve flawless background removal in Lightroom.
Table of Contents
Understanding the Removing Backgrounds in Lightroom
Removing backgrounds from photos can elevate your images and draw attention to the main subject. It’s a skill worth learning, especially for those who frequently work with images in professional contexts.
Why Remove Backgrounds?
Often, the image background can be distracting or simply inappropriate.
By carefully selecting or editing the image background, you can ensure that it enhances rather than overwhelms the focal point of your visual content.
Maybe there’s a cluttered room behind the subject or perhaps a black background would look more elegant.
By removing or changing the background, we ensure that viewers focus on the subject itself.
This practice is especially useful in product photography, professional portraits, and even creative projects where a transparent background is required for overlaying on different background images.
Overview of Lightroom Tools
Lightroom offers several tools that make background removal straightforward:
The adjustment brush allows for precise alterations. You can select specific areas of the photo and make changes without affecting the rest of the image. This tool is particularly handy when you want to remove background elements selectively.
The graduated filter tool allows for a smooth transition from one area to another. This can be very useful in creating a transparent background effect or in fading out unwanted elements in a photo.
The spot removal tool assists in cleaning up any lingering inconsistencies after you remove background elements
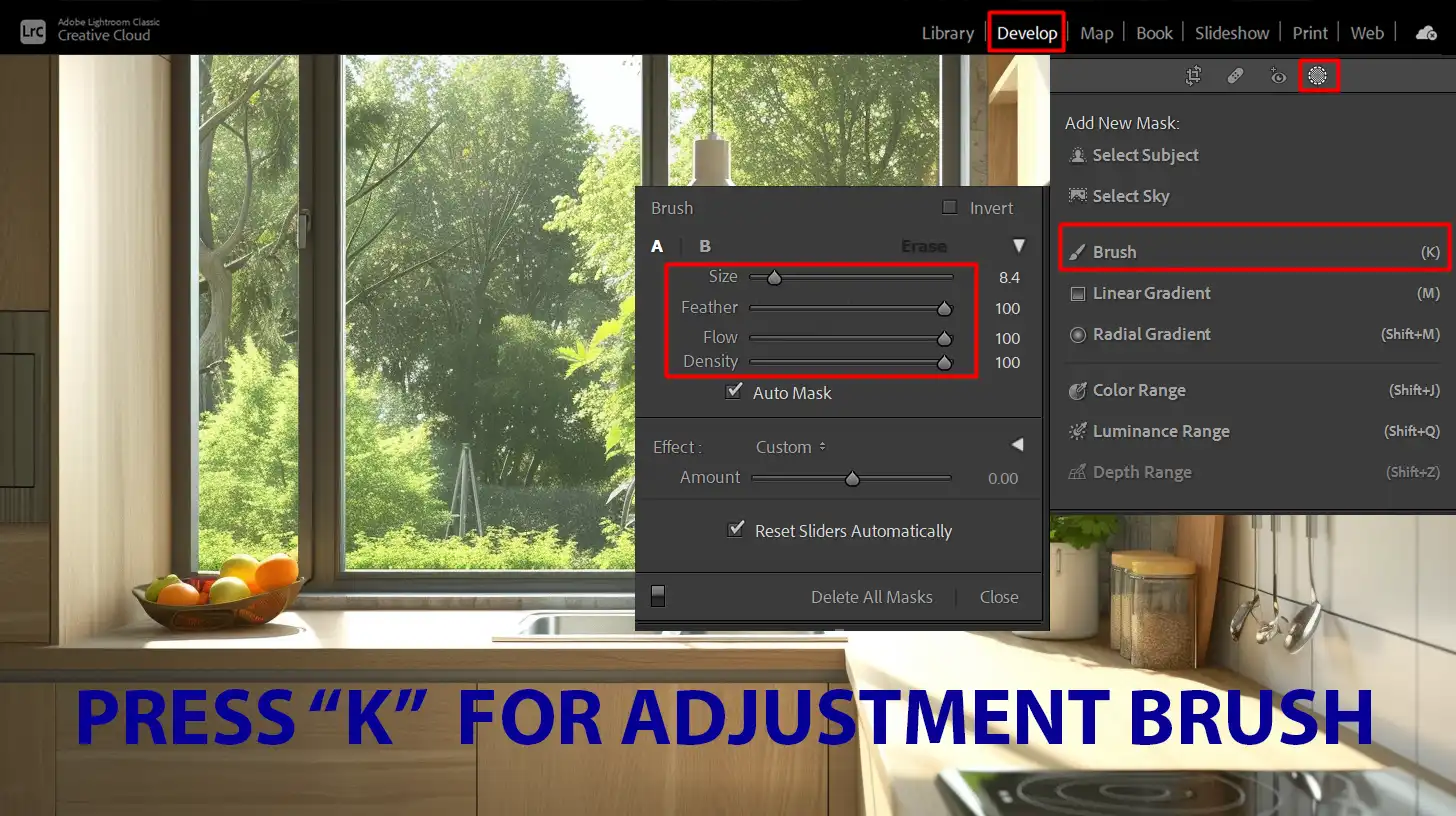
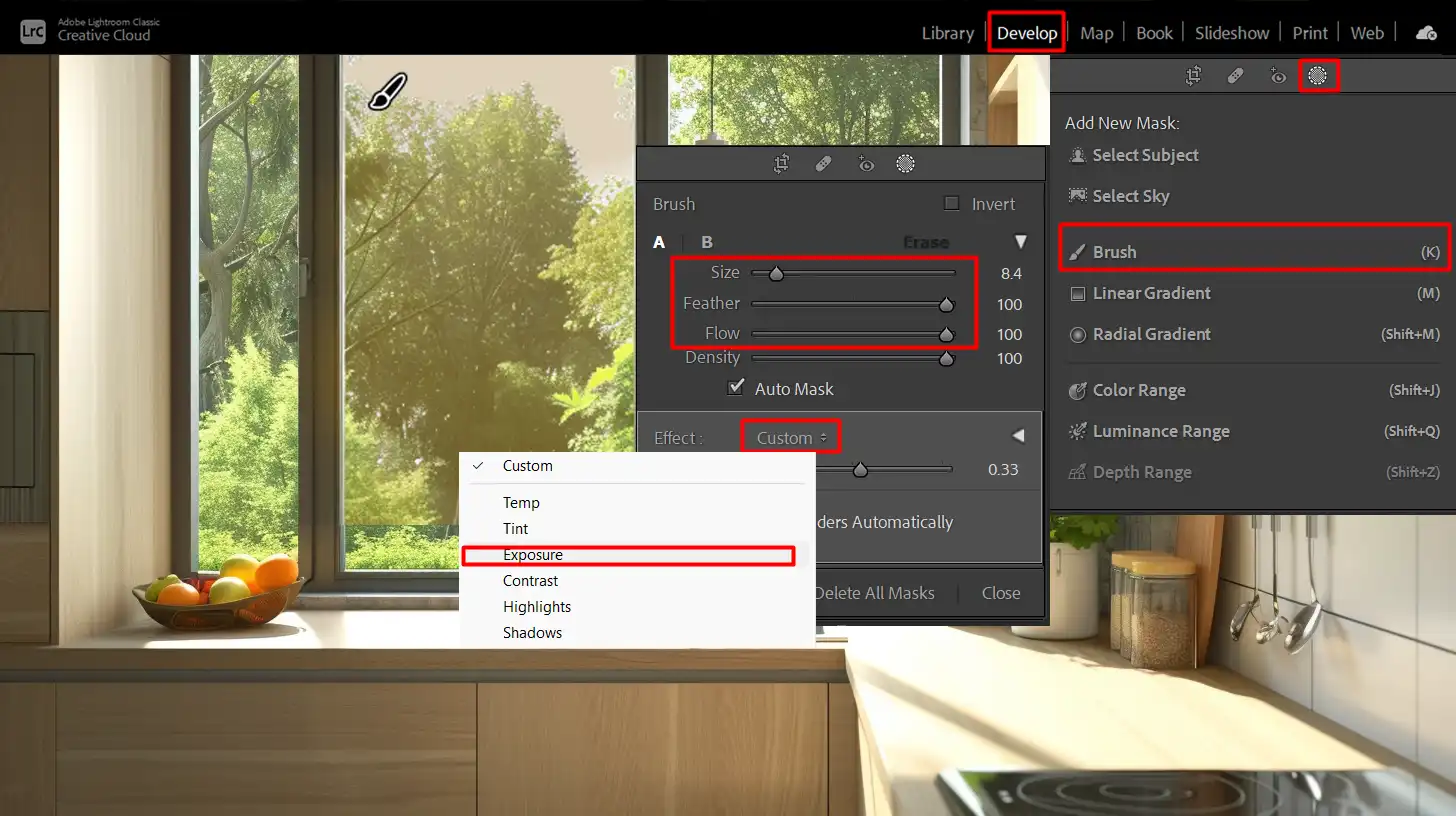
Using the Adjustment Brush Tool
The adjustment brush tool is quite versatile. First, select the tool and carefully brush over the areas you intend to remove.
Adjust the brush settings such as size, feather, and opacity to match your requirements. This careful selection process ensures a precise background removal.
Masking Tool for More Control
For more control over the editing process, use the masking tool. This tool enables you to create a mask around the subject, protecting it while you work on the background removal.
The masking tool helps to keep your edits confined to specific areas, preventing any unwanted adjustments.
Advanced Techniques: Range Mask Feature
Lightroom’s range mask features allow users to refine their edits based on color or luminance, making it easier to differentiate between the subject and detailed backgrounds.
Using this feature can simplify the process of removing intricate backgrounds, ensuring a smoother final result.
Further Editing & Final Touches
After you remove background elements, some additional editing may be required for the final image. Use the healing brush tools to eliminate stray pixels and the color correction tool to adjust the image tones
fine-tuning with the color correction tool can help ensure that the colors in your image are vibrant and accurately represent the intended look.
For those on the go, the Lightroom app on mobile also provides functionalities for background removal. This can be a quick solution for editing Lightroom images straight from your smartphone.
Pro Tip: Always save a copy of the source image before starting any edits. This ensures you have a backup if you need to restart or compare changes. For more intricate selections, consider using the quick selection tool in Photoshop.
It allows you to quickly isolate detailed areas, complementing the precise edits you make with Lightroom’s tools, ensuring smoother and more refined background removal
How to Remove Background in Lightroom
Removing the background in Lightroom may seem tricky, but it’s straightforward once you get the hang of it.
Understanding how to remove background elements and refine your image effectively can greatly enhance the overall quality of your work.
Step-by-Step Guide
To start, open your image in the Develop Section of Lightroom. This module offers various tools to help you edit your photos effectively.
Select the image you want to edit and load it in the Develop module.
Identify the area you need to remove.
Use the Adjustment Brush tool for precision work.
Adjust the brush settings as needed and begin brushing over the background you want to eliminate.
Using the Adjustment Brush Tool
The Adjustment Brush tool is perfect for precise alterations to your image. Let’s break down how to use it effectively.
What is the Adjustment Brush?
The Adjustment Brush is a fundamental tool in Lightroom that allows you to make specific changes to certain parts of your photo. This tool provides control over exposure, contrast, clarity, and more.
How to Use the Adjustment Brush Tool
Here’s a simple method to use the Adjustment Brush tool:
Select the Adjustment Brush tool from the right-hand panel.
Adjust the brush settings. You can modify size, feather, and flow.
Begin by brushing over the area you want to change.
Tweak the settings until you achieve the desired effect.
Creating a Transparent Background
Removing the background to make it transparent is helpful, especially if you plan to use the image in various contexts. To achieve a transparent background:
After using the Adjustment Brush, ensure all background elements are removed.
Fine-tune the edges with the Healing Brush tools if necessary.
Export the edited image as a PNG file to preserve transparency.
Pro Tip: Always save a copy of your original image before you begin background removal edits. That way, you always have a backup if things don’t go as planned.
Removing an image background in Lightroom doesn’t need to be complicated. With practice, you can master the Adjustment Brush tool and create stunning images with a clean, transparent background.
Mastering advanced techniques for background removal can enhance the precision and quality of your edits, especially in tricky areas like fine edges.
Here’s a quick comparison of advanced techniques for background removal in Lightroom. Each method provides unique tools and approaches to help you achieve cleaner, more professional results
Aspect
Overview
Fine-Tuning Edges
Use the Adjustment Brush tool in Lightroom to carefully refine edges by adjusting brush size and feather for precision. Continuously compare your progress with the original image to ensure clean and natural edges.
Using Masks
Masks provide control over specific areas for editing, allowing for precise background removal without affecting other parts of the image. Use tools like “Refine Edge” and “Feather” to ensure smooth transitions.
Combining Tools for Best Results
To achieve optimal background removal, combine tools like the Adjustment Brush and Masks. Continuously check your progress to maintain detail and quality in the final image.
Fine-Tuning Edges
Removing the background in Lightroom can get tricky when it comes to edges. Small details and fine lines often require more attention. You need to use the Adjustment Brush tool wisely.
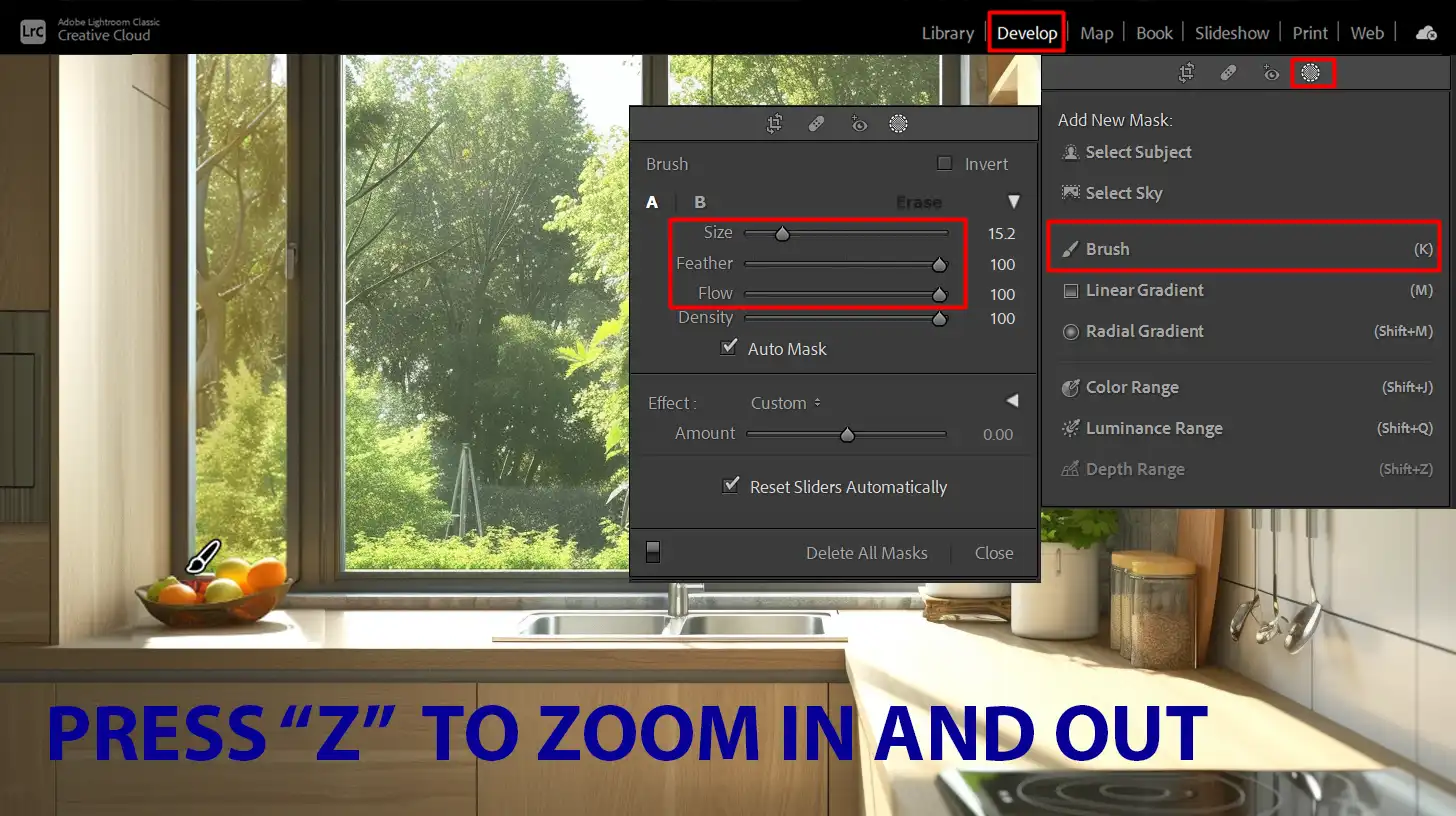
Set the brush size and feather for precision, and zoom in to see those tiny details clearly. Work slowly, and adjust your brush stroke as you go along.
Patience is important here. If you make a mistake, simply undo and try again. A good tip is to continually compare your progress to the original image to ensure accuracy. The goal is to make the edges clean and natural.
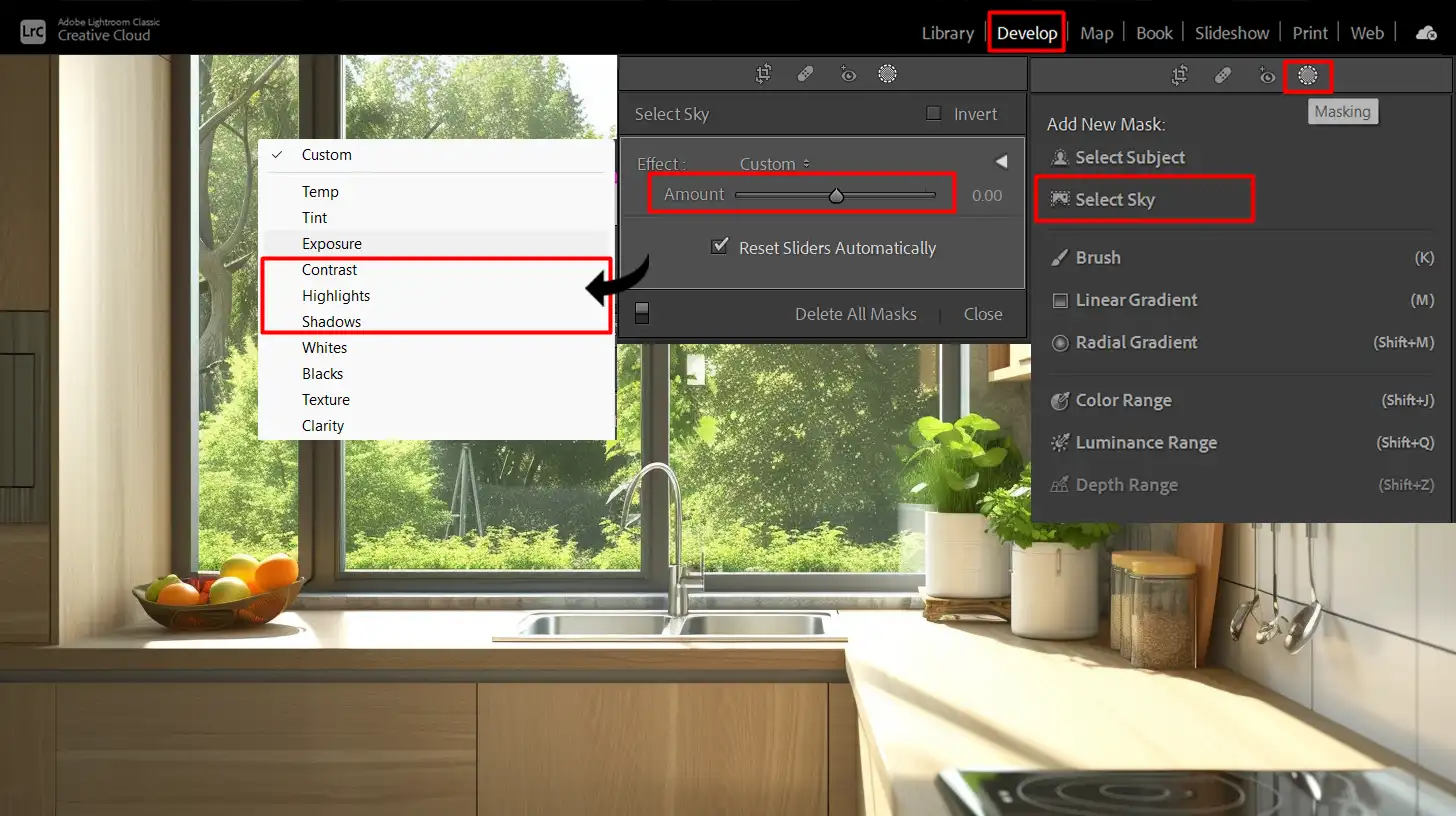
Using Masks
Masks are incredibly useful for background removal in Lightroom. They give you more control over what parts of an image are edited.
To start, create a new mask and select your desired masking method. This method helps isolate and remove the background without affecting other parts of your photo.
Once choose “Subject” or “Sky” masking method, you can apply adjustments to it specifically. Make sure to refine the mask and apply various adjustments like Exposure, Contrast, Highlights, and more to the masked area. This ensures that transitions between the kept image and the removed background look smooth.
Combining Tools for Best Results
For the best results, combine multiple tools available in Lightroom:
Begin with the Adjustment Brush for broad strokes and initial removal.
Next, move on to using masks for targeted adjustments.
This combination of techniques allows you not only to remove the background but also to maintain the quality and details of the subject.
Remember to constantly check your progress. Zooming in and out helps ensure you’re not missing any small parts. A mix of tools can make the process quicker and more efficient.
Experiment with the tools to see what works best for your specific needs. This approach guarantees a cleaner, more professional looking edited image.
Pro Tip: Practice makes perfect with background removal. Don’t rush it. Take your time with each step and practice regularly. Before you know it, you’ll be a pro at background removal in Lightroom.
Common Issues and Troubleshooting Image Background
When removing backgrounds, it’s common to encounter challenges. Let’s look at how to tackle complex backgrounds and achieve a cleaner edit.
Dealing with Complex Backgrounds
When facing an intricate image background, start with the Adjustment Brush in Lightroom. Select a medium brush size and define the edges of your subject.
Complex backgrounds often require multiple passes to clean thoroughly and remove background effectively.
For example, if you’re working with a black background, focus on outlining the lighter areas first. This approach helps in maintaining a natural look for the subject.
Zoom in and out frequently to ensure no small areas are overlooked. After the brushwork, utilize masks to isolate parts that need more refined adjustments.
Correcting Mistakes
Mistakes happen. Don’t fret! Photoshop and Lightroom have several ways to fix errors:
To begin with, the Undo command (Ctrl + Z or Cmd + Z) is your best friend. If you find you've gone too far, Lightroom's History panel allows jumping back several steps easily.
Another effective method is using masks. They provide control over the edited sections, defining what needs corrections. Use the “Refine Edge” or “Feather” tools to adjust transitions smoothly.
For missed areas, the Healing Brush and Clone Stamp in Adobe Photoshop can seamlessly blend errors into the background image. This method helps completely remove any unintended marks.
Pro Tip: Utilize Lightroom app on mobile for quick edits on the go. The mobile version offers simplified tools that make it easy to remove background in Lightroom seamlessly. Always work on a high-resolution image for the best results.
To achieve optimal results, knowing how to remove background in Lightroom effectively is significant, and regularly practicing these techniques can enhance your overall editing skills.
Additionally, mastering how to remove background in Lightroom will ensure your images maintain their quality and clarity.
Practical Applications and Examples
Let’s explore some real-world examples to see how background removal techniques can enhance different types of photography, starting with portrait photography.
Portrait Photography
Portrait photography often presents challenges, especially regarding the image background. Backgrounds can either enhance or distract from the subject, making finding the perfect portrait background important.
Ensuring the background in Lightroom aligns with your vision is important to produce a polished look. This requires knowing how to remove background in Photoshop and make targeted adjustments. When an intricate background becomes too distracting, try using Lightroom’s tools:
Start by selecting the Adjustment Brush. This is helpful for complex areas around your subject.
Adjust the brush size to define the edges. Remember, multiple passes may be necessary for a thorough job.
Outline lighter areas first to create a natural look.
Zoom in and out to avoid missing small areas.
Use masks to refine your edits.
Product Photography
In product photography, clean backgrounds matter to highlight the product. Learning how to remove background efficiently in Lightroom is significant.
A clean background allows the product to shine without distractions. Using the Adjustment Brush helps clean up the surrounding area of the product. Zoom in for precision. Removing the background ensures the focus remains on the product itself.
Lightroom’s undo command (Ctrl + Z or Cmd + Z) rectifies any mistakes easily, and the History panel lets you jump back several steps.
Working with high-resolution images is beneficial. It ensures the final product looks sharp and professional.
Another useful tip involves employing the “Refine Edge” or “Feather” tools for smooth transitions between the subject and background.
Pro Tip: Practice these methods using Lightroom Mobile for quick and efficient edits on the go. This practice helps you become quicker and more efficient. After using Lightroom, try the blur background in Photoshop technique to soften details and enhance focus on your subject for a polished portrait
Frequently Asked Questions
What is the easiest way to remove background in Lightroom?
Step 1: Open your photo in Lightroom and select the 'Develop' module.
Step 2: Use the 'Adjustment Brush' tool to paint over the background you want to remove.
Step 3: Adjust the brush settings for size, feather, and flow to ensure precise application.
Step 4: Once selected, tweak the settings like exposure and contrast to make the background blend or stand out as needed.
What is the best way to remove the background from my photo?
Step 1: Load your image into Lightroom and go to the 'Develop' module.
Step 2: Select the 'Adjustment Brush' tool.
Step 3: Carefully paint the background areas you want to modify or remove.
Step 4: Adjust the sliders (e.g., exposure, clarity) to diminish the visibility of the background.
How do I change the background in Lightroom?
Step 1: Start in the 'Develop' module with your image opened in Lightroom.
Step 2: Use the 'Adjustment Brush' to select the background.
Step 3: Modify the background by adjusting exposure, contrast, or saturation to change its appearance.
Step 4: For a more drastic change, adjust the temperature and tint sliders to add a different color to the background.
How to remove background objects in Lightroom mobile?
Step 1: Open the image in the Lightroom app on mobile and select the 'Healing Brush' tool.
Step 2: Zoom in on the object you wish to remove.
Step 3: Tap on the object and adjust the size of the brush to cover it completely.
Step 4: Lightroom mobile will automatically replace the object with surrounding pixels.
In conclusion, learning how to remove background in Lightroom has been incredibly useful to me. It has streamlined my workflow and improved the quality of my images significantly.
By mastering this skill, I can now create cleaner and more professional-looking photos.
If you’re eager to enhance your editing abilities, I highly recommend checking out these helpful resources: the Photoshop course and the Lightroom course.
These courses have been invaluable in my journey to becoming a more proficient editor and can definitely help you achieve the same results.
If this article has helped you, then Like and Share it with your friends
$2,061.00Original price was: $2,061.00.$1,061.00Current price is: $1,061.00. 27584
Download Your Free Guide Now!
Discover the secrets of photography with our printable guide! Master essential techniques like aperture, shutter speed, and ISO to create stunning images. Get your free printable PDF now and start turning your snapshots into masterpieces!