How to Photoshop Someone into a Picture: Easy Steps
How to Photoshop Someone into a Picture: Easy Steps
Curious about “how to photoshop someone into a picture“? Whether it’s for a family photo where someone was missing or you want to create a fun composite image, this technique can work wonders.
Imagine being able to seamlessly integrate a person into any background, making it look like they were always part of the original scene.
You’ll find this guide particularly useful as I walk you through why Adobe Photoshop is the ultimate tool for this task and share step-by-step instructions to achieve a professional result.
Dive in and discover how to make your photos tell the story you envision!
Table of Contents
How to Photoshop Someone into a Picture?
Discover how to photoshop someone into a picture with our simple tutorial. This process will help you create natural and seamless images, perfect for enhancing your photos or correcting group shots.
When to Use This Technique
Adding someone into a picture with Adobe Photoshop comes in handy for several scenarios. Perhaps you took a group photo, and someone important was missing, or maybe you want to combine elements from two photos into one seamless image.
These situations make Photoshop the go-to photo editing app for creating professional-looking images.
With photo editing, you can make it seem like everyone was present in the original photo. Adobe Photoshop is perfect for this as it provides photo editing tools that ensure a seamless integration of a person’s image into the background layer.
Simple Steps to Photoshop Someone into a Picture
Adding someone into a photo in Photoshop can be easy and fun. Before diving into the steps, make sure you have the photos you want to work with ready to go. Let’s start by getting your images open and set up
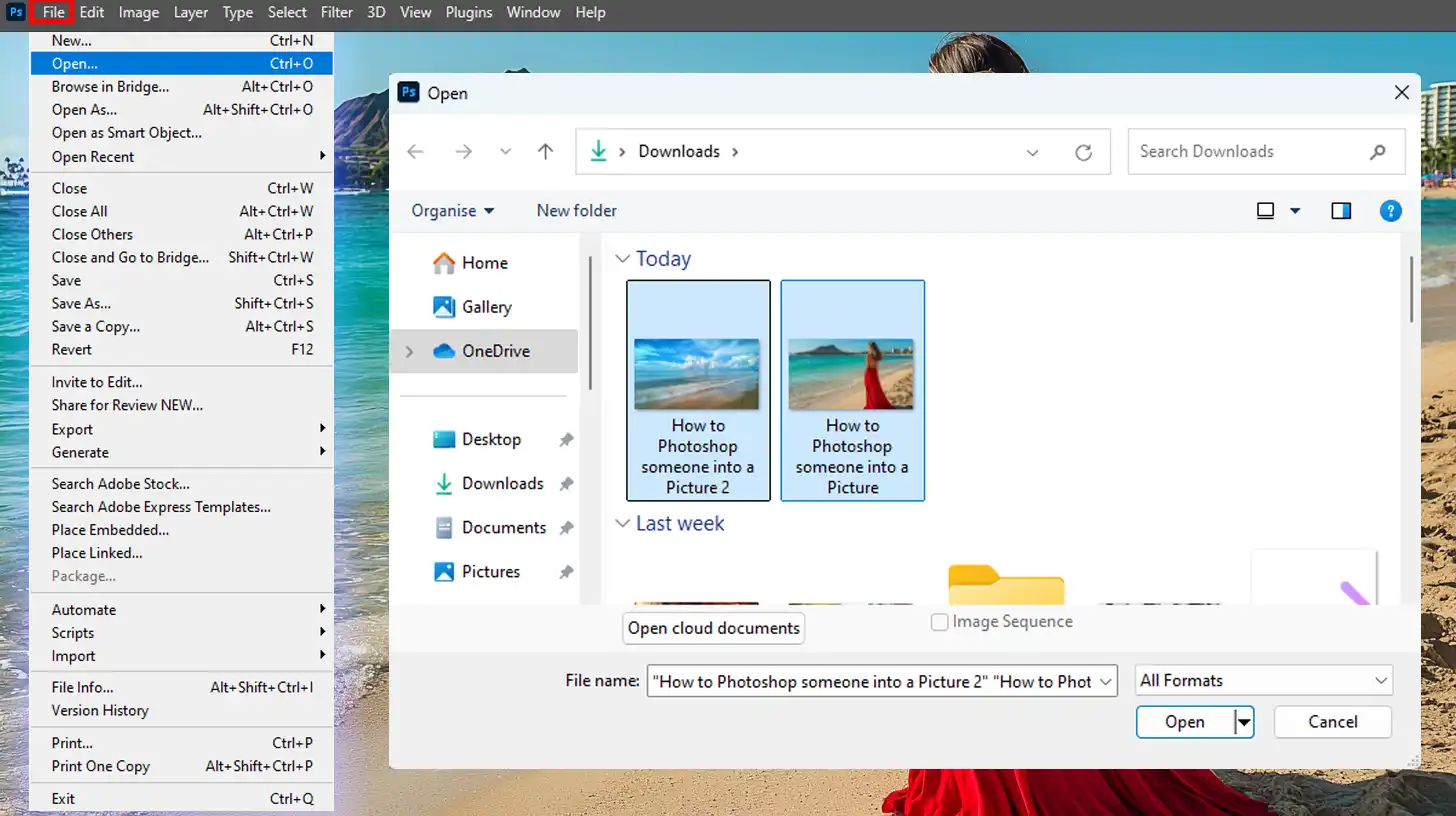
Step 1: Open your Photos
Open both photos in Adobe Photoshop, the one with the group photo and the second photo featuring the person to be added.
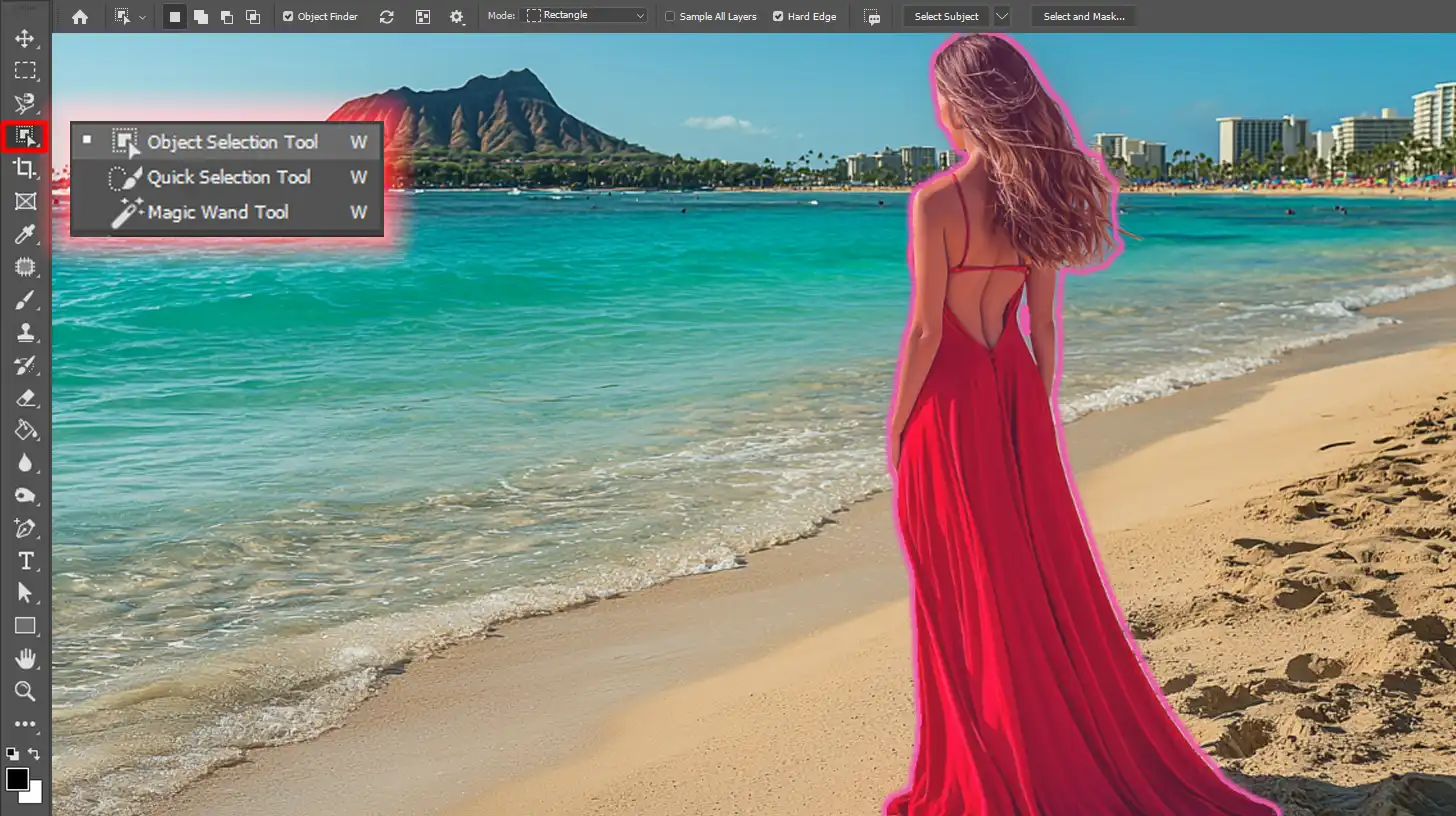
Step 2: Use a Selection Tool
Use the object selection tool or the lasso tool to select the person from the second photo. Copy this selection and paste it into the group photo.
Step 3: Refine and Adjust the Look
Refine the look by using blending techniques. You may add a slight drop shadow to match the lighting and depth of the original image. Use the layers panel to manage these adjustments.
Pro Tip: Remember to zoom in to catch any small inconsistencies. Using Photoshop, you can enhance your photo refining skills and blend pictures seamlessly, creating images that truly pop.
Discover how to photoshop someone into a picture by mastering image editing techniques. This guide will show you how to seamlessly integrate a person into your background picture, creating polished and realistic results.
Selecting the Right Image for How to Photoshop Someone into a Picture
The first step in this process is important. You must begin by looking for the right photo. Choose a clear, well-lit image where the person stands out.
Make sure both the person’s photo and the target background complement each other well in terms of lighting and angles.
Once you have both photos, open Adobe Photoshop and click on File to open the images. It’s helpful to use high-resolution photos to ensure that the final refined photo looks seamless and real.
Using the Background Layer in Photoshop
After opening your images, identify the background layer. This is the base layer that contains the background photo, where you will add someone into the picture. Unlock it by clicking on the lock icon in the layers panel.
Next, using the object selection tool, carefully select the portrait from the source photo. Use the pen tool or lasso tool for more detailed selections, ensuring that you capture the subject cleanly.
With the selection active, copy it. Switch to your background and paste it as a new layer.
Using Blending Techniques for Realism
To make your edit more convincing, employ blending techniques. Use layer masks to fine-tune the edges of the added person. Apply a slight feathering effect to soften the transition between the portrait and the background.
Adjust lighting and shadows. Ensure that the light direction and shadow intensity of the inserted subject match the rest of the scene. The drop shadoweffect can add realism if applied subtly.
Consider color matching. Use adjustment layers like curves or hue/saturation to align the colors and tones of both photos. This helps in making the final image look cohesive. Use the zoom tool to check details closely.
Pro Tip: Use the transform feature to scale and rotate the person into the picture as needed. This ensures they match the surroundings accurately.
With these steps, you can easily Photoshop someone into a picture. Remember, practice makes perfect.
Tips for Seamless Integration of a Person into a Picture in Adobe Photoshop
How do you seamlessly integrate someone into a picture? Simple steps and the right tools. Start with clear, well-lit photos. The clarity of the image matters.
The table below outlines significant tips and techniques to ensure your final image looks natural and cohesive.
Aspect
Overview
Starting with Clear, Well-Lit Photos
Begin with high-quality, well-lit images to ensure clarity and ease of integration. Good lighting enhances the natural appearance of the added person.
Matching Lighting and Shadows
Ensure the lighting on the added person matches the original photo. Align the direction and intensity of light to create a cohesive look.
Creating and Adjusting Shadows
Use the brush tool to softly create or adjust shadows, anchoring the person in the scene and enhancing the natural feel of the edit.
Color Matching
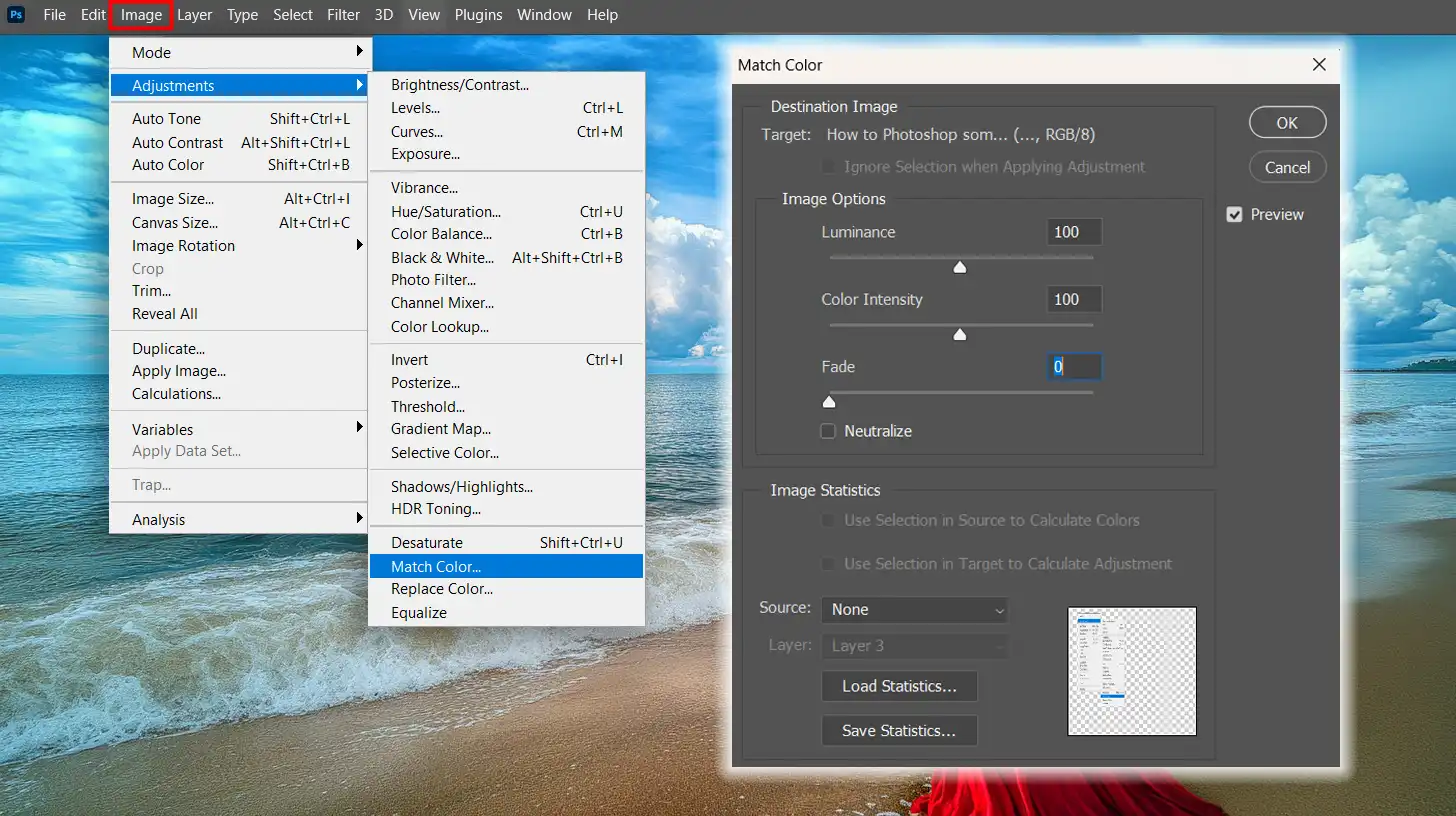
Adjust the colors of the added person to blend seamlessly with the background. Utilize Image > Adjustments > Match Color and adjustment layers for brightness, contrast, and color balance.
Using Adjustment Layers
Employ adjustment layers to fine-tune the integration. This allows for non-destructive edits and easy modifications to achieve a smooth blend.
Usage of Lighting and Shadows
Lighting and shadows are important. When you add a person to a photo, match the lighting. The light should hit the person the same way it hits the objects in the background.
Shadows also play a big role. If the original image has shadows, make sure the new person has similar ones. Use the brush tool to softly create shadows.
Adding shadows helps to anchor the person in the scene. It makes the edit look more natural. If you need to remove or adjust shadows, the “removing shadows in Photoshop” technique can be very helpful.
Color Matching
Matching the colors is important when figuring out how to Photoshop someone into a picture. Adjust the colors to blend the new layer with the original background.
Go to Image > Adjustments > Match Color. This matches the tones.
Use the adjustment layer to tweak brightness, contrast, and color balance to make the integration smooth.
Pro Tip: Use Adobe Photoshop’s select subject feature under the magic wand tool for quick selections. Then refine your selection using the pen tool for precision. This ensures edges are clean and accurate.
Additionally, when adding text to your image, utilize the text shadow Photoshop feature to enhance readability and seamlessly blend the text with the overall composition.
Remember, practice makes perfect, so keep trying different techniques to enhance your photo-refining skills and make your group photo look natural.
Creating a Realistic Group Photo
Merging multiple elements into one image involves careful attention to each picture step. By following each stage carefully, you can ensure that every person blends naturally, resulting in a cohesive and believable group shot.
Why Positioning and Perspective Matter for How to Photoshop Someone into a Picture
Positioning a person properly in a group photo is important. When you Photoshop someone into a picture, matching the perspective ensures they fit naturally within the scene.
For example, placing a person at an awkward angle can make them appear out of place. Align their eye level with the other subjects for a cohesive photo.
It’s important to consider where the light falls in the image. Light direction and intensity on the new person should match the original photo to look believable.
Using the brush tool helps create or adjust shadows. This trick can enhance the natural look of the final image.
Adding Depth and Dimension to a Picture
Adding depth gives the photo a more three-dimensional feel. Blending photos seamlessly is important when you photoshop someone into a picture. Adjust the brightness and shadows to create a natural integration.
In Adobe Photoshop, layers help fine-tune colors and tones. Use Image > Adjustments > Match Color to maintain consistency. It brings harmony between the person and the background.
To achieve fine edges, use the pen tool carefully. Clean edges contribute to a polished outcome when merging two images.
For beginners, Adobe Photoshop Express provides intuitive tools. Its user-friendly interface makes it easier to handle basic photo editing tasks efficiently.
Pro Tip: Always save your work as layers. This allows for easy adjustments and levels of creativity without losing original work.
Whether you’re blending pictures or learning how to replace sky in Photoshop, using layer masks instead of erasing areas offers more control. Remember to use layer masks instead of erasing areas, offering more control.
Finalizing and Exporting Your Edited Photo
After placing your subject on the new background, use an online tool and image editing features to refine the details. These final steps ensure your edited photo looks seamless and is ready for sharing or printing.
Review and Adjustments
Before we call it a day, let’s do some final tweaks. Open your project and take one last thorough look.
Double-check the placement of the new person in context with the original subjects.
Make sure the shadows and light sources align perfectly. If needed, use the dodge and burn tools in Photoshop to refine these details.
Zoom in to spot any rough edges and use the Pen Tool to clean them up. Small adjustments can make the difference between a good photo and a great one.
Use layers to adjust brightness and contrast, playing with tones until everything looks cohesive.
The Match Color adjustment is also a lifesaver. And remember, maintain your layers. Don’t flatten them until you’re absolutely sure you’re done. This makes tweaks easier, even at the last minute.
Exporting Your Image
Exporting your image correctly is important. Head to the “File” menu and select “Export As” or “Save for Web.” Choose the file format that best suits your needs JPEG for general use, PNG if you need transparency.
Ensure your export settings are optimal. Higher quality means larger file sizes, which can be necessary if you're planning to print.
For online use, balance quality with file size to keep it manageable. Consider using the best Lightroom export settings for Instagram if you plan to share on social media.
Select your destination folder and hit "Save". There you have it, a flawless photo ready for display or sharing.
Pro Tip: For seamless work, always use a user-friendly interface like Adobe Photoshop Express. It makes navigating tools a breeze, especially for beginners.
Additionally, incorporating tips for Lightroom editing can help you fine-tune your image’s color and lighting, ensuring your exported photos look their best across different platforms.
By following these steps, your photo editing skills go way beyond basic. With a bit of patience and these techniques, you can master how to photoshop someone into a picture effectively.
Learning how to Photoshop someone into a picture has truly changed the way I edit my photos. I remember fixing a group photo where a friend was missing, and it felt great to have everyone together.
By following the simple steps above, you can make your pictures look natural and professional. If you want to improve your skills, check out my Photoshop Course and Lightroom Course. They offer easy-to-follow lessons that can help you master these techniques.
Additionally, using tools like Adobe Photoshop and Adobe Lightroom can make the editing process smoother and more efficient. Keep practicing, and soon, you’ll be able to create stunning images that tell the stories you want.
If this article has helped you, then Like and Share it with your friends
$2,061.00Original price was: $2,061.00.$1,061.00Current price is: $1,061.00. 27584
Download Your Free Guide Now!
Discover the secrets of photography with our printable guide! Master essential techniques like aperture, shutter speed, and ISO to create stunning images. Get your free printable PDF now and start turning your snapshots into masterpieces!