Master Moving Images in Photoshop: Essential Techniques
Master Moving Images in Photoshop: Essential Techniques
Have you ever struggled with how to move an image in Photoshop?
You’re not alone! In this guide, you’ll uncover simple steps to effortlessly change your images within your projects.
Pay close attention as we dive into tips and tricks that will save you both time and frustration.
By the end, you’ll gain the confidence to handle your images like a pro. Intrigued?
Let’s get started!
Table of Contents
Method 1: Using the Move Tool To Move An Image In Photoshop
When working in Photoshop, mastering various image manipulation techniques can greatly enhance your editing efficiency and creative potential.
Each method offers unique features and advantages tailored to different use cases.
Below is a table summarizing important image manipulation methods, their use cases, and main features:
Method
Use Case
Key Features
Move Tool
Basic image repositioning
Simple drag and drop, layer-specific
Keyboard Shortcuts
Quick adjustments
Fast access, customizable
Drag and Drop Technique
Moving images between documents
Intuitive, new layer creation
Layers Panel
Managing multiple image elements
Layer organization, non-destructive editing
Transform Tool
Resizing, rotating, skewing images
Advanced transformations, precision control
The quick selection tool is incredibly useful for selecting specific areas quickly. Once selections are made, using the move tool to move an image becomes seamless, allowing for precise adjustments and improved workflow.
Step-by-Step Guide
Alright, let’s get into the Move Tool. This tool is super useful for moving stuff around in Photoshop.
Follow these steps to learn how to use it.
First Step: Open the Image
First, open the image you want to work with. Click on the file menu, choose “Open” and pick your photo.
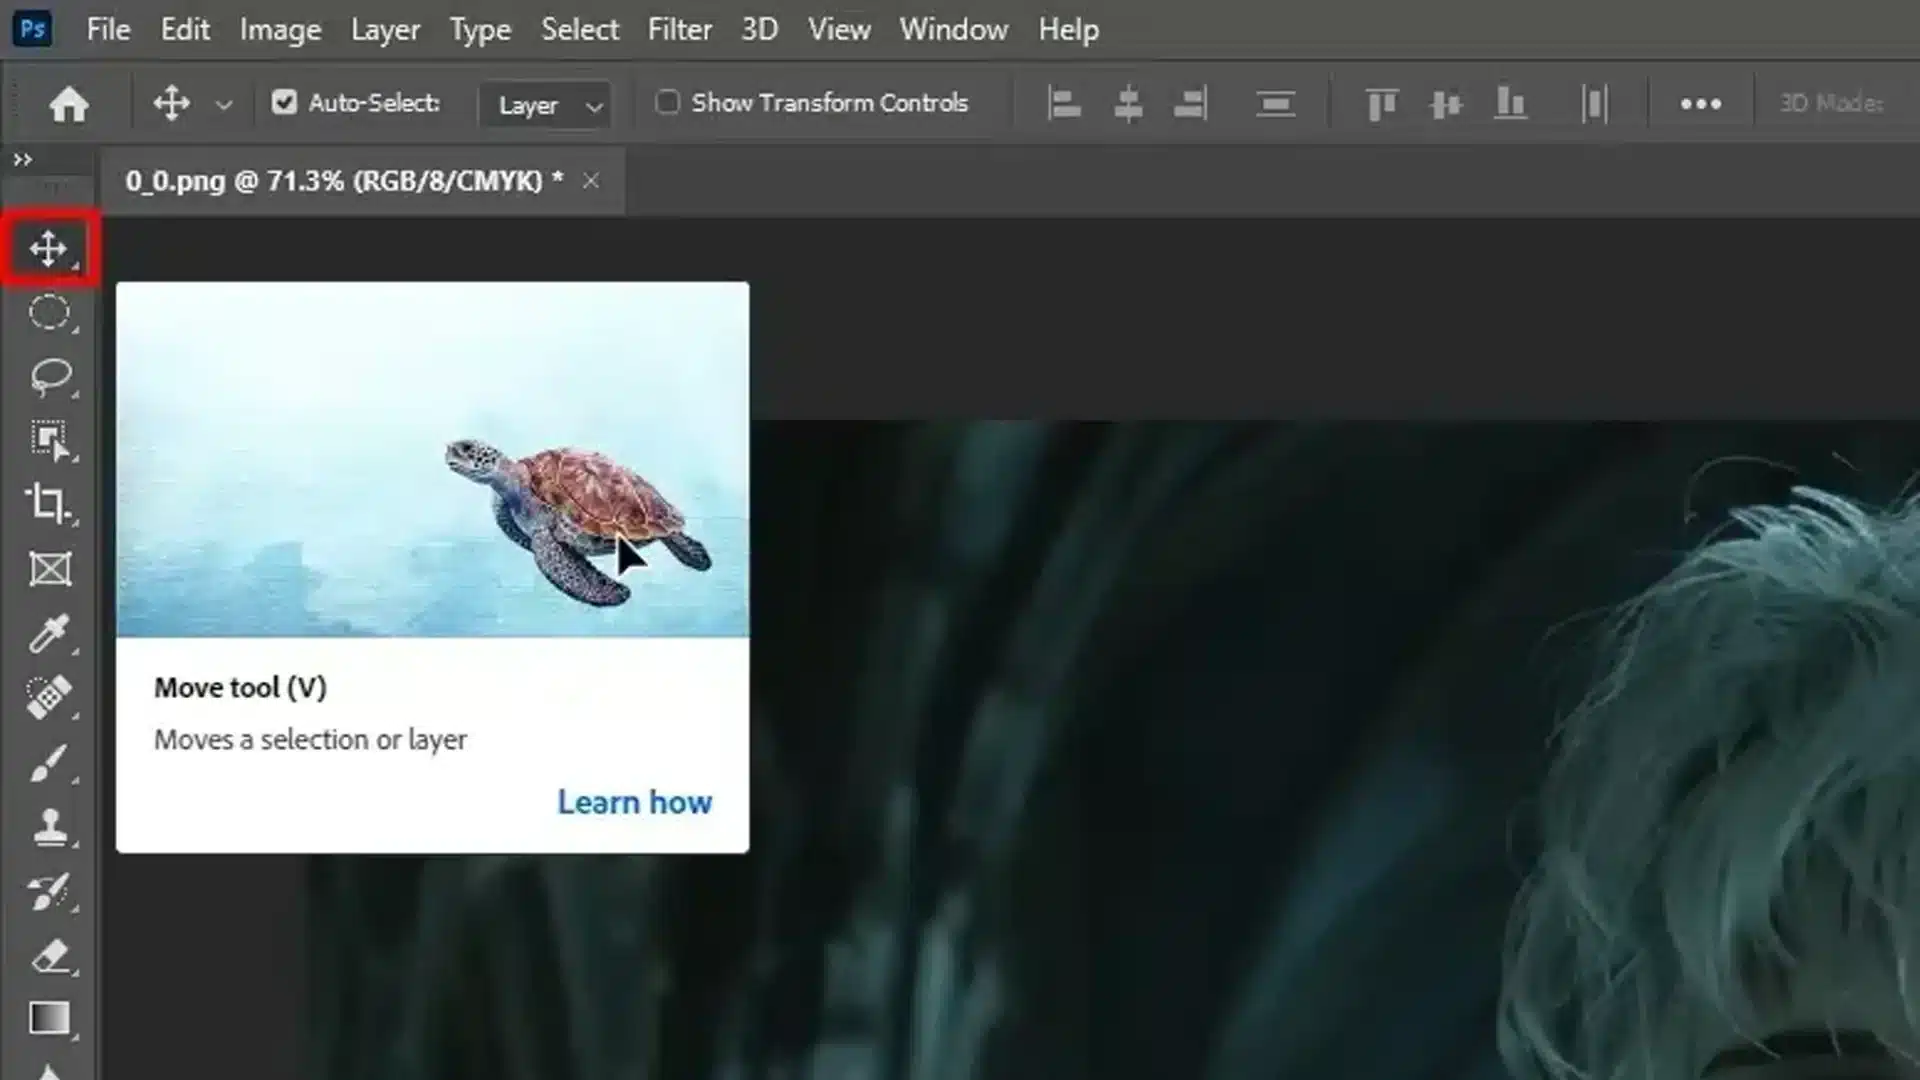
Second Step: Select the Move Tool
On the left side of the Photoshop window, find the toolbar. Locate and select the Move Tool with your cursor or press “V” on your keyboard.
Third Step: Highlight the Correct Layer
Next, go to the layers panel on the right side. Make sure the correct layer for the image you want to move is highlighted.
If it’s locked as a background layer, click twice to unlock.
Using the replace color tool can transform your images efficiently. Ensure you highlight the correct layer before applying the tool, allowing for precise color adjustments and enhancing the overall effect.
Fourth Step: Move the Image
Click on your image. Hold down the mouse button on the edges and drag it to the desired location within your Photoshop document.
Hold the shift key while dragging to keep the movement straight.
Fifth Step: Move Part of a Photo
To move part of a photo, use the Rectangular Marquee Tool to select the desired area.
With the move tool, drag the selected area to its new spot.
The selected area moves while creating a new layer.
If you need to move images between two documents, hold and drag the photo you want to move to the new document’s tab.
Let go of the mouse button once the second photoshop document emerges.
Tips for Effective Use
Using the move tool effectively can change your workflow. Here are some tips to get the most out of this tool:
Enable Auto-Select: This allows the move tool to auto-select the layer you're clicking on.
Layer Masks: Use layer mask for non-destructive edits. You can hide and reveal parts of your image without erasing them.
Snap To: Hold the Shift key while moving the layer. This ensures the movements align perfectly.
Keyboard Shortcuts: Press Cmd (Mac) or Ctrl (Windows) + T to transform your image quickly.
Multiple Layers: Select multiple layers in the layers panel's menu, then move them all simultaneously for consistent adjustments.
Using Adobe MAX
Looking for more inspiration and advanced tutorials? Adobe MAX offers workshops and sessions for all skill levels.
Keep an eye out for sessions focused on the move tool and other Adobe max Photoshop features.
Method 2: Using Keyboard Shortcuts To Move An Image In Photoshop
Now that we’ve looked at all the steps you need to take, let’s make them easier with these keyboard shortcuts. It’s like having a remote control for your TV. Here are some basics:
Select the Move Tool: Press "V".
Zoom in: "Ctrl +" on Windows, "Cmd +" on a Mac. Zoom out: "Ctrl -" or "Cmd -".
Toggle layer visibility: "Ctrl + ,".
Duplicate a layer:“Ctrl + J” on Windows, “Cmd + J” on a Mac. A new layer will emerge.
Using shortcuts saves time. No more moving between the menu bar and screen. Practice these, and see your workflow speed up.
Pro Tip: Additionally familiarize yourself with the dropdown menu in Photoshop in order to easily find different features such as the text box.
Customizing Shortcuts
Let’s customize Photoshop’s shortcuts now. Think of it like setting your favorite TV channels. Hit “Edit” in the menu bar and then “Keyboard Shortcuts”.
Edit the existing shortcuts. Can’t remember the shortcut for layer mask? Change it to something easy like “Ctrl + M”.
Save your settings and get back to work. This makes the interface easier for you. More brain space for other things, like remembering birthdays!
Method 3: Drag and Drop Technique for Moving An Image In Photoshop
Alright, we’re onto something easy—the drag and drop technique. Here’s how we do it:
First Step: Open the Image
First, open the image you want to move. Use the mouse button to click “File” on the menu bar, select “Open” and choose your photo.
Make sure it’s unlocked. If it’s the background layer, double-click it and hit OK.
Second Step: Go to the Layers Panel Menu
Go to the layers panel. Select the layer with the image you’ll be dragging.
If you have another image to work with, open that too.
Third Step: Drag the Image
Click and hold the mouse button on the image.
Now, drag it to the tab of your second image.
When the second document opens, release the mouse button.
Fourth Step: Position the Image
Boom! Your image is now in the new Photoshop document.
Press Shift while dragging to keep the movement straight.
Fifth Step: Move a Part of the Image
Need to move just a part of the image?
Use the Rectangular Marquee Tool to select the section, then switch back to the move tool and drag it over.
Sixth Step: Manage Layers
Each dragged image creates a new layer.
This helps you manage them later.
Best Practices
Let’s go over some best practices for the drag and drop technique. These tips can save you time:
Enable auto-select from the toolbar when using the move tool. This selects the layer you're working on automatically.
When moving parts of an image, use layer masks. Go to the layer menu and click "Add Layer Mask" Paint over areas you want to hide while moving other parts around.
Working with multiple or two images? Keep related layers together. Name them clearly in the layers panel so you can find them later.
Sometimes, resizing images before pasting helps. Press Ctrl + T (Cmd + T on Mac) to transform and fit them into your project neatly. Use the move tool to position them precisely.
Organize visible layers and hidden layers to clear up your workspace. Toggle visibility by clicking the eye icon next to the layer in the layers panel.
Method 4: Using the Layers Panel for Moving An Image In Photoshop
In Photoshop, the layers panel is on the right side of your screen. It shows all your layers.
Click the eye icon next to a layer to make it visible or invisible. clicking twice on a layer’s name to rename it. This keeps things organized, especially when you have many layers.
Moving Layers
Steps to move layers:
First, select the Move Tool from your toolbar or press "V" on your keyboard. This enables the move tool so you can start dragging layers around your photoshop window.
If you want to move an entire layer, click on it in the layers panel. With the move tool activated, click on your open image, then drag it to where you want it. Hold the shift key while dragging to keep the movement straight.
You can duplicate a layer before moving it. Go to "Edit" in the menu bar and select "Duplicate Layer" This creates a copy of your layer. Now you have two, and anything you do to one won’t affect the other.
To move multiple layers, hold Shift and click on each layer in the layers panel. Now you can move them all at once. This saves you the hassle of adjusting each layer one by one.
To work with a background layer, click twice its thumbnail in the layers panel and hit OK to unlock it. Now it's a regular layer that you can move around like the others.
To move parts of layers, use the Rectangular Marquee Tool to draw a box around the area you want. Then go back to your trusty move tool and start dragging. This action moves just the selected part, creating a new layer with the changes.
To drag images between documents, open both documents, select the move tool, then drag the first image to the second image in the other document's tab. Release it when the second document appears. Your pasted image lands in the new document.
Managing Layer Order
Moving layers isn’t just about shifting them around. Sometimes, it’s about managing their order. Clack and drag layers up or down in the layers panel.
The top layer is always in front, and the bottom layer is in the back. Order matters here.
Understanding the Background Layer in Photoshop
The Background layer is the base for all edits, locked by default to prevent accidental changes.
Converting it into a regular layer unlocks additional editing capabilities, such as the side by side editing, enhancing your creative flexibility.
Using Layer Mask On New Layer
Don’t forget layer masks. They let you move parts of an image without deleting anything. Go to the layer menu bar, choose “Layer” then “Layer Mask” and “Reveal All” Paint over areas to hide or reveal them as you move things around.
Pro Tip: For smoother moving, enable “Auto-Select” in the move tool options. It automatically selects the separate layer you’re clicking on, making the whole process easier.
Method 5: Using the Transform Tool For Moving Images
Now let’s get into the Transform Tool in Photoshop.
This tool helps you resize, rotate, skew, and do more with your open image. Follow these steps to use it effectively:
First Step: Open Your Images in Photoshop
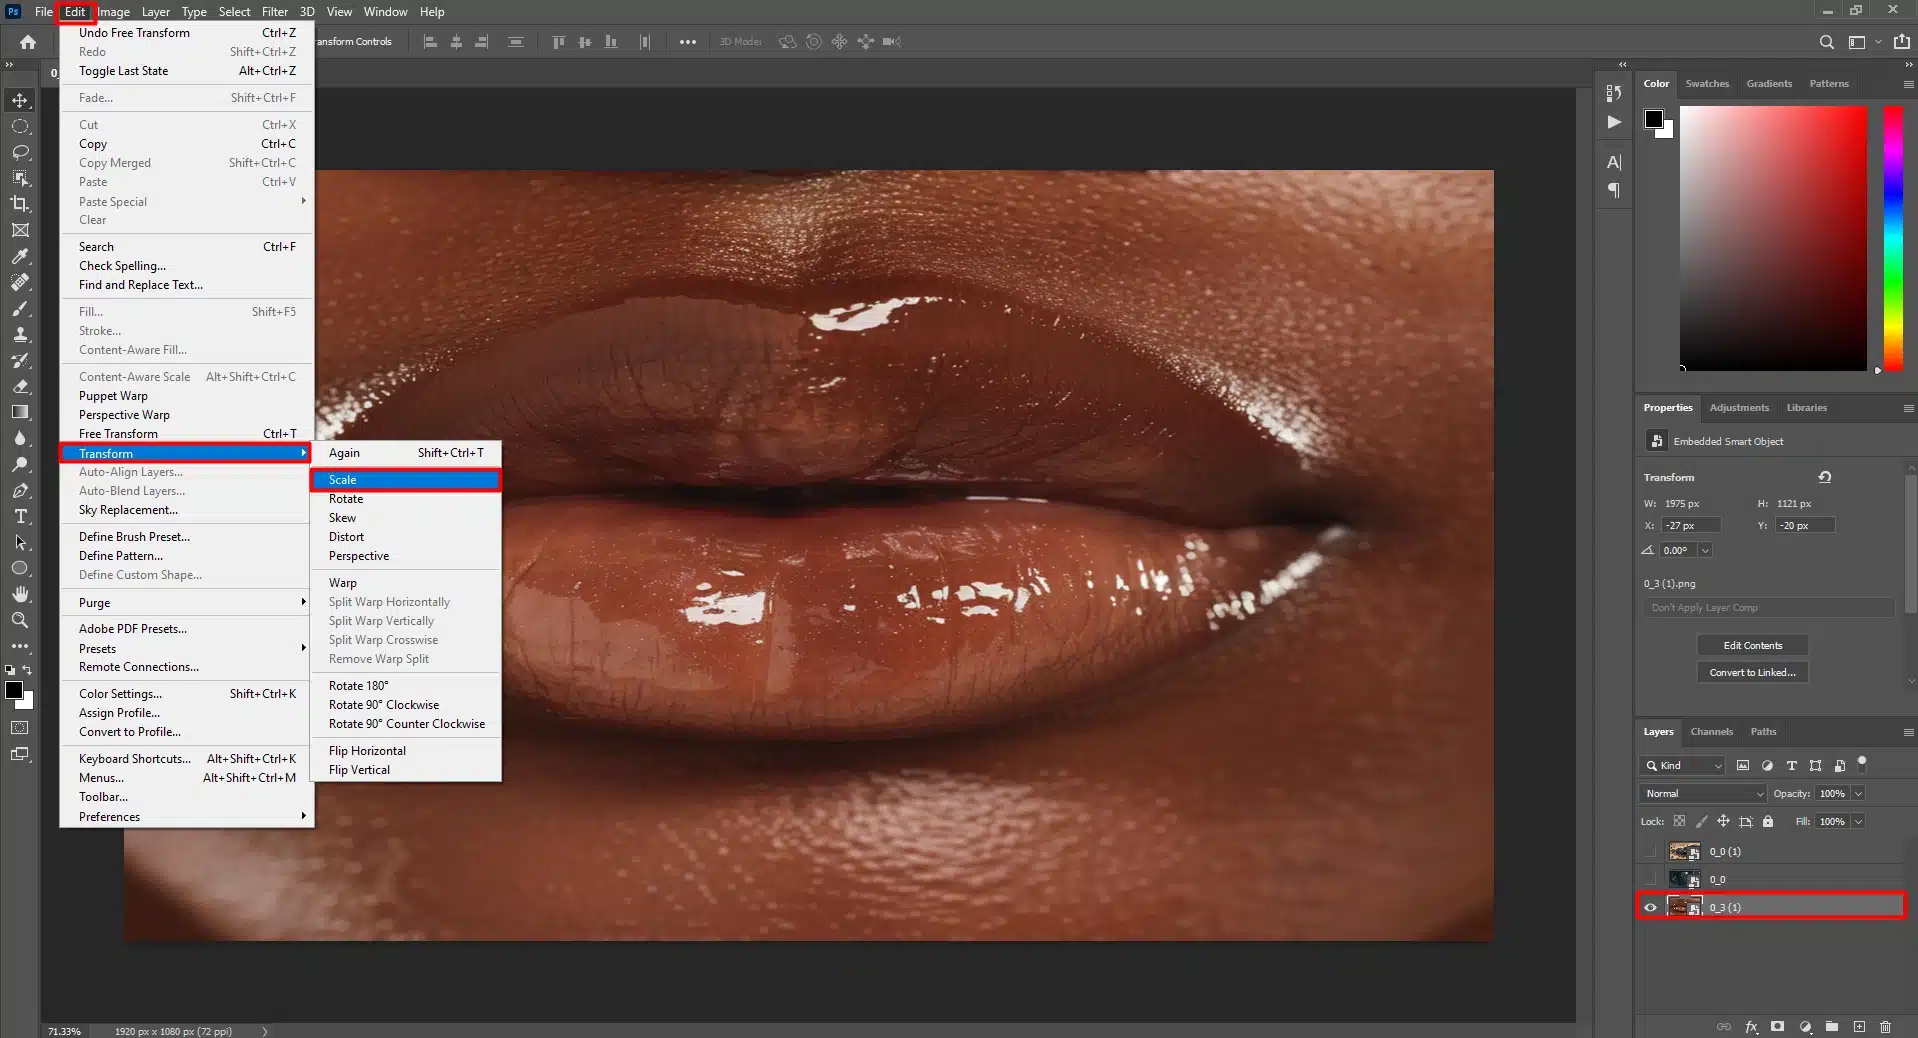
First, open your images in Photoshop. Select the layer you want to transform. Go to the Edit Menu at the top and click “Transform” Start with “Scale”
Second Step: Scale Your Images
Choose “Scale” to change the size of your image. A bounding box with handles appears. Hold the Shift key and drag a handle to resize. Press Enter to apply.
Third Step: Rotate Your Images
To rotate, go back to the Edit Menu, choose “Transform” then “Rotate” Click outside the bounding box from the menu and drag to rotate.
Holding Shift locks the rotation to 15-degree increments. Press Enter to finish.
Fourth Step: Skew and Distort
Use “Skew” and “Distort” under the Edit Menu for advanced tweaks. These options in the menu adjust angles and shapes, handy for perspective adjustments.
Fifth Step: Free Transform
For precision, select “Free Transform” from the Edit Menu or press Ctrl+T (Cmd+T on Mac).
This tool combines all transform functions. Drag to resize, rotate, or skew freely. Press Enter when done.
Sixth Step: Undo Mistakes
If you make a mistake, press Ctrl+Z (Cmd+Z on Mac) to undo.
Photoshop keeps a history of your actions, so you can easily correct errors.
Advanced Tips
Here are some extra tips to help you use the Transform Tool better:
Tip 1 : To maintain proportions, hold Alt (Option on Mac) while resizing with "Free Transform". Resize from the center outwards.
Tip 2 : Align multiple elements by showing the grid. Go to View in the Edit Menu, then "Show" and "Grid"
Tip 3 : Use a layer mask for non-destructive editing. Instead of deleting parts, mask them. Go to the Edit Menu, choose "Layer Mask" and "Reveal All" Paint over areas to hide them.
Tip 4 : Duplicate your layer before transforming. Right-click on your layer in the layer panel and select "Duplicate Layer" This way, you keep an original intact
Tip 5 : Fine-tune pixel placements by nudging. Use the arrow keys for minor movements after selecting the Move Tool. One pixel at a time ensures precision.
Bonus Pro Tip: Name your layers if you work with many. click twice the layer name in the layer panel and give it something descriptive.
Common Mistakes and How to Avoid Them While Moving An Image In Photoshop
Layers are important in Photoshop. They keep your work tidy and visible, allowing you to edit one part without messing up the rest.
Not Using Layers Right
Think of layers like a sandwich. Need to change the lettuce but not the tomato?
Layers help with that. Keep images on separate layers. Rename each layer for easier use later.
Don’t put everything on one layer.
Click "New Layer" for each new item.
Rename layers by clicking twice on the name in the layers panel.
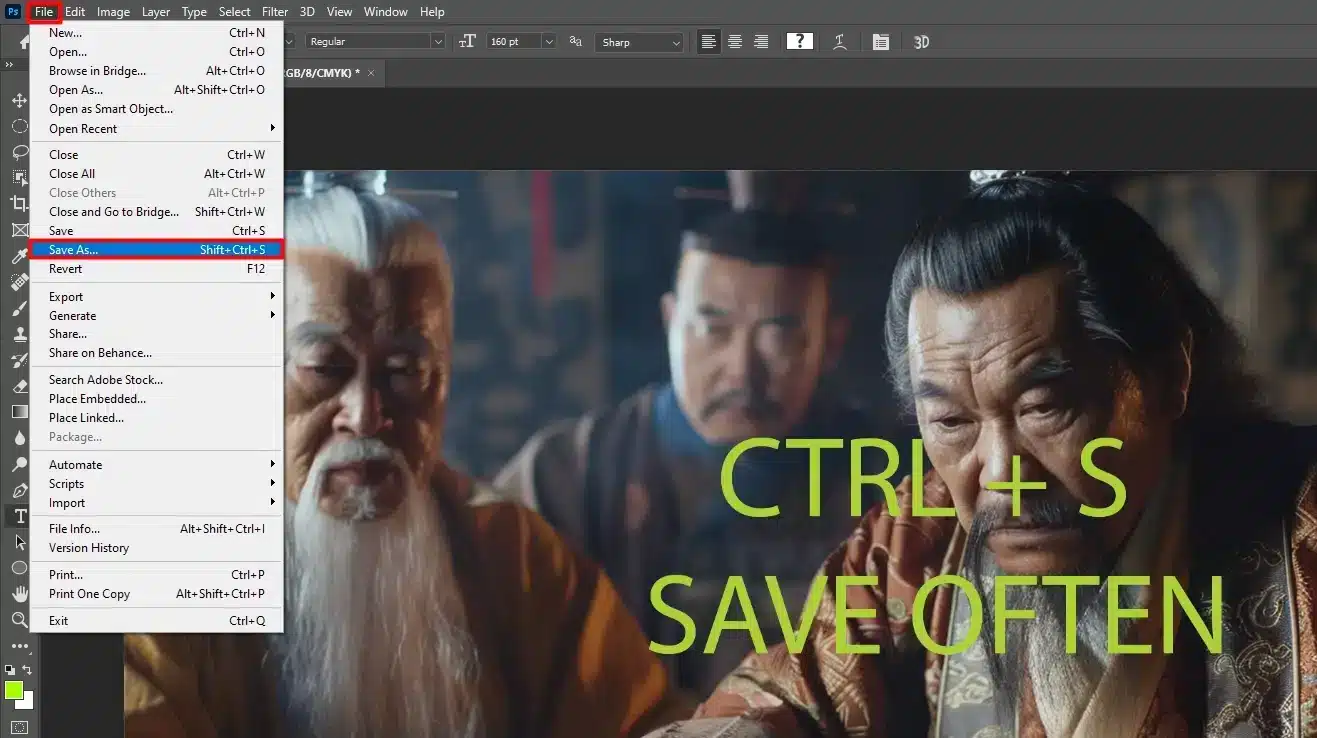
Forgetting to Save Your Work
We all do it. You get into the zone and forget to save. Then Photoshop crashes. All gone.
Save often. Press "Ctrl + S" (Cmd + S on Mac) regularly.
Want to be extra safe? Save different versions. Click "File" and then "Save As" to make a new copy.
Overusing the Transform Tool
The Transform Tool is strong but too much use can distort your images, making it look less professional.
Use the tool sparingly.
Hold Shift while resizing to keep proportions.
Check your pixels haven’t stretched. Press "Ctrl + Z" (Cmd + Z on Mac) to undo if needed.
Pro Tip: Zoom in to the maximum level to ensure pixel-perfect alignment of the object’s edges for a seamless blend.
Ignoring the Move Tool
We often forget the basic tools. The Move Tool is necessary for placing elements in your canvas.
Always select the Move Tool by clicking the icon or pressing "V".
Drag your images to the right spot. Hold Shift to move straight.
Pasting Without Checking Resolution
Pasting without checking resolution leads to mismatched quality. A low-res photo next to a high-res one looks bad.
Check the resolution before pasting.
Make sure they match for quality. Go to "Image" and select "Image Size" to adjust.
Misaligning When Dragging
Moving elements without alignment messes up your images composition. Imagine a portrait with off-center eyes.
Enable "Auto-Select" in the Move Tool options.
Use guides and grids for perfect alignment.
Press "Ctrl + R" (Cmd + R on Mac) to show rulers. Drag from rulers to create guides.
For more tips on Photoshop, check out these helpful articles on precise adjustments and lens corrections.
Not Duplicating Layers
Editing the original layer is risky. You have no backup if it goes wrong.
Duplicate layers before big edits. Right-click the layer and choose "Duplicate Layer".
Work on the new layer. Keep the original safe.
Overediting
Less is more sometimes. Over-editing makes images look fake.
Avoid too many filters and effects.
Applying motion blur and adding texture can add dynamic effects to your photos, but be cautious of overediting.
Using this effects sparingly ensures your images retain a natural look while still benefiting from the added sense of movement.
Step back and review often.
Be subtle with edits.
Let the natural look shine through.
Pro Tip: Feeling lost? Break your project into smaller parts.
Edit bit by bit, save often, and label layers well. Most importantly, have fun and try new things!
Following these tips helps you avoid common mistakes when you learn how to move an image in Photoshop. Your projects will look better, and you’ll save time. Stay patient and practice often.
Your skills will grow fast!
Frequently Asked Questions
How do I move an images freely in Photoshop?
If you want to move images freely, follow this instructions:
Select the Move Tool from the toolbar or press 'V' on your keyboard.
Click on the images you want to move.
Drag the images to your desired location.
If you need to move the images freely without constraints, make sure no other layers are selected.
How do I move a selected image in Photoshop?
Use the Marquee Tool ('M') to select the part of the image you want to move.
Switch to the Move Tool ('V').
Click and drag the selected area to the new location.
How do I change the position of an image in Photoshop?
Follow this steps to change the position of an image:
Select the image layer you want to move.
Choose the Move Tool ('V').
Click inside the image, and drag it to adjust its position.
List Item
How to drag an image in Photoshop?
Open your image in Photoshop.
Select the layer that contains the image you wish to drag.
Activate the Move Tool by pressing 'V' or selecting it from the toolbar.
Click on the image and hold, then drag it to your desired location.
In conclusion, learning how to move an image in Photoshop has made my editing process so much easier and more efficient. By using actions, I’ve saved a lot of time and kept my edits consistent across all my photos.
If you often need to apply the same edits to many pictures, actions can really help you out.
You can find many free actions online or create your own.
To get started, check out my Photoshop Course and Lightroom Course. These courses give step-by-step guides on installing, creating, and using actions effectively.
You can explore the powerful features of Adobe Lightroom to enhance your photo editing skills. It provided me with intuitive tool for organizing, editing, and enhancing images with ease
Using actions feels like having a magic wand for photo editing.
Instead of editing each photo one by one, you can apply a single action to all of them. This not only saves time but also ensures every photo looks great.
I hope you find these tips helpful.
Happy editing!
If this article has helped you, then Like and Share it with your friends
$2,061.00Original price was: $2,061.00.$1,061.00Current price is: $1,061.00. 27584
Download Your Free Guide Now!
Discover the secrets of photography with our printable guide! Master essential techniques like aperture, shutter speed, and ISO to create stunning images. Get your free printable PDF now and start turning your snapshots into masterpieces!