Have you ever wondered how to extend background in Photoshop to perfect your images? If you’ve found yourself struggling with awkward crops or limited backgrounds, you’re not alone.
But don’t worry, this guide will captivate your attention and guide you through the process with ease.
Imagine transforming your photos into stunning visuals with extended backgrounds that tell a complete story. Intrigued?
You’ll soon discover simple techniques that even beginners can master, ensuring your images stand out.
Dive into this article, and let’s unlock the full potential of your photos together, turning your creative vision into reality.
Table of Contents
Understanding the Basics of Extending Backgrounds in Photoshop
Background extension allows you to create an extended background, providing more room for your subject and enhancing your image background. This technique utilizes various tools in Photoshop to seamlessly expand your canvas.
What is Background Extension?
Background extension is a neat trick we use to give an image more room. Think of it like expanding the frame, allowing more of your vision to unfold.
In Photoshop, there are handy tools like the content-aware fill and clone stamp tool. These help blend and stretch your image background.
It’s not just stretching for the sake of it but making it seamless. Whether you use the rectangular marquee tool or the lasso tool, you get control over which parts expand.
Why Extend Backgrounds in Photoshop?
Extending backgrounds creates more versatile photos. Imagine taking a picture where the subject barely fits. Now, you can extend the background in Photoshop to yield more room without cramping the style. It also lets you play with compositions.
Canvas size adjustments help by offering alternatives to the original view. Sometimes, you want the focus elsewhere while utilizing the crop tool.
At other times, just filling in blank spaces helps. And let’s not forget about cutting out or adding items, ideally with the content-aware fill tool.
How to Extend the Background in Photoshop: The Fundamental Tools and Steps
To extend the background in Photoshop, follow these steps for a seamless result using the crop tool and content-aware features:
- Start by opening Adobe Photoshop. Load your original image.
- Select the crop tool from the menu bar, ensuring you handle the image's proportions well.
- Drag the corners to increase the canvas size.
- For seamless results, activate the content aware, find it in the left menu bar, close to the crop tool open.
- The content-aware feature will engage and automatically fill the extended areas.
- Use the crop tool again if needed to align any rough edges.
- By using the content-aware scale tool, you can expand and preserve important details.
Pro Tip: Try diversifying with the generative fill to add new backgrounds or textures. The content-aware approach, including the content-aware scale tool, allows for precise corrections.
Remember, extending the backgrounds in Photoshop adds to the space and brings balance. Photos shine their best when they aren’t constrained.
Practice these steps to masterfully extend backgrounds and see how they open up creative avenues.
How to Extend Background in Photoshop
Adobe Photoshop is a powerful tool, and a common question is how to extend background in Photoshop. Let’s go through it step by step.
Step-by-Step Guide to Extending Background in Photoshop
In this section, we will explore how to effectively use the crop tool to extend image background.
This tool helps you create more space around your subject, allowing for a more balanced composition. Let’s dive into the steps to achieve a seamless extension of your image background.
Using the Crop Tool
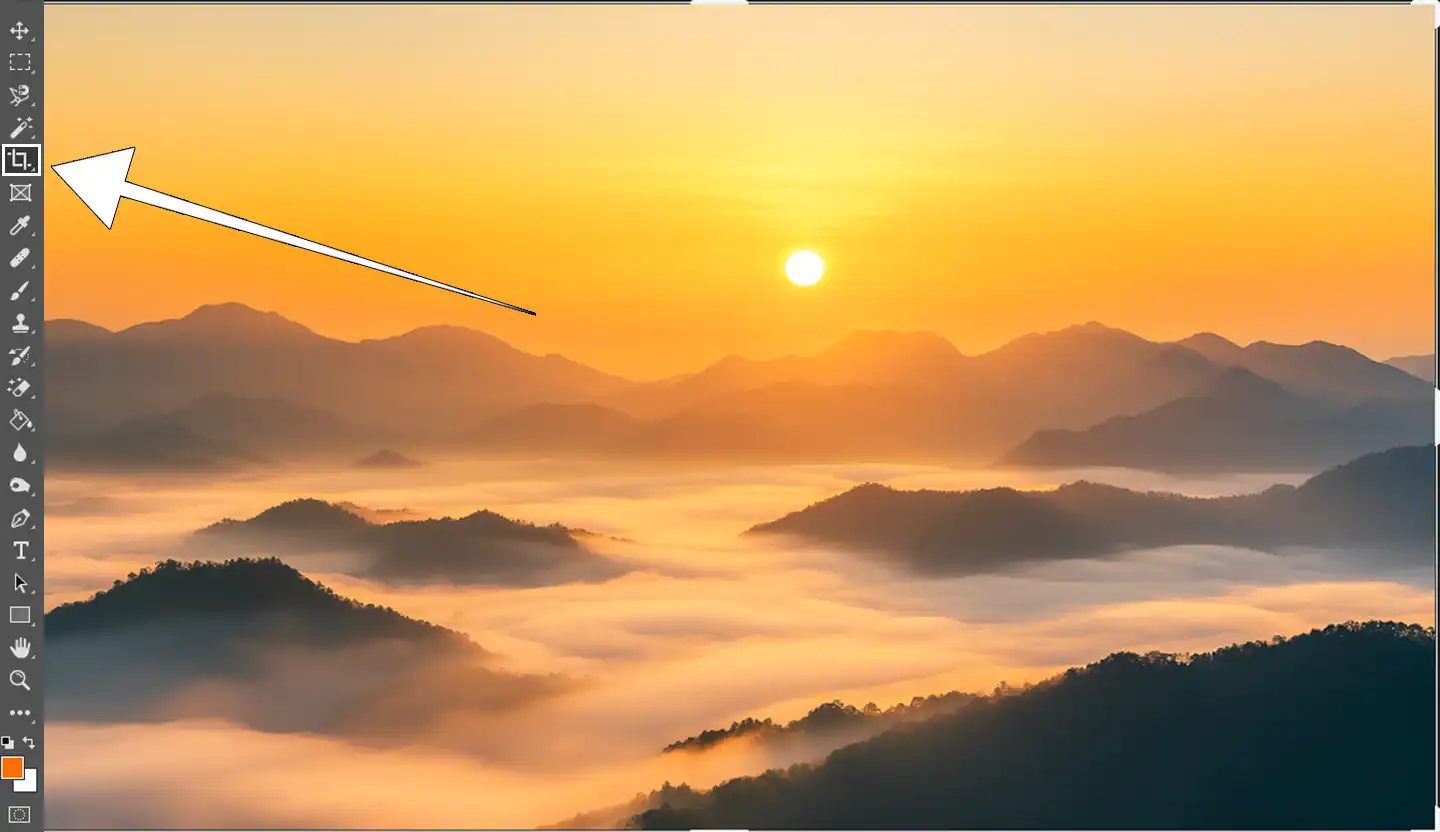
First, we need more room in our image file. The trusty crop tool comes to the rescue here. Located on the left menu bar, this tool helps us add more canvas to our picture frame. Click on it and resize the image’s border outward in the dialog box.
Remember not to crop any significant part of your image! This is the stage where you decide how much you want to extend the image background.
Leveraging Content-Aware Fill
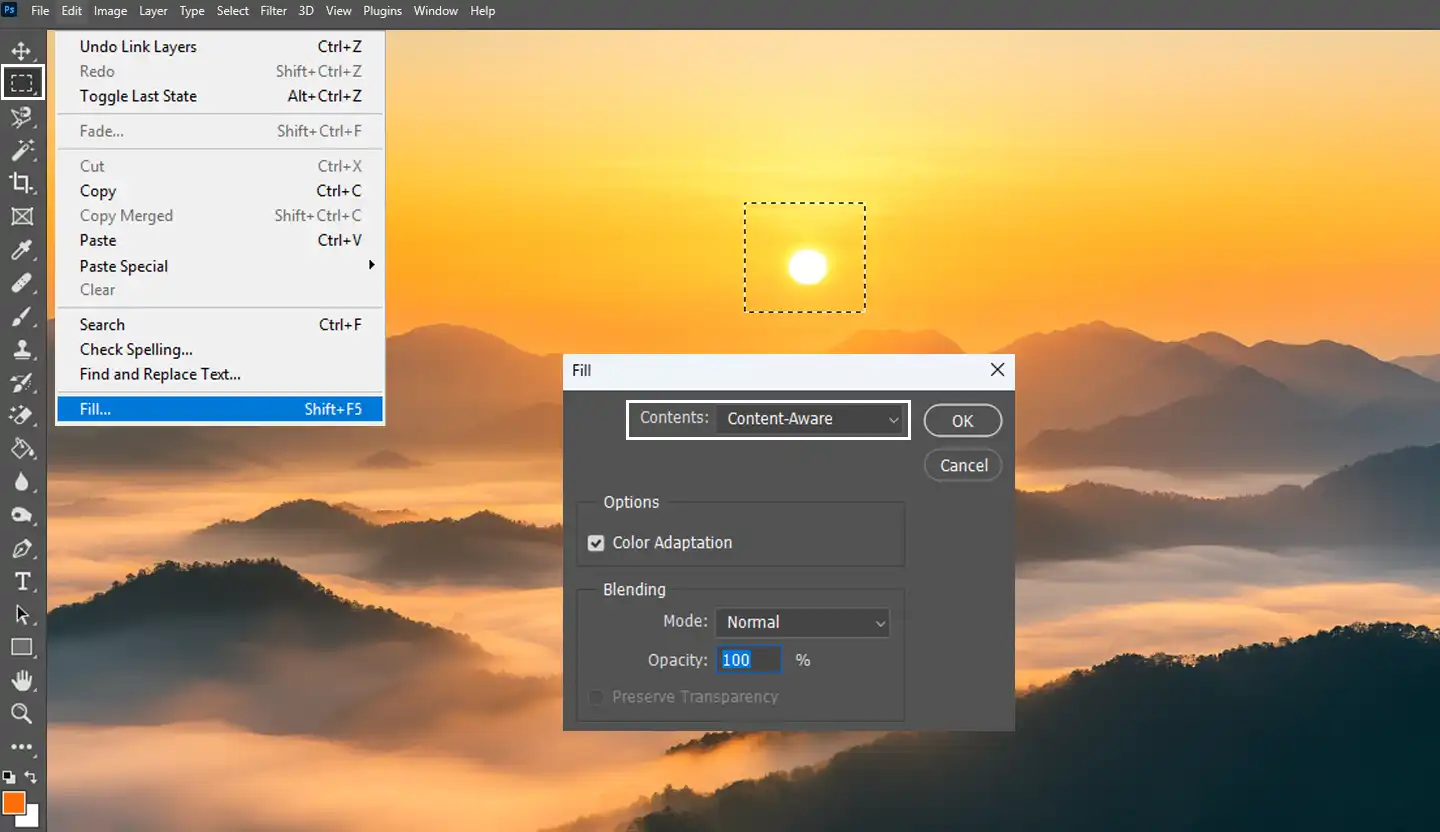
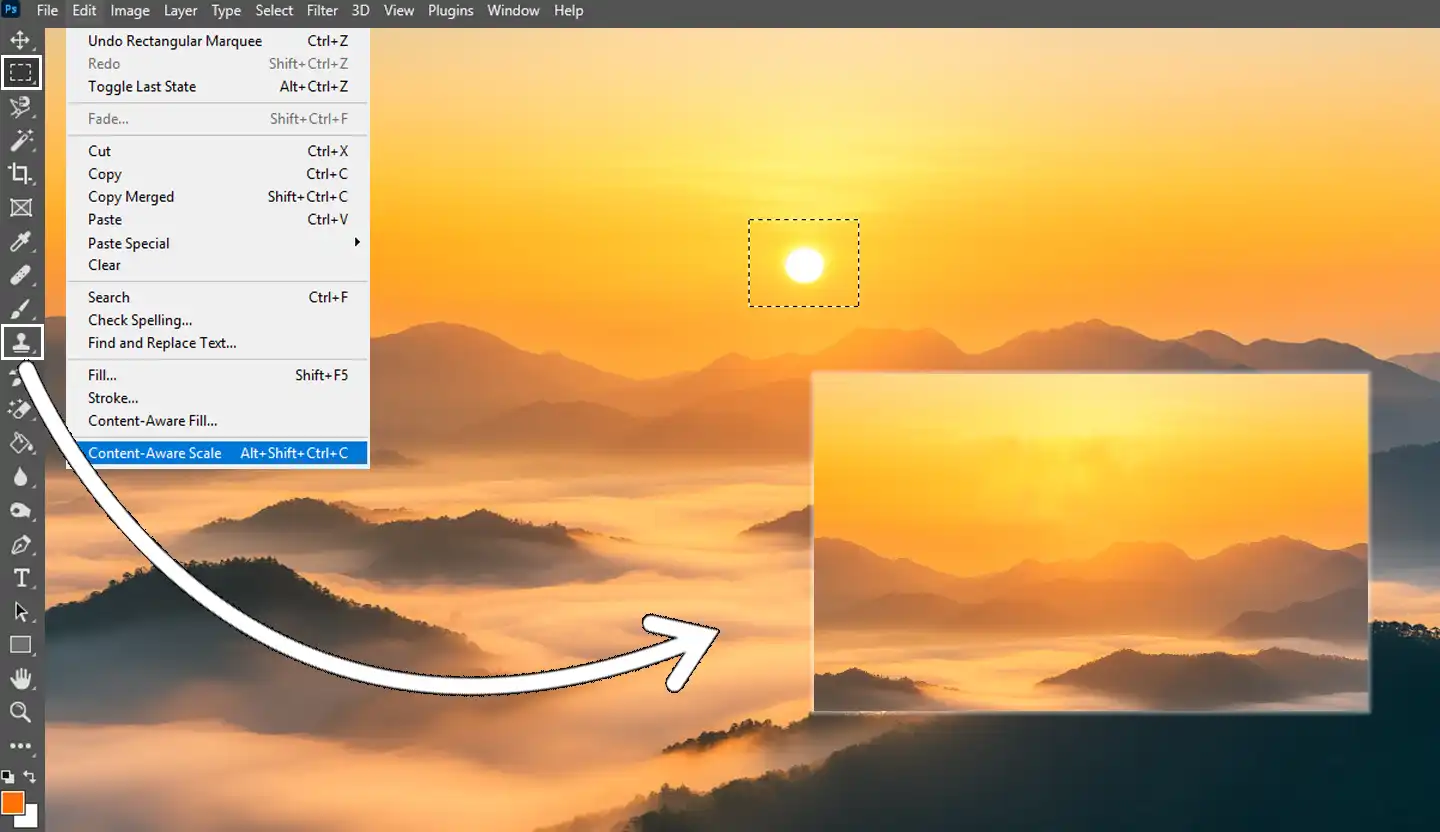
Next, let’s talk about content aware fill. Once you’ve made room with the crop tool:
- Select the newly added area using the rectangular marquee tool.
- Go to the menu bar and find 'Edit' and then click 'Fill'.
- Choose content aware from the dialog box and hit OK.
For those wondering about details, the content aware scale option is available if you want to keep specific elements unchanged while extending. The tool smartly resizes the less critical parts automatically, making it another helpful trick up your sleeve.
When you’re done, save the adjustments to your background layer. Your image’s background now extends smoothly, almost like a seamless dream.
Pro Tip: Never underestimate the clone stamp tool. It’s perfect for minor touch-ups and ensures everything blends nicely.
Additionally, consider using the Photoshop smart fill feature to creatively fill in areas or add new textures to your background. And don’t worry, these tools are just like any others; they get easier with practice.
For more Photoshop tips, always explore the contextual options on your workspace. Even a seemingly pesky option like the contextual task bar can surprise you with hidden treasures.
So go ahead and create stunning visuals now that you’ve learned how to extend background in Photoshop.
Tips for Perfect Image Background Extensions
When you extend image background, maintaining quality is important for a professional look. Using an image extender allows you to adjust the canvas size without compromising the integrity of your photo.
In this section, we’ll discuss effective strategies for preserving image quality during the background extension process.
Maintaining Image Quality
So, you’ve snapped that near-perfect shot but need a bit more room around the edges. Extending your image background doesn’t have to harm quality. In Photoshop, the crop tool isn’t just for cutting away unwanted parts; it can also add extra canvas space.
This sets the stage for using tools like content-aware fill and content aware scale. These features help keep your extended background consistent with the existing image.
When you extend background in Photoshop, pay close attention to details like color and texture for a seamless transition. Tools such as the content aware and generative fill options are lifesavers here.
They enable blending new and old sections alike by smartly using data from your original image.
For those who want to delve deeper into Photoshop functionalities, learning about Photoshop shortcuts can speed up your workflow significantly.
Avoiding Common Mistakes
First and foremost, avoid stretching your image too thin when you extend the background. Over-extension leads to blurry or distorted results.
Also, resist the temptation to go overboard with the content-aware scale. While it’s tempting to tweak away, each change should add value, not chaos.
Always watch out for the selection tool. Choose wisely what part of the image to extend and how much to alter.
Pro Tip: Always save your original image file before making major changes. And remember, keep exploring for more Photoshop tips that could surprise you!
If you’re interested in broadening your skills beyond Photoshop, consider exploring the Lightroom training guide to enhance your photo editing expertise.
Advanced Techniques for Background in Photoshop
In this section, we’ll explore how to use layers and masks effectively as part of your image extender toolkit.
These tools allow you to manipulate the canvas size while maintaining control over different elements of your composition, resulting in a more polished and professional background extension.
The following table outlines these techniques and provides a brief overview of each to help you elevate your editing skills.
| Technique | Overview |
|---|---|
| Using Layers and Masks | Layers and masks provide flexibility and control, allowing you to edit photos while preserving different elements of your composition. |
| Blending and Matching Colors | Ensures new sections integrate seamlessly with original parts, enhancing visual harmony through tools like the clone stamp. |
| Content-Aware Scale | Adjusts canvas size while preserving proportions, preventing distortion and keeping elements looking natural. |
| AI Generative Fill | Offers creative options for filling areas, enhancing your background with imaginative textures and elements. |
Using Layers and Masks
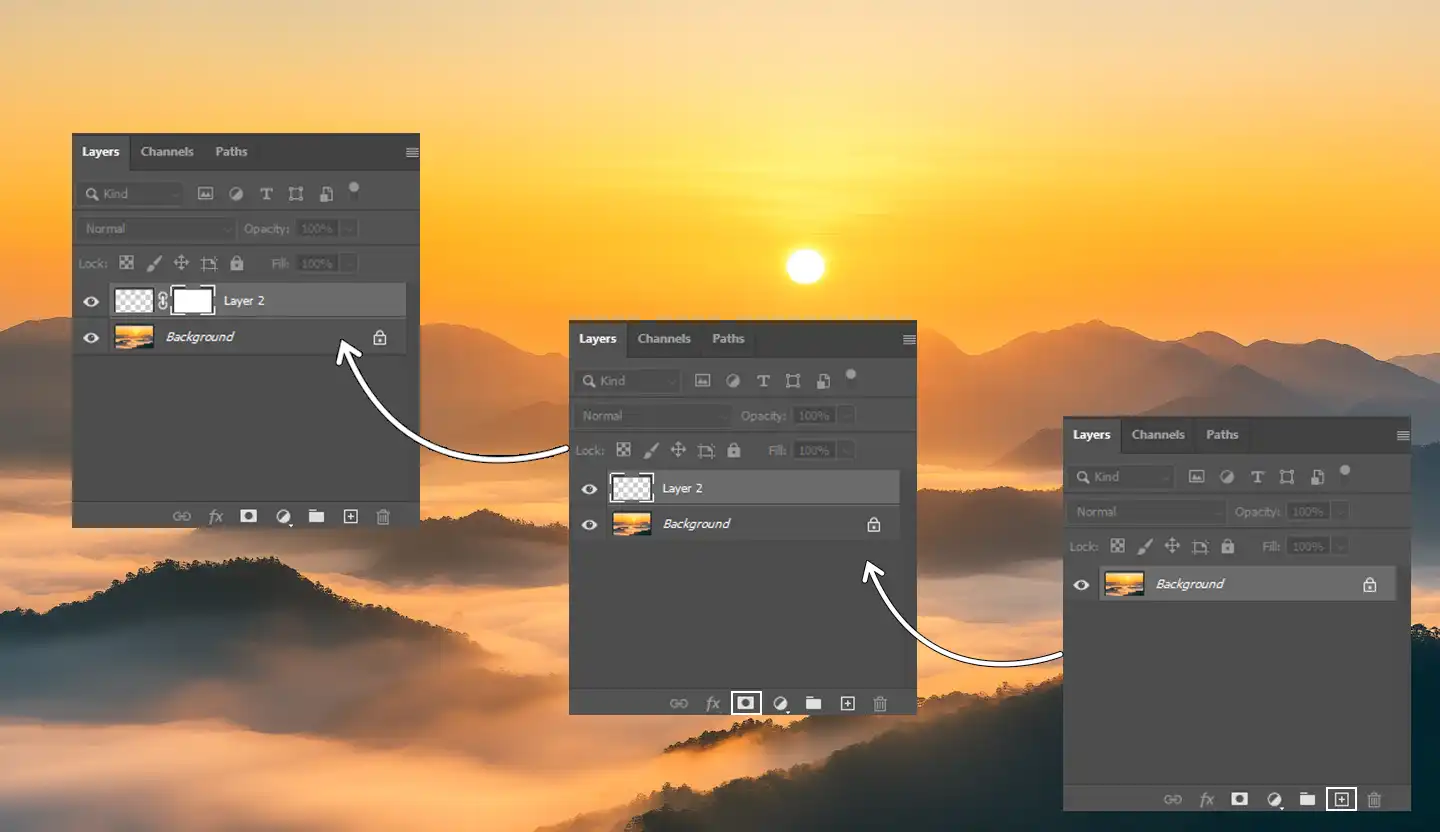
Layers and masks are essential tools in Photoshop, offering flexibility and control when editing photos. They help to undo mistakes become simple.
Think of layers as a stack of pancakes, each representing an element or part of the image that can be moved around as needed.
This creates a complete image from individual components. Masks allow you to hide parts of a layer temporarily, almost like erasing with the option to restore what you’ve erased, which feels magical.
A technique I frequently use involves painting on masks with black to hide areas and white to reveal parts of a layer.
Blending and Matching Colors
Color can be both fun and challenging. If you’ve ever noticed mismatched patches of color, you’ll understand why blending is important.
Blending colors when extending images ensures the new sections seamlessly integrate with the original parts, like old friends rather than new neighbors. Use the clone stamp tool alongside blending options to harmonize colors.
Adjusting brightness and contrast is important. Mastering this balance ensures your background in Photoshop offers smooth transitions, avoiding unexpected color trips.
Additional Techniques
Here are two advanced techniques to enhance your background extension in Photoshop while maintaining quality.
- Content-Aware Scale: This tool, known as the content-aware scale, adjusts the canvas size while preserving the proportions of your subjects. The content-aware scale tool intelligently analyzes the image to prevent distortion, keeping elements looking natural.
- AI Generative Fill: Offers creative options where imagination takes center stage. Remember, practice patience during edits. Picture results improve with diligence, like ripe fruit after a season of waiting.
Pro Tip: Always save your changes in a separate Photoshop file extension before making bold corrections.
Additionally, consider using the generative expand Photoshop feature to explore creative enhancements to your images.
If you’re interested in photography techniques, experimenting with bulb mode photography can also inspire new ideas for your backgrounds.
Frequently Asked Questions (FAQs)

How do I extend a background in Photoshop?
- Open your image in Photoshop.
- Select the part of the background you want to extend using the Marquee Tool or Lasso Tool.
- Go to 'Edit' in the top menu, then select 'Content-Aware Scale'.
- Drag the handles of the selection to extend the background as needed, then hit Enter.
How do you extend the background content aware in Photoshop?
- Load your image into Photoshop and choose the area you wish to extend.
- With the selection active, go to 'Edit' and click on 'Content-Aware Fill'.
- In the Content-Aware Fill panel, adjust the settings according to your needs and click 'OK'.
- This method allows Photoshop to intelligently fill in the extended area with matching elements from the existing background.
How do I extend the background in Photoshop without stretching?
- Open your image and select the background area you want to extend, but avoid selecting any main subjects or focal points to prevent distortion.
- Go to 'Edit', then select 'Content-Aware Fill'.
- Adjust the settings in the new window to control how Photoshop fills the new space and preserve the original aspects of your background.
- Apply the changes to see a naturally extended background without any stretching effects.
How to generatively expand in Photoshop?
- Begin by opening your image in Photoshop and selecting the area you wish to expand.
- Access 'Edit' from the top menu, then choose 'Content-Aware Scale'.
- Use the handles to pull the edges toward the direction you want to expand. Be mindful to maintain the aspect ratio if necessary by holding the Shift key while dragging.
- Release the mouse and press Enter to apply the expansion.

Conclusion
Learning how to extend background in Photoshop has truly transformed my approach to photography and design. This skill allows me to enhance images by seamlessly adding space where needed, creating a more polished and professional look.
When I first discovered this technique, it opened up new possibilities for my creative projects.
To master this skill, I utilized comprehensive resources, including the Photoshop Course and the Lightroom course. These courses offer step-by-step guidance and have greatly improved my efficiency in editing.
If you’re eager to enhance your editing skills and learn how to extend background in Photoshop effectively, I highly recommend exploring these resources. Also, if you don’t have Adobe yet, consider checking out Photoshop and Lightroom to get started.
Read more about Photoshop:


