Have you ever wondered how to add white border in Lightroom Mobile to make your photos stand out?
Imagine scrolling through your gallery and seeing your images framed perfectly, giving them a professional and polished look.
This simple yet effective techniquecan transform your photography.
Keep reading, and I’ll guide you through the easy steps to add that elegant white border using Lightroom Mobile.
By the end of this article, you’ll have the confidence and skill to enhance your photos effortlessly.
Table of Contents
Adding a Stylish White Border in Lightroom Mobile
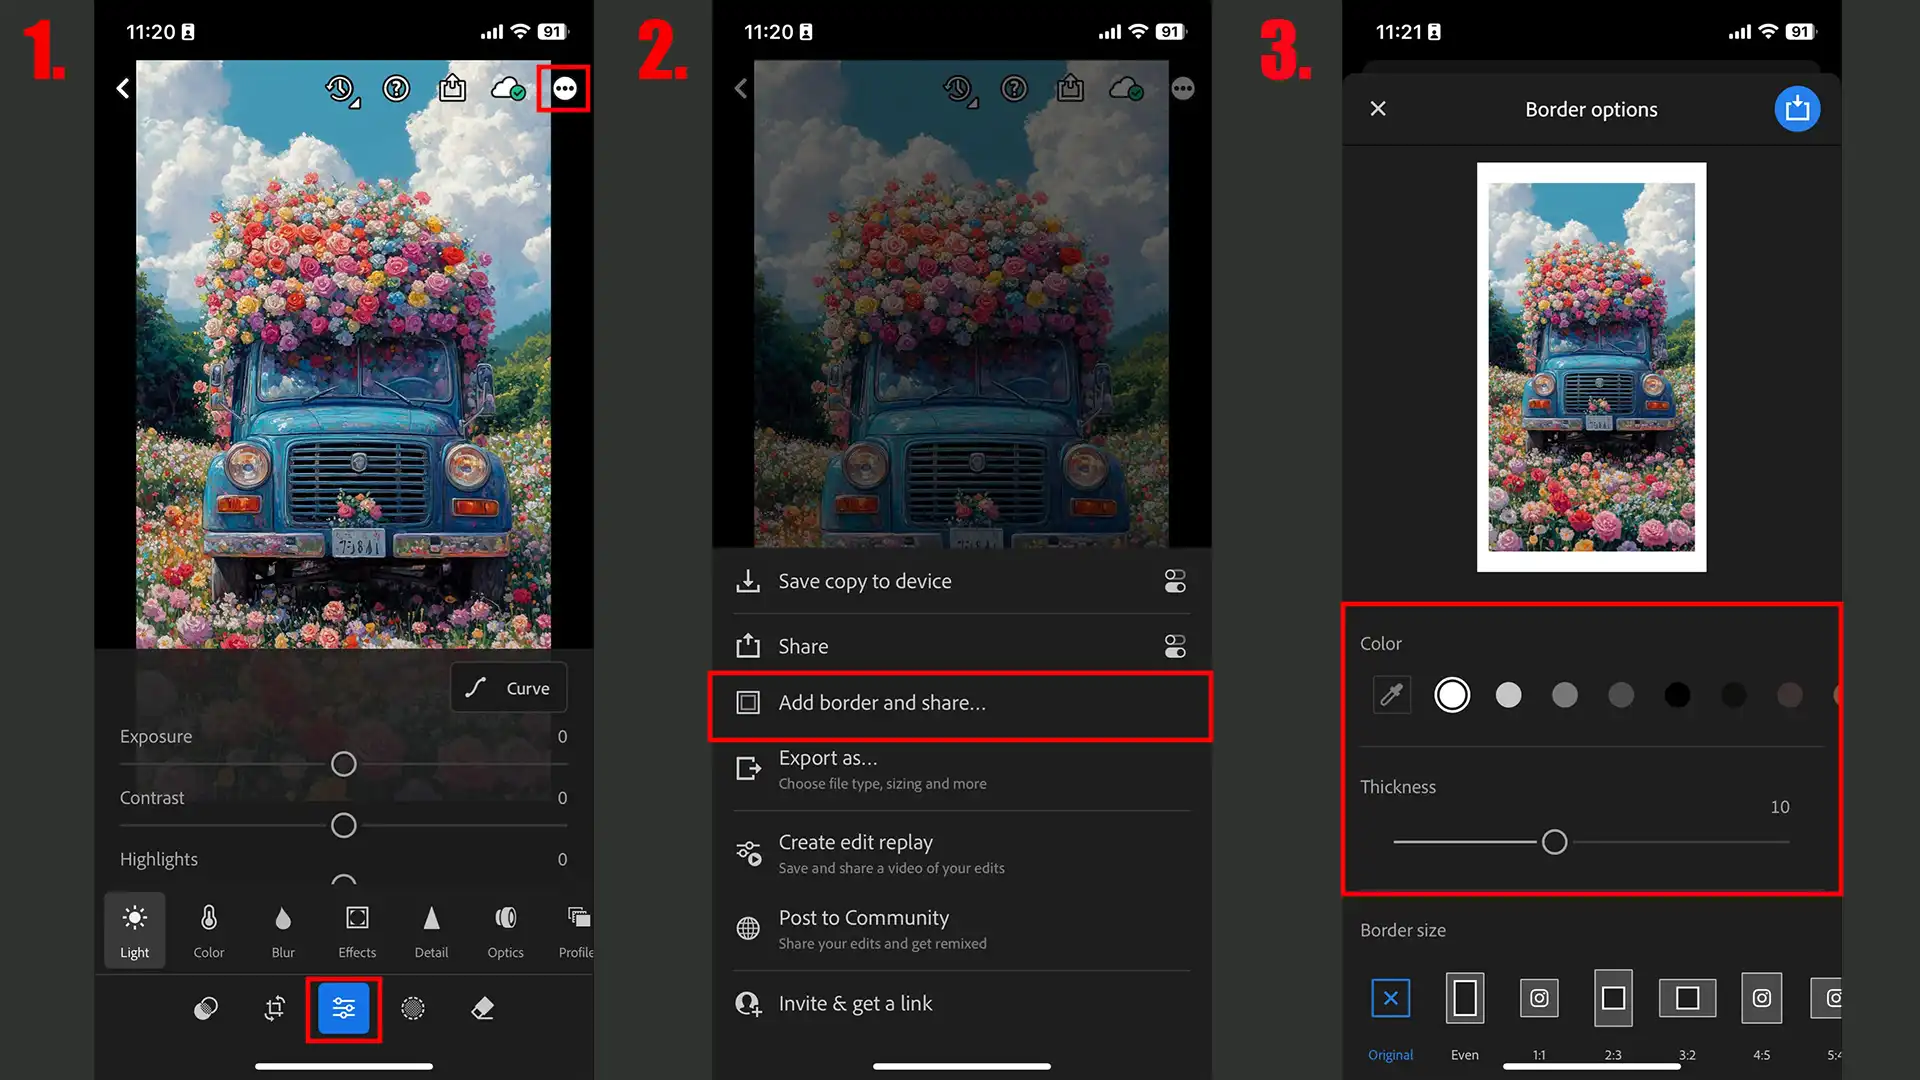
First, open the Lightroom mobile application and select the picture you want to edit. Then, tap on the Crop tools and choose the aspect ratio that best fits your image.
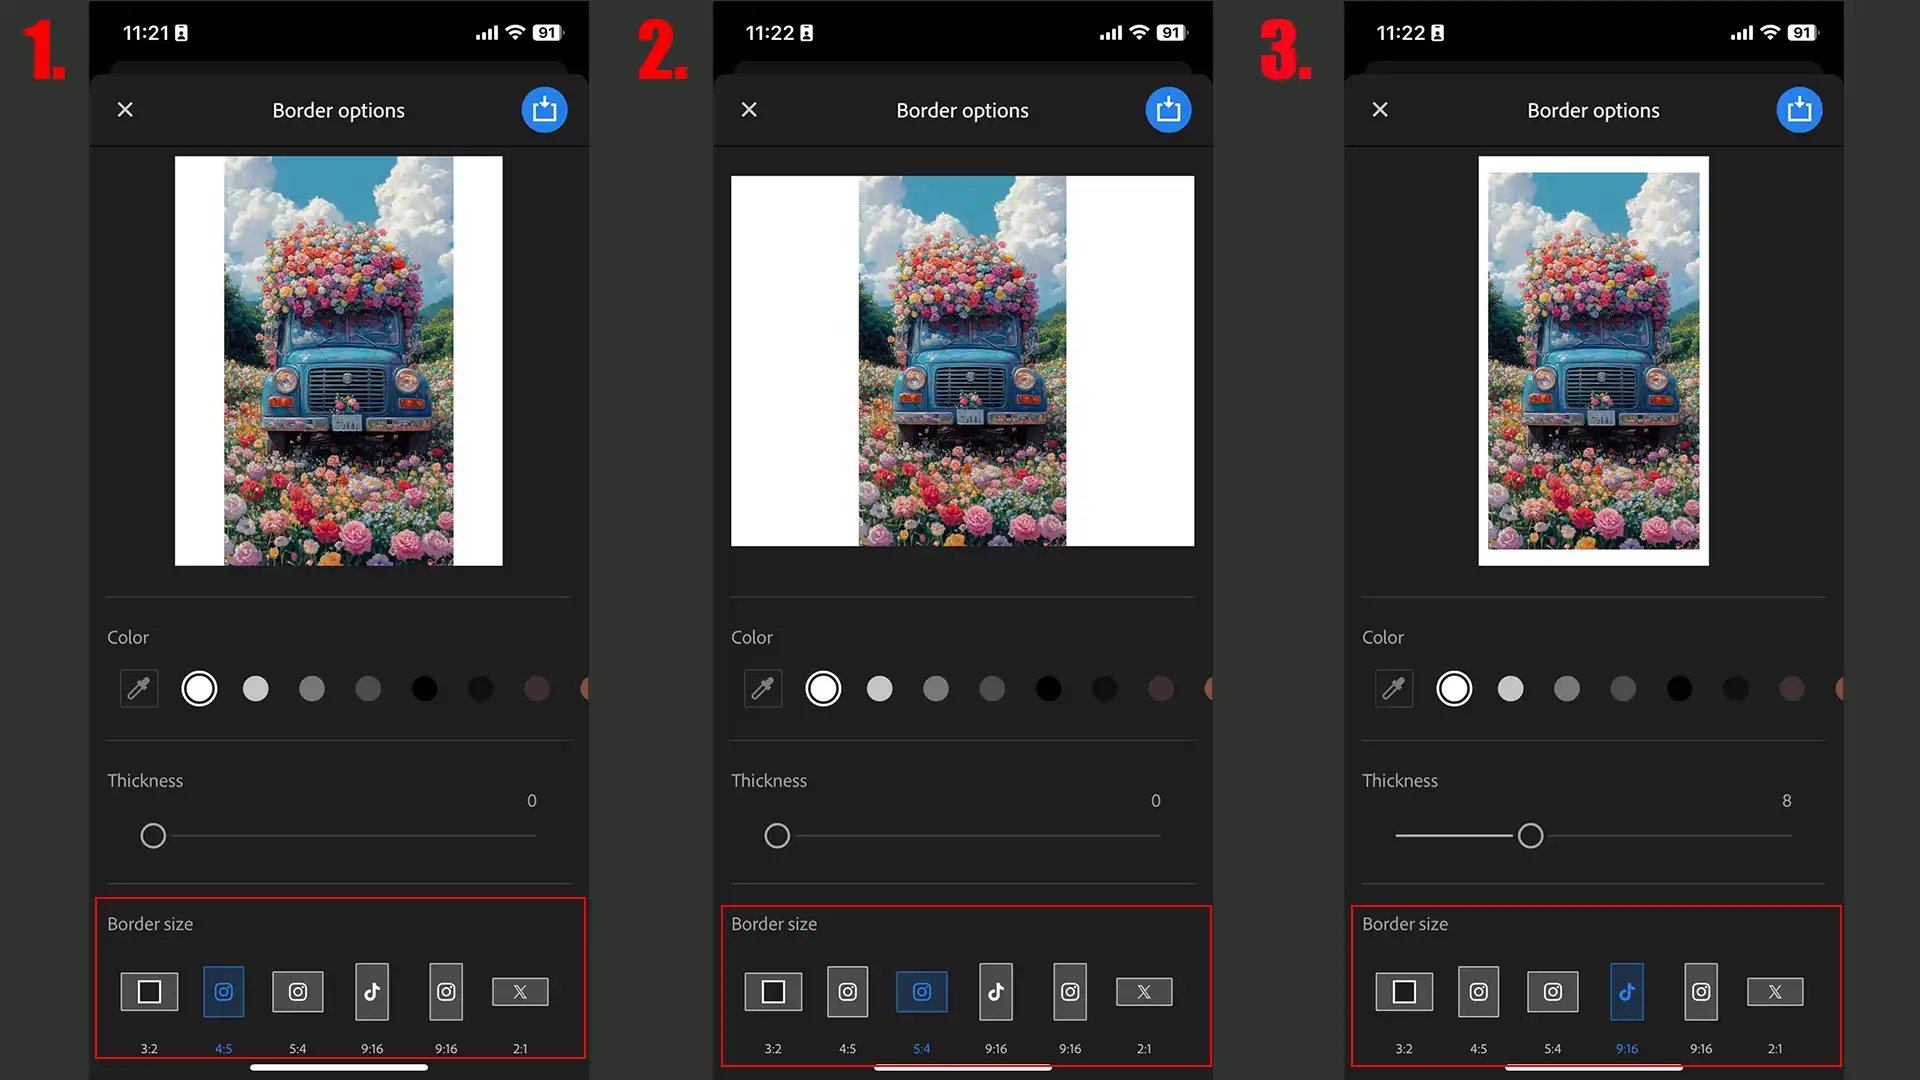
Next, go to the borders section and use the color selector to select a white border. Modify the thickness of the border to your liking. Once you’re happy with the border, save your picture by clicking the share icon and selecting Save to Camera Roll.
To make your images stand out, it’s important to know how to add border and share them effectively.
Adding a border can elevate the overall look of your images, giving them a more refined and polished appearance. Once you’ve added the border, you can seamlessly share your image with friends, family, or followers.
This not only highlights your enhanced visuals but also ensures they make a memorable impact across various platforms.
This technique enhances focus and depth. By darkening the edges, it draws attention to the center of your picture, making it more engaging.
How to Add White Border in Lightroom Mobile Perfectly
Keep it Simple: Although fancy borders can be appealing, simplicity often highlights the image better.
Consistent Aspect Ratio: Choose an aspect ratio that complements your picture size. Consistency enhances professionalism.
Add Border Thickness: Experiment with the thickness, but ensure it doesn't overwhelm the picture.
Use White Borders Wisely: While white borders can make an image pop, they may not suit all pictures.
Troubleshooting Common Issues While Applying a white border in Lightroom Mobile
If the border appears too thin or too thick, revisit the Clipping tool and readjust. Ensure you update the color picker settings if the shade isn’t right.
If you’ve exported the image but can’t find it, check your camera roll and Lightroom Application export settings.
Missing features in Lightroom can usually be resolved by updating the software to the latest version on your iPhone or Android.
Pro Tip: For a unique look, try adding borders in different colors using the color selector. This can make your pictures stand out on platforms like Instagram.
When it comes to must-have mobile photo editing apps, having the right tools can significantly boost your picture quality.
Discover top apps that make your edits easier and more effective by checking out this helpful guide.
When you want to share the image on social media, using the best Lightroom export settings for Instagram ensures your photo looks its best. Optimal settings enhance quality and engagement.
Creative Uses for White Borders in Lightroom Mobile
Borders are not just about framing a photo; they are tools that can enhance the message your image conveys.
Feature
Lightroom Mobile
Photoshop
Online Editors
Ease of Use
Easy, intuitive
Moderate, advanced
Easy, user-friendly
Customization Options
Basic to moderate
Extensive
Basic to moderate
Border Styles
Simple frames
Customizable
Limited styles
Integration with Social Media
Direct export
Requires export
Direct export
Cost
Free with app
Paid subscription
Free and paid
With tools like LightroomApplication, adding borders becomes effortless, allowing anyone to elevate their pictures with a few simple steps.
Enhancing Social Media Posts with White Borders
When you add borders to your pictures, you’re providing them a stage. Think of it: a border gives your image a polished look, making it stand out on social media platforms like Instagram or Facebook.
People scrolling through their feeds will notice a neatly bordered image more than one without any framing.
By ensuring your pictures have the right color tones, you can enhance their appeal and engagement.
Steps to Add Borders in Lightroom application:
Open your Lightroom Application.
Select the image you want to edit.
Go to the Crop tool and choose your aspect ratio.
Head to the section of the border and select your preferred border style.
With a few taps, you've added a border, transforming an ordinary photo into a polished piece.
Using white or light-colored borders can give the “pop” effect. But remember to keep it simple; less is often more when using borders.
Attention should be paid to the picture, not the frame. If you want to create a cohesive look across your social media posts, use consistent colors and styles for your borders.
This consistency makes your feed look professional, something even seasoned professional photographers might envy.
These tools can enhance your shots and simplify editing for social media. For top recommendations, check out this guide that we made just for you.
Creating a Cohesive Look
Consistency helps make your Instagram grid or any portfolio look harmonious. If you use the same border styleand thickness on your pictures, it ties everything together seamlessly.
Tips for Consistency:
In Lightroom, set a standard size for your borders and stick to it.
Experiment with different border colors depending on the mood of your edit. For black-and-white photos, a thin black border works well, while vibrant images might benefit from clean white borders.
Once done, save your image by tapping the export feature and selecting “Save to Camera Roll” or another destination. When you share your final image, it’ll have a refined look that enhances your overall aesthetic.
Now, to your loyal Lightroom desktop fans, you haven’t been left out!
The same principles apply. Use the Clipping tool to add borders and ensure your images are ready for the big screen.
Pro Tip: If you frequently add a border and share on different platforms, create a template with your preferred settings.
For example, after adding a white border in Lightroom Mobile, use the Photoshop black and white shortcut to quickly enhance your black-and-white images
This way, you save time and maintain a consistent look. By integrating these simple steps, you’ll find that adding borders elevates your message, giving your work both a professional quality and the personal touch it deserves.
To take professional photos with your phone, mastering a few important techniques can make a huge difference. Improve your results with simple tips and tricks.
Also, utilizing free desktop apps for iOS can streamline your editing and exporting process.
Frequently Asked Questions (FAQs)
How to add white borders in Lightroom mobile?
Follow these steps to add white borders in Lightroom:
Open the Lightroom app on your mobile device.
Select the photo you want to edit.
Go to the 'Effects' panel.
Scroll down and find the 'Vignette' feature.
Alter the amount to maximum to create a white border.
Modify the midpoint, roundness, and feather to fine-tune your border.
Save your photo once you are satisfied with the border.
How do I put a white border on my photos on my phone?
Follow these steps to put a white border:
Launch Lightroom on your phone.
Pick the image you wish to edit.
Access the 'Effects' panel.
Utilize the 'Vignette' option to add a border.
Set the vignette amount to its highest setting for a white border.
Change additional settings like midpoint and feather to achieve the desired look.
Save the edited image.
How do I add vignettes in Lightroom mobile?
Follow these steps to add vignettes:
Open the photo that you want to edit in the Lightroom application.
Navigate to the 'Effects' control panel.
Select the 'Vignette' option.
Slide to adjust the vignette effect to your liking.
Experiment with the midpoint, roundness, and feather controls for different effects.
Apply the changes when you're happy with the outcome.
How do I make my wall white in Lightroom?
Follow these steps to make your wall white:
Open the Lightroom app and select your photo.
Tap on the 'Color' panel.
Adjust the 'Whites' slider to brighten up the wall.
Use the 'Brush' tool to selectively paint over the wall area.
Increase the exposure and highlights in the brushed area.
Make sure to check the overall balance to maintain natural photo quality.
Save the edit once you achieve a satisfactory white tone on the wall.
Adding a white border to your photos in Lightroom Mobile is a simple yet effective way to make them stand out.
By following the steps outlined above, you can give your images a clean, polished look that enhances their overall appeal.
From selecting the right dimension ratio to adjusting the border thickness, these easy adjustments can make a big difference in how your pictures are presented.
I’ve found that adding a border can really help in framing my photos nicely, especially when I want to showcase them on social media or in a portfolio.
$2,061.00Original price was: $2,061.00.$1,061.00Current price is: $1,061.00. 27584
Download Your Free Guide Now!
Discover the secrets of photography with our printable guide! Master essential techniques like aperture, shutter speed, and ISO to create stunning images. Get your free printable PDF now and start turning your snapshots into masterpieces!