Grayscale Editing in Photoshop: Transform Your Photos
Grayscale Editing in Photoshop: Transform Your Photos
Have you ever noticed how magazine photos look flawless; the secret is grayscale editing in Photoshop.
This technique turns ordinary photos into striking black-and-white images, highlighting shadows and tones.
In this article, I’ll show you how adjusting to grayscale can boost your photographyskills and make your images stand out.
Whether you’re new to photography or want to improve your editing, mastering grayscale in Photoshop will give your photos a professional touch.
Table of Contents
How to Use Grayscale Tool in Photoshop
Here’s how you can convert your color picture using different techniques:
Open your Photo: First, load your desired color photo in Photoshop.
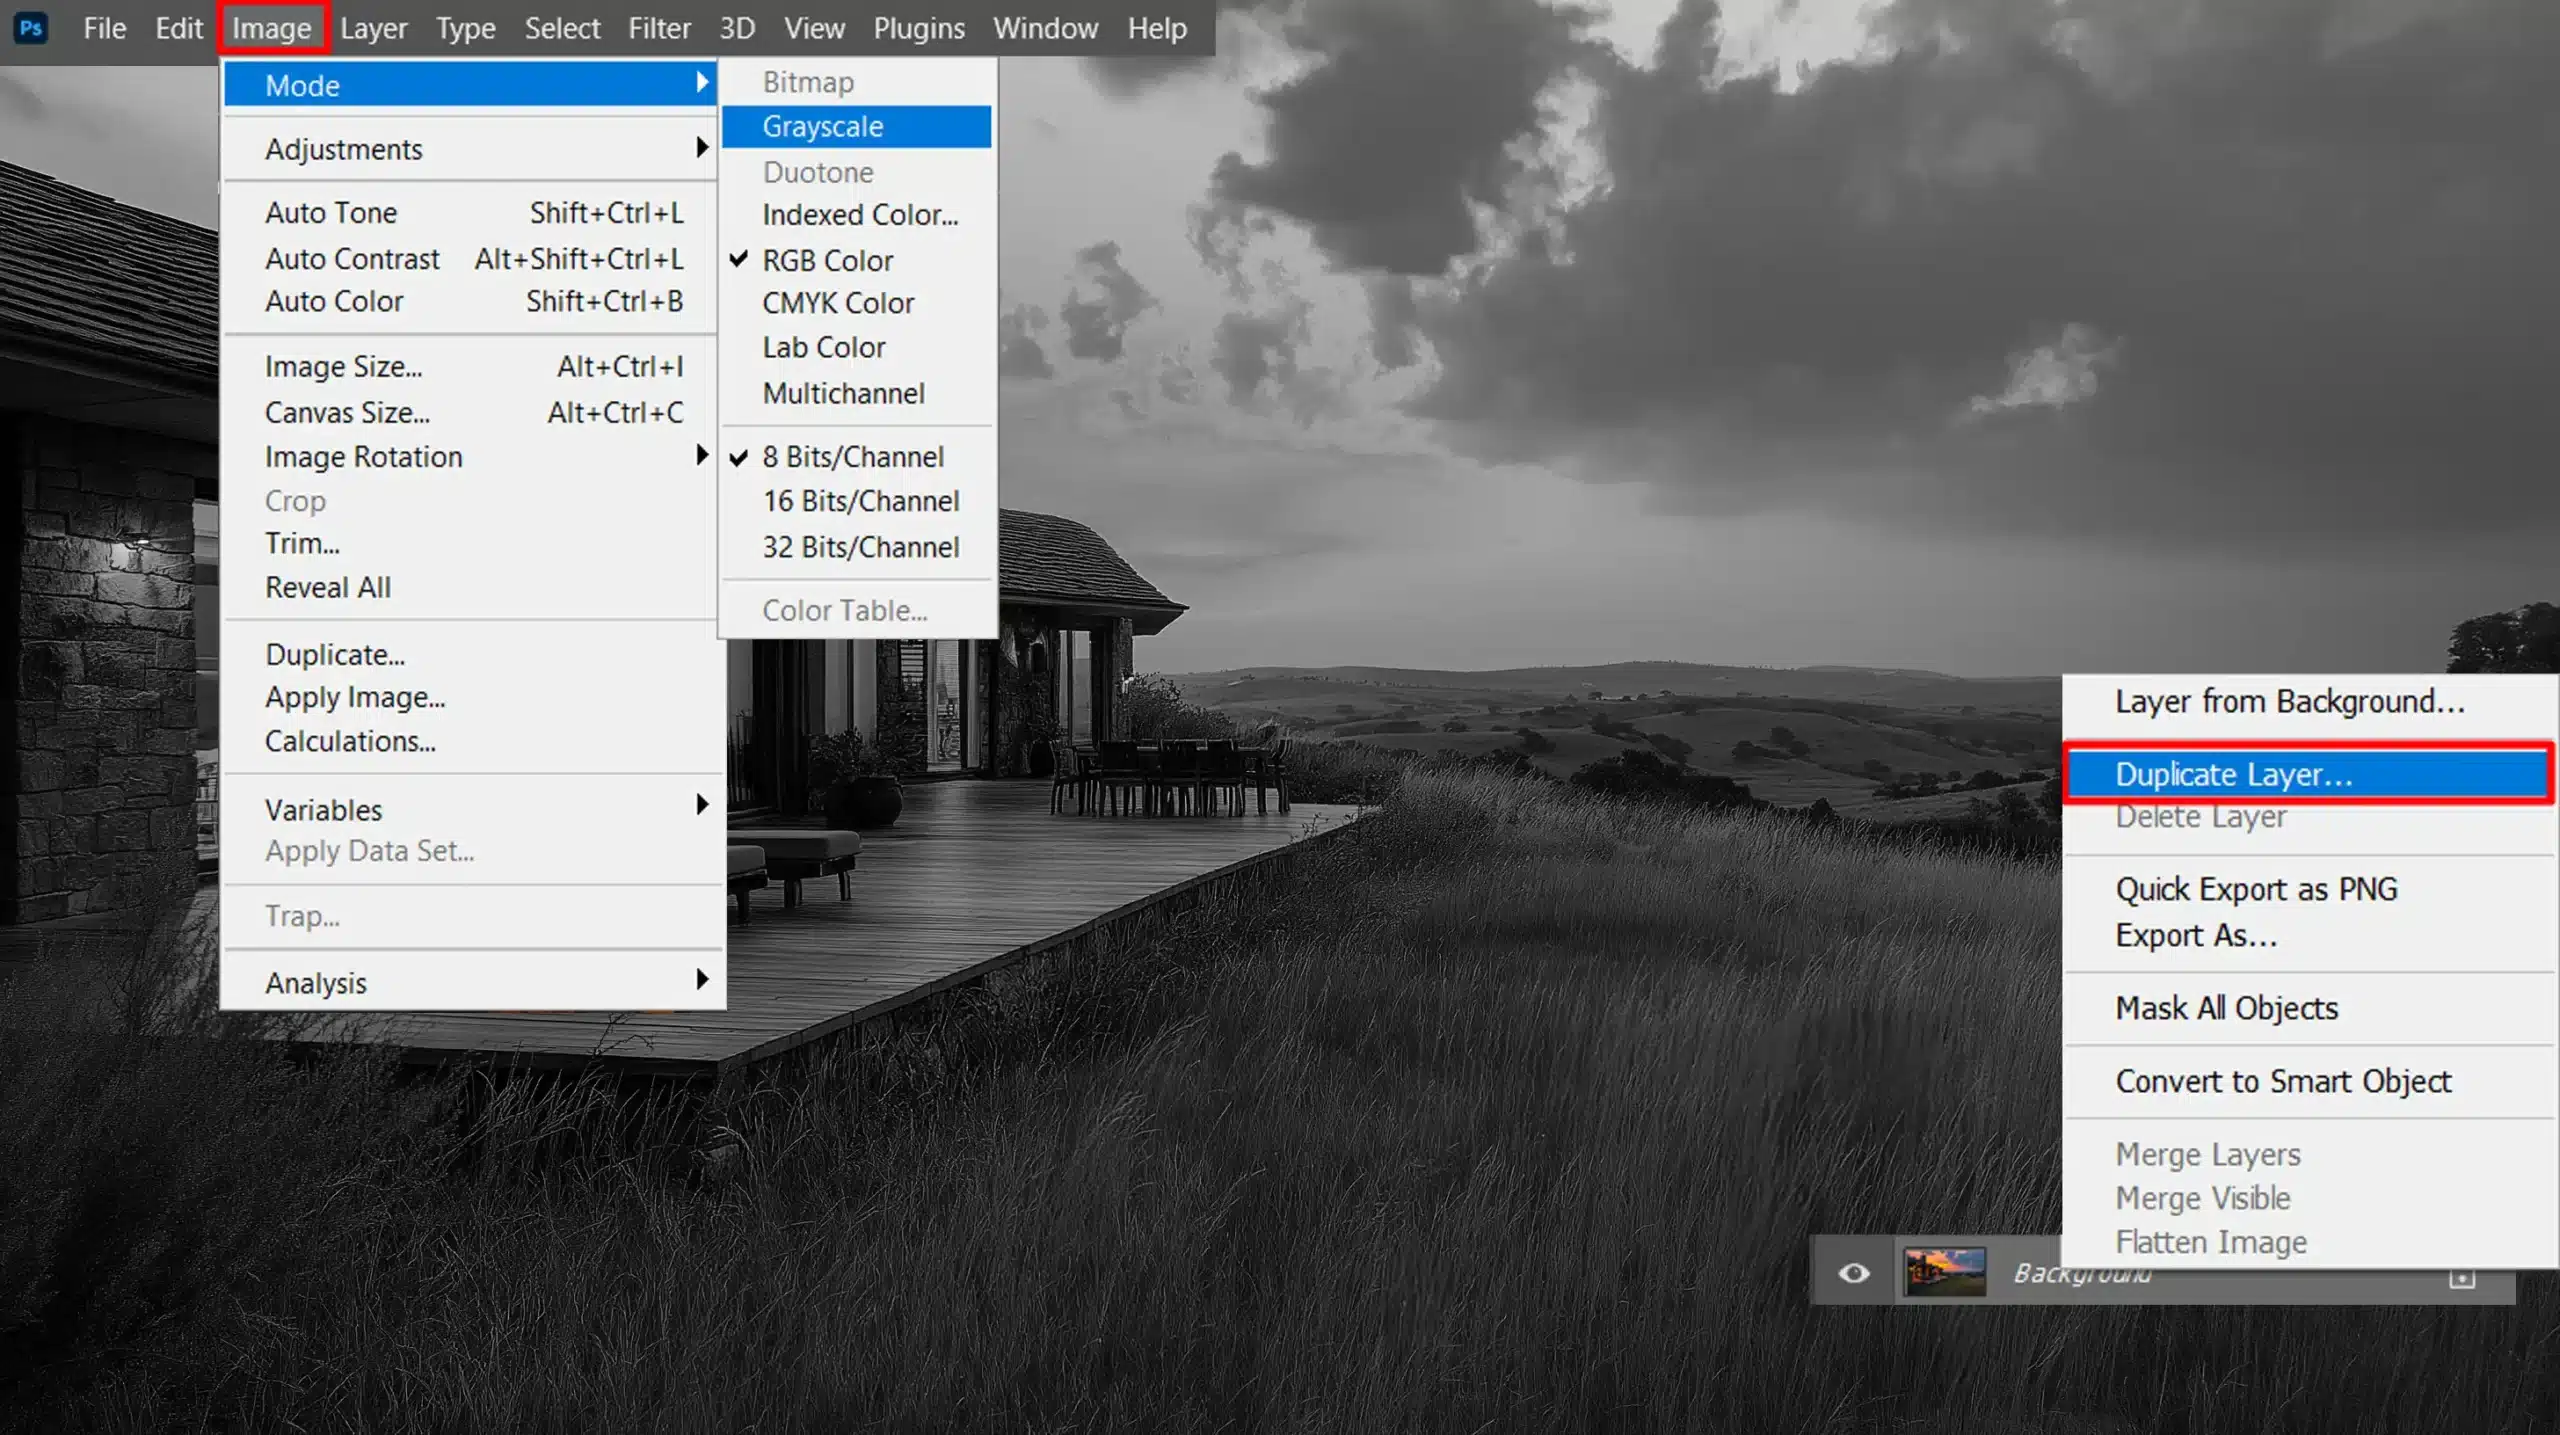
Duplicate the Layer: Second, make a backup copy of the original layer.
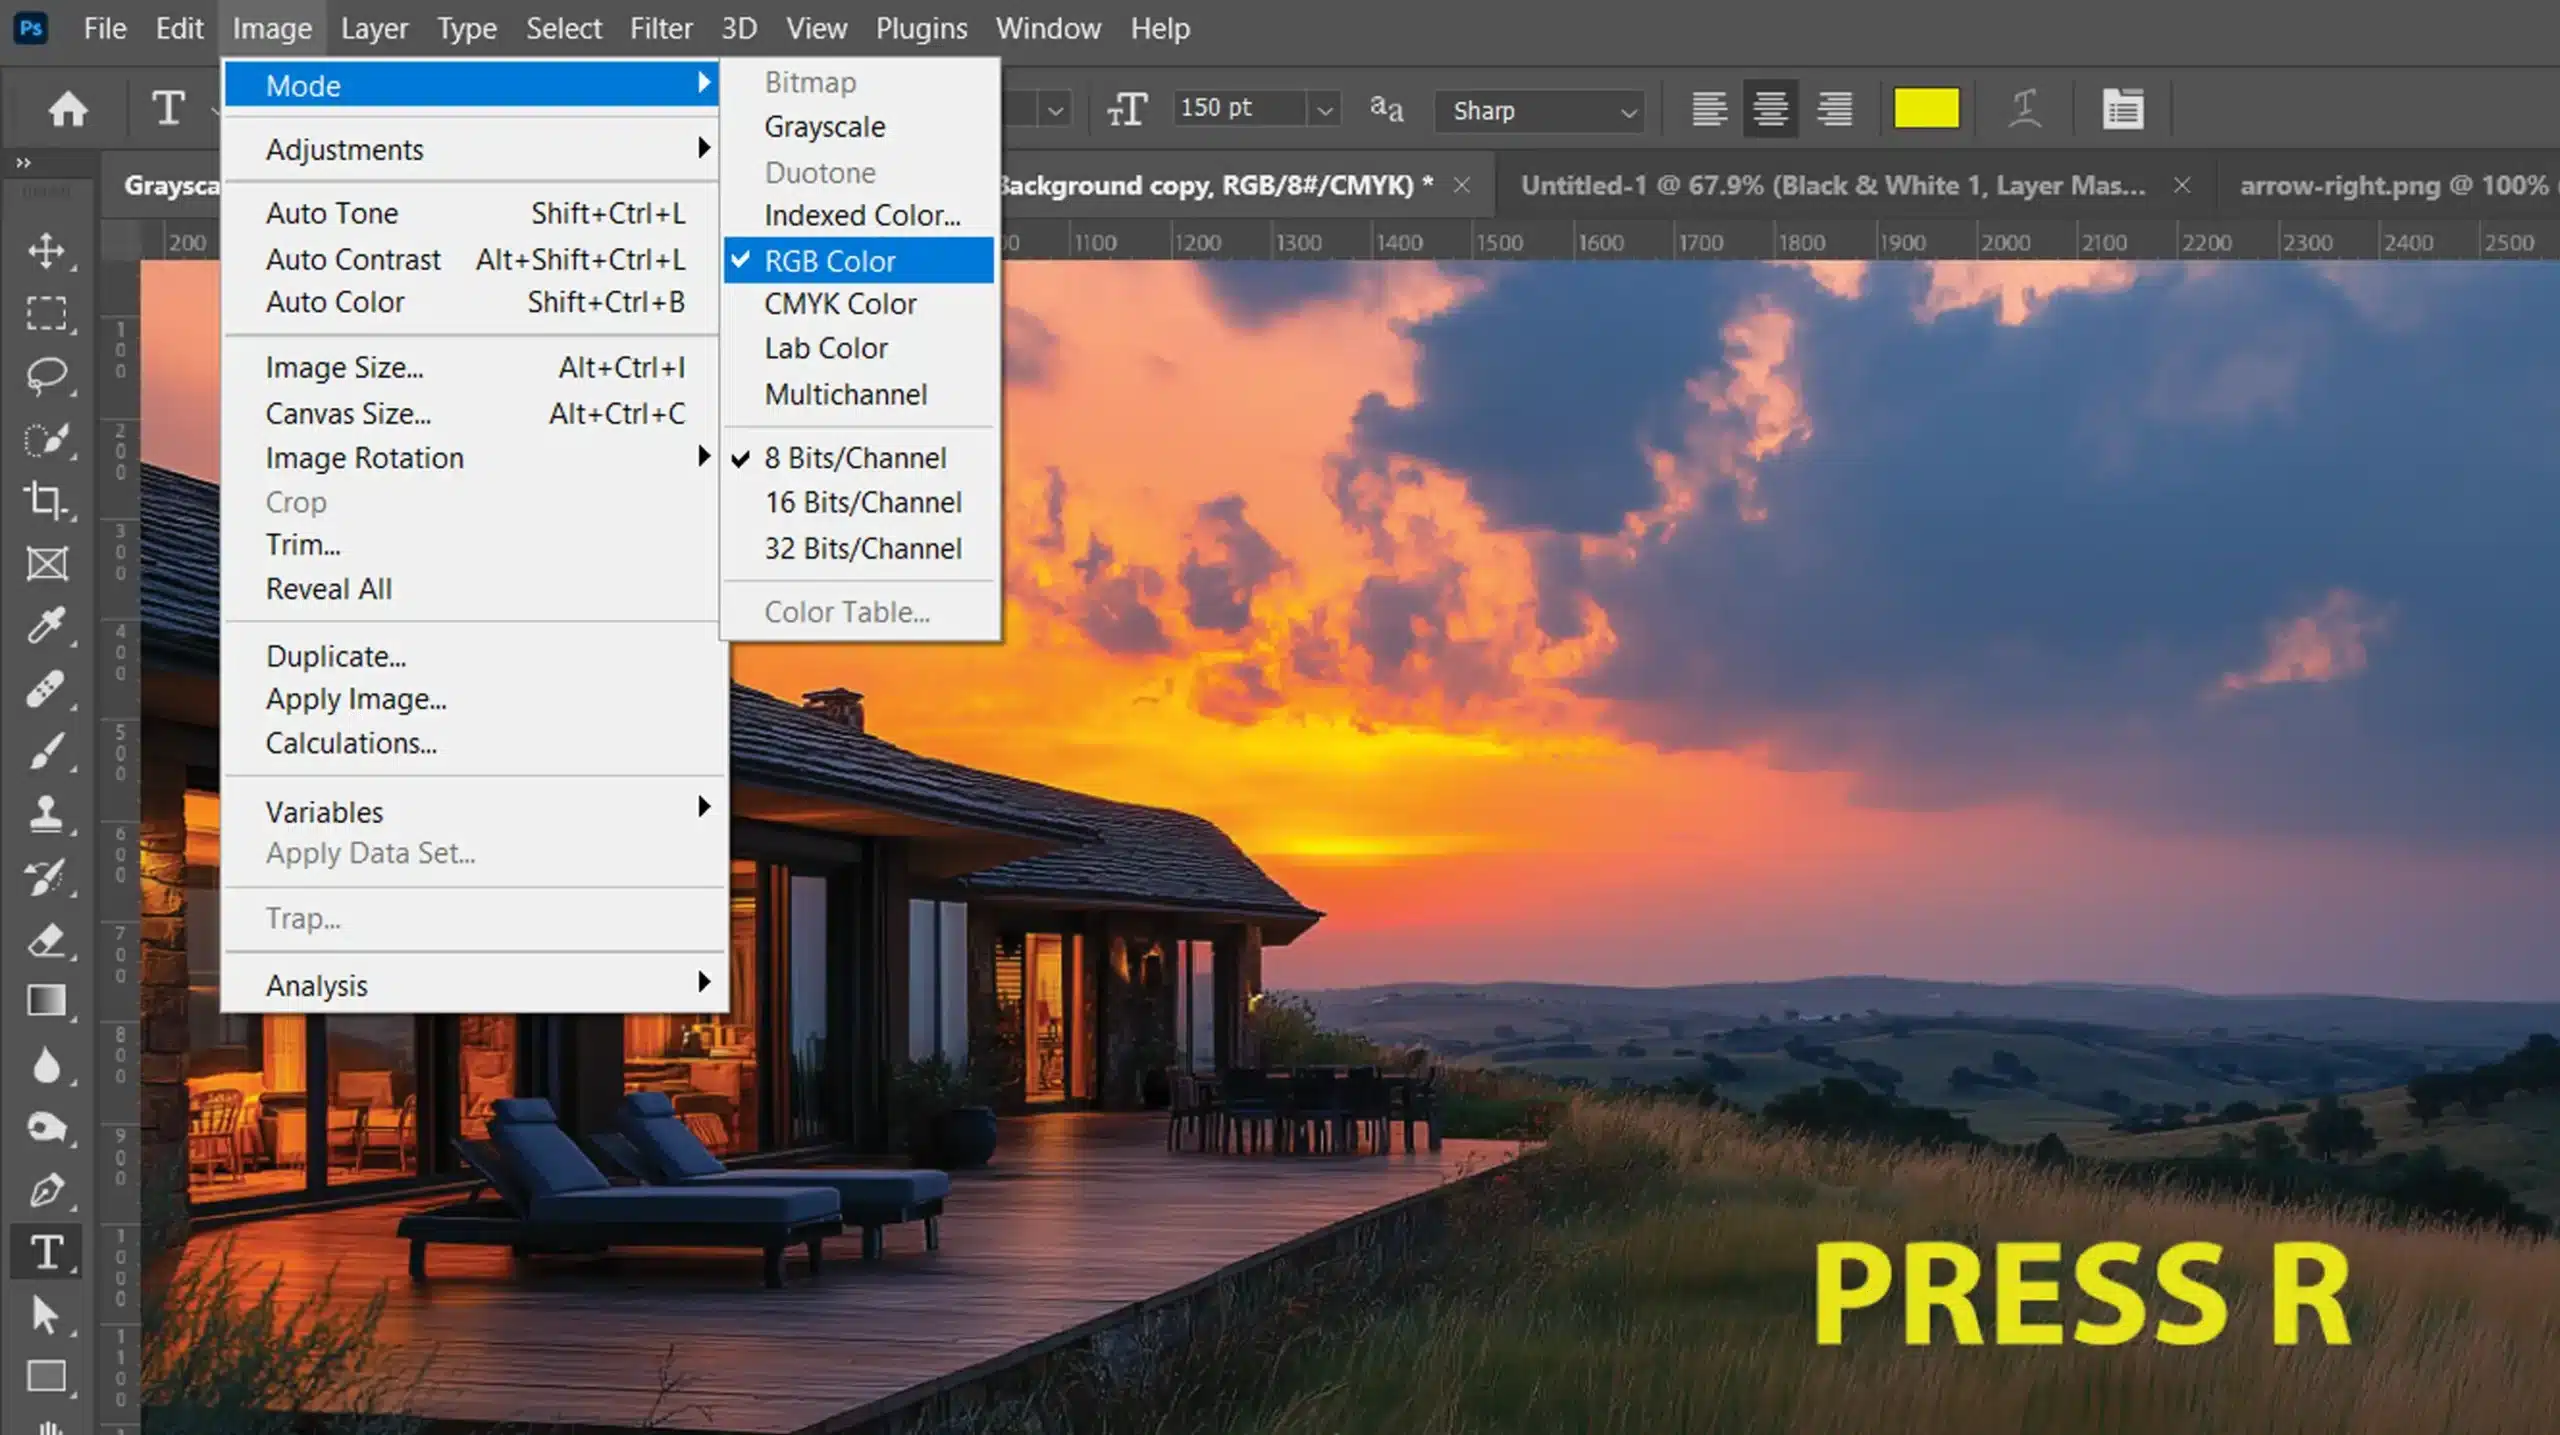
Use Image Mode Grayscale: Then, go to Menu > Image > Mode > Grayscale.
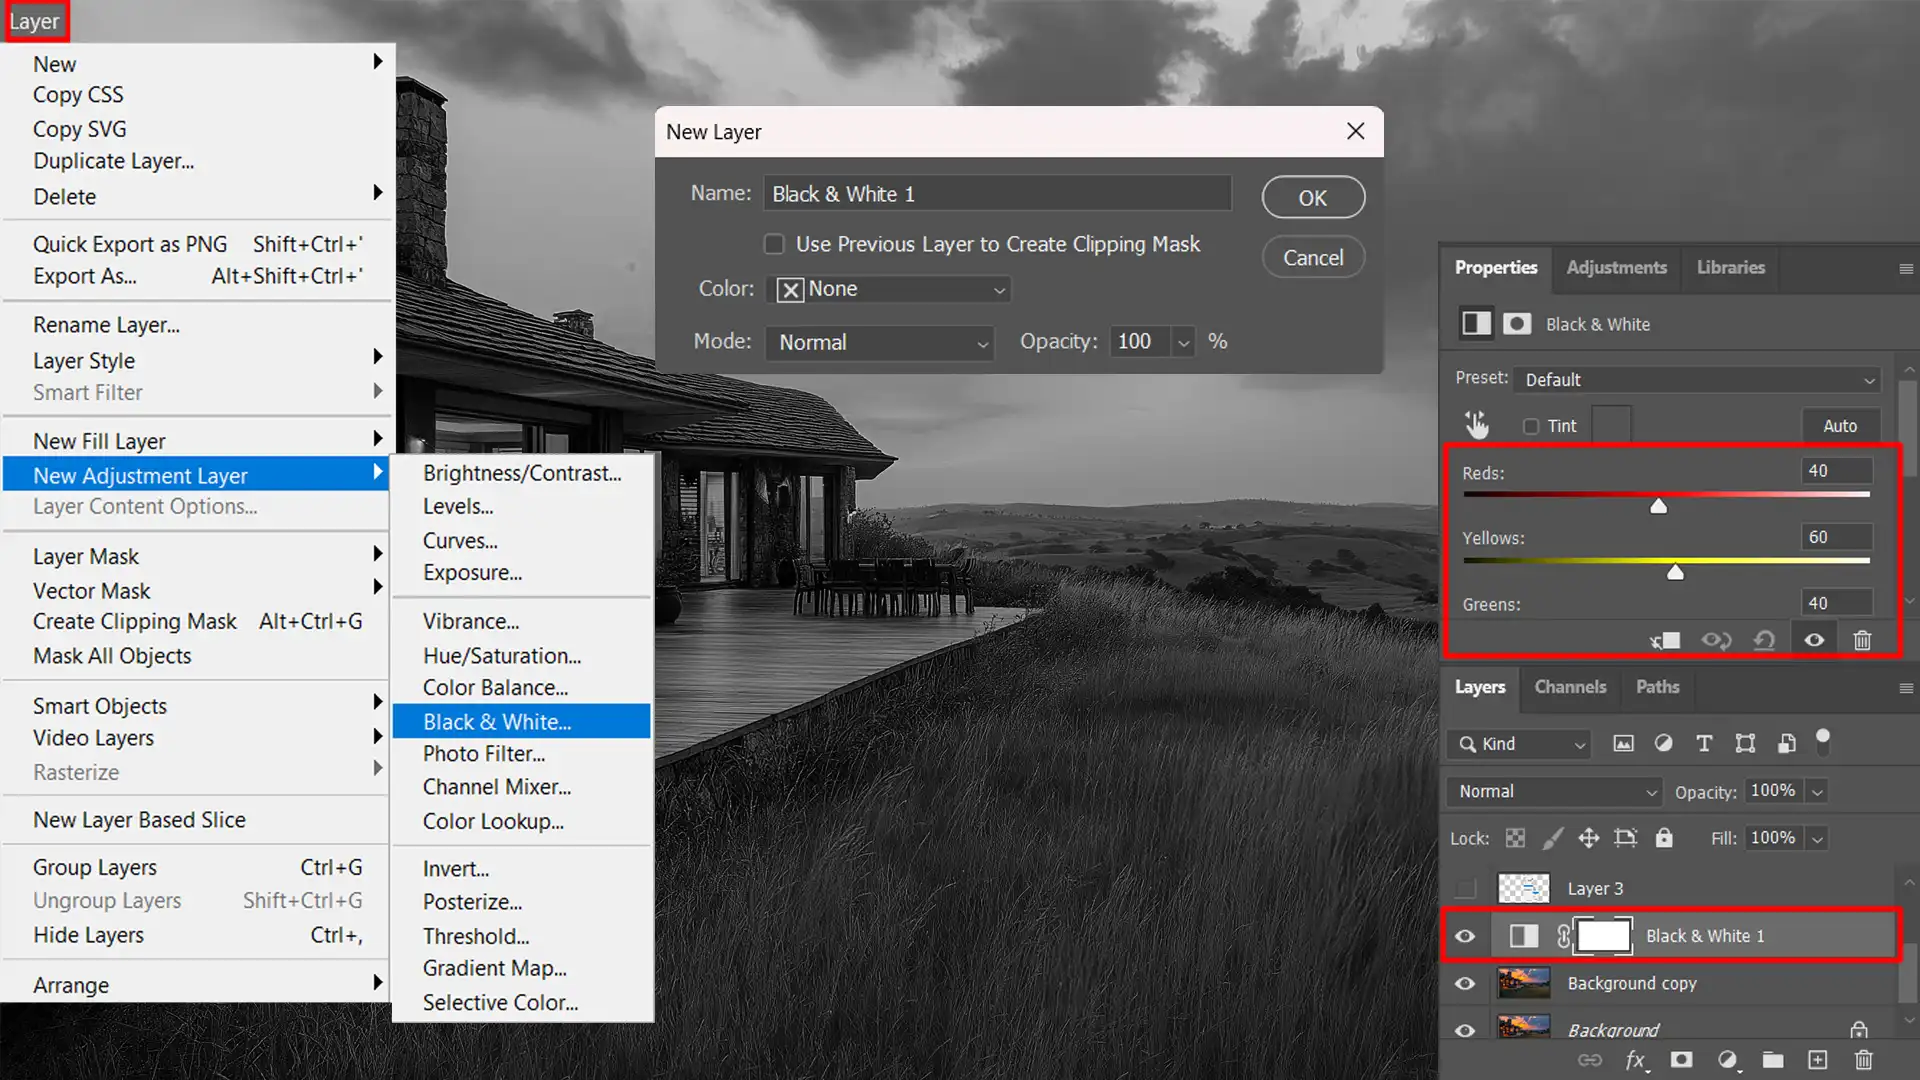
Utilize Adjustment Layers: To create new adjustment layers, navigate to Menu > Layer > New Adjustment Layers > Black & White.
Fine-tune with Channel Adjustments: Lastly, tweak red, green, and blue channels individually for optimal results.
Using the Black & White Adjustment Layer
The Black-and-White Adjustment Layers in Photoshop is a powerful tool for converting color pictures into grayscale and providing complete control over how individual colors are translated into shades of gray.
This feature lets you fine-tune the luminance of various colors in your photo, allowing you to create striking black-and-white images with enhanced contrast and detail.
Therefore, to use these adjustment layers, go to Layer > New Adjustment Layers> Black & White.
Then, you can adjust the sliders for reds, yellows, greens, cyans, blues, and magentas to achieve the perfect balance and depth in your black-and-white photo.
Learning how to adjust white balance is significant for accurate color in your photos. Using the Black & White Adjustment Layer enhances this process by refining monochrome tones.
How to adjust white balance. This approach helps achieve precise color adjustments in black-and-white images.
Tips for Better Results
Experiment with Layer Blending Modes Changes: Different blending modes often yield unique effects.
Keyboard Shortcuts: Use Ctrl + Shift + U (Windows) or Cmd + Shift + U (Mac) as a quick desaturation method.
Control Over Shades: Adjust the shades of gray through advanced channel manipulations.
To achieve a more dramatic transformation, you can convert most images from their original version to gray by adjusting how the image is converted to black.
This retained rich contrast while enhancing finer details like facial expressions and textures.
Moreover, by following these steps consistently, you’ll master converting even complex images with ease.
Grayscale Photoshop: Understanding Color Modes
Color modesdetermine how colors are represented in an image. Whether you’re working with RGB color or grayscale, each serves a distinct purpose.
Let’s dive into the specifics.
RGB Color Mode
The RGB color mode is important when working with digital images. This mode combines red, green, and blue light to create all the colors in a photo.
When I first started using Photoshop, understanding RGB color was important.
For example, by adjusting the blue channel, I could emphasize cooler tones in my image edits.
To switch to this mode:
First, go to the Image Menu.
Then, select Mode.
Lastly, choose RGB Color.
The table below provides a quick reference to the primary colors and their corresponding secondary counterparts.
Primary Color
Secondary Colors
Red
Cyan
Green
Magenta
Blue
Yellow
Adjusting individual channels can help you achieve precise corrections and effects on your photos.
Grayscale Photoshop Color Mode
Using the grayscale color mode reduces your image to shades of gray, simplifying editing for nuances and contrast.
My first memorable edit involved turning a vibrant scene with smart filters into a compelling grayscale image it made me appreciate different lighting elements much more profoundly.
Here’s how you can convert an image:
First, open your photo in Photoshop.
Second, navigate to the Image Menu.
Lastly, select Mode, then choose Grayscale.
Benefits of Grayscale Photoshop
Simplifies tonal adjustments.
Often minimizes file size without losing critical details.
Converts well to ink-based printing formats.
Example Use Case: Converting Outdoor Scenes to Grayscale
For instance, converting outdoor landscapes into grayscale can highlight textures and focus on dramatic lighting without the distraction of colors.
Remember, choosing between these two depends heavily on your project’s needs while ensuring you get optimal results every time!
Moreover, make sure you’re continuously experimenting with different modes; that’s where growth happens!
Converting to Grayscale Photoshop
Converting an image to grayscale inPhotoshop can produce dramatic, artistic effects.
Therefore, if you want to transform your color photo into captivating black and white, follow these simple steps to understand the impact.
Steps to Convert
To convert your image effectively, follow these practical steps:
Open Image: First, open your image in Photoshop.
Go to Mode Menu: Second, click on the "Image" menu at the top.
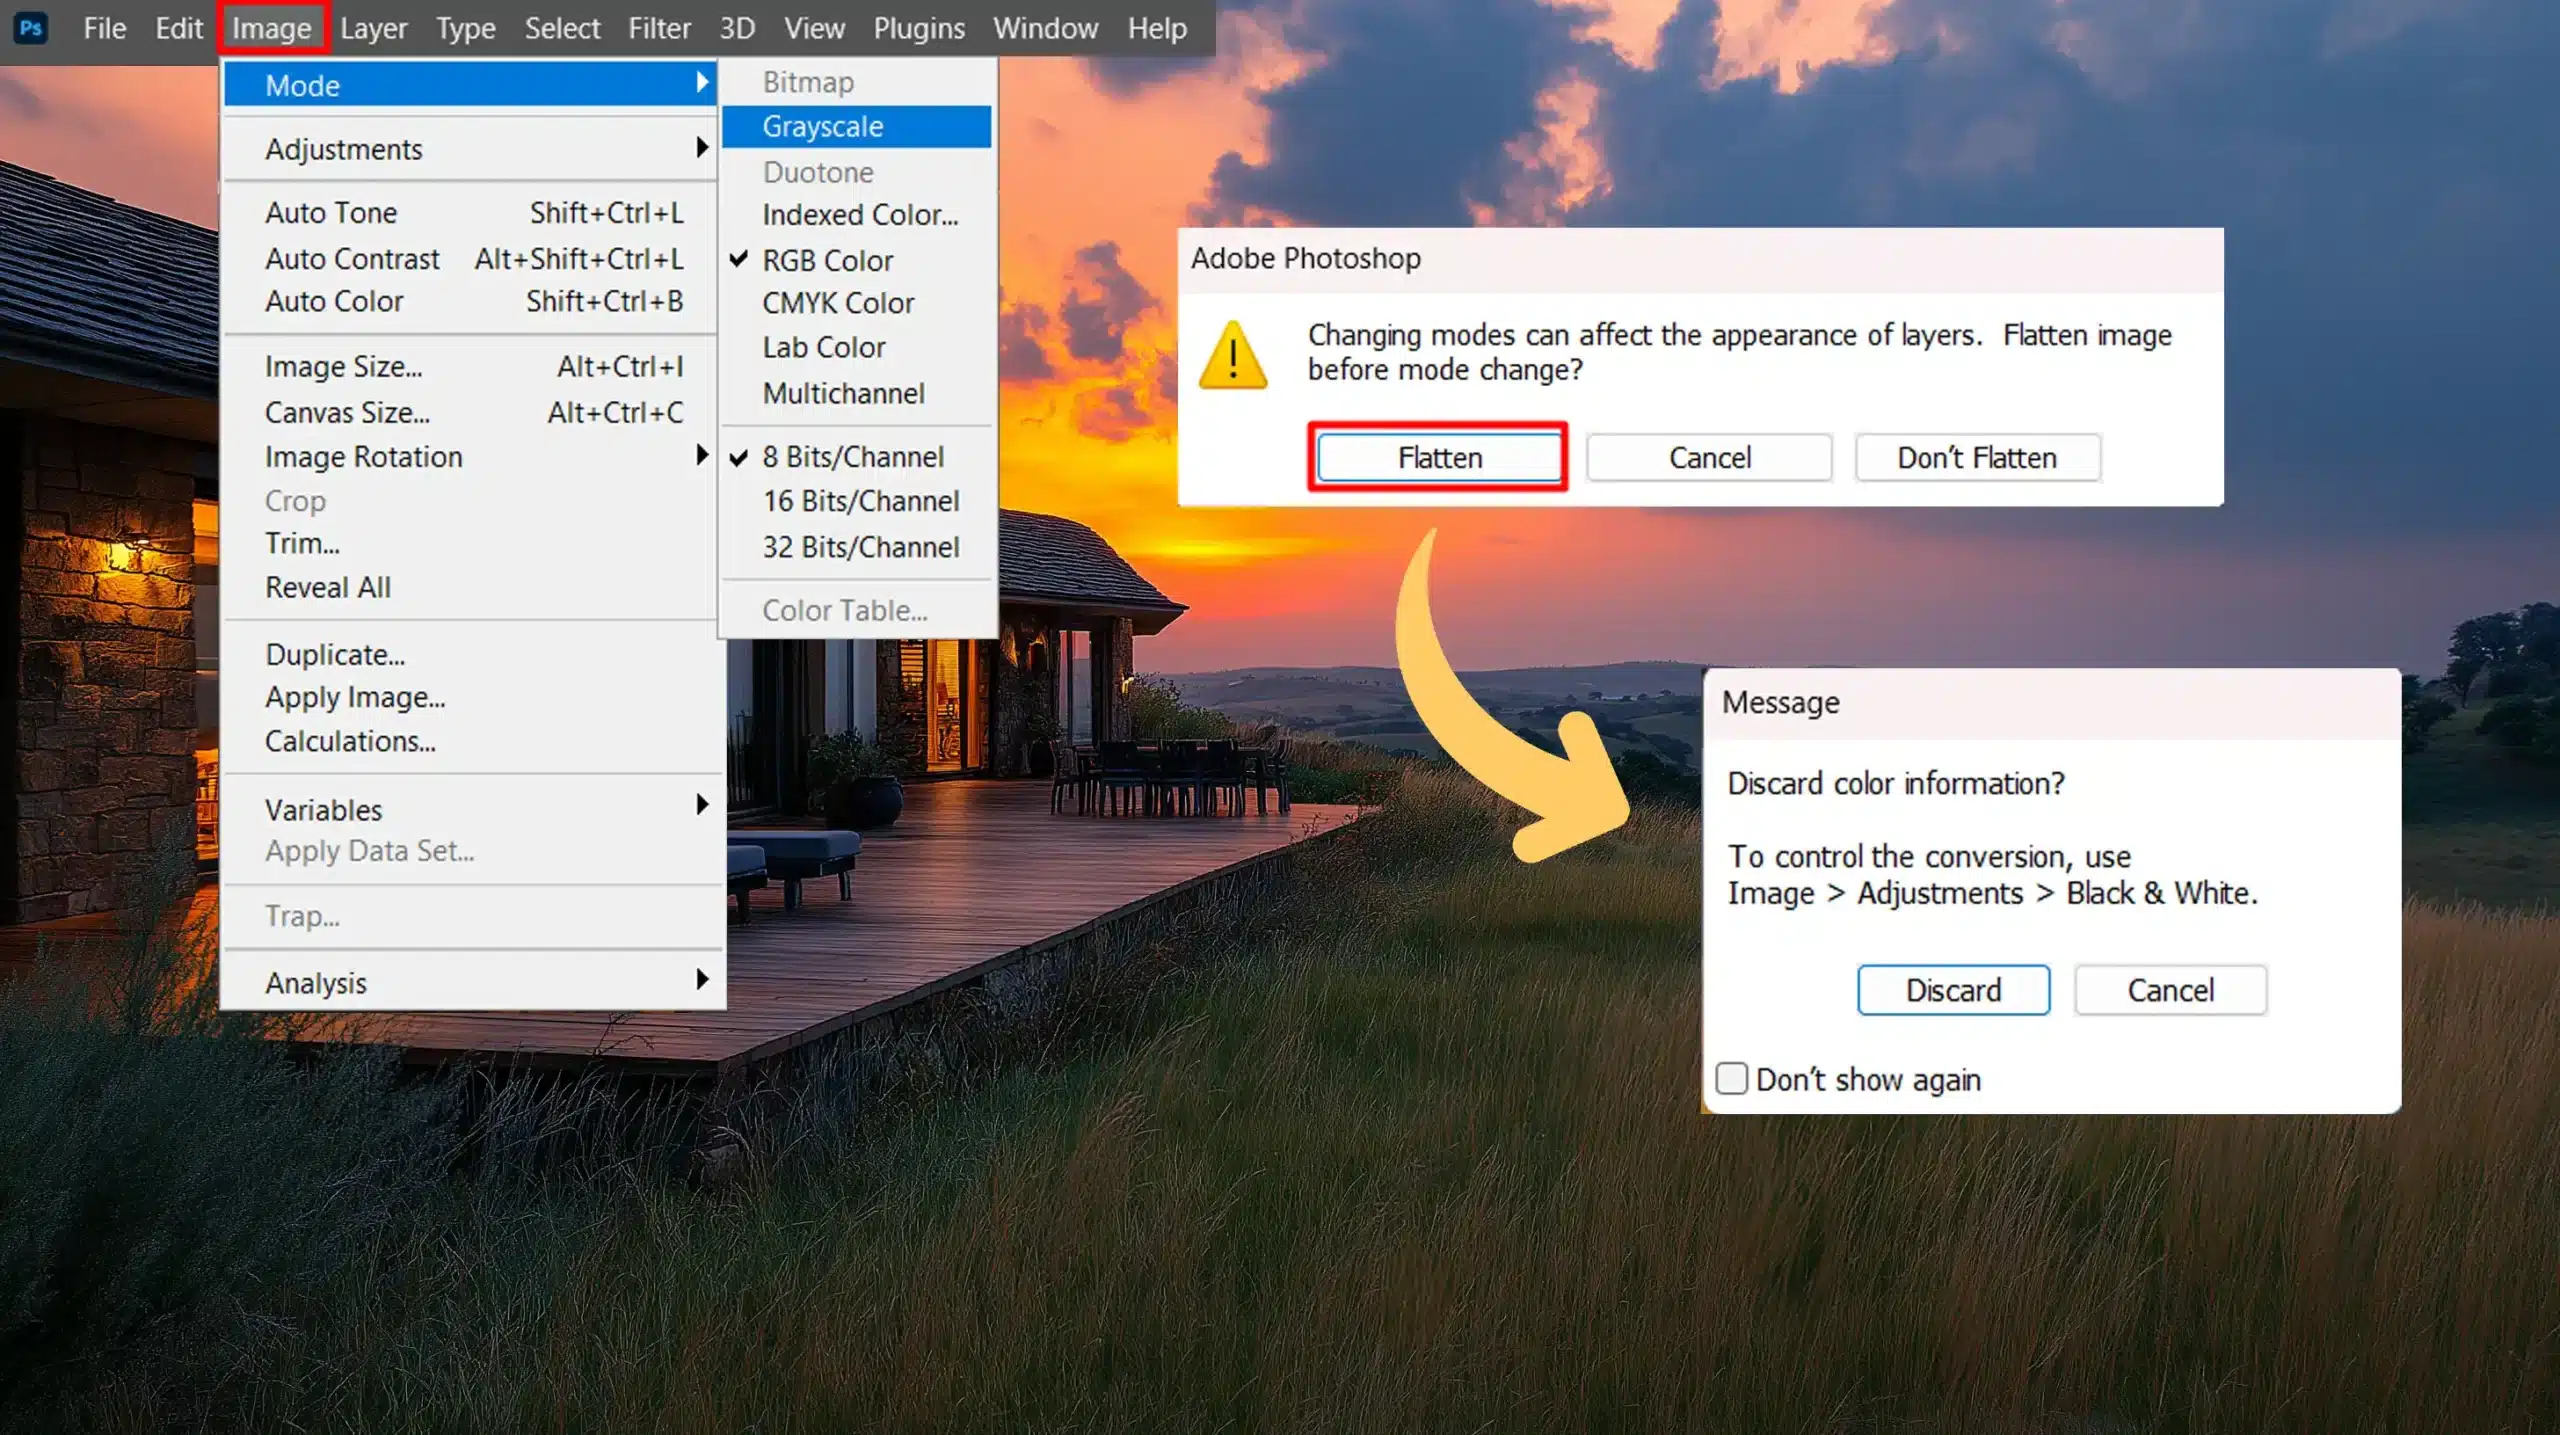
Mode Selection: Then, cover over “Mode,” then select “Grayscale.”
A dialogue box will ask if you want to discard color information.
Click "Discard."
Adjust Tones(Optional): Lastly, use levels or curves for better contrast.
For better results, place Levels adjustment layers and tweak sliders.
Here’s a simple table summarizing the steps for quick reference:
Step
Description
Open Image
First, select the image file in Photoshop.
Change Mode
Second, select ‘Image’ > ‘Mode’ > ‘Grayscale’.
Tweak Tones
Lastly, use Levels or Curves for adjustments.
Impact on the Grayscale Photoshop Image
When converting images to grayscale, Photoshop dramatically changes the way colors appear. The absence of colors directs attention to textures and contrasts.
Converting color images into shades of gray makes certain elements stand out more deeply despite removing color information.
For instance, higher light areas could turn pure white, while dark regions might become pure black.
Moreover, deciding to map colors or use specific blue color channels during the conversion can further refine the final look of most images.
Using my experience with the glossary of photography, converting a vibrant photo taken in sunlight into a black-and-white version allowed me to emphasize shadows and depth that aren’t as noticeable with bright color channels.
Explore different ways, like using adjustment layers, for as much editing flexibility as possible before saving your image mode changes.
Lastly, with careful practice, these techniques ensure each grayscale creation looks stunningly detailed even without RGB color richness.
Revert the black and white photo with colorized filter Photoshop, seamlessly integrating with grayscale. Master these techniques to transform your grayscale images into stunning, colorful masterpieces.
Grayscale Photoshop: Checking Color Image Mode
Are you curious to explore different color modes in Photoshop?
Understanding image mode is significant for achieving precise tonal adjustments.
Let’s delve into verifying and switching your image’s color settings.
Steps to Check Image Mode
When checking the current color mode of an image in Photoshop, follow these simple steps:
First, open your image in Photoshop.
Then, navigate to the "Image" option at the top menu.
Lastly, hover over the "Mode" submenu.
Let’s go through it practically with a helpful table for clarity:
Step
Description
First
Open your image.
Second
Select “Image” from the top menu.
Last
Hover over the “Mode” submenu and check the active mode.
Depending on the project, you may work with RGB, CMYK, or Grayscale modes. Each one affects how colors are displayed and edited.
Types of Color Modes in Grayscale Photoshop
Understanding different color modes helps tailor edits precisely:
RGB: Ideal for digital screens, combining Red, Green, and Blue.
CMYK: Used for print materials: Cyan, Magenta, Yellow, and Black ensure accurate printing colors.
Grayscale: Commonly used for artistic effects and removing all colors except gray tones.
By knowing these options, you adapt your workflow optimally!
Troubleshooting File Issues with Color Modes
Sometimes, incorrect color settings can cause mismatched prints or inconsistent screen displays.
Here’s a checklist:
Ensure the correct working space: RGB for digital and CMYK for print.
Check if you've accidentally converted a color picture to grayscale.
Here is a helpful table that lists some common mistakes and their solutions to ensure your work stays on track and looks professional.
Mistake
Solution
Wrong Working Space (e.g., RGB when printing)
Select the appropriate color setting.
Accidental Grayscale Conversion
Change mode back to RGB.
By regularly checking your image mode using these steps, you ensure consistency.
Skilled handling of Photoshop boosts efficiency and elevates output quality!
Next time you edit an image in Photoshop, remember to check the image mode and experiment with different color spaces to achieve your desired effect.
Grayscale Photoshop: Using the Channels Palette to Grayscale
In this part, I’ll show you how to use the Channels Palette in Photoshop.
It’s a game changer for manipulating and enhancing images with specific color channels.
Therefore, are you ready to dive into some powerful techniques?
Understanding Channels
Every image in Photoshop uses color channels to store color information.
Typically, there are three main channels: Red, Green, and Blue (RGB).
Each channel captures different aspects of the colors in the image, enabling fine control over adjustments.
To create a striking 3D glasses effect in Photoshop, understanding channels is important. This technique leverages color channels to simulate depth and dimension.
Mastering channels enhances your ability to apply dynamic visual effects effectively.
Viewing Channels
First, open the Channels Palette from the Window menu.
Then, click on each channel (Red, Green, Blue) to see how it affects your image.
Red displays shades from red to black.
Green shows greenish tones.
Blue highlights blue areas.
This exploration helps you understand which channels impact specific colors.
Adjusting Individual Channels
To adjust a particular channel:
First, select a channel in the palette.
Then, use smart objects like Levels or Curves for targeted adjustments.
Lastly, apply changes while previewing results on-screen.
Remember to switch back to RGB mode after making adjustments.
Understanding your color profile in Photoshop is important for accurate color representation. Adjusting individual channels can fine-tune how colors appear in your images.
Creating Black and White Images
Want a stunning black-and-white image?
Follow these steps:
First, go to Image > Mode > Grayscale.
Photoshop converts your image into black and white by discarding color information.
Alternatively, for more control:
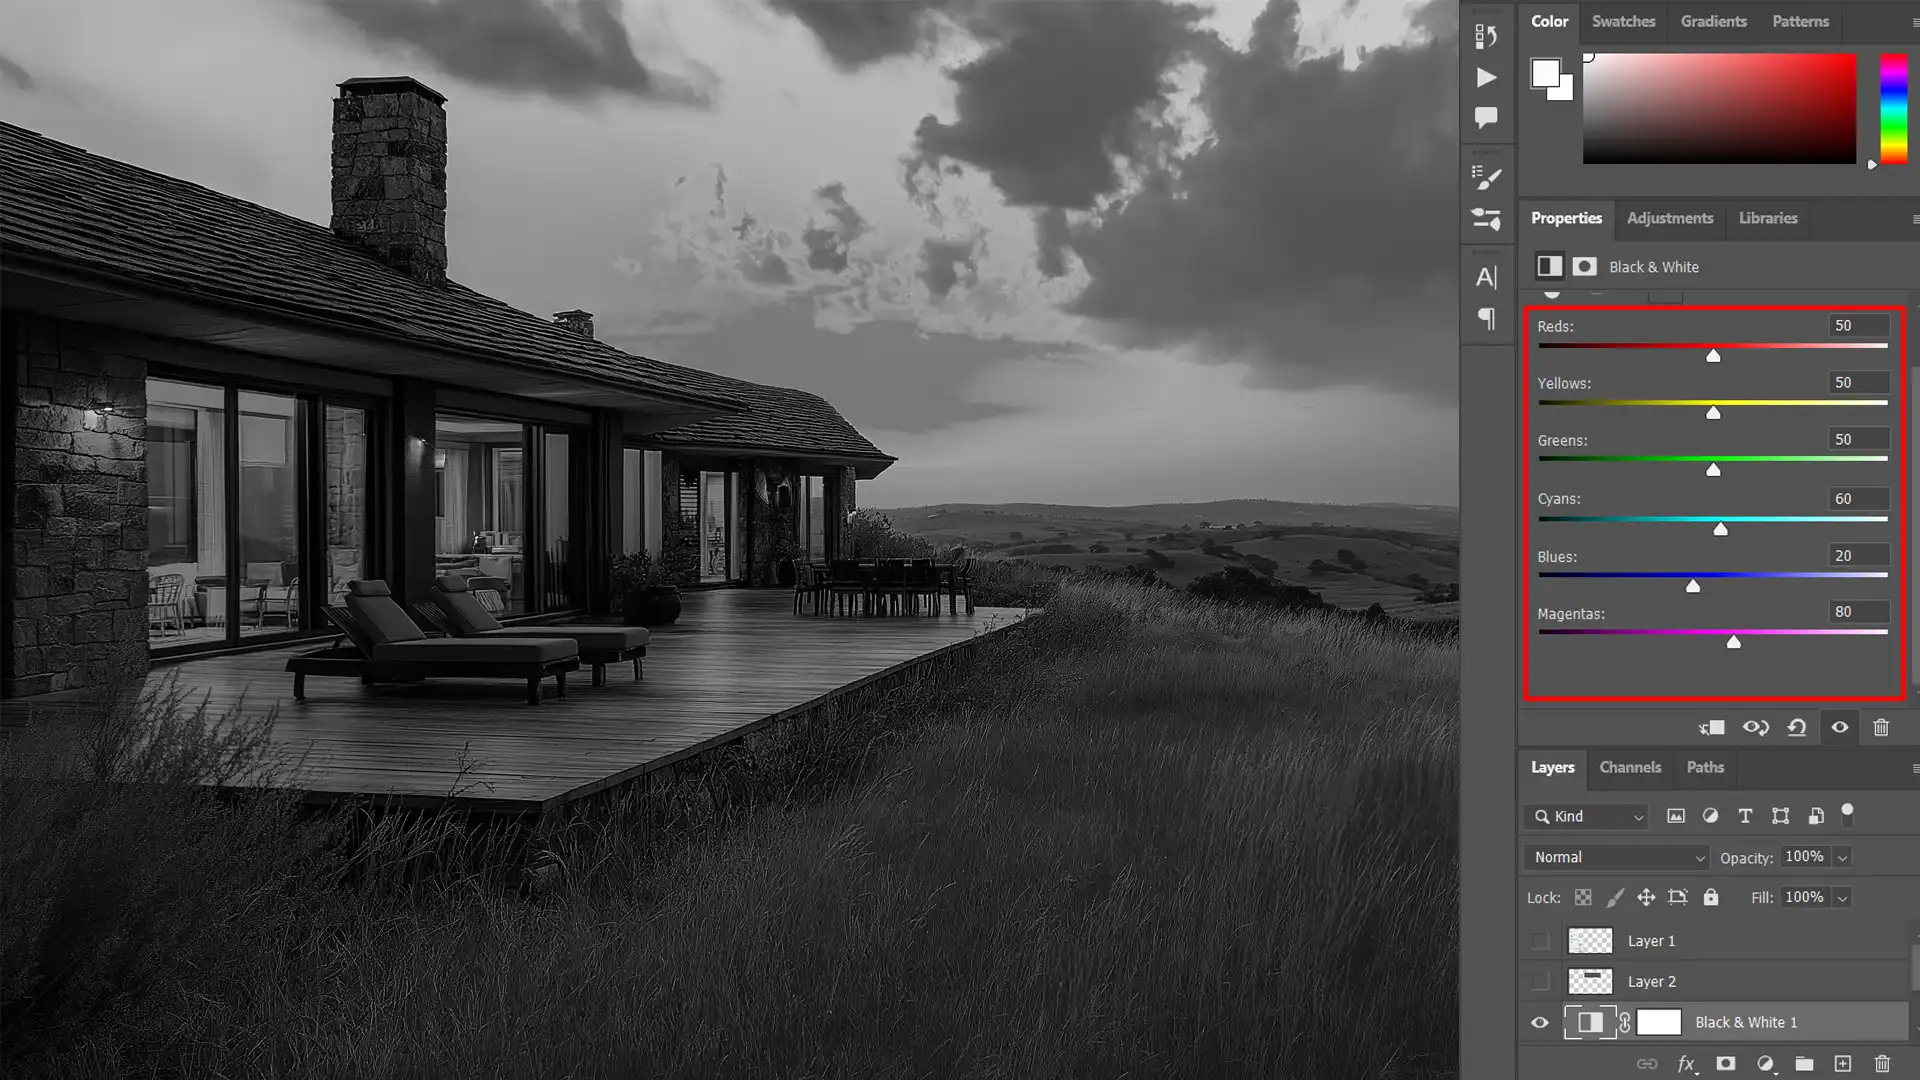
Use Image > Adjustments > Black & White.
For precise tones, you can tweak sliders corresponding to red, green, and blue channels.
Convert Adjacent Colors
You can convert adjacent color effectively using individual channels:
Identify blending areas using Red, Green, or Blue channels.
Adjust these zones separately for smooth transitions while maintaining the integrity of other colors in the image.
I once needed a specific gray tone in an ad project but didn’t want it to be too harsh. For example, in white or black zones, it worked wonders!
Try implementing these tips next time you’re editing images!
Transform your images by learning how to colorize black and white photos. This guide offers step-by-step techniques to bring vibrant color to your monochrome pictures effortlessly.
Reverting to RGB Color in Adobe Photoshop
Have you ever converted your image to grayscale but wanted the vibrant colors back?
Don’t worry, I’ll guide you through reverting an image to its original RGB color mode using Photoshop.
Enhance your workflow by learning how to use selective color in Photoshop, essential for reverting to RGBColor . Master selective adjustments to transform your images effectively.
Using the Menu Bar
Open Photoshop and ensure your image is loaded on the workspace.
The first and most straightforward method is using the menu bar.
First, click on “Image” in the top menu bar.
Second, select "Mode."
Lastly, choose “RGB Color.”
This will revert any grayscale image to RGB mode, returning all the colors in the image.
Therefore, by following these steps, I was able to revert them to their colorful selves effortlessly:
Select Image > Mode > RGB Color
Use Alt + I + M + R for shortcut
Things to Note
First, when reverting an image, all embedded color data previously hidden becomes visible again.
Then, if you want to keep both versions for later comparison, save your project under a different name.
Lastly, converting from grayscale back to RGB doesn’t always bring back tones ideally; manual adjustments might be necessary.
These methods should make your experience seamless, whether reviving old photos or making quick tweaks to your current projects.
Enhance your workflow with side by side editing in Photoshop, perfect for comparing images while editing. Easily evaluate changes and improve your editing precision.
Frequently Asked Questions
How do I turn on grayscale in Photoshop?
To enable grayscale in Adobe Photoshop, simply go to Image, then Mode, and select Grayscale.
This method swiftly transforms the entire image to shades of gray, effectively converting all the colors in the image to a spectrum from pure white to pure black.
How does Photoshop convert RGB to grayscale?
Photoshop can convert RGB to grayscale by discarding the color information and mapping each pixel’s color to a corresponding shade of gray.
This conversion process evaluates the red, green, and blue color channels and combines them into a single gray channel.
This method emphasizes the tonal range over specific color values.
How do I revert to grayscale in Photoshop?
Open your image: Start Photoshop and open the image you want to convert.
Select the Image menu: At the screen's top, click "Image."
Choose Mode: Hover over the "Mode" submenu.
Select Grayscale: Click on "Grayscale" from the list.
How do I convert images to grayscale?
To convert an image to grayscale in Photoshop, go to Image > Mode > Grayscale, and click Discard when prompted to remove color information. Alternatively, you can add a Black & White Adjustment Layer for more control over the conversion or use Image > Adjustments > Desaturate for a quick grayscale effect.
I’ve discovered that mastering grayscale in Photoshop is a fantastic way to enhance and manipulate my images.
By utilizing Photoshop’s grayscale color mode, I can transform most of my images from their original versions into stunning black-and-white representations.
Whether I’m aiming to convert a color image to black and white for artistic purposes or simply for the streamlined aesthetics of gray hues, Photoshop provides powerful tools to achieve this.
Working within this mode has opened new creative avenues for my photography and design endeavors.
For more detailed tutorials and tips, consider our Photoshop Course and Lightroom Course. These courses are designed to enhance your photo editing skills further.
Mastering these techniques will ensure that each grayscale creation is beautifully detailed, even without the richness of RGBcolor.
Lastly, explore the possibilities and refine your skills to make your images stand out.
If this article has helped you, then Like and Share it with your friends
$2,061.00Original price was: $2,061.00.$1,061.00Current price is: $1,061.00. 27584
Download Your Free Guide Now!
Discover the secrets of photography with our printable guide! Master essential techniques like aperture, shutter speed, and ISO to create stunning images. Get your free printable PDF now and start turning your snapshots into masterpieces!