Color Splashes Photoshop: Vibrant Photo Transformations
Color Splashes Photoshop: Vibrant Photo Transformations
Have you ever wondered how to create stunning color splash in Photoshop that make your images stand out?
Imagine transforming your photos with just a few clicks, highlighting vibrant hues against a monochrome background.
In this article, I will guide you through the simple yet powerful techniques to achieve this captivating effect.
Whether you’re a novice or a seasoned designer, you’ll find these steps easy to follow and incredibly rewarding.
Ready to add some drama and flair to your photos?
Keep reading to unlock the secrets of creating mesmerizing color splashes in Photoshop!
Table of Contents
Preparing Your Image for Color Splashes Photoshop
Let’s dive right into making your images pop using Photoshop. It can feel a little overwhelming at first, but once you get the hang of it, you’ll be creating photo masterpieces in no time.
Choosing the Right Photo
First things first, let’s pick a compelling image. It’s always better to start with an image that has a strong focal point.
You want to capture the viewer’s eye right off the bat. If you’re looking to create a color splash effect, choosing a photo with vivid colors works wonders.
Now that we’ve got our photo, let’s move ahead.
Opening Your Photo in Photoshop
Open your selected photo in Adobe Photoshop. Simply go to File > Open, and navigate to where your photo is stored.
Now, your photo should appear in the document window.
Let’s keep the momentum going.
Creating a Background Layer
Next up, let’s talk layers. Specifically, the background layer. Layers are like stacked sheets of paper.
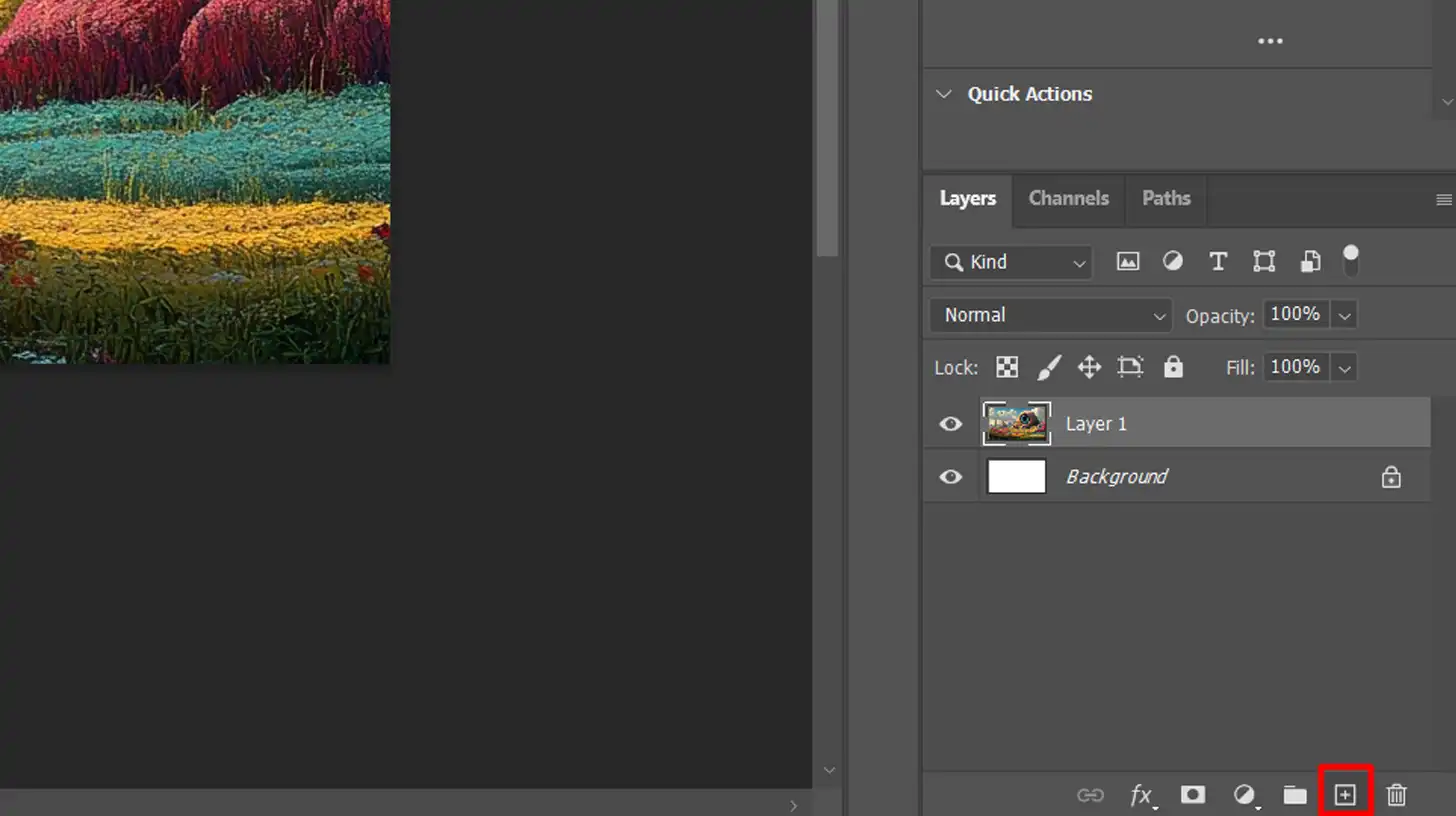
Here’s how you create a new background layer:
Go to your layers panel.
Click on the 'Create a new layer' icon at the bottom.
Now, we’ve officially got our background layer set and we’re ready for some fun adjustments.
Using the Gradient Map Adjustment Layer
We’re going to add some drama with a gradient map.
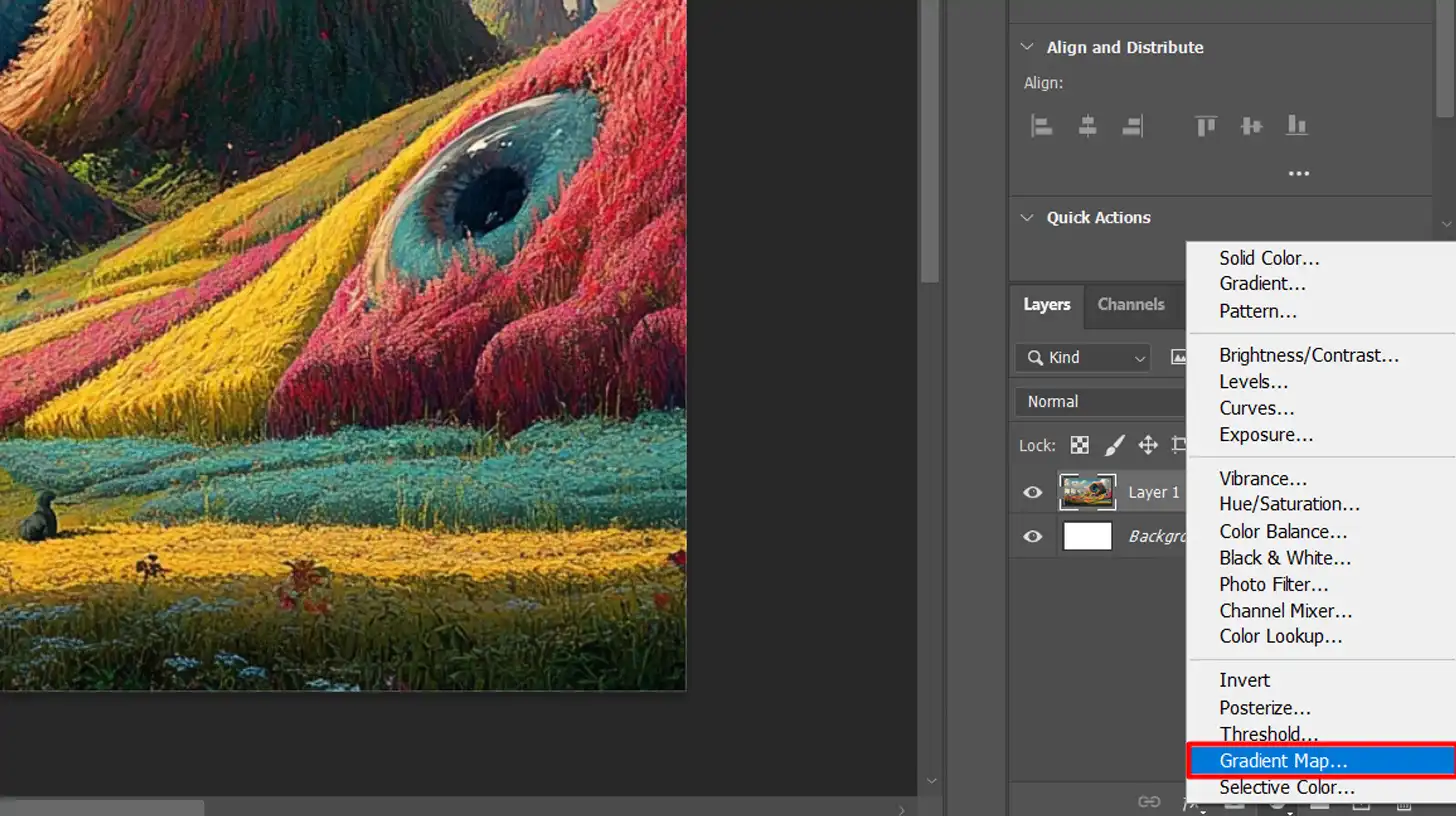
Head to Layer > New Adjustment Layer > Gradient Map. Look for the properties panel that appears and select a gradient that complements your image’s tones.
This converts your photo to a dynamic black and white image using the gradient map adjustment layer.
You can always refine this adjustment layer by experimenting with different gradients. This can dramatically change the feel of your photo.
Remember, if you want to revert the changes, just use the undo brush tool in the history panel.
Bringing Back Color with Layer Masks
Here’s the magic part ,adding a color splash effect.
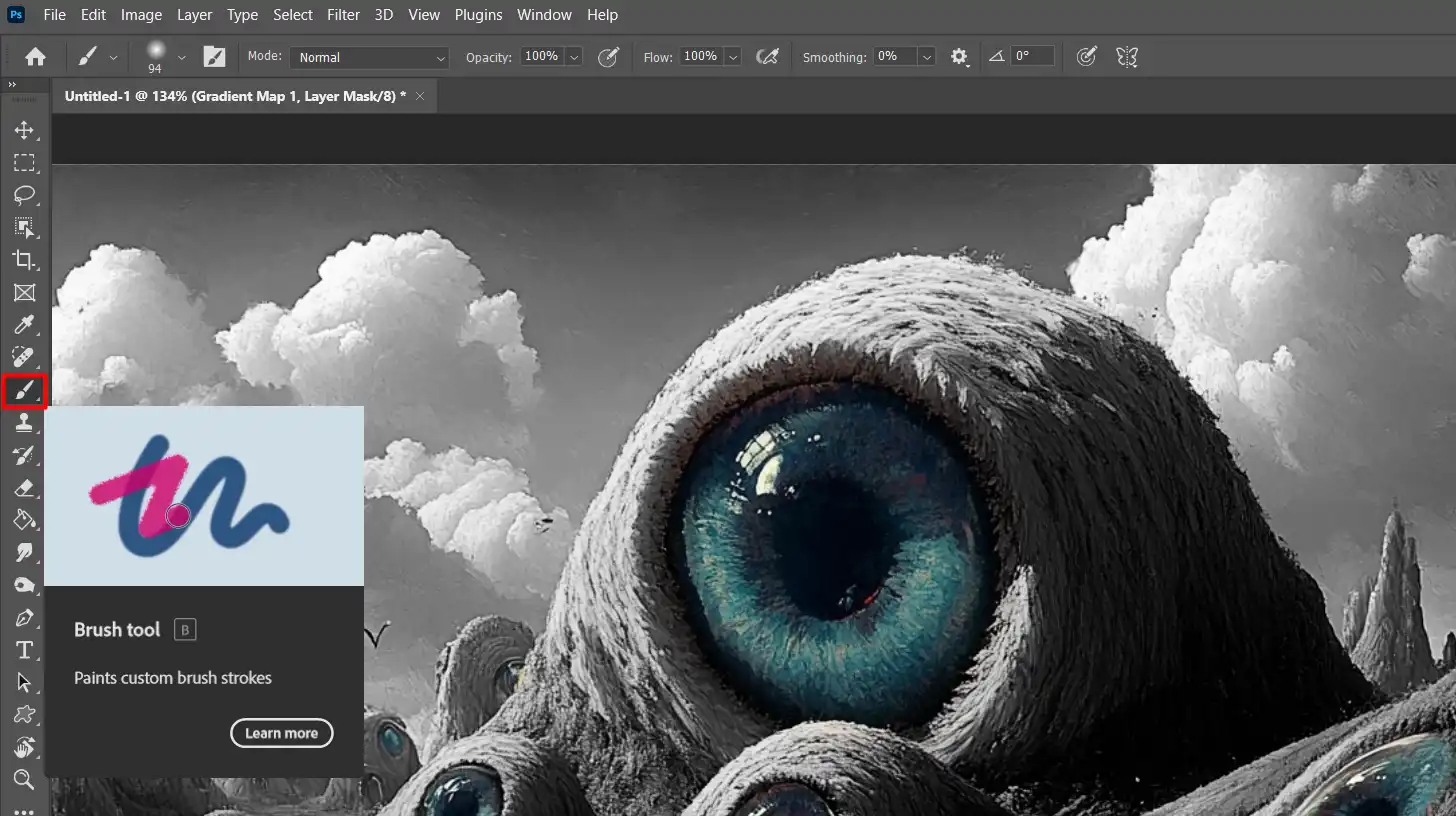
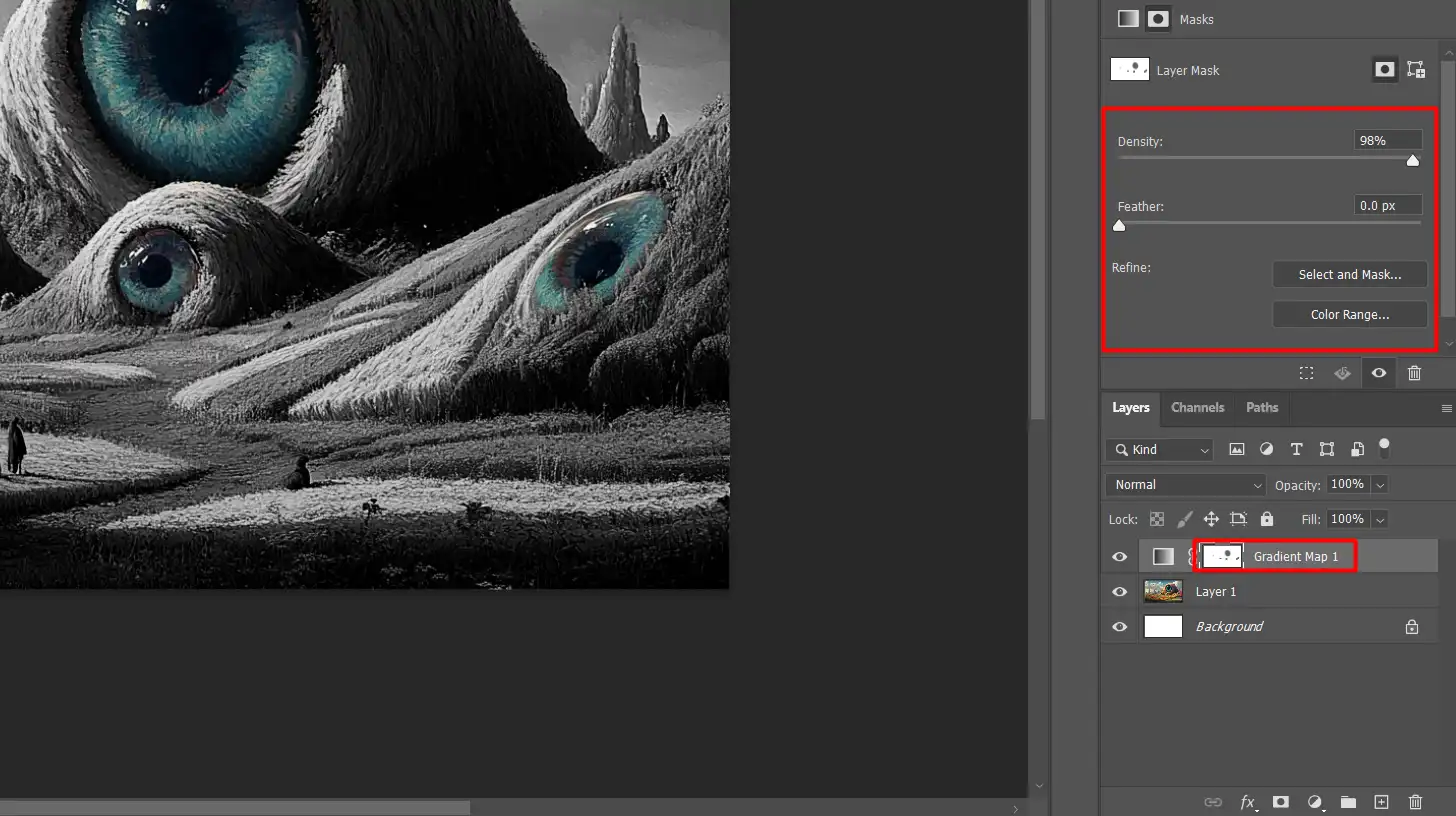
With your gradient map adjustment layer selected, click on the layer mask icon in the layers panel.
Select the brushtools and make sure your foreground color is black. This allows you to paint over areas of your image where you want color to reappear.
Pro tip: Use the left bracket key to decrease brush size and the right bracket key to increase brush size. This helps in detailing your color splash effect.
With the brush tool selected, carefully paint over the areas where you want the original colors to show through. Make sure the brush tools is selected for precise control over your adjustments.
Fine-Tuning With Brush Tool Settings
Doing some clean-up work? Adjust the brush hardness for more precise edges. Soft brushes blend colors seamlessly, while hard brushes keep the lines sharp.
The density slider in the properties panel allows you to control how strong the colorsplasheffect is on your image.
Saving Your Masterpiece
Once you’re happy with your colorful creation, go to File > Save As. Choose your format, and don’t forget to name your file.
Your vision is now a beautifully crafted reality.
Enhancing With Color Splas and Adjustment Layers
For an extra pop, consider adding a gradient map adjustment layer or other types of adjustment layer to boost vibrancy. These small tweaks can make your image even more compelling.
Pro Tip: Always save a copy of the original image before making edits. This way, you can always go back if needed.
You’ll master that color splash effect in Photoshop in no time.
Creating the Color Splash Effect
To create the color splash effect, apply a gradient map adjustment layer to convert your image to black and white, then use a layer mask to selectively paint back the vibrant colors.
Converting to Black and White
Convert to black and white, use a gradient map adjustment layer to transform your image while maintaining control over how colors are displayed in the final monochrome effect.
Using Gradient Map Adjustment Layer
First, open your photo in Photoshop. Navigate to the top menu and choose to add a gradient map adjustment layer.
This will convert your image to black and white. The gradient map tool maps the light and dark values of the image to the gradient, giving you a base black and white photo.
Now, let’s move on to the fun part, adding colors.
Adding Color Back to Selected Areas
To add color back to selected areas, use a layer mask with a brush tool to paint over the areas where you want to reveal the original hues, adjusting the brush size and opacity for precision.
Colorizing black and white images can bring new life to your monochrome photos. Learn how to seamlessly add color and enhance depth while preserving the essence of black and white.
Using the Brush Tool
We use the brush tool for selective coloring. First, ensure the layer mask of the black and white adjustment layer is selected.
With the foreground color set to black, paint over the areas where you want the original colors to show through.
Adjusting the brush hardness and size using the left bracket key or the properties panel, you control the effect precisely.
This process is ideal for achieving the color splash effect.
For a polished result, refine the areas on the layers panel and adjust the background colors as needed to complement the black and white adjustment layer.
Fine-Tuning the Color Splash Effects
These tweaks will help you enhance the overall impact of your color splash effect, resulting in a polished and visually appealing final image.
Adjusting the Layers Panel
In the layers panel, make sure to adjust the settings of your layers for a smooth final image.
Use the density slider to fine-tune how much color shows through. This slider plays a crucial role in controlling the transparency of the layer mask.
Tweak additional adjustment layer if necessary to enhance picture vibrancy. This will add that extra pop to your photo.
Remember to save your masterpiece by selecting File > Save As and choosing your desired format. Try various background colors to see what fits best with your selectively colored image.
Pro Tip: Always save a copy of the original image before editing. This way, you can always start fresh if needed.
A photoshop tutorial is an excellent way to get hands-on experience with different techniques.
There you have it, a quick way to create color splashes in photoshop.
Incorporating a reflection in water can enhance the color splash effect by adding depth and interest to your images. This technique creates a dynamic visual contrast, making your colors stand out even more.
Enjoy creating those vibrant photos!
Saving and Exporting Your Image
By now, you’ve made some awesome edits to your photo.
Understanding how to save and export in the right format is the final step.
Here are some formats and their uses:
Format
Best For
File Size
Quality
Transparency
JPEG
Web use, social media
Small
Good
No
PNG
Web use with transparency
Medium
Excellent
Yes
TIFF
High-quality prints
Large
Excellent
No
PSD
Editing in Photoshop
Large
Excellent
No
Saving Your Project File
First things first, saving your project file. In Photoshop, this means saving it as a .PSD file.
This format keeps all your layers intact.
Go to “File” and select “Save As” Choose the destination folder and type in a name.
Save often to avoid losing any work. If you’re using a lot of adjustment layer and edits, frequent saving becomes even more essential.
Exporting for Web and Print
Once you’re satisfied with your edits, it’s time to export for sharing or printing.
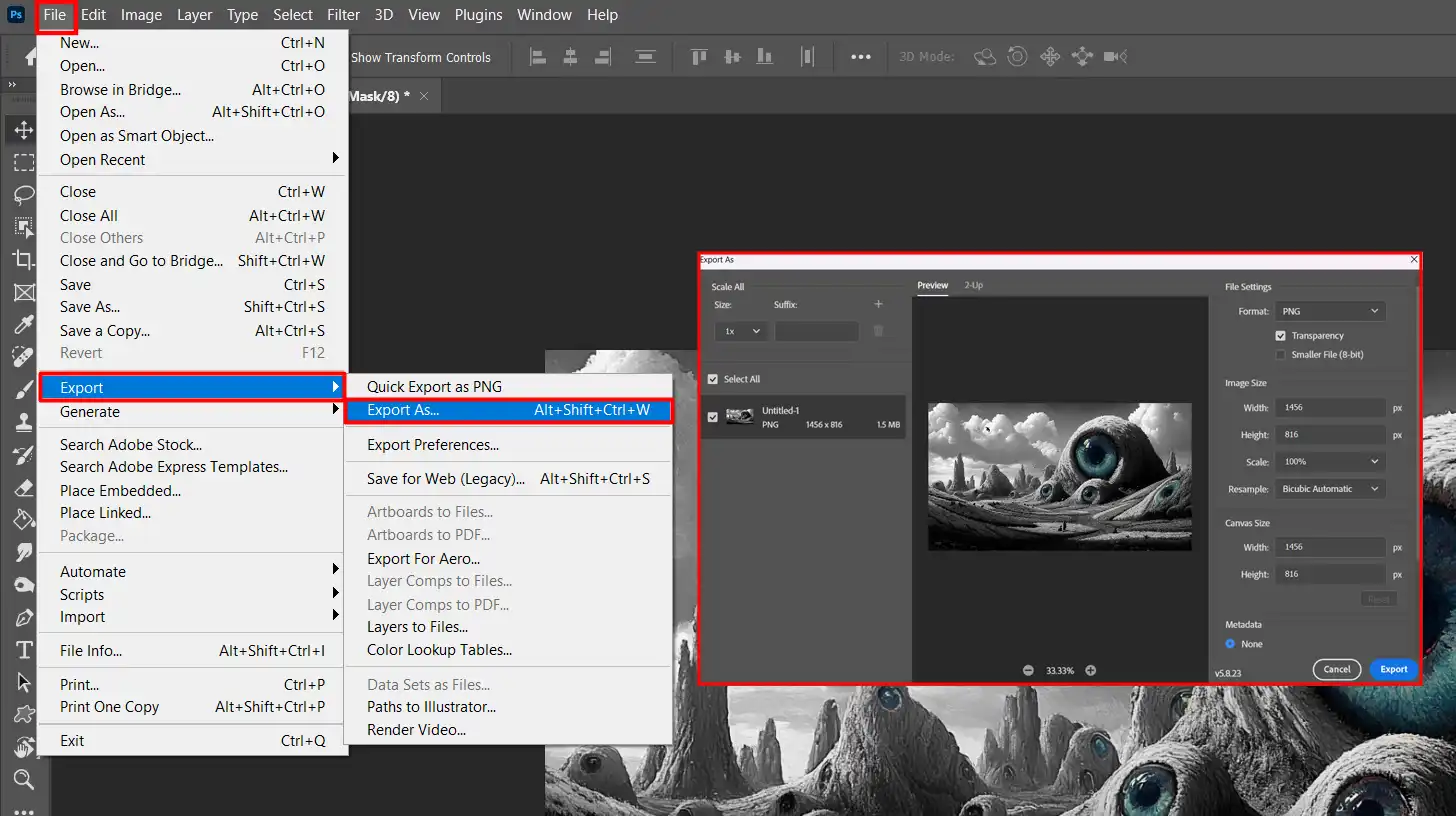
For web use, go to “File” and choose “Export As” Pick JPEG or PNG based on your need. Use the properties panel for further tweaks.
Ensure the resolution is set to 72 DPI for the web. Adjust the quality slider to balance file size and image clarity. For print, things are a little different.
Go to “File” then “Save As” Choose TIFFor high-resolution JPEG. Set resolution to 300 DPI. High resolution ensures your print looks crisp.
Color management also matters. If you have multiple versions of the same image, use background colors to make each file distinct.
This makes it easier to identify later.
Pro Tip: Use a gradient map adjustment layer to tweak colors before exporting. It can enhance vibrancy and make the image pop!
This technique allows you to adjust the selective color and fine-tune the background colors, ensuring a more dynamic and visually striking result.
Advanced Tips and Tricks for Color Splash Effects
These advanced techniques will help you push the boundaries of your color splash effects, creating striking and professional-looking images.
Using Layer Masks for Precision
Enhance your workflow by capitalizing on the layer mask. It adds more control over your edits. The layer mask works by hiding parts of your image without permanently erasing them.
Activate the layer mask then paint with black to hide and white to show. Your foreground color should be set to one of these.
By understanding how a layer mask functions, you gain mastery in isolating specific areas requiring effect modifications. Just think about it as a fancy eraser that you can change with double clicking.
Balancing white color is crucial when working with black and white images.
Adjusting white balance ensures your monochrome conversions retain accurate tones and contrast.
Combining Multiple Color Splashes
Create stunning artwork with multiple color splashes. Begin by converting your image to a black and white image. After that, choose the brush tool to paint color onto sections of your image.
By experimenting with colors and gradient map, you generate a surprising layered look.
Combining colors effectively makes the resultant image more vivid. It frequently requires practice to strike the right balance and seamless integration with other elements.
For a quick and efficient way to handle black and white conversions in Photoshop, explore essential black and white shortcuts. These time-saving techniques streamline the process, enhancing your editing workflow.
Adding Textures and Overlays
Textures add dynamism. Load textures as new layers. Set your blend modedifferently such as Overlay or Soft Light, depending on the outcome you desire.
Play with opacity for subtlety.
Explore various filters to refine texture appearance on your projects. Add overlays to enrich scenes with context-specific details. For additional creative control, consider using the patch tool in Photoshop to seamlessly integrate textures.
Experimenting with Different Brushes
The brush tool is integral to creative editing. With the brush tool selected, you can choose from different presets, from soft strokes to grunge effects.
Each brush allows for diverse expressions.
To achieve the best results, ensure the brush tool is selected and switch default colors or refine your settings to match the foreground color with special brush impacts.
Use the brush tools effectively by sampling brush tips from numerous digital sources for specific needs.
Additionally, adjust the density slider to control the opacity and flow of your brush strokes for more precise editing.
and fine-tune the selective color to perfect your overall image.
Frequently Asked Questions (FAQs)
How to do color splash in Photoshop?
Open your image in Photoshop.
Select the area where you want to apply the color splash using tools like Quick Selection or Lasso.
Desaturate the selected area to remove color, usually by adjusting the saturation levels to zero.
Refine the edges of your selection to ensure the colored areas are well-defined.
What is the splash color technique?
The splash color technique involves highlighting specific areas of an image in color while the rest remains black and white.
This technique draws attention to certain elements, making them stand out vividly against a muted background.
What is the color splash effect?
The color splash effect in Photoshop is a visual technique where one part of an image is shown in color, while the rest is in grayscale.
It emphasizes emotion or importance of the colored parts and is often used for artistic effect in photography and graphic design.
How do you fix a color spill in Photoshop?
To fix a color spill, select the 'Color Replacement Tool' from the toolbar.
Adjust the brush settings to match the tone and size of the spill area.
Gently paint over the spilled color to blend it with the desired background colors.
Use the 'Clone Stamp Tool' if needed to clean up any remaining spill.
In conclusion, creating color splashes in Photoshop is a fun and effective way to make your photos stand out.
By following the steps to prepare your image, use gradient maps, and add color back with layer masks, you can achieve stunning effects with just a few simple techniques.
I’ve found that experimenting with these methods can really enhance the impact of your images. If you’re looking to dive deeper into Photoshop or Lightroom, check out my Photoshop Course and Lightroom Course.
$2,061.00Original price was: $2,061.00.$1,061.00Current price is: $1,061.00. 27583
Download Your Free Guide Now!
Discover the secrets of photography with our printable guide! Master essential techniques like aperture, shutter speed, and ISO to create stunning images. Get your free printable PDF now and start turning your snapshots into masterpieces!