The color replacement tool in Photoshop and Lightroom is a powerful feature for transforming images.
In this post we’ll show you how to use it even if you’re a complete beginner in design or just want to touch up your personal photos!
Let’s get into it.
Table of Contents
How to Resize Images in Photoshop Using Color Replacement Tool
Resizing images is a common task. But, did you know you can also use the color replacement tool to your advantage?
This versatile tool ensures that as you alter your image’s dimensions, you can simultaneously refine or change its colors for better integration and results.
Step-by-Step Guide to Resize and Replace Colors
1. Open Your Image: Start by loading your photo into Photoshop. Ensure it’s set to the right layer if working with multiple layers.
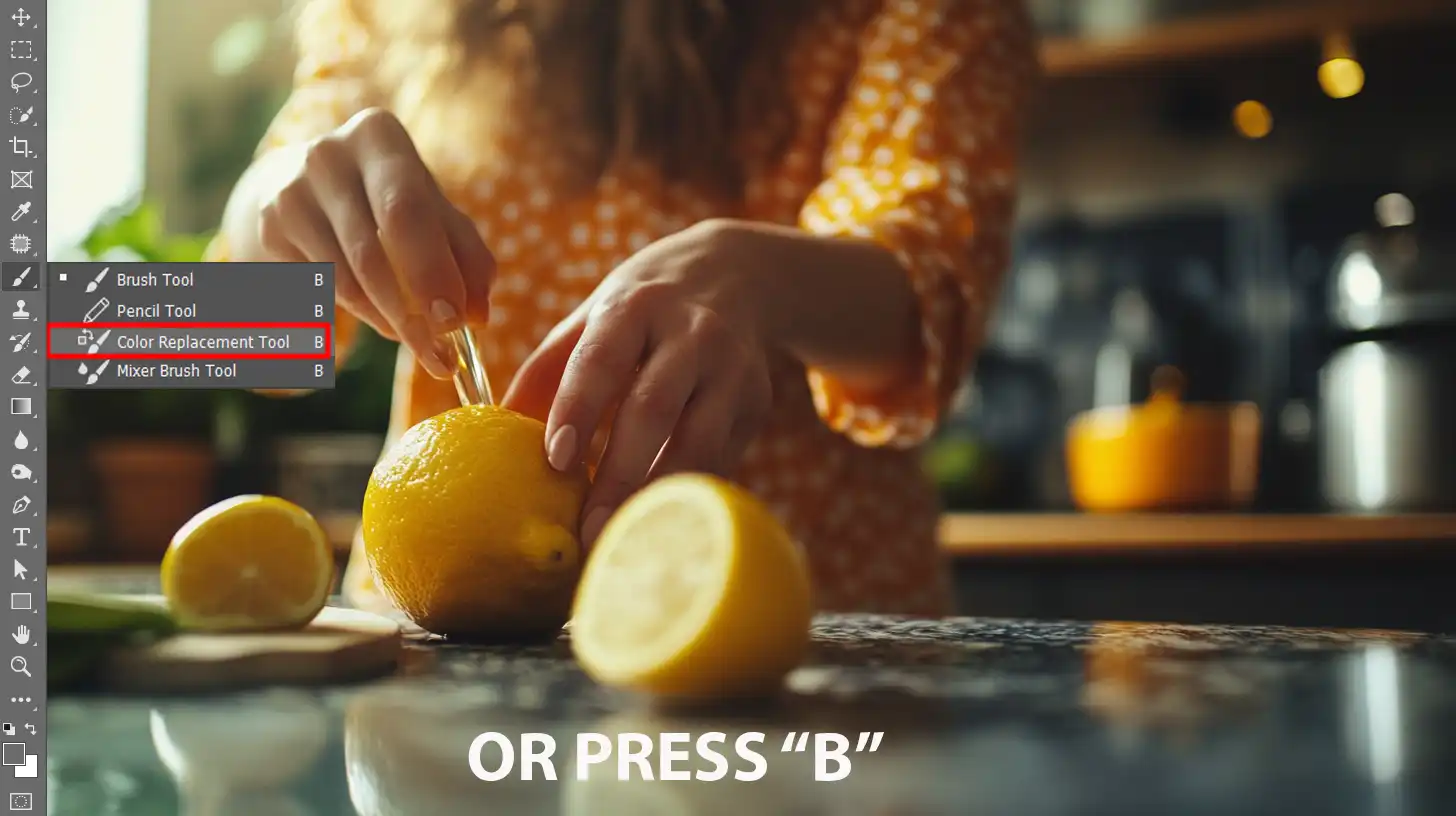
2. Select the Color Replacement Tool: Find this tool nested under the brush on the toolbar or simply type ‘B’ for a shortcut and hold to navigate.
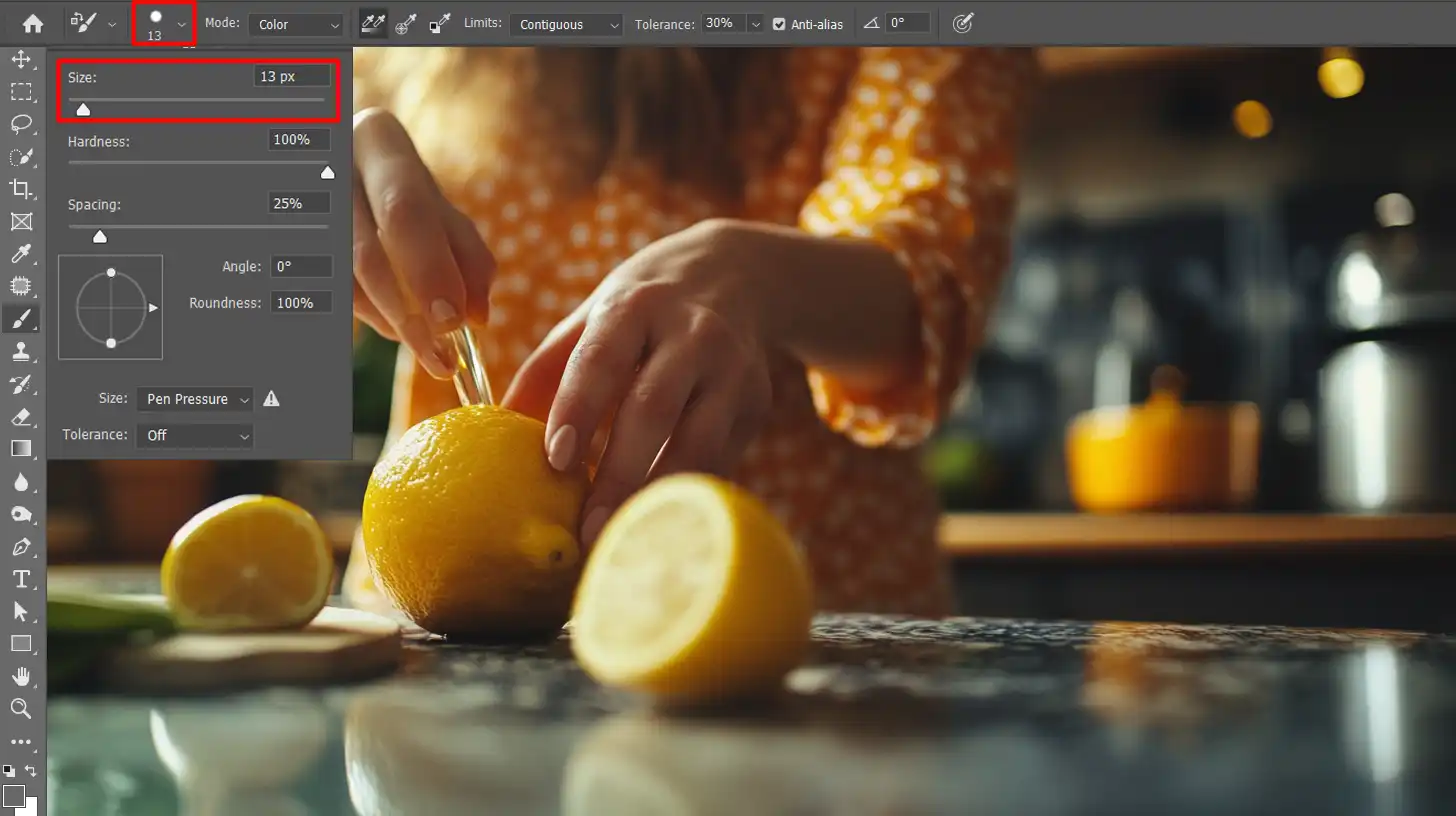
3. Set Brush Properties: Adjust your brush size according to the area of color intervention needed, ensuring to modify brush edges subtly for smoother transitions.
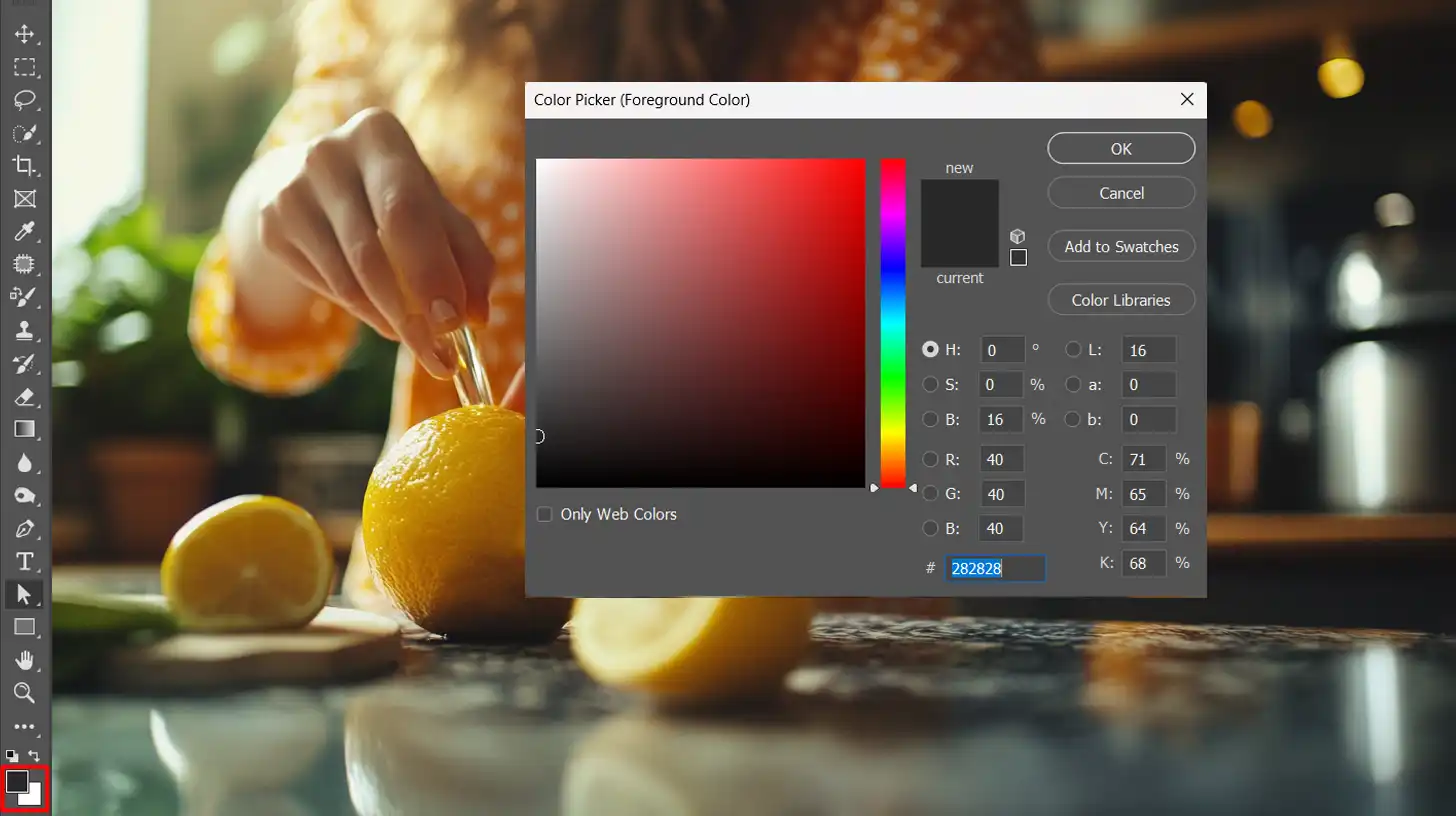
4. Choose Your Foreground Color: Use the ‘color picker’ from the options bar to select a new foreground color aim for an eye-catching shade that suits your project needs.
5. Apply New Color: Click and drag over areas where color adjustment is desired, delicately blending the new hues with existing tones for an effortless transition.
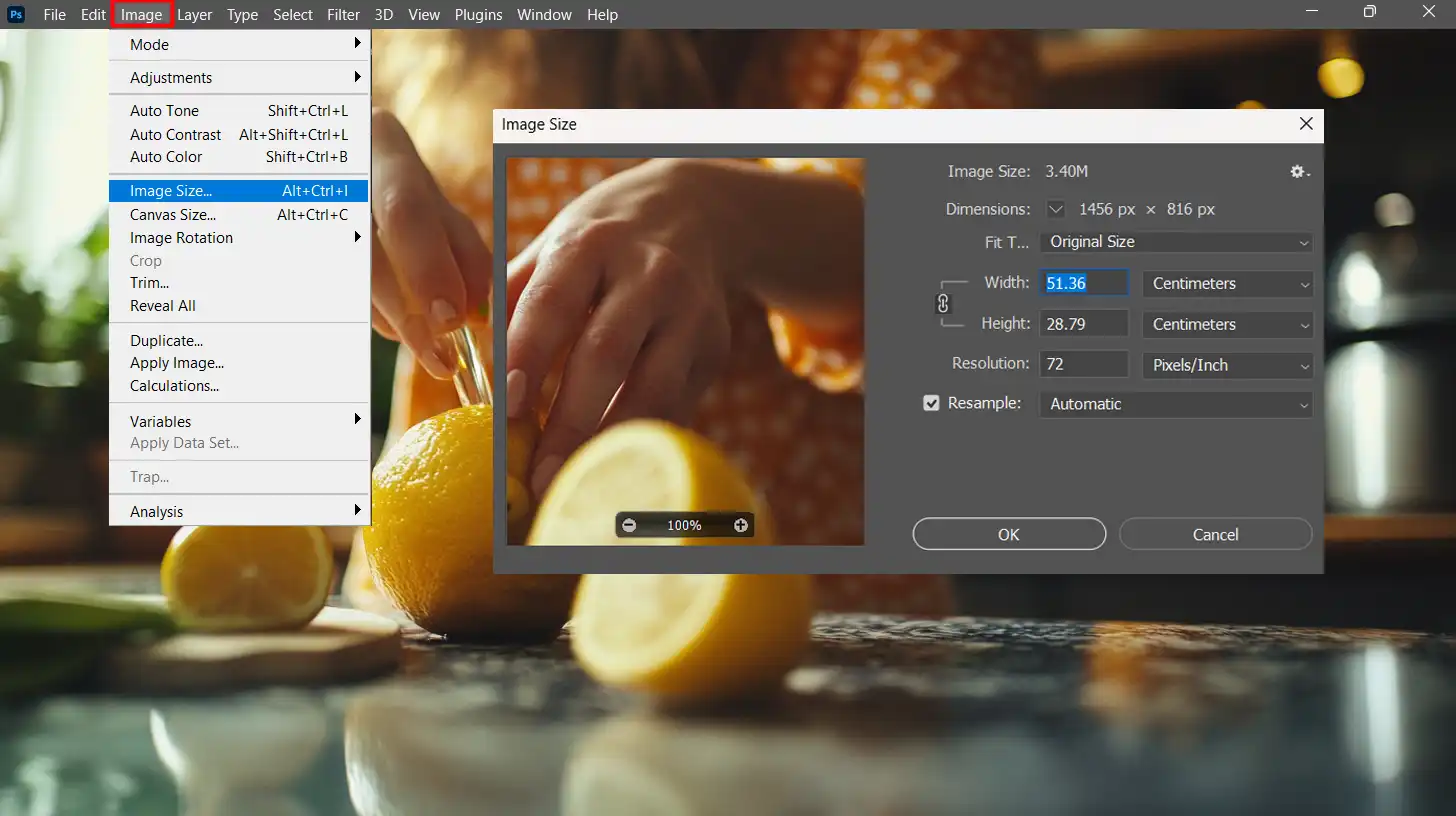
6. Resize Image: Post color adjustments go to ‘Image‘, then ‘Image Size’. Alter dimensions as required be sure to maintain aspect ratio.
For added convenience, you can also utilize Photoshop shortcuts to speed up your workflow. Using shortcuts like ‘Ctrl+T‘ for free transform and resizing your image is particularly useful.
Optimizing Image Quality Post-Resizing
After resizing and changing colors in an image:
- Check pixel integrity: Zoom in to inspect any irregularities or quality loss; undo changes if necessary before applying other corrections.
- Enhance sharpening lightly: Navigate ‘Filters’ > ‘Sharpen’ > ‘Unsharp Mask’. Apply minimally as excessive use might make lines too harsh introducing artifacts especially on resized photos.
- Consider using "Adjust Levels" or "Curves" from adjustments panel gently lift up shadows richen some parts balancing overall tone.
Optimizing not only retains but enhances original photo quality granting adept adaptability irrespective initial condition!
Enhance your skills in mastering image quality by optimizing image quality post-resizing. Discover techniques to preserve clarity and detail, ensuring your resized images maintain their stunning appearance.
Troubleshooting Common Issues with Color Replacement Tool
Some common challenges when using this method include:
| Issue | Solution |
|---|---|
| Color Bleed | Set the ‘Tolerance slider’ at lower numbers to preserve more border definition, ensuring original hues remain intact through multiple layers and merge seamlessly on the final canvas. |
| Inconsistent Brush Strokes | Practice applying the brush steadily and take time to allow the natural flow of the process to build up gradually, creating a grand and memorable display. |
| Unwanted Residuals Post Resize | Make adjustments to remove stray pixels on a clear canvas, reclaiming the pristine base for a magical creation journey. |
Using reduced troubleshooting increases efficiency, refines output maximizing usability satisfaction derived crafted masterpiece!
This strategic approach combines resizing with dynamic adjustment ensure that each action enhances rather than compromising the holistic quality fulfilling challenging desires
Advanced Techniques for Color Replacement Tool in Large Images
Large images can be challenging when it comes to color replacement, due to their size and the amount of detail they contain.
Employing advanced techniques can ensure efficient and accurate results without compromising the quality of the original image.
Enhance your color profile in Photoshop to support advanced techniques for the color replacement tool in large images. Accurate profiles ensure seamless and consistent color changes across expansive projects.
Handling High-Resolution Images with the Color Replacement Tool
When dealing with high-resolution images, using a color replacement tool effectively is important.
The eyedropping tool helps in selecting the exact foreground color you want to replace by picking it directly from the image.
Accuracy here is critical to maintain an eye-catching appeal and natural look in your photos.
- Use a color picker that offers precision and flexibility.
- Adjust the tolerance setting on the options bar to manage how similar the replaced colors need to be in relation to your selected sample.
- If changing more extensive areas with similar hues, utilize the "Find Edges" feature within your toolset to protect bordering colors from unwanted changes.
This precision ensures that despite high resolutions, each detail holds its integrity after applying new color, retaining pixel perfection throughout the editing process.
Enhance your editing workflow by mastering 8 bit vs 16 bit comparing color depth and image quality.
Effective handling of high-resolution images with the color replacement tool relies on selecting the appropriate color depth, ensuring your images retain their quality and detail.
Batch Processing Tips for Efficiency
Batch processing is a go-to method when needing to apply color replacement across multiple files efficiently:
- Prepare a preset list of color replacements, including settings like shade, tolerance, and which sampling option works best based on typical requirements.
- Utilize script or action features within your software, like Photoshop’s Actions pane, where you can record an instance of replacing colors in one file and then apply it automatically to others.
- Continually review a sample from every batch before proceeding with this check against any errors propagated during automated processes.
By adopting these strategies, consistency in color tone is maintained across numerous images, resulting in an improved visual coherence of edited images at scale.
These techniques allow you not just changing colors but also enhance details beautifully even in substantial photographic projects, ensuring none of your hard work loses its professional touch during extensive edits.
Pro Tip: If you want to protect your work or brand it, learning how to add watermark is significant. A watermark can be easily added in Photoshop and Lightroom by creating a new text layer or using a logo image.
This ensures your images remain uniquely yours while circulating online or in digital portfolios.
Boost your editing efficiency with batch edit in Lightroom. Learn to apply uniform adjustments to multiple photos simultaneously, ensuring consistency and saving valuable time.
Color Matching and Replacement for Brand Consistency
Brand consistency is significant for maintaining the visual identity of your company. Replacing colors accurately across all your digital assets ensures a uniform brand image that resonates with customers and strengthens brand recall.
Maintain color filter in Photoshop for brand consistency. Consistent color filters help uphold your brand’s visual identity across all images, ensuring a cohesive and professional appearance.
Understanding Color Theory
Before delving into practical applications, it’s important to grasp some basics of color theory. Color harmony is a foundational concept that helps in selecting colors that blend well together, promoting a cohesive look.
- Primary Colors: Red, blue, yellow - the building blocks of all other shades.
- Secondary Colors: Green, orange, purple - created by mixing primary colors.
Using tools like the color picker and understanding properties such as hue, saturation, and brightness are imoprtant.
These tools help in identifying and modifying colors more precisely in your branding materials.
Techniques for Maintaining Brand Colors
Maintaining consistent brand colors across your digital assets is important for a cohesive and recognizable brand identity.
By using specific tools and techniques, you can ensure that every image and design element aligns with your brand’s color palette, creating a unified and professional look.
1. Employing the Color Replacement Tool
The replacement tool in photo editing software is invaluable for tweaking colors without disturbing the shading and lighting of the images.
It allows you to pinpoint specific areas where brand colors must be consistent and apply modifications efficiently.
How does it work?
- Choose the tool from your toolbox.
- Select your desired (foreground color) to replace existing hues in an image.
- Adjust settings like tolerance to refine how selective the color change should be based on similar colors around it.
This tool is especially useful when working with complex images where manual color correction would be cumbersome.
2. Utilizing Eyedropper & Brush Tool
To ensure precision:
- Use the eyedropper tool to select an exact match from a standard color palette or any part of your layout.
- Once selected, use this sample as your new base reference using brush or fill techniques across various design elements.
This method ensures that all replacements or additions maintain uniformity with your predefined brand palette, which is significant for creating a professional appearance that adheres rigidly to corporate styling guidelines.
By leveraging these advanced tools within software solutions like Photoshop or Lightroom, marketers can ensure their creative outputs reflect their branded visuals accurately ultimately boosting consumer trust through visual consistency across all platforms!
Integrating Color Replacement Tool with Other Photoshop Features
The color replacement tool is a powerful asset in Photoshop, ideal for modifying hues in your photos without losing texture and shadows.
Here’s how you can enhance your editing workflow by integrating the color replacement tool with other important Photoshop functionalities.
Combining with Photoshop Actions
Harnessing the power of Photoshop actions can streamline complex editing tasks involving the replace color tool.
By recording an action that includes specific arrangements of this tool, such as tolerance setting, sampling option, and desired foreground color, you can automate repetitive tasks.
Steps to Combine:
- Open the Actions panel and start a new action.
- Apply the color replacement tool with your chosen arrangement.
- Stop recording the action once complete.
This technique not only saves time but also ensures consistency in how colors are replaced throughout your project, enhancing both efficiency and outcome quality.
Leveraging Layers for Complex Edits
For more intricate edits, using layers in conjunction with the color replacement tool offers unmatched control.
Create a new layer from the background swatch where you would apply changes, preserving the image intact beneath it.
Important Advantages:
- Non-destructive Editing: The original photo remains untouched.
- Multiple Adjustments: Layer different instances of color modifications to achieve a composite effect.
Begin by duplicating the target image layer and selecting this duplicate layer while utilizing the color replacement tool to adjust as necessary.
Gradually build up alterations by adding further adjustment layers or employing masks to refine areas affected by changed colors or newly sampled hues based on your creative needs.
Both leveraging actions and resizing layers afford flexibilities but using them requires practice.
However, once mastered, these techniques will undoubtedly elevate your photo editing skills and expand what you can achieve visually in Adobe Photoshop.
Automating Tasks Using the Color Replacement Tool
Automating repetitive tasks can significantly enhance your workflow, allowing more time for creative aspects of your photography or graphic design projects.
Utilizing the Color Replacement Tool is an excellent way of automating the color adjustment process, ensuring consistency across multiple images.
Scripting in Photoshop for Automation
Photoshop scripts can help you automate complex or repetitive tasks, including color replacements. By writing a simple script using JavaScript, you can command Photoshop to identify and replace colors in photos automatically.
For instance, integrating functions involving the eyedropping tool to sample source colors and then executing a series of commands that apply these new colors to specified areas.
Such automation is especially useful when needing a consistent look across many images without manually adjusting each one.
A common application could be updating product images to display various color options without reshooting each variant.
Automated Color Correction Workflows with Color Picker
Developing an automated workflow for color correction ensures that all your photos meet certain standards before final editing touches.
With the Color Replacement Tool, you initiate this by having parameters around which hues need adjustment.
The color picker aids in defining precisely what replacement color should be applied, while options like tolerance levels and limits can be predefined to handle variations in lighting or shadow.
This method lets artists quickly enhance colors, like turning a dull sky vibrant, using presets for faster, desired results.
Pro Tip: To learn how to make sky edits, use the Color Replacement Tool in combination with gradient adjustments and layer masks.
This approach allows you to replace or enhance sky colors smoothly, making them more vivid and appealing, ensuring that every sky edit appears natural and professionally done.
Optimizing Workflow with Custom Presets in Color Replacement Tools
Custom presets in color replacement tools can significantly streamline your photo editing workflow, allowing you to apply preferred settings.
This efficiency not only saves time but also ensures a consistent style across your projects, enhancing the appeal of your photographs.
Creating and Managing Presets with the Eyedropper tool
Creating custom presets with tools like the eyedropper tool or color picker starts by finding a combination of settings that suits a specific look or project requirement to remove an object.
Typically, you’d start by using the eyedropper tool to select a source color that forms the basis of your editing framework.
Once you have established your desired baseline, for example, shifting all shades of blue to a warmer shade, you can save these settings as a preset.
It’s important to organize these presets meaningfully. Name them according to their effect or usage context, such as “Summer Warmth” or “Desaturated Blues,” which immediately gives an idea of the replacement color effects.
Here’s how you might structure this setup:
- Select the base photo using the eyedropper tool.
- Use the brush tool for precision areas if required.
- Adjust the hue and saturation through the color picker until you have achieved the desired tone.
- Save these arrangements under an easy-to-remember name in your software’s preset panel accessed via the “options bar”.
Best Practices for Preset Utilization
To maximize their benefit, it’s important to use these presets judiciously:
- Apply Contextually: Use different presets crafted for varying lighting conditions or subjects within your images.
- Adjust and Adapt: While presets offer a great starting point, they should be adjusted per image specifics, not one size fits all.
- Review Changes: Always review every change through side-by-side comparisons with bones before applying presets on batch images.
Although presets save time on recurrent tasks like replacing colors, the dynamic range of each individual photo must still be considered independently to achieve optimal results (finished result).
Thus having a collection that covers a broader range is beneficial but keeping in tune with manual adjustments when needed can’t be understated.
By changing your presets you achieve a balance of speed, precision, and quality in photo editing.
Case Studies: Successful Color Replacement Projects
Exploring how professionals have handled successful color replacement projects can provide invaluable insights for both beginners and experts in the field of photography and image editing.
These case studies highlight the role practical applications play in mastering digital editing techniques.
Real-World Examples and Learning
Delving into real-world scenarios where replacing color strategies is significant reveals various innovative approaches photographers and designers adopt.
For instance, consider a campaign where replaced colors transformed a fashion brand’s online catalog look.
Advanced tools like Photoshop enabled artists to sample a background swatch from accessories on models.
Practical Case
In one particular project, an automobile manufacturer wanted to showcase their vehicle in different environments.
The original photo displayed the car in a standard white, but using skilled techniques, designers sampled color directly from sundown scenes, effectively placing that same car into a vibrant sunset scenario and catching new customer segments’ interest.
Improve your photos by learning how to adjust white balance. Correcting white balance ensures accurate colors and enhances image quality for more natural, professional-looking results.
Analysis of Techniques Used in Different Cases
The process of achieving accurate and aesthetically pleasing results varies significantly depending on the images’ complexity or desired outcome.
It is critical to analyze which methods bring success under different conditions.
Technique Overview
For example:
- Finding Edges: When working with detailed objects where clear separation is necessary.
- Sampling New Color: Getting perfect tone matches using eyedropping tools.
- Using Source Color as Guide: Ensuring consistency across variations by keeping reference shades.
Each technique requires careful adjustment and precise control over aspects such as hue, saturation, and lightness to create or change colors effectively while maintaining realism.
Frequently Asked Questions

How do I replace one color with another in a picture?
To replace one color with another, first select the color replacement tool from your editing software. Then, choose the replacement color using the color picker.
Adjust the brush size for precision and use the eyedropper tool to select the source color you wish to replace.
What is the AI tool to replace Photoshop color change tool?
AI color replacement tools use artificial intelligence to detect and replace colors in a photo with precision and flexibility.
These tools analyze the image to understand context, making replacing colors or adjusting shades more intuitive.
They often provide options to fine-tune the results, such as adjusting tolerance settings and sampling options, leading to a perfect finish with an eye-catching appeal.

Conclusion
In my personal experience, mastering the color replacement tool in Photoshop has transformed the way I approach photo editing.
Recently, I took a series of landscape photos during a particularly overcast day.
The images were technically fine but lacked the vibrancy I desired. This simple yet effective technique helped elevate my photos from ordinary to extraordinary.
For those looking to refine their photo editing skills or explore the vast potential of tools like Adobe Photoshop and Lightroom, I highly recommend checking out the comprehensive courses available at Photoshop Course and Lightroom Course.
These resources are invaluable for anyone from beginners to seasoned professionals seeking to enhance their digital imagery.
Unlock your creative potential today and see where these skills can take you!
Read more about Photoshop:


Course

Light Effect Photoshop


Lightroom Course 2025

Adobe Photoshop Course 2025

Photo Editing Course


