Change Photoshop to Automatically Save Recovery Every 15 Minutes
Change Photoshop to Automatically Save Recovery Every 15 Minutes
How to change Photoshop to save recovery information every15 minutes automatically is a lifesaver for anyone who’s spent hours perfecting an image, only for Photoshop to crash unexpectedly.
No matter what happens, imagine never losing more than a few minutes of work.
In this guide, I’ll show you how to enable this crucial auto-save feature in just a few simple steps.
You’ll discover how to safeguard your projects from unexpected disruptions, ensuring a seamless and stress-free editing experience. Let’s dive in and make sure your hard work is always protected!
Table of Contents
Why Photoshop Auto-Save Matters
Where multitasking and managing numerous files is a must, the auto-save feature has become an essential tool.
The risk of losing hours of work due to unexpected crashes or power outages is always present.
Saves Time and Effort
Imagine working on an image for hours, making every pixel perfect. Then Photoshop suddenly crashes and your computer restarts without warning.
Without the automatically save function, all is lost. But when you enable auto save, your files are automatically saved in the background of the software, making your workflow easier.
Resumes Work Seamlessly
The following table compares key aspects of working with and without automatically save, highlighting how this feature can save time and effort, ensure work continuity, and improve crash handling.
Feature
Without Auto-Save
With Auto-Save
Time and Effort
Manual saving required, risk of losing work
Automatic saves, minimal risk of losing work
Work Continuity
Work may be lost, disrupting workflow
Seamless continuation from last auto-save point
Crash Handling
No recovery options, work lost
Creates recovery files, Photoshop can recover work
When your PSD file is saved frequently, you never lose over a few minutes of changes. You can continue working right from where you left off.
This ensures consistency in your workflow.
Preferences for Personalization
In Photoshop, you can customize how often your document is saved in the background. By changing the file handling preferences, you can set it to save recovery information every 15 minutes automatically.
Pro Tip: Enable Auto Save and change Photoshop to automatically save backup information every 15 minutes
Open Photoshop and go to the Edit menus.
Navigate to File Handling and check the box for automatically save.
This simple step can be a lifesaver.
Remember: Always activate the automatically save feature to avoid unnecessary disruptions and safeguard your creativity
Step-by-Step Guide to Enable Auto-Save Feature in Photoshop
Open Photoshop Preferences
First, open Photoshop. Click on “Edit” in the top menu bar. Then, select “Preferences” at the bottom. On a Mac, this might be under the “Photoshop” menu.
Navigate to File Handling
In Preferences, find the File Handling section. This is where you adjust settings to save files.
Set Auto-Save Interval to 15 Minutes
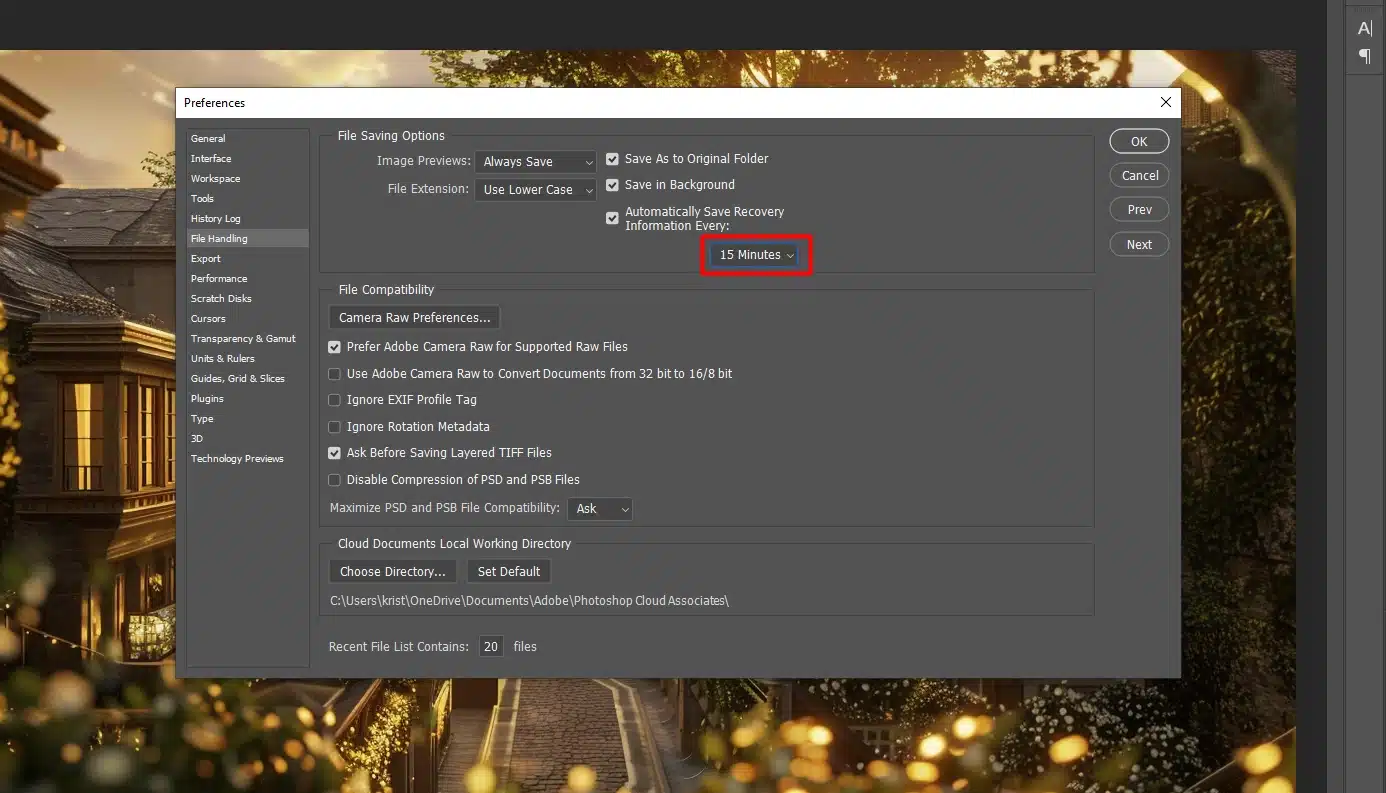
In File Handling, look for the option to save backup information automatically. Change the interval to every 15 minutes. This helps you avoid losing much progress.
Save Your Settings
After setting the interval, click “OK” to save your settings. This turns on the automatically save function in Photoshop.
You should also consider enhancing your Photoshop skills further.
Check out this detailed guide on ‘Selection Tools in Photoshop: Mastering the Basics for stunning edits to improve your editing techniques.
Auto-Save Feature Tip
Regularly back up your main folder for saved files. It can save you from unexpected data loss. Additionally, familiarize yourself with essential tools in Photoshop to enhance your workflow efficiency.
Additionally, familiarize yourself with essential tools in Photoshop to enhance your workflow efficiency.
To further complement your skills in Adobe software, lens correction in Lightroom provides invaluable insights on improving your photo editing workflow.
Quick Steps Recap:
Open AdobePhotoshop
Go to "Edit"> "Preferences" (or "Photoshop" on Mac)
Find "File Handling"
Set automatically save to 15 minutes
Click "OK" to save settings
And there you have it! You’re now protected from losing your hard work.
Enhancing Workflow Efficiency with Photoshop's Auto-Save Feature
Photoshop’s automatically save feature is a game-changer for maintaining workflow efficiency.
By enabling automatically save, each layer and its adjustments are automatically saved, ensuring that your layers remain intact even during unexpected crashes.
This feature allows you to recover your progress seamlessly, so you can create without worrying about losing your work.
When working on detailed photos, auto-save ensures that your edits are preserved, preventing the loss of intricate adjustments.
Additionally, regularly saving your photos manually complements the automatically save feature. Adding comments to your layer adjustments helps keep track of changes, enhancing organization.
With automatically save, you can quickly recover your work, allowing you to focus on creativity and productivity. Utilize this feature to safeguard your created projects and maintain a smooth workflow.
After setting up automatically save to protect your work, mastering basic navigation tools in Photoshop will further enhance your editing skills.
Beginners looking to learn how to effectively zoom in on their projects can find valuable tips in our guide, how to zoom In on Adobe Photoshop.
Troubleshooting Common Issues
Encountering technical issues can be frustrating, especially when you’re in the middle of an important task.
However, understanding how to troubleshoot common problems can save you time and stress.
Steps to Enable Auto-Save in Photoshop
First, open Photoshop app on you PC. Go to the top menu and click “Edit.” Then, navigate to “Preferences” and open the “File Handling” section.
Ensure that the “Autosave feature” is enabled and set to save backup information every 15 minutes. This simple action saves you a lot of headaches down the line.
Steps for Mac Users: Change Photoshop to automatically save recovery information every 15 minutes
If you’re on a MacOS, the process is similar. Click “Photoshop” in the menu bar, then select “Preferences”.
Follow the same steps as above.
This adjustment makes sure your files are saved automatically, reducing the risk of lost work.
Additional Tips for Auto-Save Function
Still not working? Check if your computer’s storage isn’t full.
An entire hard drive might prevent the auto-save function from working properly. Create space if needed and try again.
Pro Tip: Regularly check your settings to ensure they haven’t been accidentally changed or reset.
Photoshop Crashing Frequently
Nothing is more frustrating than Photoshop crashing frequently. Here’s what you should do!
Check System Requirements
First, check your system requirements. Photoshop needs a certain amount of RAM and disk space to function smoothly.
Ensuring your computer meets these requirements is critical.
Disable Plugins and Extensions
Sometimes, plugins and extensions can cause crashes. Temporarily disable them to see if this solves the issue.
Launch Photoshop in Safe Mode by holding down the Shift key while starting the program.
This loads Photoshop without third-party plugins.
Keep Photoshop Updated
Update Photoshop and Lightroom versions regularly. Adobe releases updates that fix bugs and improve stability.
Keeping your software up-to-date helps minimize crashes.
Optimize Large Files
If your files are large PSDs, try optimizing them. Reduce the number of layers or flatten them.
This can make theprocess smoother and prevent overload. Additionally, consider cleaning up your scratch disk.
A cluttered scratch disk leads to performance issues, including crashes.
Also, check for any corrupted images within your projects. They can disrupt the flow and cause crashes. If identified, remove and re-add images.
Reinstall Photoshop
If none of these solutions work, consider reinstalling Photoshop. This can often solve larger issues and refresh the program.
Backup Regularly
Pro Tip: Backup your PSD file regularly. Create a habit of saving your work in a different folder to avoid data loss when unexpected crashes occur. That’s the point of the auto preserve option feature.
Using Photoshop Shortcuts can speed up this process, and tools like content-aware fill can enhance your editing efficiency.
How To Access Auto-Saved Projects
Alright, let’s make this easy. Auto-saving your work in Photoshop is like having an assistant who saves, notes, and loads your progress while you focus on being creative.
This way, if something goes wrong like a crash so you don’t lose hours of work. Here’s how to access those auto-saved projects.
Backup Your Files
Backing up your work is smart. It’s like insurance for your creativity.
When you back up your files, you make sure that you have copies of important documents stored safely away from your primary working folder.
Steps to Find Auto-Saved Documents:
First, find the folder where your auto-saved documents are kept. By default, Photoshop saves recovery file in a specified directory. But it’s good practice to know how to locate it.
For Windows Users:
Navigate to the “Edit” menu, choose “Preferences,” and then “File Handling.” You’ll see the option to change Photoshop to automaticallysave recovery information every 15 minutes. This ensures minimal data loss if you restart your computer or encounter other issues.
For MacOS Users:
Select “Photoshop” from the top menu, then “Preferences,” followed by “File Handling.” You want it set so that even if the system crashes, your latest edits are not entirely lost.
Frequently Asked Questions
How do you make Photoshop save recovery information every 15 minutes?
Tweak the save recovery options in few steps:
Open Photoshop
Go to Edit > Preferences > File Handling.
Under the 'File Saving Options' section, find 'Automatically Save Backup Information Every:'.
Select 15 Minutes from the dropdown menu.
Click OK to save the settings.
How do I change AutoSave time in Photoshop?
Change to autp-save settings in easy steps:
Start by opening Photoshop.
Click Edit from the menu, then select Preferences and File Handling.
Look for 'Automatically Save Backup Information Every:'.
Choose your desired time interval from the dropdown menu.
Press OK to apply the changes.
Does Photoshop have auto-recovery?
Yes, Photoshop includes an auto-recovery feature.
Click Edit > Preferences > File Handling to check or adjust the settings.
Ensure 'Automatically Save Backup Information' is enabled and set to your preferred time interval.
How do I change the default save settings in Photoshop?
Change to default settings in easy steps:
Launch Photoshop on your computer.
Navigate to Edit > Preferences > File Handling.
Adjust your settings under 'File Saving Options' as needed.
Learning how to change photoshop to automatically save recovery every 15 minutes has been a game-changer for me. It ensures I never lose more than a few minutes of work, even during unexpected crashes.
This simple adjustment has significantly reduced my stress levels and improved my workflow. If you want to safeguard your projects and enjoy a seamless editing experience, follow the above steps.
$2,061.00Original price was: $2,061.00.$1,061.00Current price is: $1,061.00. 27584
Download Your Free Guide Now!
Discover the secrets of photography with our printable guide! Master essential techniques like aperture, shutter speed, and ISO to create stunning images. Get your free printable PDF now and start turning your snapshots into masterpieces!