Looking to master the bokeh effect in Lightroom? You’re in the right place! Imagine transforming your photos with that dreamy, blurred background that makes your subjects pop.
Whether you’re a budding photographer or just want to add a professional touch to your snapshots, I’m here to guide you step-by-step.
Keep reading to discover how you can create stunning bokeh effects in your images using Lightroom.
You’ll learn tips, tricks, and insider secrets that will make your photos stand out.
Table of Contents
Understanding Bokeh Effect in Lightroom
The bokeh effect occurs when you create an aesthetic blur in the out-of-focus areas of your photos. This effect highlights the subject in focus and adds a soft, dreamy quality to the background.
Two factors influence the bokeh: lens quality and aperture shape.
Different lenses produce unique bokeh effects because of their optical designs.
The aperture’s shape affects how light scatters in the blurry parts of an image. The term bokeh comes from the Japanese word “boke,” meaning blur or haze.
In photography, it has evolved to represent characteristics of blurred lights and patterns, enriching the visual appeal of pictures.
Examples of Bokeh Effect
You often see bokeh in portrait photography. Imagine a close-up shot where the background appears as a lovely array of soft lights, making your subject pop.
Bokeh also shines in nature shots where sunlight filters through leaves, creating glittering, indistinct orbs.
To better understand, it’s helpful to look at specific pictures:
Portraits: The background transforms into a gradient of light circles, isolating the subject effectively.
Cityscapes at night: Street lights blur into colorful dots, giving an artistic vibe to the scene.
Macro shots: Pictures of flowers benefit from bokeh as the environment fades into a mosaic of hues.
In Adobe Lightroom, you can enhance these examples using manual adjustments. Go to the Develop module and use the Lens Blur Tool.
This tool mimics how camera lenses would soften the backgrounds.
The “Bokeh Effect” menu offers more control. It includes sliders to adjust bokeh intensity and shape. New lens blur tools updates provide easier options to modify blur amount and visualize depth in your picture.
To create stunning bokeh effects, mastering selective focus in Photoshop can be incredibly helpful. By using selective focus in Photoshop, you can highlight your subject just like in examples of the bokeh effect.
Quick Guide
Select your photo and go to the Develop module.
Click on the "Blur" panel.
Adjust the "Bokeh" slider to increase or decrease the blur effect.
For precise control, use the "Lens Blur" tool to fine-tune areas of the image.
Lightroom presets can help save time. Presets provide quick settings for blur and bokeh effect. They allow you to achieve consistent results across multiple images.
Pro Tip: For the best bokeh, use a wide-aperture lens and shoot with a shallow focal range. This combination will make your subject stand out while creating a beautiful, smooth backgrounds.
Experimenting with different focal range can help you achieve the most visually appealing bokeh effects.
How to Create Bokeh Effect in Lightroom
Creating the bokeh effect in Lightroom is a breeze. You just need to adjust a few sliders, and that’s it. Lightroom makes it so easy.
Here is a step-by-step guide on how to create the best bokeh effect in Lightroom:
Select Your Photo: Open Adobe Lightroom and choose the photo you want to enhance. You will find a lot of options, but focus on the one you want to work on.
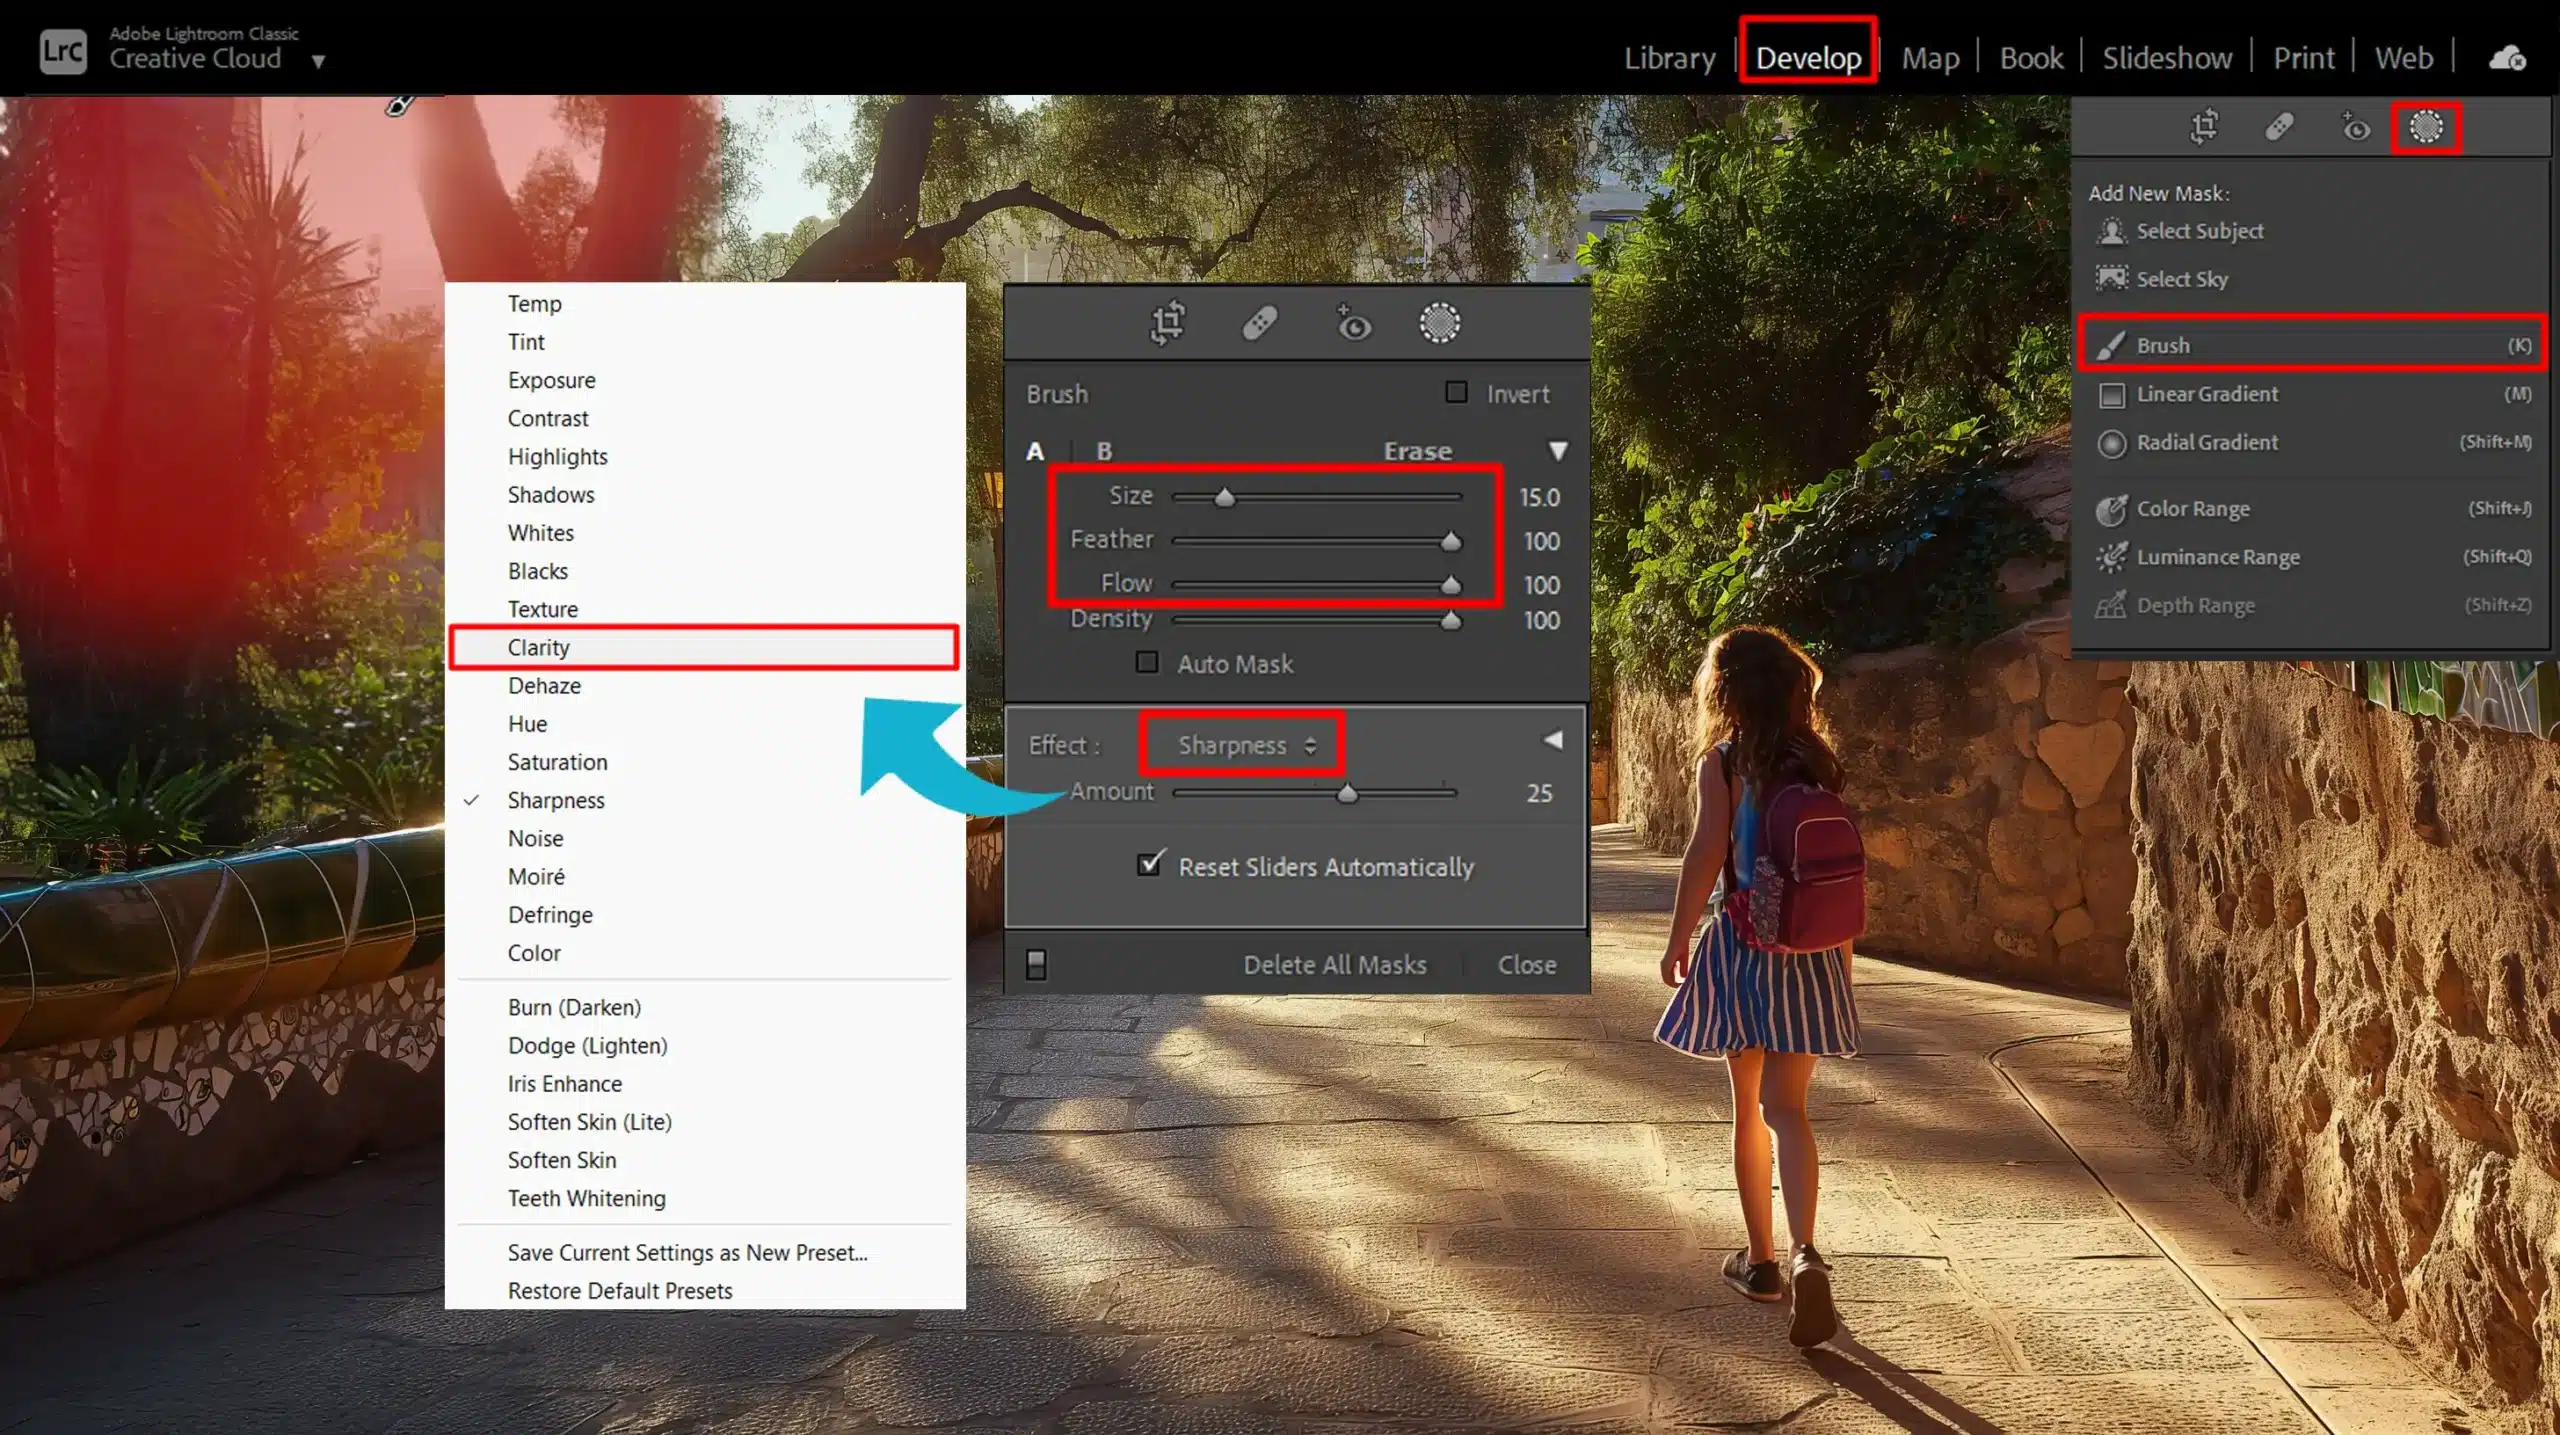
Develop Module: Go to the Develop module. This is where the magic happens. Here, you can manually adjust many elements of your photo, including the blur and bokeh effects.
Adjust Basic Settings: Before diving into bokeh, adjust the basic settings such as exposure, contrast, and clarity. Setting a good base will help reach the best bokeh effect. Fine-tuning the blur and bokeh effects in this module allows you to enhance the overall aesthetic and focus on your subject more effectively.
Apply Blur: Use the 'Adjustment Brush' to select the areas where you want the blur to be applied. Adjust the brush size and blur amount to fit your needs.
Add Bokeh: Navigate to the "Bokeh Effect" menu. Here, you can add bokeh by adjusting the intensity and shape sliders. Don't hesitate to experiment until you find what looks best.
Understanding the Lens Blur Tool
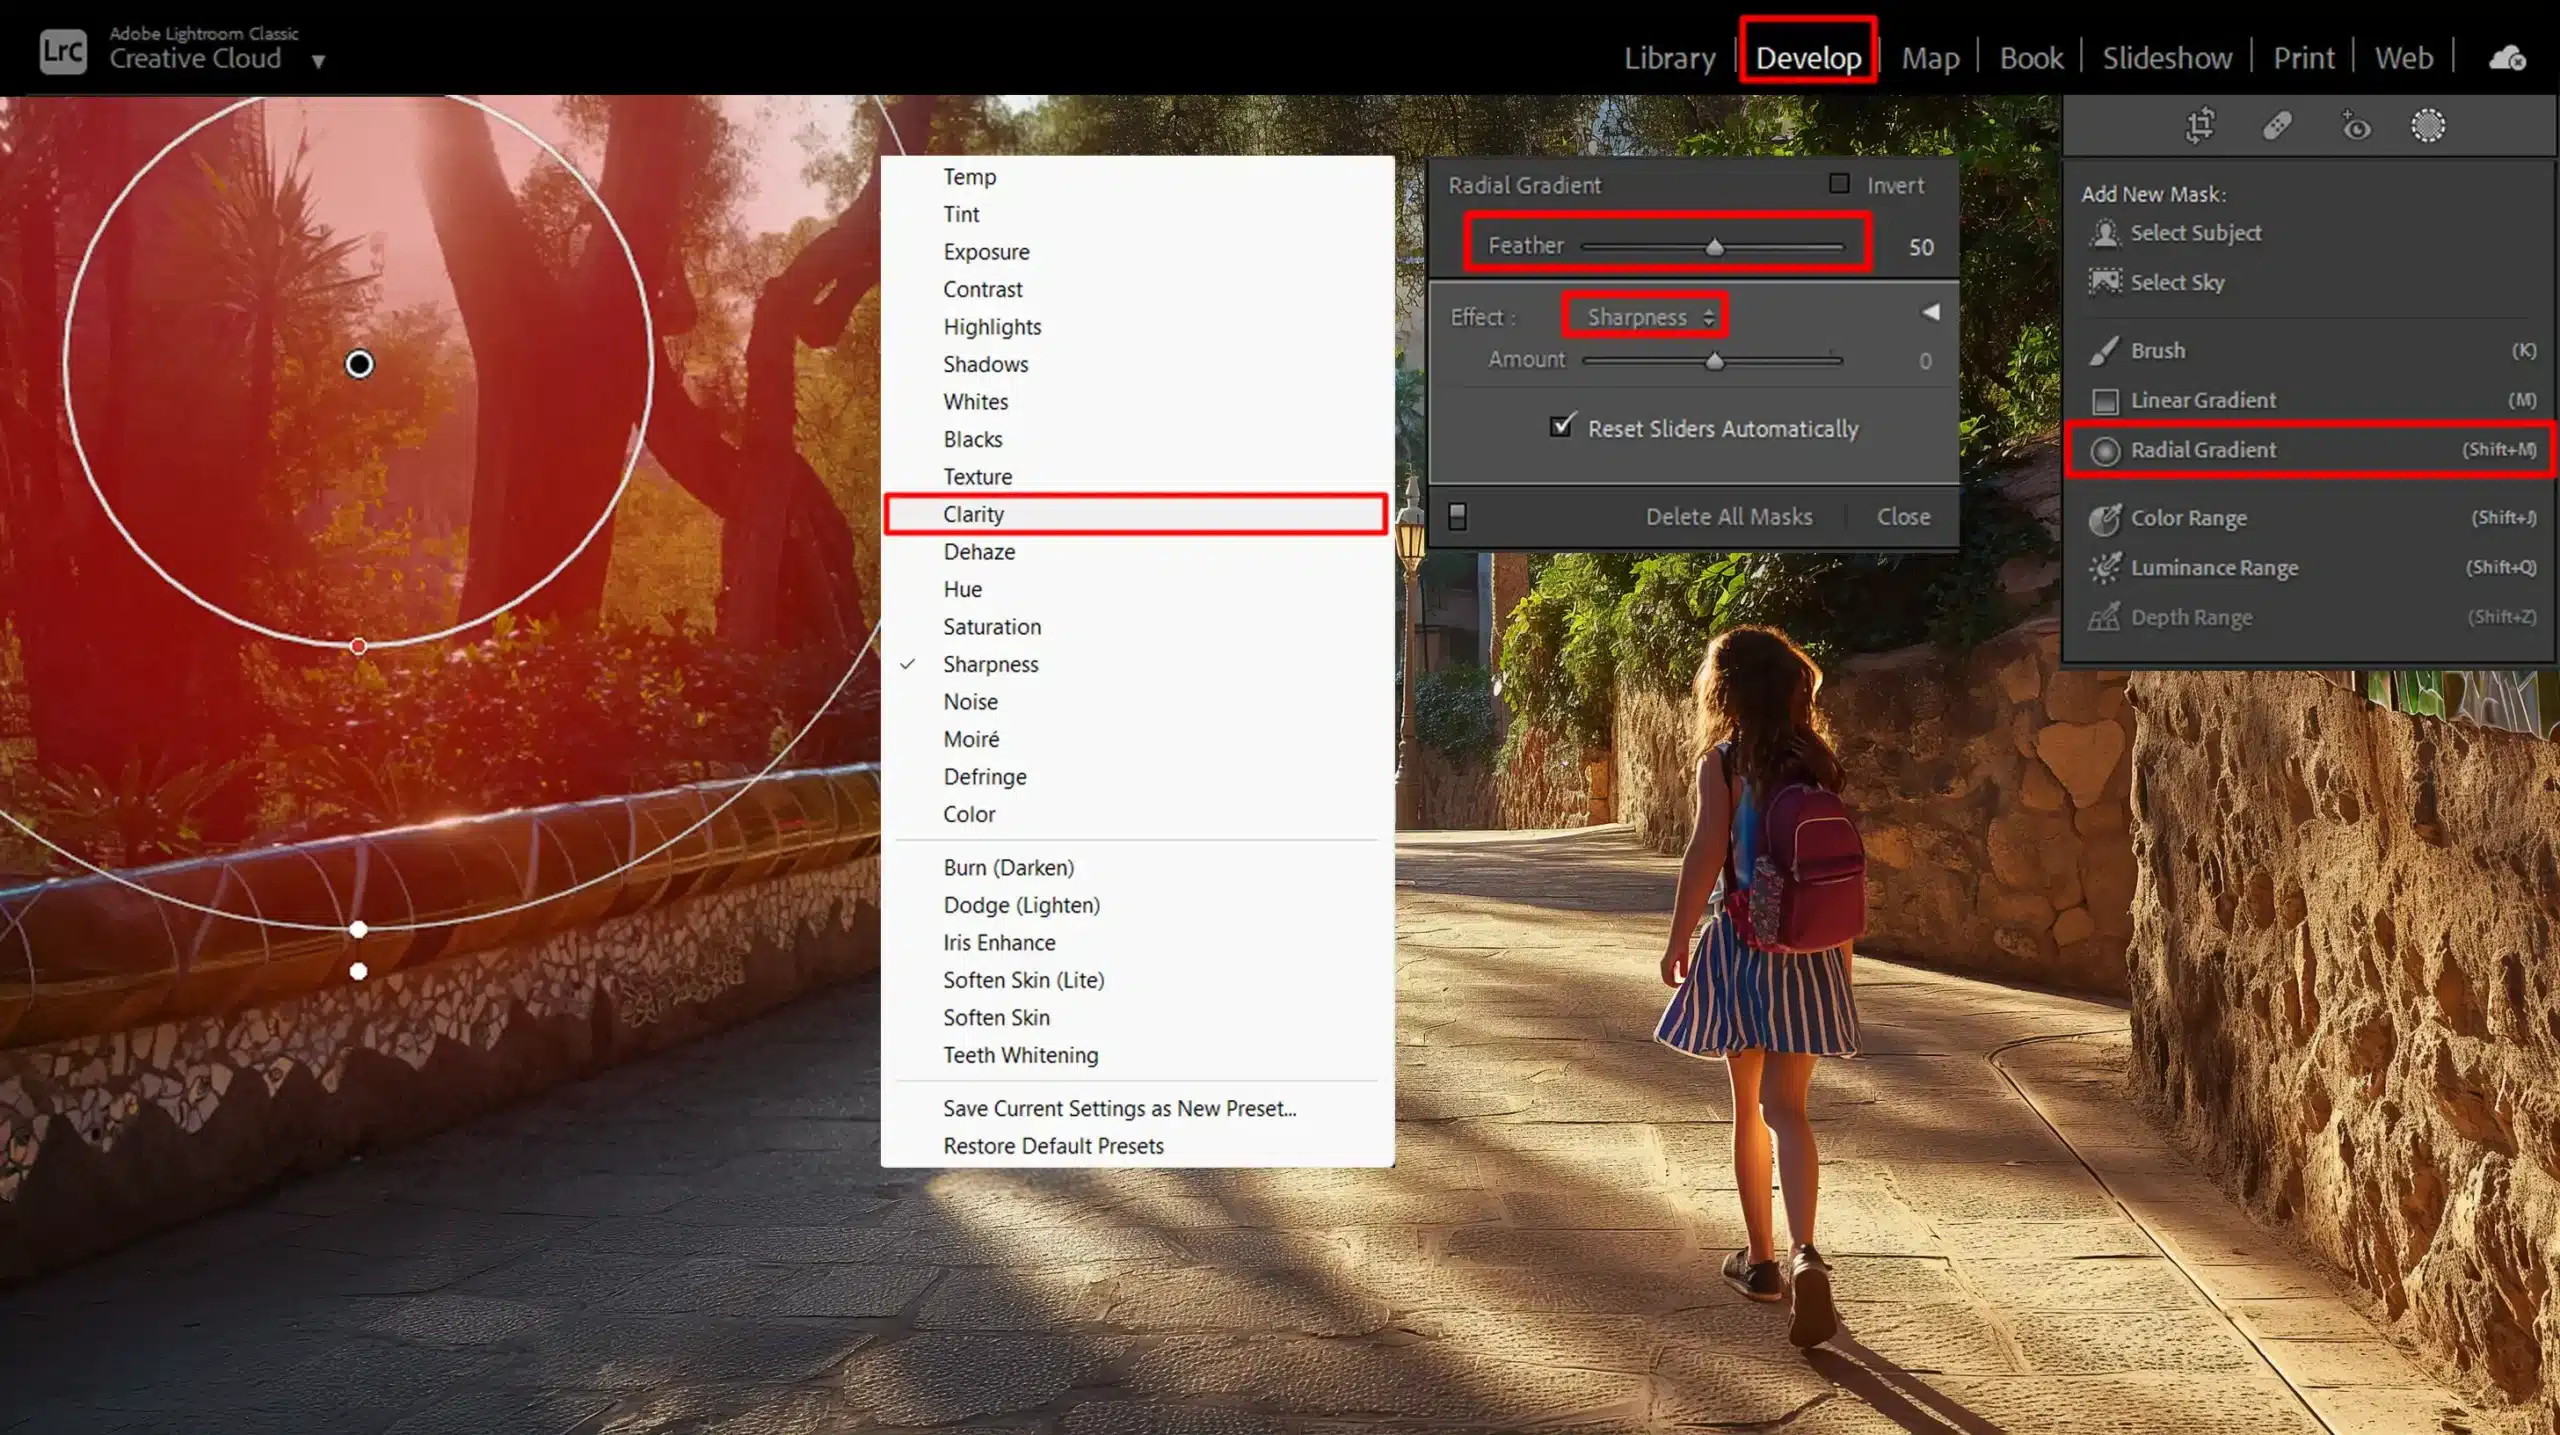
Open Lens Blur Tool: Still in the Develop module, find the Lens Blur tool. It's excellent for creating blur that mimics shallow depth-of-field.
Manually Adjust Blur: The Lens Blur tool allows you to modify manually the blur and bokeh. Focus on key aspects of your photo to create a natural look.
Fine-Tune Bokeh: Besides applying blur, you can also tweak other subtle settings like focal range and blur amounts for more precision.
Save Your Work: Once satisfied with your adjustments, save your edited photo. Lightroom presets can be precious here because they save time and ensure your edits are consistent.
Pro Tip: To create the most captivating bokeheffect, use a lens with a wide aperture. This technique maximizes blur and makes your images pop.
Remember, adding bokeh is not about following strict rules but finding the right balance for each image.
Advanced Techniques for Bokeh Effect
You’re here because you want to dive deeper into creating stunning images with bokeh effect in Lightroom.
You’re in the right place.
Technique
Description
Pros
Cons
Lens Blur Tool
Precision tool for creating a bokeh effect.
High accuracy, customizable settings.
Requires fine-tuning for best results.
Combining Effects
Adjusting exposure, contrast, and vibrance.
Enhances overall image, highlights bokeh.
Can be overdone if not carefully applied.
Layering Effects
Adding multiple layers of bokeh and effects.
Creates a magical glow, adds depth.
Risk of creating a cluttered image.
Let’s cut to the chase and talk about some advanced methods.
Using the New Lens Blur Tool
When it comes to precision, nothing beats the new Lens Blur tool in Lightroom. It lets you reach a breathtaking bokeh effect.
Here are the steps you should follow:
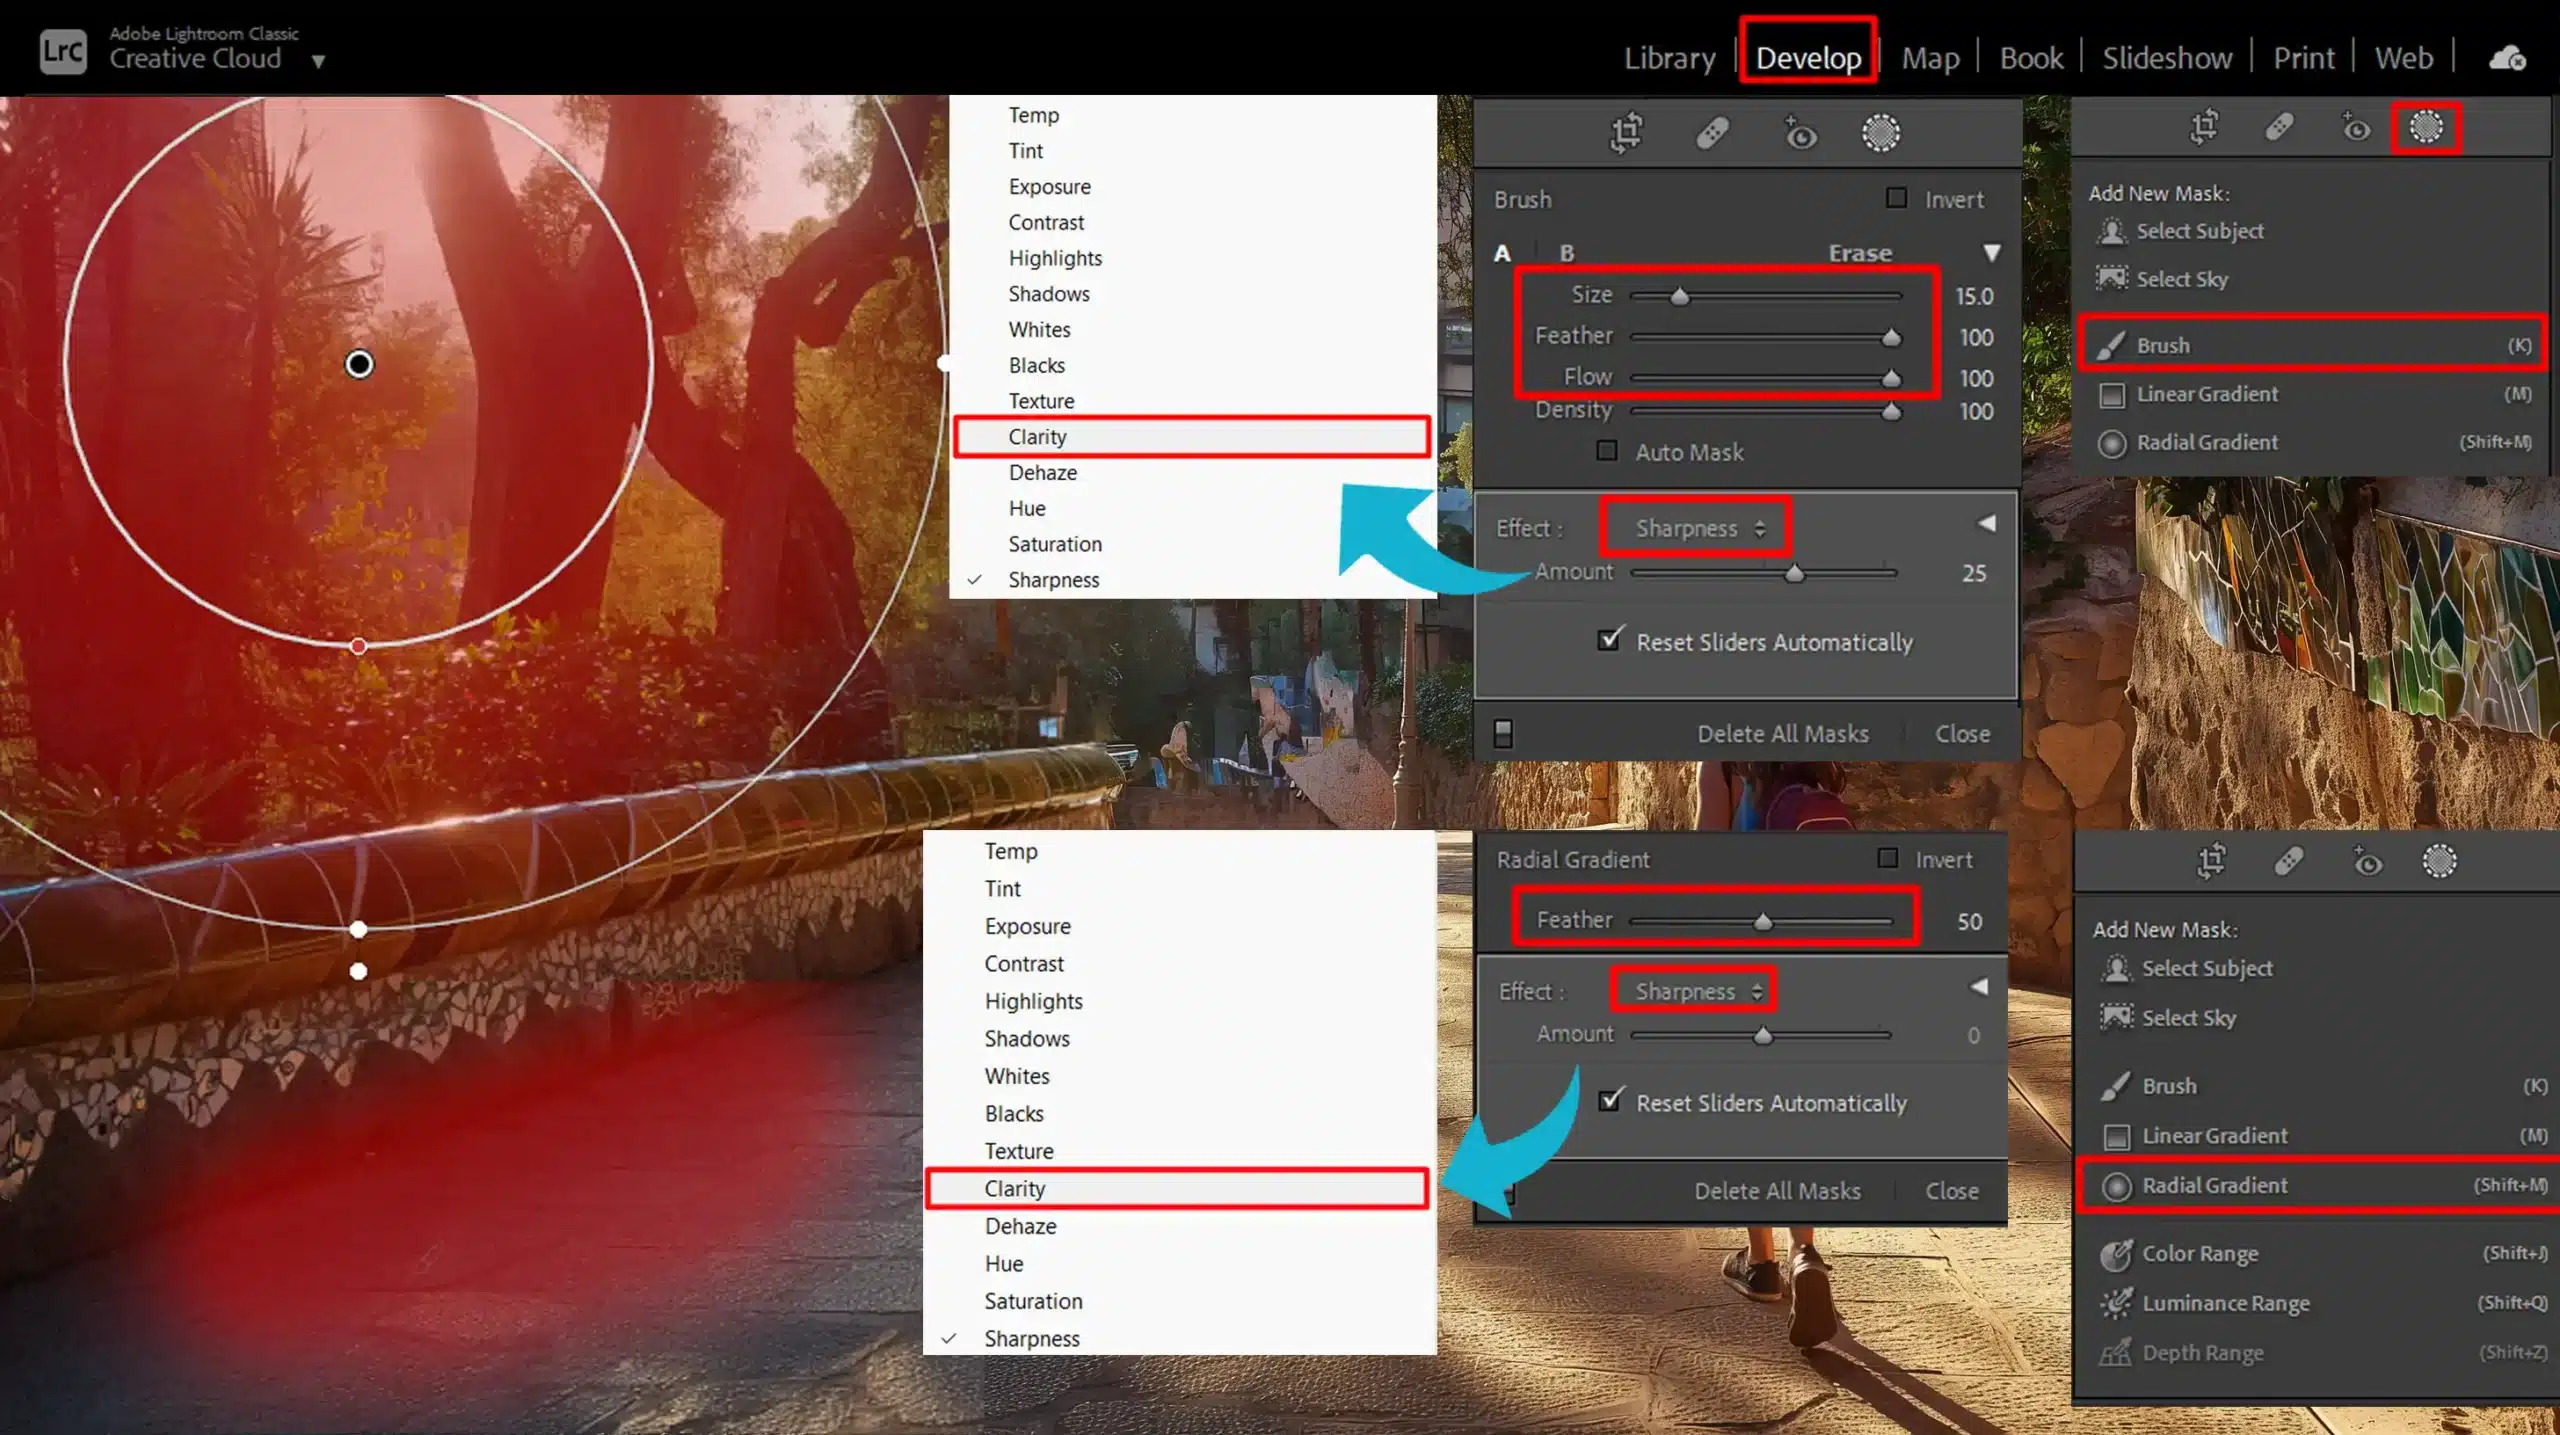
Open your photo in Lightroom.
Head over to the Develop module.
Select the Lens Blur tool.
Adjust the blur amount to see changes immediately.
Pro-tip: Combine this with minor tweaks in contrast and clarity to enhance the entire image.
Combining Bokeh with Other Effects
Bokeh is fantastic on its own, but combining it with other effects can bring your image to life.
Here’s how:
First, apply your bokeh using the lens blur tool.
Then, head to the basic settings.
Increase the exposure slightly.
Add some contrast but not too much.
Try a touch of vibrance to make colors pop.
You’ll notice that these adjustments not only highlight the bokeh effect but also enrich the overall look of the image.
Layering Effects
Layering effects can transform a simple blob of light into a magical glow. Bokeh options are immense; experiment with different settings until you find what you like.
Avoid making your photos look like a disco ball. Moderation matters!
Continuous Learning
Always keep experimenting. That’s the fun part! You’ll get better at creating captivating photos that draw people in.
Creating a Compelling Bokeh Effect in Lightroom
To create a compelling bokeh effect in Lightroom: use the new Lens Blur tool, combine with other effects, and fine-tune every detail.
Pro Tip: For a unique touch, try adding a “cat eye” bokeh. It has a distinctive, eye-catching shape that can set your images apart.
Common Mistakes and How to Avoid Them
Ensure you don’t overlook key aspects like when to add blur for emphasis, missing the point of your composition, improper handling of photography settings, and incorrect adjustments to brightness.
Overusing the Bokeh Effect
The bokeh effect in Lightroom can breathe new life into photos. However, many users overdo it. I get it. It’s fun to add bokeh everywhere, but restraint is important.
Too much bokeh can distract from your main subject. Consistency in your edits maintains harmony.
For those new to Lightroom, consider looking into Lightroom Training to master this effect.
Incorrect Use of Lens Blur Tool
The Lens Blur tool might seem straightforward, but incorrect use can ruin your shot.
Here are some tips to use it correctly:
Ensure your focal point remains clear.
Adjust the blur amount carefully.
Check twice before finalizing.
I’ve learned that subtle adjustments often yield the best results.
If you’re working in Photoshop afterwards, you might also explore Photoshop Shortcuts to streamline your editing process.
Pro Tip: Always preview your edits at different zoom levels. This ensures clarity and consistency.
Tools and Resources for Bokeh Effect
Discover essential tools and resources that can help photographers master the bokeh effect, including techniques for dragging the focus and creatively using the foreground to enhance your shots.
$2,061.00Original price was: $2,061.00.$1,061.00Current price is: $1,061.00. 27582
Download Your Free Guide Now!
Discover the secrets of photography with our printable guide! Master essential techniques like aperture, shutter speed, and ISO to create stunning images. Get your free printable PDF now and start turning your snapshots into masterpieces!