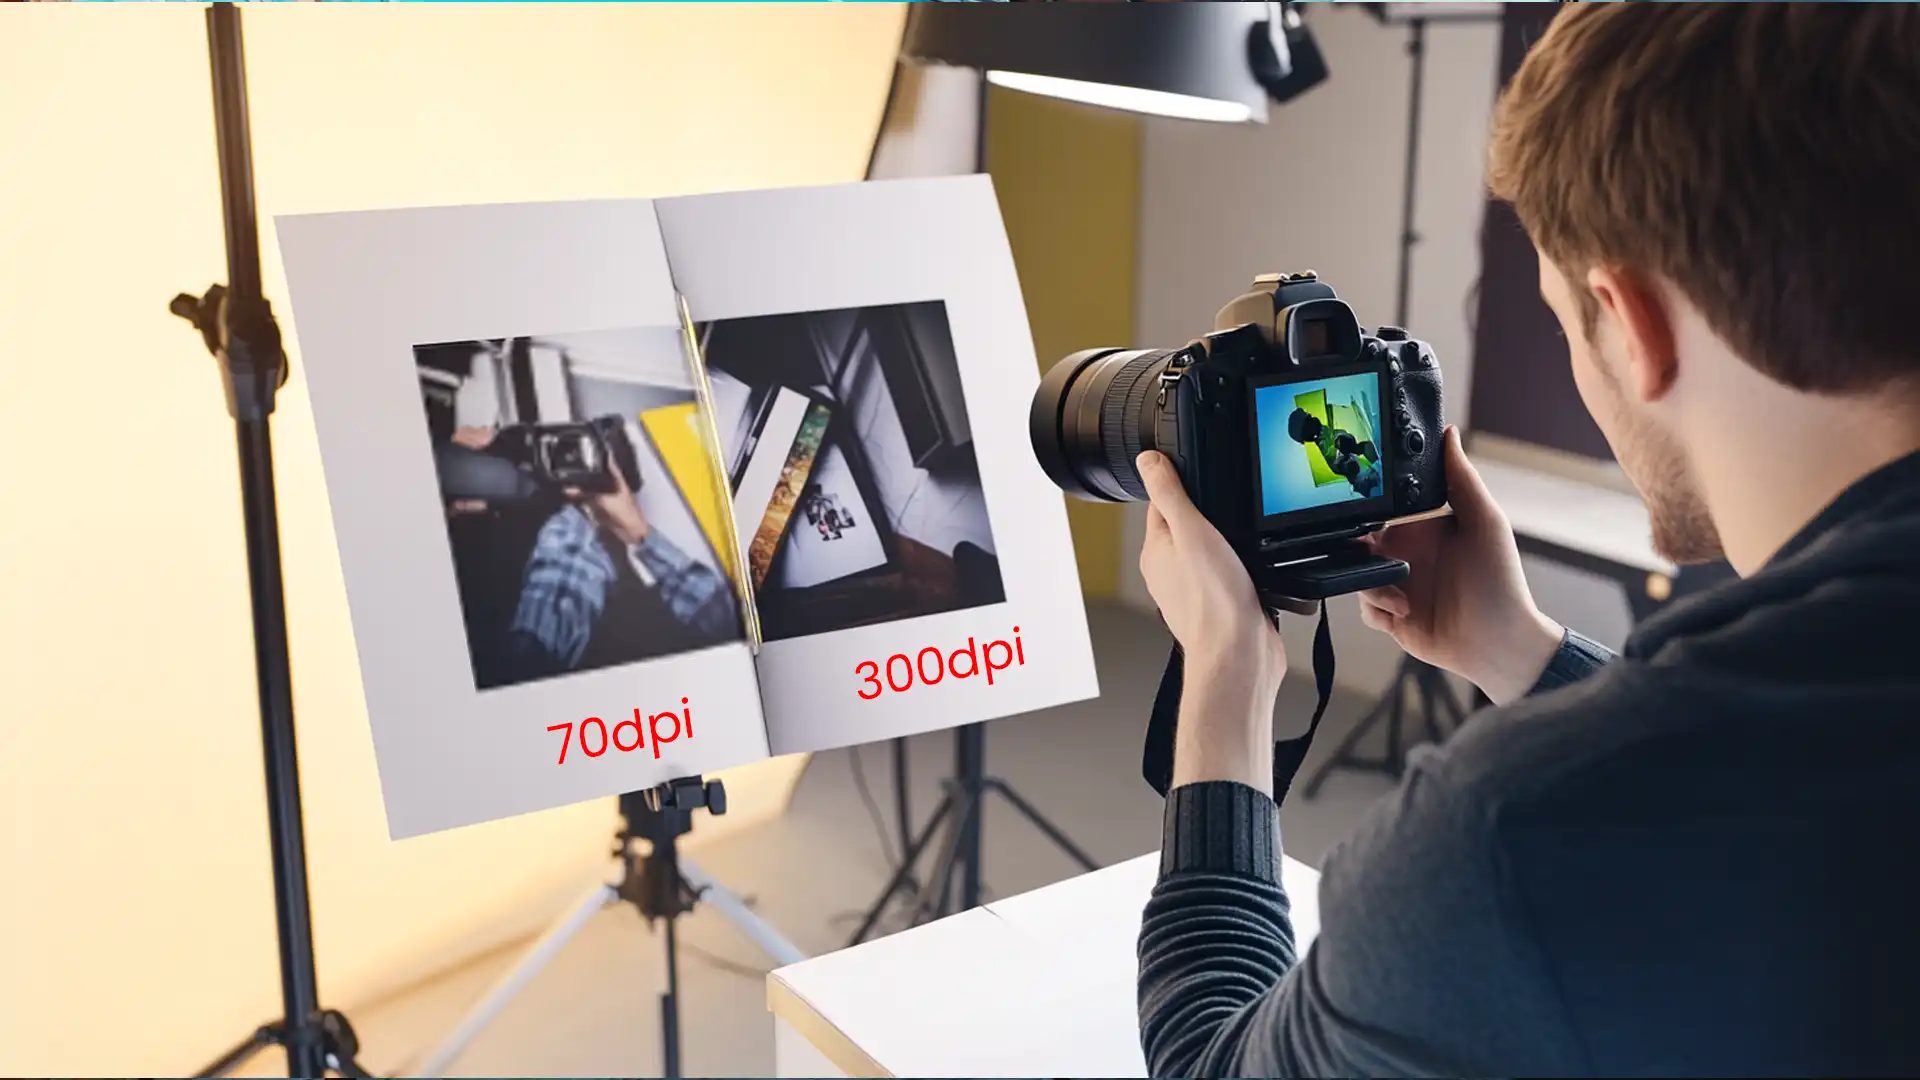
Looking for the best resolution for printing photos, can truly elevate your photography game, ensuring each printed piece bursts with clarity and detail.
Whether you’re a budding photographer or just want to spruce up your space with some vibrant personal touches, understanding how different resolutions affect your prints is important.
In this post, we’ll explore how choosing the right settings can transform your photos from good to breathtakingly beautiful.
Let’s dive into the world of resolutions and discover how to bring out the best in your photography projects!
Table of Contents
Guide to Resize Images in Photoshop for Optimal Image Quality
Resizing images can help you achieve optimal print quality.
To achieve optimal image quality, knowing how to resize images in Photoshop is important. Proper resizing ensures your images maintain their clarity and detail.
Follow these steps to ensure your photos look their best when printed.
Opening Your Image File in Photoshop
First, open Adobe Photoshop and load your image file.
- Go to "File" in the top menu.
- Select "Open".
- Pick the desired photo from your computer.
Make sure you are starting with a high-resolution image to maintain the best resolution for printing photos.
When opening your image file in Photoshop, understanding the different types of image files can significantly impact your workflow.
Each file type, from CR2 or JPEG, affects how you edit and save your image.
Navigating Photoshop's Resize Tool
Next, navigate to the resize tools. These tools are significant for setting the correct image size for prints.
- Click on "Image" in the top menu.
- Select "Image Size".
Here, you’ll see options to adjust pixel dimensions, widths, and heights of your digital image.
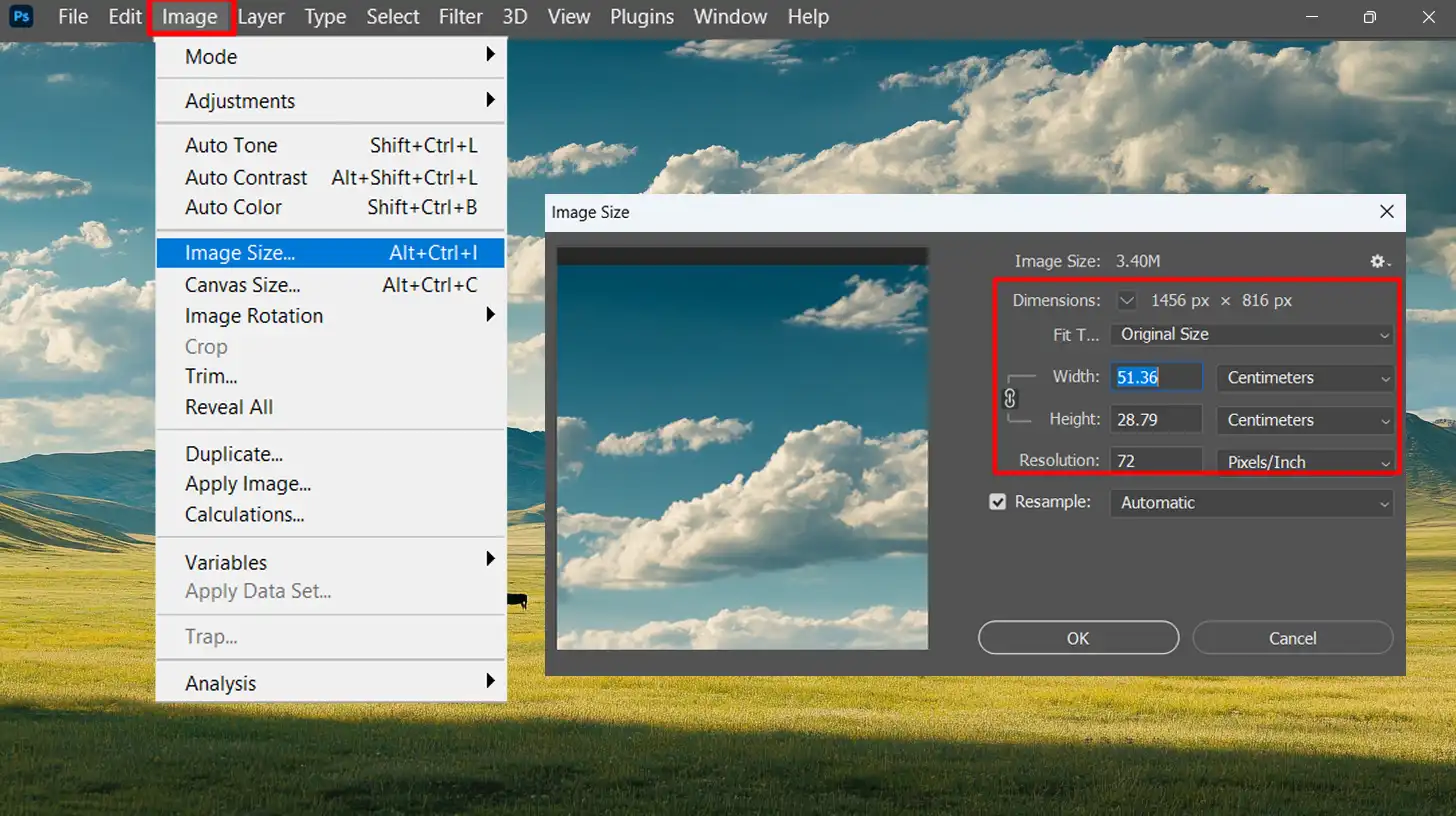
Setting the Best Resolution for Printing Photos
Now, it’s time to set the appropriate resolution for your project. For most purposes, 300 pixels per inch (PPI) is considered ideal.
- Enter 300 PPI in the resolution tab.
- This number ensures high-quality prints without making a pixelated image.
Adjusting this helps in maintaining impeccable print quality, and choosing a higher print resolution delivers better results.
To resize an image for printing effectively, it’s important to combine it with setting the best resolution for printing photos. Proper resizing ensures that the image maintains its quality at the desired print size.
Using Smart Objects to Preserve Quality
Smart objects in Photoshop help retain original data, aiding in resizing without losing quality:
- Convert Layer: Right-click on the layer and select "Convert to Smart Object".
- Resize: Use the Free Transform tool by pressing Ctrl+T or Cmd+T.
Using smart objects can preserve details even if you need different print sizes later on.
Saving Your Resized Image for Print
Finally, save your resized image while keeping its integrity intact:
- Go to "File" > "Save As".
- Choose TIFF or PNG as file formats because they do not compress data too much.
- Set any further details like color profiles according to printer requirements.
- Save ensuring that it holds up as a high print resolution suitable for professional prints.
By following these steps closely, you’re set up for success with clearly detailed high-quality printing objectives!
Whether you’re working with family photos or larger fine art pieces, knowing how many pixels per inch are necessary ensures unwavering excellence every time!
Discover how Adobe Lightroom can elevate your photography skills by visiting, explore its powerful features and tools to create stunning images today!
Understanding DPI and PPI in Photo Printing
Differences Between DPI and PPI
Understanding the differences between DPI and PPI is important for achieving high-quality prints. While these terms are often used interchangeably, they serve different purposes.
- DPI: Refers to the number of printed dots per inch on paper. It's used in printing to describe how many ink dots a printer can produce in one-inch lines.
- PPI: Relates to digital photo resolution on screens or photo editing software, describing how many pixels fit into one inch of the display area.
These metrics affect your final result. Using the correct term ensures clarity on whether you are discussing a digital or print resolution.
Understanding pixel dimensions is important to grasping the differences between DPI and PPI. Proper pixel dimensions ensure your print achieves sharpness and clarity by aligning with the correct DPI/PPI settings.
Optimal DPI Settings for Various Print Sizes
Achieving the best resolution for printing photos requires knowing your target print size’s optimal DPI settings.
Different sizes need varying DPIs to maintain image quality, without sacrificing detail.
- For small prints like 4x6 inches, aim for at least 300 DPI.
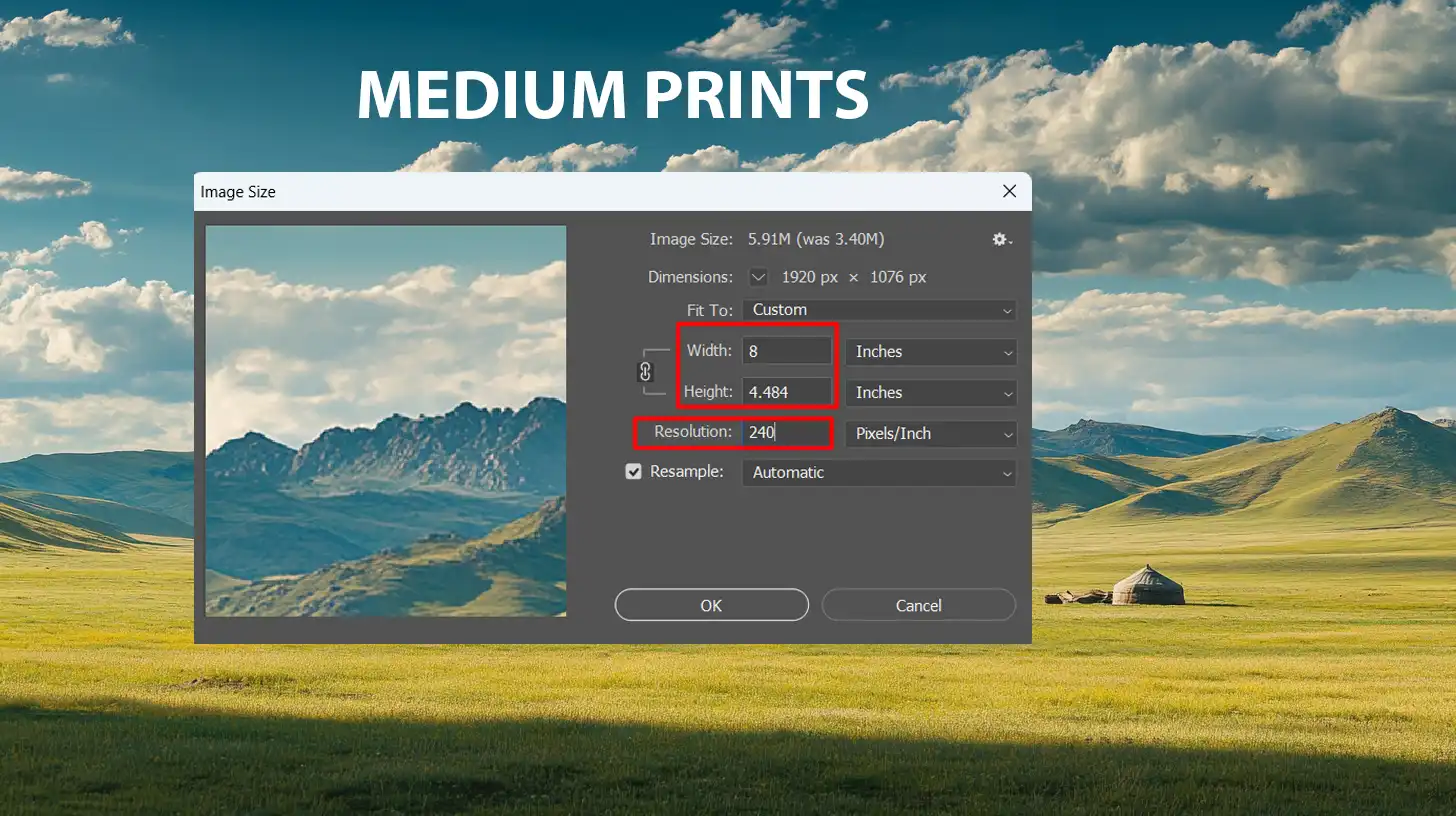
- Medium-sized prints, such as 8x10 inches, should use around 240 DPI.
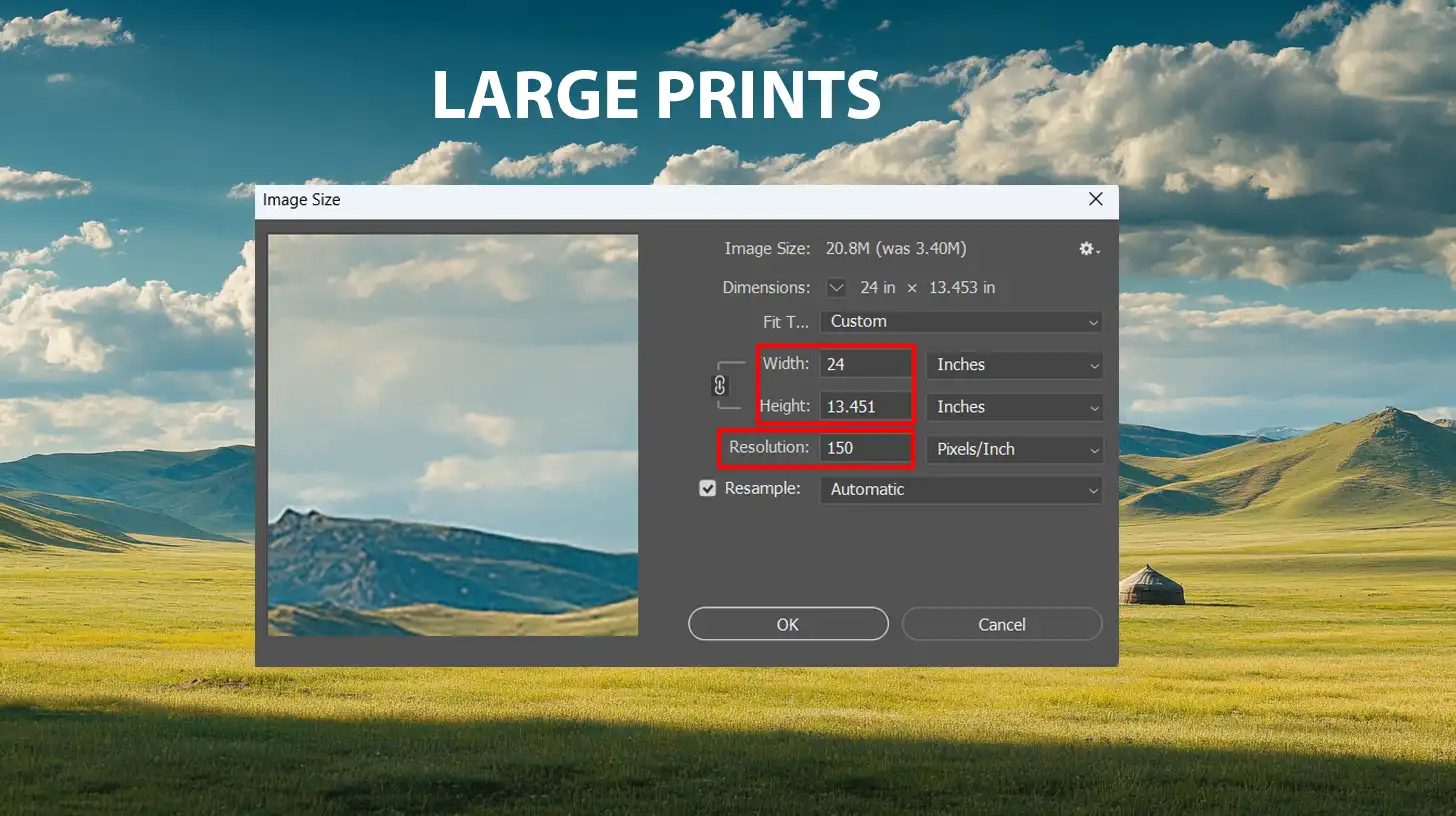
- Due to increased viewing distance, larger formats like posters or banners can have a lower resolution of about 150 DPI.

Here’s a quick reference list for optimal settings:
- Small Prints (4x6 inches) - 300 DPI
- Medium Prints (8x10 inches) - 240 DPI
- Large Prints (Posters/Banners) - 150 DPI
By using these settings, you ensure each printed image has the necessary detail without losing quality or generating unnecessary data from extremely high resolutions.
When prepping your image for print, it’s important to consider its original pixel dimensions and alter them accordingly without lowering resolution if possible.
This approach preserves image sharpness and overall good image quality throughout different media platforms.
Equipping yourself with this knowledge supports successful photo projects!
Choosing the Right File Format for Printing
Selecting the correct file format is important for ensuring optimal print quality. The file format determines how well your image retains its detail and colors during printing.
Explore the different image file types to choose the best format for your projects. Understanding each type’s advantages helps optimize your workflow and achieve desired results efficiently.
Advantages of TIFF Over JPEG for Printing
TIFF (Tagged Image File Format) offers superior quality compared to JPEG.
Here’s why:
- Lossless Compression: Unlike JPEG, TIFF uses lossless compression, retaining all pixels.
- Higher Bit Depth: TIFF files can store more color information, enhancing photo resolution and overall print quality.
- Flexibility in Editing: TIFF images remain editable without losing quality, making them ideal for adjustments in photo editing software like Adobe Photoshop.
For example, I use a Canon EOS digital camera that captures high-resolution images. Saving them as TIFF ensures I maintain image quality when printing in large formats or fine art prints.
Using PSD Files for Best Quality
PSD files are another excellent choice if you seek the best resolution for printing photos. Created in Photoshop, PSD files provide several benefits:
- Layers and Adjustments: Store layers and adjustments within the same image without flattening.
- Editable Anytime: You can reopen and edit PSD files multiple times without degrading the digital image resolution.
- Rich Metadata: Includes extensive metadata, which is useful for future editing.
When working on a complex project that requires various edits and adjustments, saving as PSD helps maintain high-quality images without sacrificing quality even after multiple changes.
Choosing wisely between these formats will help ensure your printed material meets professional standards and client satisfaction.
By considering factors like pixel dimensions, print size, aspect ratio, and viewing distance, you can achieve the proper resolution needed for outstanding prints.
To master image quality, focusing on using PSD files for best quality is important. PSD files retain more detail and allow for better adjustments, ensuring top-notch image clarity.
Selecting the Correct Color Profile for Photo Printing
When printing your photos, selecting the correct color profile ensures your prints look as vibrant and accurate as possible.
Enhance your images by understanding the color profile in Photoshop. Learn to select and apply the right color profiles to ensure consistent and accurate colors across all devices and mediums.
The Importance of sRGB and Adobe RGB
- sRGB: Ideal for web and regular prints. Most printers and computer screens use this profile.
- Adobe RGB: Better for advanced photo editing software like Photoshop. It offers wider color gamut, ideal for professional printing photos.
Both profiles affect the final print quality significantly. Personally, I once printed a landscape photo using sRGB and Adobe RGB to compare results.
The Adobe RGB version had richer greens and blues, proving its superiority in some cases.
How Color Profiles Affect Print Output
Color profiles manage how colors convert from digital image files to prints. This conversion impacts image quality, ensuring high-quality images when viewed or printed.
Factors affecting print output:
- Print Resolution: Higher resolution equals more detail.
- Pixel Dimensions: The number of pixels affects how sharp an image appears.
- Viewing Distance: Larger prints might need fewer PPI due to being viewed from farther away.
Regularly updating your resolution settings also helps maintain quality across different mediums.
Finally, matching the color profile to your specific printer can further refine results, transforming a good photo into an amazing one with deeper tones and richer details.
By paying attention to these factors, you’ll always achieve the best resolution for printing photos, ensuring your prints showcase their true beauty both digitally and physically!
How to Choose the Best Paper Type for Photo Prints
Selecting the right paper type can significantly influence your photo prints.
Let’s look at some important factors to consider.
Comparison of Glossy and Matte Finishes
The finish of your photo paper is important for achieving high-quality images. Here is a comparison between glossy and matte finishes:
Glossy Finish:
- High-resolution photos look vibrant.
- Offers deep contrast and vivid colors.
- Reflects light, which can cause glare on some viewing angles.
Matte Finish:
- Ideal for reducing glare and fingerprints.
- Produces high-quality images with less reflection.
- Colors are softer compared to a glossy finish, allowing for a more subtle presentation.
To determine the best option, consider your preferred visual effect and the common lighting conditions where you’ll display your prints.
Impact of Paper Weight on Print Quality
Paper weight affects both durability and print quality. The heavier the paper, the sturdier it feels and appears.
Here is how different weights impact your prints:
Lightweight Paper (less than 150 gsm)
- Suitable for casual printing.
- Often used in everyday scenarios with lower-resolution images.
Medium Weight Paper (150 – 200 gsm)
- A common choice for decent image sharpness in photo printing.
- Offers a balance between durability and flexibility.
Heavyweight Paper (above 200 gsm)
- Preferred for professional photography prints with higher pixel dimensions.
- Provides optimum support for maintaining image sharpness over time.
Choosing the appropriate paper weight provides additional stability needed to preserve image quality when framing or displaying.
Always consider your desired print size when selecting paper weight to ensure it matches the type of ink being applied and avoids warping or deterioration over time.
Applying an old paper texture in Photoshop can enhance the visual appeal of your prints, but it’s also important to consider the impact of paper weight on print quality. The right texture combined with suitable paper weight ensures a professional finish.
Significant Photoshop Tools for Photo Enhancement
When enhancing photos in Photoshop, several tools can significantly impact final image quality.
Here’s a closer look at two significant techniques.
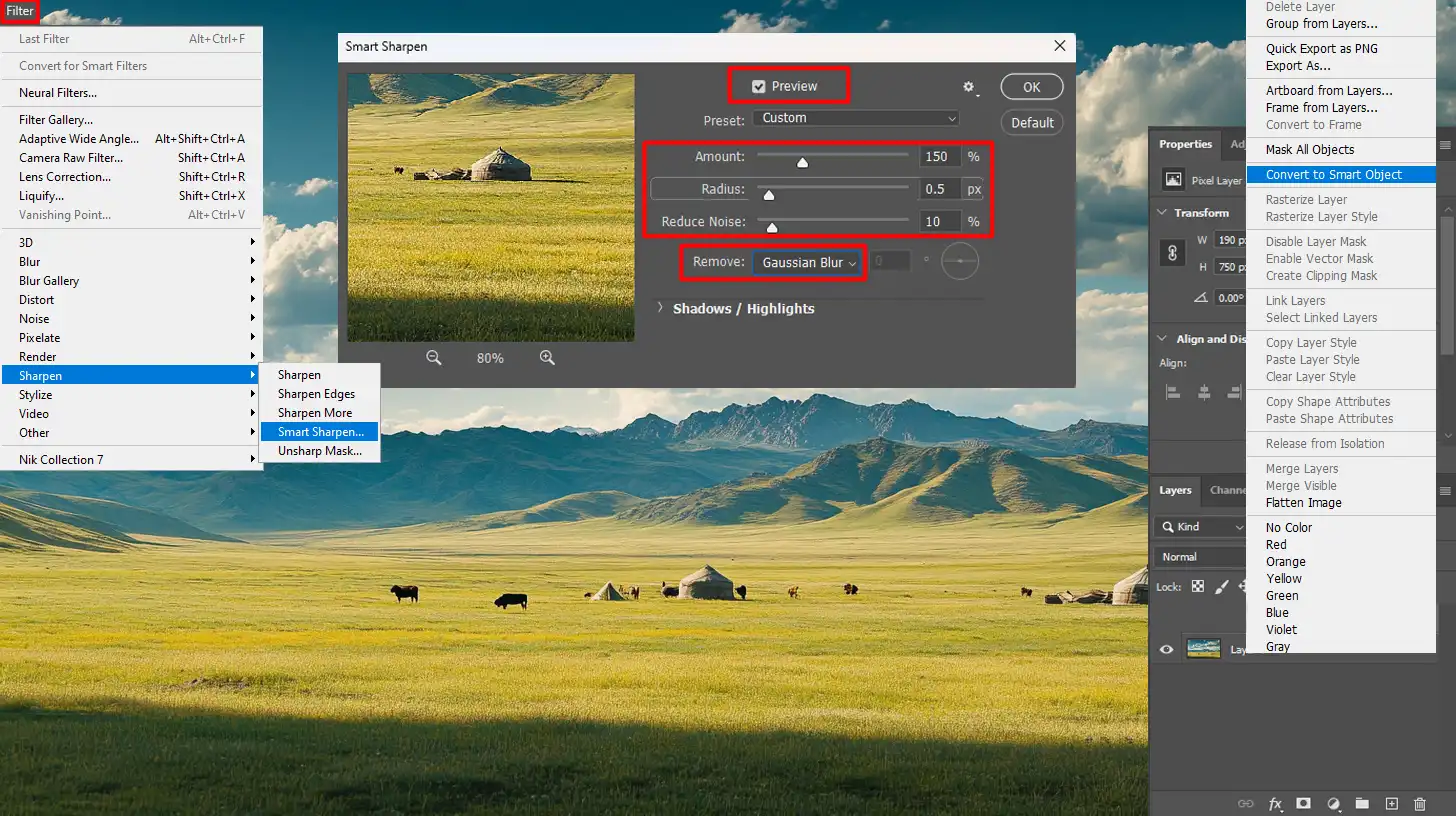
Utilizing the Sharpening Tool for Crisp Prints
The sharpening tool can transform images from soft to sharp, ensuring your prints look vivid and detailed.
- Adjust settings: Choose an appropriate radius and threshold based on your image resolution. A lower radius works best for high-resolution images.
- Preview changes: Always check the preview while adjusting to avoid over-sharpening.
When I printed my vacation photos using a sharpening tool, they went from blurry to crystal clear.
And I noticed the difference, particularly when viewing them close-up!
Benefits of Adjustment Layers for Non-destructive Editing
Adjustment layers are significant for flexible and non-destructive editing. They allow you to tweak colors, brightness, and contrast without altering the original image data.
- Layer stack flexibility: Change the order of adjustment layers to see how different settings interact with each other.
- Editable at any time: Revisit and adjust settings long after you've applied them, preserving high-quality images.
For example, when working on my gallery exhibition shots, I used adjustment layers to perfect color correction.
This way, if any print size or print resolution requirements changed later, I could easily adapt without starting from scratch.
Incorporating these tools into your workflow ensures that even small pixel dimensions will yield stunning printed images with excellent photo resolution.
Whether you’re displaying prints on a computer screen or physical material like canvas or paper, mastering these tools leads to more detail and higher print quality every time.
Crop and Composition Techniques for Striking Prints
Cropping and composition play important roles when creating prints. Proper techniques ensure your photos stand out with the best resolution.
Rules of Thirds in Cropping for Better Framing
The rule of thirds enhances your print’s balance and interest.
By splitting your frame into nine equal sections using two equally spaced horizontal lines and two equally spaced vertical lines, you can position important elements along these lines or at their intersections to create a captivating photo.
Imagine you’re printing a sunset over a beach. Instead of centering the sun, place it on one of the intersecting points for added depth.
| Technique | Description | Best For |
|---|---|---|
| Rule of Thirds | Divides the frame into nine sections to position important elements along lines or intersections. | Creating balanced and interesting compositions. |
| Aspect Ratio Maintenance | Keeps the image’s original ratio to avoid distortion and maintain quality. | Ensuring print consistency and avoiding distortion. |
| Aligning Horizons | Ensures that horizontal lines in the image are level. | Achieving a stable and professional look in prints. |
| Positioning Subjects | Places important subjects along vertical lines for better framing. | Enhancing the focus on important elements. |
Understanding composition rules in photography is important for creating impactful images. The rules of thirds in cropping for better framing is an important technique that helps you apply these principles effectively.
This method not only helps achieve the best possible framing but also optimizes print resolution, ensuring that every detail stands out when transferred from screen to print.
Maintaining Aspect Ratio While Cropping
The aspect ratio is important when cropping to avoid distortion and maintain quality.
Consistent ratios ensure that what you see on the computer screen matches exactly what gets printed, preserving both the photo resolution and overall quality.
Common Aspect Ratios:
- 4:3
- 16:9
- 1:1 (square)
For instance, if you start with an image that is 4000 pixels wide by 3000 pixels high, maintaining this 4:3 aspect ratio while cropping will preserve its balance and details, enhancing both the image size and image quality.
Maintaining proper aspect ratios prevents unwanted stretching or squishing of images, which can affect viewing distance, especially if larger prints are to be displayed in gallery spaces.
By mastering these crop techniques paired with sharp resolutions and calculated dimensions, creating striking prints becomes second nature!
Optimizing Images for Large-Scale Printing
To create stunning large-scale prints, you need to optimize your images very carefully. This ensures high-quality results that captivate viewers.
Bilinear and Bicubic Resampling Explained
When preparing an image for large-scale printing, you’ll encounter two common resampling methods: bilinear and bicubic.
Bilinear resampling is simpler.
It estimates new values using the average of four neighboring pixels. This method works well for quick resizing but often produces lower quality, especially when enlarging photos.
Bicubic resampling, on the other hand, is more sophisticated.
It considers sixteen surrounding pixels to generate smoother transitions and preserve edge sharpness, which greatly enhances image quality.
When I printed a landscape photo at 24×36 inches using bicubic resampling, the details remained crisp even up close.
When to Use Upsampling for Large Prints
Sometimes, the original image dimensions won’t suffice for a larger print size, making upsampling necessary.
Always start with the highest-resolution version of your photograph.
An original image with greater pixel density naturally supports better enlargement without losing too much quality.
Here are important points on when to opt for upsampling:
- If you need a higher print resolution, typically above 150 DPI.
- Ensuring enough pixel dimensions so the final print appears smooth without visible pixelation.
- For artistic or commercial purposes where crisp edges and fine details must be preserved.
Remember, it helps to review the viewing distance.
For large prints viewed from afar, slight reductions in resolution as low as 100 DPI often go unnoticed by casual viewers.
Imagine showcasing a giant wall mural; standing several feet away hides minute imperfections that would otherwise ruin close-up prints like portraits.
For my gallery show, I produced an A1 print size (33×23 inches).
It was initially shot with a 24-megapixel camera (6000×4000 pixels) and processed in Photoshop using bicubic smoother upsampling techniques.
The result? A remarkably clear printed image generates awe among visitors at different distances. Mastering these aspects ensures professional results every time you tackle large-scale printing!
Lighting Adjustments for Enhanced Print Results
Optimizing lighting adjustments can dramatically enhance the clarity and vibrancy of your prints, ensuring that every detail is captured with stunning accuracy.
Adjusting Brightness and Contrast for Print Clarity
When preparing digital images for print, adjusting brightness and contrast is important.
This adjustment ensures that the details in the shadows and highlights are visible even when printed.
Steps to adjust brightness and contrast:
- Open your editing software - such as Lightroom or Photoshop.
- Select the Brightness/Contrast tool from the adjustment panel.
- Increase or decrease brightness to ensure your image is not too dark or too light.
- Adjust contrast to highlight differences between light and dark areas.
These adjustments can help achieve the best resolution for printing photos, making sure every detail stands out.
I once printed a photo with low contrast, which made it look flat. Adjusting contrast fixed this, giving the photo more depth and clarity when I tried again.
Using Curves for Dynamic Range Adjustment
Curves are an advanced tool that photographers use to enhance the dynamic range of their images.
It allows you to adjust tonality by changing the curve line on a graph representing your photo’s brightness.
How to use curves:
- Open the Curves tool in your editing software.
- Create points on the curve by clicking - typically three: one for shadows, one for mid tones, and one for highlights.
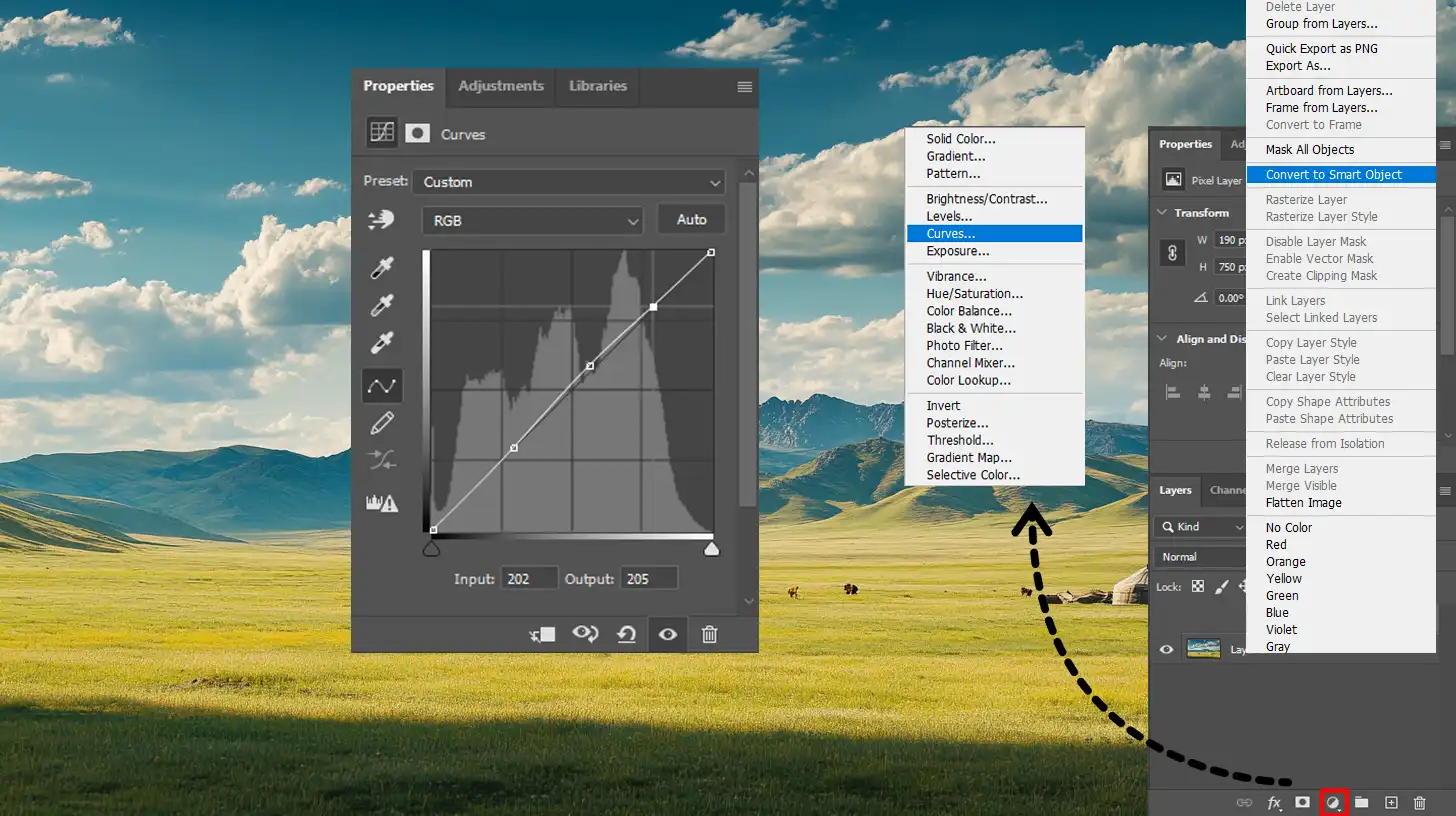
Drag these points up or down:
- Shadows go down to darken them.
- Highlights go up to brighten them.
- Midtones are adjusted to balance overall exposure.
This technique is important if you’re aiming for a higher pixel count in larger digital images because it helps maintain detail across all tonal ranges of your printed material.
For example, during my early photography days, I used curves to improve the dynamic range of a sunset shot.
The results were remarkable; after printing photos with precision settings like 300 PPI, every gradient of color was beautifully rendered on paper.
Remember to always preview how changes will look before finalizing them. This will prevent any last-minute surprises regarding print size adjustments!
Incorporating these techniques can elevate your print quality significantly, resulting in stunning final products ready for gallery displays or personal collections!
Managing Noise Reduction for Clearer Photo Prints
Controlling noise is important to achieving clear photo prints. Noise reduction techniques help ensure your high-resolution image looks spotless on paper.
Techniques for Reducing Noise without Affecting Detail
Effective noise reduction should not compromise the details of your photo.
Here are some practical methods:
- Use Noise Reduction Plugins: Tools like Topaz DeNoise AI can remove noise while maintaining sharpness.
- Adjust Luminance and Color Settings: In software like Lightroom, fine-tuning the luminance and color sliders helps reduce graininess.
- Selective Noise Reduction: Focus on noisy areas rather than applying global adjustments, preserving important details.
These steps ensure your prints retain their quality without sacrificing the best resolution for printing photos.
For a landscape shot taken at night, I applied selective noise reduction only to the sky. This approach retained the rock details in my foreground while eliminating sky noise.
Enhance your editing by learning how to apply noise in Photoshop, a key aspect of managing noise reduction. Balance noise application with reduction for cleaner, more professional images.
ISO Settings and Their Impact on Noise
ISO affects noise in photos and is significant for managing it during the shooting and post-processing phases.
- Low ISO Settings: Ideal for reducing noise but less sensitive to light, requiring longer exposure times.
- High ISO Settings: More sensitive to light but prone to introducing more sensor noise into shots.
For example, using an ISO setting of 100 in daylight reduces the need for heavy noise reduction later when aiming for a high-resolution photo print.
By mastering these techniques and understanding the impact of your camera settings, you can minimize unwanted graininess and achieve clearer printed images every time.
Properly applying these strategies ensures you always attain the correct resolution for stunning photo prints.
Understand ISO sensitivity in photography to control your camera’s light sensitivity. Mastering ISO helps you achieve the right exposure and enhance image quality in any shooting condition.
Preparing Photos for Professional Printing Services
Preparing your photos for professional printing services ensures the highest quality for your final prints.
Understanding print resolution and how to communicate with your provider is important.
Communicating with Your Print Service Provider
Effective communication with your print service provider can enhance the print resolution of your finished photos.
Discuss resolution needs:
- Confirm the best resolution for printing photos. A common standard is 300 PPI.
- Ask about their requirements for high-quality prints.
Specify print sizes:
- Determine the print size you need.
- Ensure your digital file matches these specifications to avoid cropping or scaling issues.
Provide detailed files:
- Ensure files are in JPEG or TIFF formats, commonly preferred by printing companies.
- Double-check that the file has enough detail and that there are no compression artifacts.
Understanding viewing distance:
- Discuss the expected viewing distance for each photo. Higher ppi may be needed for closer viewing distances, whereas larger prints viewed from farther away can tolerate lower ppi.
Create a communication checklist this simple checklist will help you stay organized when communicating with your print service provider:
Preparing properly and keeping an open line of communication ensures professionals deliver prints that meet, if not exceed, expectations!
By following these steps and using this checklist, you’re well on track to getting stunning printed images!
If you want to optimize web image quality, it’s important to understand how resolution affects your visuals. Proper adjustments ensure your images look sharp and load efficiently on the web.
Frequently Asked Questions

What resolution should I use for printing photos?
- Use a minimum of 300 pixels per inch (PPI) for crisp, clear photos.
- This resolution delivers excellent print quality for a variety of sizes, ensuring your memories look sharp in physical form.
What are good pixel dimensions for high-quality 8x10 prints?
Good PPI for 8×10 are:
- For high-quality 8x10 prints, aim for an image resolution of 2400 x 3000 pixels.
- This pixel dimension strikes a balance between file size and print quality, producing detailed and vibrant prints.
What is the best resolution for 4x6 prints?
The best resolution for 4×6 prints is:
- The best resolution for printing photos that are 4x6 is 1200 x 1800 pixels.
- At this resolution, your photos will remain sharp and detailed, bringing out the true beauty in your images.
What is a high-resolution photo for print?
- A high-resolution photo for print typically has 300 pixels per inch (PPI).
- This level of resolution supports a wide range of print sizes while maintaining image quality, ensuring that the printed image retains all the detail and colors of the original digital image.

Conclusion
finding the best resolution for printing photos is fundamental for making your images look their best. I still remember when I printed my first photo and was shocked by how much clarity and detail mattered. It really brought my memories to life.
By using the right settings in editing software like Photoshop and Lightroom, you can ensure your prints capture every color and detail.
If you’re looking to improve your skills, I encourage you to check out my Photoshop Course and Lightroom Course.
These courses offer practical tips and techniques that will help you understand how to achieve the best resolution for printing photos.
With the right knowledge, you can create stunning prints that showcase your creativity and passion for photography!
Read more about Photoshop:


Course

Light Effect Photoshop


Lightroom Course 2025

Adobe Photoshop Course 2025

Photo Editing Course


