
Rotate text in Photoshop isn’t just a cool trick, it’s essential for achieving the perfect aesthetic harmony on your project.
When you need to shift from the standard horizontal layout to something more dynamic, like angling your headers or swirling captions around objects, knowing how to manipulate text in Photoshop can open up a new world of creativity.
Grab this guide, and we’ll show you how simple steps can have a dramatic impact on your designs. Mastering how to rotate text in Photoshop can make even newbies feel like seasoned pros!
Table of Contents
Text Rotation in Photoshop
To rotate text in Photoshop is a simple task that can significantly enhance your graphic projects. Whether you’re creating advertisements, web graphics, or custom art, knowing how to rotate text in Photoshop is an essential skill.
Selecting the Text Layer
Before you can start to rotate the text, make sure you’ve selected the correct layer:
1. Open your project and locate the Layers panel.
2. Click on the text layer you wish to rotate. It’s usually labeled with a “T” icon.
3. Ensure this layer is active by observing whether it’s highlighted in the Layers panel.
Selecting the correct layer ensures any transformations apply only to your intended text in Photoshop without altering other elements of your design.
Using Free Transform Tool
Once your text layer is selected, proceed to use the Free Transform tool, a versatile feature for manipulating text in Photoshop:
1. Access Free Transform controls by pressing Ctrl + T (Cmd + T on Mac), or you can select it from Edit > Free Transform.
2. A Free Transform bounding box surrounds your chosen text when activated.
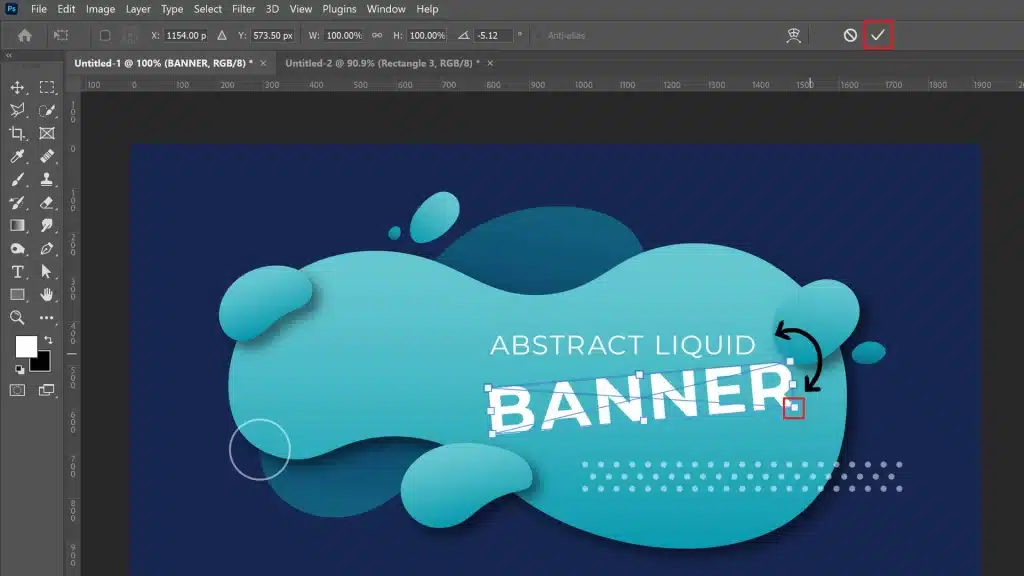
3. To rotate text in Photoshop, move your cursor to one of the corners until you see a curved arrow.
4. Click and drag left or right and observe as you rotate text freely around its axis.
5. Hold ‘Shift‘ while dragging if you need precise adjustments at 45-degree angles.
This move tool is crucial for direct control over rotation and positioning within your workspace.
Applying and Saving Changes
Finalize and protect your modifications:
1. Once you are satisfied with your text’s newly adjusted alignment, press Enter or click on the check mark at the top right of your workspace to apply the changes.
2. Save these adjustments to prevent data loss:
- Choose File > ‘Save As’ to create a new version while preserving the original
- Alternatively, choose ‘Save’ (Ctrl+S) to overwrite existing work if no backup is needed
Adjusting the Canvas Size for Rotation
Expanding the Canvas
Expanding your canvas provides the necessary space for rotation without any part of the text in Photoshop being cut off.
To expand the canvas:
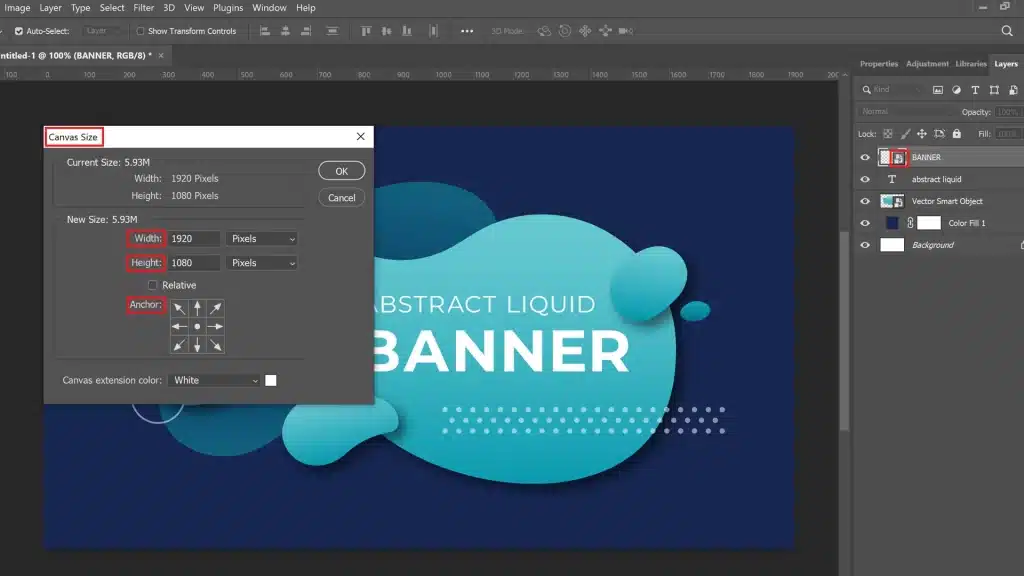
1. Go to Image in the top menu.
2. Select Canvas Size.
3. In the dialog box, increase the width or height values depending on the direction of your rotation.
4. Ensure you set the anchor point opposite to where you want to expand (e.g., if expanding width, set the anchor to the left or right side).
5. Click ‘OK‘ to apply changes.
This adjustment is particularly important when dealing with larger blocks of text or when you rotate text in Photoshop at unusual angles, which might require additional space, just like learning to make a Lightroom collage.
Maintaining Text Quality
After expanding your canvas and rotating your text in Photoshop, it’s essential to maintain high quality, crisp text graphics, especially at higher resolution settings:
Use Smart Object: Before you rotate text in Photoshop, convert your text layer into a Smart Object. This preserves its quality after transformation.
1. Right-click on the text layer
2. Choose ‘Convert to Smart Object‘
Adjust Sharpness: After rotation, sometimes small adjustments are necessary:
1. Select ‘Filter‘
2. Navigate through ‘Sharpen‘ options and apply as needed
By ensuring both enough canvas space and sharp image quality, not only does your rotated text stand out visually, but it remains practical and readable regardless of how much you adjust its orientation within Photoshop.
Using Rotate Tool Options
Accessing the Text Rotate Tool
To access the Rotate Tool in Photoshop, simply select the layer containing your text or object. Then, choose Edit from the top menu bar, followed by Transform, and finally, Rotate.
This sequence initiates a free transform mode where you can manually rotate text by dragging outside the bounding box corners.
Using this tool is crucial for textual adjustments, especially when applying artistic angles or correcting skewness.
It’s a fundamental skill for achieving professional-looking design elements in your compositions.
Setting the Rotation Angle
The precision in setting the rotation angle can dramatically influence the aesthetics of your design. After activating the Rotate option as described:
1. Look for a reference point (the center by default) that you might want to change based on your design needs.
2. Enter a specific value in the angle field on the options bar at the top if you have an exact degree in mind.
3. Alternatively, click and drag outside of the bounding box to visually set your desired angle.
4. Press Enter when satisfied to apply the rotation.
This method ensures that each element aligns perfectly with your composition without compromising on visual fidelity.
Understanding these settings allows for tailored customization and adds to a proficient workflow when handling various elements across your projects.
Fine-Tuning Text Placement After Text Rotation
Aligning Text Post-Rotation
After rotating text in Photoshop, it might not automatically sit where you want it to on your Photoshop rotate canvas. It’s crucial to adjust its alignment manually to maintain balance and harmony in your composition.
Here’s how you can achieve precise alignment:
1. Select the text layer: Click on the layer that contains your rotated text.
2. Use the Move Tool: Select the Move Tool from the toolbar or press ‘V’ on your keyboard.
3. Adjust positioning: Click and drag the text to the desired location. For finer adjustments, use the arrow keys on your keyboard.
Remember, slight nudges can make a big difference in how integrated the text feels within your overall design.
Using Alignment Tools
| Topic | Description |
|---|---|
| Alignment Options | With your text layer selected, look towards the options bar at the top of Photoshop when the Move Tool is active. You’ll find align commands such as “Align vertical centers” or “Align horizontal centers.” |
| Guide Lines | Drag guides from rulers (View > Rulers) to set the exact lines where you want your text to align. |
| Smart Guides | Turn on Smart Guides (View > Show > Smart Guides). These help by snapping your text into alignment with other elements or suggested alignments based on Photoshop’s calculations. |
Resizing the Text Before or After Text Rotation

Deciding When to Resize
Understanding when to resize your text is crucial in maintaining clarity and visual appeal. If you’re aiming for precise control over typography aesthetics:
- Before Rotation: Consider resizing beforehand if alignment with other page elements is critical. This allows for accurate adjustments relative to these components.
- After Rotation: If dynamic flow within the artwork is prioritized, resize after rotation. This might cater better to spontaneous, creative adjustments according to the new
Steps to Resize Text
Resizing text in Photoshop efficiently involves a few step-by-step procedures that enhance your workflow:
1. Selecting the Text Layer: Ensure the layer containing your text is active.
2. Using free Transform Tool:
Shortcut Method: Press Ctrl + T (Cmd + T on Mac) for quick access to the transform controls tool.
3. Menu Bar Access: Click Edit > Free Transform for manual selection.
4. Adjusting Scale:
Drag corners to adjust size while maintaining proportions by holding down the Shift key as you drag.
5. Applying Changes: Hit Enter or double-click inside the transform controls box to apply changes.
Knowing how and when to resize can significantly improve your designs, especially when mastering techniques like knowing how to rotate text in Photoshop.
This technique efficiently manipulates textual dynamics on a digital canvas, offering fresh perspectives and engaging visual plays in layouts.
Working with Layer Styles for Text Rotation
Once you’ve mastered how to rotate text in Photoshop, enhancing these texts with layer styles can dramatically improve their visual impact.
Layer styles offer a variety of customization options, from shadow and glow effects to bevel and embossing, allowing your rotated text to stand out or integrate subtly into your design.
Here we’ll explore how each method affects final outcomes.
Applying Effects to Text Rotation
After you rotate text using the essential how to rotate text in Photoshop technique, applying effects can make it more dynamic. Here’s how you can bring more attention to your text:
- Drop Shadow adds depth by creating a shadow behind the text. It is ideal for making text pop against similar background colors.
- Outer Glow: Useful for creating a halo effect, which is perfect for emphasizing important headers.
- Bevel and Emboss: This gives the text a three-dimensional look, making it leap off the page.
Adjusting Style Settings
- Depth: Adjusts how pronounced an emboss or bevel appears.
- Spread: Widens or narrows the area of glow and shadow effects.
- Size: Manipulates the scale of the effect; larger sizes create a more dramatic impact.
Experiment with different combinations of settings to achieve various artistic or textual emphases that enhance readability and aesthetic appeal.
Using layer styles creatively can significantly change the appearance of rotated text while maintaining legibility and design harmony.
Navigating the Layers Panel
The Layers Panel in Photoshop is essential for managing and organizing different elements of a project.
It allows users to adjust properties like opacity and visibility independently for each layer, making complex compositions easier to manage.
Mastering the Layers Panel, which offers features to reorder, lock, and group layers, is crucial for creating efficient and detailed digital artwork.
Tips for Maintaining Text Rotation Clarity During Rotation
Choosing the Right Font and Size
The choice of font and size significantly impacts text clarity when applying transformations like rotation.
Opt for fonts that are inherently clean and legible; sans-serif fonts such as Arial or Helvetica perform well under rotation due to their straightforward character designs.
Recommended Fonts and Sizes for Rotation
| Font Name | Recommended Size |
|---|---|
| Arial | 14pt or larger |
| Helvetica | 12pt or larger |
Ensure that the size of your text is large enough to remain legible after rotation a minimum of 12 points is advisable.
When considering how to rotate text in Photoshop, always preview your adjustments to optimize font type and size choices based on the specific requirements of your project.
Techniques to Avoid Pixelation
Pixelation occurs when bitmap images (including rasterized text) are enlarged beyond their resolution, causing visible pixels. To maintain the crispness of rotated text:
- Use High-Resolution Settings: Work with high DPI settings in Photoshop before starting your design. This ensures that when you rotate the text, there's enough detail present to prevent pixelation.
- Vector-Based Text: Always keep your text editable (vector form) until the final stages of design. Vector formats preserve edge definition regardless of rotation angle, preventing any loss in quality.
- Smart Object Conversion: Convert your text layer into a Smart Object before rotating it. This approach allows you to perform non-destructive transformations, which means you can tweak rotation angles without degrading the original text quality.
Applying these techniques will enhance the readability and overall appearance of rotated texts, allowing them to integrate seamlessly into your projects without compromising quality.
For more detailed Photoshop tutorials on working with Adobe Photoshop, including gradient techniques.
Additional Tools to Facilitate Text Rotation in Photoshop
Using Grids and Guides
Grids and guides are indispensable in achieving precise alignment while rotating text in Photoshop. Here’s how to use them effectively:
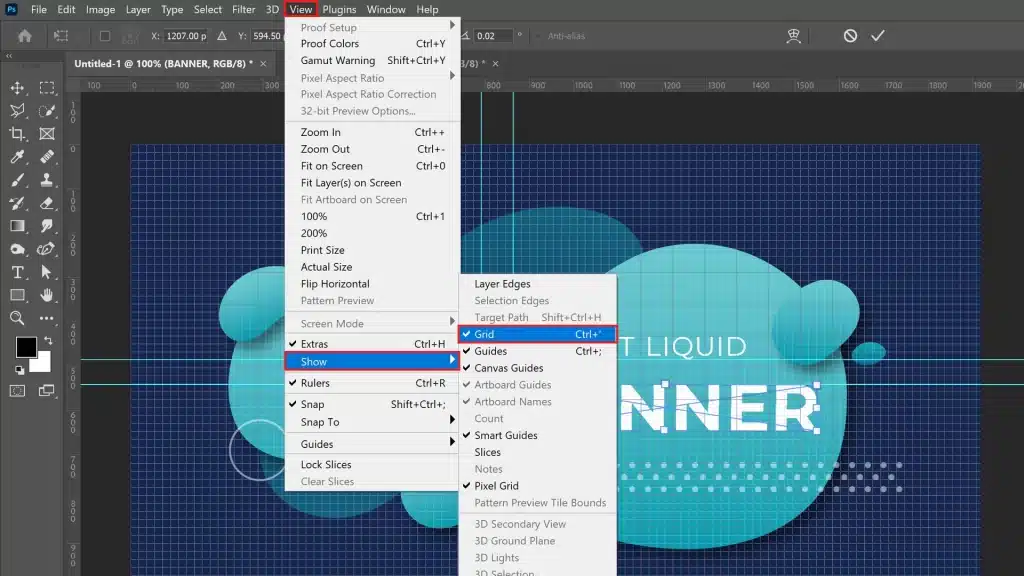
1. Open your project and select the text layer you want to adjust.
2. Navigate to “View” in the top menu bar, then choose “Show” and select “Grid.” Alternatively, activate “Guides” for more refined positioning.
3. With grids or guides visible, select the text transform box with the Move Tool (V).
4. Rotate the text by hovering near a corner until you see a curved arrow, then drag it to your desired angle, using the grid lines or guides for precision.
This method ensures that your adjustments are exact, aiding in maintaining a balanced and visually appealing composition.
Shortcut Keys for Faster Rotation
For those who prefer keyboard shortcuts for efficiency, Photoshop offers quick key combinations to rotate text:
1. Select the text layer you wish to rotate.
2. Press Ctrl+T (Cmd+T on Mac) to activate Free Transform mode.
Once in Free Transform mode:
1. Rotate clockwise: Press Ctrl+] (Cmd+] on Mac).
2. Rotate counterclockwise: Press Ctrl+[ (Cmd+[ on Mac).
These shortcut keys allow for rapid adjustment without interrupting your creative flow.
Utilizing these Photoshop shortcuts can drastically reduce design time and simplify repetitive tasks.
For more shortcuts and tips, check out this comprehensive guide on Lightroom shortcuts.
Frequently Asked Questions

How do I rotate text in Photoshop?
To rotate text in Photoshop, first select the text layer you wish to rotate.
Then, choose the Edit menu, go to Transform, and select Rotate.
Click and drag outside the bounding box of your text to rotate it freely to your desired angle.
How do I change text direction in Photoshop?
Changing text direction in Photoshop is easy.
Select the text layer and find the vertical Type tool.
Click on the character panel, then choose the Paragraph direction button.
You can switch between Right-to-Left and Left-to-Right to adjust the direction as needed.
How do I rotate text that is warped in Photoshop?
To rotate warped text in Photoshop, first apply your warp text effect via Format > Warped Text.
Next, select the text layer, choose the Edit menu, select Transform box, and then Rotate.
Now, you can adjust the skewed text to any angle, maintaining the warp text effect.
How do I make text horizontal in Photoshop?
Making text horizontal in Photoshop requires selecting the text layer you want to adjust.
Then, simply use the Horizontal Type Tool to click on your text and ensure the orientation option at the top toolbar is set to horizontal.
This method straightens any text alignment for a clean, horizontal presentation.

Conclusion
Mastering the art of how to rotate text in Photoshop has allowed me to elevate my design projects in ways I never thought possible.
For instance, just last week, I was working on a promotional poster and found the perfect spot for a catchy phrase. However, the text needed a dynamic twist to truly pop.
By applying the techniques on how to rotate text in Photoshop discussed above, I was able to rotate the text precisely, enhancing the overall visual appeal and drawing more attention to the key message.
A deep understanding of how to rotate text in Photoshop can transform good designs into great ones.
Whether you’re looking to perfect your photo editing techniques or enhance your creative designs, our Photoshop course and Lightroom course offer comprehensive training that caters to both beginners and seasoned professionals.
Additionally, if you’re considering investing in Adobe software, now is a great time to explore. Click through these links for special discounts on Adobe Photoshop and Adobe Lightroom.
Read more about Photoshop:


| Aspect | Overview |
|---|---|
| Understanding Your Drone’s Camera and Settings | Learn about key camera settings like ISO, shutter speed, aperture, white balance, and picture profile/color mode to enhance image quality. |
| Flight and Safety Precautions | Conduct pre-flight checks, practice basic maneuvers, and understand no-fly zones to ensure safety and compliance. |
| Essential Add-Ons for Enhanced Photography | Utilize accessories like ND filters, extra batteries, and carrying cases to improve the photography experience. |
| Creative Techniques and Composition | Explore different angles and composition techniques to capture unique and visually interesting shots. |
| Advanced Flying Techniques | Develop skills in advanced flying maneuvers such as orbiting, revealing, and tilt-revealing to create dynamic footage. |
| Editing and Post-Processing | Use color correction, cropping, and HDR processing to refine images and bring out their best qualities. |
| Staying Current with Regulations | Stay informed about FAA guidelines and local laws to ensure legal and safe drone operation. |
Course

Light Effect Photoshop


Lightroom Course 2025

Adobe Photoshop Course 2025

Photo Editing Course


