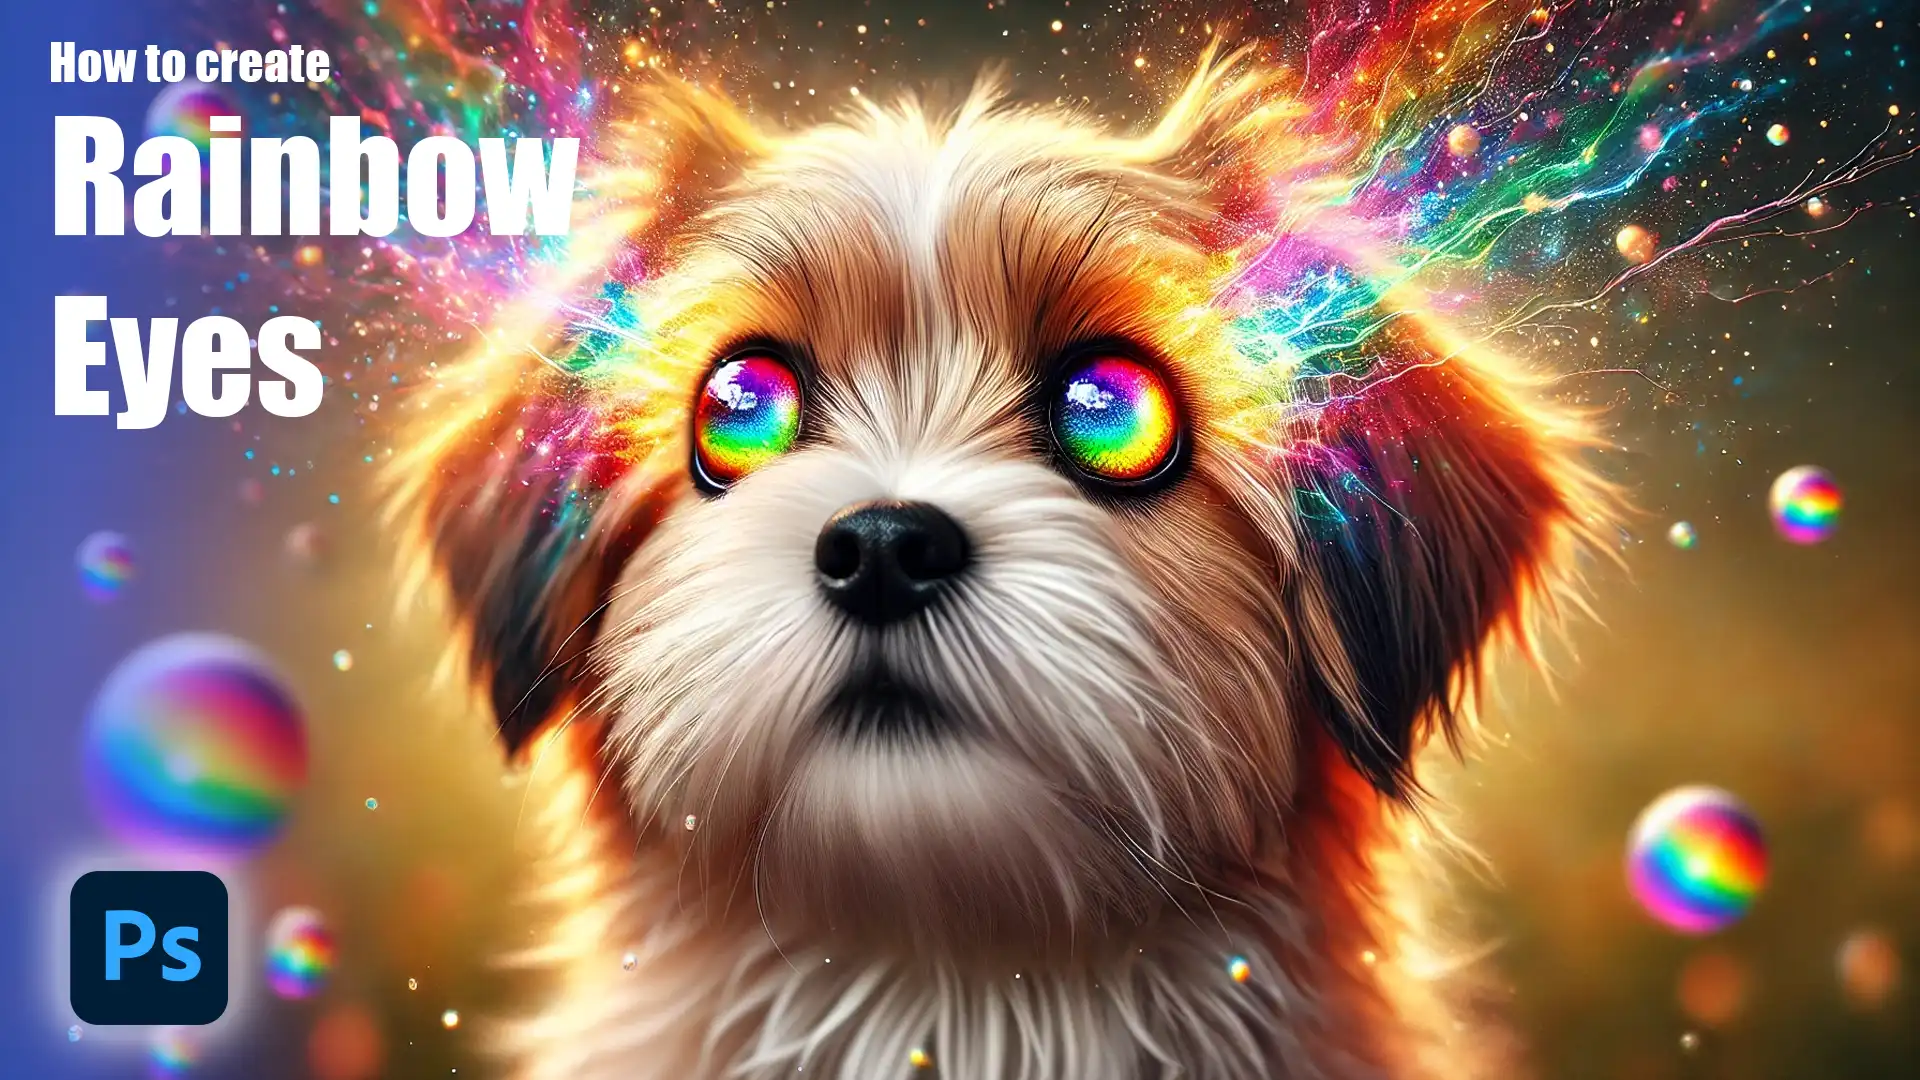
Rainbow Eyes Photoshop: Create Stunning Color Effects
Rainbow Eyes Photoshop: Create Stunning Color Effects
Have you ever wondered how to create stunning rainbow eyes in Photoshop?
If you’ve ever been captivated by vibrant, multicolored irises and wanted to bring that dazzling look to your photos, you’re in the right place. In this tutorial, I’ll walk you through the steps to achieve mesmerizing rainbow eyes using Photoshop.
Imagine transforming a simple portrait into a captivating masterpiece that grabs attention instantly.
Whether you’re a beginner or a seasoned pro, this easy-to-follow tutorial will help you add a splash of color and creativity to your images.
Ready to make your photos stand out? Let’s dive in and unlock the magic of rainbow eyes Photoshop!
Table of Contents
How to Create Vibrant Rainbow Eyes in Photoshop
Creating vibrant rainbow eyes in Photoshop can elevate your photos with a burst of color and creativity. This effect not only makes your images stand out but also adds a unique, artistic touch that draws attention.
Using rainbow colors in the eyes can transform a simple portrait into something visually striking and memorable. It’s a fun way to experiment with color and explore your creativity, making your photos more engaging and dynamic.
For personal projects or professional portfolios, adding rainbow eyes is a powerful way to enhance visual impact and showcase your artistic skills.
Overview of Photoshop's Versatility
Photoshop is a powerful tool for both amateurs and professionals. Its broad range of features makes it ideal for tasks like enhancing “eyes” with “rainbow” effects.
Understanding Rainbow Eyes
“Rainbow eyes” can transform an image, giving it a unique and vibrant look. This effect is interesting and adds a burst of color to the “eye“.
What is Rainbow Eyes Photoshop?
This is simply using Photoshop to add a “rainbow” effect on “eyes“.
It involves layers, blending modes, and a mix of colors. The steps are simple to follow and can bring life to your photos.
Steps to Create Rainbow Eyes in Photoshop
Following this Photoshop tutorial to produce rainbow eyes will guide you through adding vibrant, eye-catching colors that transform and elevate the visual appeal of your portraits.
Step 1: Open the Image
First, launch Photoshop and open the image you wish to edit. Use quality images for the best results.
Step 2: Zoom In on the Eyes
Zooming focuses on the eyes, allowing better precision while editing. Shortcut: Hold down “Alt” and scroll with your mouse.
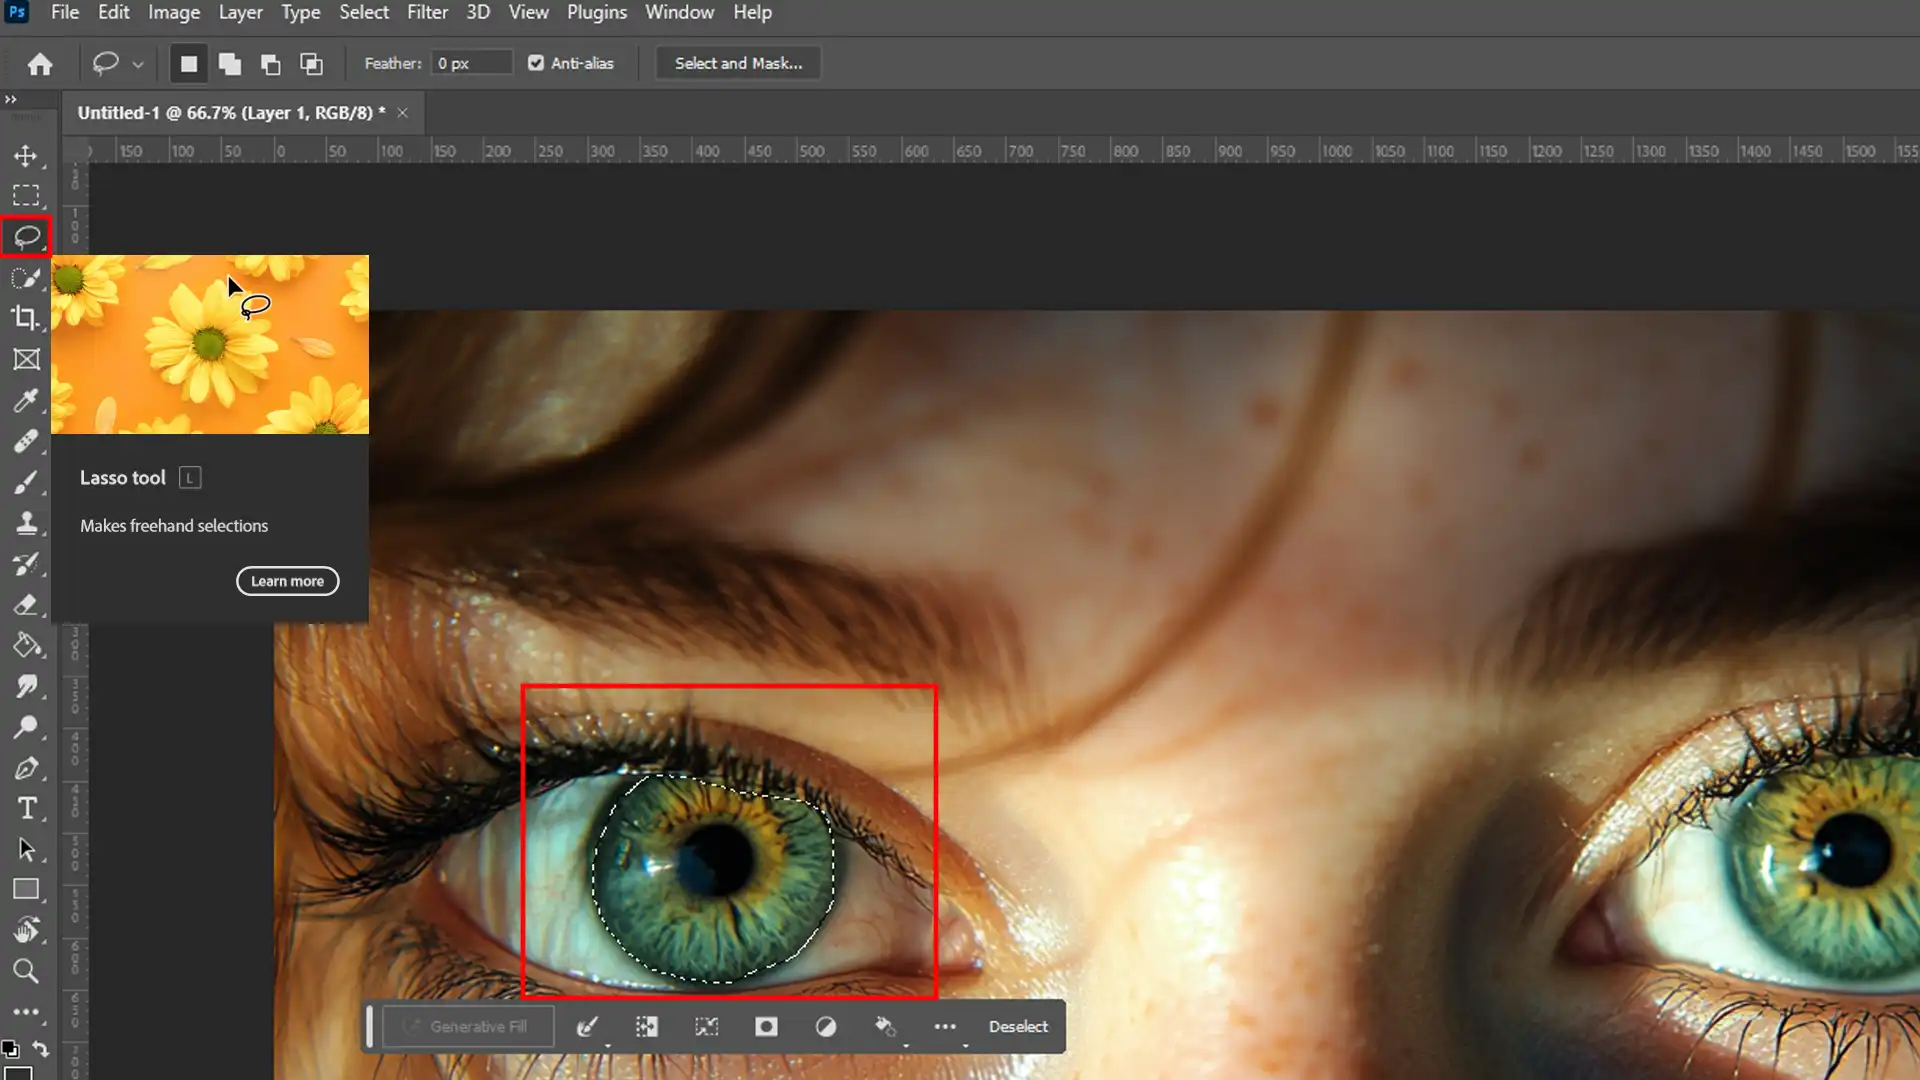
Step 3: Select the Eyes
Use the lasso tool or the “Pen Tool” to select the eyes carefully. Accuracy is important here for the best results.
Step 4: Add a New Layer
Make a new “layer” for the “eye” colors. Ensures the original image remains untouched.
Step 5: Apply the Colors
Use the “Brush Tool” to paint “rainbow” colors on the new “layer“. Avoid over-saturation to maintain realism.
Step 6: Blend the Colors using Layer Modes
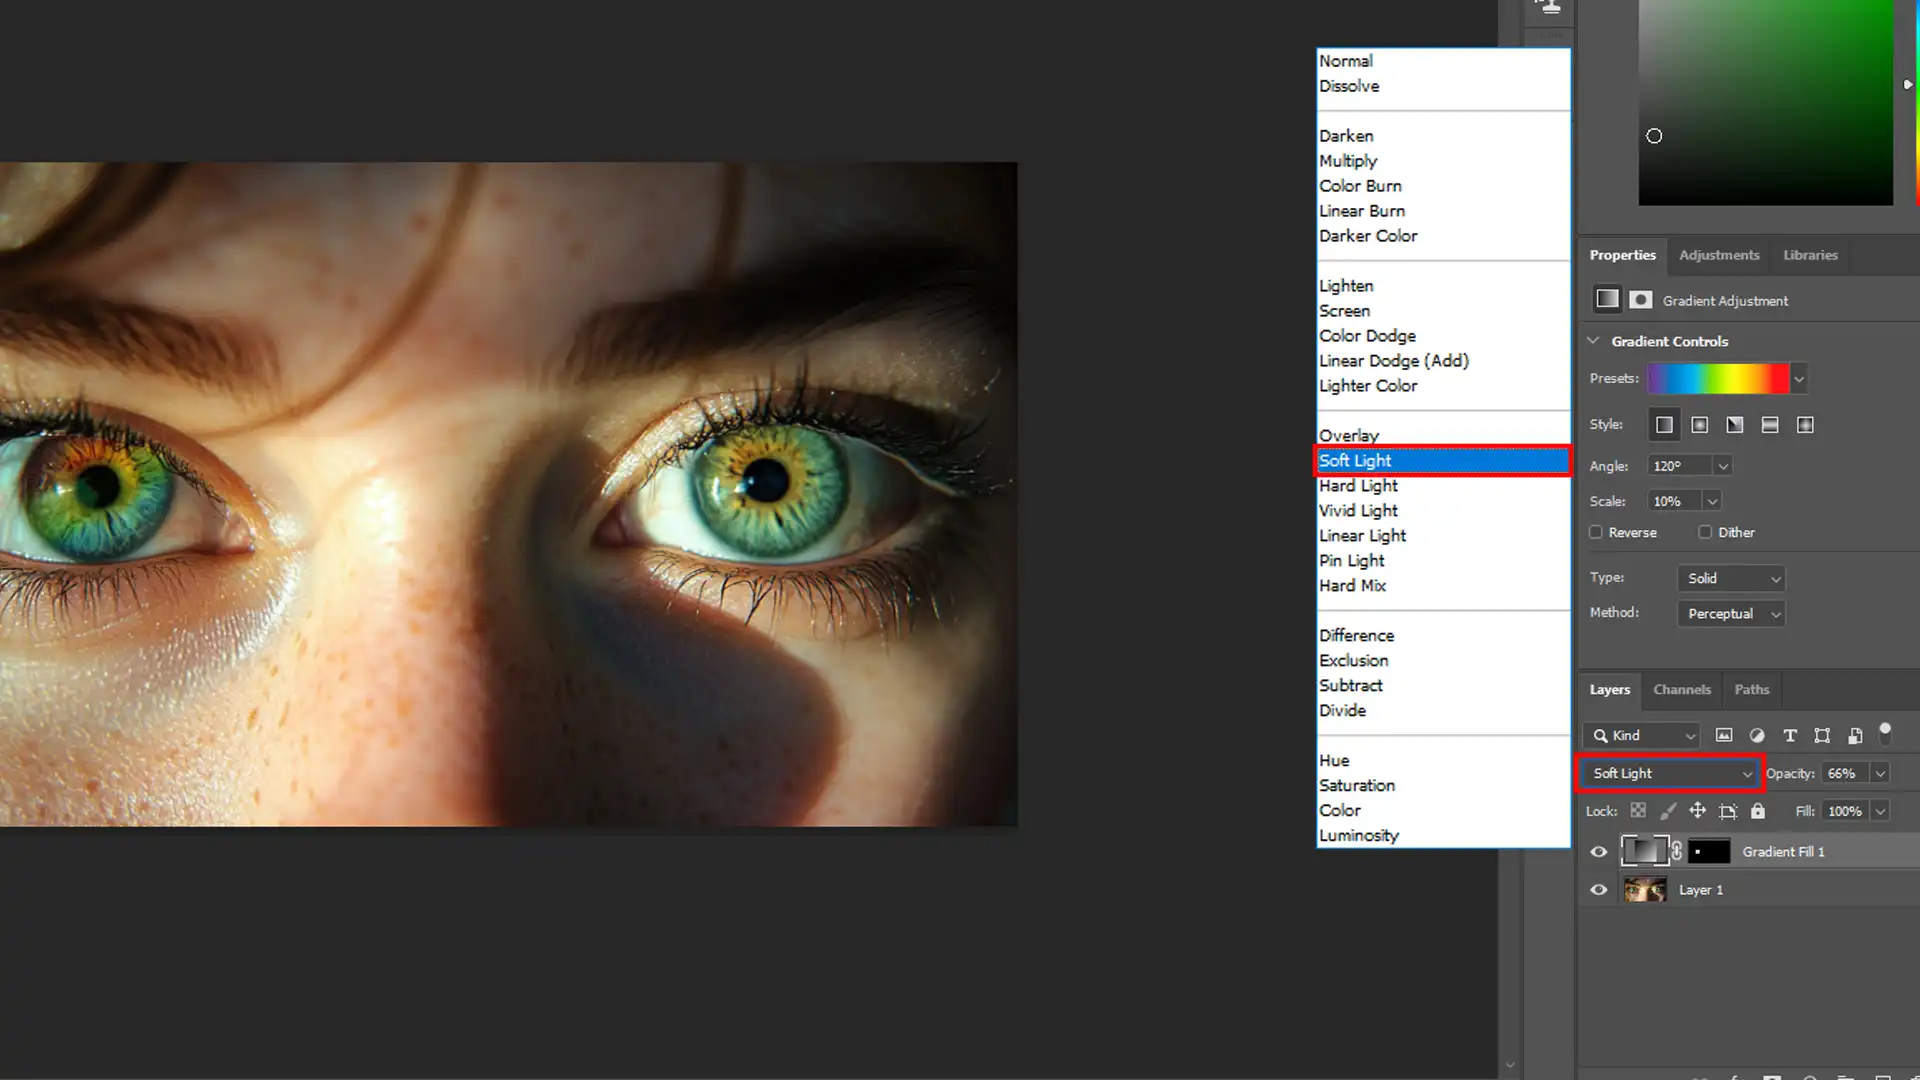
Select the appropriate blending mode (like Overlay or Soft Light). Blending modes help the colors look more natural on the eyes.
Step 7: Refine the Edges
Use a soft-edge eraser or mask out excess colors. Eliminates any unnatural-looking parts of the “eye“.
Why Use Photoshop for Rainbow Eyes?
Photoshop offers a flexible and detailed approach to “creating” “rainbow eyes”. Allows you to “play” and explore creativity without limits.
Pro Tip: The best way to master “Photoshop tutorials” is through practice. Follow the steps closely and remember: each “mistake” teaches you something valuable.
To further enhance your skills, consider learning about different “Photoshop shortcuts” to speed up your workflow.
Advanced Guide to Creating Rainbow Eyes in Photoshop
In this step-by-step Photoshop tutorial on creating rainbow eyes, you’ll embark on a creative journey that transforms your photos with vibrant color. The process begins by isolating the eyes from the rest of the image, ensuring precise application of color.
Next, you’ll work on a new layer dedicated to the rainbow effect, allowing you to experiment without affecting the original photo. The blending of colors and adjustment of layer modes will integrate the vibrant hues naturally into the eyes.
Finally, fine-tuning the edges will ensure a seamless and realistic appearance. This process is designed to enhance your editing skills and add a striking visual element to your images.
Here is a comprehensive breakdown of the steps and techniques involved in creating rainbow eyes in Photoshop. This table will guide you through each important aspect, from preparing your image to the final adjustments.
Aspect
Overview
Preparing Your Image
Ensure high-quality images and zoom in on the eyes for precise edits. Proper preparation sets the stage for detailed work.
Using the Selection Tool
Select the eyes carefully with the Lasso or Pen Tool. Precision is key for a realistic and impactful rainbow eye effect.
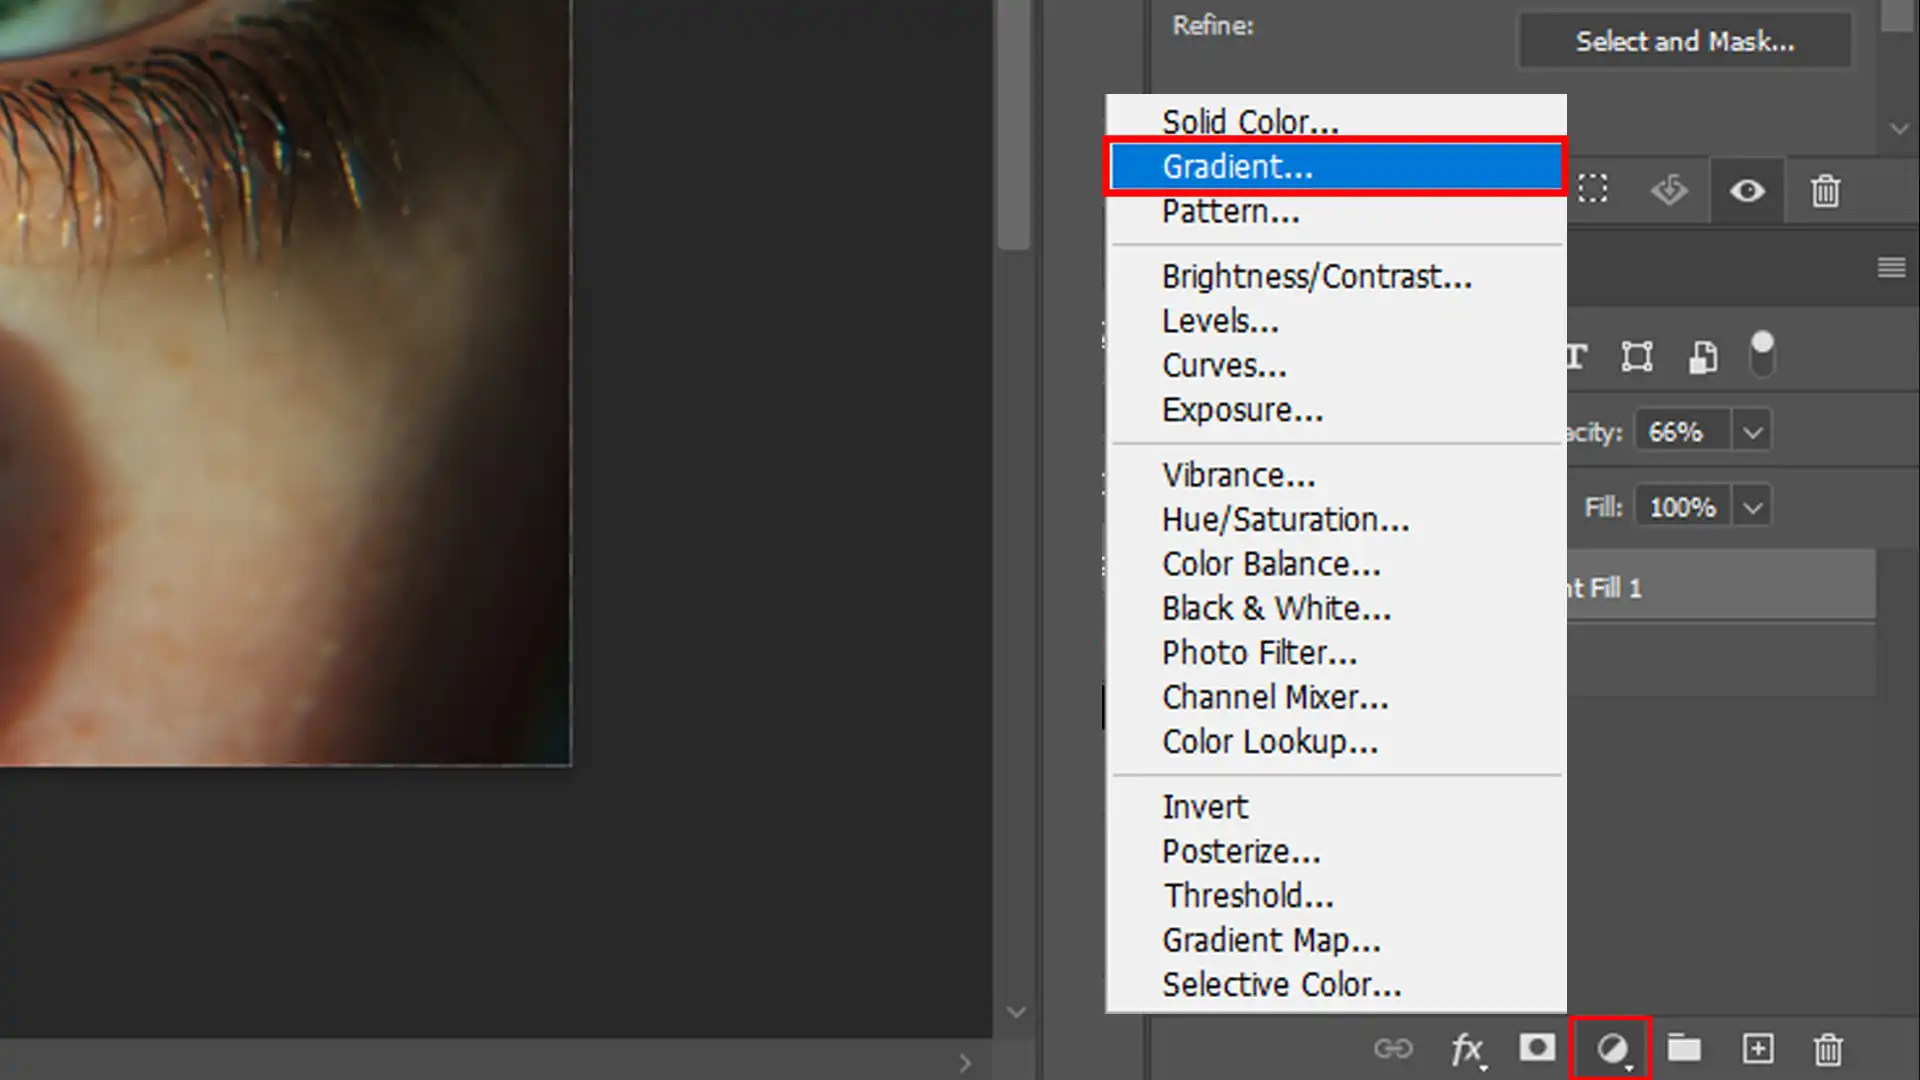
Applying the Rainbow Gradient
Choose a vibrant gradient and apply it to a new layer. Ensure it covers the entire eye area evenly to create a striking effect.
Adjusting the Gradient Overlay
Use blending modes like Overlay or Soft Light to blend colors naturally. Refine with the Eraser Tool for a polished look.
Final Touches and Adjustments
Make final adjustments such as tweaking opacity and checking the overall look. Minor changes can significantly impact the final image.
Preparing Your Image
Alright, now that you’ve got Photoshop open, it’s time to prepare your image.
Ensure the image quality is good enough for detailed work. You don’t want a blurry start.
Zoom in on the eyes for better precision. Prep work makes every detail shine in the final result.
Using the Selection Tool
The next step is all about precision.
Use the Lasso Tool or Pen Tool to select the eyes. Be patient. The more accurate the selection, the better your rainbow eye will turn out.
Remember, Photoshop shortcuts can speed up your process. You need to get accustomed to them over time for a smoother workflow.
When working on your rainbow eye effect, use the Lasso Tool or Pen Tool to carefully select the eyes.
Precision is important; the more accurate your selection, the more stunning and realistic your rainbow eye will appear. Don’t rush the process. Take your time to ensure every detail is perfect.
Mastering these shortcuts will help you work more efficiently and focus on creating that eye-catching rainbow eye effect.
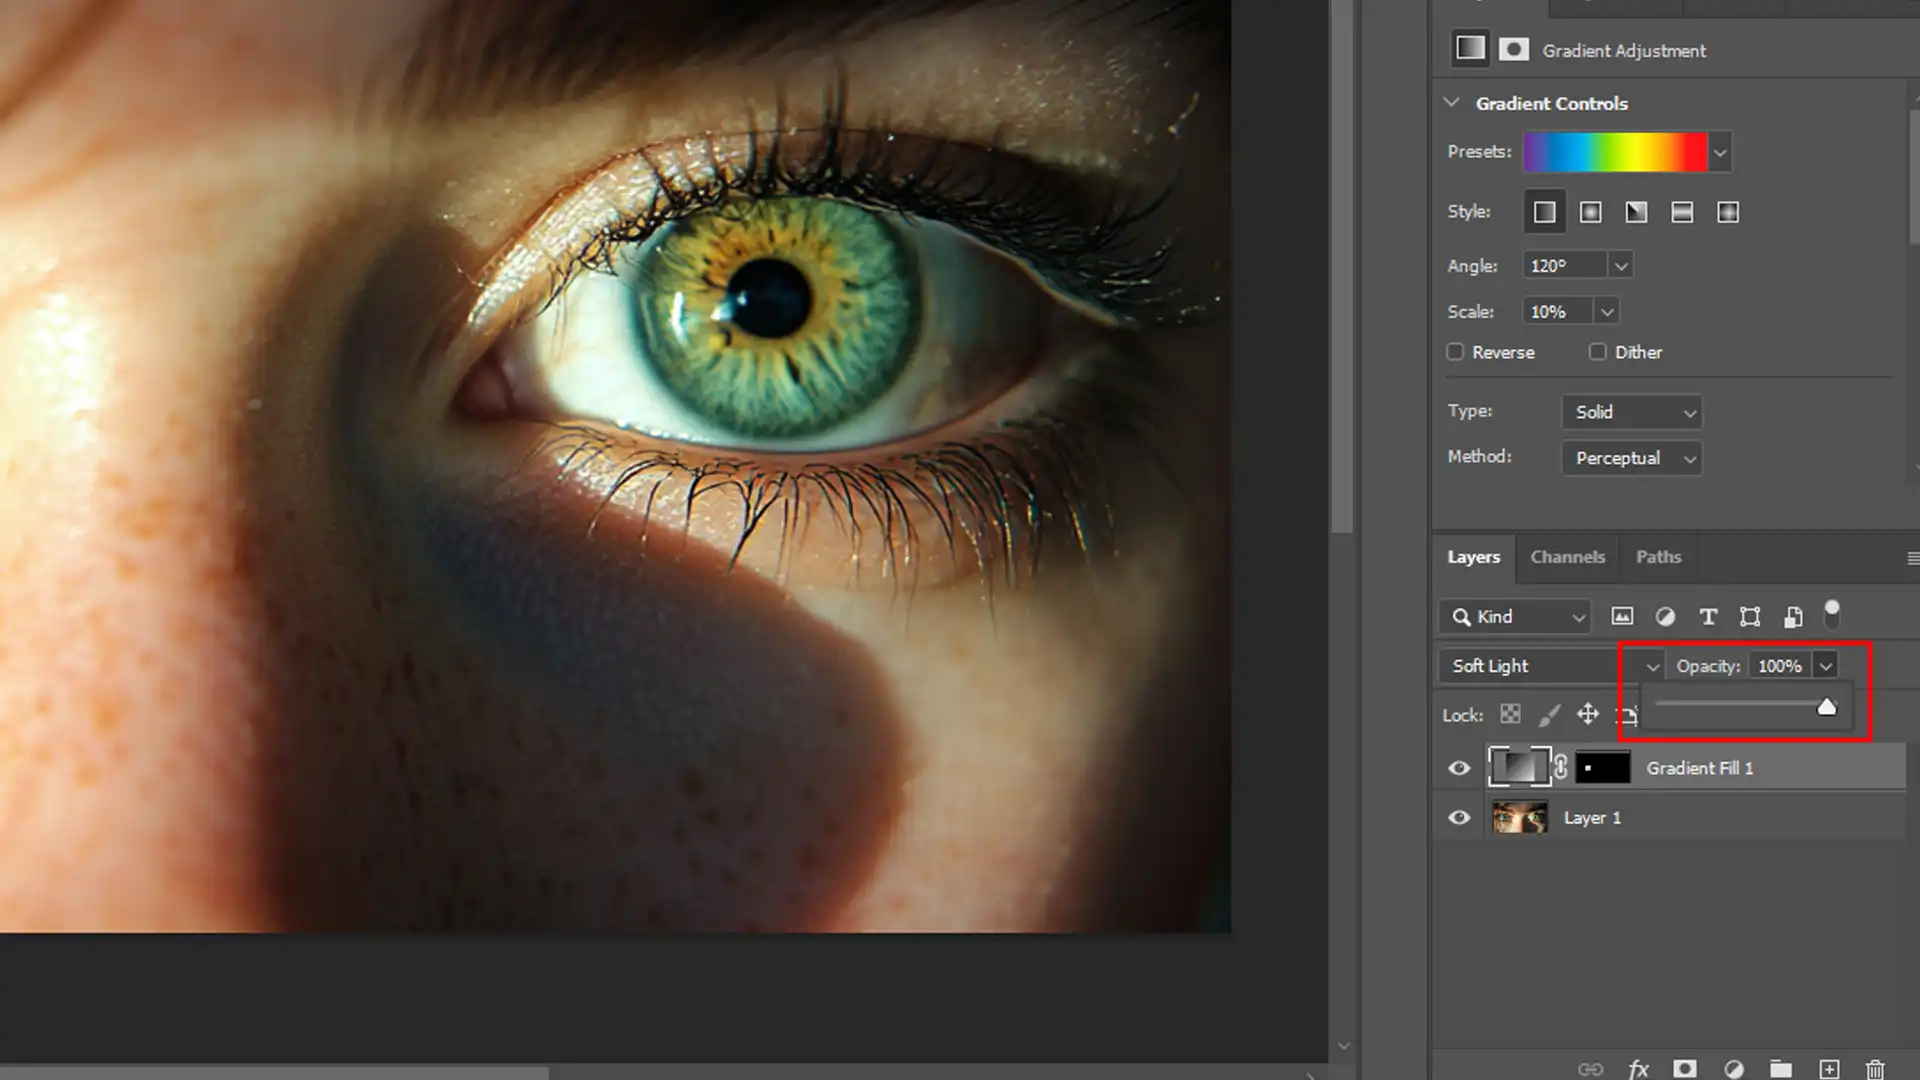
Applying the Rainbow Gradient
Choosing the right gradient is important for achieving the desired effect, as it ensures the colors blend seamlessly and enhance the overall visual impact of your design. This is where the rainbow gradient technique comes into play
Make a new layer just above the one with the eyes.
Choose your rainbow gradient from the Gradient Tool’s options. A vibrant selection will make the effect stand out.
Make sure the gradient covers the entire selected eye area evenly.
Adjusting the Gradient Overlay
After adding the gradient, adjust the blending mode of your layer to Overlay or Soft Light. This ensures the rainbow colors blend naturally with the eye.
Use the Eraser Tool with soft edges to refine the color application, ensuring it stays within the eye boundaries.
Final Touches and Adjustments
We’re almost done!
Make any final adjustments like tweaking the opacity of the gradient layer to perfect the look. Keep playing with the settings until you're satisfied.
Lastly, zoom out to see how the entire image looks. Sometimes, minor tweaks make a huge difference.
Pro Tip: Save your work frequently in different stages. This way, you can come back anytime to remove or add elements without starting over.
Keeping backup versions allows you to credit specific stages in your project and refer back to earlier steps, as shown in the tutorial, making it easier to remove or adjust elements as needed.
Tips and Tricks for Perfect Rainbow Eyes
Let’s dive into creating stunning rainbow eyes with some simple yet effective methods using Photoshop.
The goal is to get vibrant, realistic colors that blend naturally with the eyes. Follow these steps to make your edits look professional.
Enhancing the Effect with Layer Masks
Layer Masks are significant in achieving perfection. Always use high-quality images. A clear image provides the best basis for precise editing. Here are some steps:
First, zoom in on the eyes. This gives better control.
Then, use the Lasso Tool or Pen Tool to carefully select the eye area. Accuracy here makes everything easier later.
Next, make a new layer above your eye selection. Layer management helps keep things organized.
Apply a gradient map to this new layer. Choose a vibrant rainbow gradient because it adds flair to the eyes.
Carefully use the Eraser Tool to refine the edges. A soft brush minimizes harsh transitions.
Using Blending Modes for Realism
The right blend mode brings the modification to life. Let’s make those rainbow eyes look natural:
Set the blending mode of your rainbow layer to Overlay or Soft Light. These modes create an authentic blend with existing eye colors.
Adjust opacity if needed. Small tweaks can make a big difference in realism.
Zoom out and assess your work. Sometimes, subtle details need a second look.
For final touches, play around with other blending modes like Color or Hue. These can add different effects and give your edit a unique feel.
Pro Tip: Use adjustment layers to fine-tune color and contrast without permanently changing the original image. This non-destructive technique lets you perfect your rainbow eyes with ease.
For more advanced techniques, consider exploring the tips for Lightroom editing as it offers a wide range of tools for color correction, exposure adjustments, and more or how to use the content-aware fill for even more creative possibilities.
Creative Ideas for Using Rainbow Eyes
Rainbow eyes can infuse your images with a burst of creativity, making them stand out and capture attention with a unique, colorful twist.
Incorporating Rainbow Eyes in Portrait Photography
When using rainbow eyes in portrait photography, the key is subtlety. Adjusting the opacity often results in a natural blend. Select the eye area precisely with tools like the lasso tool or the pen tool.
This ensures accurate modification and maintains the quality of the original image. To stay organized, file all modifications on a new layer above your selection. This practice aids in quick undo steps without worrying about errors.
Next, apply a vibrant rainbow gradient map on the new layer. The blending mode should be set to Overlay or Soft Light. This allows the rainbow effect to meld naturally with the eye.
Constantly zoom out to assess your work and refine details as needed. Fine-tuning never hurts. The rainbow effect in portraits offers an ethereal look, enhancing the subject’s aura without overwhelming the viewer. Remember, less is often more.
Rainbow Eyes in Digital Art
Rainbow eyes in digital art offer vast creative potential. Start by selecting the eye area with precision. Use a new layer for your modifications.
Add a vibrant gradient map and set the blending mode to Overlay or Soft Light. For digital art, you can also experiment with blending modes like Color or Hue for a truly unique effect. Adjust the opacity of the new layer to maintain a natural look. Often, setting it between 50-70% achieves a good balance.
Also, use adjustment layers for color and contrast tweaking. This non-destructive method allows for multiple edits without losing the original eye details. Constantly zoom out to get a holistic view and refine. Experimentation in digital art is significant to unlocking potential.
Finally, every detail matters. The practice of these steps can result in professional-looking results over time. Each phase contributes to the overall quality and appeal. Plus, it adds a touch of uniqueness to your artwork.
Pro Tip: Always keep a duplicate of your original image layer untouched when you brighten your eyes with Photoshop or engage in Photoshop face editing. This ensures that if you need to revert or make changes, you have the original image as a reference point.
This approach is especially useful for maintaining balance and harmony in your composition in photography, allowing you to experiment freely without compromising the integrity of the original photo.
Frequently Asked Questions
What steps are involved in making rainbow eyes in Photoshop?
Open your image in Photoshop.
Select the Elliptical Marquee Tool from the toolbox to make a circular selection around the eye.
Go to Layer > New Adjustment Layer > Hue/Saturation. Click OK.
In the Properties panel, check the Colorize box and adjust the hue sliders to form a rainbow effect across the eye.
Use the Eraser Tool to clean up any areas where the rainbow effect spills outside the eye.
How do you make rainbow eyes?
Open your portrait photo in Photoshop.
Zoom in on the eye and select them using the Lasso Tool.
Make a new layer and fill it with a gradient. Choose the Rainbow gradient preset.
Change the blending mode of the layer to Overlay to blend the rainbow with the natural eye color.
Adjust opacity to get the desired intensity of the rainbow colors.
How do you make a rainbow effect in Photoshop?
Open the image you want to edit.
Select the area where you want the rainbow effect using the Rectangular Marquee Tool.
Create a new layer and go to Edit > Fill. Choose Gradient and select the Rainbow gradient.
Adjust the gradient angle and scale in the Gradient Fill dialog box to fit the image context.
Reduce the layer opacity or change the blending mode for a more natural look.
What tool makes rainbows in Photoshop?
The Gradient Tool is primarily used to create rainbow effects.
Access it from the toolbox or press G on your keyboard.
To create a rainbow, select the Gradient Editor and choose the Rainbow preset from the list of gradients.
You can adjust the angle and scale of the gradient to customize the rainbow effect.
Learning the technique of rainbow eyes Photoshop has changed how I work on my creative projects. By following this method, I’ve been able to give my portraits a fresh and unique look that stands out in my work.
The vibrant colors and dynamic effects of rainbow eyes grab attention and make any image pop. If you’re looking to sharpen your skills and learn more advanced techniques, I recommend checking out this Photoshop Course and this Lightroom Course.
These courses have helped me improve and push my creative limits. Also, for those who want to dive deeper into Adobe’s tools, consider exploring Adobe’s Photoshop and Lightroom. These tools have been key in helping me create eye-catching images.
If this article has helped you, then Like and Share it with your friends
$2,061.00Original price was: $2,061.00.$1,061.00Current price is: $1,061.00. 27584
Download Your Free Guide Now!
Discover the secrets of photography with our printable guide! Master essential techniques like aperture, shutter speed, and ISO to create stunning images. Get your free printable PDF now and start turning your snapshots into masterpieces!