Have you ever wondered why the PSDfileformat is crucial when working with graphic design?
The fantastic capability of preserving layers makes PSD’s treasure chests, unlocking the ability to tweak and enhance visual projects effortlessly.
Whether you’re a budding designer or just starting to dabble in digital arts, understanding this file format can significantly boost your creativity and efficiency.
So, let’s dive into the world of PSDfiles and discover how they can transform your design experience!
Table of Contents
How to Resize Images in Photoshop Using PSD File Format
Resizing images in Adobe Photoshop using the PSD file formats can significantly enhance your editing workflow. The PSD file retains image data, layer and mask, and other detailed information.
Open your PSD file: Launch Adobe Photoshop and open a PSD file by navigating to File > Open or using the shortcut Ctrl + O.
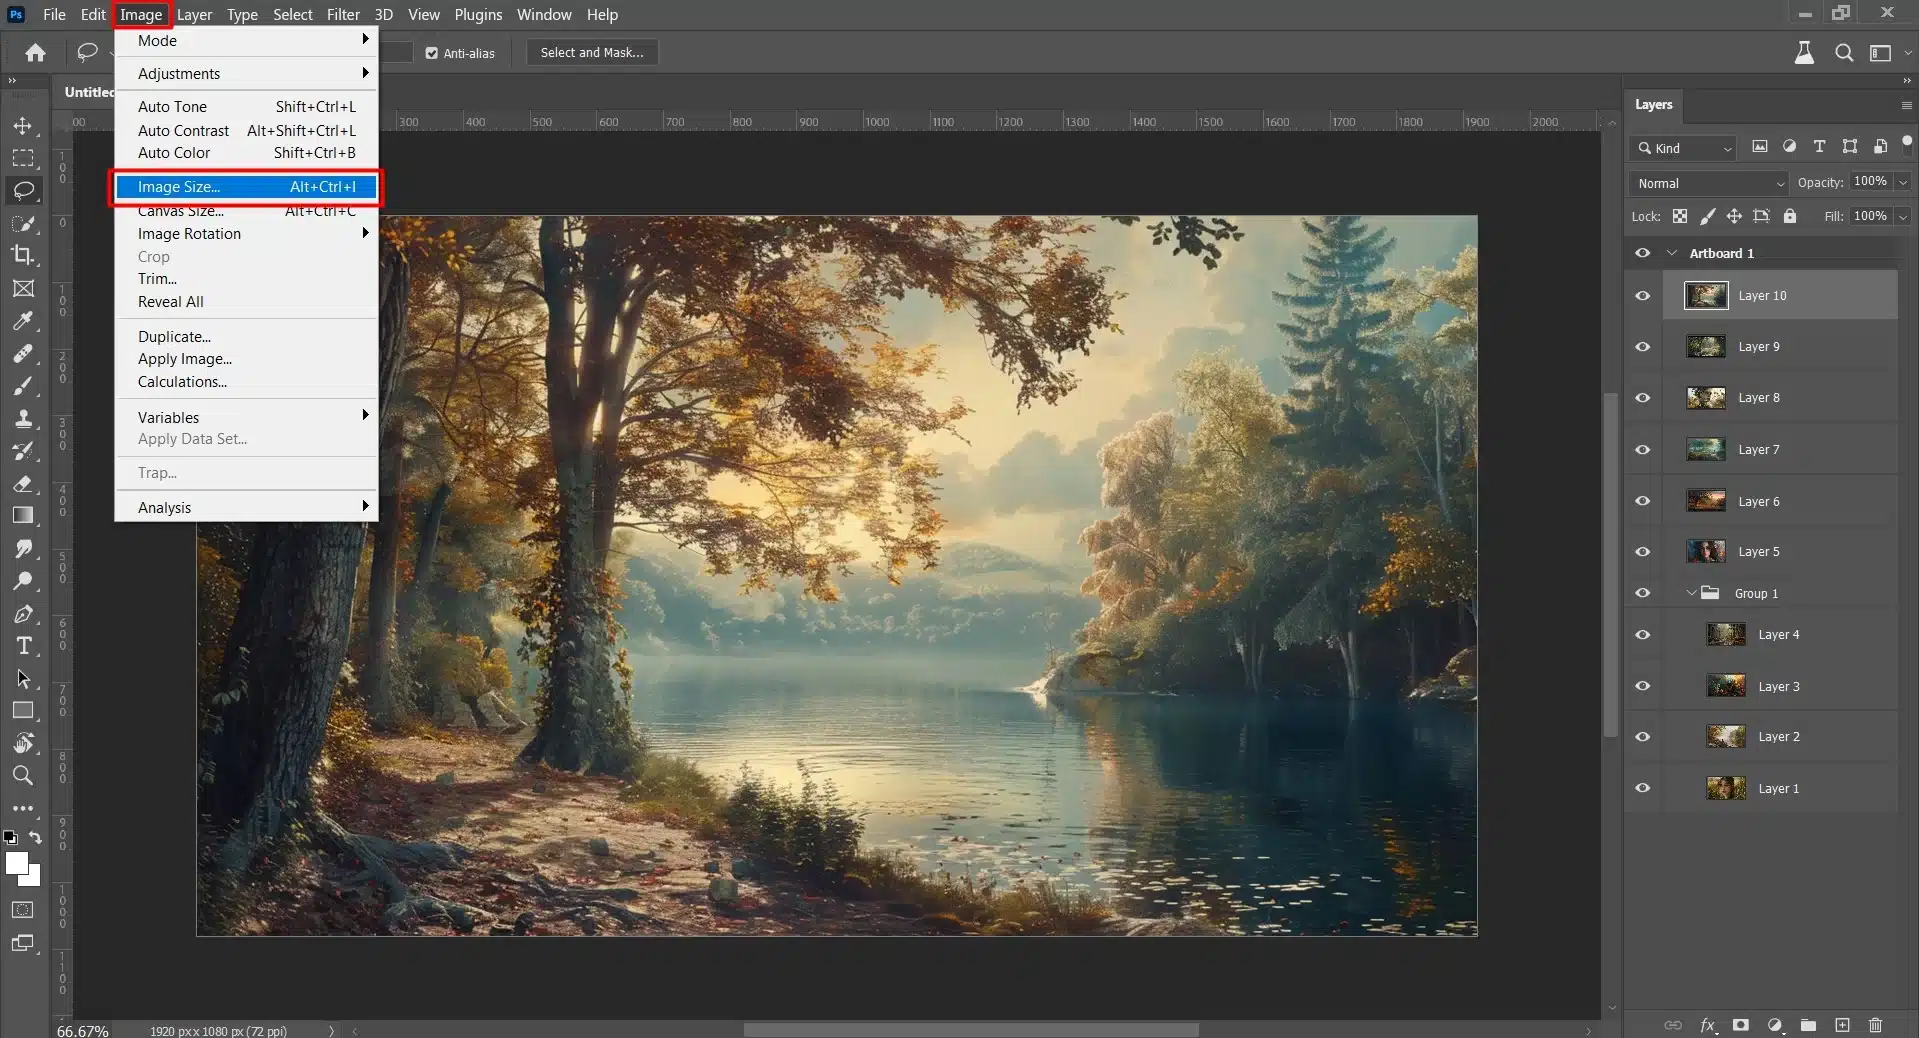
Access Image Size: Go to Image > Image Size. This brings up the Image Size dialog box.
Set New Dimensions: Enter your desired width and height values. Ensure the resolution is set according to your needs.
Preserve Aspect Ratio: Check the "Constrain Proportions" box to maintain the aspect ratio.
Let’s say you have 3000×2000 image formats at 300 DPI, but you need it smaller for web use.
Adjusting it to 1500×1000 while keeping the DPI intact will reduce its size effectively without compromising quality.
Open the PSD file
Go to Image > Image Size
Set new width and height
Ensure "Constrain Proportions" is checked
Optimal Settings for Quality and Speed
When resizing images, understanding optimal settings is crucial:
Resolution: For web use, 72 DPI suffices; for print, stick with 300 DPI.
Resampling Method: Choose "Bicubic Sharper (Reduction)" for downsizing images as it sharpens while reducing.
Color DataHandling: Convert color modes wisely based on final output needs.
For example, if converting an image meant for print into one suitable for the web, you’d adjust both the resolution and resampling method accordingly.
Use Bicubic Sharper (Reduction) for the best downsizing results.
Maintain originalaspect ratios when resizing.
Always switch resolutions fittingly - lower DPI for screen use, higher DPI for print.
Using these settings ensures that resized images maintain high quality without excessive processing time.
Common Mistakes to Avoid When Resizing
Resizing mistakes often degrade image quality or result in improper dimensions:
Ignoring Aspect Ratios: This leads to stretched or squished images. Always keep proportions intact.
Not Considering Final Use Case: Resize differently based on whether it's web or print media.
Incorrect Resampling Method: Using an inappropriate resampling technique leads to loss of detail.
To avoid errors:
Regularly preview changes before finalizing them.
Be mindful of how resizing affects layer styles and adjustment layers within the document.
For instance, avoid using lower-quality resampling methods like “Nearest Neighbor,” which can cause image pixel data loss when enlarging an image intended initially for smaller prints.
By avoiding these common pitfalls, you’ll ensure your resized images are high quality and appropriately sized for their respective uses.
Pro Tip: When you need to resize an image for printing, always ensure the DPI is set to 300 for the best print quality. This approach maintains the sharpness and clarity of the image, ensuring smooth transitions across various platforms without losing visual integrity
Essential Tools in Photoshop for Editing PSD Files
Understanding and mastering Photoshop tools are necessary for efficient photo editing, especially when working with a PSD file. This guide will highlight crucial instruments that aid in refining these files.
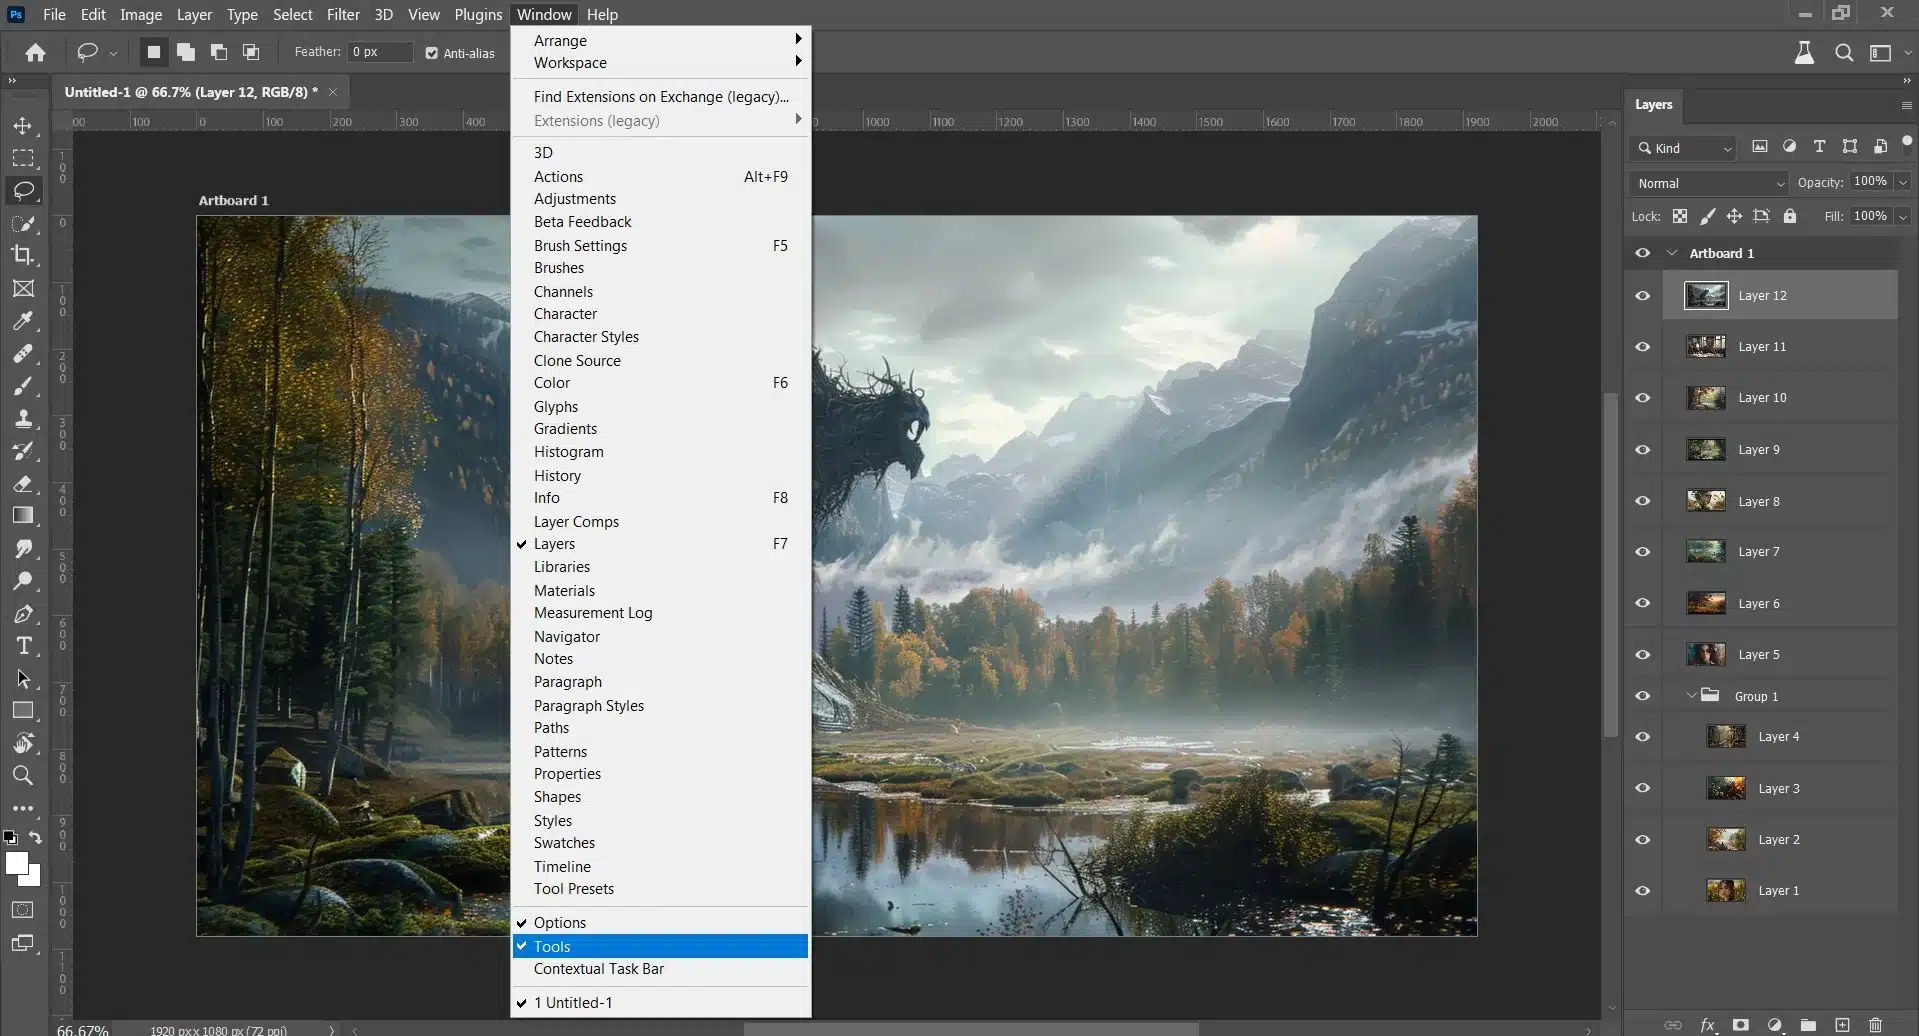
Overview of Toolbar: Key Tools for Image Editing
The toolbar in Adobe Photoshop boasts an arsenal of tools tailored for precise image editing.
Let’s explore the most vital ones:
Tool
Description
Move Tool
Perfect for repositioning layers within the workspace.
Marquee Tools
Ideal for making rectangular, elliptical selections, or even single row/column selections.
Lasso Tools
Enable freehand, polygonal, and magnetic selections.
Quick Selection Tool/Magic Wand Tool
Handy for quick area selection based on color.
Crop Tool
Allows resizing and trimming images to desired dimensions.
Brush/ Pencil Tools
Essential for detailed artwork or retouching blemishes.
Using these tools helps enhance your efficiency in editing PSD files, ensuring precision and creativity.
Using Layers and Masks with PSD Files
Layers and masks are fundamental when working with PSD files because they can separate different elements of an image without permanent alteration.
Layers Panel:
Create new layers using the "New Layer" icon.
Rearrange or group layers logically by dragging them up or down within the panel.
Layer Types:
Regular Layers
Adjustment Layers
Smart Objects
Masks:
Add a mask by clicking the "Add Layer Mask" button at the bottom of the Layers panel.
Use black or white brushes to hide or reveal parts of your layer non-destructively.
Mastering layers and masks allows you to manage complex edits more easily without compromising the original quality of your Photoshop document.
Engage deeply with these tools to optimize your workflow when editing PSD files on Adobe Photoshop tutorials.
The more familiar you become with these essentials, the more proficient you’ll be at creating stunning images!
Advanced Techniques for PSD File Manipulation
Working with PSD files in Adobe Photoshop training offers immense creative control. Mastering advanced techniques can elevate your work significantly.
Implementing Non-destructive Editing Practices
Non-destructive editing is a must for maintaining the integrity of your original image data while allowing creative flexibility.
Technique, Description, Adjustment Layers
Apply adjustment layers instead of direct adjustments. They offer a reversible way to alter color and tone.
Smart Objects
Convert layers to Smart Objects to make scalable edits. They preserve the original quality of the layer.
Layer Masks
Use Layer Masks for selective editing without harming the base layer. Ideal for blending and hiding portions seamlessly.
Clipping Masks
Utilize Clipping Masks to apply effects to specific sections. They are perfect for targeted adjustments on particular elements within Photoshop files.
Editable Filters
Apply filters as Smart Filters, enabling you to tweak settings anytime.
Personal Example
When working on a project involving multiple images, I used adjustment layers extensively to keep each edit isolated and reversible.
For instance, while enhancing a landscape photo, I could adjust brightness and contrast individually for the sky and ground, maintaining non destructive changes.
Creative Use of Filters and Effects
Smart filters and effects add visual flair to your projects when used creatively in Photoshop.
Gaussian Blur Create soft focus or depth effects using Gaussian Blur.
Sharpening Images Utilize sharpening filters like Unsharp Mask for clearer images.
Distortion Filters Play with distortion filters such as Pinch or Spherize for artistic results
CustomBrushes & Patterns Implement custom brushes and patterns created from different vector graphics or textures.
PhotoFilter Applies color over an image, giving it a vintage look without changing actual colors dramatically.
Personal Example
Once, I worked on transforming a simple portrait into a surreal artwork by creatively combining several distortion filters with color adjustments through adjustment layers, achieving this surreal effect smoothly within a short time span.
Mastering these advanced techniques can significantly enhance the ability to manipulate and edit effectively to impress clients by showcasing work professionally.
And always remember: never stop experimenting, pushing limits, and discovering more exciting opportunities in Adobe Photoshop.
If you’re looking to elevate your photo editing skills further, don’t forget to explore Adobe Lightroom.
Therefore, it’s an essential tool for photographers and designers, offering powerful features for organizing, editing, and sharing your images.
More knowledge, practical insights, and reliable ways to consistently achieve the best possible results.
Workflow Optimization: Tips for Faster Editing in Photoshop
Streamlining your workflow is critical to enhancing efficiency in Adobe Photoshop.
We’ll explore two significant aspects of workflow optimization: customizing workspaces and employing keyboard shortcuts alongside automation scripts.
Customizing Workspaces for Efficiency
A well organized workspace can significantly boost productivity when working with multiple PSD files.
Panelsand Toolbars: Tailor panels and toolbars to house frequently used tools. Group related tools together.
Presets: Create and save workspaces as presets for different tasks like photo retouching or web design.
For instance, I created a workspace preset specifically for editing PSD files with actions, history, and layers always visible.
Keyboard Shortcuts and Automation Scripts
Mastering keyboard shortcuts saves immense time during repetitive tasks in Photoshop.
Common Shortcuts: Familiarize yourself with common shortcuts. For example, use Ctrl+J to duplicate a layer or Ctrl+E to merge layers.
Actions and Scripts: Record actions for repetitive steps. Automate complex workflows using scripts.
I automated resizing images using a custom script that processed multiple images stored as PSD files, cutting my task time by half!
Pro Tip: When working with RAW files, consider integrating camera raw into your workflow. It offers powerful adjustment capabilities right from the start, allowing you to perform non-destructive edits before bringing your images into Photoshop.
How to Save and Export PSD Files Correctly
Saving and exporting PSD files is crucial for ensuring your work maintains its quality and compatibility across various platforms.
Moreover, here’s a detailed guide on best practices.
Best Formats for Different Usage Scenarios
Choosing the suitable Photoshop file formats can save you a lot of headaches. Each format has its strengths depending on the use case:
PNG: Ideal for web images due to lossless compression.
JPEG: Great for photographs meant for both print and online, but note that it uses lossy compression.
TIFF: Preferred for print projects as it retains high image quality without compressing the data.
GIF Files: Best for animations or simple graphics with limited colors.
PDF (Portable DocumentFormat): Suitable for documents combining text, fonts, vector graphics, and images.
While PSD files hold all layers and adjustments within Adobe Photoshop, converting them into formats like, RAW or JPEG format optimizes file size and compatibility.
I once designed a corporate logo in PSD file format; however, delivering it to the client in NEF or JPEG ensured universal readability.
Ensuring Compatibility with Other Software
It’s essential to guarantee that your files can be opened in various software applications:
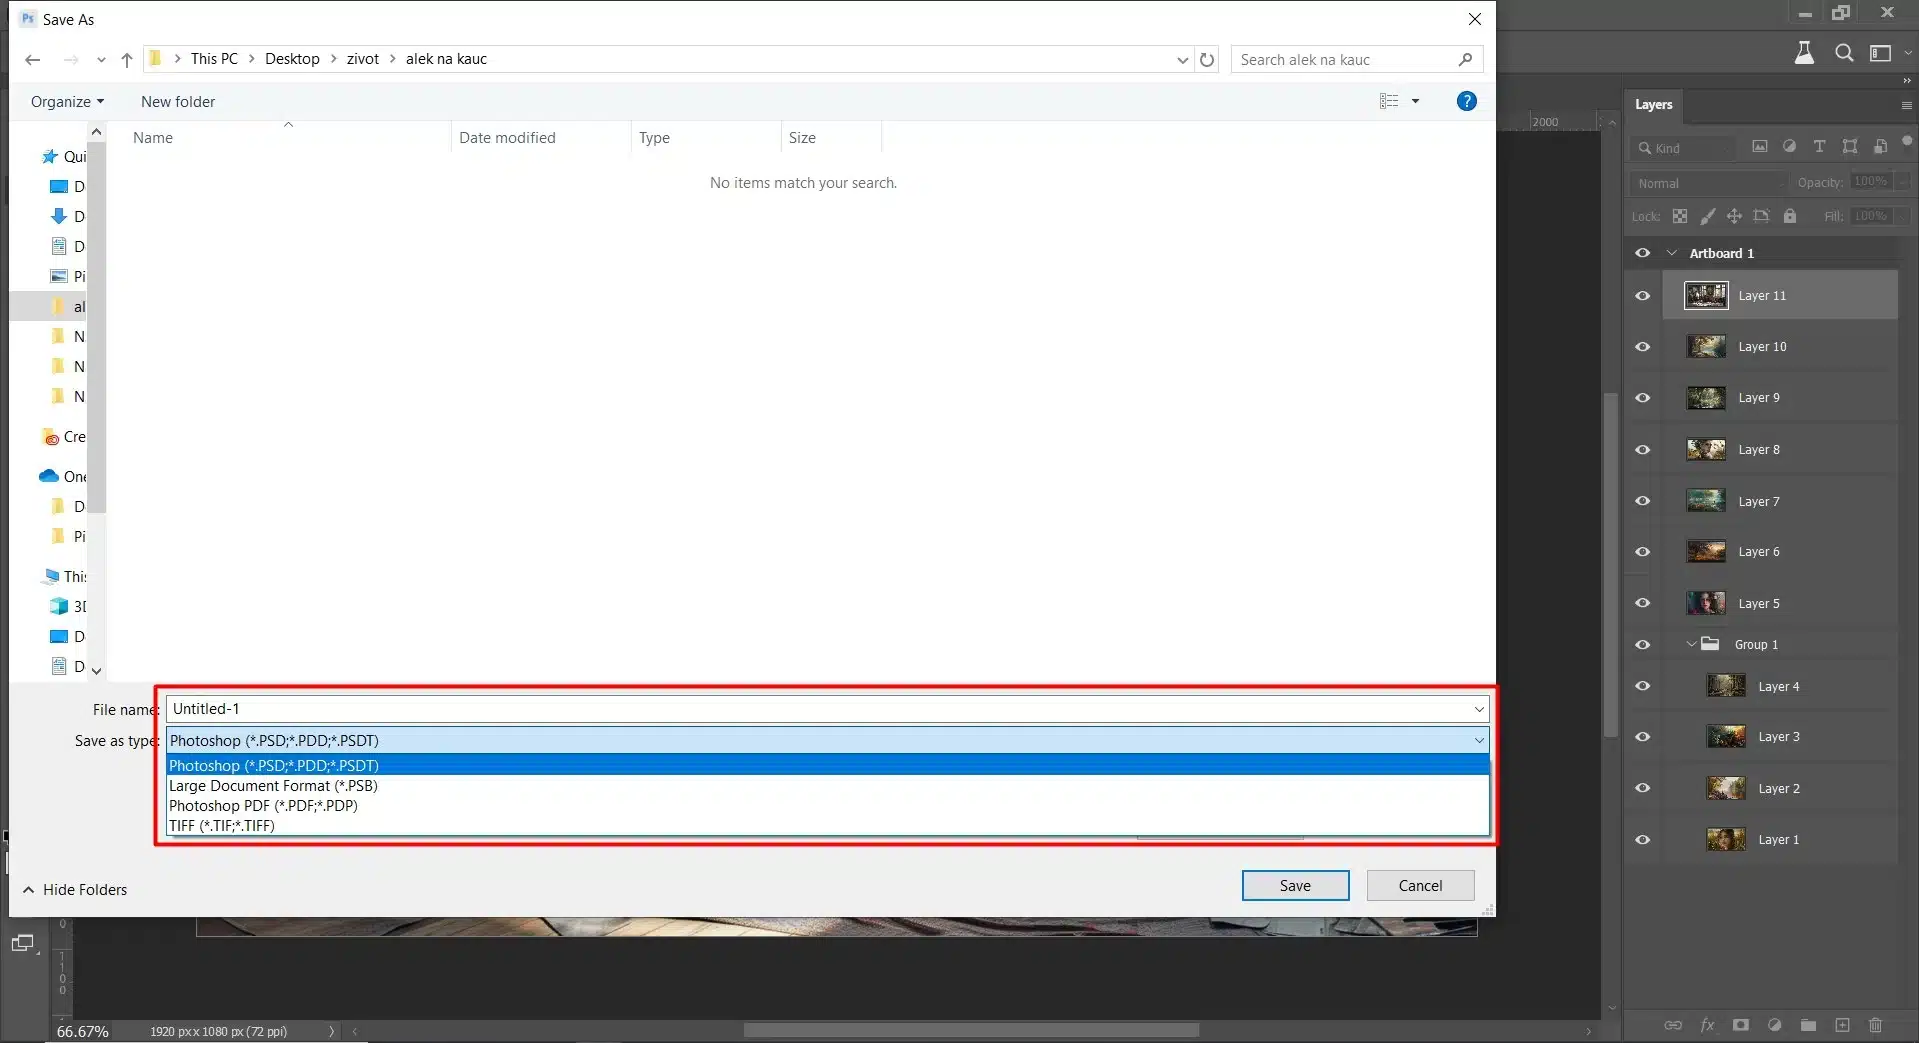
To retain editable components, permanently save a layered version of your project as a Photoshop document (.psd file).
For vector-based designs, export formats readable by tools like AdobeIllustrator or Inkscape, such as SVG or EPS.
Understanding how to open PSD files in different programs enhances workflow efficiency.
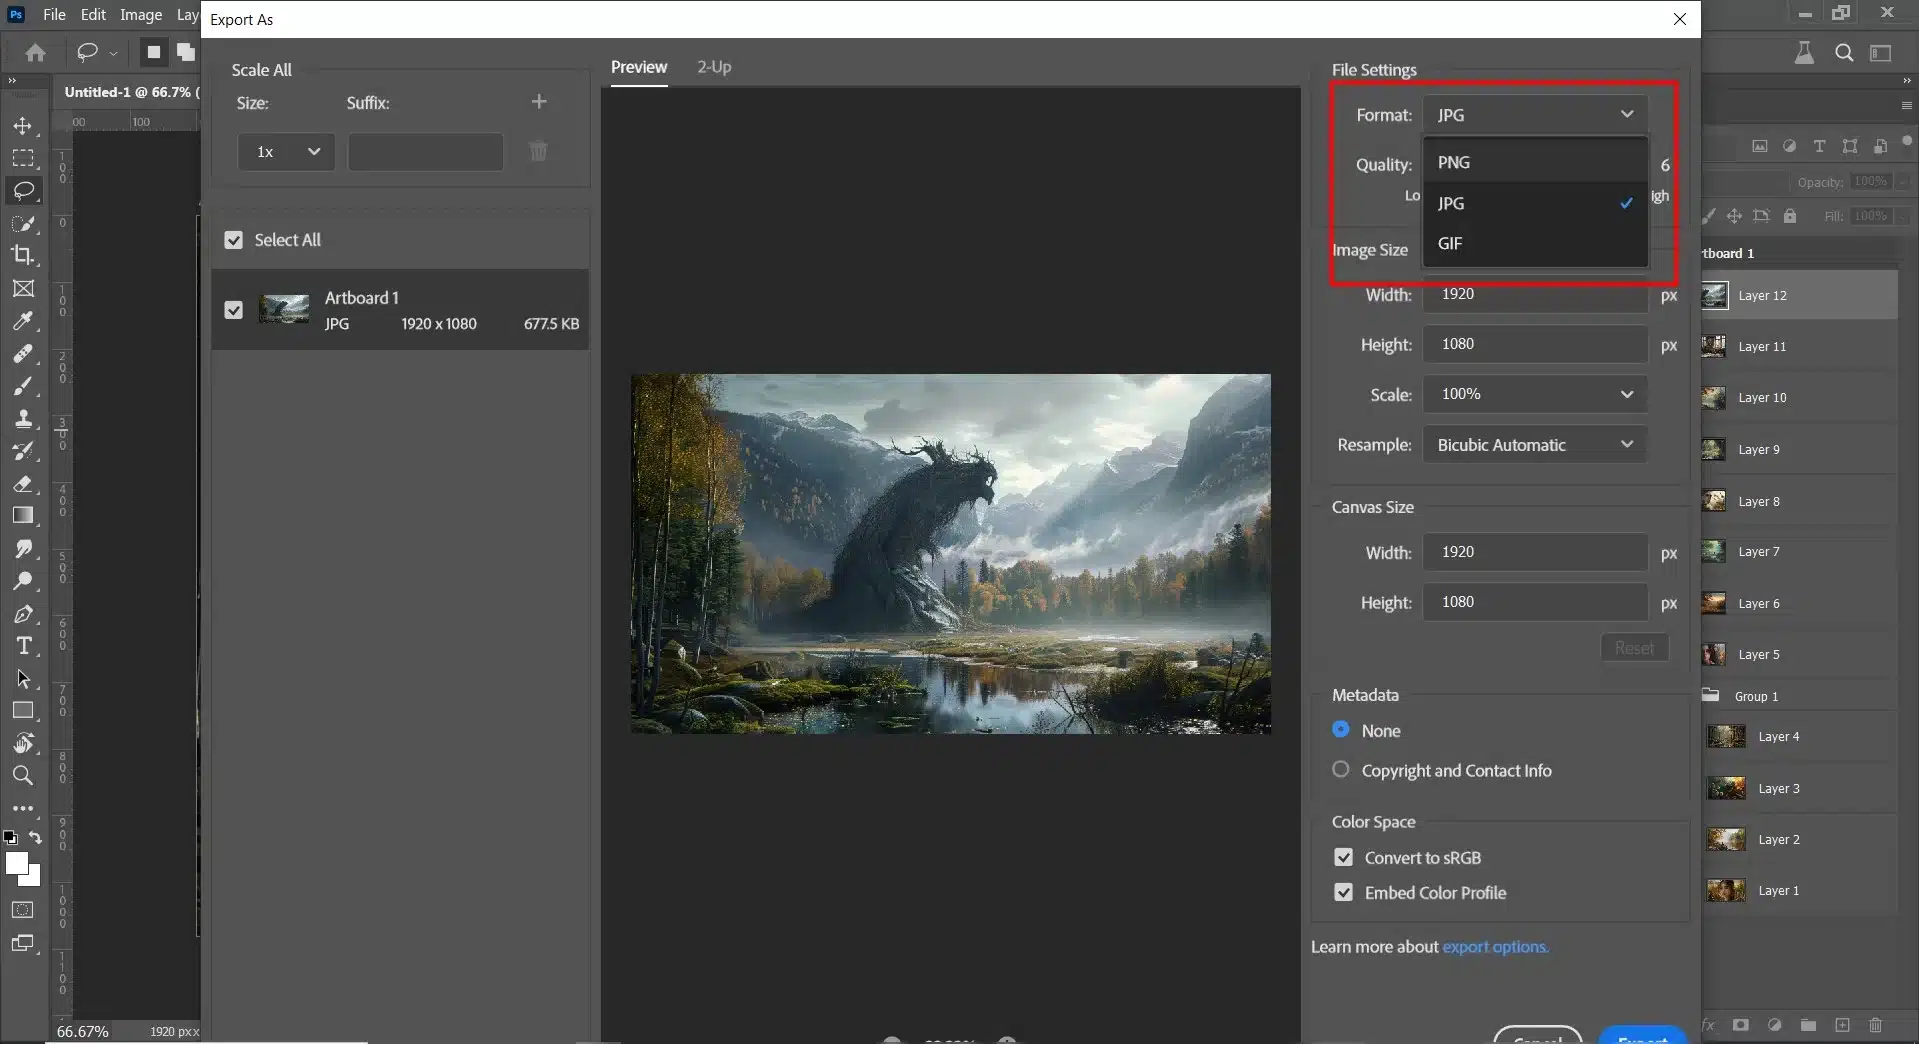
When exporting from Photoshop:
First, navigate to File > Export > Export As…
Second, select the desired file type (PNG, JPEG).
Lastly, adjust settings according to needs (quality, compression level).
To ensure cross-software compatibility:
Use intermediate formats like TIFF or PDF, which are amenable to most design software.
Keep track of any features native only to Adobe Photoshop that might not translate well through other applications.
Pro Tip: Familiarize yourself with the strengths and weaknesses of different image file types. Understanding when to use PNG, JPEG, TIFF, GIF, and PDF can greatly influence the quality, file size, and compatibility of your final output across various platforms and devices.
Frequently Asked Questions (FAQs)
What program will open a PSD file?
Besides the well-known Adobe Photoshop, various software options can open PSD files. These include Adobe Illustrator for vector graphics and Adobe Lightroom for photography.
Free alternatives like GIMP also offer compatibility, providing a route to access PSD file content without the need for Photoshop.
Can I open PSD files without Photoshop?
Yes, you can open PSD files without Photoshop. Many alternative programs, such as GIMP, Paint.NET, and Photopea, enable you to access the PSD file format.
These alternatives provide a wide range of tools and features for editing PSD files, catering to basic and advanced users.
What is a PSD file format?
The PSD file format, short for Photoshop Document, is Adobe Photoshop’s native file format.
It supports multiple image formats, layers, masks, alpha channels, text, and filter effects, preserving graphic designers’ complete editing capabilities.
The PSD formats are ideal for complex image manipulation and graphic design projects.
How do I convert a PSD to JPG?
Yes, converting PSD files to JPG is possible and straightforward with the use of image editing software like Adobe Photoshop, GIMP, or online conversion tools.
This process allows you to change the Photoshop file format while retaining the image’s visual essence, making it suitable for easy sharing and viewing across different devices.
Mastering the PSD file formats is essential for anyone serious about graphic design and image editing, including myself.
The ability to preserve layers, masks, and other elements makes PSD files incredibly versatile and powerful.
Understanding PSD files has significantly enhanced my workflow and creative output, whether I’m resizing images, applying non-destructive edits, or exporting my work in different formats.
Ready to dive deeper into Photoshop?
Check out our Photoshop Course for comprehensive tutorials and tips. If you want to improve your photo editing skills, our Lightroom Course is also available.
If this article has helped you, then Like and Share it with your friends
$2,061.00Original price was: $2,061.00.$1,061.00Current price is: $1,061.00. 27584
Download Your Free Guide Now!
Discover the secrets of photography with our printable guide! Master essential techniques like aperture, shutter speed, and ISO to create stunning images. Get your free printable PDF now and start turning your snapshots into masterpieces!