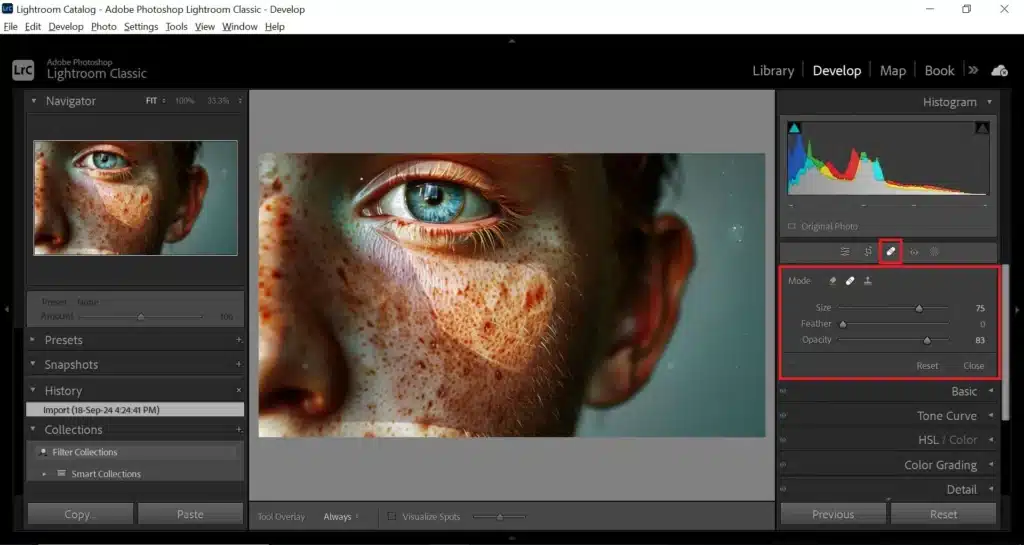
Introduction to Patch Tool in Lightroom
Table of Contents
How to Use the Patch Tool in Lightroom
Step 1: Open Your Image in Lightroom
First, open your image in Lightroom. Make sure you’re working with the latest version of the software to take advantage of all its features and enhancements.
Step 2: Navigate to the Healing Panel
Step 3: Select the Patch Tool
Click on the Patch Tool to activate it. You’ll notice several customization options appear in the options bar at the top of your screen. The options allow you to tweak settings like the opacity, feathering, and size of the tool for precise control.
Step 4: Define the Area to Be Patched
Next, select the source area you want to patch. Do this by clicking and dragging around the object or blemish you want to remove. Be sure to draw the selection slightly outside the borders of the object to ensure smooth blending.
Step 5: Choose the Destination
Once you’ve made your selection, Lightroom will automatically analyze nearby areas. it will suggest the best match for filling the selected region. You can manually adjust the position of the replacement. Do this by dragging the selected area to the part of the image you want to use as the patch.
Step 6: Fine-Tuning the Patch
Step 7: Add a New Layer for Complex Edits
Step 8: Apply the Patch
Step 9: Use Spot Healing Brush Tool for Enhancements
Tips for Using the Patch Tool in Lightroom
- Combine with the Spot Removal Tool: One of the best ways to maximize the effectiveness of the Patch Tool is by pairing it with the Spot Removal Tool. The Spot Removal Tool is fantastic for minor touch-ups. Sometimes it’s just not enough for larger or more complex areas. When you use the Spot Removal Tool, you can target small imperfections before moving on to the Patch Tool.
- Leverage the Healing Tool for Smooth Blending: The Healing Tool is another powerful feature in Lightroom that works in tandem with the Patch Tool. Using the Healing Tool before applying the Patch Tool can help you achieve a more seamless blend, especially in areas with tricky textures or gradients. In cases where the Healing Tool doesn’t fully resolve the issue, you can fall back on the Spot Removal Tool for a final touch-up.
- Use Visualize Spots for Enhanced Precision: One of my favorite tips for precision editing is to use the Visualize Spots feature. If you’re struggling to see small imperfections or dust spots in your image, turning on Visualize Spots makes everything much clearer. You can find this option in the lower left corner of the Develop Module, and it helps highlight areas that might not be immediately noticeable. I rely on Visualize Spots throughout my workflow to make sure I’m not missing any problem areas.
- Know When to Use the Aware Move Tool: While the Patch Tool is perfect for removing large areas of unwanted objects, the Aware Move Tool is incredibly useful when you need to reposition content in your image. For example, if you have an object in your shot that you want to keep but it’s slightly misplaced, the Aware Move Tool allows you to adjust its location without damaging the image quality. This is a great alternative to simply removing something with the Spot Removal Tool.
- Fine-Tune with the Spot Healing Brush: After using the Patch Tool, I often switch to the Spot Healing Brush to refine the final result. The Spot Healing Brush is ideal for targeting small blemishes or areas that the Patch Tool might not have fully corrected. Using the Spot Healing Brush after the initial patch can ensure that your edits are as smooth as possible. I typically go over my entire image with the Spot Healing Brush to make sure no imperfections remain.
- Visualize Spots for Complex Textures: For images with complex textures, such as grass or fabric, turning on Visualize Spots again can help you catch any remaining flaws. Even after applying the Patch Tool and Healing Tool, some areas may still need attention. With Visualize Spots, you’ll see exactly where these issues are hiding, so you can go back with the Spot Removal Tool or Spot Healing Brush to fix them.
- Use the Aware Move Tool for Larger Adjustments: The Aware Move Tool isn’t just for small tweaks. If you need to make larger adjustments to your composition, such as moving a subject slightly within the frame, this tool comes in handy. Like the Patch Tool, it helps to maintain the integrity of the surrounding area while relocating content. Always consider the Aware Move Tool when you need to reposition elements in your image but want to avoid causing distortions.
- Fine-Tuning in the Develop Module: Finally, after you’ve used the Spot Removal Tool, Healing Tool, and Patch Tool, head back into the Develop Module for any final adjustments. Here, you can make sure your exposure, color balance, and clarity are all on point, giving you a polished and professional final image.
- Pay Attention to the Lower Left Corner: When you’re working with healing tools, always keep an eye on the lower left corner of your workspace. This area can provide critical information, such as when you’ve enabled Visualize Spots or other features that help you see your edits more clearly. It’s a small detail but one that can make a big difference in your workflow.
Tip | Tool | Purpose | Action |
---|---|---|---|
Visualize Spots | Spot Removal Tool | Highlight imperfections | Use for clarity |
Healing Tool | Spot Healing Brush | Smooth blending | Apply after patching |
Aware Move Tool | Aware Move Tool | Reposition objects | Use for relocating elements |
Lower Left Corner | Visualize Spots | Visibility toggle | Always check for missed spots |
Advanced Techniques with the Patch Tool
Using the Patch Tool with the Heal Tool
Adjusting Brush Size for More Precision
When working with the Patch Tool, it’s essential to adjust the brush size for optimal precision. You can change the size of the patch by clicking and dragging the edges of your selection. A smaller brush size will give you more control over detailed areas, whereas a larger brush can cover broader regions in a single stroke. Using the right brush size allows you to target specific spots with greater accuracy.
Sampling Multiple Areas for Complex Edits
H Key Shortcut for Visualizing Patches
Undoing Mistakes with Press Delete
Visualizing with the Arrow Pointing Feature
FAQs
Does Lightroom have a patch tool?
Yes, Lightroom has a Patch Tool that allows you to fix blemishes and imperfections by blending areas using surrounding pixels. While it’s more commonly referred to as part of the spot removal toolset, it works effectively by replacing the selected area with pixels from a nearby clean section of the image.
Where is the heal tool in Lightroom?
The heal tool in Lightroom is located in the right-hand panel under the Develop module. When selected, it gives you three options: Heal, Clone, and Visualize Spots, making it perfect for removing dust spots and other small imperfections from your images.
Does Lightroom have a blemish tool?
Can you spot fix in Lightroom?
Conclusion
Mastering the Patch Tool in Lightroom has been a game-changer in my editing workflow. I recall working on a portrait shoot where there were numerous small distractions in the background, which I initially thought would take hours to fix. However, using the Patch Tool allowed me to clean up the image seamlessly, blending everything perfectly.
Have a nice photoshoot!
Learn more about Photo Editing with Lightroom and Photoshop: