Make Collage in Lightroom Mobile: A Step-by-Step Guide
Make Collage in Lightroom Mobile: A Step-by-Step Guide
Have you ever wondered how to make a collage in Lightroom Mobile? You’re in the right place! In this article, I’ll guide you through a simple and effective process to create stunning collages using just your mobile device.
Whether you’re looking to showcase your favorite vacation photosor put together a stylish mood board, Lightroom Mobile offers a user-friendly way to bring your vision to life.
Keep reading, and discover how to turn your photo collections into beautiful collages that capture attention and tell a story.
Table of Contents
Why Use Lightroom Mobile for Collages?
Lightroom Mobile is ideal to create collages because it offers a seamless lightroom collage experience with special batch processing mode.
Allowing you to arrange and enhance multiple photos at once efficiently.
Create Collages in Lightroom Mobile
For a simple and effective way to present your photos, the app has features that make collage creation easy.
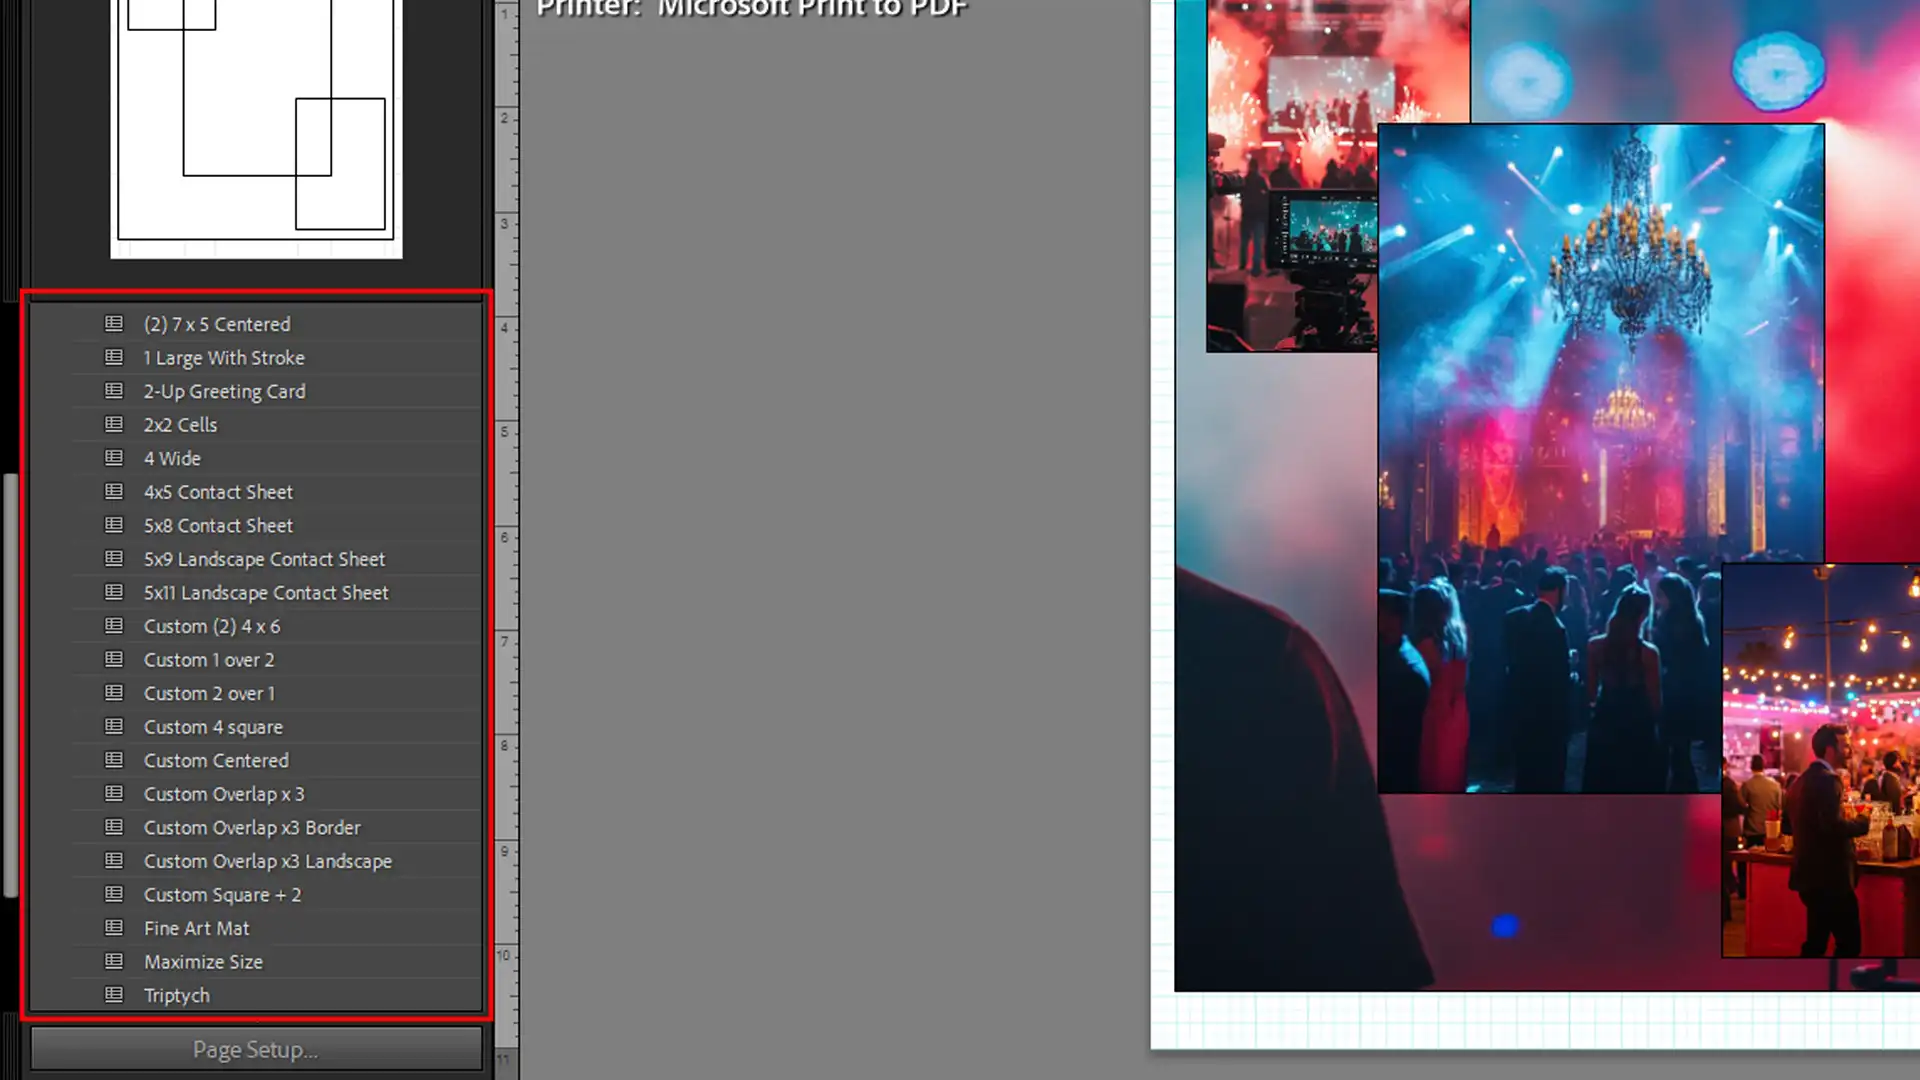
First, it offers many layout options. You can pick a pre-designed collage template or start from scratch.
Lightroom Collage Templates
These templates are designed to fit different themes. Whether it’s vacation photos or wedding photos, the template browser offers several options.
Choose the one that best suits your photo collection.
Template Browser Panel
Using this panel, you can easily navigate through your user templates. Save these templates for later use, making future collage creation quick and straightforward.
Image Settings Panel
This panel provides control over the photo layout. Here, adjust size, position, and rotation of your image cells.
This customizability ensures that you get the perfect Lightroom collage template for your needs.
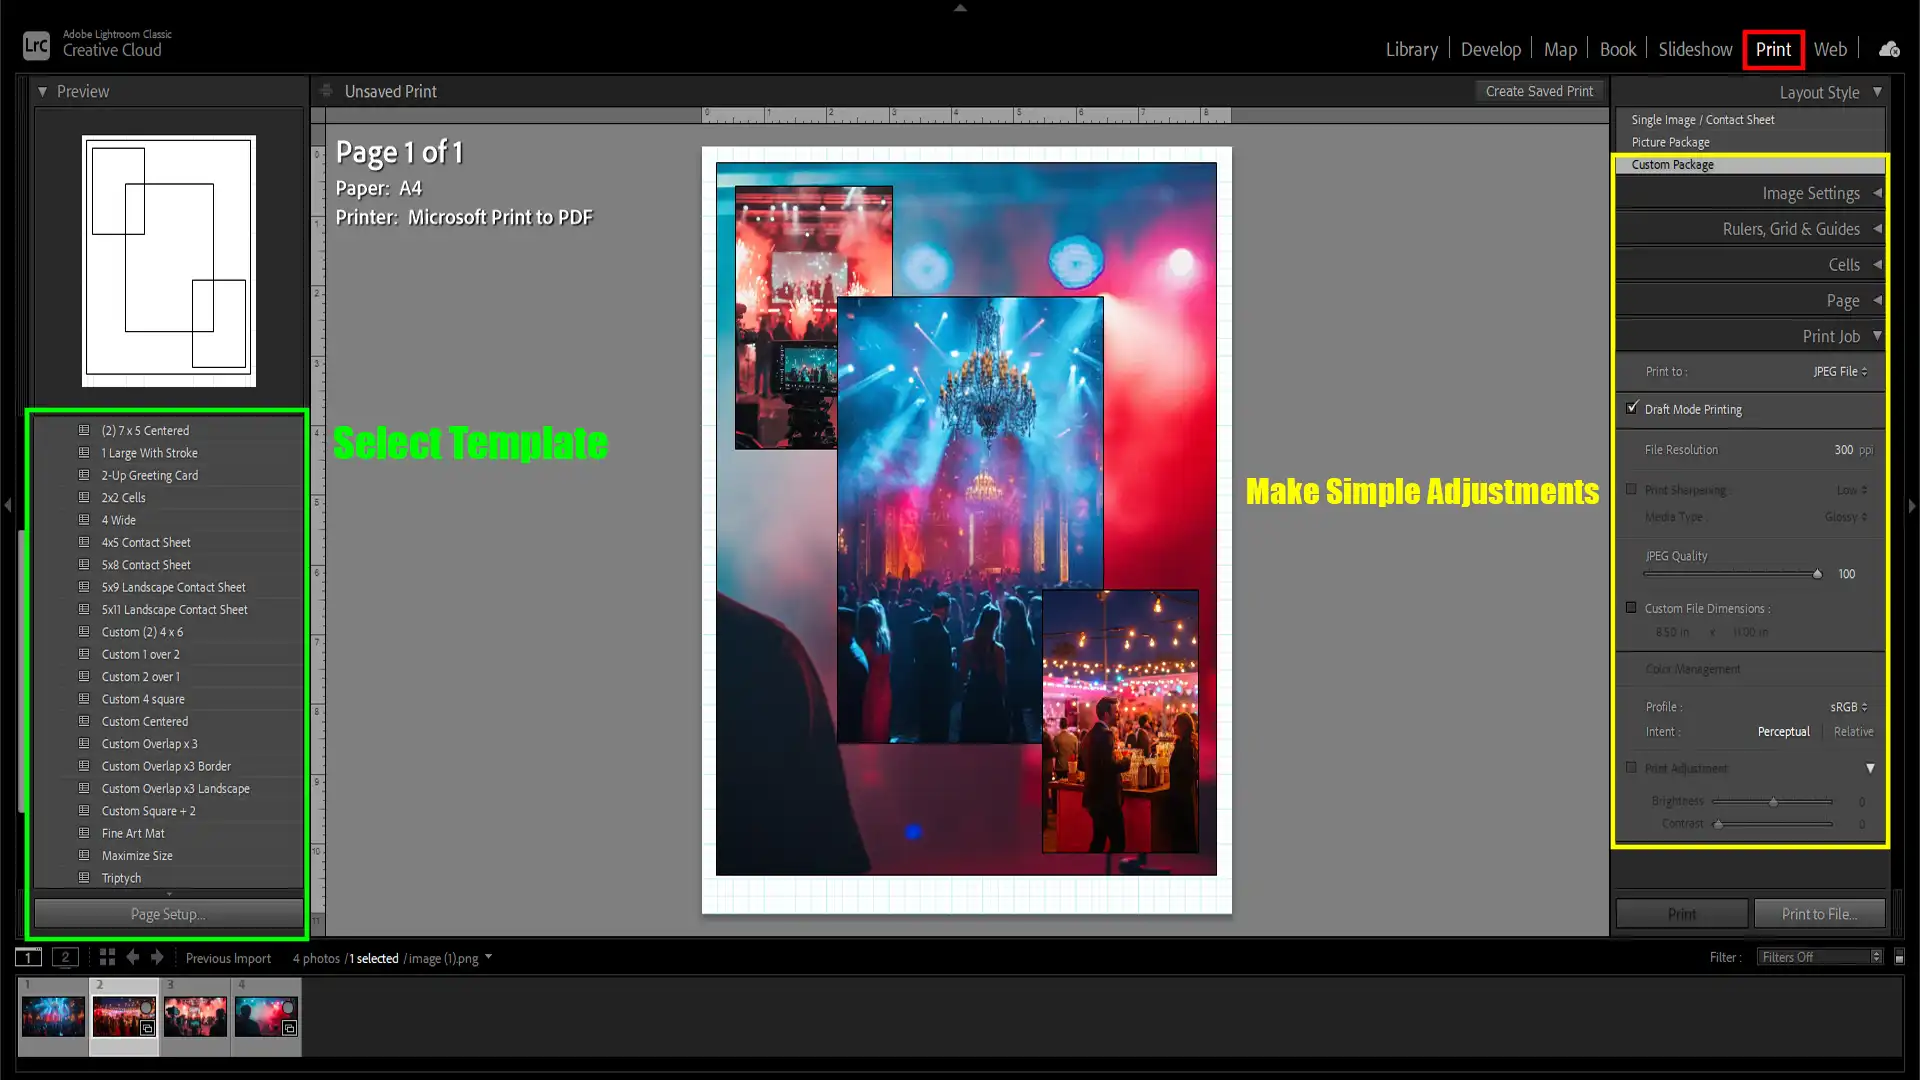
Final Output Options
Think about your final output as well. Do you want a JPEG file? Or perhaps you’re interested in using the print module?
The print job panel gives you various options, like print sharpening for better quality prints.
Custom Templates
Default templates may limit creativity. So, exploring custom templates is a good step.
Save your creations to the user templates folder. This not only saves time but also makes the process enjoyable.
Sharing Your Photo Collage
When sharing your photo collage, focus on enhanced details. You can even save your projects as a create saved print to revisit later.
Another tip is to use Lightroom’s batch editing feature, which speeds up the process when dealing with multiple images.
Pro Tip: Don’t forget to add a photo border to give your collages a polished look.
Additionally, consider learning some Lightroom shortcuts to streamline your workflow and make the collage assembly process even more efficient.
If you’re wondering how to make a collage in Photoshop, you might also ask, why use Lightroom Mobile for collages? Lightroom offers unique features for creating stunning collages quickly. For a comparison, explore how both tools can elevate your design.
Step-by-Step Guide to Make Collage in Lightroom Mobile
Lightroom Mobile simplifies the process of creating collages. I’ll guide you through each step.
Setting Up Your Workspace
First, launch Lightroom Mobile on your device. Ensure you have a clear, clutter-free workspace. This makes it easier to focus on your collage. Organizing your work area helps too.
Choosing the Right Collage Template
In Lightroom Mobile, navigate to the Template Browserpanel. Select from various collage templates.
Pay attention to the theme you want. Whether it’s a vacation photo collage or a wedding, different templates suit different needs.
If existing options don’t fit, select a custom template.
Importing Photos into Lightroom Mobile
Import your photos into Lightroom Mobile. Create folders and albums to keep your images organized. This saves time and eases accessibility during editing.
Tips for Selecting the Best Photos
Choose high-quality images. Consider using portrait images for better results. Focus on photos that tell a story. This step is important in making quality collages.
Using the Image Settings Panel
Adjust each image cell within your Lightroom collage template. Resize, rotate, and reposition photos until you achieve the desired look. It’s all about balance.
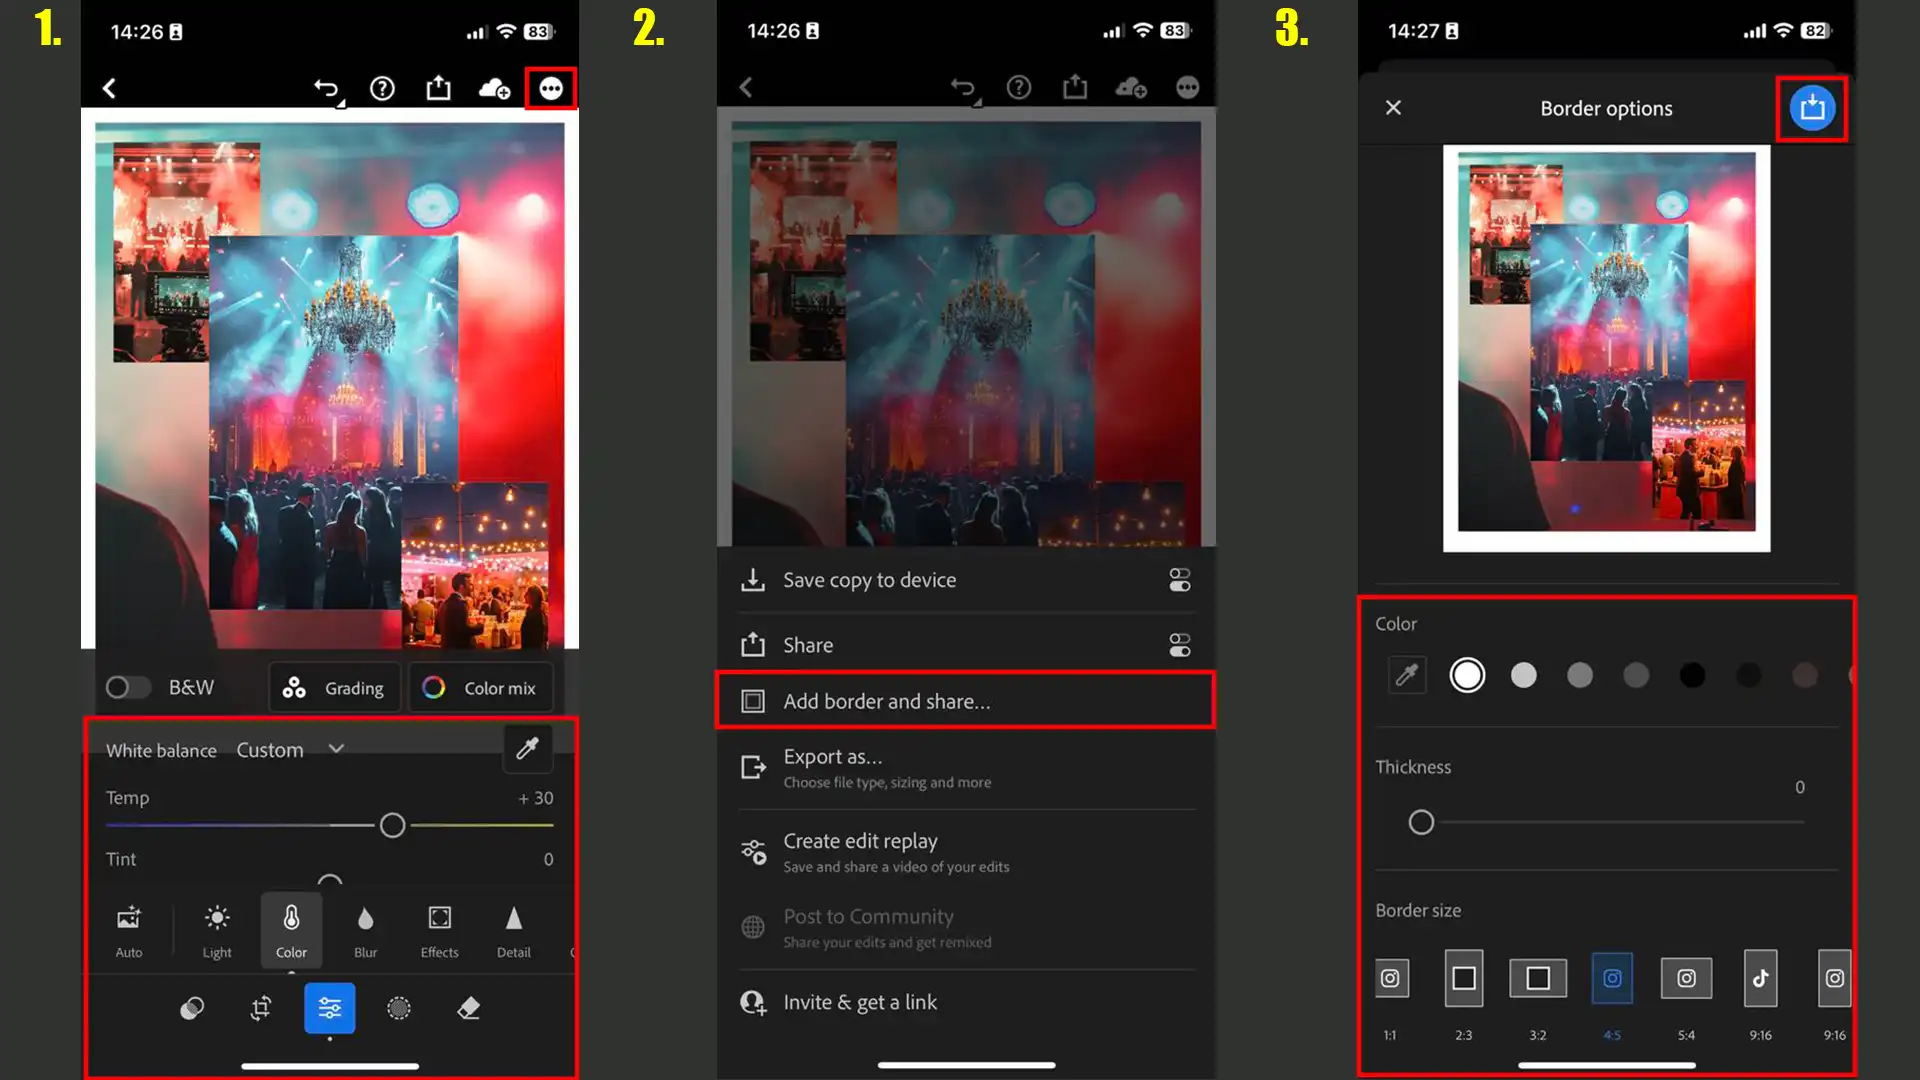
Adding Photo Borders
Add a photo border to each image for a cleaner look. This separates individual photos, making your collage more professional. Experiment with different border sizes.
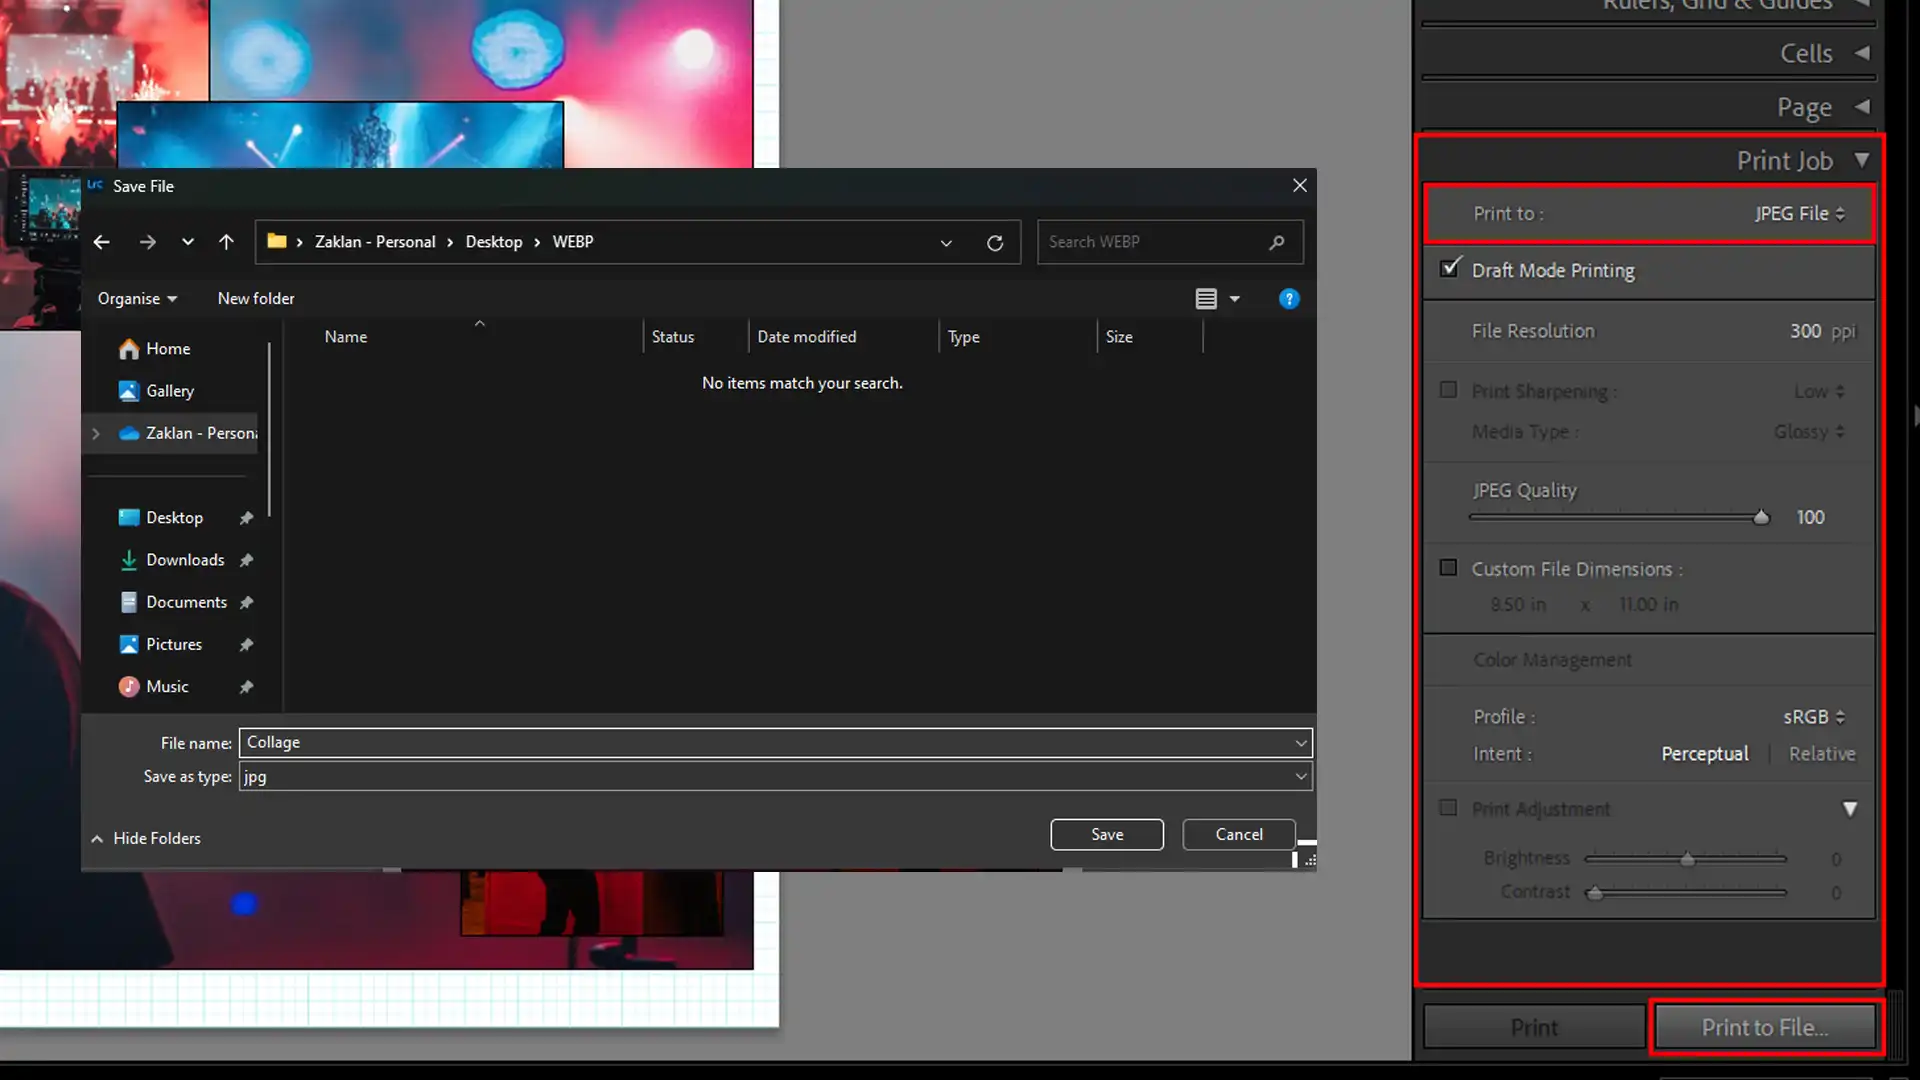
Saving and Exporting Your Collage
Once satisfied, save your collage in your user templates folder. Export as a JPEG for easy sharing.
Explore the print module if you want a physical print.
Pro Tip: Use Lightroom shortcuts to speed up your workflow. This enhances efficiency. How to make collages in Lightroom might seem challenging initially, but with this guide, you should feel more confident.
Creating Your Collage in Lightroom Mobile
To create a visually appealing collage in Lightroom, follow these guidelines. These steps will guide you through arranging, adjusting, and editing your photos.
Mastering how to take professional photos with your phone is also important. Refine your images by creating a collage in Lightroom Mobile, which can elevate your photos and make them stand out.
Arranging Photos in the Collage Template
Start by launching Adobe Lightroom Mobile. Access the Template Browser panel to choose your preferred collage template.
If none of the predefined templates suit your vision, opt for a custom template. Import your chosen photos into Lightroom and organize them into dedicated folders or albums. Select story-telling images, focusing on portrait orientations for better dynamics.
Use drag-and-drop to arrange the photos into the selected collage layout. This makes it easy to visualize your final composition.
Adjust the collage layout to achieve the perfect balance and harmony in your design.
Adjusting Photo Sizes and Positions
Resize, rotate, and reposition the photos within the collage template. Adjust each image cell individually until you achieve the desired look.
Experiment with different photo sizes to create balance. Keep proportions consistent to maintain a professional appearance.
Adding borders to the photos helps separate each image. This makes your collage appear cleaner and more structured.
Applying Edits and Filters
Enhance each image before finalizing your collage. Basic edits can include brightness, contrast, and color adjustments.
Apply filters to achieve a cohesive look across all photos. Ensure that your selected filters complement the overall theme of your collage.
After editing, save your collage template in the user templates folder. Export the final collage as a JPEG file for easy sharing and printing.
Pro Tip: Use Lightroom shortcuts to speed up your workflow. Familiarize yourself with common shortcuts to streamline the process and enhance productivity.
To master Lightroom desktop collage techniques, begin by focusing on creating your collage in Lightroom Mobile. Both platforms offer tools to ensure each photo fits seamlessly, enhancing the overall look.
Enhancing Your Collage with Creative Touches
Enhancing your Lightroom collage with creative touches can significantly boost image quality, allowing for a polished and professional final result.
To make a collage in Lightroom Desktop effectively, start by utilizing the right tools and techniques available in the app. By enhancing your collage, you ensure that each photo fits perfectly, creating a cohesive and visually appealing final result.
Adding Text and Graphics
You’ll find that adding text and graphics transforms your Lightroom collages into vivid narratives.
Click on the photo you want to enhance.
Use the text tool to add quotes or captions. Ensure the text complements the photos.
Consider including icons or small graphics to provide a visual anchor. Drag and drop these elements onto your collage layout. Resize and position them to fit seamlessly.
Before you move on, always double-check your spacing. Poorly placed text can distract viewers.
Using Presets for Lightroom Collage Template for a Consistent Look
If you aim for cohesion, presets are your best friend. Apply them uniformly across all images in your Lightroom collage preset. This brings unity to your collage.
Browse through the available layouts in the print module.
Explore both paid and free Lightroom collage templates. Each one offers various artistic vibes, so choose wisely.
Presets not only save time but ensure each photo maintains the same visual standard. Your photo editing will appear more polished.
Incorporating Light and Shadow Effects
Want to add depth? Utilize light and shadow effects.
Click on the images and play with exposure settings. Adjust shadows to create a realistic sense of depth.
For more precise control, navigate to the print module. It's more than just a place for printing; it's your toolkit for advanced adjustments within Lightroom collages.
Remember, subtlety is fundamental. Too much shadow or light can overwhelm your collage in Lightroom.
Pro Tip: Utilize the custom file dimensions feature in the print module. It ensures your collage fits perfectly for any platform or print size.
Exporting and Sharing Your Collage
Once you’ve finalized your Lightroom collage using your own template and arranged all your photos from the Lightroom collection.
Aspect
JPEG
TIFF
Best For
Online Sharing
Printing
File Size
Smaller
Larger
Quality
Good for web use
Higher detail and quality
Color Space
sRGB (for web)
Adobe RGB (for print)
Compression
Lossy
Lossless
Detail Retention
Standard
Excellent
You can easily export and share the collage by selecting the best settings for the quality of your imported photos.
Saving Your Collage in High Quality
To ensure your collage remains crisp and clear, always save it in highquality.
Go to the export settings in Lightroom and select the highest resolution available. This step is important, whether you’re keeping it digital or printing it out.
When you export your Lightroom collage, remember to pick the right file format:
JPEG works well for online sharing.
TIFF might be a better choice for printing as it retains more details.
Don’t forget to check the color space settings – usually, sRGB is suitable for web, while Adobe RGB serves well for print.
Sharing on Social Media Platforms
After saving, it’s time to share your masterpiece. Before uploading your collage in Lightroom to social media, resize your image.
Platforms like Instagram have specific dimensions, so use Lightroom to get it right. This avoids cropping and loss of important parts of your collage.
Once resized, upload it to your preferred platform. Add engaging captionsand use hashtags, like #LightroomCollage, to attract more viewers. Interact with comments to boost engagement.
Printing Your Collage for Display
Printing your collage adds a personal touch to the decor. Access the print module in Lightroom for optimal settings:
Select the appropriate paper size.
Control the layout by choosing from the available Lightroom templates.
Align your images within the chosen grid.
Ensure you use the correct printer settings. Matte or glossy finish depends on your preference. High DPI (dots per inch) ensures detail and sharpness in the final print.
Pro Tip: Use collage templates available online; they save time and provide a professional look to your photo collages. Also, learning how to make a photo grid in Lightroom can be a game-changer, allowing you to easily create a custom layout that suits your style
When exploring mobile photography accessories, consider how they can enhance your overall shooting experience. The right accessories can significantly improve your photo quality and creativity.
Frequently Asked Questions
Can you create a collage on the Lightroom app?
Open the Lightroom app and select the photos you want to include in your collage.
Look for the "Collage" feature in the app's editing tools.
Arrange the photos into your desired layout.
Adjust borders and spacing as needed.
Save your collage in Lightroom or share it directly from the app.
How do I create a collection in Lightroom mobile?
Launch the Lightroom mobile app on your device.
Tap on the '+' icon usually found at the bottom or top of the screen.
Select 'Create Collection' from the menu options.
Name your new collection and add a description if needed.
Start adding photos to your collection by selecting them from your library.
How to make a grid of photos in Lightroom?
Follow these steps to make a grid of photos:
Open your Lightroom desktop application.
Navigate to the 'Print' module from the right panel.
Select a grid template from the template browser.
Drag and drop your photos into the grid cells.
Adjust margins and grid lines to customize the appearance.
Export or print the grid directly from Lightroom.
How do I add multiple photos to Lightroom mobile?
Open the Lightroom mobile app.
Access the library where your photos are stored.
Tap on the 'Add Photos' option.
Select the photos you want to add to Lightroom by tapping on them.
Confirm the selection and wait for the photos to upload.
Making a collage in Lightroom Mobile is a fun and straightforward way to showcase your photos. From choosing the right template to customizing each image, the process is designed to be user-friendly, even for beginners.
I’ve found that using Lightroom Mobile’s features makes creating collages both efficient and enjoyable. If you want to dive deeper into photo editing, check out my Photoshop Course and Lightroom Course.
$2,061.00Original price was: $2,061.00.$1,061.00Current price is: $1,061.00. 27584
Download Your Free Guide Now!
Discover the secrets of photography with our printable guide! Master essential techniques like aperture, shutter speed, and ISO to create stunning images. Get your free printable PDF now and start turning your snapshots into masterpieces!