Are you wondering how to work with Lightroom to take your photo refining skills to the next level? You’ve come to the right place! In this article, I will guide you through the fundamentals of using Lightroom to its fullest potential.
Whether you’re a beginner or looking to refine your skills, you’ll find valuable tips and tricks to make your workflow smoother and more efficient.
Get ready to transform your images and unlock your creative potential. Keep reading to discover the magic of Lightroom and start creating stunning photos today!
Table of Contents
Introduction to How to work Lightroom
Adobe Lightroom is a powerful tool for photographers looking to edit and organize their photos on a computer.
Learning how to work with Lightroom can help you streamline your workflow, enhance your images, and manage your photo library more efficiently. In the following sections, we’ll explore what Lightroom is and how it can elevate your photography skills.
What is Adobe Lightroom?
Adobe Lightroom is software photographers and editors use to manage and edit their photos. It helps you organize, enhance, and share your images seamlessly. Lightroom allows you to edit pictures without altering the original photo, enabling you to always revert back if needed.
Why Use Lightroom for Photo Editing?
Lightroom offers an efficient workflow. You import photos, organize them using the Lightroom catalog, and start refining without hassle. It supports non-destructive refining, meaning all the edits you make do not impact the original images.
Professional photographers prefer Lightroom because it speeds up the refining process and maintains high-quality output. Additionally, there are numerous Lightroom shortcuts that can further streamline your workflow.
Lightroom Classic vs Lightroom CC
Lightroom Classic focuses on desktop-based workflows. It’s perfect for those who need to handle large volumes of photos efficiently.
On the other hand, Lightroom CC is more accessible across multiple devices, including mobile. It stores images on the cloud, making it easier to access from anywhere.
How to Work Lightroom Step-by-Step
Import your photos. You can import from a memory card, directly from the camera, or even from your mobile device.
Organize your photos using collections or albums in the Lightroom catalog.
Begin refining by selecting the photo and adjusting settings like exposure, contrast, and color temperature.
Create and use your own presets to apply similar effects to multiple photos quickly.
Once satisfied, export your photos in the desired format. For those looking to share on social media or mobile platforms, knowing the best Lightroom export settings for Instagram can be very beneficial
Pro Tip: Always make sure to keep backups of your original file before beginning the post processing. It’s a safeguard against losing precious moments.
Getting Started with Learning How to Work Lightroom
To start making edits to your photos with Lightroom, you first need to get it set up on your computer.
Lightroom allows you to adjust everything from under-exposed shots to overly bright ones, helping you bring out the best in your images. Let’s begin with how to install Lightroom and get started with your photo editing journey
How to Install Lightroom
First things first, let’s get Lightroom Classic onto your device. You need to visit the Adobe website and purchase a subscription. Once done, you’ll be able to download the installer.
After downloading, open the installer file and follow the on-screen instructions. It’s straightforward. Make sure your system meets the requirements to avoid issues.
Setting Up Your Lightroom Workspace
Lightroom offers flexibility in workspace setup, allowing you to tailor it to your workflow. Begin by launching Lightroom from your desktop. The interface may appear overwhelming initially but don’t worry.
Navigate through the different modules: Library, Develop, Map, Book, Slideshow, Print, and Web. Spend some time exploring these to understand what each does. Arrange panels and tools as per your convenience for an efficient workflow.
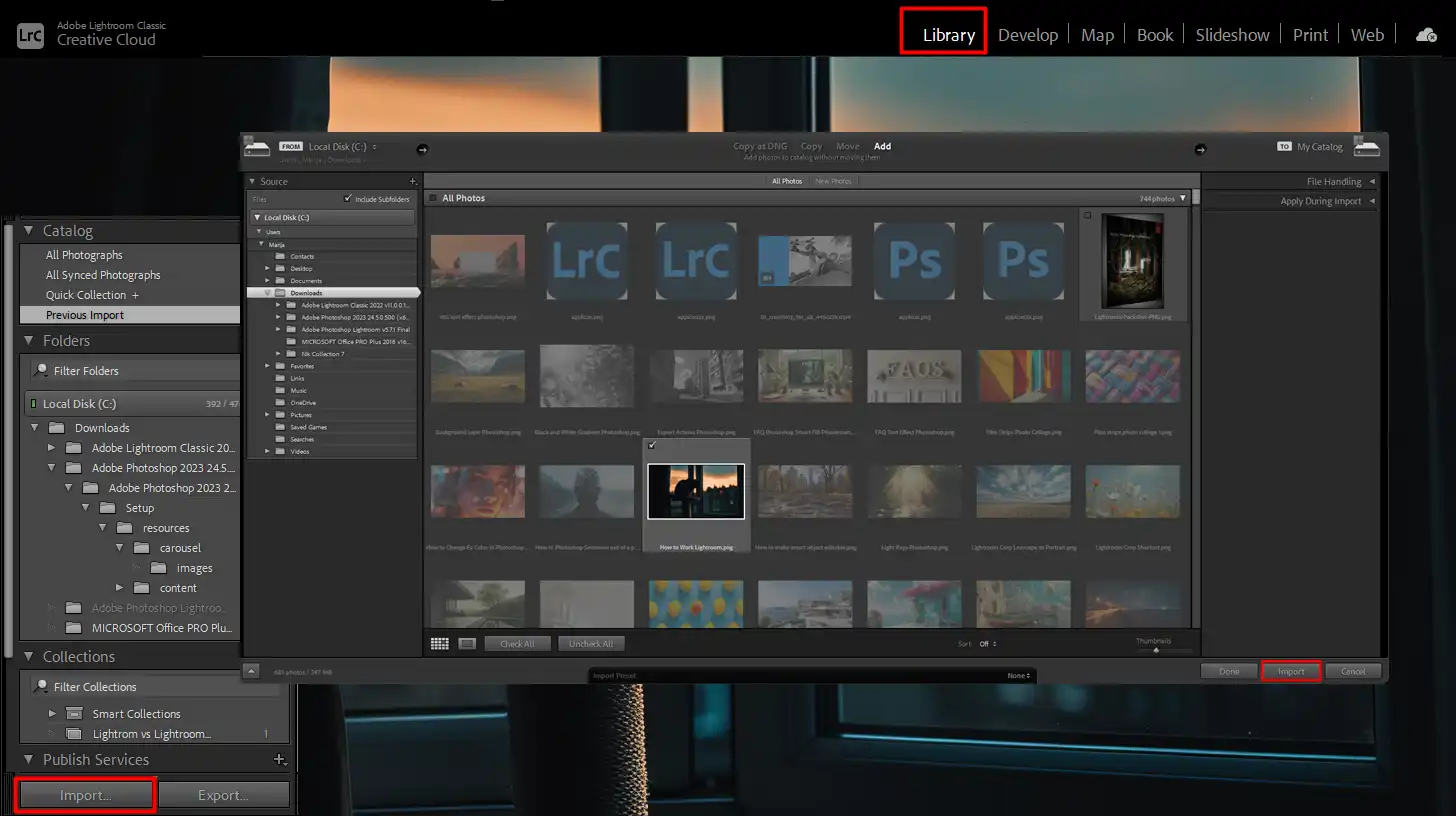
Import Photos into Lightroom
Let’s dive into uploading photos. Connect your memory card or camera directly to your computer. In Lightroom, click on the ‘Import’ button. A new window will pop up, showing thumbnails of all photos on your device.
Select the images you wish to import.
Choose whether to move, copy, or add your files. These options decide where your Lightroom catalog refers to the photos. For safety, copy the images to a specific folder.
Click the 'Import' button at the bottom.
Wait for Lightroom to finish importing photos. Once complete, your images will be available in the Library module, ready for editing.
Edit Your Photography Photos
Editing your photography photos can transform them from ordinary to extraordinary. Whether you’re adjusting the light, color, or sharpness, getting started with editing involves understanding the basic tools and techniques that bring your creative vision to life.
How to Work Lightroom: Getting Started with Editing
Editing is where the magic happens. Switch to the Develop module. Here, you can adjust exposure, contrast, highlights, shadows, and more. Remember, Lightroom Classic adjustments are non-destructive, meaning they never alter the original photo.
Try using presets for quick adjustments or delve into manual adjustments for more control. If you make a mistake, you can reset all the edits anytime. For more advanced edits, consider learning about Lightroom shortcuts to speed up your workflow.
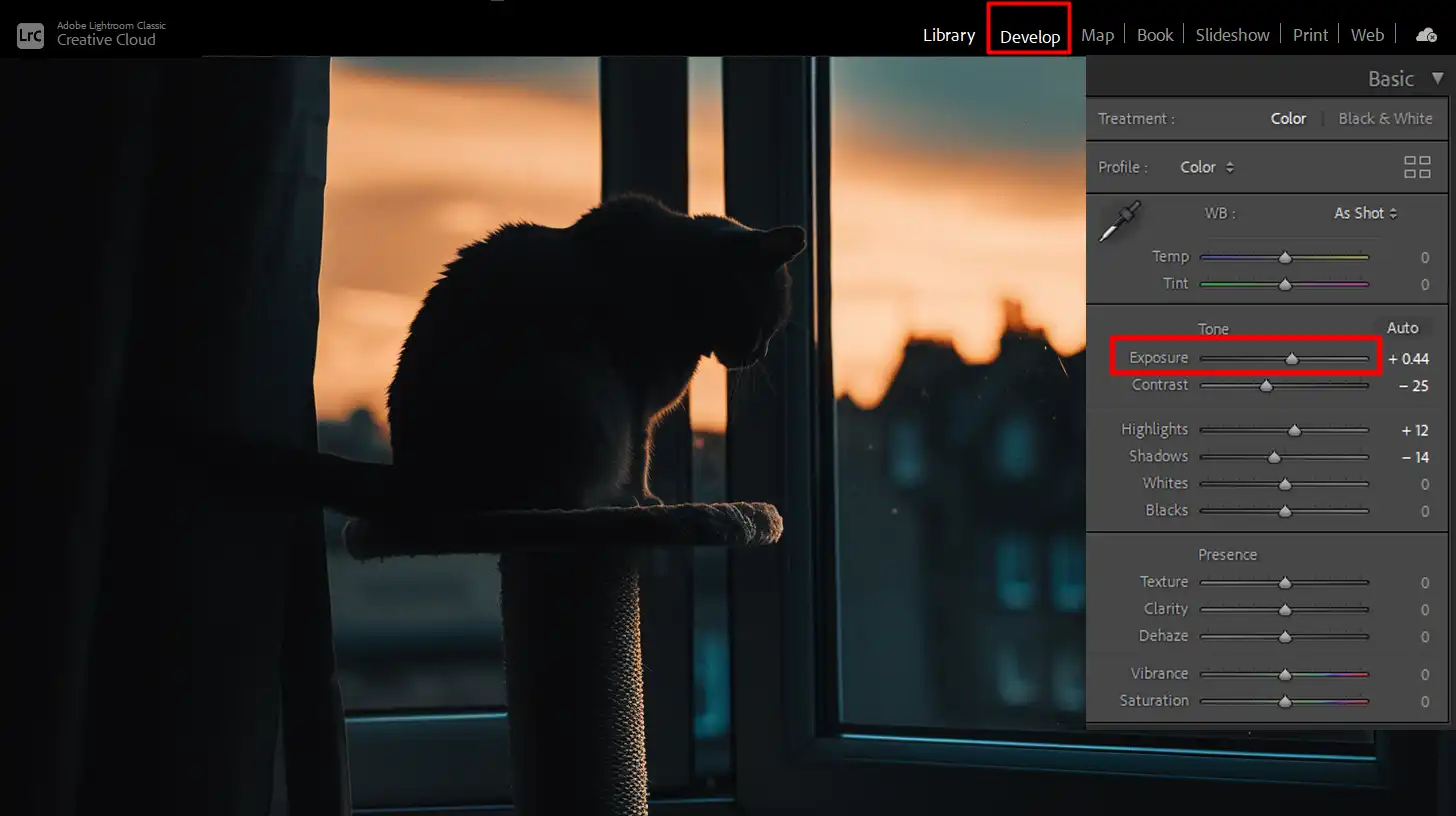
Basic Adjustments of How to Work Lightroom: Exposure, Contrast, and White Balance
In the Develop module, the first adjustments to tackle are exposure, contrast, and white balance.
Exposure
This slider brightens or darkens the entire image. If a photo is underexposed, move the slider to the right. If it’s too bright, move it left. To fix overexposed photos, you can also use the Highlights slider to bring back details in bright areas.
Contrast
This slider makes the darks darker and the lights lighter. Increasing contrast can add depth, while decreasing it can make an image softer.
White Balance
Adjusting white balance corrects color temperature. Use the eyedropper tool to click on a neutral color (like a gray) in your photo. This helps Lightroom Classic adjust the colors for you. Alternatively, tweak the Temp and Tint sliders.
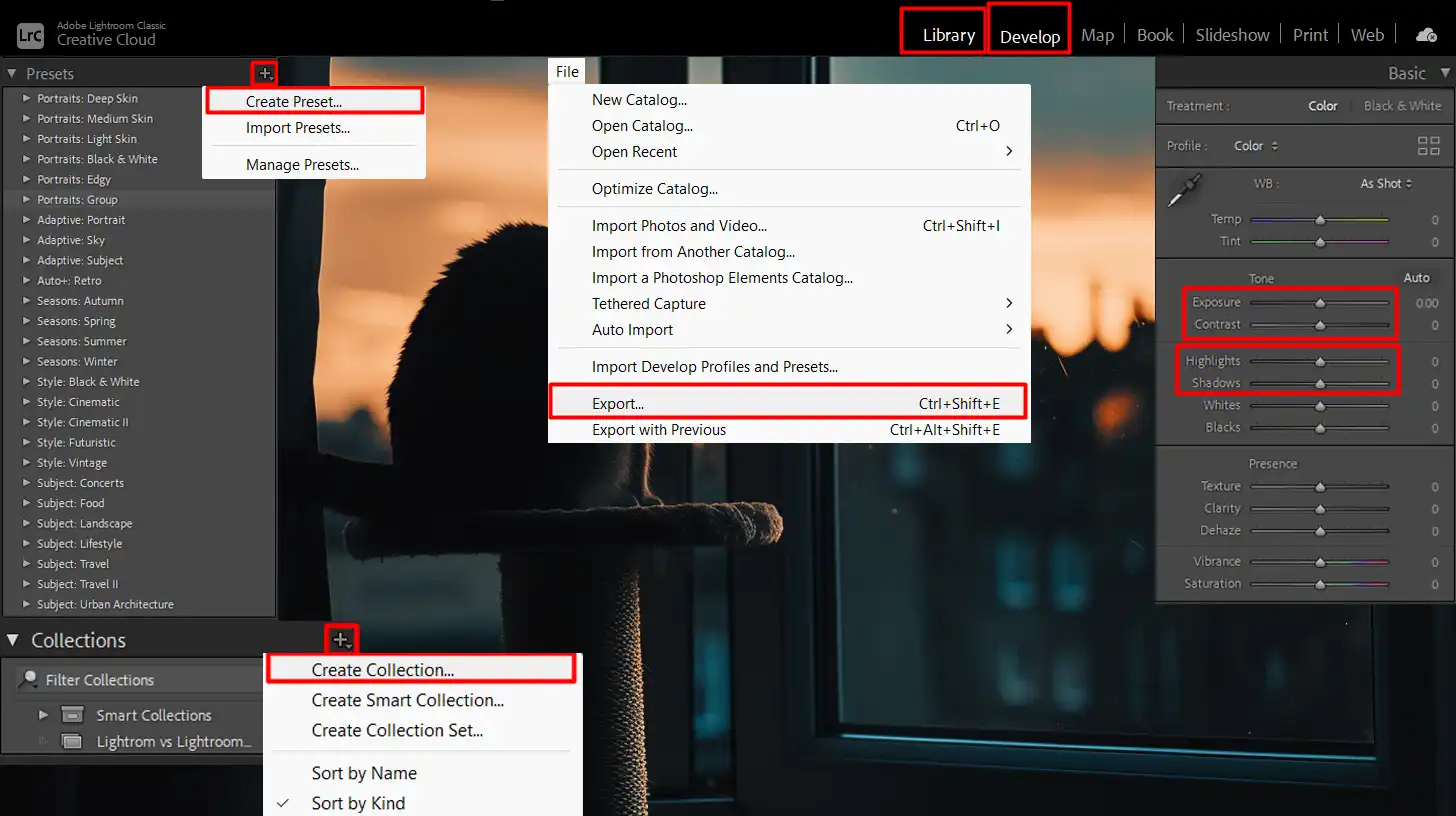
How to Work Lightroom: Export Your Final Photo
After editing, the next step is to export your final photo. Click on the ‘Export‘ button in the Library module. Select the destination for your file, choose the format, and set the quality. As mentioned earlier, you can resize for web or print.
Click ‘Export,’ and Lightroom will save your image to the chosen folder. That’s it; you’ve successfully edited and exported your photo using Lightroom.
Pro Tip: Always keep a backup of your original file before beginning the post-processing work. This saves you from potential mishaps.
Additionally, familiarize yourself with essential tools in Lightroom to make your editing process more efficient. Additionally, familiarize yourself with Adobe tools, such as Lightroom’s essential features, to make your editing process more efficient.
Basic Photo Refining to Learn How to Work Lightroom
When it comes to photography, mastering the basics of photo refining in Lightroom can make a huge difference.
Using Lightroom 2024 on your computer, you can fine-tune your images to enhance their look and feel. Let’s get into the Develop Module to see how it all works
Understanding the Develop Module
To start refining your photography images, it’s important to understand the Develop module. It’s where most of the magic happens in Lightroom on your computer.
When you open an image in this module, you find tools on the right side. These tools help you adjust exposure, contrast, color, and more.
Additionally, learning some significant Lightroom shortcuts can speed up your workflow significantly.
Experimenting with these tools can make a simple photo look spectacular. Remember, each adjustment changes the feel of the photo. Making small tweaks one at a time is always a good approach.
Cropping and Straightening Photos
Sometimes, a photo needs a little trimming or straightening. Cropping can improve the composition, and straightening ensures your horizon isn’t tilted.
Click on the Crop tool, which looks like a grid. You can manually drag the corners to resize the photo. Click outside the photo and drag to straighten the horizon. A helpful grid overlays the image aiding in making these adjustments.
After adjustments, don’t forget to save your work. Use the export feature to save your edited image. Specify the destination, file format, and choose the quality settings. Keeping a backup of the original file is always a good idea.
Pro Tip: While modifying, create a new Lightroom catalog for each project. This keeps everything organized and helps manage your workflow efficiently.
How to Work Lightroom: Advanced Lightroom Editing Techniques
Once you’ve mastered the basics, it’s time to explore more advanced Lightroom editing techniques. These techniques can take your photography to the next level and make refining on your computer more efficient.
Let’s start by looking at how using presets can help you achieve quick edits with consistent results
Using Presets for Quick Edits
Presets are the secret sauce of Lightroom. They transform your photos in a click. Download and install them to get a myriad of styles from vintage to modern.
Why waste time tweaking each slider when a preset can do it faster? Just import your image, select a preset, and you’re done. You still can edit afterward if you feel creative.
Installing and Managing Presets
To install presets, simply download the preset file and import it into Lightroom. Keep your presets organized in folders for easy access. Experiment with different presets to find your unique style.
Understanding how to install Lightroom presets is crucial for mastering the art of installing and managing presets. Simplify your workflow and enhance your edits with effective installation techniques.
Advanced Color Grading
Color grading can change the entire mood of your image.
Start by navigating to the color wheel tool.
Adjust hues, saturation, and luminance until you strike the perfect balance.
Got an underexposed image? No worries. Mastering color grading can revive it.
Experiment with shadow and highlight tints to add depth and drama.
Remember, subtle changes make a big difference.
Selective Adjustments with Brushes and Gradients
Selective adjustments let you target specific areas in your photos. Use the adjustment brush to brighten a face or bring out details in the background. Gradients are fantastic for skies.
Simply drag from top to bottom to enhance clouds or create stunning sunsets. Combine brushes and gradients for a highly customized edit process. This is where your Lightroom skills put all the others to shame.
Mastering the Adjustment Brush
Use different brush sizes and flow settings to fine-tune your adjustments. Feathering the brush can help blend the adjustments seamlessly with the rest of the image.
Using Radial and Graduated Filters
Radial and graduated filters add another layer of control. Use them to draw attention to the subject or to balance the exposure across the frame. Experiment with different shapes and positions to see what works best for your image.
Pro Tip: Export your image as a PSD file to continue detailed edits in Adobe Photoshop.
How to Work Lightroom: Organizing Your Photos in Lightroom
Lightroom is a powerful tool, but sometimes it feels a bit overwhelming. A good organizational system makes everything more efficient.
When working with Lightroom, organizing and managing your photos effectively can make a big difference in your workflow.
Below is a quick comparison of essential features and tips to help you streamline your Lightroom experience
Aspect
Overview
Using Collections and Folders
Group images without moving actual files on hardware by using collections and organize images at the file level using folders in the Library module.
Keywording and Metadata
Apply descriptive keywords during import and include metadata like camera model and settings to make image searches easier.
Rating and Flagging Photos
Use star ratings and flags to assess and categorize photos, helping in sorting out the best shots and rejecting lesser ones.
Utilizing Presets and Syncing Edits
Create presets or use existing ones to apply edits across multiple photos quickly and maintain a consistent look by syncing edits.
Backing Up and Exporting
Frequently back up your Lightroom catalog and learn how to export edited photos to ensure data safety and flexibility.
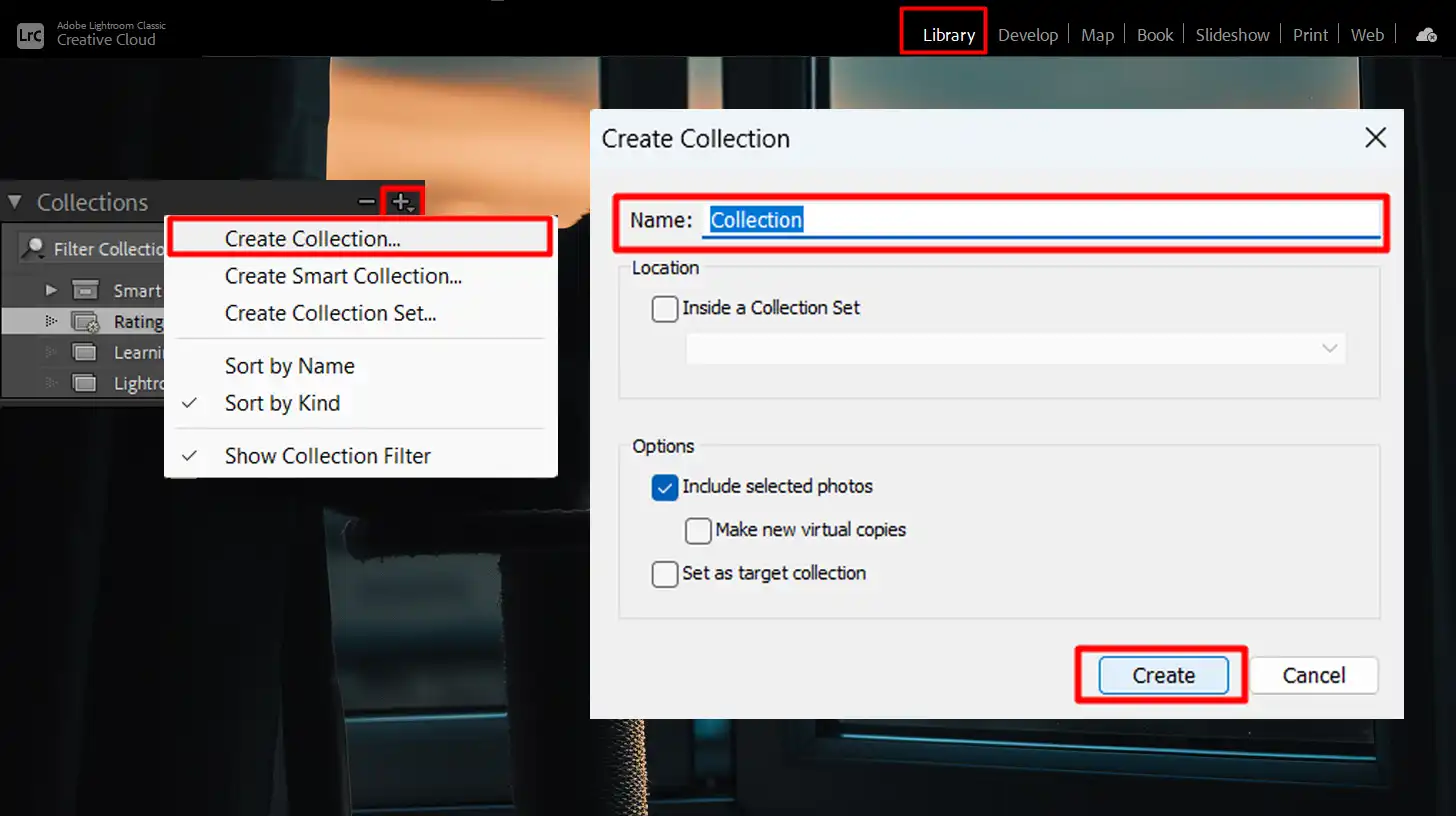
Using Collections and Folders
First things first, collections and folders are your best friends. Collections allow you to group images without moving actual files on your hardware.
Steps to Use Collections and Folders:
Create a collection for events or projects by clicking on the "+" sign next to Collections.
Organize images at the file level using folders. Right-click to create new folders in the Library module.
Utilize Smart Collections to automatically include photos based on set criteria, saving a lot of time.
Keywording and Metadata
Next up, let’s talk about keywording and metadata. These tools will help locate a specific image among hundreds, the photographer’s treasure map.
Effective Keywording and Metadata Tips:
Apply keywords during the import process. Tag them with descriptive words relevant to the shoot.
Include metadata details like the camera model, lens type, and settings for more focused searches.
Maintain consistency by using repetitive and recognizable keywords to avoid confusion.
Rating and Flagging Photos
Let’s move on to rating and flagging photos. Here’s where subjective judgment steps in. Still, it’s a significant part of your photo organization strategy.
How to Rate and Flag Photos:
Use stars to rate the quality (e.g., 5 stars mean keep, 1 star means consider deleting).
Flags help you pinpoint your best shots. Use the "P" key to flag and "X" to reject.
Combining ratings and flags offers a comprehensive view of your work quality and quantity.
How to Work Lightroom: Utilizing Lightroom's Advanced Features
Aside from basic organizational techniques, Lightroom offers a plethora of advanced features that can further streamline your workflow and enhance your photo management strategy.
Utilizing Presets and Syncing Edits:
Create your own presets or use provided ones to standardize edits across similar photos quickly.
Sync edits between multiple photos to maintain a consistent look without repetitive tasks.
Use virtual copies to experiment with different edits without duplicating files, helping to keep your library organized.
Backing Up and Exporting
Regularly backing up your Lightroom catalog and knowing how to export edited photos are also integral parts of an effective photo organization system.
Backup and Export Tips:
Frequently backup your Lightroom catalog to prevent data loss in case of hardware failure.
Set up automatic backups within Lightroom to ensure consistency.
Learn the various export settings to resize, rename, and adjust image quality as per your needs.
Pro Tip: Automate your imports. Create Import Presets to apply keywords, sort into folders, and add metadata in one go. This saves a large amount of time and keeps your workflow smooth. And remember, practice makes perfect.
The more you use Lightroom, the more intuitive it becomes. For more tips, check out our Lightroom training resources.
Exporting and Sharing Your Photos with Lightroom
After perfecting your photos in Lightroom, the next step is to export and share them.
Understanding how to export your images properly ensures they look their best on any platform.
For perfect results when exporting and sharing your photos with Lightroom, mastering Instagram export settings is fundamental for sharing on social media.
Learn how to adjust these settings to optimize your images for Instagram
Let’s explore how to optimize your export settings for different sharing needs.
Export Settings for Different Platforms
To export your photos:
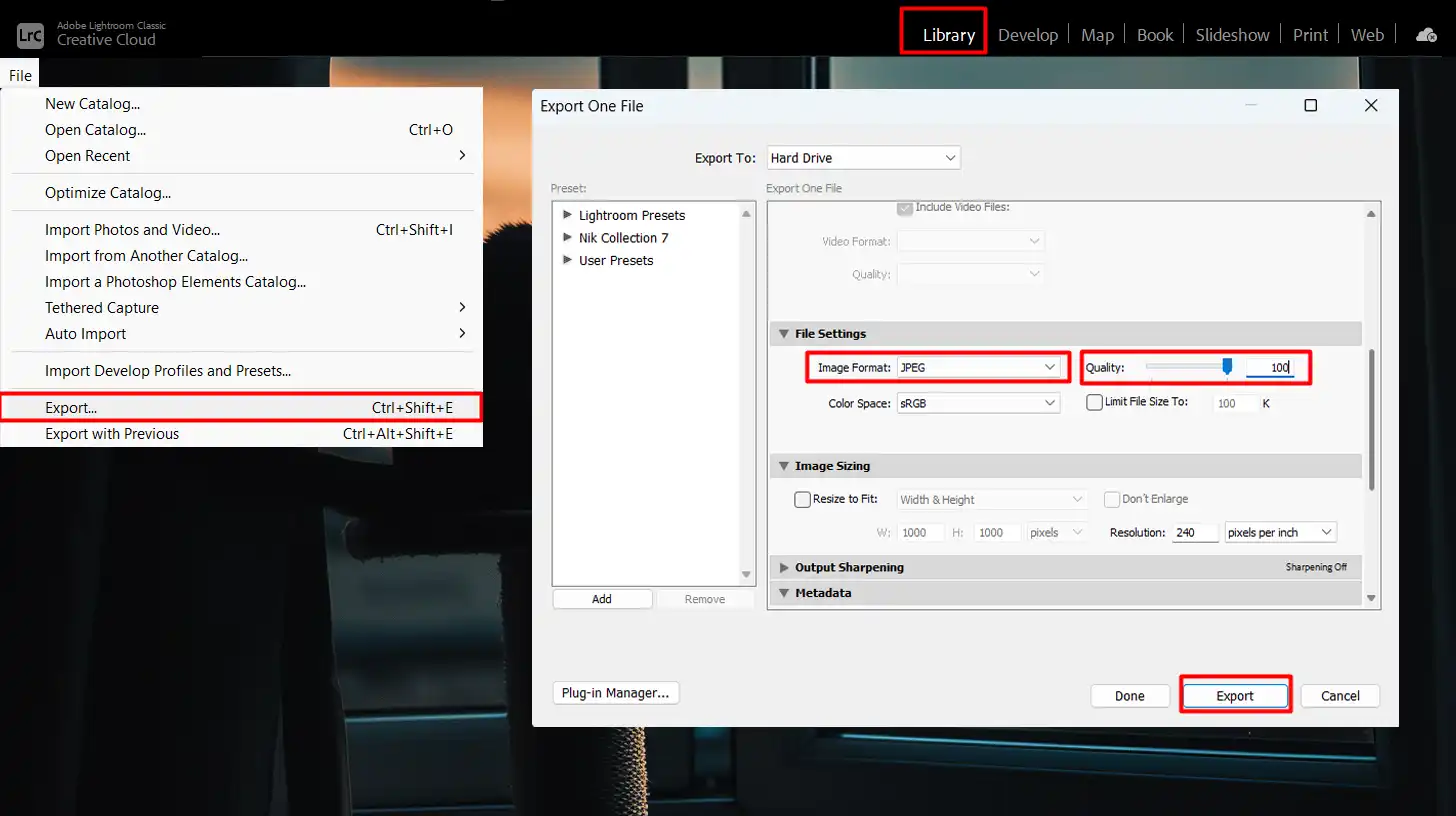
Click "File" > "Export".
Select the correct export settings for each platform.
For web use, opt for JPEG format and resize for faster loading.
For print, choose a higher resolution and set quality to 100%.
Save export presets for future use.
Creating and Sharing Photo Albums
To create and share photo albums:
Go to "Collections".
Click the "+" sign to create a new collection.
Name the collection appropriately.
Create "Smart Collections" to automatically gather images based on specific criteria.
Organize albums by event or project for easier access.
Share the album link with others.
Printing Photos from Lightroom
To print photos:
Choose photos you want to print by flagging them.
Click "Print" in the Module Picker.
Select a print template that suits your needs.
Adjust layout options according to your printer settings.
Set print orientation, size, and color management profile.
Review settings and print your photos.
Pro Tip: Always export a high-resolution version of your images for prints and a smaller, optimized version for web use.
Consider whether your photo needs to be in RAW or JPEG format, RAW is ideal for further refining due to its high quality, while JPEG is perfect for quick sharing and web uploads.
This ensures you maintain quality while keeping loading times to a minimum.
Yes, Lightroom is quite beginner-friendly. It offers an intuitive layout and various automated features which make it easier for newcomers to start editing their photos without being overwhelmed.
How Do I Use My Lightroom?
Start by importing your photos into the Lightroom library.
Choose a photo to edit by double-clicking on it.
Use the different modules like Develop to adjust lighting, color, and other elements.
Experiment with presets for quick edits.
Export your edited photo once you're satisfied with the changes.
How to Work Lightroom Step by Step?
Import your photo into Lightroom.
Select the Develop module to access refining tools.
Adjust the exposure and contrast to enhance your image.
Modify the color balance for a natural look.
Apply sharpening and noise reduction as needed.
Crop or rotate the image to improve composition.
When you're happy with the edit, export the photo to your desired format.
What is the Difficulty Level of Learning Lightroom?
Learning the basics of Lightroom is not very hard. With its user-friendly interface, most beginners can start refining photos effectively after a few tutorials. The depth of features means there is always more to learn, but getting started is straightforward.
Learning how to work with Lightroom has been a game-changer for me. It took my refining skills from basic to advanced, helping me create better images without spending hours on each one.
The non-destructive refining tools let me experiment without worry, and the organizational features make finding and refining images a breeze. If you want to improve your refining skills, I suggest starting with a solid foundation. Check out this Photoshop course and this Lightroom course. They both provide practical steps and techniques that are easy to follow.
For those looking to dive deeper into Adobe’s tools, consider exploring Adobe Photoshop and Lightroom through Adobe. They offer powerful features that can help bring your creative ideas to life. These tools, combined with the right training, can make a big difference in how you edit and manage your photos.
If this article has helped you, then Like and Share it with your friends
$2,061.00Original price was: $2,061.00.$1,061.00Current price is: $1,061.00. 27584
Download Your Free Guide Now!
Discover the secrets of photography with our printable guide! Master essential techniques like aperture, shutter speed, and ISO to create stunning images. Get your free printable PDF now and start turning your snapshots into masterpieces!