Are you looking to enhance the clarity of your images? In this guide, I’ll show you exactly how to sharpen photos in Lightroom.
Whether you’re a beginner or a seasoned photographer, mastering this skill is essential for creating stunning visuals.
Imagine turning a slightly blurry shot into a crisp, professional masterpiece with just a few tweaks. Interested?
Keep reading to discover simple steps and expert tips that will transform your editing game and make your photos stand out.
Don’t miss out on learning this valuable technique your images will thank you!
Table of Contents
Getting Started with Sharpening Photos in Lightroom
To effectively sharpen photos in Lightroom, begin by familiarizing yourself with the sharpening settings and sharpening sliders.
Use the sharpen slider to manually adjust the level of detail, or opt for automatic sharpening to apply sharpening according to Lightroom’s presets.
Why Sharpening is Important
Sharpening photos significantly improves the appearance of your images, making details much clearer.
This process is essential, particularly for those who work with digital photography. Digital images often require sharpening because the process of capturing digital photos tends to soften them a bit.
Sharpening ensures that your photos exhibit more pop and clarity. An adequately sharpened photo stands out, drawing the viewer’s eye to key details.
For example, a sharp image helps to distinctly highlight textures and patterns.
Achieving proper photo focus is important for clear, impactful images. Its important to understand why sharpening helps enhance this focus effectively.
Understanding the Basics of Sharpening
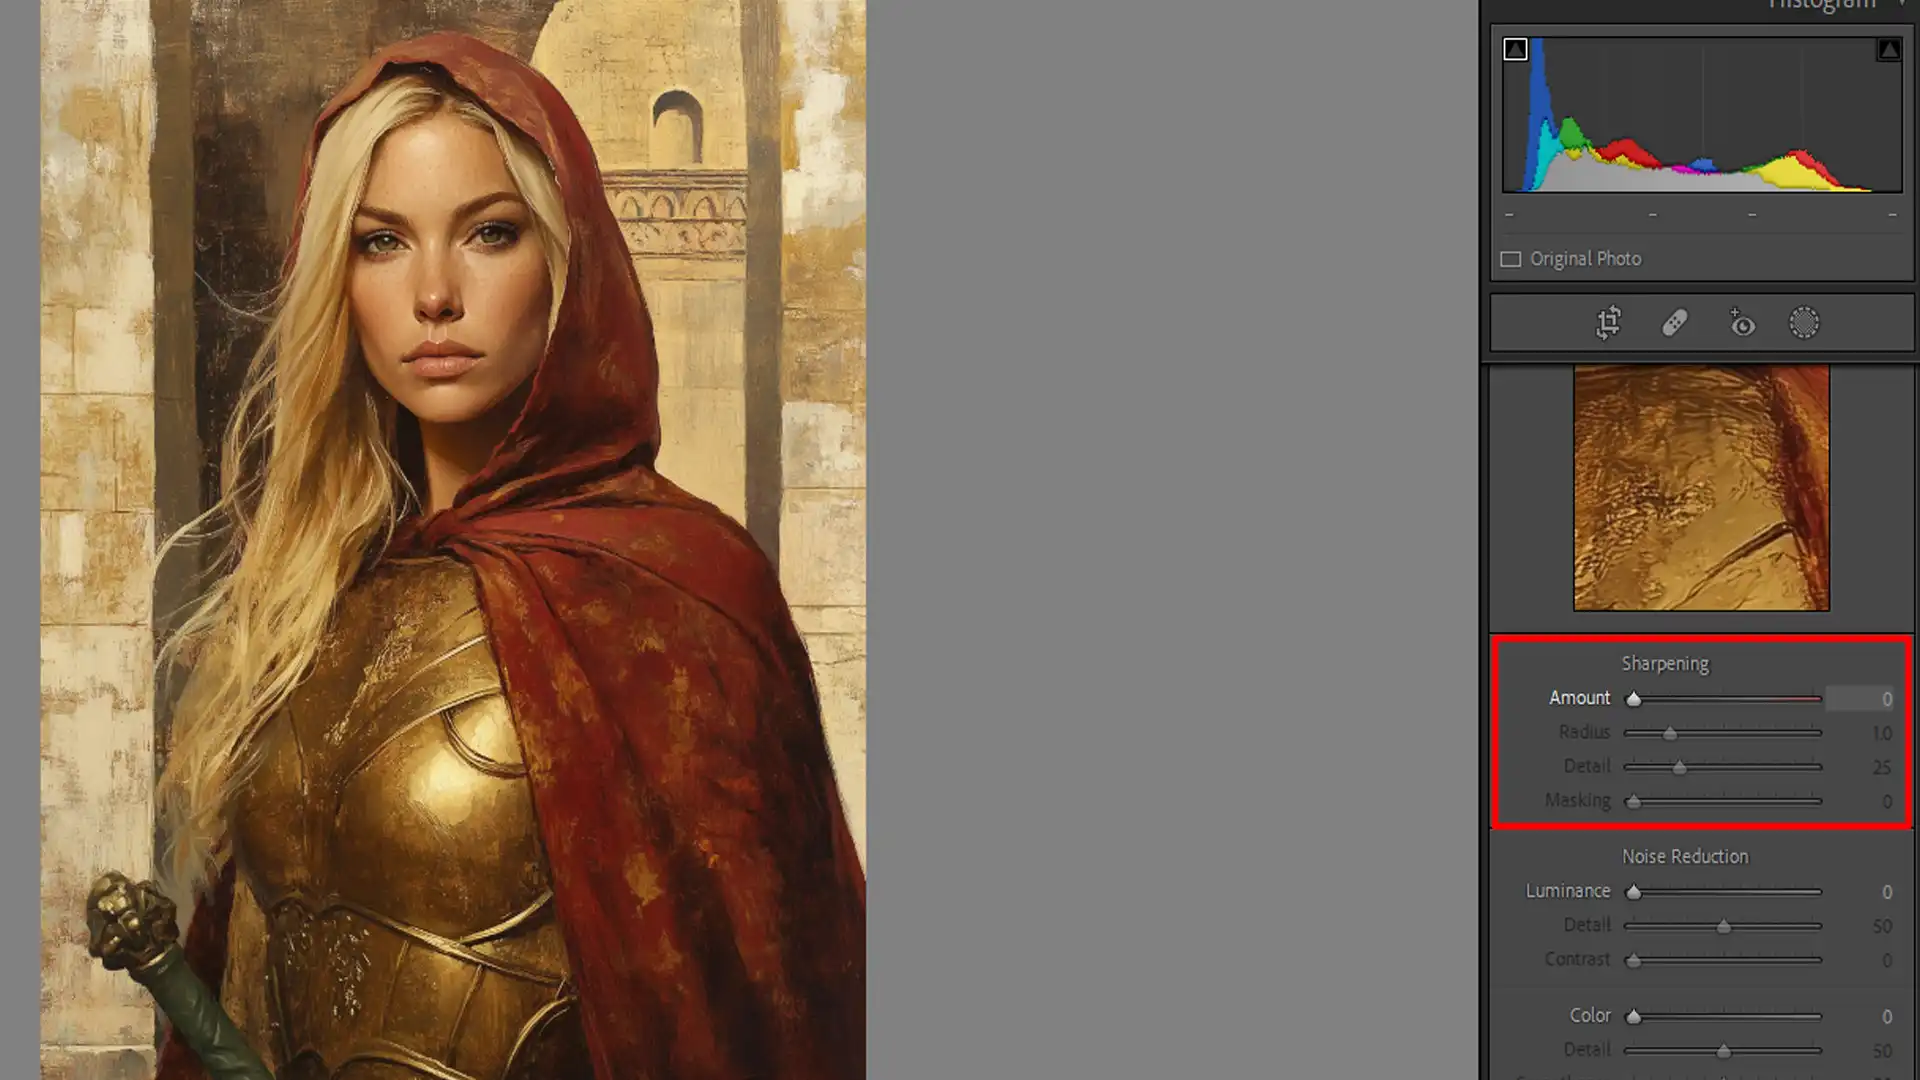
In Lightroom, sharpening involves several key sliders. These sliders control how much sharpening is applied to your image.
The main sliders you’ll use are the amount, radius, detail, and masking sliders.
Amount slider: Adjusts the intensity of the sharpening effect. Start with a lower value and increase it gradually to avoid too much sharpening.
Radius slider: Dictates the width of the edges being sharpened. Smaller values sharpen only fine details, while larger values affect broader edges.
Detail slider: Determines how much emphasis is placed on the edges. Higher values enhance more textures.
Masking slider: Selectively applies sharpening to the edges, preventing the entire image from being affected.
Photoshop’s high pass filter is a powerful technique for enhancing photo clarity. Understanding why sharpening is important helps you use this filter more effectively.
How to Sharpen Your Photos Step-by-Step
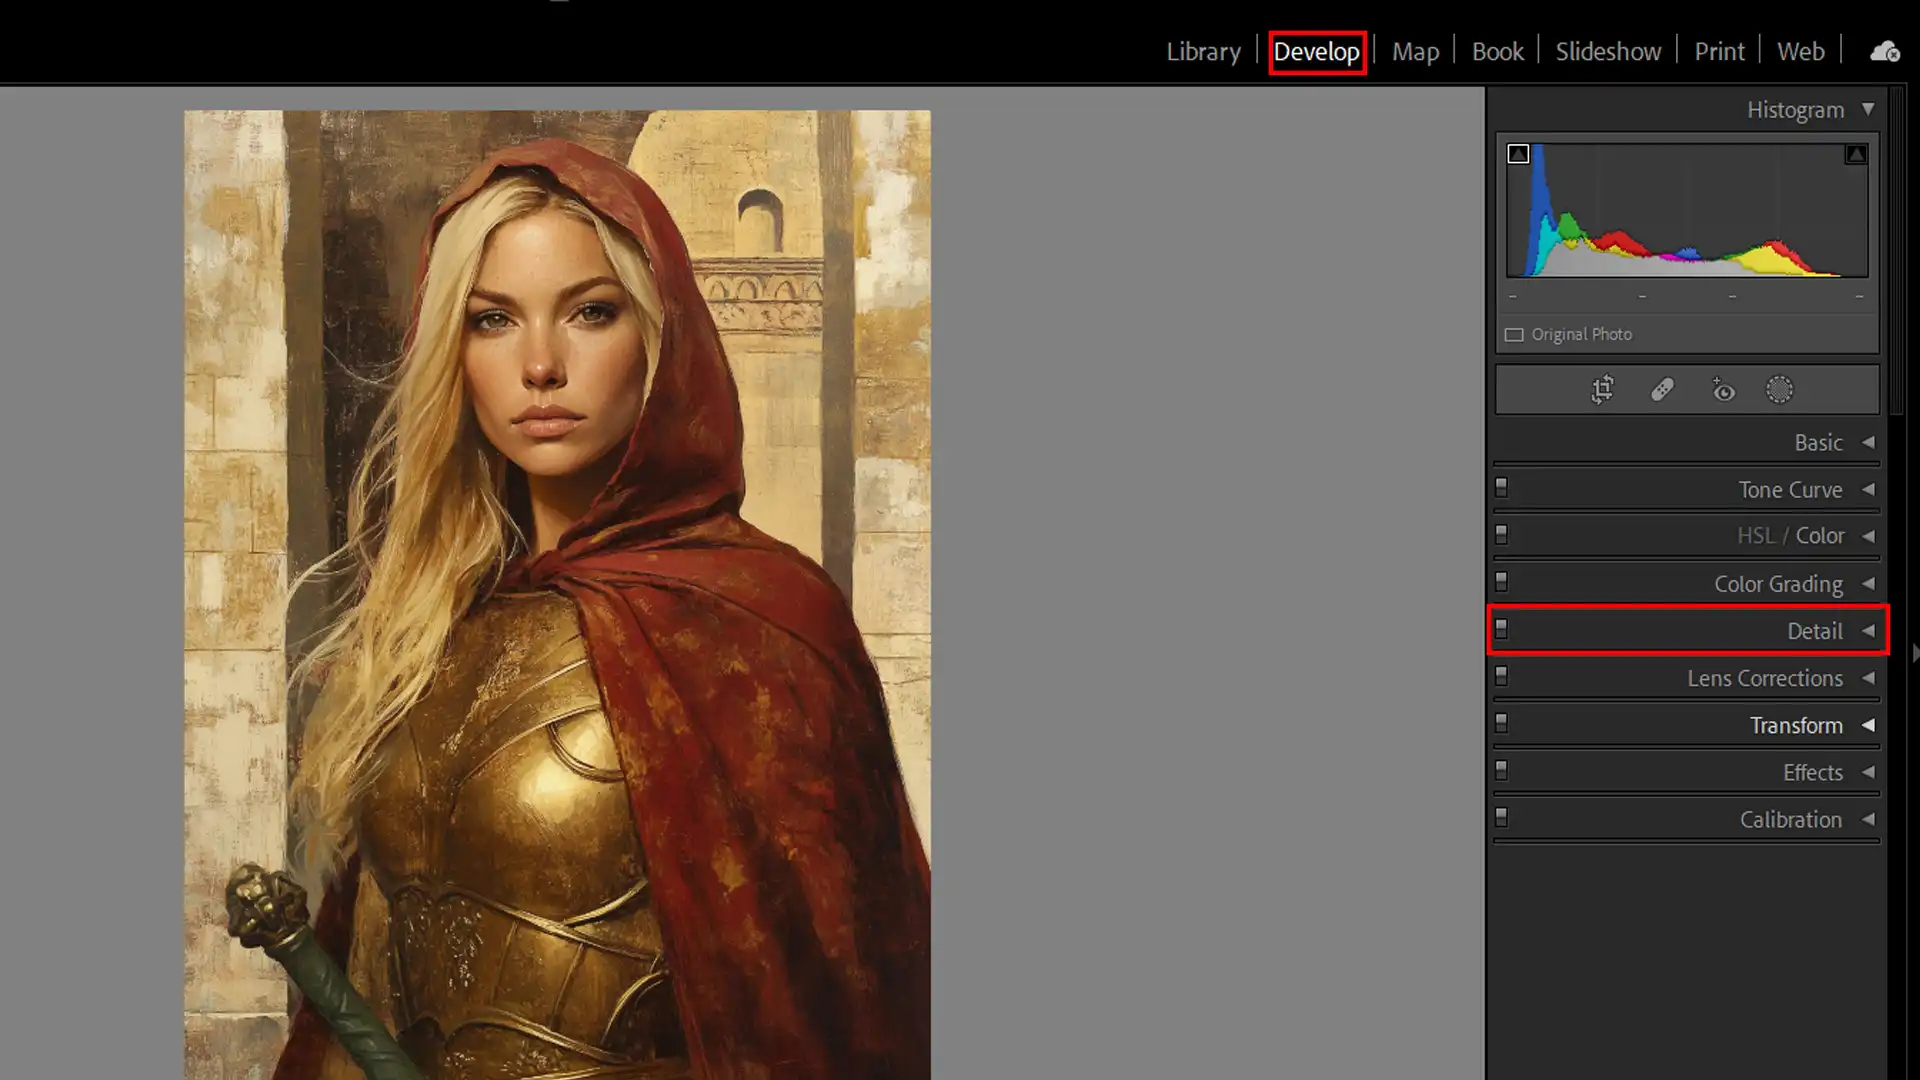
Open the Develop module, where all the editing magic happens.
Go to the Detail Section, which houses all your sharpening tools.
Use the amount slider to adjust the sharpening effect. Keep an eye on your image to determine the appropriate level.
Tweak the radius slider to focus the sharpening on the right level of detail.
Adjust the detail slider to enhance specific textures.
Use the masking slider to refine where the sharpening is applied only to the edges for a subtle look.
Advanced Sharpening Techniques
For more control over your sharpening, use the adjustment brush for selective sharpening. This tool lets you target specific areas, ensuring precision.
Pay attention to masking slider affects as these adjustments refine the outcome.
Remember, overdoing sharpening might result in unnatural-looking photos. Always review your adjustments by zooming in and out of the image to strike a balance.
Pro Tip: For a natural look, moderate the radius slider and keep an eye on details. Too much sharpening can make images look harsh.
The key lies in subtle enhancement without losing the overall integrity of your photo.
How to Sharpen Photos in Lightroom
To sharpen images effectively, use the masking tool to refine the areas where you apply sharpening, ensuring that only the desired details are enhanced.
Adjust brush strokes and visible lines carefully to maintain the integrity of the original image while achieving a crisp, polished look.
Accessing the Detail Panel
First things first, open Adobe Lightroom and get into the Develop module. Here lies the magic of photo editing. Scroll down until you find the Detail panel.
Just a click away, this panel is where we can transform blurry photos into sharp images. It’s our toolbox for sharpening images.
Using the Masking Slider
Next, let’s talk about the masking slider. This slider lets us target the areas that need sharpening while ignoring smoother parts.
Hold down the Alt/Option key and drag the masking slider.
White areas get the sharpening applied, black areas stay untouched. It’s an easy way to avoid over-sharpening skin or other soft areas.
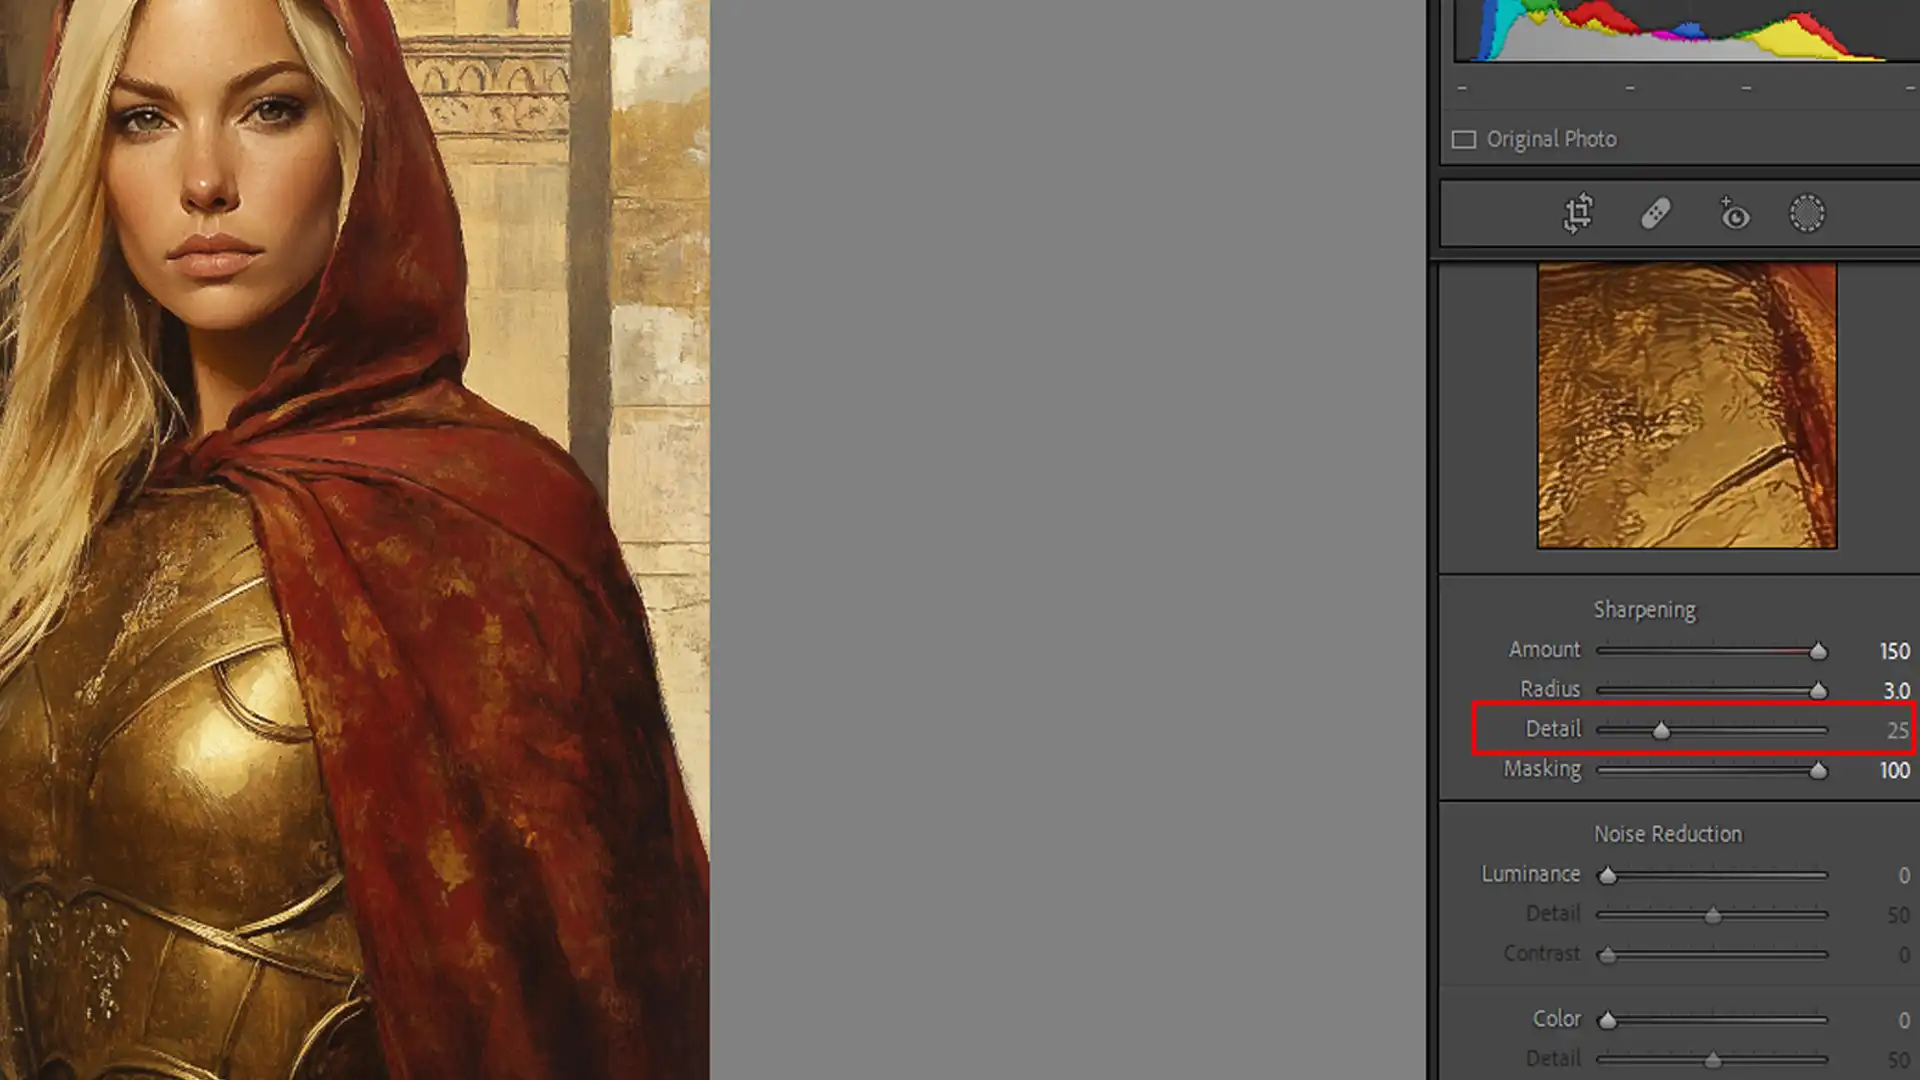
Adjusting the Detail Slider
The detail slider adjustments how much emphasis to put on the edges. Move it right for more intricate details, or left if you want a softer touch.
Remember, less is more. High values can make photos look unnatural. The detail slider helps in refining textures and patternseffectively.
Fine-Tuning with the Detail Panel
Back in the Detail panel, use the sharpening slider to adjust the overall effect. Set the radius and detail sliders to balance the sharpness.
Watch out for halos or exaggerated lines, which can ruin the look. It’s all about striking the perfect balance.
Pro Tip: For a powerful sharpening tool, use the adjustment brush for more control. Stick to subtle adjustments with the detail slider to avoid unnatural results.
Blurry photos happen to the best of us, whether due to shaky hands or a moving subject.
Don’t worry; we can fix it. Let’s look at how we can make those photos shine.
Identifying Blurry Images
First, we need to figure out which photos are worth saving. Check for areas where important details are fuzzy. Faces and key objects should be sharp.
If they’re not, it’s blurry. Look closely at the edges of your main subjects. Clear lines mean a sharp image, while fuzzy lines mean you need sharpening.
Zoom In for Subtle Blurriness
Sometimes, we can overlook subtle blurriness. Zoom in to check. Even minimal blur requires corrections. Make it a habit to review your photos immediately after taking them.
You’ll avoid surprises later on.
Best Practices for Sharpening Blurry Photos
When sharpening blurry photos, focus on using targeted adjustments and fine-tuning to enhance clarity without introducing unwanted noise.
Now that we have identified which photos need fixing, let’s move on to sharpening them. Open the photo in Adobe Lightroom.
Go to the Develop module and find the Detail panel. This is where magic happens.
Amount Slider: Move it gradually to increase the sharpness. Go slow and avoid overdoing it.
Radius Slider: It controls the size of the edges being sharpened. Higher values sharpen broader edges, and lower values focus on fine details.
Detail Slider: Manage how much emphasis is put on the edges. High values bring out more textures but can make the image look harsh. Find a balance.
Masking Slider: Use for targeted sharpening. Hold down the Alt/Option key while dragging. This ensures only the corners get sharpened.
Selective Sharpening
For tough cases, use the adjustment brush to selectively sharpen specific areas. You’re in control. Refine your technique to get a natural look.
Advanced Sharpening Techniques
Let’s elevate your image-sharpening game. You’re already familiar with the basics, now, let’s dive into the more advanced techniques that will make your photos stand out.
Mastering these methods will show you how to sharpen photos in Lightroom like a pro.
Using the Masking Slider for Precision
The masking slider is like a scalpel in your photo editing toolkit. It allows precise control over where sharpening is applied.
First, hold down the Alt/Option key. As you slide the masking slider, you’ll notice the image changing. White areas are where sharpening happens.
Black areas stay untouched. This helps focus sharpening on edges while ignoring smooth areas like skies or skin.
Why is this essential? Over-sharpening can ruin your image. The masking slider ensures only crucial details get the attention they need.
It’s especially useful for portraits. You won’t want to sharpen someone’s face so much that it looks unnatural.
Combining Sharpening with Other Adjustments
Sharpening alone won’t fix everything. It’s best used with other adjustments:
After using the sharpening tools, adjust the contrast. This makes the details pop even more.
Tweak the brightness to ensure no part of the image is too dark or too light.
The detail slider controls help you fine-tune your sharpening adjustments by focusing on textures and patterns.
Now, what’s a good photo without some color correction? After sharpening the images, adjust the color balance.
This helps your freshly sharpened details appear vivid. The combination of color correction and sharpening often results in stunning, professional-quality photos.
Pro Tip: For those looking to streamline their workflow, mastering Lightroom shortcuts can significantly speed up the editing process.
Understanding essential tools in Photoshop is crucial for achieving stunning results. Combining sharpening with other adjustments can elevate your photos even further.
Common Mistakes and How to Avoid Them
We all want our photos to look great. But sometimes, we make common mistakes when trying to sharpen images.
Let’s dive into these pitfalls and learn how to avoid them.
Mistake
Description
How to Avoid
Over-Sharpening
Excessive sharpening creates unnatural halos and harshness.
Adjust the amount slider slowly; less sharpening often results in a more natural look.
Ignoring Masking Slider
Applying sharpening to the entire image can affect smooth areas poorly.
Use the masking slider with the Alt/Option key to sharpen only the edges, keeping smooth areas intact.
Not Adjusting Radius
Using a high radius can cause excessive edge contrast and haloing.
Keep the radius slider low to avoid exaggerated edge effects; focus on subtle adjustments.
Using Incorrect Detail Settings
Applying too much detail enhancement can introduce unwanted noise.
Fine-tune the detail slider to enhance texture without amplifying noise or artifacts.
Skipping Noise Reduction
Sharpening without reducing noise can accentuate image grain.
Apply noise reduction before sharpening to ensure a clean and sharp final image.
Let’s examine these pitfalls and learn how to avoid them so you can master sharpening photos in Lightroom effectively.
Over-Sharpening
Ever seen a photo that looks unnaturally crisp? That’s over-sharpening.
People often think more is better, but too much edge sharpening can ruin an image. It creates halos around objects, making them look unnatural.
The fundamental principle is moderation. Adjust the amount slider carefully. Watch your image as you tweak it. Less can indeed be more here.
Ignoring the Masking Slider
The masking slider is often overlooked. Ignoring it leaves your entire photo uniformly sharpened.
This can make smooth areas like the skies or skin look bad. Hold down the Alt/Option key while moving the masking slider.
This smart tool focuses on edges, not flat areas. This selective sharpening keeps your image natural.
Steps to Master Sharpening in Lightroom
Open the Detail panel
Adjust the amount slider slowly
Use the masking slider for precision
Pro Tip: Use sharpening controls along with other adjustments like contrast and brightness.
Sharpening photos can really bring your images to life. From my experience, learning how to sharpen photos in Lightroom has been a game-changer.
It’s not just about adjusting sliders, it’s about understanding how each tool affects your image. Remember, avoiding common mistakes and using advanced techniques can make a huge difference.
If you’re eager to learn more, check out my Photoshop Course and Lightroom Course. They offer detailed lessons to help you get the most out of your editing.
Also, if you’re considering getting the right software, you can explore Adobe Photoshop and Adobe Lightroom to enhance your photo editing journey.
Happy editing!
If this article has helped you, then Like and Share it with your friends
$2,061.00Original price was: $2,061.00.$1,061.00Current price is: $1,061.00. 27585
Download Your Free Guide Now!
Discover the secrets of photography with our printable guide! Master essential techniques like aperture, shutter speed, and ISO to create stunning images. Get your free printable PDF now and start turning your snapshots into masterpieces!