How to Reset Photoshop Preferences: A Complete Tutorial
How to Reset Photoshop Preferences: A Complete Tutorial
Resetting Photoshop preferences can be a lifesaver when dealing with unexpected crashes, tool malfunctions, or performance issues.
It can bring Photoshop back to its default state, resolving many problems you might encounter.
In this guide, I’ll show you how to reset Photoshop preferences and explain why this method is effective.
Let’s dive in!
Table of Contents
Preparing to Reset Preferences
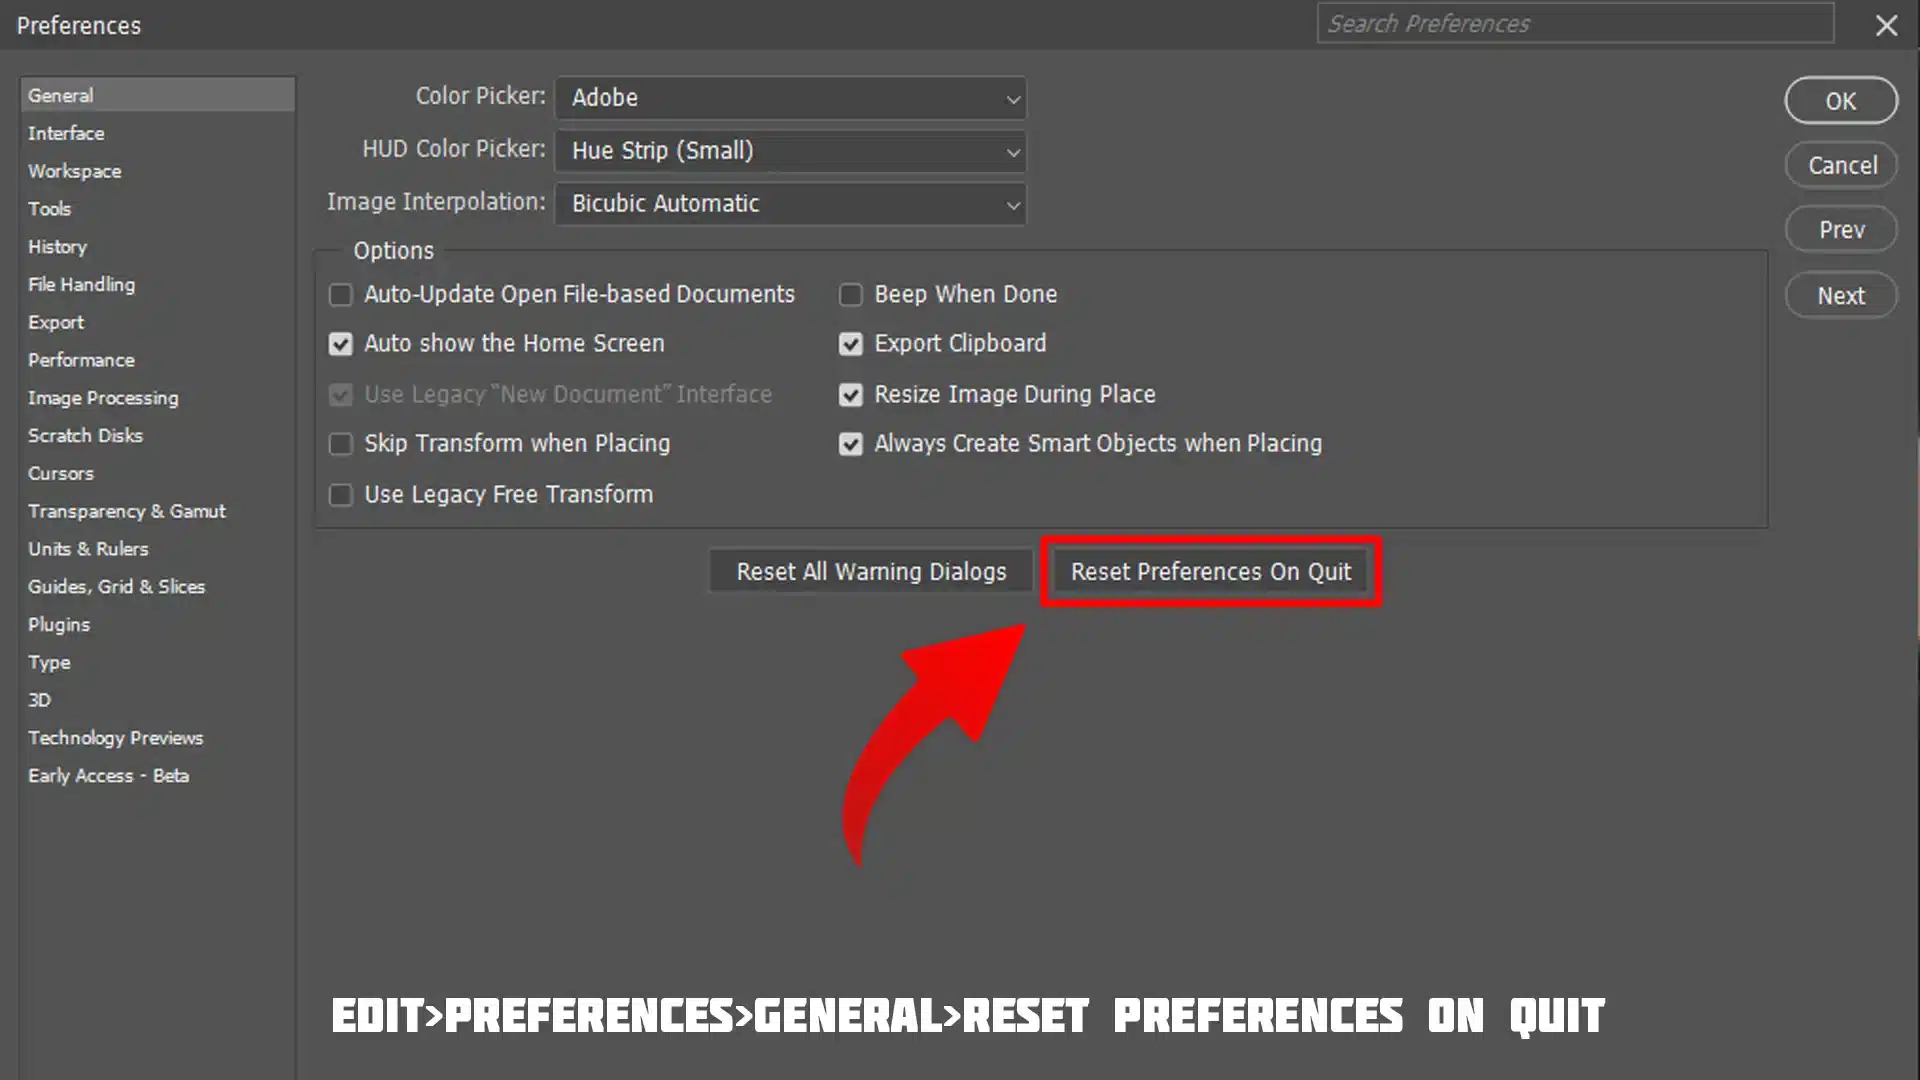
Before you reset precedence, ensure you are ready to reset preferences on quit.
To reset Photoshop settings, choose Quit Photoshop from the dialog box that appears when you attempt to reset Photoshop.
This action will clear all the settings, allowing you to start with a clean slate.
Once you have decided to reset preferences on quit, it’s crucial to fully quit Photoshop to ensure the reset takes effect.
If you don’t quit Photoshop, the changes won’t be applied correctly, and you might not achieve the desired reset of preferences.
When preparing to reset preferences, it’s important to understand the Photoshop interface.
Familiarity with its layout helps you quickly reconfigure settings and tools after a reset, making the transition smoother and restoring your preferred workflow efficiently.
Step 1: Back Up Your Settings
Before I show you how to reset Photoshop preferences, it’s a good idea to back up your current settings.
This way, if you find that resetting Photoshop preferences doesn’t help or you lose some customizations you want to keep, you can restore them.
To back up your settings:
Open Photoshop.
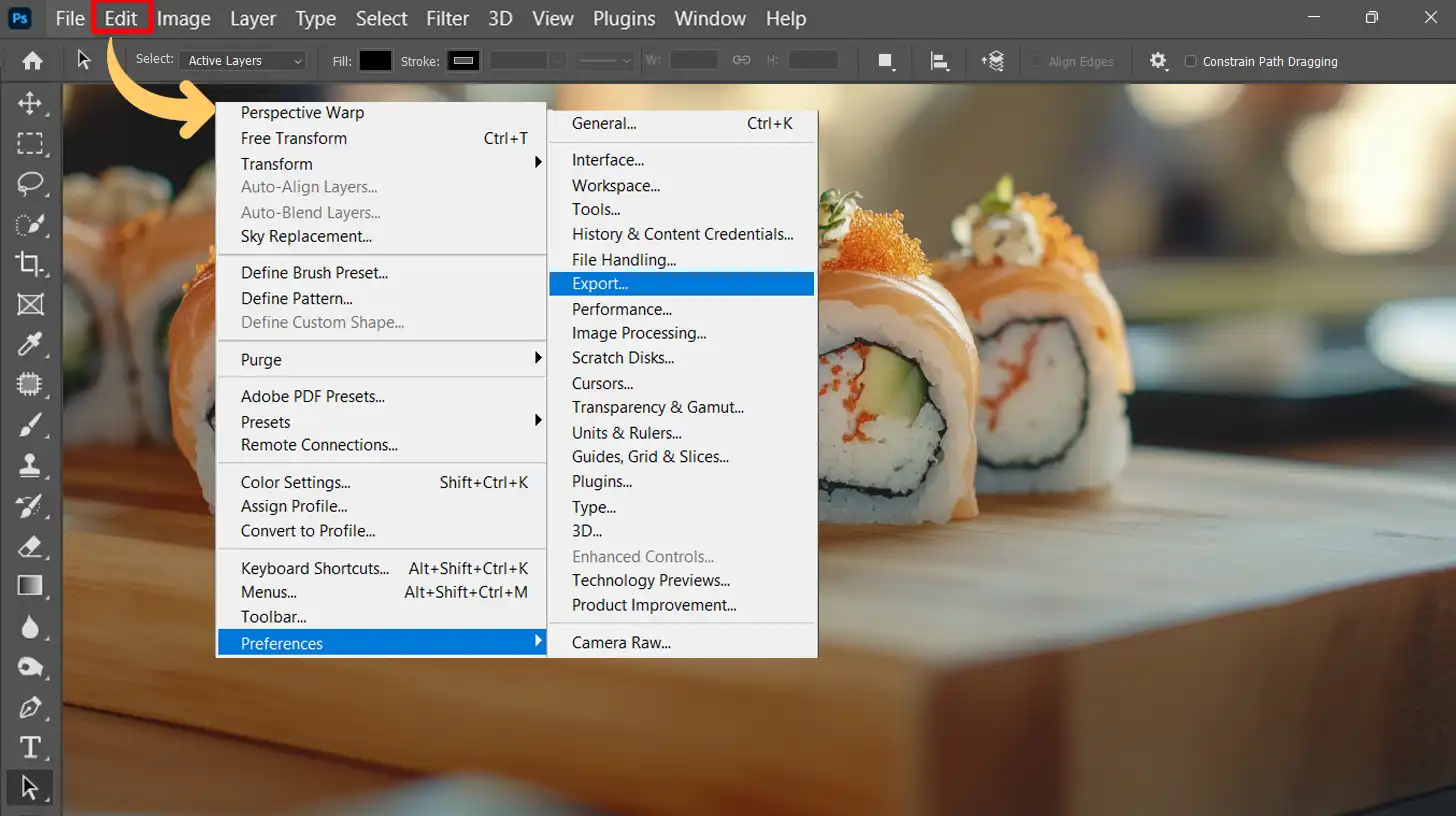
Go to Edit (Windows) or Photoshop (Mac) in the Photoshop CC menu bar.
Select Preferences > General.
Click on Export/ImportPresets.
Choose Export Presets and save them to a location on your computer.
This will create a backup settings file containing your current Adobe Photoshop version settings, which you can re-import later if needed.
Optimize your workflow by mastering the option bar in Photoshop, essential for backing up your settings. Learn to customize and save your tool configurations to ensure a seamless editing experience.
Step 2: Close Photoshop
Make sure Photoshop is completely closed before you reset preferences. The reset process won’t work if the application is still running, like if you’re using essential tools in Lightroom.
Check your task manager (Windows) or activity monitor (Mac) to ensure no Photoshop processes are running in the background.
Step 3: Locate the Adobe Photoshop Settings File
Photoshop stores its preferences in a specific file menu on your computer. The location of this Adobe Photoshop settings file depends on your operating system:
Windows:
Open File Explorer.
Navigate to C:Users[Your Username]AppDataRoamingAdobeAdobe Photoshop [version]Adobe Photoshop Settings.
Mac:
Open Finder.
Go to Users/[Your Username]/Library/Preferences/Adobe Photoshop Settings.
If you can’t see the AppData or Library folders, they might be hidden.
On Windows, you can make hidden folders visible by going to View in File Explorer and checking Hidden items.
On Mac, hold down the Option key while clicking the Go menu in Finder to access the Library folder.
Step 4: Delete the Preferences File
Once you’ve located the corrupted preferences file, delete it. This file usually has a name like Adobe Photoshop Prefs.psp.
Deleting this file will remove all your current Photoshop preferences, and Photoshop will create a new default preferences file the next time it starts.
Step 5: Restart Photoshop
Open Photoshop again. After you reset Photoshop settings, the application will create a new preferences file with the defaultsettings.
You should now have a fresh start, which can help resolve any issues you were experiencing before I showed you how to reset Photoshop preferences.
Alternative Method: Keyboard Shortcut
If you prefer a quicker method, you can use a keyboard shortcut to reset your preferences. This method is straightforward and doesn’t require you to navigate through your file system.
Mastering Photoshop shortcuts can significantly boost your efficiency with keyboard shortcuts.
Learning these shortcuts helps streamline your editing process, making your workflow faster and more intuitive.
Hold down the Ctrl + Alt + Shift keys (Windows) or Command + Option + Shift keys (Mac) while launching Photoshop.
A preferences dialog box will appear, asking if you want to continue resetting Photoshop’s preferences file. Click Yes to confirm this action.
Using layersinPhotoshop effectively is crucial for non-destructive editing. Knowing the layers shortcut in Photoshop can speed up your workflow significantly.
By mastering these shortcuts, you can quickly navigatethroughlayers, improving productivity and allowing more time to focus on creating detailed and polished images
Mastering Lightroom shortcuts can greatly enhance your efficiency with keyboard shortcuts. Understanding these shortcuts helps streamline your workflow, making editing faster and more intuitive.
This method is handy if you’re in a rush or not comfortable navigating through system folders.
While you’re here, here’s how to make a collage in Photoshop!
After you reset Photoshop preferences, you might want to learn how to make a collage in Photoshop. This knowledge helps you quickly start fresh with your new settings and create engaging collages, making the most of your reset.
Post-Reset Steps
After you resetpreferences on quit, it’s essential to ensure that you fully quit Photoshop to apply the changes.
Once you quit Photoshop, the reset preferences will be in effect, and when you reopen it, the application will start with the default settings.
This feature protects your work from unexpected crashes by automaticallysavingprogress, providing peace of mind as you restore and customize your settings.
Restoring Your Settings
If you find that the default settings aren’t to your liking or you want to restore some of your custom settings, you can import the presets you backed up earlier.
Open Photoshop.
Go to Edit Menu (Windows) or Photoshop (Mac) in the Photoshop menu bar.
Select Preferences > General.
Click on Export/Import Presets.
Choose Import Presets and select the backup Photoshop preferences file you created.
This will restore your previous settings, allowing you to keep any customizations that you find useful while still benefiting from when you reset preferences.
Reinstalling Plugins and Extensions
After you reset your preferences, you might need to reinstall any plugins or extensions you were using.
Some of these may have contributed to your issues, so reinstall them one at a time and test Photoshop’s performance after each installation.
Action
Description
Outcome
Reset Preferences on Quit
Fully quit Photoshop after resetting preferences to apply changes.
New default settings will take effect on restart.
Restore Settings
Import your previously backed-up presets using the Export/Import Presets option in the Preferences menu.
Restores custom settings saved before the reset.
Reinstall Plugins and Extensions
Download and install the latest versions of plugins/extensions one by one, testing after each installation.
Ensures smooth performance by adding only stable plugins.
Customize Preferences
Adjust memory, interface, and workspace settings according to your workflow needs.
Optimizes Photoshop for better performance and usability.
Customizing Preferences
With a fresh start, it’s a good opportunity to customize your preferences to better suit your workflow.
To improve your editing precision, learning to zoom in Photoshop effectively is crucial.
By mastering this tool, you can enhance your workflow and achieve better detail in your projects.
Here are some common preferences you might want to adjust:
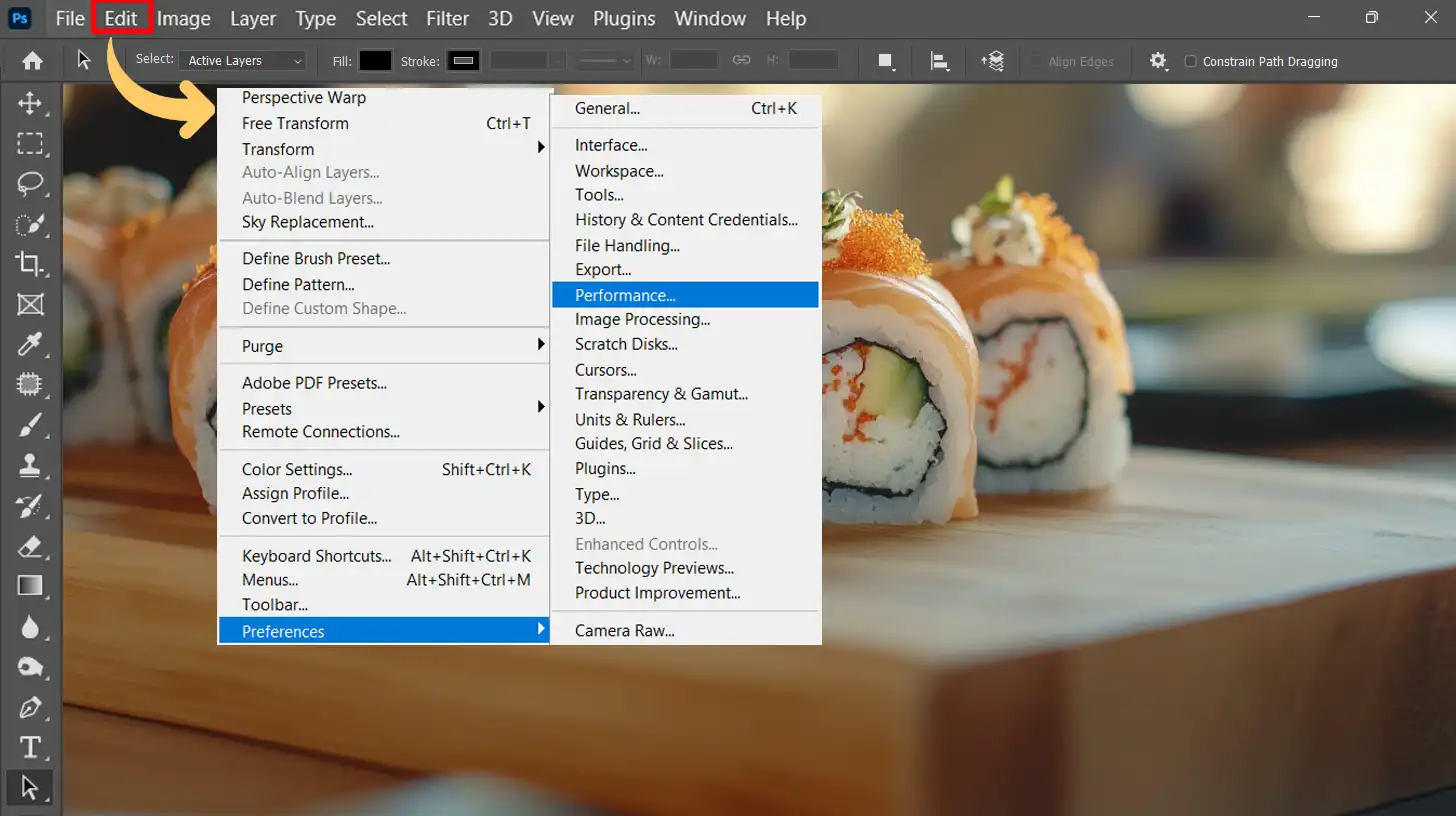
Performance Settings: Go to Edit (Windows) or Photoshop (Mac) > Preferences > Performance. Here, you can adjust settings related to memory usage, graphics processor settings, and cache levels. Increasing the amount of RAM Photoshop can use can improve performance, especially with large files.
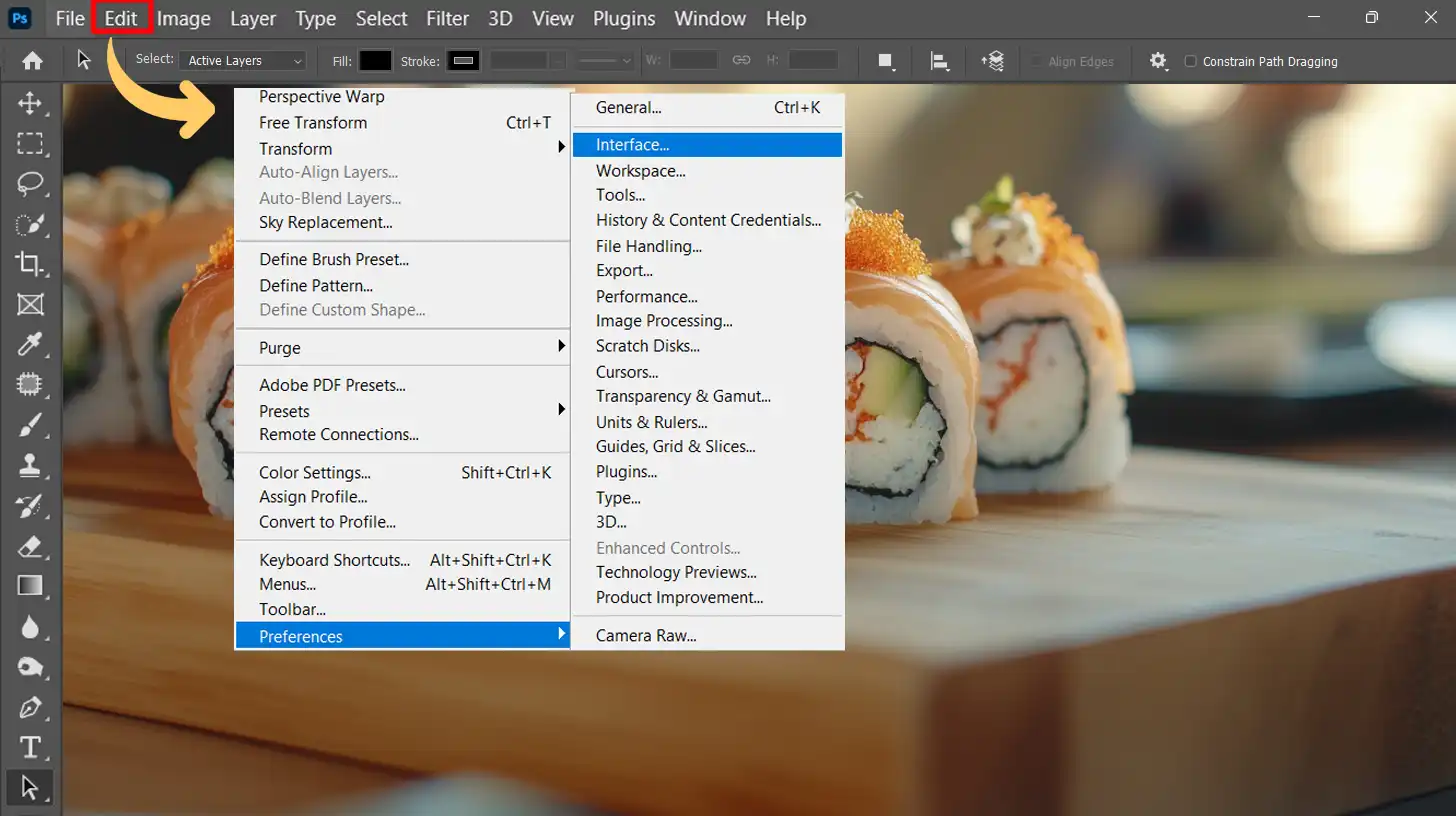
Interface Settings: Go to Edit (Windows) or Photoshop (Mac) > Preferences > Interface. Here, you can adjust the appearance of the interface, including theme colors and font sizes. Customizing the interface can make it easier to work in Photoshop for extended periods.
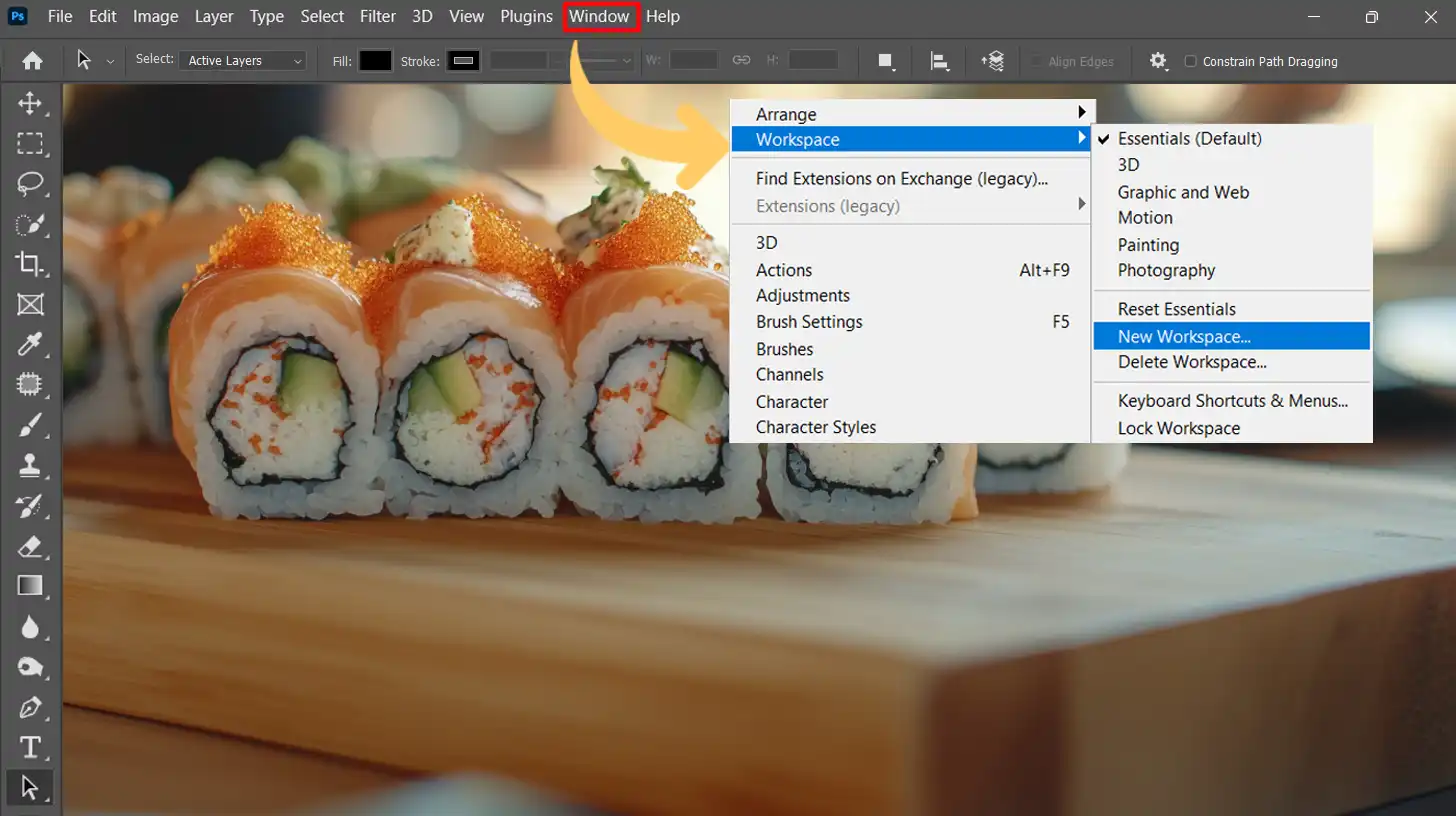
Workspace Layouts: Go to Window > Workspace > New Workspace. Save your preferred panel layout as a workspace, so you can quickly switch between different setups depending on your current task. This is particularly useful if you switch between tasks like photo editing and graphic design.
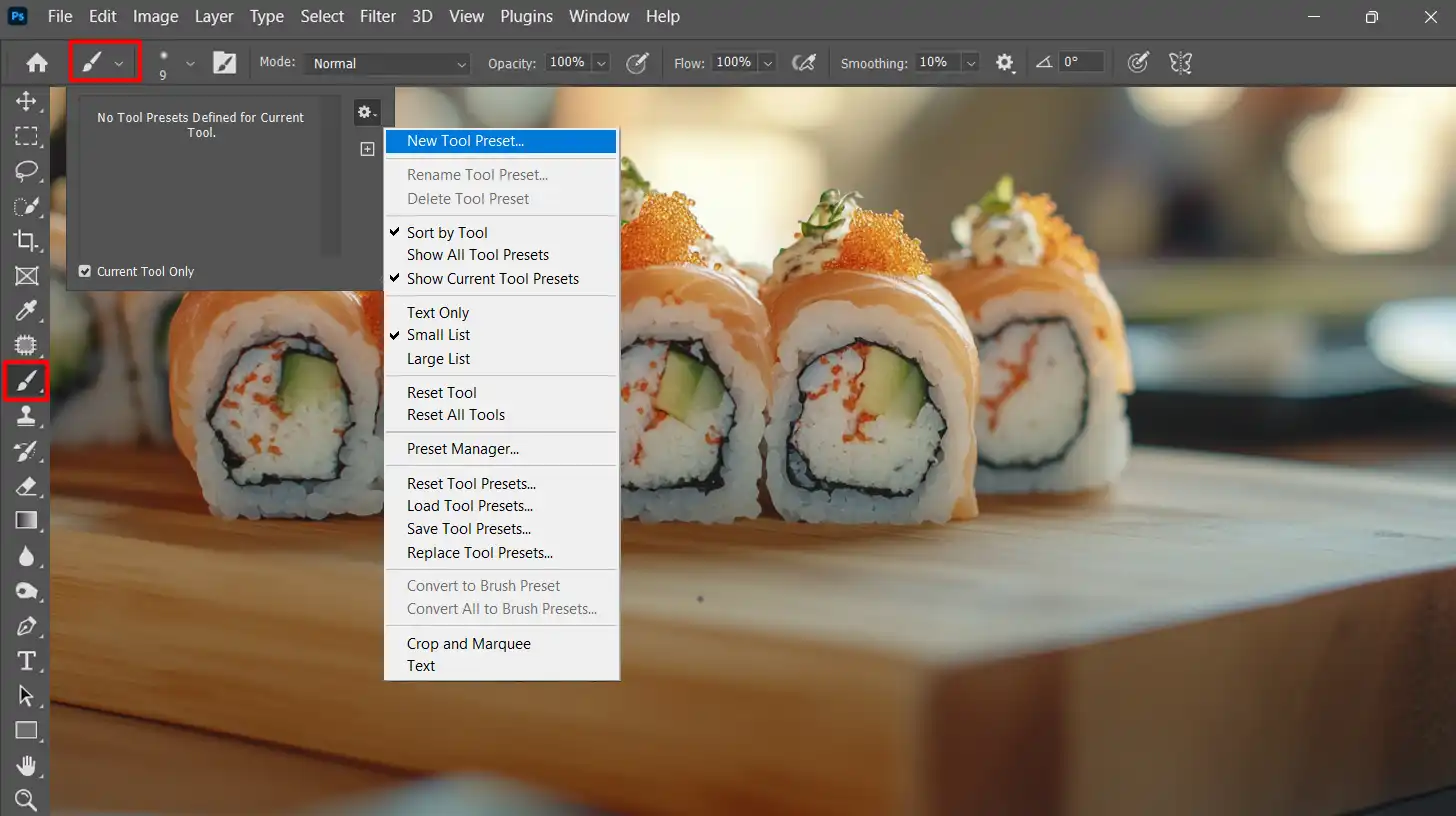
Tool Settings: Customize your tool presets by selecting the tool you want to adjust, configuring its settings, and then clicking on the tool preset button in the options bar. Then, click on the New Tool Preset button to save the preset.
Adjusting these settings allows you to better manageyourlayers, enhancing your editing efficiency and making your workflowsmoother.
Frequently Asked Questions
How do I reset Photoshop to default settings?
Hold down Alt + Ctrl + Shift (Windows) or Option + Command + Shift (Mac) while starting Photoshop.
A preferences dialog box will appear asking if you want to delete the Adobe Photoshop settings file.
Click “Yes.” on the preferences dialog box set.
How do I reset my Photoshop view?
Go to “Window” > “Workspace” > “Reset[Workspace Name]”. This will reset the selected workspace to its default layout.
How do I reset Photoshop tools?
Reset your tools to their default settings.
To reset the tools, underneath the top line menu and the word “File,” right click on the tool icon [rectangular marquee tool shown].Select “Reset All Tools.”
This is advisable in the IMC where students may change Photoshop default settings.
How do I change my preferences in Photoshop?
Go to “Edit” > “Preferences” (Windows) or “Photoshop” > “Preferences” (Mac). From there, you can adjust Adobe Photoshop version settings in various categories such as General, Performance, and Interface.
Resetting Photoshop preferences can solve a lot of common problems like crashes, slow performance, or tools not working right. I’ve had to do it myself when Photoshop started acting up, and it really helped me get back on track.
Now, you know how to reset Photoshop preferences by either deleting the preferences file or using the keyboard shortcut method.
Make sure to always back up your settings and fully reset preferences on quit and quit Photoshop to apply the changes.
If you want to dig deeper into mastering Photoshop, check out my Photoshop Course. It covers everything from basics to advanced techniques.
For those who also use Lightroom, my Lightroom Course can help you get the most out of it too.
Both tools are available on Adobe Photoshop and Adobe Lightroom, so give them a try and see the difference they can make in your editing workflow.
Happy editing!
If this article has helped you, then Like and Share it with your friends
$2,061.00Original price was: $2,061.00.$1,061.00Current price is: $1,061.00. 27584
Download Your Free Guide Now!
Discover the secrets of photography with our printable guide! Master essential techniques like aperture, shutter speed, and ISO to create stunning images. Get your free printable PDF now and start turning your snapshots into masterpieces!