
Are your photos plagued by unwanted grain? If you’ve been wondering how to remove grain in Lightroom, you’re in the right place.
Grain can be a real nuisance, diminishing the quality of your otherwise stunning images. In this article, I’ll guide you through simple, effective techniques to smooth out that grain and bring back the sharpness and clarity your photos deserve.
Intrigued?
Keep reading to discover the secrets to achieving crisp, professional-looking images effortlessly.
Table of Contents
How to Remove Grain in Lightroom
The first place to start in Lightroom when working on noise reduction is with the Detail Panel.
You open it by locating the small triangle next to the word “Details” and clicking on it. You’ll see sliders for various adjustments, including Sharpening and Noise Reduction.
To effectively remove grain from your images, knowing how to fix grain photos in Lightroom is important. This technique helps ensure clean, clear results by addressing unwanted noise.
Understanding these sliders is important to mastering how to remove grain in Lightroom effectively.
Adjusting Luminance Noise to Reduce Digital Noise
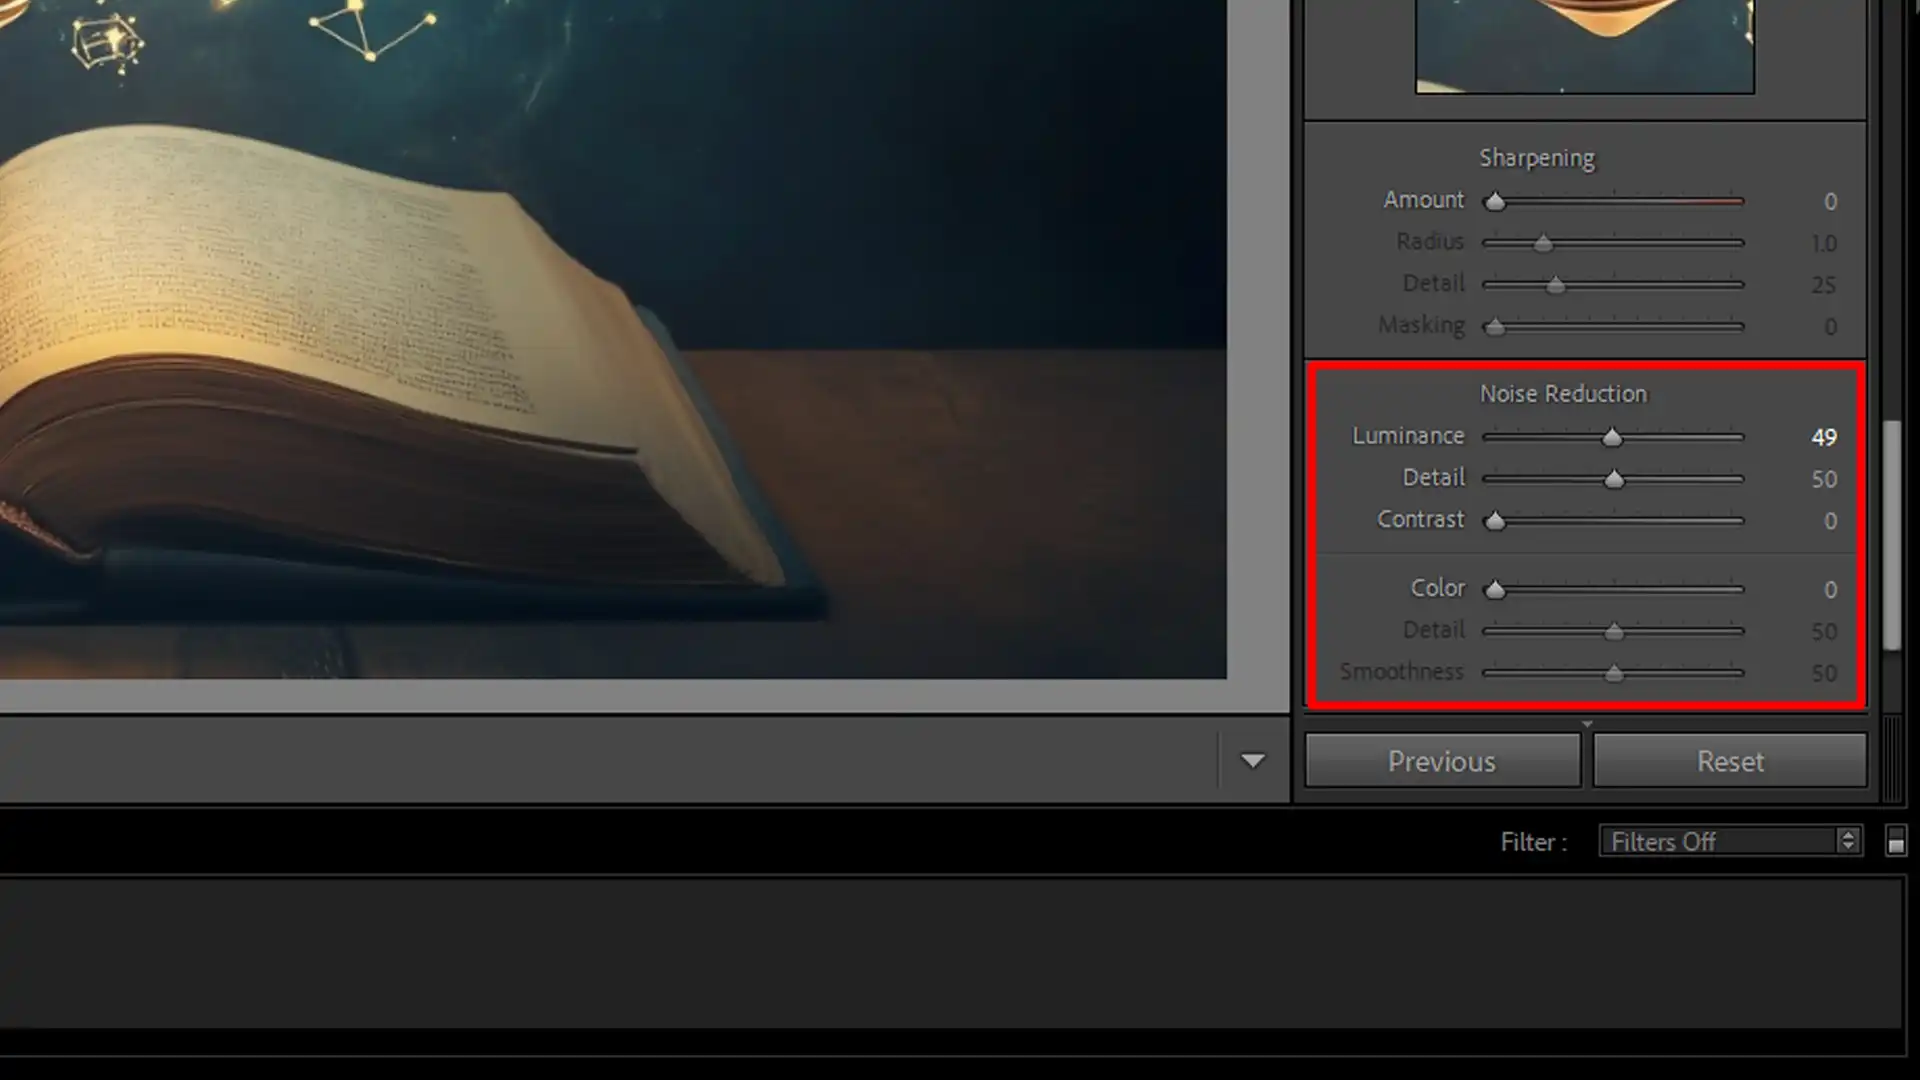
Next, you’ll want to address luminance noise.
To do this, focus on the luminance slider. Slide it to the right to reduce the digital noises that appears as grain in your photo.
Keep in mind that too much luminance can also reduce detail, so find a balance.
Fine-Tuning with Color Noise Reduction
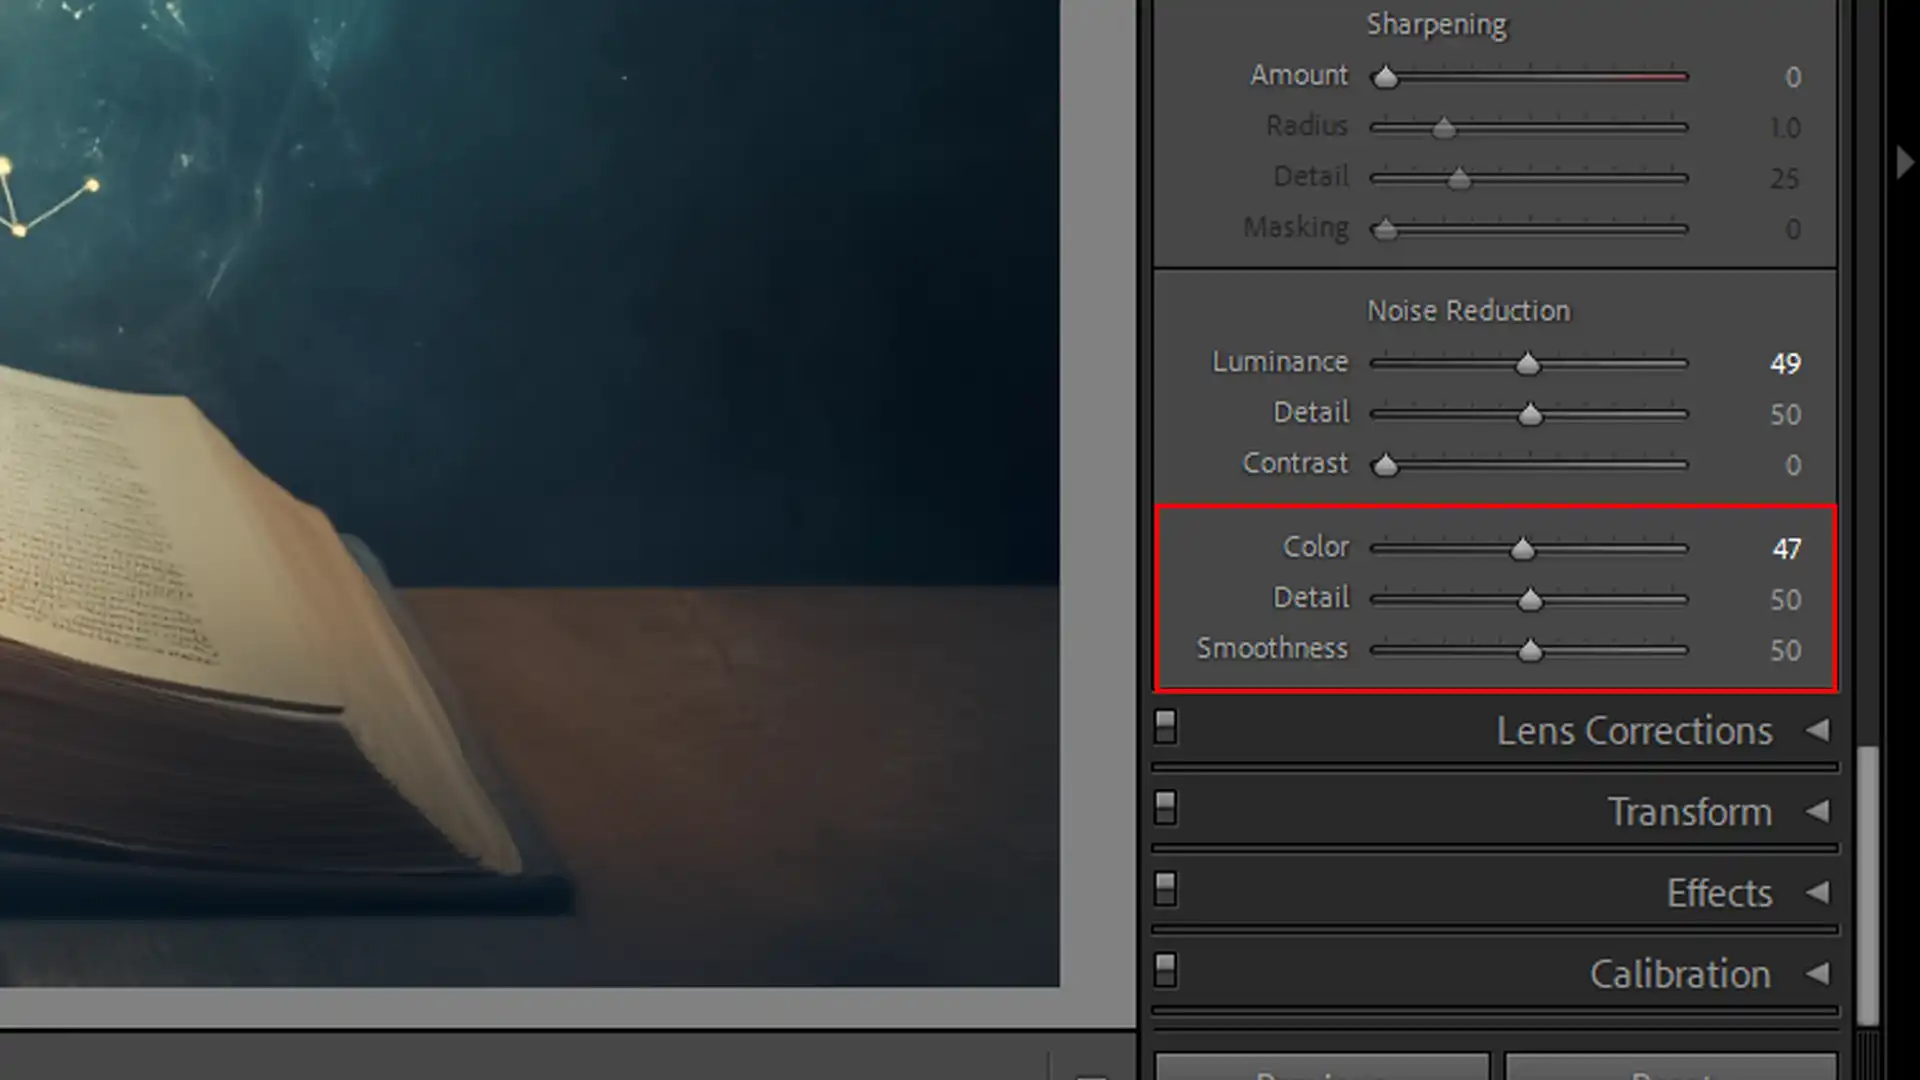
Color noise often comes in the form of random red, green, or blue pixels. For this, look at the color noise reduction section in the Details Tab.
Use the 30 range for most photos, and fine-tune using the color noise slider. To better fine-tune, you might also use the Detail and Contrast sliders available there.
Now you have the basic understanding of the lightroom noise reduction process . Play around with these sliders and settings to see what works best for your photos.
Pro Tip: For stubborn luminance noise reduction, try using Lightroom presets specifically designed to remove noise.
Additionally, if you’re not satisfied with the results in Lightroom, learning how to fix grainy photos in Photoshop can give you more advanced control over noise reduction.
Also, consider mastering some Lightroom shortcuts to speed up your workflow and balance your effects.
When fine-tuning with color noise reduction, understanding how to add noise in Photoshop can be useful for balancing effects.
This knowledge helps ensure that your adjustments achieve a natural look without unwanted artifacts.
Noise Reduction Techniques
Lightroom noise reduction can be a lifesaver for photos plagued by unwanted grain. Let’s dive into the various techniques for tackling this common problem effectively.
When applying noise reduction techniques, using lens correction in Lightroom can enhance your results by fixing distortion and vignetting. This ensures your noise reduction is both effective and precise.
Global vs. Local Adjustments
When we think of noise reduction, it’s important to understand global vs. local adjustments.
- Global Adjustments affect the entire image. These adjustments are useful when dealing with extensive luminance noise.
- Local Adjustments, on the other hand, allow us to target specific areas. This local noise reduction can help maintain sharpness in important parts of your image while reducing noise in others.
The concept is to use the appropriate tool to balance between these two approaches.
Balancing Sharpness and Noise Reduction
Finding the balance between sharpness and noise reduction involves multiple Lightroom tools.
- Luminance Slider: Start with this smoothness slider. It reduces noise across the board but can blur details if overused.
- Detail Slider: Fine-tune your adjustments with this tool. The detail slider helps retain fine details in your image.
- Contrast Slider: This slider enhances the contrast in your image’s details without increasing overall noise.
Remember, less is often more. Avoid pushing sliders to their extremes to keep a natural look.
Using Presets for Lightroom Noise Reduction
Using presets can be a shortcut for effective noise reduction. Adobe Lightroom offers a range of presets that cater to different levels of noise.
- Presets simplify frequent adjustments, offering quick fixes for those needing consistency across multiple images.
- Explore various presets to find your best fit instead of sticking to one.
Applying Lightroom’s noise reduction offers consistency, saving you time and ensuring your images look their best without tedious manual adjustments.
Pro Tip: For stubborn luminance noise, try combining manual adjustments with a trusted noise reduction plugin. It provides higher control and can achieve superior results.
Noise reduction in Lightroom is all about balance and understanding your tools. With a bit of practice, you’ll find it an invaluable skill, enhancing your overall image quality easily.
Advanced Lightroom Noise Reduction Tips
To effectively remove noise in Lightroom, adjust the Luminance and Chroma noise sliders to eliminate noise, use the Detail panel for precise control, and implement noise reduction selectively while combining it with sharpening to maintain image clarity.
For the best results, mastering these techniques is significant for understanding how to remove grain in Lightroom.
Using the Masking Slider to Effectively Reduce Noise
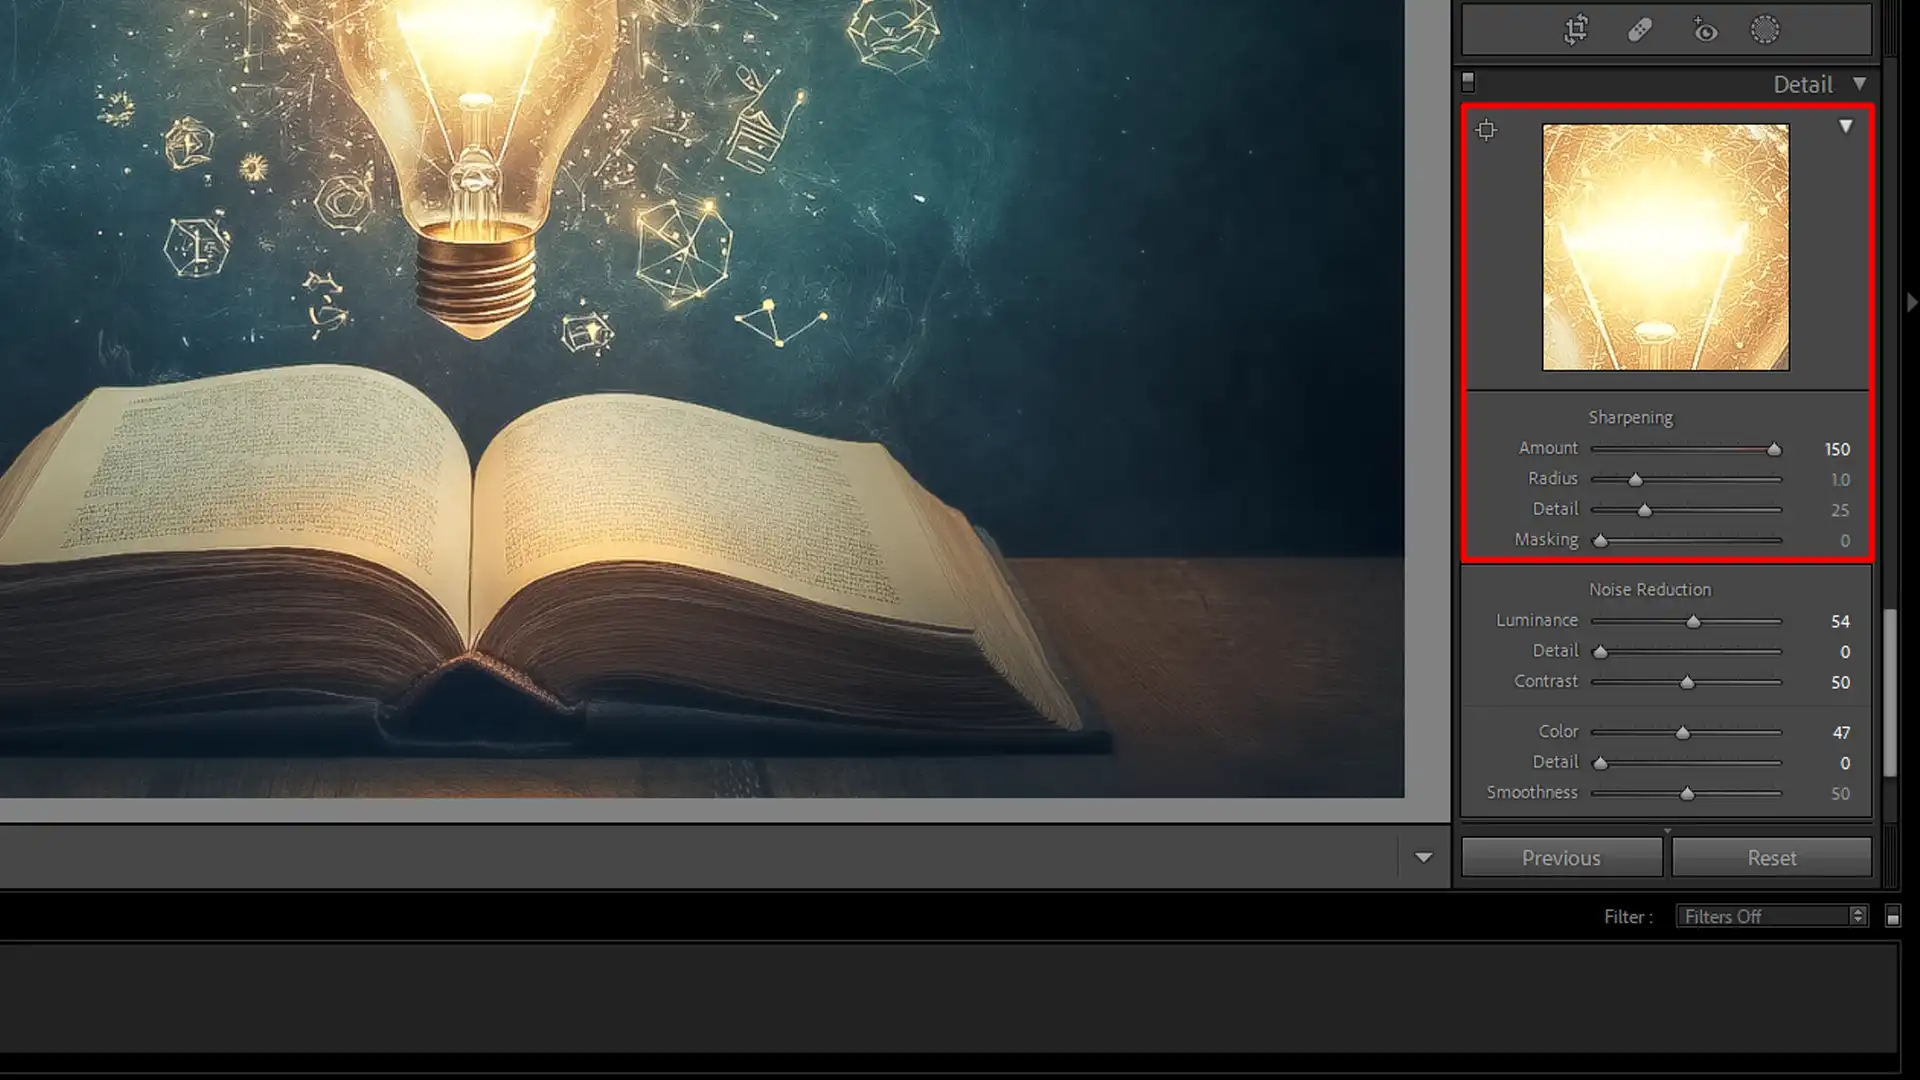
The Masking Slider in Lightroom’s noise reduction allows more control over where you apply noise reduction. It helps to focus the effect on areas that need noise reduction while keeping important details sharp.
Move the slider up to increase masking. This reduces noise but preserves details in edges and textures. If your photo has a lot of textures or sharp edges, use the Masking Slider generously.
Combining Noise Reduction with Other Edits
Combining noise reduction in Lightroom with other edits can produce better results.
Follow these steps:
- Start with the basic adjustments like exposure and white balance.
- Then move to reducing noise. The order matters because further edits might reintroduce noise if done first.
- Use the luminance slider carefully to reduce luminance noise, but watch out for loss of detail.
- The contrast slider helps to bring back the lost contrast after reducing noise.
Batch Processing for Noise Reduction
For those with multiple photos needing noise reduction, batch processing in Lightroom is a time-saver.
Follow these steps:
- Select all the photos that need similar noise reduction.
- Apply your noise reduction settings to the group.
- Adjust settings like the color noise slider individually when needed.
This method maintains consistency across all images and speeds up the workflow.
Remember that the goal is to implement noise reduction uniformly without compromising image quality.
Pro Tip: For best results, combine manual noise reduction options with selective noise reduction. This lets you fine-tune the noise reduction process in different parts of the image differently.
Aim for a balance between reducing noise and maintaining clarity. Additionally, paying attention to Lightroom white balance settings can help ensure that your images have the correct color tones, which may reduce the appearance of noise in certain lighting conditions
For those interested in expanding their editing skills beyond Lightroom, understanding the difference between Photoshop and Lightroom can help you decide which tool is best suited for specific tasks.
Practical Application for Grain Filter in Lightroom
Photos often have grain, also known as noise. It appears as random specks of color. These specks can distract from the photo.
Fortunately, Lightroom offers tools to manage this.
By using these tools effectively, you can learn how to remove grain in Lightroom and enhance the overall quality of your images.
How Noise Appears
Noise happens for several reasons:
- High ISO settings
- Low light conditions
- Small sensors in cameras
Luminance Noise and Color Noise
There are two types of noise:
- Luminance noise: Black and white specks
- Color noise: Unwanted colors
Using the Luminance Slider
The luminance control reduces black and white specks. Move it slowly until you see fewer specks.
Be careful, going too far makes the photo look blurred.
Adjusting the Detail Slider
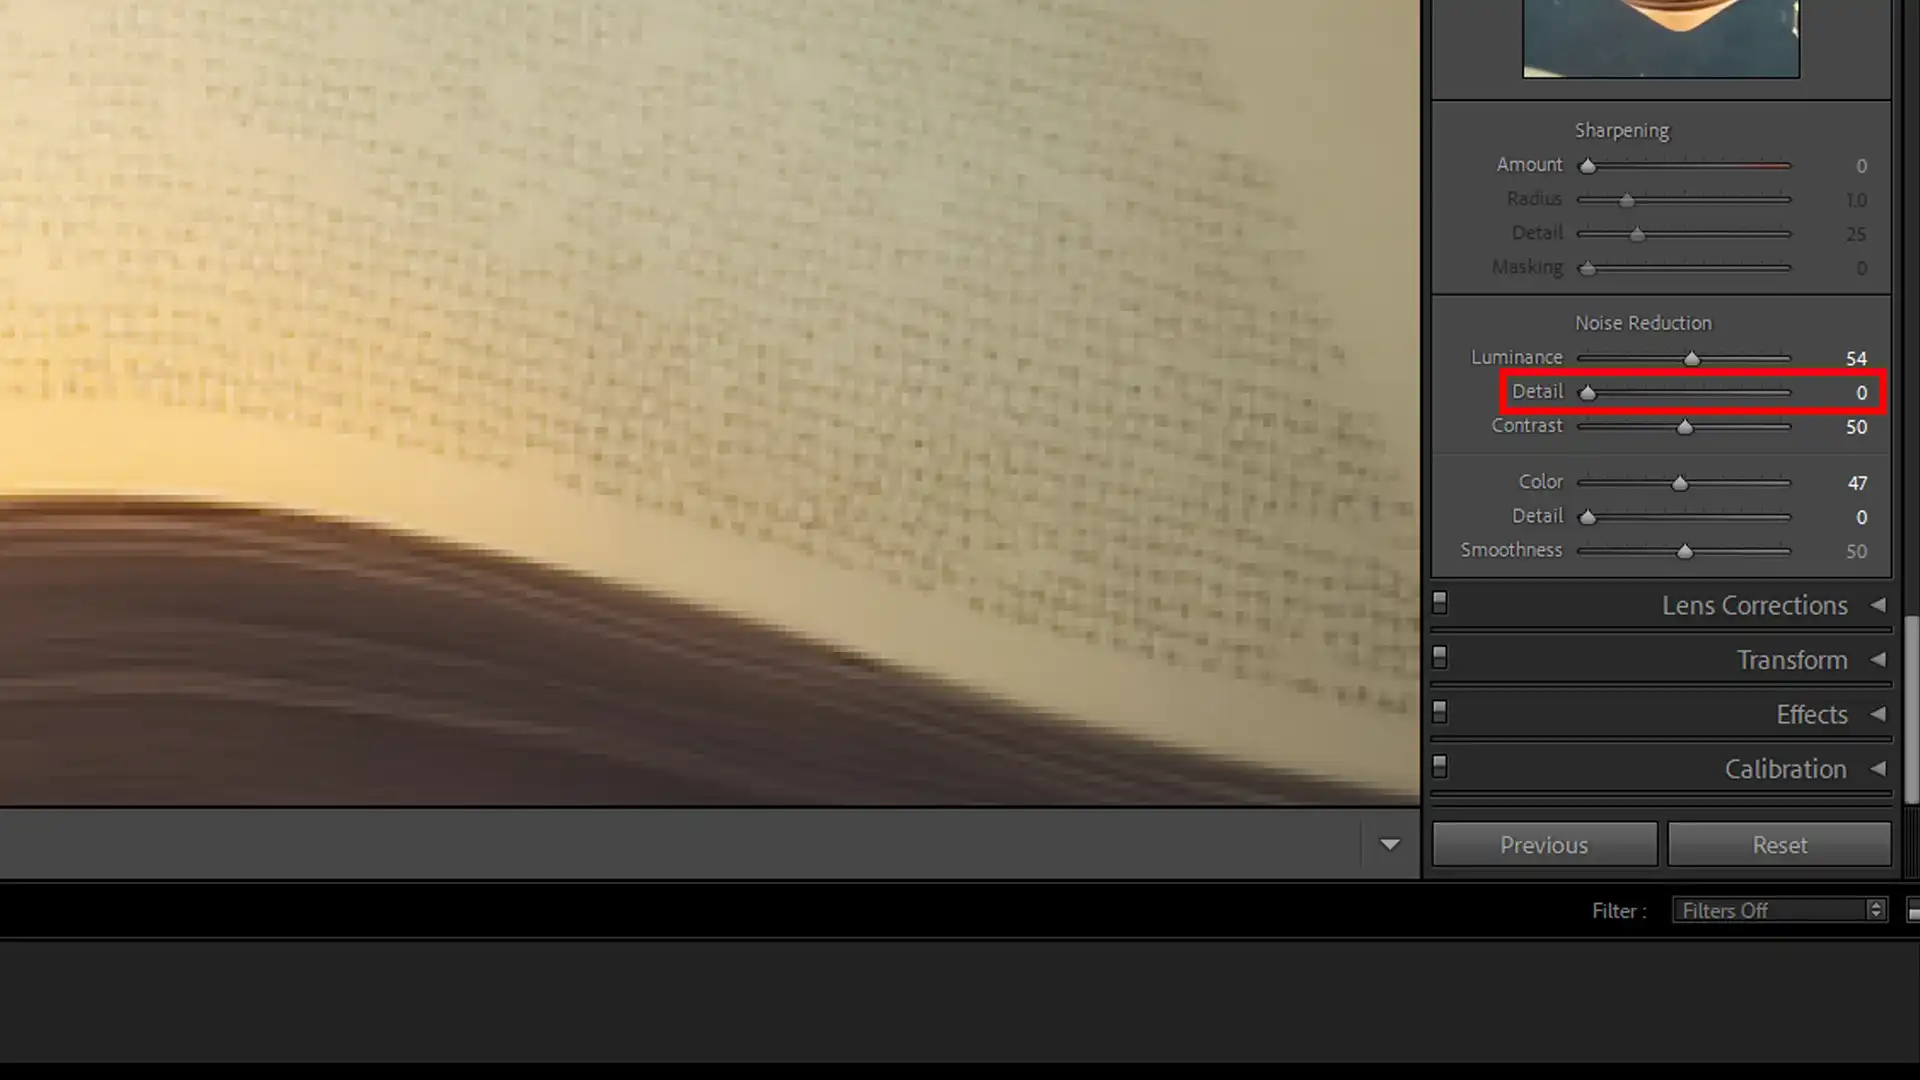
The detail adjuster recovers textures. Increase detail to keep the image sharp after reducing noise.
Balance it carefully with the luminance control.
Handling Color Noise
Color noise has a specific tool. The color noise removal slider removes these unwanted hues.
Adjust it until unwanted colors vanish.
Advanced Techniques for Noise Removal
Sometimes, basic adjustments are not enough.
Here are some advanced techniques:
- Selective Noise Reduction: Target specific areas for better results.
- Manual Noise Reduction Option: Use local noise reduction for parts of the image needing extra care.
Pro Tip: Always zoom in at 100% when making adjustments. This gives a real view of changes. It ensures you don’t overdo noise removal.
For more in-depth learning, consider exploring Lightroom Training resources or reading Photography articles to enhance your skills further.
Tips for Better Noise Reduction Results
To achieve better noise canelletion results, carefully adjust settings to avoid introducing more noise and ensure a balanced approach for optimal image clarity.
Additionally, mastering how to remove grain in Lightroom can help refine your images and enhance their overall sharpness.
| Feature | Lightroom Built-In Tools | Third-Party Plugins |
|---|---|---|
| Noise Reduction Control | Basic sliders for luminance and color noise | Advanced sliders with more granular control |
| Ease of Use | User-friendly, but limited features | May require learning curve, but offers greater flexibility |
| Integration | Seamless with Lightroom | Requires installation but integrates well with Lightroom |
| Customizable Presets | Limited preset options | Often includes customizable presets and profiles |
| Price | Included with Lightroom subscription | Typically require additional purchase or subscription |
Shooting Techniques to Minimize Noise
Reducing noise starts during the shoot:
- Use the lowest ISO setting possible. High ISO settings introduce more digital noise.
- Proper lighting helps too. Take advantage of natural light or use external lights when shooting in low light conditions.
- Keep your sensor clean. Dust on the sensor can cause extra noise.
- Pay attention to your camera settings as well. Shoot in RAW format for better control over noise removal in post-processing. This adds flexibility when you need to apply noise reduction in lightroom later.
Post-Processing Tips
Once you have your shots, it’s time to head to Lightroom:
- The noise cancellation process begins in the details tab. The luminance control reduces black and white specks known as luminance noise. Move it gently to avoid blurring your image.
- Switch to the color noise reduction slider. This tool effectively removes color noises. Balance is important here, as overuse can cause flat colors.
- Don’t forget the detail slider to recover textures lost during noise reduction in lightroom. Check your work by zooming in at 100%.
- Use the contrast slider to bring back some of the visual pop in your photo. Lightroom's noise cancellation tools offer controls that make this less painful than it sounds.
Using Plugins for Enhanced Removing Noise
Sometimes, the built-in tools are not enough.
That’s where noise reduction in lightroom plugins come in:
- These third-party tools can offer enhanced features. They often provide finer control over different types of noise.
- For Adobe Lightroom users, several plugins integrate seamlessly, offering an easier workflow. This can lead to superior image quality and allow the noise removal process smooths out.
- If you want the noise cancellation procedure to smooth your images without losing detail, consider investing in a reliable plugin.
- Using a noise reduction in lightroom plugins can help when Lightroom's noise cancelation tools aren't sufficient. It ensures you get the best possible results.
Pro Tip: Always save a backup copy of your original image. This provides you with a safety net. It allows you to experiment freely with different techniques without the risk of permanently altering your photo.
Common Mistakes and How to Avoid Them
Common mistakes in reducing noise include over-applying settings, which can lead to more noise, and failing to properly balance adjustments, making it significant to finely tune sliders to effectively reduce noise.
To avoid these pitfalls and understand how to remove grain in Lightroom, it’s important to experiment and refine your approach to achieve the best results.
To avoid common mistakes in photo editing, it’s important to understand common photo editing mistakes and how to prevent them. Proper knowledge ensures you avoid pitfalls and achieve polished results.
Overdoing the Process to Reduce Noise
Reducing noise helps improve photos, but using it too much can destroy important image details.
Follow these steps to avoid overdoing reduction in noise:
- Start by adjusting noise reduction tools.
- Gently increase the values while constantly zooming in and out to check the overall effect.
- Aim for a balance where details are preserved.
Over-applying noise reduction can lead to a plastic-like appearance.
Ignoring Color Noise
Color noise appears as random colors where they shouldn’t be. It’s common, especially in low-light photos.
To effectively remove color noise in Lightroom:
- Navigate to the Details tab and find the Color slider.
- Move the slider until the unwanted colors are minimized.
Ignoring color noise detracts from photo quality, so pay attention here.
Not Using the Masking Tool
Another common mistake is neglecting the masking tool. The Masking Slider targets areas needing noise reductions.
To use this tool effectively:
- Adjust the Masking Slider carefully.
- Check the effect in different parts of your image.
This ensures noise reductions only affects specific areas, preserving detail in the rest of your photo.
Pro Tip: Focus on gradual changes. Start with basic adjustments, then fine-tune using the manual noise reductions option in Lightroom.
This makes the whole noise removal process smooth and efficient.
Hope you found these tips useful. Always remember, less is more when it comes to noise reductions!
Avoiding common mistakes with filters in Photoshop involves understanding the different types of filters in Photoshop.
Knowing their applications can prevent ineffective edits and improve your workflow.
Frequently Asked Questions

Can you fix grainy photos in Lightroom?
Yes, Lightroom offers tools to reduce graininess. Use the ‘Detail’ panel to adjust the ‘Noise Reduction’ sliders.
How do I soften grain in Lightroom?
To soften grain in Lightroom, you need to:
- Increase the 'Luminance' slider in the 'Noise Reduction' section of the 'Detail' panel.
How to Denoise Lightroom?
To denoise in Lightroom:
- Go to the 'Detail' panel and tweak the 'Luminance' and 'Color' noise reductions sliders to clean up the image noise.
How do I remove edges in Lightroom?
To remove rough edges, use the ‘Sharpening’ mask slider in the ‘Detail’ panel. Adjusting this helps to keep the edges smoother and less pronounced.
Conclusion
Learning how to remove grain in Lightroom can really make a difference in your photos.
I’ve found that tweaking the luminance and color noise sliders helps smooth out unwanted grain without losing too much detail.
It’s all about finding the right balance and using the tools effectively.
If you want to dive deeper, check out my Photoshop Course and Lightroom Course for more tips and tricks.
For the best tools to get started, consider Adobe Photoshop and Adobe Lightroom, available on Adobe’s official website.
Read more about Lightroom:


