Learning how to copy and paste in Photoshop is a fundamental skill that can greatly improve your editing efficiency.
This simple technique allows you to seamlessly transfer elements between images, unlocking a world of creative possibilities. Whether you’re a beginner or looking to refine your skills, mastering copy-pasting in Photoshop will elevate your design work.
In this guide, I’ll walk you through the significant steps, helping you confidently apply this technique in your projects. Ready to take your Photoshop skills to the next level? Let’s get started!
Table of Contents
Step-by-Step Guide: How to Copy Paste in Photoshop
Here’s how the actual process of using copy paste commands works between multiple documents.
Creating a New Photoshop Document
Set up a new Photoshop document to ensure proper fit and image quality before copying and pasting.
- Open the desired Photoshop file when you want to copy from one image to another.
- Ensure the same resolution before pasting to maintain image quality and ensure dimensions fit.
- Create a new layer to paste into, preventing overwriting existing elements in your current project.
Saving and Exporting Your Work
Save your work and choose the right file format before exporting for optimal quality.
- After pasting, remember to save your work. Use Ctrl+S or go to File > Save As to keep your changes.
- Choose file formats based on end-use JPEGs for the web and TIFFs for print. Consider whether to use RAW or JPEG format depending on your needs.
- Review the image resolution settings before exporting to ensure ideal quality in outputs.
Learn how to paste an image into Photoshop for more advanced techniques and tricks to enhance your editing skills.
Using Keyboard Shortcuts for Efficiency

Learning to utilize keyboard shortcuts optimizes your workflow in Adobe Photoshop. Using the copy and paste functions becomes swift when you press Ctrl+C for copy and Ctrl+V for paste.
Consistency with keyboard shortcuts develops quicker muscle memory, making your editing more fluid.
Not needing to navigate through the edit menu each time you copy or paste allows for uninterrupted creative flow.
This efficiency improves productivity, which is especially important if you’re working with multiple layers or different resolutions.
Creative Uses of Copy and Paste in Design
Let’s talk about a couple of creative uses.
Creating Patterns and Textures
Generate intriguing designs by pasting repeated elements. Use the move tool to drag objects into place when creating patterns.
Applying these can enhance your designs with depth and character.
Collage and Composite Techniques
Collages combine images from different sources. Use the smart object for editable layers, allowing transformation adjustments. Ensure layers blend seamlessly by experimenting with opacity and blending modes.
Troubleshooting Common Copy and Paste Issues
You sometimes encounter issues when copying and pasting between documents. If the pasted object looks blurry, check your image resolution and ensure both documents share the same resolution.
Activate the free transform tool or use the move tool to reposition and scale elements properly without distortion. If layers disappear, confirm they’re visible in the layers panel.
Pro Tip: Use the shift key with free transform to maintain the object’s aspect ratio. It provides precision in resizing without warping your artwork.
Master moving images in Photoshop to improve your skills and handle images with more control and accuracy.
Understanding the Layers Panel
In Adobe Photoshop, the layers panel is an important tool for organizing your image. The layers panel shows all layers in your image file.
Think of the layers panel as a stack that lets you see each individual component of your masterpiece.
Get into the edit menu, where you can manage these layers. Then, use the move tool to tweak your new layer and find the perfect place for it.
The following table highlights fundamental tips and techniques for maintaining an efficient workflow and ensuring each element in your project is in the right place.
| Aspect | Overview |
|---|---|
| Understanding the Layers Panel | Learn how to navigate the layers panel, an essential tool for organizing your Photoshop project and managing different elements effectively. |
| Organizing Layers for Better Workflow | Use labeled layers and groups to keep things tidy and maintain a smooth editing process, especially when working with multiple layers. |
| Layer Management Tips | Maximize productivity by using keyboard shortcuts and smart objects, and avoid confusion by utilizing the free transform tool effectively. |
| Pro Tip: Using the Move Tool | When managing layers, the Move Tool is indispensable. It helps position elements precisely, streamlining your workflow. |
Organizing Layers for Better Workflow

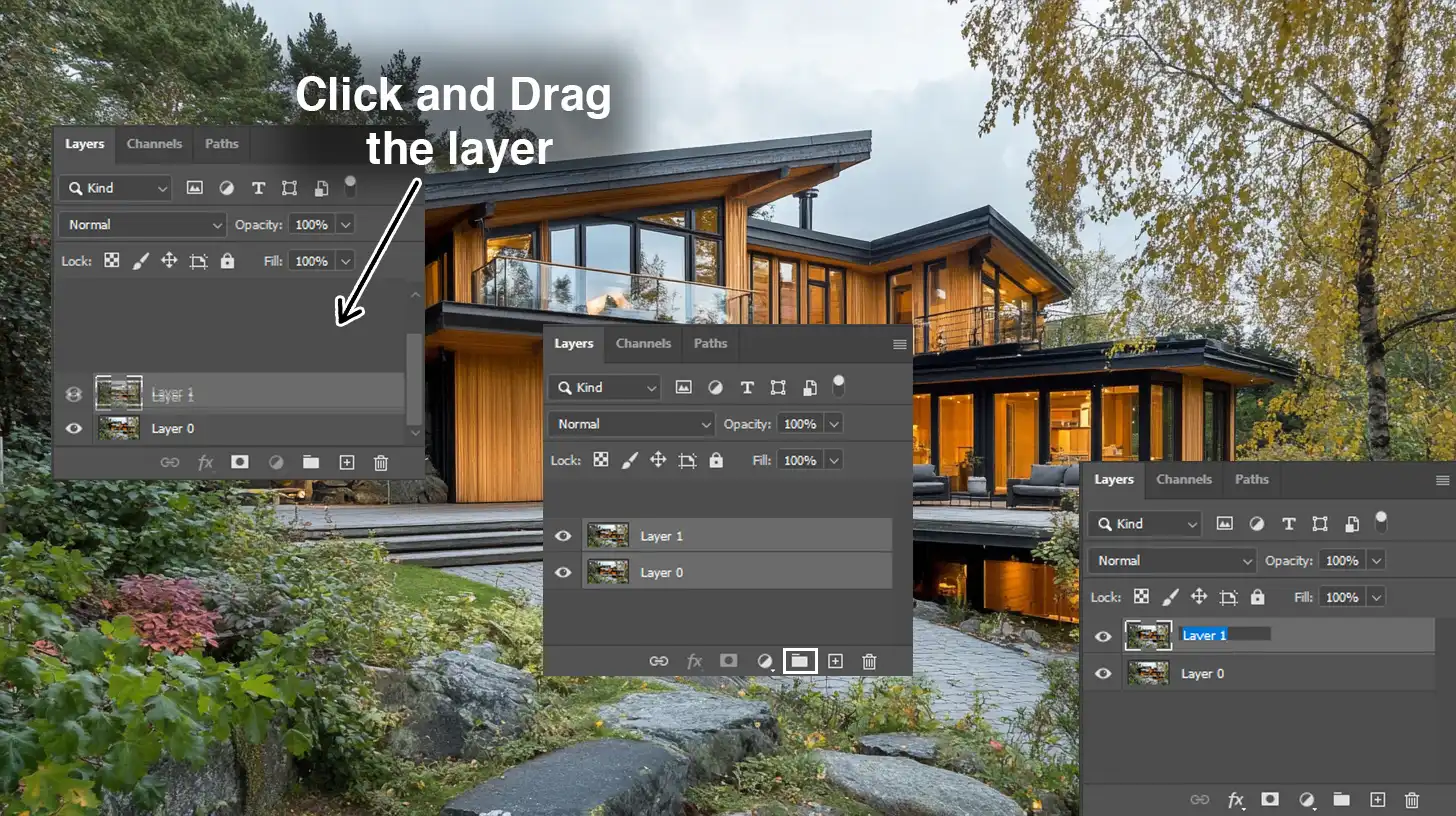
Being organized is significant. Keep your layers labeled. Use different layer groups when handling multiple layers to tidy things up.
Dragging one image from another project? Use the tool drag feature effectively. Oh, and knowing how to handle a base layer is fundamental. Keep your layers organized to avoid confusion and ensure a clean workspace.
Layer Management Tips
Use these tips to streamline your layer management and speed up your workflow in Photoshop.
- Keyboard shortcuts can be your best friend. Use them wisely, especially when working with Photoshop shortcuts to speed up your workflow.
- The bounding box appears handy with the free transform tool, allowing you to scale the image size without a hitch.
- Utilize smart objects for non-destructive editing and always have your options bar ready for tweaking preferences.
- Don't forget the power of copy and paste; use it creatively.
Pro Tip: When you paste in Photoshop, take advantage of smart objects for better flexibility if you need adjustments later. It’s like having an undo button that spans time, which sounds pretty magical in the digital art world.
For a deeper dive into these techniques, check out Photoshop layering tutorials to master managing layers with more efficiency.
Mastering the Background Layer

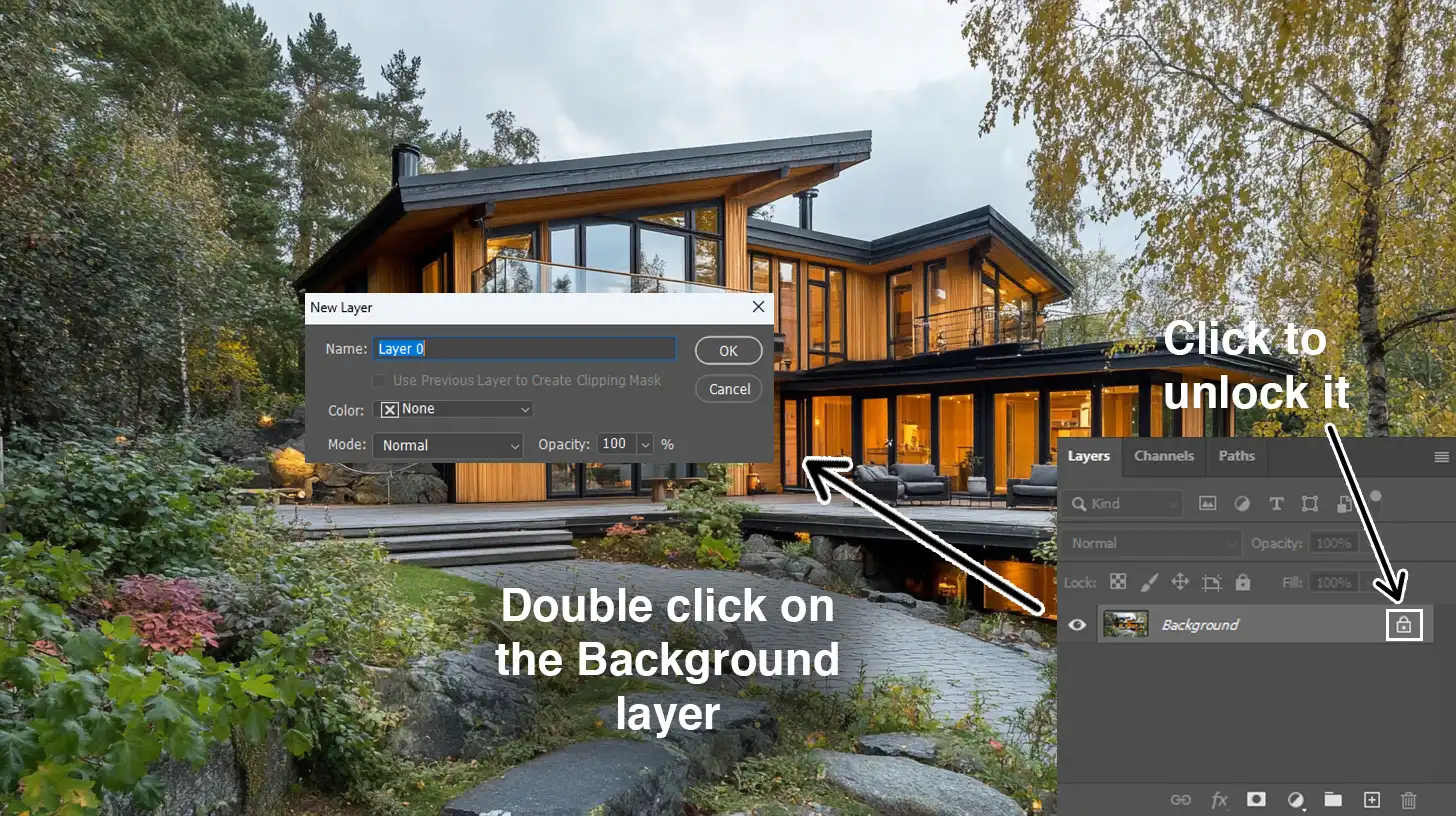
When you open an image file in Adobe Photoshop, there’s always a default layer waiting for you. It’s like the canvas of your masterpiece. This layer is locked, meaning you can’t move or directly edit it.
Want to change that? Many beginners find this limitation a bit confusing at first but worry not. Turning it into a regular layer is just a few clicks away.
- Double-click on the background layer.
- A dialog box appears where you can rename it or leave it as Layer 0.
- Click OK, and now your floor is a movable element. You can use the move tool to reposition it, allowing for more flexible editing.
Converting Background to Regular Layer
Now, let’s make that background more manageable. You know that locked symbol on the right of the background layer?
So, let’s double-click the said layer in the Layers Panel. A dialog box will appear. Rename your new layer to something descriptive, like “Layer 1.“.
You’ve liberated that layer. Now, it’s free to be moved. This step offers a small but rewarding sense of accomplishment. Watch how your creative potential shoots up now that the move tool is usable here, too.
Oh, and let’s not forget the paste operation. Copy and paste can now work freely without barriers.
Working with New Images
Switching gears to a new image, don’t hesitate to apply this trick when working on fresh projects. The unlocked layers allow for easy rearrangement.
From new banners to holiday cards, versatile layer handling means slick projects all around.
Pro Tip: Use the keyboard shortcut Command + J (or Control + J on Windows) to quickly duplicate layers and create backups of your work.
For those looking to further enhance their skills, understanding the difference between Photoshop and Lightroom can provide additional insights into how these tools complement each other.
Additionally, mastering Photoshop shortcuts can significantly speed up your workflow, making your editing process more efficient.
Using the Free Transform Command
The Free Transform command in Photoshop opens doors to creativity. It allows us to manipulate images and adjust them using various transformation options. Let’s delve into how you can access and apply it effectively.
Accessing the Free Transform Tool

With one keyboard shortcut, you unlock endless possibilities.
Press Command + T on Mac OS or Control + T on Windows. The bounding box appears around your selected area or whole image. The options bar above offers more control.
Scale, rotate, or warp without ever leaving the screen. The Free Transform tool functions as a bridge between an idea and its execution. It saves time in resizing the image, allowing space for more creativity.
Practical Applications of Free Transform
In this section, we’ll explore how to adjust the image size and use the Move Tool to place elements into a new position with precision. These tips will help ensure your transformations are smooth and accurate.
Tips for Precise Transformations
Follow these steps for precise transformations in Photoshop to ensure accuracy and maintain image proportions.
- Zoom into details. Make sure to hold down Shift when resizing images for consistent proportions. Don't let a small mistake lead to skewed figures.
- Use the resize tool to keep things tidy.
- Know your tools: paste in Photoshop can adjust layers precisely with paste selections or using the move tool.
- Strategic clicks and drags guide perfect repositioning.
Just a tip for Adobe Illustrator users: when moving content from macOS, make sure to double-check your keyboard shortcuts for accuracy.
Headers and proportions matter in big projects. Playing with image size should not be the last thing on our minds. Fine-tuning these basics brings depth to designs.
Pro Tip: Don’t be afraid to copy and paste elements between layers or into a new layer. It speeds up workflow and preserves your hard work.
One graceful move of the move tool can make switching layers a seamless symphony.
For added precision, use the free crop Photoshop feature to perfectly adjust your image boundaries without losing any important details.
If you’re working with images that have grain, remember to check out how to fix grainy photos in Lightroom to enhance your photo’s clarity before making adjustments.
Frequently Asked Questions (FAQs)

What's the quickest way to copy and paste in Photoshop?
- Select the layer or object you want to copy.
- Hit Ctrl+C (Windows) or Cmd+C (Mac) to copy the selected item.
- Hit Ctrl+V (Windows) or Cmd+V (Mac) to paste it.
How do you copy and paste an object in Photoshop?
- Use the Marquee Tool (M) to select the area that includes the object.
- Copy the selection by pressing Ctrl+C (Windows) or Cmd+C (Mac).
- Paste the object into the same or a new document by pressing Ctrl+V (Windows) or Cmd+V (Mac).
What’s the method to copy and paste in the same place in Photoshop?
- Ensure you are in the correct layer from where you want to copy.
- Hit Ctrl+C (Windows) or Cmd+C (Mac) to copy.
- Hit Ctrl+Shift+V (Windows) or Cmd+Shift+V (Mac) to paste in the exact same location.
How do you duplicate in Photoshop?
- Select the layer or object you wish to duplicate.
- Press Ctrl+J (Windows) or Cmd+J (Mac) to create a duplicate of the selected layer or object.

Conclusion
Learning how to copy paste in Photoshop has significantly streamlined my creative process.
As I navigated through various projects, mastering this simple yet significant skill allowed me to save time and improve the efficiency of my workflow.
Whether I’m duplicating elements or integrating different images seamlessly, the ability to copy and paste has become an indispensable part of my toolkit.
For anyone wanting to improve their Photoshop skills, I highly recommend checking out this Photoshop Course. It offers helpful tips and tricks that have made a big difference for me. If you want to expand your photo editing skills even further, the Lightroom Course is also a great resource.
Also, if you’re looking for the tools to take your editing to the next level, Adobe offers both Photoshop and Photoshop Lightroom, which have been invaluable in my editing journey.
Read more about Photoshop:


