Ever wondered how to convert RAW to JPEG in Lightroom quickly and efficiently? If you’re like me, you appreciate the power of RAW images but need the convenience of JPEGs for sharing and printing.
Imagine transforming those detailed, high-quality RAW files into versatile JPEGs without losing any of the impact. In this guide, I will walk you through each step, ensuring you master this significant skill with ease.
Whether you’re a professional photographer or just starting out, learning to convert RAW to JPEG in Lightroom will streamline your workflow and keep your images looking their best.
Table of Contents
Getting Familiar with RAW Files
A RAW file is an uncompressed, unprocessed file from your camera’s sensor. It’s like a digital negative, preserving all information without any loss. This format offers greater editing flexibility compared to formats like JPEG. Many photographers use this format for detailed editing.
When getting familiar with RAW files, understanding Camera Raw is important. This tool helps you fully utilize RAW’s editing capabilities.
Benefits of Using RAW Files
- Better Quality: RAW files retain more details and colors. You can adjust exposure, white balance, and more with fewer issues.
- Non-destructive Editing: Edits don't alter the original RAW file. You can always revert to the original settings.
- Improved Sharpness and Details: Greater detail than compressed formats like JPEG.
- Dynamic Range: They capture a wider range of light and dark. This helps in brightening shadows and recovering highlights.
Common Issues with RAW Files
- File Size: RAW files are much larger than compressed formats. This takes up more storage space.
- Slower Processing: Editing RAW files can be slow due to their size and detail. Computers must be powerful to handle them efficiently.
- Compatibility: Not all software supports RAW format. Often, specialized software like Lightroom Classic is needed.
Understanding the Conversion Process
First, open Lightroom Classic and import your RAW files into the Library Component. Select the RAW image you want to convert.
Once you’ve chosen the RAW image, you can adjust its settings and export it to your desired format.
Then, switch to the Develop Module to make your edits. Adjust lighting, color, and apply Lightroom Classic presets.
Steps to Convert RAW to JPEG
- Select your edited images in the Library Component.
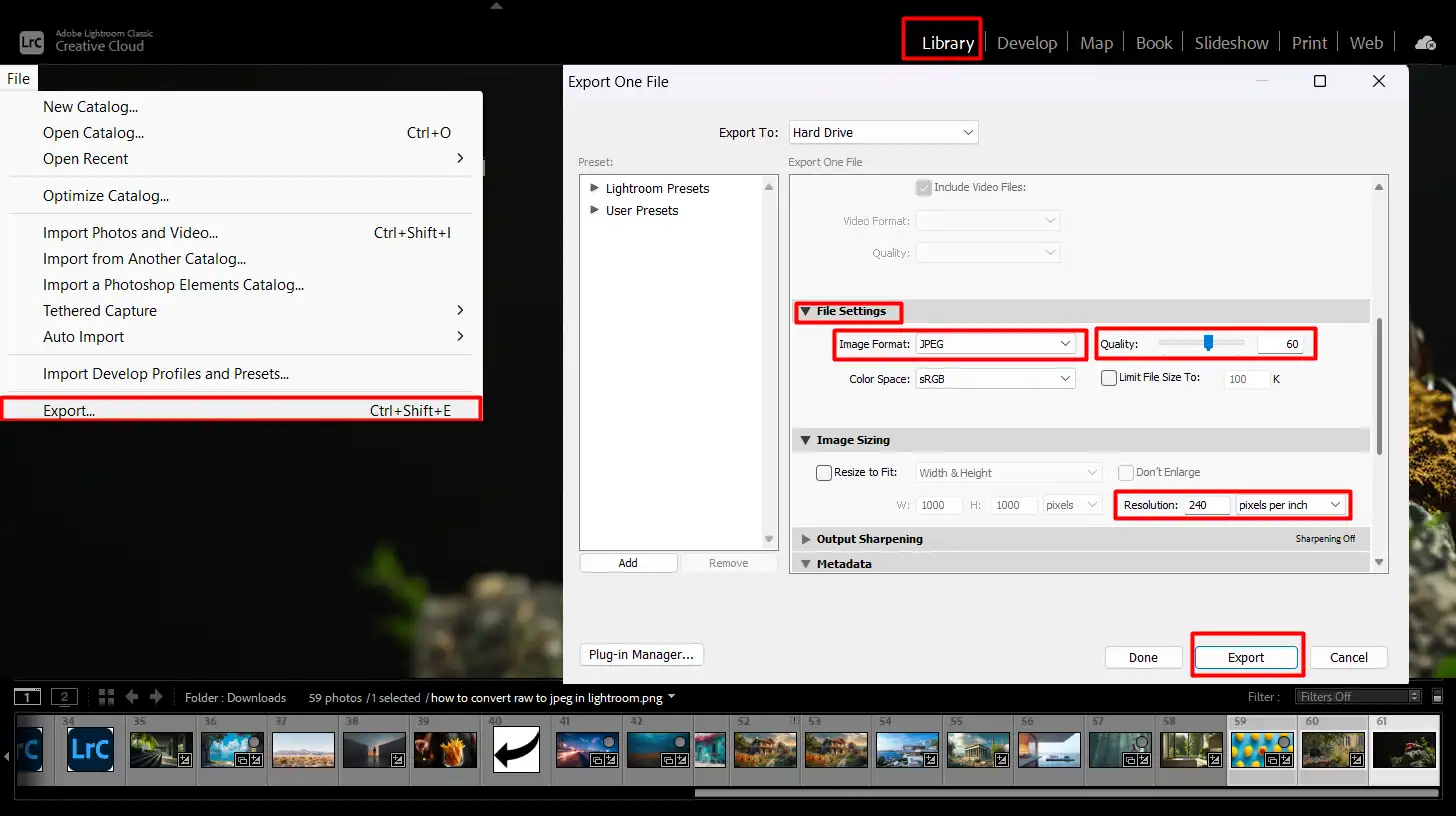
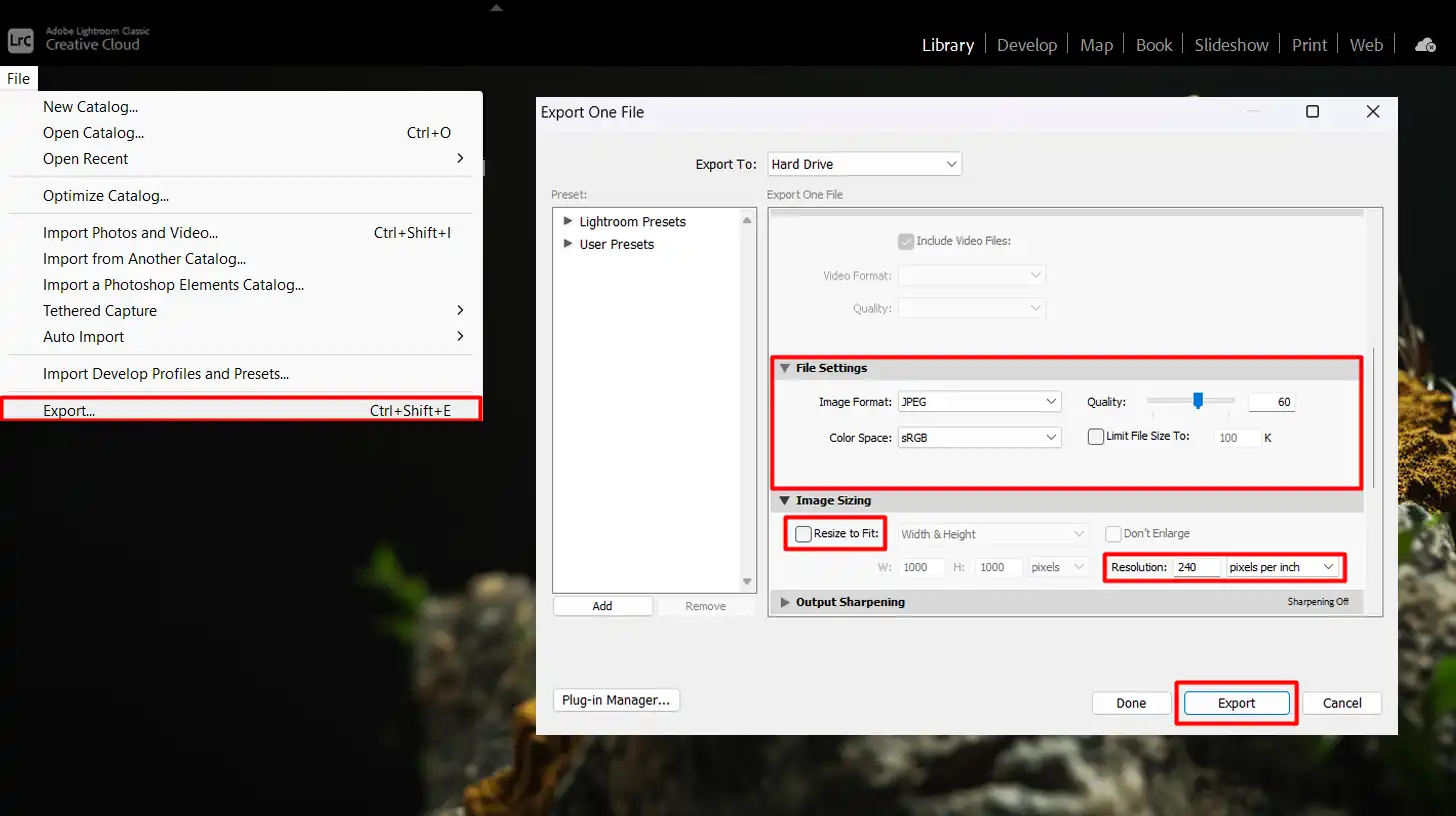
- Go to the Top Menu and select File, then Export.
- In the Export Location section, choose the desired folder for your exported files.
- Set the Output Format to JPEG.
- Configure settings like quality, resolution, and file settings.
- Click the Export Button to start the conversion process.
Remember, converting RAW files to JPEG simplifies sharing but results in some quality loss. Always keep your original RAW file for future edits.
When shooting RAW, the image format retains the greatest detail, so preserving the original allows for more flexibility in creating a new JPEG version later.
Using cloud virtual storage ensures you never lose your only option for full-quality edits and re-exports.
Knowing the steps to convert RAW to JPEG is important when considering RAW or JPEG format. Understanding the format differences helps streamline the conversion process.
Pro Tip: Don’t forget to save your export settings as an export preset. This streamlines the process for multiple files in future conversions.
Preparing to Convert RAW Files
Many of us enjoy the flexibility and detail offered by shooting in RAW mode. However, these files often need conversion for easier sharing.
Here’s what to do. To make your RAW files more accessible and compatible with various platforms, you’ll need to convert RAW files into a more widely supported format.
Choosing the Right Software
First, selecting the right software is significant. Adobe Lightroom is a go-to for many photographers. It’s user-friendly and provides numerous features for reformatting RAW files. Make sure your computer meets the software’s requirements.
When choosing the right software, understanding different image file types is important. The software you use can affect how well these formats are handled.
Importing RAW Files into Lightroom
To begin, import your RAW photos into Lightroom. Plug in your memory card or use an external hard drive. Click on the ‘Import‘ button. Choose the image files you want. Import them to your main catalog.
Check that all the images display correctly. Now, you’re ready for the next steps.
Converting RAW to JPEG in Lightroom
After importing, start editing your RAW files. Switching to the Develop Module, you can make necessary adjustments. Once satisfied, return to the Library Component.
How to convert RAW to JPEG in Lightroom:
- Select the edited images.
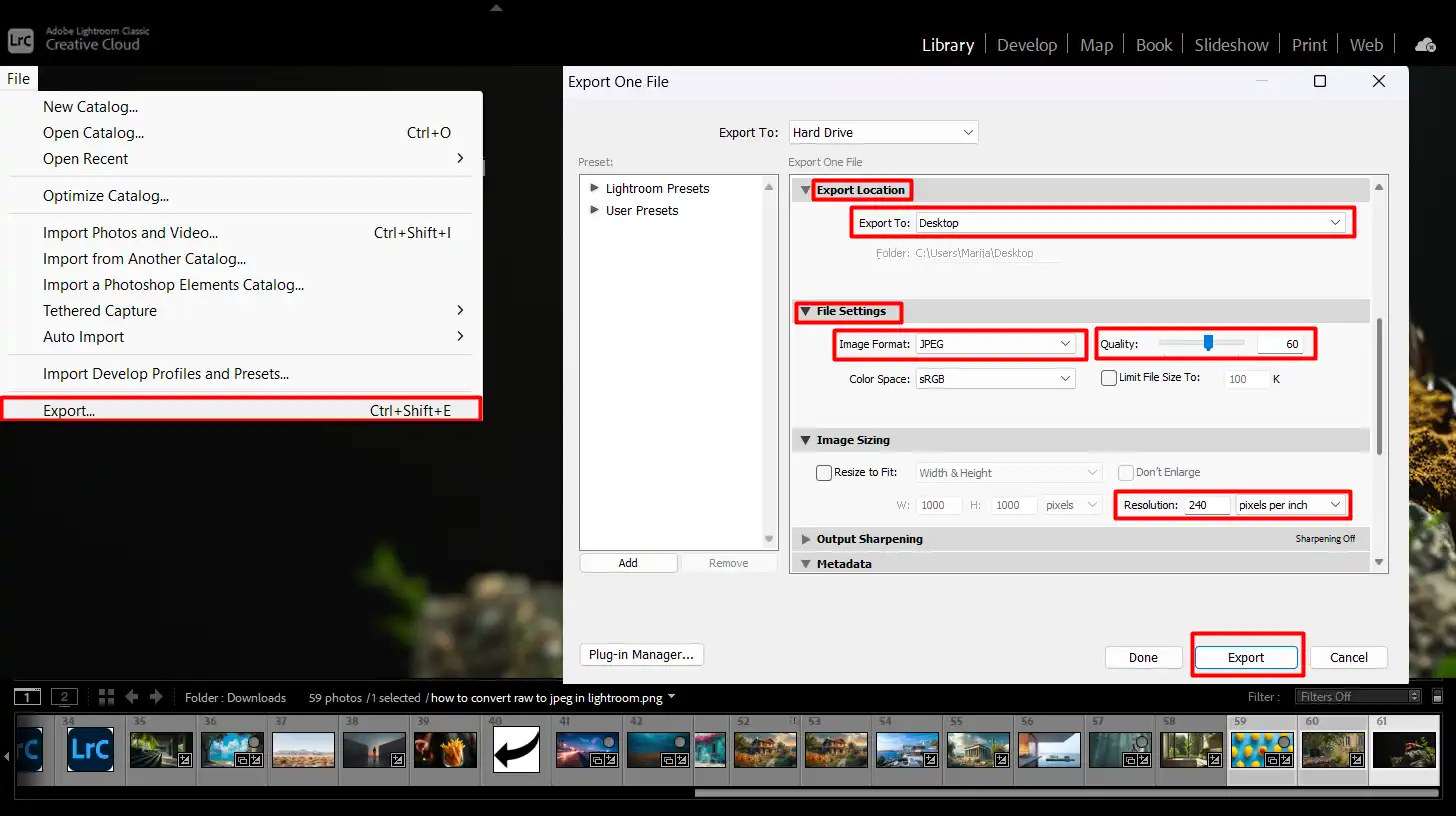
- Go to File > Export.
- Choose an export location.
- Select exported file settings in a format such as JPEG.
- Set desired quality and resolution.
- Click Export to save your JPEG copy.
Convert multiple images at once by selecting them before clicking ‘Export’. Reformatting RAW files to JPEG offers simpler sharing capabilities while keeping the quality close to the original.
File Configuration and Quality Concerns
While you convert, pay attention to file configuration, such as quality level and resolution. Remember, compressed JPEG file sizes are smaller than RAW, but there will be some quality loss.
Keep the original RAW files if you need to make further edits.
Common Pitfalls and How to Avoid Them
A common issue when converting RAW to JPEG is overlooking image sizing options. For best results, keep the image sizing option unchecked unless you need the same size for all images.
Also, ensure output sharpening panels are configured properly for the type of display or print you have in mind.
Pro Tip: Save your most used export settings as a preset in Lightroom Classic. This speeds up your workflow and maintains consistency across your projects.
Engage, practice, and improve your skills with each conversion. This process might seem tedious at first, but with time, it will become second nature. Ready to convert your RAW files? Let’s get started!
Step-by-Step Guide: How to Convert RAW to JPEG in Lightroom
Follow this step-by-step guide to convert RAW to JPEG in Lightroom and easily manage your JPEG images by ensuring the best quality while creating multiple JPEG images from your original RAW files.
Here’s a quick comparison of the important steps and considerations when converting RAW to JPEG in Lightroom. This table outlines the essential aspects to ensure a smooth and efficient workflow.
| Aspect | Overview |
|---|---|
| Importing RAW Files | Use Lightroom’s Library Module to import RAW files from your computer or external storage devices for editing. |
| Editing RAW Files | Make adjustments such as exposure, contrast, and color corrections using Lightroom’s Develop Module to enhance your RAW images. |
| Exporting as JPEG | Choose JPEG format in the export settings, adjust quality and resolution for your needs, and export the edited files. |
| Choosing NEF or JPEG | Decide between keeping the larger NEF files with more detail or using JPEGs for smaller, more convenient file sizes. |
| Troubleshooting Common Issues | Check your export settings for resizing issues, format options, and resolution adjustments if you encounter problems. |
Step 1: Import RAW Files
Start by launching Lightroom and opening the Library Module. To import your RAW files, click on the “Import” button located in the lower-left corner.
Use this tool to navigate your computer or connected storage device, such as a memory card or external hard drive. This assists you in selecting and adding your RAW images to your Lightroom library.
Step 2: Edit Your RAW Files
Once your RAW files are imported, proceed to the Develop Module. Here, you’ll find all the necessary tools to enhance your RAW images.
Make adjustments such as exposure, contrast, color correction, and cropping. This ensures that you apply optimal edits before converting raw.
Step 3: Export Settings for JPEG
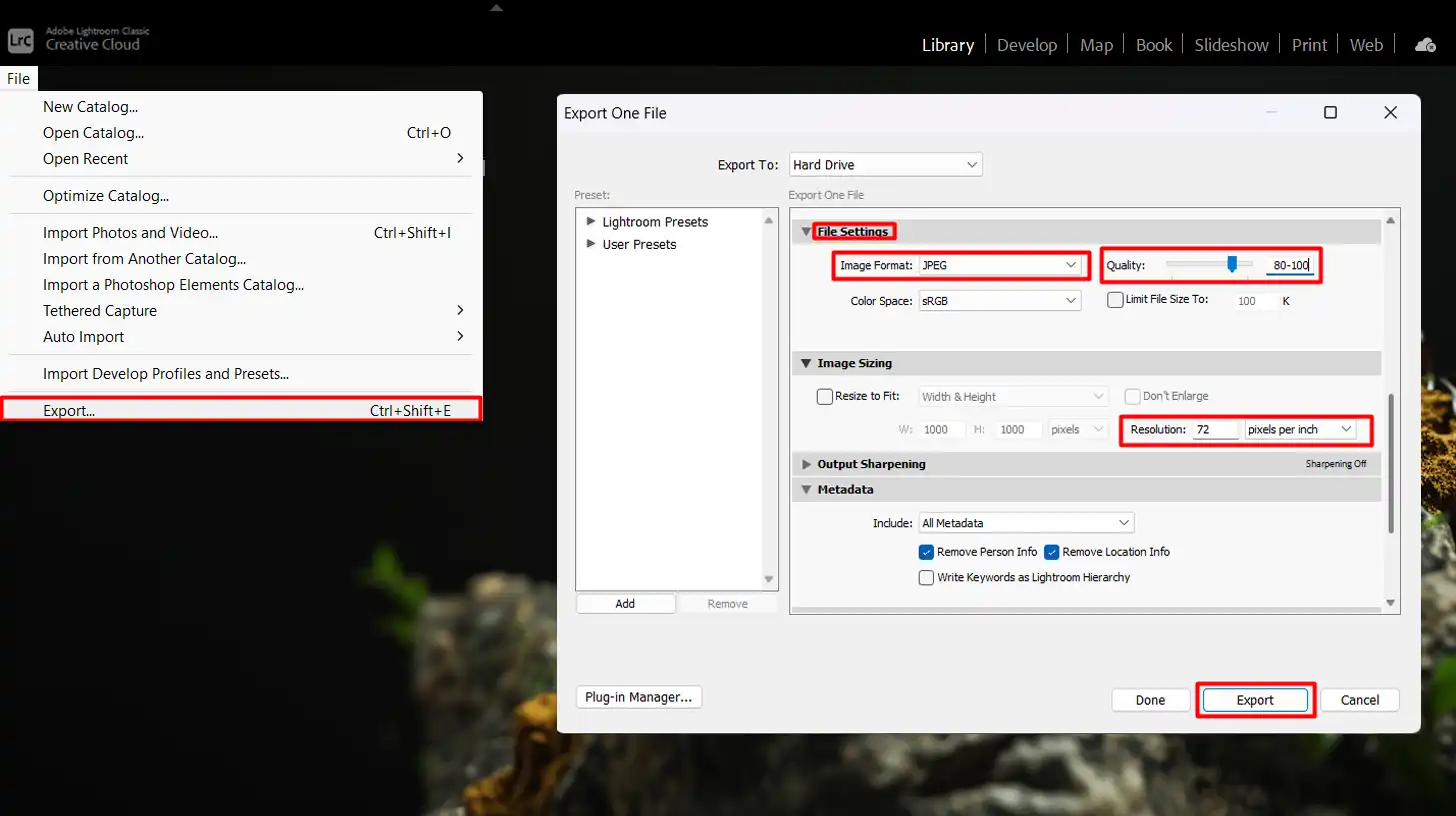
When satisfied with your edits, it’s time to export. Go to the File menu and select the Export function. A dialog box with various settings appears. Under “File Settings,” choose the JPEG format.
Ensure the quality slider is set appropriately; 80-100 usually works well. Finally, configure resolution settings. For standard use, 72 pixels per inch (PPI) is fine, while for print, aim for 300 PPI.
Step 4: Exporting the Files
Now, it’s time to finalize the process. After configuring your export settings, press the Export button. Lightroom generates JPEG files based on your specified parameters. Choose a destination folder for easy access to the created JPEGs.
When exporting the files, choosing between NEF or JPEG affects both file size and quality. NEF files offer more detail but are larger, while JPEGs are smaller and more convenient.
Troubleshooting Common Issues
- If you encounter issues, double-check your settings: Make sure the "Resize to Fit" option is off if you want to avoid unexpected image sizing options.
- Confirm you’ve selected the correct format and quality levels.
- Keep an eye on resolution, and review export location settings.
Pro Tip: Save regularly used export settings as a preset. This makes future exports quick and consistent.
Common Mistakes to Avoid
To ensure the best results in your photo editing, be aware of common pitfalls like ignoring color profiles, neglecting file size, and skipping RAW file backups.
Overlooking Color Profiles
Always consider the color profile. Many people forget this step. Exporting with the wrong profile can distort colors. For the web, use sRGB. For print, use Adobe RGB.
These profiles ensure colors look accurate where you need them.
Ignoring File Size
Don’t ignore file size. Large files can slow down your workflows and take up space. Before you export, check the dimensions and quality settings. Adjust them for the intended use. You’ll save time and storage, plus your devices will thank you.
When deciding between CR2 or JPEG, ignoring file size can lead to issues. Large CR2 files can slow down your workflow, while JPEGs are more manageable.
Not Backing Up RAW Files
Never skip backups of RAW files. These are your original files, full of data. Losing them means losing a lot of flexibility in editing. Use external drives or cloud storage. Make backups a regular habit.
Pro Tip: Create a habit of cleaning your workflow space regularly. This ensures efficiency and prevents clutter from slowing you down. Additionally, familiarize yourself with essential tools in Lightroom to streamline your editing process.
Frequently Asked Questions

How to Convert a Raw File to JPEG?
Follow these steps to convert Raw to JPEG file:
- Open your raw file using image editing software that supports raw formats, such as Adobe Photoshop or Lightroom.
- Make any desired adjustments to the image's exposure, contrast, color, and other settings.
- Once you're satisfied with the edits, go to the 'File' menu and select 'Export' or 'Save As.'
- In the export or save settings, choose JPEG as the format and select your preferred quality settings.
- Click 'Save' or 'Export' to convert your raw file to a JPEG.
How do I Bulk Convert Raw to JPG in Lightroom?
Follow these steps to Bulk Convert:
- Import your raw files into Lightroom.
- Select the images you want to convert from the Library module.
- Go to the 'File' menu and select 'Export.'
- In the Export dialog, set the format to JPEG and adjust the quality settings as needed.
- Choose the destination folder where you want the JPEGs to be saved.
- Click 'Export' to start converting all selected raw files to JPEG in bulk.
How do I Convert Raw to JPEG in Adobe?
Follow these steps to convert Raw to JPEG in Adobe:
- Open your raw file in Adobe Photoshop.
- Make necessary adjustments using various tools and filters.
- After editing, go to 'File' and select 'Save As.'
- In the Save As dialog, choose JPEG as the format from the dropdown menu.
- Set your desired quality level and click 'Save.'
How do I Separate Raw and JPEG in Lightroom?
Follow these steps to separate Raw and JPEG in Lightroom:
- Import both your RAW and JPEG files into Lightroom.
- In the Library module, use the 'Attribute' filter to sort files by type.
- Select the JPEG files and move them to a new collection or a different folder.
Conclusion
Converting RAW to JPEG in Lightroom is a straightforward process that can make your photo editing easier. By following the steps outlined above, you can quickly turn your detailed RAW files into versatile JPEGs ready for sharing and printing. From my experience, this method helps streamline your workflow and ensures your images maintain their quality while becoming more manageable.
If you want to dive deeper into photo editing, consider checking out my Photoshop Course and Lightroom Course. Both courses cover significant techniques and tips to enhance your skills.
For those interested in Adobe software, you can explore more about Photoshop and Lightroom to get the latest tools for your photo editing needs.
Read more about Lightroom:


