Film Strips Photo Collage: Creating a Stunning Step-by-Step Guide
Film Strips Photo Collage: Creating a Stunning Step-by-Step Guide
Creating a film strips photo collage is a fun and creative way to showcase your favorite memories.
Imagine combining the nostalgia of vintage film strip with your best photos, bringing a unique touch to your digital or printed collection.
In this article, I will guide you through the simple steps to design an eye-catching collage using Photoshop and Lightroom. Whether you’re a beginner or have some experience, you’ll find valuable tips and tricks to make your collage stand out. Ready to turn your photos into a stunning film strip masterpiece? Let’s dive in!
Table of Contents
Essential Software for Creating Stunning Film Strips Photo Collage
Creating stunning film strips photo collages requires the right software. Here, we’ll guide you through selecting and using the best tools for the job.
Here’s a quick comparison of the important aspects and best practices for creating stunning film strips photo collages:
Aspect
Overview
Choosing the Right Software
Photoshop and Lightroom are ideal for creating film strips photo collages, offering powerful tools and features.
Setting Up Your Workspace
Ensure your computer has enough RAM, organize your desk with necessary peripherals, and use proper lighting.
Optimizing the Panels
Utilize the layers panel in Photoshop and organize images in Lightroom using collections and smart collections.
Keyboard Shortcuts
Learning keyboard shortcuts boosts efficiency and saves time when editing multiple images.
Saving Frequently
Regularly saving your work prevents loss of important edits due to unexpected crashes.
Pro Tip
Use the Color Picker in Photoshop to maintain consistency in your projects by sampling colors directly from your images.
Choosing the Right Software
Let’s start with the basics: software. When you work with Photoshop and Lightroom, you need the right programs to get the perfect film strips photo collage.
The most recent versions of these programs offer powerful tools and features to handle almost any photo-editing situation.
Photoshop excels at detailed edits and retouching. It’s perfect for those who want to deeply manipulate their images.
Meanwhile, Lightroom shines in its ability to organize and batch process large numbers of images. If you shoot a lot of images on a regular basis, it is your best friend.
Both programs support RAWfile formats and provide non-destructive editing. This means that your original images remain untouched while you make changes. So you can feel free to experiment without fear of losing your original work!
Setting Up Your Workspace
Your workspace affects your productivity. Start by ensuring your computer has enough RAM. Both Photoshop and Lightroom consume a significant amount of memory. At least 8GB is advisable.
Organize your desk. Keep necessary peripherals like a graphics tablet, an external hard drive, or an additional screen within reach.
A second monitor is useful for multitasking between source images and your editing screen.
Lighting also matters. Proper lighting reduces eye strain and helps you see color accurately. If possible, use a daylight-balanced lamp.
Lastly, customize your work area in Photoshop and Lightroom. You can customize the panels to fit your workflow. Drag and drop the ones you use most often to positions that are convenient for you. This small step saves time in the long run.
Optimizing the Panels
In Photoshop, utilize the layers panel. This panel helps manage all the elements within your image.
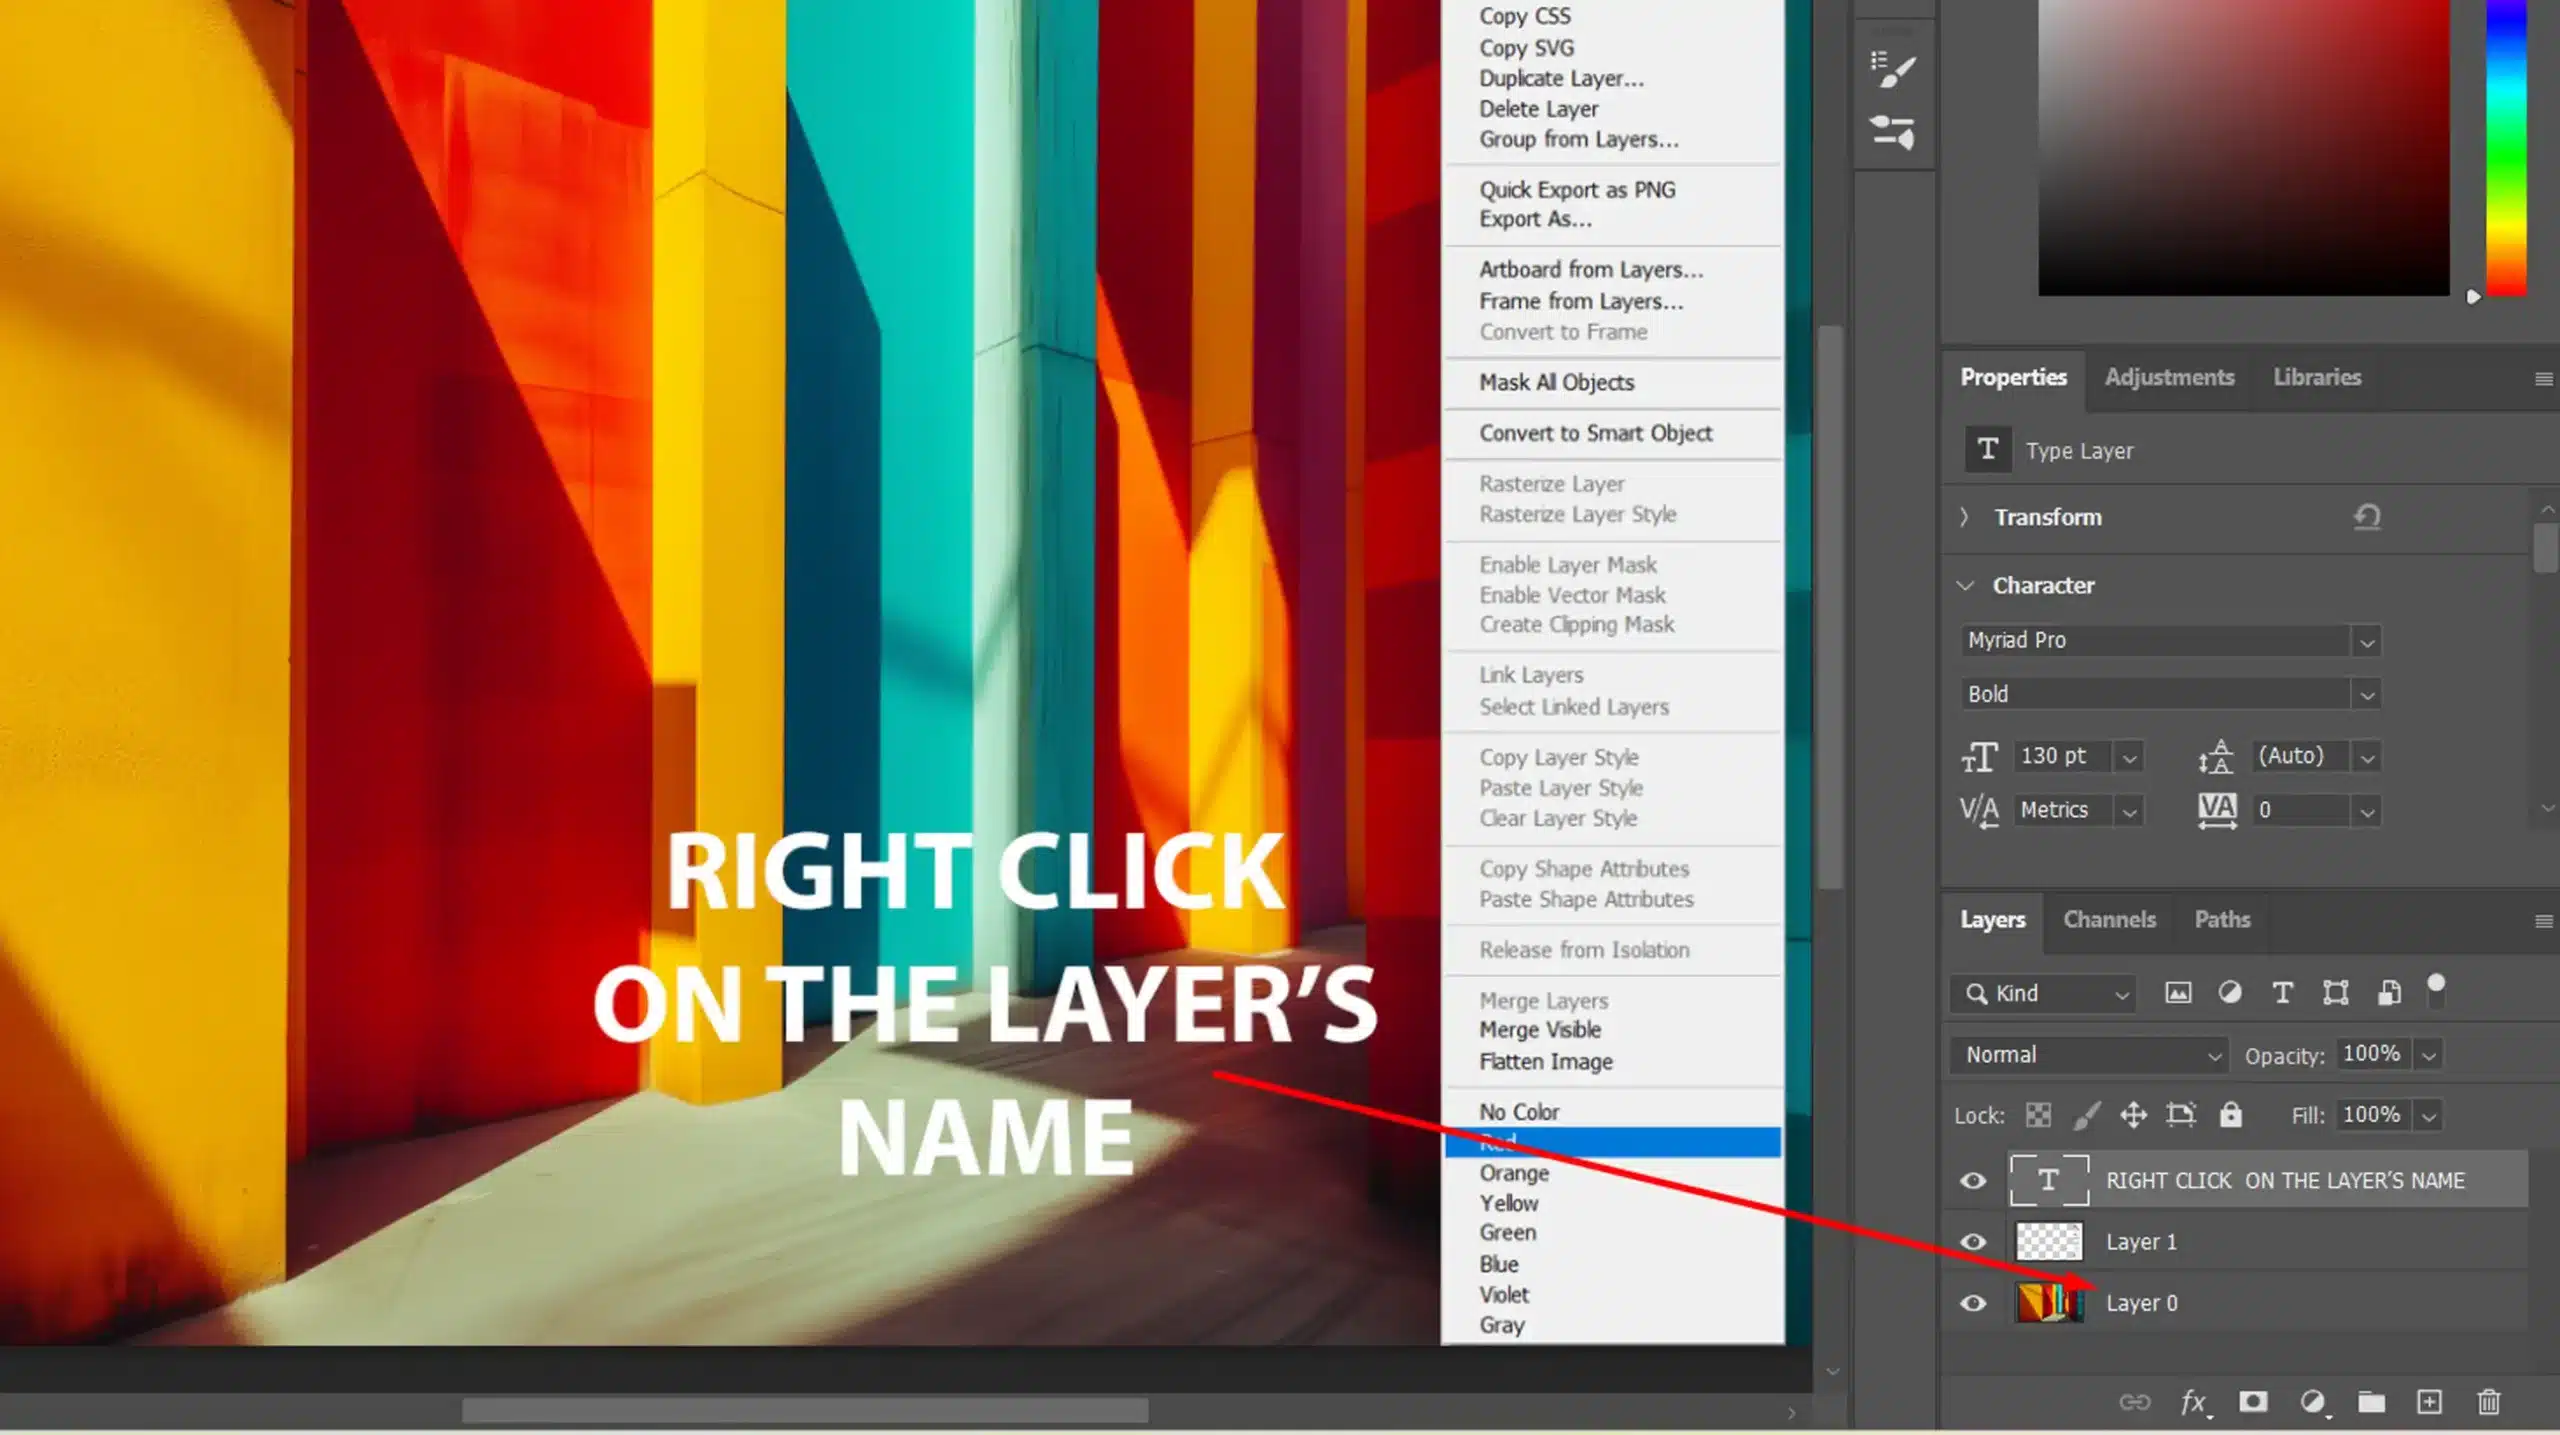
You can easily see and control what’s on top of what. Rename and color-code your layers for easy identification by using the options found in the top right corner of the panel.
You can find these options by right-clicking on the layer’s name. It’s a small effort that pays off when working on complicated projects.
Lightroom’s equivalent would be filtering your images using collections and smart collections. Organizing makes sure you don’t lose track of your images. Add keywords to your photos for easier search later.
Keyboard Shortcuts
Learning keyboard shortcuts boosts efficiency. For instance, pressing ‘D‘ in Lightroom switches you to the Develop module. In Photoshop, ‘Ctrl+J‘ duplicates a layer.
These shortcuts can save significant time when editing multiple images. Photoshop shortcuts can save significant time when editing multiple images. Create a cheat sheet by writing down frequently used shortcuts and keeping it nearby.
Saving Frequently
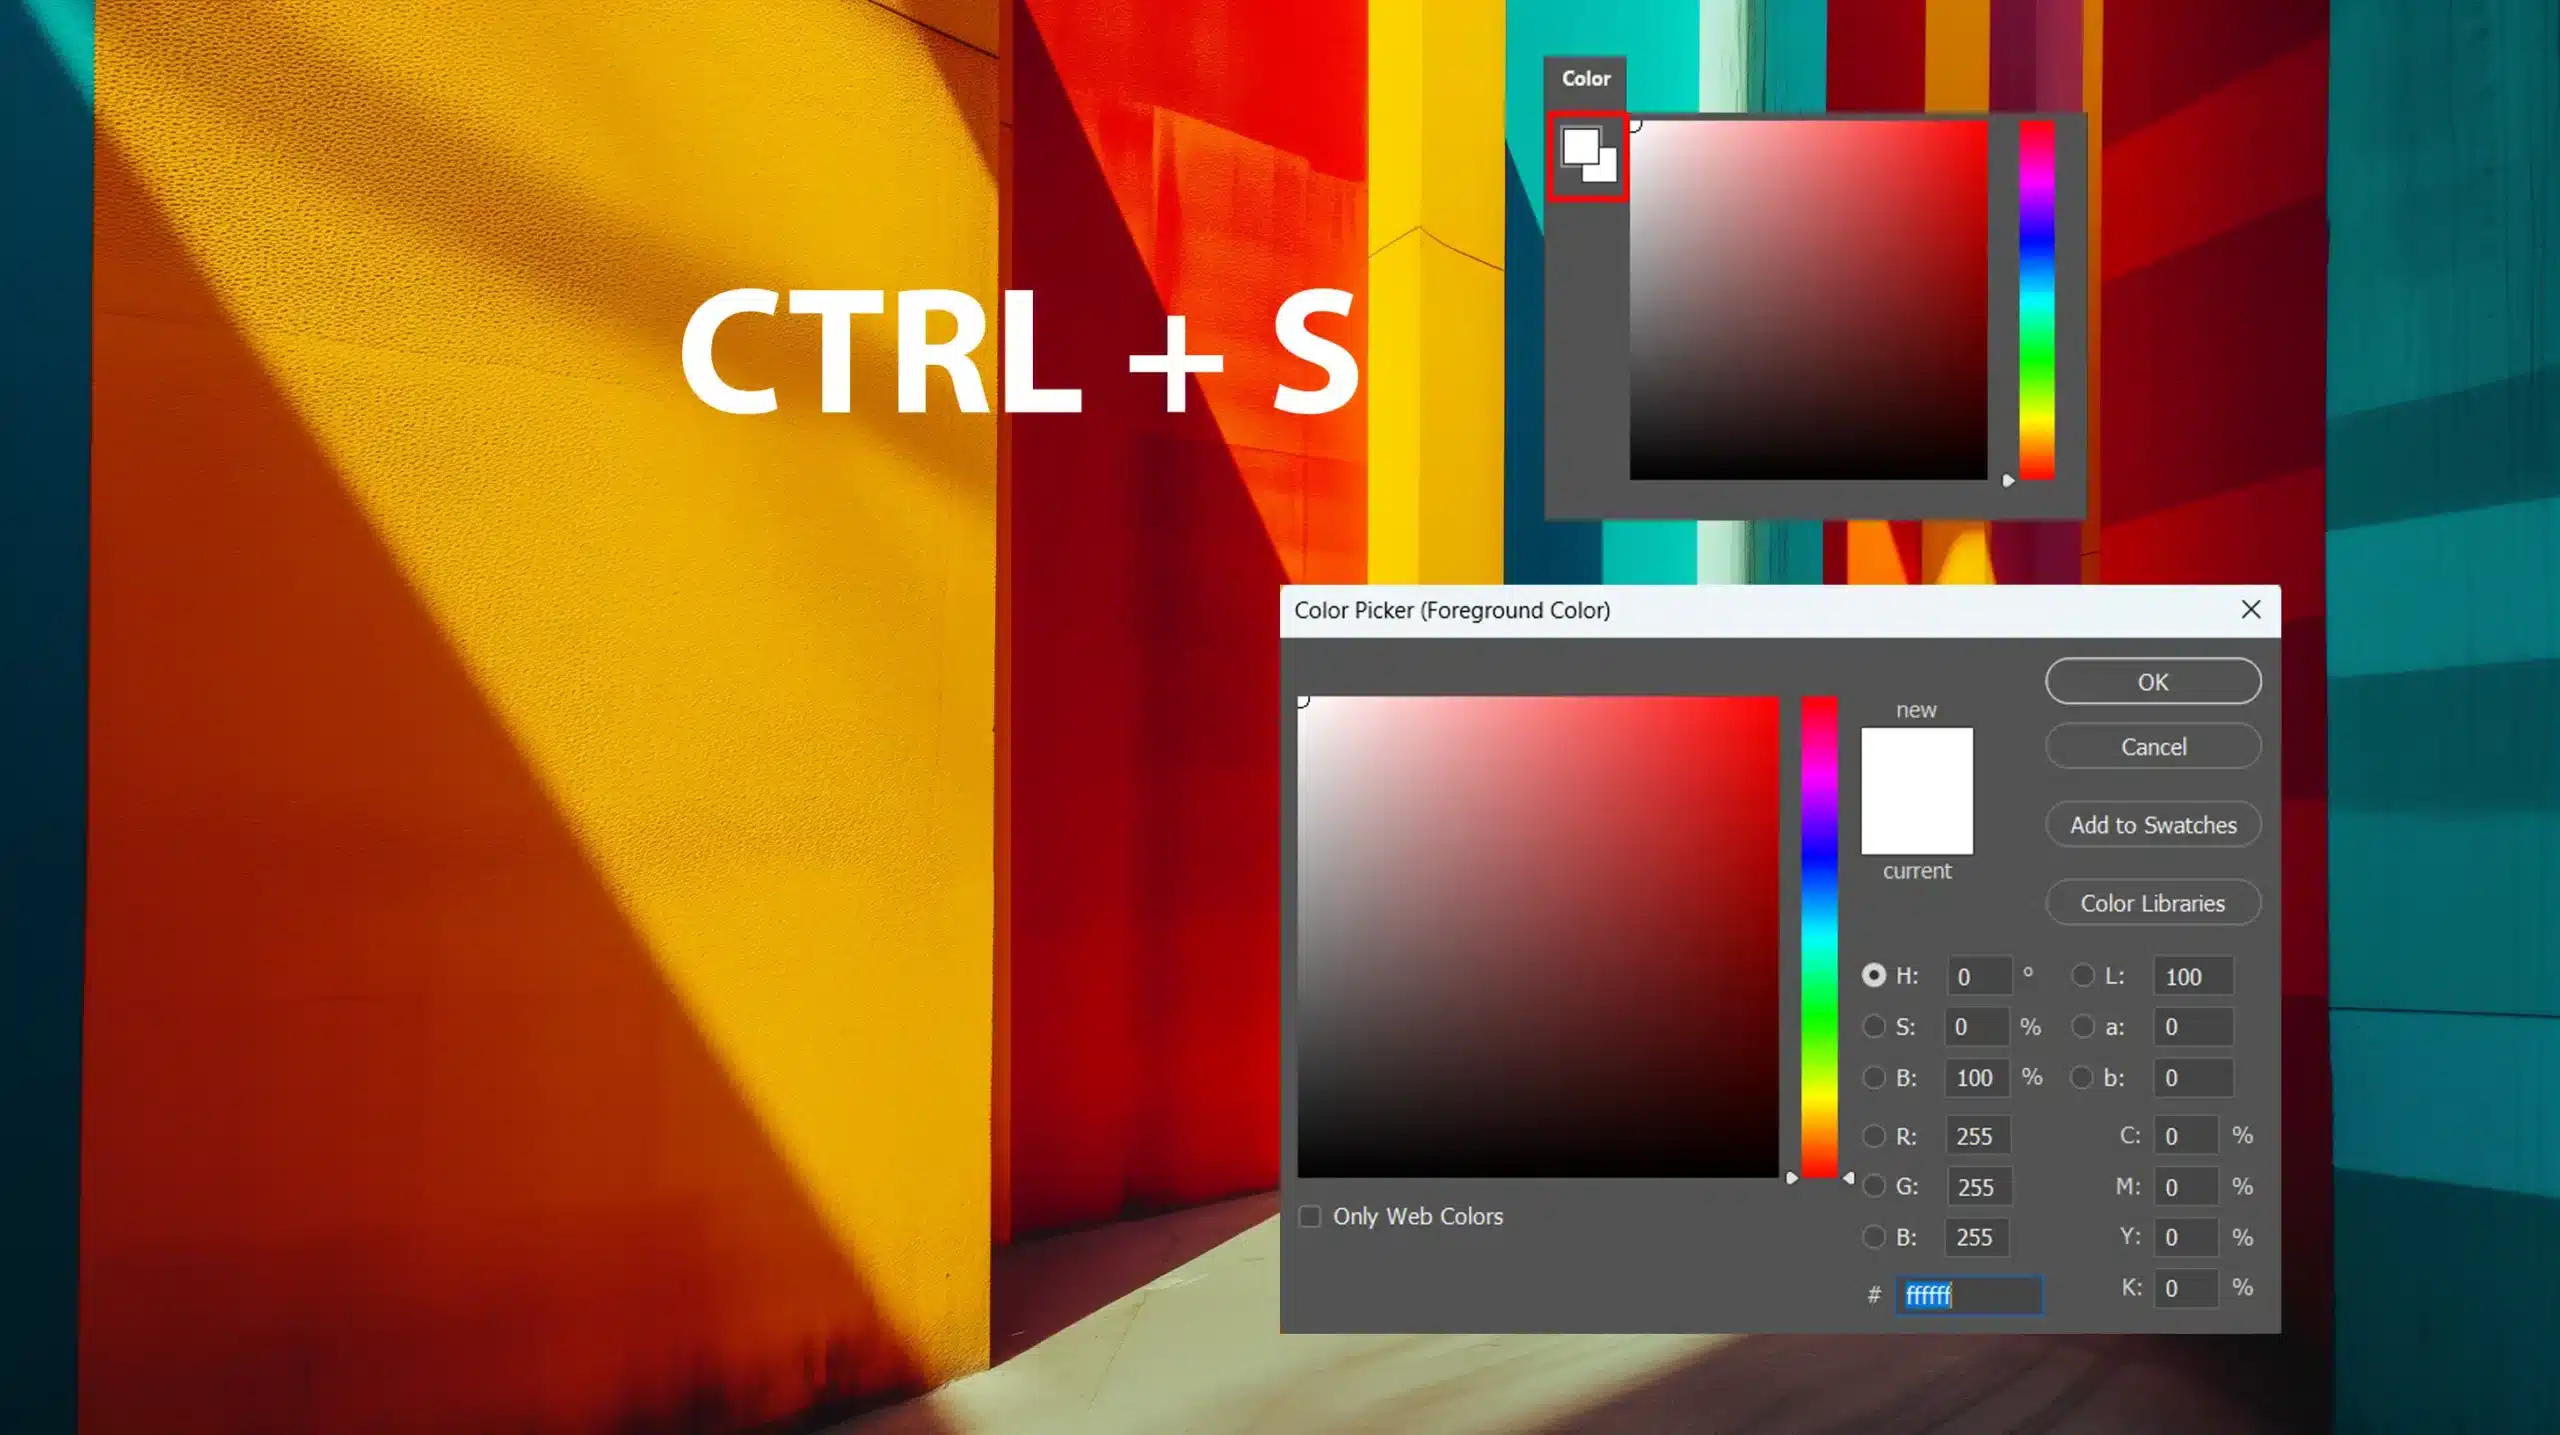
Don’t forget to save your work regularly. In Photoshop, use Ctrl+S. For Lightroom, consider the automatic backup features.
Saving frequently avoids the frustration of losing important edits due to unexpected crashes.
Pro Tip: Use the Color Picker in Photoshop to maintain consistency in your projects. By sampling colors directly from your images, you ensure harmony and a professional finish.
Creating a film strips photo collage is a fun way to showcase your favorite memories. Let’s start with the basics:
Step 1: Selecting Your Images
First, to create a fim strips photo collage you need to pick the images you want to use. Choose images that tell a story or have a common theme.
Now, arrange your chosen images in the shape of a film strip. Position each photo next to the other like frames in a reel.
Ensure equal spacing between them to keep the collage clean. Remember to keep a consistent size for all images. This gives your film strips photo collage that authentic film strip look.
Step 3: Adding a Background Layer
Next, we have to add the background layesr. This background layer will serve as the base of your film strips photo collage.
Consider a plain or subtle textured background. This way, you can make sure the background doesn’t overpower your images.
Step 4: Using the Layers Panel
Let’s utilize the layers panel for organizing everything. In Photoshop, arrange each photo on a separate layer.
You can customize their positions by dragging and dropping them into place. This way, you easily move, resize, and customize each image. Layering also allows you to fix any mistakes and resize elements simply.
Step 5: Final Touches to your Retro Film Strip Collage
Lastly, give your film strips photo collage some final touches. Add shadows or lighting effects to create depth.
You can even draw borders around each image to emphasize them.
To enhance the overall design, draw subtle accents that complement the theme of your collage.
Save your file often to prevent data loss. Once satisfied, you might consider printing or sharing it online.
Pro Tip: Use the grid feature in your software to maintain alignment and spacing easily.
To give your collage an authentic look, consider the techniques used to develop a film at home. This can add a unique, vintage feel to your film strips photo collage.
Transforming Your Film Strip Photo Montage into Videos
Turning a film strip photo montage into videos is an exciting way to enhance your static designs. Start by preparing your film strip photo montage with images from your favorite ads and videos.
Once your montage is ready, drag it into your video editing software to bring your vision to life.
Enhancing Your Montage with Video Effects
In the video editor, search for effects that can animate your film strip photo montage. You might want to add transitions or motion effects that simulate the movement of a film reel, making the ads and videos in your montage more dynamic.
Basically, the goal is to turn your still images into engaging videos.
Integrate additional ads and videos into your project to create a richer narrative. Use zoom and pan effects to highlight specific parts of your montage, especially those on the left side.
Ensure the elements are well-aligned, and adjust settings to maintain smooth transitions between the ads and videos.
For a polished result, regularly preview your videos to ensure the transitions between ads and videos are smooth, and check that the corners of your film strip photo montage are clean.
Final Touches and Export
If you plan to print a frame or still from the video, make sure the final export maintains high quality.
By transforming your film strip photo montage into videos and incorporating multiple ads and videos, you create a compelling visual experience that maximizes the impact of your ads and videos.
Creating and Printing Your Film Strip Photo Montage
When working on your film strip photo montage, start by selecting the photos you want to include. Drag your images into the film strip layout and adjust them as needed.
For a balanced composition, pay special attention to the elements on the left side of your montage. Ensure that these elements on the left are well-aligned and make any necessary adjustments to maintain visual harmony.
After finalizing your montage, it’s time to prepare for print. Use your software to search for print settings that will best preserve the quality of your film strip photo montage.
Make sure to search for specific print options that highlight details, especially those on the left side. Preview your work to ensure that the left side of your montage looks just as intended and that all elements are correctly positioned.
For a high-quality print, carefully adjust the settings and check that everything aligns properly. If you’re planning to print multiple copies, double-check the print settings to ensure consistency across all prints.
By paying close attention to these details and ensuring the settings are correct, you’ll achieve a professional-looking film strip photo montage that captures the essence of your original design.
Pro Tip: To ensure the best results, examine every corner of your film strip photo montage for any inconsistencies. Pay close attention to each corner and where elements meet, making adjustments as needed for a flawless final product.
Tips and Tricks for Film Strip Photo Collage
Here are some helpful tips and tricks to make your film strip photo collage stand out
Enhancing Your Collage with Effects
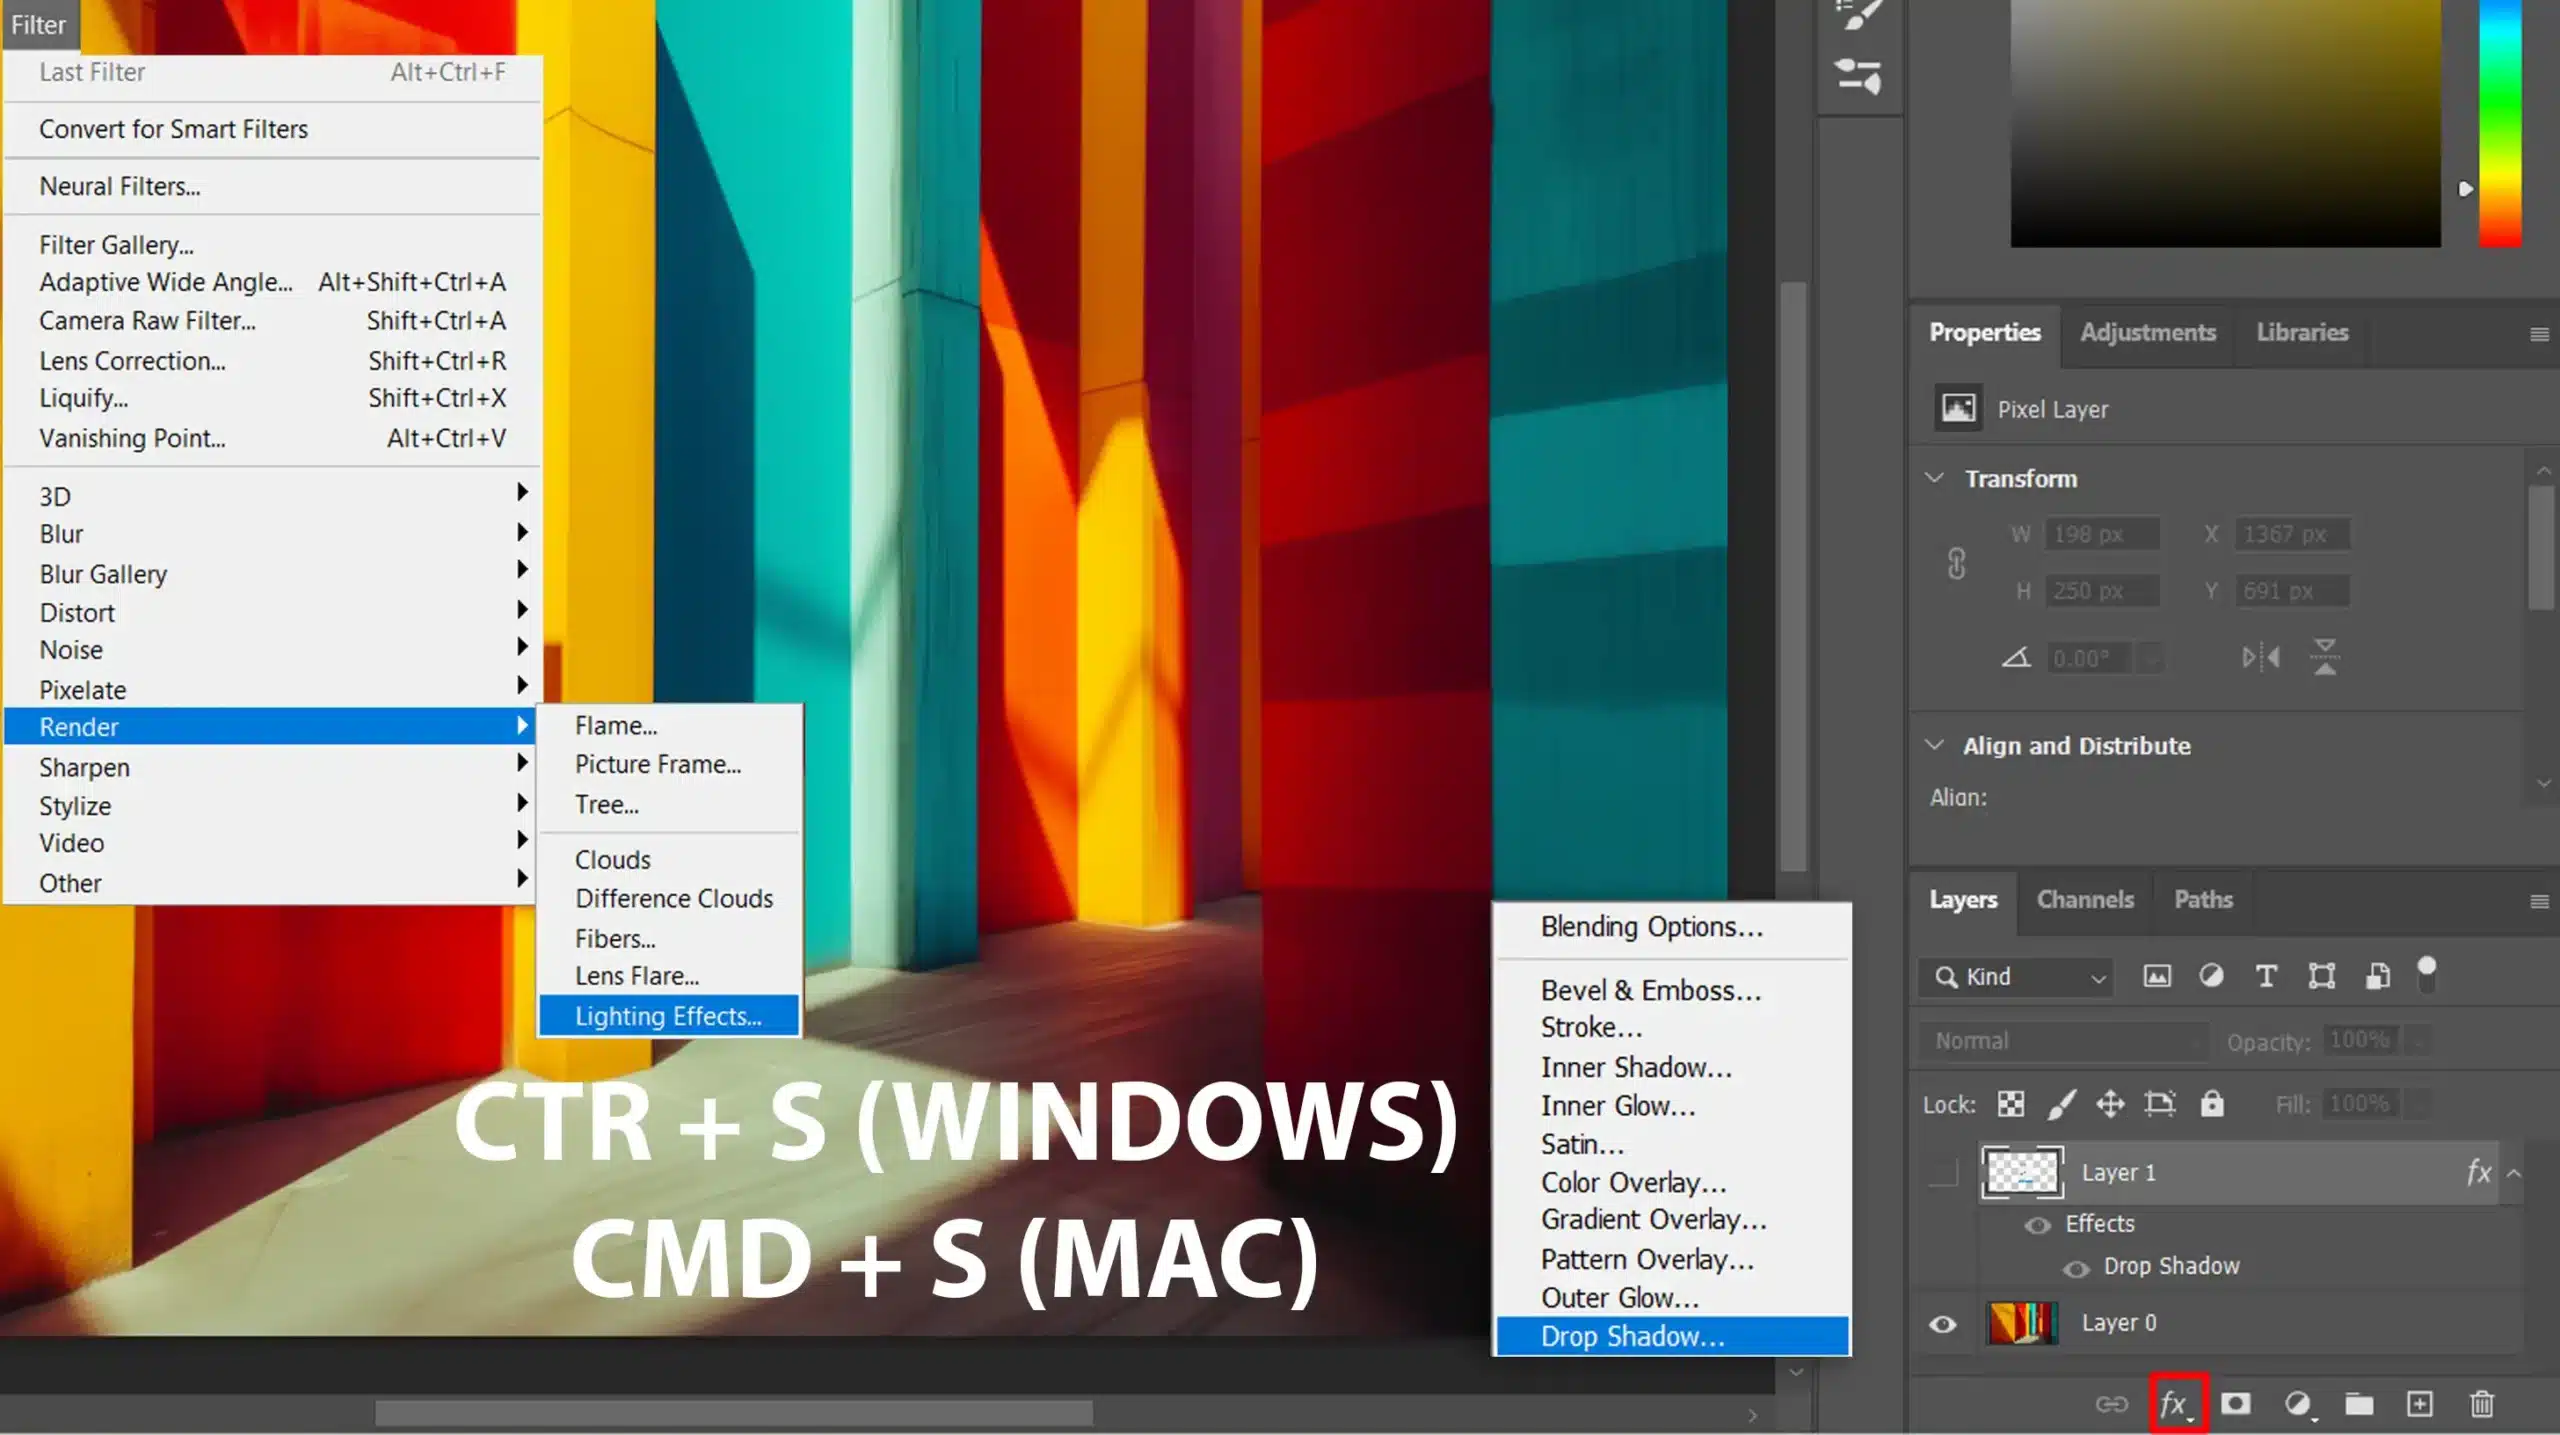
You first need to have your images ready. To make them pop, try using shadows. Go to the Layers panel, select a photo, and add a drop shadow. This effect creates depth and makes each image stand out.
Another useful trick is adding lighting effects. Photoshop allows you to adjust brightness and contrast.
Just go to Image > Adjustments. Play around until you get the desired look. Adjusting these settings can make a huge difference in how your collage feels.
When taking photos, using shutter priority mode can help you control the exposure and capture the perfect lighting for your images.
Consider learning about Softbox vs Umbrella Lighting to achieve the best results in your photography. Also, you can apply borders to each photo. This technique gives a clean look and helps separate each image clearly.
Lastly, while adjusting effects, always save your work often. Use Ctrl + S or Cmd + S on a Mac.
This simple habit can save you time and prevent data loss. Remember, the small touches like shadows and borders make your collage stand out.
Common Mistakes to Avoid While Making Retro Film Strip Collage
One common mistake is overcrowding. People often try to fit too many images into a single collage. It makes everything look busy and confusing. Keep it simple and balanced.
Another mistake is inconsistency in image sizes. Aim for uniformity. Use the grid feature in Photoshop to help align everything properly.
It’s also easy to forget saving your work. Imagine spending hours and losing everything! Save frequently to avoid this mishap.
Don’t overdo the effects either. Less is sometimes more. Subtlety can have a more substantial impact.
Watch out for low-resolution images. High-quality photos provide a much clearer and more professional look.
Lastly, play around, but don’t stray too far from your theme. Staying consistent with your theme ensures your film strips photo collage remains cohesive and visually appealing.
Pro Tip: To make your film strips photo collage, arrange your images with equal intervals and consistent size. This layout adds a unique, vintage feel to your project.
Creating a film strips photo collage has been a game-changer for me, both professionally and personally. It’s an incredible way to showcase multiple images in a cohesive and visually appealing manner.
Using this technique, I can tell a story through my photos, capturing moments in a sequence that feels natural and engaging. If you’re looking to take your skills to the next level,
I highly recommend checking out this Photoshop course and this Lightroom course. They’ve been instrumental in refining my approach and enhancing my creativity.
Whether you’re a seasoned photographer or just starting out, mastering the art of a film strip photo collage can add a unique touch to your portfolio.
If this article has helped you, then Like and Share it with your friends
$2,061.00Original price was: $2,061.00.$1,061.00Current price is: $1,061.00. 27584
Download Your Free Guide Now!
Discover the secrets of photography with our printable guide! Master essential techniques like aperture, shutter speed, and ISO to create stunning images. Get your free printable PDF now and start turning your snapshots into masterpieces!